Sarp FA 50 S User manual

FR
0000051002 02/2019
Manuel d’utilisation - Notice originale
- Lire les instructions du manuel d’utilisateur, ainsi que les consignes de sécurité.
Se familiariser avec le fonctionnement et les commandes de la motobineuse avant utilisation.
FR
FA 50 S
MOTOCULTEURS A FRAISES ARRIERES
MOTOR CULTIVATORS WITH REAR TINES
Instruction for use - Original notice
- Read the instruction manual, and also the safety instructions. Familiarise yourself with how the
cultivator and its controls work, before using it.
EN
EN

FRFR
CONSIGNES DE SÉCURITÉ
Attacher une attention particulière aux indications précédées des mentions sui-
vantes:
ATTENTION : Signale une forte possibilité de blessures corporelles
graves, voir un danger mortel si les instructions ne sont pas sui-
vies.
PRÉCAUTION :
Signale une possibilité de blessures corporelles ou de détériora-
tion de l’équipement si les instructions ne sont pas suivies.
NOTE : Fournit des informations utiles.
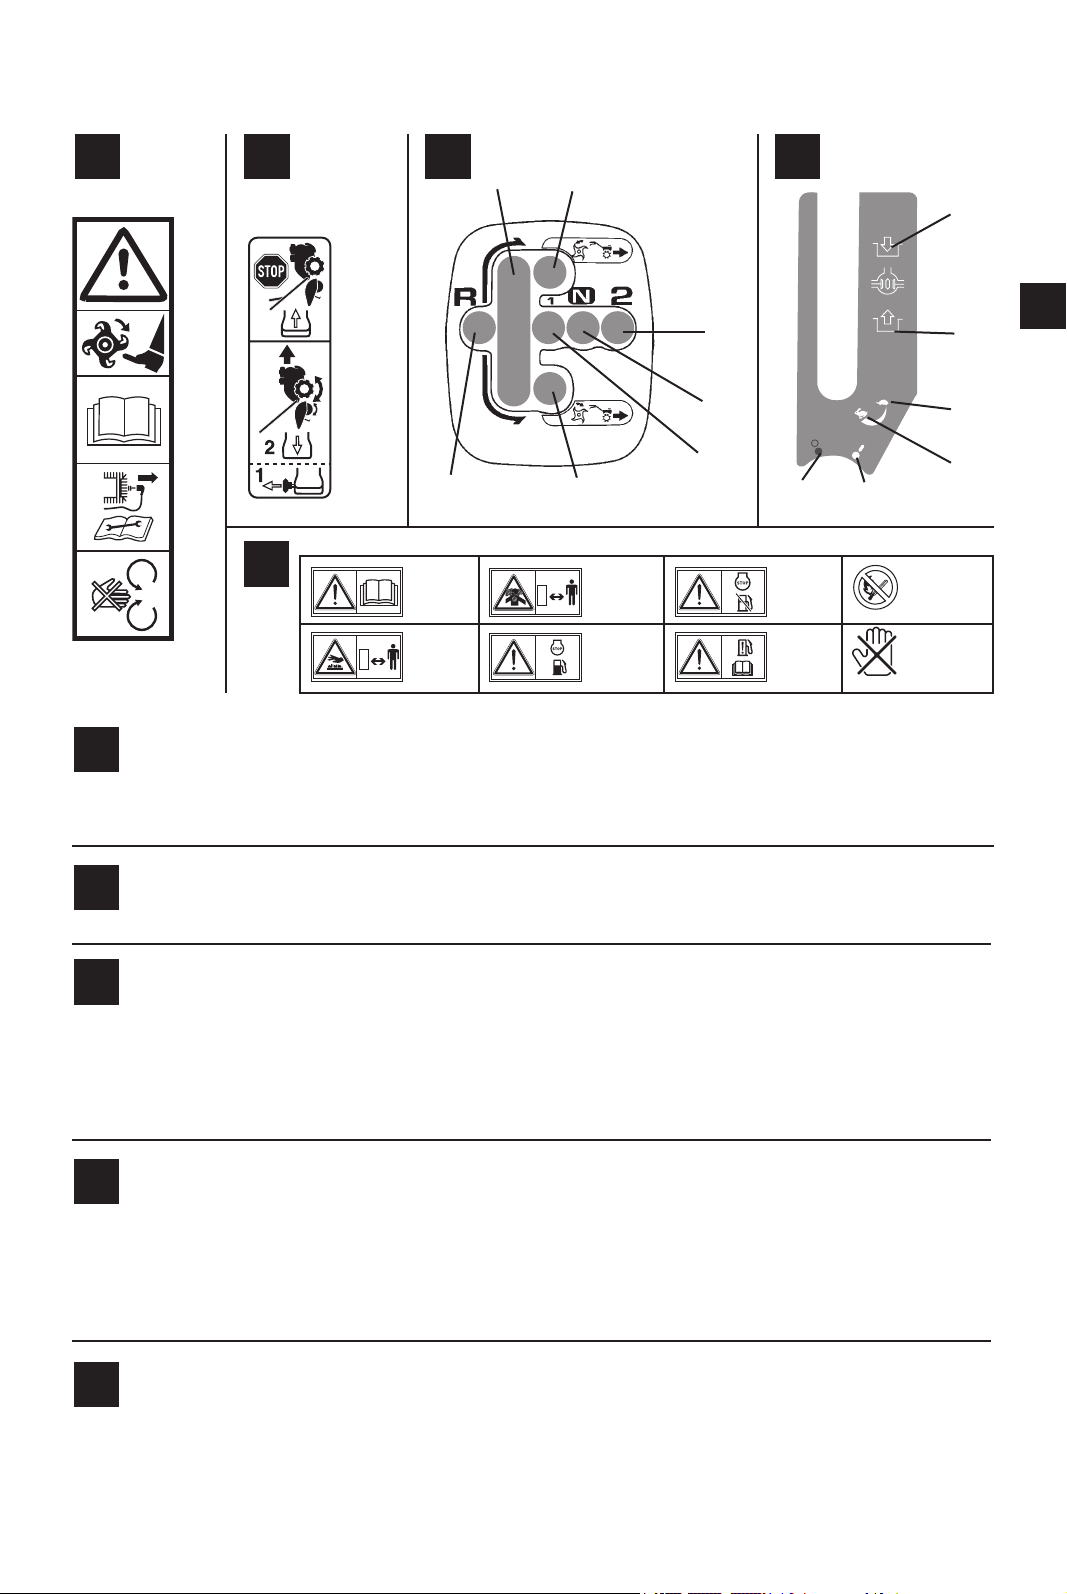
: Ce signe vous appelle à la prudence lors de certaines opérations.
En cas de problème, ou pour toutes questions concernant la machine, veuillez
vous adresser à un concessionnaire agrée.
ATTENTION : La machine est conçue pour assurer un service sûr et
able dans des conditions d’utilisation conformes aux instructions.
Avant d’utiliser votre machine, veuillez lire et assimiler le contenu
de ce manuel. A défaut, vous vous exposeriez à des blessures et
l’équipement pourrait être endommagé.
Formation / Informations
- Se familiariser avec l’utilisation correcte et les commandes avant d’utiliser la
machine. Savoir arrêter le moteur rapidement.
- La machine doit toujours être utilisée suivant les recommandations indiquées
dans la notice d’instructions.
- Ne pas oublier que l’utilisateur, est responsable des accidents ou des phéno-
mènes dangereux survenant aux autres personnes ou à leurs biens. Il est de
sa responsabilité d’évaluer les risques potentiels du terrain à travailler et de
prendre toutes les précautions nécessaires pour assurer sa sécurité, en parti-
culier dans les pentes, les sols accidentés, glissants ou meubles.
- Ne jamais laisser les enfants, ou des personnes non familières avec ces ins-
tructions, utiliser la machine. Les réglementations locales peuvent xer un âge
minimal pour l’utilisateur.
- Ne jamais travailler en présence de personnes, en particulier d’enfants, ou
d’animaux dans un rayon de 20 mètres autour de la machine; l’utilisateur de-
vant rester impérativement aux commandes des mancherons.
- Ne pas utiliser la machine lorsque l’utilisateur a absorbé des médicaments ou
des substances, réputées comme pouvant nuire à sa capacité de réexe et de
vigilance.
- Dans un terrain dur, l’utilisateur doit avoir une attention plus particulière car
la machine aura tendance à être beaucoup moins stable qu’en terrain cultivé.
- Pendant le travail, porter toujours des chaussures résistantes, non dérapantes
et des pantalons longs et serrés. Ne pas utiliser la machine lorsque l’on est pied
nus ou en sandales. Nous recommandons le port de protection auditive.
- Utiliser la machine pour l’usage auquel elle est destinée, à savoir la culture du
sol toute autre utilisation peut s’avérer dangereuse ou entraîner une détériora-
tion de la machine.
Préparation :
- Inspecter minutieusement la zone sur laquelle la machine doit être utilisée et
éliminer tous les objets qui pourraient être projetés par la machine (pierres, ls,
verre, objets en métal…).
- Avant utilisation, toujours procéder à un contrôle visuel de la machine pour
s’assurer que les outils et les deecteurs ne sont ni usés ni endommagés. Faire
remplacer les pièces usées ou endommagées.
- Si la machine est équipée d’un bouton d’arrêt moteur, maintenir les câbles
électriques d’arrêt moteur en bon état de façon à garantir l’arrêt moteur.
- Vérier l’absence de fuite de liquide (essence, huile…)
- Ne pas utiliser la machine sans garde -boue ou capots de protection et s’assu-
rer que tous les dispositifs de xation sont bien serrés.
Utilisation :
- Ne jamais transporter de personnes sur la machine
- Démarrer le moteur avec précaution en respectant les instructions du fabricant
et en maintenant les pieds éloignés de l’(des) outil(s).
- Arrêter le moteur quand la machine est sans surveillance.
- Marcher, ne jamais courir avec la machine.
- Tirer la machine vers soi ou inverser le sens de marche (si disponible) avec
beaucoup de précaution.
- Conserver la distance de sécurité par rapport aux outils rotatifs, donnée par la
longueur du guidon.
- Ne pas placer les mains ou les pieds près ou sous des éléments en rota-
tion.
En cas de :
- vibration anormale,
- blocage,
- problème d’embrayage,
- choc avec un objet étranger,
- détérioration du câble d’arrêt moteur (suivant modèle)
- Arrêter le moteur immédiatement (Si le câble d’arrêt moteur est coupé, action-
ner la commande du starter comme décrit au § “Démarrage moteur” pour arrê-
ter le moteur), laisser la machine refroidir, débrancher le l de bougie, inspecter
la machine et faire effectuer les réparations nécessaires par un réparateur
agréé avant toute nouvelle utilisation.
- Travailler uniquement à la lumière du jour ou dans une lumière articielle de
bonne qualité.
- Ne pas utiliser la machine dans des pentes supérieures à 10° (17%).
- Travailler les pentes dans le sens transversal, jamais en montant ou en descen-
dant.
- Sur les terrains pentus, bien assurer ses pas, changer de direction avec beau-
coup de précaution.
- L’utilisation d’accessoires autres que ceux recommandés peut rendre la ma-
chine dangereuse, et occasionner des dommages sur votre machine qui ne
seront pas couverts par votre garantie.
Maintenance / stockage
- Arrêter le moteur et débrancher la bougie avant toute opération de nettoyage,
de vérication, de changement d’outils, de réglage ou d’entretien de la ma-
chine.
- Arrêter le moteur, débranchez la bougie et utiliser des gants épais pour changer
les outils.
- Maintenir tous les écrous et vis serrés an d’assurer des conditions d’utilisation
sûres.
- Pour réduire les risques d’incendie, maintenir le moteur, le silencieux, et la zone
de stockage de l’essence dégagés de végétaux, d’excès de graisse, ou de tout
autre matière susceptible de s’enammer..
- Faire remplacer les silencieux d’échappement défectueux par un réparateur
agréé.
- Ne pas réparer les pièces. Faire remplacer les pièces par des pièces d’ori-
gine.
- Remplacer les outils par des lots complets an de préserver l’équilibre.
- Pour votre sécurité ne pas modier les caractéristiques de votre machine. Ne
pas modier les réglages de régulation de vitesse du moteur et ne pas utiliser
le moteur en sur vitesse. Un entretien régulier est essentiel pour la sécurité et
le maintien du niveau de performances.
- Laisser le moteur refroidir avant de ranger la machine dans un local.
Attention danger l’essence est hautement inammable :
- Stocker le carburant dans des récipients spécialement prévus à cet effet. Faire
le plein à l’extérieur uniquement et ne pas fumer pendant cette opération.
- Ne jamais enlever le bouchon du réservoir d’essence ou ajouter de l’essence
pendant que le moteur tourne ou tant qu’il est chaud.
- Si de l’essence a été répandue sur le sol, ne pas tenter de démarrer le moteur
mais éloigner la machine de cette zone et éviter de provoquer toute inamma-
tion tant que les vapeurs d’essence ne sont pas dissipées.
- Entreposer la machine dans un endroit sec. Ne jamais entreposer la machine
dans un local ou les vapeurs d’essence pourraient atteindre une amme, une
étincelle ou une forte source de chaleur.
- Remettre correctement en place les bouchons du réservoir et de la nourrice
d’essence.
- Limiter la quantité d’essence dans le réservoir pour minimiser les éclabous-
sures.
- Ne pas faire tourner le moteur dans un endroit conné où les vapeurs de mo-
noxyde de carbone peuvent s’accumuler.
- Le monoxyde de carbone peut être mortel. Assurer une bonne ventilation.”
Déplacement, manutention, transport.
Toute action sur la machine hors du travail du sol doit s’effectuer moteur arrêté
et bougie débranchée.
- Le déplacement (hors travail du sol) doit s’effectuer suivant les instructions du
§ “déplacement”
- Manutention : ne pas soulever la machine. Le poids de la machine est indiqué
sur la plaque constructeur, à la n de ce manuel.
- Le chargement et le déchargement de la machine dans une remorque doit
s’effectuer à l’aide d’une rampe de chargement adaptée. Arrimer correctement
la machine pour un transport en toute sécurité.
- Le transport doit s’effectuer moteur arrêté et bougie débranchée à l’aide d’une
remorque, n’utiliser aucun autre moyen de transport.
2

FRFR
3
1 - ATTENTION Lire le manuel d’utilisation
2 - Ne pas toucher aux surfaces chaudes
3 - Les gaz d’échappement sont dangereux. Ne pas utiliser dans un endroit mal aéré
4 - Couper le moteur avant de refaire le plein
5 - Fermer le robinet d’essence quand le moteur est à l’arrêt
6 - Vérier l’étanchéité des tuyaux et des raccords
7 - Interdit de fumer, de faire ou d’approcher du feu
8 - CHAUD, éviter de toucher la partie chaude
1 - Entraînement des deux roues ensemble
2 - Entraînement des deux roues séparément
Commande de gaz
3 - Rapide
4 - Lent
Coupe circuit
5 - Stop
6 - Marche
Levier de vitesse
1 - Fraise rotation arrière
2 - Deuxième vitesse, marche avant
3 - Neutre
4 - Première vitesse, marche avant
5 - Fraise rotation avant
6 - Neutre
7 - Marche arrière (Roues)
Manette embrayage
1 - Débrayé
2 - Embrayé
1 - DANGER
2 - DANGER Outils rotatifs
3 - ATTENTION Lire le manuel d’utilisation
4 - ATTENTION Consulter le manuel d’utilisation et débrancher la bougie avant toute intervention.
5 - ATTENTION Ne pas utiliser sans protecteur (éléments tournants).
AUTOCOLLANT
A1 A2 A3 A4
A5
A1
A2
A3
A4
A5
1
2
3
4
5
1
2
1
2
3
4
57
6
2
1
4
3
5 6
3
4
5
6
1
2
7
8

FR
4
1
2
12
5
4 6
11
7
10
9
814 13
3
1. CONTREPOIDS(7,4Kg)
2. RESERVOIRDECARBURANT
3. LEVIERDEDIFFERENTIEL
4. LEVIERDEVITESSE
5. COMMUTATEURMOTEUR
6. POIGNEED’EMBRAYAGE
7. POIGNEE
8. BEQUILLEDERESISTANCE
9. PANNEAUDEREGLAGEDUNIVEAU
10. LOQUETDESECURITE
11. BEQUILLEDEPROFONDEURMANUEL
12. MANETTEDEGAZ
13. LANCEUR
14. VERROUILLAGEDUGUIDON
I - CARACTERISTIQUES TECHNIQUES
Longueurdelamachine
Largeurdelamachine
Hauteurdelamachine
Poidsàsec
Modèledemoteur
Typedemoteur
Cylindrée
Puissancenominale
Niveaudepréssionacoustique
Mesuredevibration
Capacitéduréservoirdecarburant
Systèmededémarrage
Pneus
Pressiondegonage
Distanceentrelesroues
Systèmed’embrayageprincipal
Systèmed’embrayaged’entraînement
Transmission
Largeurdebêchage
1600mm
560mm
1095mm
88Kg
EX17
Refroidiparairmoteuràessence4temps
169cm3
3,7Kwà3400tr/mn
83,5dB(A)+1
3,2m/s2+0,2
3,4L
Lanceuràrappelautomatique
100/85D6
1,2bars
300mm
Tensiondelacourroie
Verrouillagedudifférentiel
2vitessesenmarcheavant
1vitesseenmarchearrière
2vitessesdetravail
500mm
ACCESSOIRE:
Aucunaccessoiren’estprévusurcettemachine.L’utilisationd’accessoiresaveccettemachinepeutrendre
lamachinedangereuse,etoccasionnerdesdommagessurvotremachinequineserontpascouvertspar
votregarantie.
II - ASSEMBLAGE
L’assemblagepeutêtreréaliséparunparticulier.Sivousrencontrezdesproblèmeslorsdumontage,
contactezvotredistributeur.
Aprèsavoirsortilamachinedesonemballage,veuillezprocéderàsonassemblagecommesuit.
Remarque : lespiècesnécessaires(xationguidon,rondelleGrower,rondelleplateetboulon)sontemballéesdans
lemêmesachetquelesinstructionsd’utilisation.
1) INSTALLATION DU GUIDON
Desserrezles écroussurlaplaque etenlevezleguidonparl’arrière.Placezlabarresurl’entailledelamonture
de la poignée. Insérez la vis longueur 190 depuis le côté du capot de la courroie et fixez-la à l’opposé avec la
molettenoire,larondelleGroweretlarondelleplate.
3

FR
5
Serrezl’écrousurlaplaque.
Veillez à ne pas coincer l’embrayage ni le câble de
commandeentrelapoignéeetsamonture.
1. POSITIONDELAPOIGNEE
2. VERROUILLAGEDELAPOIGNEE
3. PLAQUE
4. POIGNEE
5. FIL
6. BOULON
2) RACCORDEMENT DU CABLE D’EMBRAYAGE
Insérezlecâbled’embrayageàtraverslafentedelaxationducâblesurlecôtégaucheduguidon.Raccordezl’ex-
trémitéducâbled’embrayageàl’axedulevierd’embrayageàl’aidedel’écrouàgriffes.
1. ECROUDESERRAGE
2. GOUPILLEDELAPOIGNEED’EMBRAYAGE
3. CABLED’EMBRAYAGE
4. FIXATIONDUCABLE
3) INSTALLATION DU LEVIER DE VITESSE SUPERIEUR
Raccordezl’extensiondulevierdevitesseaulevierdevitesseàl’aidedelagoupillefendue.Ecartezl’extrémitéde
lagoupilled’arrêtpourlabloquer.
A. Incorrect
B. Correct
1. LEVIERDEVITESSE(SUPERIEUR)
2. LEVIERDEVITESSE(INFERIEUR)
3. GOUPILLEFENDUE
4) CABLAGE
Fixezlescâblesdecommandeauguidonàl’aidedesbraceletsserrecâble.
III - AVANT DE DEMARRER LE MOTEUR
REMARQUE : le moteur est livré sans huile. Versez de l’huile dans le moteur jusqu’au niveau appro-
prié avant de le démarrer. Veillez à ne pas laisser la saleté pénétrer dans le moteur lors du contrôle ou
lors de l’ajout d’huile ou du plein de carburant
1) REMPLISSAGE DU MOTEUR D’HUILE
(1) Placezuneplaquede4ou5cmd’épaisseursouslamachineanquelemoteursoitbienàl’horizontale.
(2) Retirezlebouchond’huile.
(3) Versezl’huilemoteurrecommandéejusqu’auniveauindiqué.
Quantitéd’huile:0,6l
REMARQUE : Vériezleniveaud’huileavantchaqueutilisation.
PLEIN D’HUILE ET NIVEAU
Huileapréconiser➔10W30
Capacitéhuile:0,6L
12
3
6
5 4
2
1
34
AB 1 3
2

FR
6
2) REMPLISSAGEDELATRANSMISSION
Aremplireavecdel’huileEPSAE80W90:Quantité3L
1. BOUCHOND’HUILE
2. NIVEAUMAXI
3. NIVEAUMINI
4. MANETTEDEGAZ
1
2
3
4~ 5 cm
6
5
4
7 8
5. POIGNEE
6. POIGNEED’EMBRAYAGE
7. LEVIERDEVITESSE
8. RESERVOIR
3) PLEIN DE CARBURANT
Utilisezuniquementdel’essencesansplombfraîcheetpropre.
REMARQUE : N’enlevez pas le ltre du réservoir de carburant lors du
remplissage.
3) REGLAGE DU GUIDON
Desserrezlamoletteduguidonetsélectionnezlahauteurduguidonparmilestroispositions.
Unefoislahauteurréglée,serrezduguidonénergiquement.
4) INSTALLATION DES COUTEAUX
(1) Installezlescouteauxextérieures(2)àl’extérieurdusupport.
(2) Lesautresdents(4)sontinstalléesàl’intérieurdusupport.
(3) Lesdentsdenettoyage(5)doiventêtrepositionnéessymétriquementàunanglede150°.
(4) L’arbrerotatifdoitêtreinstallécommeillustré.
(5) L’axe(1)doitêtrexéaumoyend’unegoupilleBéta(3)desortequ’ilnesedétachepas.
1. RIVET
2. SUPPORTDECOUTEAUX
3. CLIPENU
4. (12)COUTEAUBIDIRECTIONNELLE
5. (2)COUTEAUDENETTOYAGE
5) CONTROLES AVANT UTILISATION
1. Quantitéd’huileàl’intérieurdumoteur
2. Quantitédecarburantdansleréservoirdecarburant
3. Filtreàairpropre+Niveaud’huileltreàair
4. Entréesd’airdecarterlanceurpropre
5. Absencededommagessurleexibledecarburant
6. Outilsdetravail(fraises)enbonétatetpropre
7. Absencedefuited’huilesurlespièces
8. Béquillesenbonétatetpropres
9. Fonctionnementcorrectdulevierdevitesse
10. Lemoteurs’arrêtelorsquelecommutateurestdésactivé.
11. Lelevierd’embrayageetlelevierdecommandedumoteurfonctionnentcorrectement.
12. Pressiondespneus
1
2
3
1
5
4
3

FR
7
IV - FONCTIONNEMENT
Avant d’utiliser votre moto-bêche pour la première fois, étudiez ce chapitre et lisez attentivement le para-
graphe « Utilisation en toute sécurité ».
1) DEMARRAGE DU MOTEUR.
a. Positionnerlerobinetd’essence(2)situésousleltreàairsurOUVERT.
b. Placezlelevierdevitesseaupointmort.(3)
c. Placezlelevierd’embrayagesurARRET.(6)
Lorsquevousrelâchezlelevierd’embrayage,celui-ciseplaceautomatiquementenpositionARRET.
d. Placezlelevierderégimemoteurenpositionmoyenne.(7)
e. Placezlestarter(1)surA
f. Tournezlecommutateurdedémarragedumoteur(8)surON.
g. Tirezsurlelanceur
Silemoteurnedémarrepasendeuxoutroistractions,poussezlamolettedestartersurouvriret
continuezàl’aidedulanceur.Lorsquelemoteuradémarré,poussezlentementlestarter(1)surB.
2
1
A
3
4
78
5
6
1. STARTER
2. ROBINETD’ESSENCE
3. LEVIERDEVITESSE
4. POIGNEED’EMBRAYAGE
5. MARCHE
6. ARRET
2) DEMARRAGE DE LA MACHINE
a. RéglezlelevierderégimemoteursurLENT.(1)
b. Relâcheztotalementlelevierd’embrayage.(8)
c. Placezlelevierdevitessesurlapositionnécessairepourletravailàeffectuer.
d. Déverrouillerleloquetdesécurité(9).
e. Actionnezlentementlelevierd’embrayage(8).Lamachinedémarre.
f. Actionnezlelevierderégimemoteurpouraugmenterlavitessederotationdecedernier.(1)
REMARQUE :N’utilisezlelevierdevitessequelorsquelelevierd’embrayagesetrouveenpositionARRET.
Ramenezlelevierdevitesseaupointmortsilesvitessessontdifcilesàchanger.Débrayez(maintenezlelevier
d’embrayage)etembrayez(relâchezlelevier)puischangezdenouveaudevitesse.
REMARQUE :Sivousactionnezlelevierd’embrayagetroprapidement,lemoteurdémarreraous’arrêterabrutale-
ment.Parconséquent,actionnezlelevierd’embrayageLENTEMENT.
3) ARRET DE LA MACHINE
a. Lemouvementdelamoto-bêcheetdescouteauxs’arrêtentrapidementunefoislelevierd’embrayagerelâché.(8)
b. Poussezlelevierderégimemoteur(1)surLENT.
c. Passezlelevierdevitesse(3)aupointMORT.
d. Tournezlecommutateur(4)dumoteursur(2).
4) MANŒUVRE DE LA MACHINE
a. Relâchezlelevierd’embrayage.
b. RéglezlelevierdedifférentielsurARRET(6).
c. Pousserlelevierderégimemoteur(1)surLENT.
1
2
3
5 6 784
9
B
1
7. REGIMEMOTEUR
8. BOUTOND’ARRET

FR
8
d. Réglezlelevierdevitessesur«1ou2».Lescouteauxnetournentpas.
e. Soulevezleguidonpoursouleverlescouteauxdusol.
f. Pivotezleguidondansladirectionopposéesouhaitéeenveillantàéloignervospiedsetjambesdescouteaux.
g. Unefoislamanœuvreterminée,abaissezleguidon.
h. Relâchezlelevierd’embrayageetplacezlelevierdevitessesurlapositiondefraisagesouhaitée«fraise
rotationinverséousensdelamarche».Réglezlelevierderégimemoteursurlavitessesouhaitée.
Pourcommencerlebêchage,tirezlelevierd’embrayagecontrelapoignée.
5) BEQUILLE DE TERRAGE
Laprofondeurdebêchagepeutêtreajustéeparleréglagedelabéquille.
a. Amenezlelevierderéglagedelabéquilleenpositionderelâchement.(12)
b. Ajustezlaprofondeurdebêchageàl’aidedulevier.(10)
Bêchageenprofondeur:levezlabéquille.(11)
Bêchagepeuprofond:abaissezlabéquille.(11)
c. Relâchezlelevierderéglage(12)etlebloqueraprèsavoirdéterminélaprofondeurdebêchage.
10
11
12
16
17
14
19
18
10. POIGNEEDEBEQUILLEDEPROFONDEUR
MANUELLE
11. ECROUPAPILLON
12. LEVIERDEREGLAGEDELABEQUILLEDE
PROFONDEUR
14. BEQUILLEDEPROFONDEURMANUEL
16. POSITIONDEVERROUILLAGE
17. POSITIONRELACHEE
18. BEQUILLEDERESISTANCE
19. BEQUILLEDEPROFONDEURMANUEL
7) LEVIER DIFFERENTIEL
MARCHE:Permetlemodedifférentielpourunemanœuvreaisée.
Lesrouessontentraînéesséparément.(3)
ARRET:Entraînelesdeuxrouespourunetractionmaximale.(2)
Fonctionnement:
a. Relâchezlelevierdevitesseavantd’actionnerlelevierdedifférentiel.(1)
b. Silelevierestduràpasserenpositionarrêt,tournezlamachineversla
gaucheouladroited’un1/8ou1/4detourtoutenappuyantsurlelevier.
Répétezl’opérationjusqu’àengagement.Neforcezpassurlelevierde
différentiel.
23
1
8) BECHAGE
a. Tirezlelevier deréglagedelabéquilleenprofondeurenpositionrelâ-
chéeetajustezlaprofondeurrequise.
b. Placezlelevierdevitesse(4)enpositionFraiserotationavantouFraise
rotation arrière selon l’état du sol puis tirez lentement le levier d’em-
brayagecontrelapoignéepourdémarrerlebêchage.
4
V - MAINTENANCE ; CONTROLES ; STOCKAGE(Afaireeffectuerdansunatelieragréé.)
REMARQUES :Débranchezleldelabougied’allumageavantdeprocéderàlamaintenance(saufpourleréglage
ducarburateur)and’éviterledémarrageaccidenteldumoteur.
Pourévitertoutincendie,enlevezl’herbe,lesfeuilles,lestracesd’huileoudecarburantdumoteur.Vidangezleré-
servoirdecarburantavantd’inclinerlamachinepourlamaintenance.
Enlevezl’herbe,lasaletéetlesrésidusdelazonedel’échappement.
1) REGLAGE DE LA COURROIE D’ENTRAINEMENT
a. Arrêtezlemoteuretretirezlecapotdelacourroieenenlevantl’écrou.
b. Maintenezlelevierd’embrayageengagéàl’aided’unecorde,etc.

FR
9
c. Ajustezlatensiondesorteàobteniruneexioncompriseentre10et15mmlorsquevousappuyezaucentrede
lacourroietrapézoïdale,avecleraccordducâbled’embrayage.(3)
d. Réglezlelevierdevitesseaupointmortetdémarrezlemoteur.
Aprèsavoirréglélatensiondelacourroietrapézoïdale,assurez-vousquelapouliedetransmissions’arrêtetotale-
mentlorsquelelevierd’embrayageestrelâché.Sicelle-cines’arrêtepasrapidement,alignezleguidedelacourroie
etréajustezlecâbled’embrayage.
1. MOINSDETENSION
2. PLUSDETENSION
3. GARNITUREDUCABLED’EMBRAYAGE
4. TRANSMISSION
5. RESSORTD’EXTENSION
2
1
5
3
4
2) REGLAGE DU CABLE DE DIFFERENTIEL
a. Réglezlachargesurunevaleurcompriseentre24,5et29N(2,5et3,0kgf)lorsquelelevierdedifférentielestsur
MARCHEavecleraccorddedifférentiel.
Assurez-vousqueledifférentielestverrouillélorsquevousréglezlelevierdedifférentielsurMARCHE.
3) REMPLACEMENT DES COUTEAUX DE FRAISE
REMARQUES :Arrêtezlemoteur,passezaupointmortetretirezleldelabougied’allumageavantdenettoyerles
dentsàlamain.
Silesdentssontusées,votremotoculteurfonctionneramoinsbienetcreuseramoinsenprofondeur.Demême,les
dentsuséesnepeuventpassaisiretarracherlescorpsorganiquesdemanièreaussiefcacenicreuseraussien
profondeurquedesdentsenbonétat.Remplacezlesdentsusées.
Pourmaintenircettemachinedansunétatdefonctionnementirréprochable,vériezquelesdentssoientbienser-
rées,pasuséesnitordues,notammentlesdeuxdentsdenettoyagesituéesprèsdelatransmission.
Siunedentdenettoyageestcasséeoutordueversl’extérieurenraisond’uneutilisationdansdesconditionsdif-
ciles,labéquillederésistancepourraêtrebloquéparl’herbeoulaboueenmodeFraiserotationavant,cequipourra
provoquerunebaissederendement.
1. DENTBIDIRECTIONNELLE
2. DENTNEUVE
3. DENTUSEE
2
3
1
4) SYSTEME DE REFROIDISSEMENT
Votremoteurestrefroidiparair.Pourunfonctionnementirréprochableetprolongersaduréedevie,maintenezvotre
moteurpropre.
Sil’arrivéed’airsurlelanceuroul’ailettederefroidissementestbloquéepardel’herbeoudelapoussière,lemoteur
surchauffera.
5) BOUGIE D’ALLUMAGE
1. Contrôlezlabougied’allumageaudébutdechaquepériodedebêchage.
2. Réglezl’intervallesur0,7mmetréinstallez-la.
Silejeudevientsupérieurà0,7mmetconstitueunvide,remplacezlabougie.
3. Assurez-vousqueleldelabougied’allumageestbienxéàlabougie.
6) VIDANGE ET REMPLACEMENT HUILE MOTEUR
1. Lorsduremplacementdel’huile,arrêtezlemoteuretdesserrezlebouchondevidange.
2. Réinstallezlebouchondevidangeavantdeverserl’huile.

FR
10
7) Entretien ltre a air
1. Nettoyez régulièrement l’entrée d’air situé sur le lanceur à l’aide
d’unebrossedure.
2. Unltreàairsalepeutêtreàl’originededifcultésdedémarrage.
Effectuezdescontrôlesetnettoyezrégulièrement.
Nefaitesjamaistournerlemoteursansltreàair.
Séchezbienlespiècesintérieuresavantdelesréinstaller(voirmanuel
moteur).
Ne pas utiliser de solvant inammable pour nettoyer
l’élément mousse du ltre à air
8) DEPLACEMENT
Pourdéplacervotremachinedesonlieudestockagejusqu’auterrainàtravailler,vous
pouvez:
- Pousserlamachinesilesolestbienplatetsansobstacles,moteuràl’arrêt,levierde
vitesseenpositionneutre,etensoulevantlégérementleguidonanquelesfraisesne
touchentpaslesol.
- Démarrer le moteur, positionner le levier de vitesse sur la 1er ou 2 ème vitesse de
marcheavant,puisactionnerlapoignéed’embrayage.
ATTENTION: Ne jamais positionner le levier de vitesse sur «fraises rotation avant» ou «fraises rota-
tion arrière» lors des opérations de déplacement.
9) STOCKAGE
Conservezvotremotoculteurdansunendroitàl’abridesintempériesetdel’humidité.
Encasd’entreposagedurantunepériodesupérieureà30jours,cesopérationsprotègerontlesélémentsdebasedu
moteurdesdépôtsdegommeetfaciliterontlaremiseenservicedevotremotoculteur.
a.Vidangezleréservoirdecarburant,leltreetlecarburateur.Faitestournerlemoteurjusqu’àcequ’ils’arrête.
b.Vidangezl’huiledumoteuretrempliravecdel’huileneuve.
c.Retirezlabougied’allumage,versezenviron5cm3d’huilemoteurdanslecylindre,tirezlentementlapoignéedu
démarreurà2ou3reprisesetréinstallezlabougied’allumage.
d.Nettoyezintégralementlemotoculteur,ycomprislesailettesducylindre,lecarterdulanceuretleltreàair.
e.Nettoyezlesbéquillesdeterrageetderésistance.
Enlevezl’herbeetlaboueethuilezlessurfacesdefrottement.
f. Retirezlepanneaulatéralducapotdeprotectionetlesfraises.
Nettoyezcedernieretl’intérieurdumoyeu.Rincezàl’huilepénétrante.Appliquezdelagraisseetassemblezà
nouveau.
REMARQUE : N’enlevezpasleltreduréservoirdecarburantlorsduremplissage.
AVERTISSEMENT :L’expériencemontrequelescarburantsàbased’alcoolpeuventattirerl’humidité,cequipro-
voque la séparation et la formation d’acides durant le stockage. Les carburants acides peuvent endommager le
systèmedecarburationd’unmoteurdurantsonstockage.
And’éviterlesproblèmes,lesystèmedecombustiondoitêtrevidangéavanttoutentreposagede30joursouplus.
Vidangezleréservoirdecarburant,démarrezlemoteuretlaissez-letournerjusqu’àcequelesconduitesdecarbu-
rantetlecarburateursoientvides.Lasaisonsuivante,utilisezdel’essencesansplombfraîche.
10) DEPISTAGE DES PANNES
Cause possible
Nefonctionnepasalorsquelelevierd’embrayageestengagé.
Lacourroieestdétendueetglisse.
Lecâbleestdétendu.
AbsencededifférentielalorsquelelevierestsurMARCHE
Lecâbledudifférentielestdétendu.
Remède
Ajustezlatensiondelacourroie.
Ajustezlatensionducâble
Ajustezlecâbledudifférentiel


EN
SAFETY PRECAUTIONS
Pay particular care to the sections marked as follows:
DANGER : This indicates a strong likelihood of serious or even
fatal injury if the instructions are not followed.
WARNING : This indicates a risk of injury or damage to the equipment if the
instructions are not followed
NOTE : This indicates useful information
This symbol reminds you to take care with certain operations.
If you have any problems or questions about the cultivator, please contact your
approved supplier.
DANGER : The machine is designed for safe and reliable service if
used as instructed. Before using your machine, please make sure
you have understood the contents of this manual. Otherwise you
could be injured and your equipment could be damaged.
Training / Information
- Familiarise yourself with the correct use and the controls before using the
machine. Know how to stop the motor rapidly.
- The machine must always be used according to the recommendations given
in the instruction manual.
- Remember that the user is responsible for any accidents or dangerous reac-
tions occurring to other people or their belongings. It is his responsibility to
assess the potential risks of the ground to be cleared and to take all precau-
tions necessary to ensure it is safe, in particular on slopes and on loose,
slippery or uneven ground.
- Never allow children or people unfamiliar with these instructions to use the
machine. There may be local laws which set a minimum age for users.
- Never work when there are people, especially children, or animals within a
radius of 20 metres of the machine; the operator must necessarily remain at
the controls of the handles.
- Do not use the machine if you have been taking medicine or other subs-
tances that might slow your reactions or make you drowsy.
- The operator must pay particular attention on hard ground because the ma-
chine has the tendency to be much less stable than on cultivated ground.
- Always wear sturdy, non-slip footwear and tight long trousers when working.
Do not use the machine in bare feet or sandals. Ear protectors are recom-
mended.
- Use the machine for the purpose it is designed for – digging the ground. Any
other use may be dangerous or cause damage to the machine.
Preparation
- Carefully inspect the area where the machine is to be used and remove any
objects that might be projected by the machine (stones, wire, glass, metal
objects …).
- Before use, always check over the machine to ensure that the blades and
deectors are not worn or damaged. Replace any worn or damaged parts.
- Maintain the electrical cables that stop the engine in good condition so that
you can be sure to turn the engine off.
- Check that no petrol or oil are leaking.
- Do not use the machine without mud-guard or protective casings and ensure
that all the ttings are tight.
Use
- Never transport persons on the machine.
- Take care when starting the engine, following the manufacturer’s instructions
and keeping your feet away from the tool(s).
- Stop the engine when the machine is not in use.
- When holding the machine, walk don’t run.
- Take great care when pulling the machine towards you or reversing the di-
rection of rotation (if tted).
- Keep a safe distance from the rotating blades, set by the length of the stee-
ring column.
- Do not place your hands or feet near or beneath rotating parts.
If there is:
- abnormal vibration,
- a blockage,
- a problem engaging or disengaging the clutch,
- a collision with a foreign object,
- deterioration of the engine halt cable, (following model)
- Stop the engine immediately (if the engine halt cable is severed, use the star-
ter control as described in paragraph “Engine starting” to stop the engine),
let the machine cool down, unplug the spark-plug lead, inspect the machine
and have the necessary repairs carried out by an approved repairer before
using again.
- Work only by daylight or in good articial light.
- Do not use the machine on slopes greater than 10° (17%).
- Work across slopes, not up or down them.
- Make sure to keep your footing on sloping ground, change direction very
carefully.
- Using accessories other than those recommended may make the machine
dangerous and cause damage to your machine which will not be covered by
your guarantee.
Maintenance / storage
- Stop the engine and disconnect the spark plug before cleaning, inspecting,
adjusting or maintaining the machine or changing the blades.
- Stop the engine, disconnect the spark plug and use thick gloves when chan-
ging the blades.
- Keep all nuts and bolts tight to ensure safe conditions of use.
- To reduce re risk, keep the engine, the silencer and the fuel storage area
free of plants, waste oil, or any other inammable material.
- If the exhaust silencer is defective, have it replaced by an approved repairer.
- Do not mend parts; replace them by the maker’s own spares.
- Replace the cutting blades in complete sets to keep them balanced.
- For your own safety, do not alter the characteristics of your machine. Do
not the engine speed settings and do not run the engine at excess speeds.
Regular maintenance is essential for safety and to maintain the level of per-
formance.
- Allow the engine to cool down before putting the machine away.
Danger ! Petrol is highly inammable !
- Store fuel in containers specially designed for it. Always ll the tank outdoors
and do not smoke while doing it.
- Do not unscrew the fuel cap or top up with petrol while the engine is running
or still hot.
- If petrol is spilt on the ground, do not try to start the engine; Carry the machine
elsewhere and avoid all naked ames until the petrol vapour has dispersed.
- Store the machine in a dry place. Never store the machine in a building
where the petrol vapour can reach a ame, spark or source of intense heat.
- Replace the caps of the fuel tank and the petrol can correctly.
- Limit the amount of petrol in the tank to reduce spillage.
- Do not run the engine in a conned space where carbon monoxide vapour
might accumulate.
- Carbon monoxide can be fatal. Ensure good ventilation.
Moving, handling, transporting
- Any action on the machine apart from ground digging must be performed with
engine stopped and spark plug disconnected.
- Except when (ground digging) the machine must be moved according to the
instructions in § “Moving”.
- Handling : Do not lift the machine. The weight of the machine is indicated on
the manufacturer’s plate, at the end of this manual.
- When loading or unloading the machine to or from a trailer, use a suitable
ramp. Lash the machine down correctly for safe transport.
- The machine should be transported in a trailer, engine stopped and spark
plug disconnected; do not use any other method of transport.
2

EN
3
1 - WARNING Read the instruction manual
2 - Do not touch any hot surface
3 - The exhaust gases are dangerous. Do not use in a poor ventilated area.
4 - Switch off the engine before topping up the fuel.
5 - Shutt off fuel valve when the engine is not in use.
6 - Check for leakage from hose and ttings.
7 - Fire, open ame and smoking prohibited.
8 - HOT, avoid touching the hot area.
1 - Driving both wheels together
2 - Driving two wheels séparately
Accelerator
3 - Fast
4 - Slow
Ignition key
5 - Stop
6 - Go
Gear lever
1 - Blade backward rotation
2 - Second gear, forward
3 - Neutral
4 - First gear, forward
5 - Blade forward rotation
6 - Neutral
7 - Reverse (wheels)
Clutch lever
1 - Released
2 - Engaged
1 - DANGER
2 - DANGER Rotating blades
3 - WARNING Read the instruction manual
4 - WARNING Consult the instruction manual and disconnect the spark plug before starting work.
5 - WARNING Do not use without protective cover (rotating parts)
SYMBOLS
A1 A2 A3 A4
A5
A1
A2
A3
A4
A5
1
2
3
4
5
1
2
1
2
3
4
57
6
2
1
4
3
5 6
3
4
5
6
1
2
7
8

EN
4
1
2
12
5
4 6
11
7
10
9
814 13
3
1. COUNTER WEIGHT ( 7,4 Kg)
2. FUEL TANK
3. DIFFERENTIAL LEVER
4. SHIFT LEVER
5. ENGINE SWITCH
6. CLUTCH BAIL
7. HANDLE
8. RESISTANCESTAKE
9. LEVELINGSHIELD
10. SAFETYLOCK
11. MANUALDEPTHSTAKE
12. GASLEVER
13. IGNITIONCORD
14. HANDLEBARLOCK
I - TECHNICAL SPECIFICATIONS
MachineLenght
MachineWidth
MachineHeight
DryWeight
Enginemodel
Enginetype
Capacity
Nominalpower
Acousticpressurelevel
Vibrationlevel
Fueltankcapacity
Startingsystem
Tire
Tyrepressure
WheelDistance
Maincluthsystem
Drivingsluthsystem
Transmission
TilingWidth
1600mm
560mm
1095mm
88Kg
EX17
Air-cooled,4strokegasolineengine
169cm3
3,7Kwà3400tr/mn
83,5dB(A)+1
3,2m/s2+0,2
3,4L
Recoil
100/85D6
1,2bars
300mm
Belttension
Differentiallock
2forwardand1reverse,2workingspeeds
500mm
ACCESSORIES
Noaccessoriesarerequiredonthismachine.Usingaccessorieswiththismachinemaymakethemachine
dangerous,andcausedamagetoyourmachinewhichwillnotbecoveredbyyourguarantee.
II - ASSEMBLY
Theassemblycanbyrealisedbyaprivateindividual.Ifyoumeetproblemsduringtheassembly,contact
yourdistributor.
Aftertakingthemachineoutfromthecarton,pleaseassembleinthefollowingmanner.
Note :Necessarypartsforassemblyarepackedinthesamebagasinstructionmanual.Partsconsistxedgrip,plain
washerandbolt.
1) INSTALLING HANDLE
Loosenthenutsontheplate andremovethehandletothepositionofrearward,andplacethebaronthenotch
ofthehandleframe.Insertthehandlefromthesideofbeltcoverandfixwithgrip,Swasher,andwasher.
3

EN
5
Tightenthenutontheplate.
Be careful not to catch the cluth and control cable
betweenhandleanhandleframe.
1. HANDLEPOSITION
2. HANDLELOCKGRIP
3. PLATE
4. HANDLE
5. WIRE
6. BOLT
2) CONNECTING CLUTH CABLE
Inserttheclutchcablethroughttheslotofthecablebracketonthelefthandle.
Connecttheclutchcableendtotheclutchleverpinwithpushnut.
1. PUSHNUT
2. CLUTCHBAILPIN
3. CLUTCHCABLE
4. CABLEBRACKET
3) INSTALLING SHIFT LEVER UPPER
Connecttheextensionshiftlevertotheshiftleverusingcotterpin.
Spreadcotterpintosecure.
A. Wrong
B. Correct
1. SHIFTLEVER(UPPER)
2. SHIFTLEVER(LOWER)
3. COTTERPIN
4) WIRING
Attach the control cables to the handlebars using the cable clamp straps.
III - BEFORE STARTING ENGINE
NOTE : The engine is shipped without oil. Fill the engine to the proper oil level before starting. Be very
carefu not to allow dirt to enter the engine when checking or adding oil or fuel.
1) FILL THE ENGINE WITH OIL
(1) Puttheplatewith4to5cmthicknessunderthemachinetokeepenginehorizontally.
(2) Removetheoilllerplug
(3) Fillwithrecommendedengineoilup
Quantityofoil:0,6l
NOTE : Checktheoillevelbeforeeachuse.
OIL FILLER AND GAUGE
Recommendedoil➔10W30
Oilcapacity0,6L
12
3
6
5 4
2
1
34
AB 1 3
2

EN
6
2) FILLING THE TRANSMISSION
TobelledwithEPSAE80W90oil.Quantity3L
1. OILPLUG
2. UPPERLIMIT
3. LOWERLIMIT
4. THROTTLELEVER
1
2
3
4~ 5 cm
6
5
4
7 8
5. HANDLE
6. CLUTCHHANDLE
7. SHIFTLEVER
8. TANK
3) FILL FUEL TANK
Usefreshclean,unleadedautomotivegasolineonly.
NOTE : Donotremovethestrainerfromfueltankwhenlling.
3) ADJUSTMENT OF HANDLE
Loosenthehandleknobandselectthehandleheightfromthethreepositions;
Tightenthehandleknobafteradjustmentofhandleheight.
4) INSTALLATION OF TINES
(1) Installoutermosttines(2)tooutsideoftineholder
(2) Theothertines(4)areinstalledinsideoftheholder
(3) Cleaningtines(5)shouldbepositionedsymmetricallywith150degreesangle.
(4) Rotarytineshaftshouldbeinstalledasshown.
(5) Rivet(1)shouldbeinstalledwithhairpinclip(3)nottoloosen.
1. RIVET
2. TINESHOLDER
3. HAIRPINCLIP
4. (12)BI-DIRECTIONALTINE
5. (2)CLEANINGTINE
5) CHECK POINT BEFORE OPERATION
1. Oilquantityinsideengine.
2. Fuelquantityinsidefueltank
3. Aircleanerisclean+Airlteroillevel
4. Partofairscreenontherecoilstarterisclean
5. Nodamageonthefuelhose
6. Nodamageordustonthetines
7. Nolackofoiloneachpart
8. Nodust/grassonresidencestake
9. Shiftleverworkscorrectly
10. EnginestopswhenengineswitchturnsOFF
11. Clutchleverandenginecontrolleverworkcorrectly
12. Tirepressure
1
2
3
1
5
4
3

EN
7
IV - OPERATION
Before operating your tiller for the st time, study this section and real carefully the “safe operation”.
1) STARTING THE ENGINE.
a. Turnfuelcock(2)leveronthefuelstrainertoOPEN.
b. Moveshiftlevertoneutralposition.(3)
c. MovreclutchlevertoOFF.(6)
Whenyoureleasetheclutchlever,itisautomaticallybecome“OFF”position.
d. Movethtottlecontrollevertomidrange.(7)
e. Movechokeknob(1)onA
f. MoveenginestartswitchtoON(8).
g. Pullrecoilstarterrope
Ifenginefailstostartintwoorthreepulls,pushchokeknobandcontinueusingtherecoilstarter.
Afterenginestarts,pushchokeknobslowlyB.
2
1
A
3
4
78
5
6
1. RECOILSTARTERHANDLE
2. FUELSHUTOFF
3. SHIFTLEVER
4. CLUTHBAIL
5. ON
6. OFF
2) STARTING THE MACHINE
a. MoveenginecontrollevertoLOW.(1)
b. Releaseclutchlevercompletely.(8)
c. Changeshiftlevertothepositionwhererequiresthework.
d. Unlockthesafetylatch(9).
e. Gripclutchleverslowlyandthenthemachinestarts.(8)
j. Moveenginecontrollevertoincreaseenginerevolution.(1)
NOTE : ShiftlevershouldbeusedonlywhentheclutchleverisOFFposition.
ReturntheshiftlevertoNeutralpositionifitishardtoshifttoanypositions.Engagetheclutch(holdthe
clutchlever)anddisengagetheclutch(releasetheclutchlever)thenshiftagain.
WhenchangetheshiftlevertoSRT(StandardRotatingtines)position,thehandleshouldhangupinorder
nottotouchtheresistancestaketotheground.
REMARK : Ifgriptheclutchleverquickly,itisthereasonoftroubleforsuddenstartorsuddenstopofengine.
So,theshiftlevershouldgripSLOWLY.
3) STOPPING THE MACHINE
a. Tillermovementandtineswillstopquicklywhentheclutchleverisreleased.(8)
b. PushthrottlelevertoLOWposition.(1)
c. ChangeshiftlevertoNEUTRALposition.(3)
d. Changeengineswitch(4)toOFF.(2)
4) TURNING THE MACHINE
a. Releasetheclutchlever.
b. ChangedifferentialleverlevertoOFF.(6)
c. Movethethrottlecontrollevertolowspeed.
1
2
3
5 6 784
9
B
1
7. ENGINETHROTLE
8. ENGINESWITCH

EN
8
d. PlaceshiftleverinF1orF2(Forward)position.Tineswillnotturn.
e. Lifthandletoraisetinesoutoftheground.
f. Swingthehandleintheoppositedirectionyouwishtoturn,beingcarefultokeepfeetandlegsawayfromthetines.
g. Whenyouhavecompletedyourturn-around,lowerthehandle.
h. ReleasetheclutchleverandplacetheshiftleverinCRTorSRT(tilling)position.
Movethethrottlecontrollevertodesiredspeed.
Tobegintilling,pulltheclutchleveragainstthehandle.
5) DEPTH STAND
Tillingdepthcanbeadjustedbythedepthstand.
a. Movedepthstandadjustmentlevertothereleaseposition.(12)
b. Adjusttillingdepthusingthedepthstakeadjustmentlever.(10)
Deeptilling:raisethemanualdepthstandupward.(11)
Shallowtilling:gothemanualdepthstanddownward.(11)
c. Releasedepthstakeadjustmentlever(12)andxedthestakeafterdeterminingtillingdepth.
10
11
12
16
17
14
19
18
10. MANUALDEPTHSTANDGRIP
11. BUTTERFLYNUT
12. DEPTHSTANDADJUSTMENTLEVER
14. MANUALDEPTHSTAND
16. LOCKPOSITION
17. RELEASEDPOSITION
18. RESISTANCESTAND
19. MANUALDEPTHSTAND
7) DIFFERENTIAL LEVER
ON:Allowsdifferentialactionforeasyturning.(3)
Wheelsareindependentlydriven.
OFF:Drivesbothwheelsformaximumtraction.(2)
Tooperate:
a. Releaseshiftleverbeforeshiftingdifferentiallever.(1)
b. Ifleverdoesn’tmoveeasilyintotheoffposition,turnmachineleftor
right1/8to1/4turnwhilepressingdownonlever.
Repeatuntilengaged.
Donotforcethedifferentialshiftlever.
23
1
8) Tilling
a. Pullthedepthstandadjustmentlevertoreleasedpositionandadjustthe
depthwichisrequired.
b. Pacetheshiftlever(4)inSRTorCRTdependingonthegroundcondition
andthenpulltheclutchleveragainstthehandleslowlytostarttiling.
c. Selectalsotheresistancestandposition,consideringtothegroundcondi-
tion.
4
V - MAINTENANCE ; CHECKS ; STORAGE(HAVE THIS WORK DONE BY AN APPROVED REPAIR SHOP)
REMARKS : Disconnectsparkplugwirebeforeperforminganymaintenance(exceptcarburetoradjustement)to
preventaccidentalstartingofengine.Preventres.Keeptheenginefreeofgrass,leaves,spilledoilorfuel.
Removefuelfromtankbeforetippingunitformaintenance.
Cleanmuvvlerareaofallgrass,dirtanddebris.
1) DRIVE BELT ADJUSTMENT
a. Stoptheengineandremovethebeltcoverbytakingoutonenut.
b. Keeptheclutchleverengaged,usingaropeetc.

EN
9
c. Adjustthebendtobecomebetween10to15mmwhenpushcenterorV-belt,witchclutchcabletting.(3)
d. Movetheshiftlevertoneutralpositionandstartengine.
AfteradjustingthetensionoftheV-belt,checktoseethatthetransmissionpulleystopscompletelywhentheclutch
leverisreleased.
Ifthetransmissionpulleydoesnotstopquickly,alignthebeltguideandreadjusttheclutchcable.
1. LESSTENSION
2. MORETENSION
3. CLUTCHCABLEFITTING
4. TRANSMISSION
5. EXTENSIONSPRING
2
1
5
3
4
2) DIFFERENTIAL WIRE ADJUSTMENT
a.Adjusttheloadweighttobecome24,5to29N(2,5to3,0kgf)whenthedifferentialleverisONwithdifferentialtting.
ChecktoseethatthedifferentialislockedwhenmovethedifferentiallevertoON.
3) TINE REPLACEMENT
REMARKS :Stoptheengine,shifttoneutralandremovesparkplugwirebeforecleaningoutthetinesbyhand.
AbadlywornTinecausesyourtillertoworkharderanddigshallower.
Mostimportant,worntinescannotchopandshredorganicmatteraseffectively,norburyitasdeeply,asgoodtines.
Aworntineneedstobereplaced.
Tomaintainthequperbtillingperformanceofthismachine,thetinesshouldbecheckedforsharpness,wearand
bending,particularlythetwocleaningtineswhicharenexttothetinetransmission.
Ifacleaningtinehasbeenbrokenorbentoutwardbyharshusageintherougheld,theautostake(resistancestake)
canbecomecloggedwithgrassormudduringSRToperation.Ifcanlowercultivatingefciency.
1. BI-DIRECTIONALTINE
2. NEWTINE
3. WORNTINE
2
3
1
4) COOLING SYSTEM
Yourengineisair-cooled.Forproperengineperformanceandlongerlife,keepyourengineclean.
Whentheairinletattherecoilstarterorthecoolingniscloggedwithgrassordust,theenginewilloverheat.
5) SPARK PLUG
1. Thesparkplugshouldbecheckedatthebeginningofeverytillingseason.
2. Setthegapat0,7mmandreinstall.
Incasethegrapbecomesbiggerthan0,7mmandexhausted,itshouldbereplaced.
3. Makesuresparkplugwireisrmlyattachedtosparkplug.
6) ENGINE LUBRICATION
1. Whenchangingoil,stoptheengineandloosenthedrainplug.
2. Re-installthedrainplugbeforerellingoil.

EN
10
7) AIR FILTER MAINTENANCE
1. Cleanairxcreenontherecoilstarterfrequentlyusingastiffbristled
brush.
2. Adirtyaircleanermaycausedifcultstarting.Checkfrequentlyand
clean.
Neverrunenginewithoutaircleaner.
Dryinnerelementcompletelybeforereinstalling.
Do not use inammable solvents to clean the foam in-
sert in the air lter.
8) MOVING
Tomoveyourmachineofitsstorageplaceuptothegroundtobeworked,youcan:
- Pushthemachineifthegroundisveryatandwithoutobstacles,engineinstop
position,gearshiftinneutralposition,andbyraisingslightlythehandlebarssothat
cuttingbladesdon’ttouchtheground.
- Starttheengine,positionthegearshifton1stor2ndspeedforward,thenactivate
theclutchhandle.
WARNING: Never position the gearshift on «front rotation cutting blades» or «back rotation cutting
blades» during the moving operations.
9) STORAGE
Keepyourtillerinaweatherproof,drybuilding.
Ifstoredforover30days,thesestepswillprotectbasicenginepartsfromgumdepositsandwilleaserestoringyour
tillertoservice.
a.Drainfueltank,stainerandcarburetor.Runengineuntilitstops.
b.Drainoilfromengineandrellwithoil.
c.Removesparkplug,forabout5ccofengineoilintothecylinder,slowlypullthestarterhandleoftherecoilstarter
2or3times,andreinstallthesparkplug.
d.Cleanentiretiller,includingcylindernsblowerhousingandairscreen.
e.Cleanbothresistancestakeanddepthstake.
Removegrassandmudandoiltherubbingsurfaces.
f. Rempvetheoutersideshielandrotarytineshaft.
Cleantherotarytineshaftandinsideoftineshaft.Washwithpenetratingoil.
Applygreaseandreassemble.
NOTE : Donotremovethestrainerfromfueltankwhenlling.
WARNING :Experienceindicatesthatalcoholblendedfuelscanattractmoisturewichleadstoseparationandfor-
mationofacidsduringstorage.
Acidicgasfcandamagethefuelsystemofenginewhileinstorage.
Toavoidproductproblems,thefuelsystemshouldbeemptiedbeforestorageof30daysorlonger.
Drainthegastank,starttheengineandletitrununtilthefuellinesandcarburetorareempty.
Use fresh unleaded fuel next season.
10) TROUBLE SHOOTING
Possible cause
Notrunwhentheclutchleverenganges
Thebeltisextendedandslipped
Thewireisextended
NodifferentialwhenthedifferentiallevermovedtoON
Thedifferentialwireisextended
Possible remedy
Adjustthebelttension
Adjustthewiretension
Adjustthedifferentialwire
Table of contents
Languages: