SATA dry jet 2 User manual

SATA® dry jet™ 2
Betriebsanleitung | Упътване за работа | 使用说明书 | Návod k použití
Betjeningsvejledning|Kasutusjuhend|OperatingInstructions|Instrucciones
de servicio | Käyttöohje | Mode d'emploi | Οδηγίες λειτουργίας | Üzemeltetési
utasítás | Istruzione d'uso | Naudojimo instrukcija | Lietošanas instrukcija |
Gebruikershandleiding | Bruksveiledning | Instrukcja obsługi | Instruções
de funcionamento | Manual de utilizare | Руководство по эксплуатации
Bruksanvisning | Navodilo za obratovanje | Návod k použití | Kullanım
talimatı | Operating Instructions

[2-6]
[2-7]
[2-2]
[2-3]
[2-4]
[2-5]
[2-1]
[1-6]
[1-7] [1-2]
[1-3]
[1-4]
[1-5]
[1-1]
[1]
[2]

[3]
[3-1]
[3-6]
[3-5]
[3-4]
[3-3]
[3-2]

[4]
[4-6]
[4-7]
[4-8]
[4-9]
[4-4]
[4-2]
[4-3]
[4-5]
[4-1]

53
EN
Operating instructions SATA dry jet 2 Operating instructions SATA dry jet 2
Content [Original Ver-
sion: German]
1. General Information...............53
2. Safety Instructions................. 54
3. Use........................................54
4. Description ............................54
5. Scope of Delivery ..................54
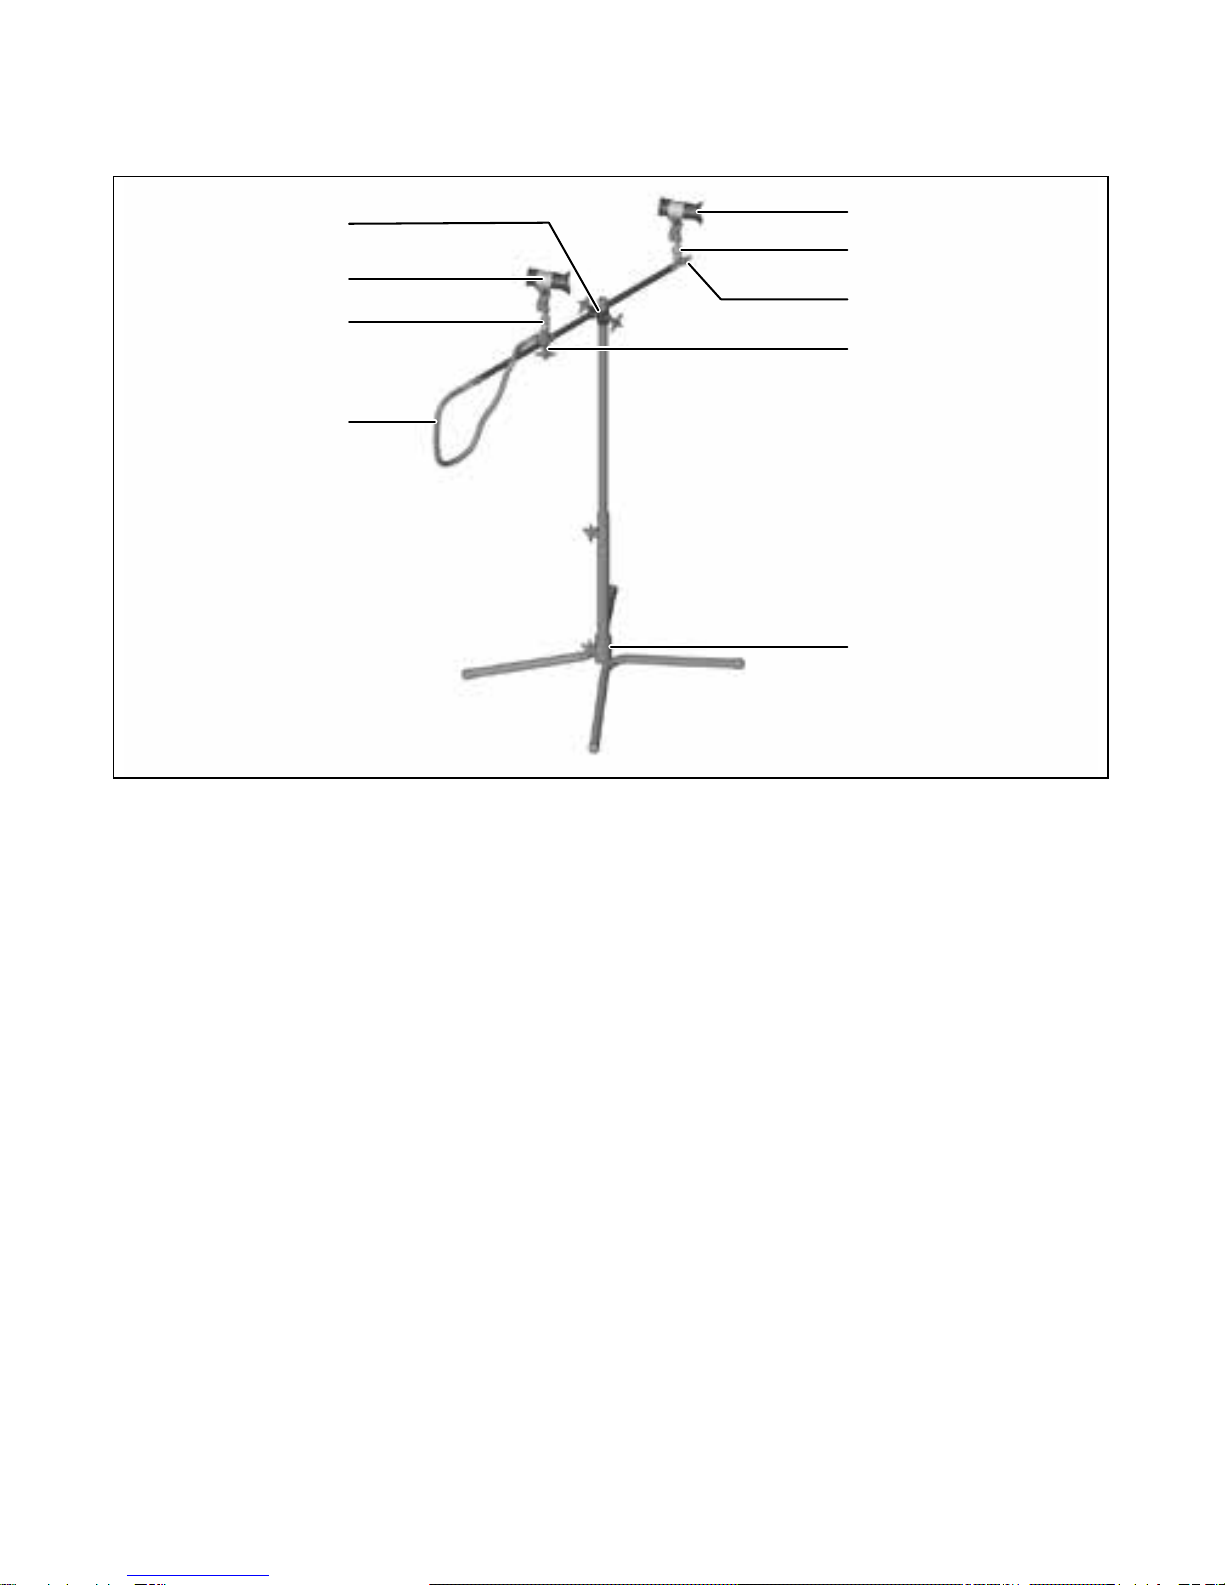
6. Technical Design ...................54
7. Technical Data....................... 55
8. First Use................................55
9. Normal Operation..................56
10. Maintenance and Care..........57
11. Malfunctions ..........................58
12. After Sale Service..................59
13. Spare Parts ...........................60
Read first!
Read these operating instructions
thoroughly and carefully before
use. Comply with the safety in-
structions and danger warnings!
Always make sure that these oper-
ating instructions are kept with the
product or keep them easily acces-
sible for everyone at any time!
1. General Information
These operating instructions con-
tain important information for oper-
ating the SATA dry jet 2, hereinafter
referred to as dry jet gun. They also
describe use, care, maintenance,
cleaning and troubleshooting.
1.1. Target group
This operating manual is intended
for
■Painting and varnishing profes-
sionals.
■Trained personnel for varnishing
work in industrial and craftman's
workshops.
1.2. Accident prevention
As a basic principle, the gen-
eral and specic national accident
prevention regulations must be
heeded, together with correspond-
ing workshop and industrial safety
instructions.
1.3. Replacement, accessory
and wear-and-tear parts
Always only use original SATA
spare parts, accessories and wear
parts. Accessories not supplied by
SATA have not been tested and ap-
proved. SATA assumes no liability
for damage caused by the use of
non-approved spare parts, acces-
sories and wear parts.
1.4. Warranty and
liability
The SATA General Conditions of
Sale and Delivery and further con-
tractual agreements apply, if ap-
plicable, as well as the valid legisla-
tion at the time.
SATA is not liable in case of
■non-adherence to the operating
manual.
■use of untrained personnel.
■improper use of the product.
[EN] Operating Instructions | english

54
EN
Operating instructions SATA dry jet 2
■personal protection gear not be-
ing used.
■original accessory and spare
parts not being used.
■ unauthorised modications or
technical changes.
■natural wear and tear.
■abnormal impact.
■impermissible assembly and
disassembly work.
2. Safety Instructions
Read and comply with all direc-
tions listed in the following. Non-
compliance or incorrect compliance
can lead to malfunctions or severe
injuries and even death.
2.1. Requirements regarding
personnel
The dry jet gun may only be used
by experienced skilled workers and
instructed persons who have thor-
oughly read and understood these
operating instructions. Do not use
the dry jet gun when tired or under
the inuence of drugs, alcohol or
medication.
3. Use
Intended Use
The dry jet gun is used for forced
curing of waterborne paints. Small-
er surfaces such as doors or wings
can be dried with a single hand-
operated dry jet gun. The stand ver-
sion with several dry jet guns can
be used for larger surfaces.
Incorrect use
Incorrect use refers to using the
dry jet gun to cure solvent-borne
materials.
4. Description
The dry jet gun is connected to the
compressed air circuit by a con-
nection nipple. The sucked in air is
cleaned by a sieve. The integrated
air ow control and the rotating at
fan nozzle point the air directly onto
the sprayed surface. The dry jet
gun consists of the main parts:
■Filter holder [1-1] with sieve [1-2]
■Handle [1-4] with air ow control
[1-3]
■Flat fan nozzle [1-6]
5. Scope of Delivery
Notice!
The connection nipple is only
included in the standard version.
For all other versions, the con-
nection nipple has to be supplied
by the customer. The SATA con-
nection nipple (Art. No. 6981) is
necessary for connecting the dry
jet gun to a SATA dry jet 2 stand
or SATA dry jet 2 stand jumbo.
■Dry jet gun SATA dry jet 2
■Sieve (set of 3)
■Flat fan nozzle
■Connection nipple (for standard
version)
6. Technical Design
[1-1] Filter holder
[1-2] Sieve (not visible)
[1-3] Air ow control
[1-4] Handle

55
EN
Operating instructions SATA dry jet 2 Operating instructions SATA dry jet 2
[1-5] Connection nipple
[1-6] Flat fan nozzle (rotating)
[1-7] Nozzle
7. Technical Data
Description Unit
Optimum operat-
ing overpressure
2.5 bar
Max. operating
pressure
10.0 bar
Max. operating
temperature
60 °C
Storage tempera-
ture
-20 °C – 80 °C
Air consumption 270 Nl/min at
2.5 bar
8. First Use
The dry jet gun must be tted be-
fore being used for the rst time.
Check after unpacking:
■Dry jet gun damaged.
■Scope of supply complete (see
chapter 5).
8.1. Mount flat fan nozzle
To align the blowing air, the at
fan nozzle has to be mounted and
aligned.
■Push the at fan nozzle [2-6]
onto the front nozzle [2-7] of the
dry jet gun until locks in place.
8.2. Mount connection nipple
Notice!
The connection nipple is only
included in the standard version.
For all other versions, the con-
nection nipple has to be supplied
by the customer. The SATA con-
nection nipple (Art. No. 6981) is
necessary for connecting the dry
jet gun to a SATA dry jet 2 stand
or SATA dry jet 2 stand jumbo.
■Screw connection nipple
[2-5] onto the air connection
of the dry jet gun [2-4] (torque:
1 Nm).
8.3. Mount sieve
Notice!
The sieve is not suitable for clean-
ing and must be replaced when
clogged (see chapter 10).
The sieve is symmetrical in de-
sign. It can be tted in any direc-
tion.
■Press a sieve [2-1] into the lter
holder [2-2] until it locks in place.

56
EN
Operating instructions SATA dry jet 2
9. Normal Operation
Warning!
Explosion risk
The use of unsuitable com-
pressed air hoses may cause
explosions.
→Only use solvent-resistant,
antistatic, undamaged and tech-
nically awless compressed air
hoses with permanent pressure
resistance of minimum 10.0 bar ,
inner diameter of minimum 9 mm,
such as the SATA air hose (Art.
No. 53090).
Attention!
Loss of function caused by
clogged sieve
Dirt particles in the sucked in air
and deposits settling during the
spraying process can clog the
sieve.
→Replace the sieve at regular
intervals.
→Clean dry jet gun from any soil-
ing incurred during the spraying
process.
Attention!
Damage from flying dust
Pointing the outgoing air towards
the oor can cause dust to y up.
This dust can lead to impurities on
the sprayed surface.
→ Do not blow towards the oor.
Attention!
Damage from inadequate
clearance
Inadequate clearance between
the dry jet gun and the sprayed
surface can displace the paint.
→
Heed the optimum alignment of
the dry jet gun.
Notice!
Use compressed air connection
with 1/4" male thread or suitable
SATA connection nipple.
Use clean compressed air, for
example with SATA lter 484 (Art.
No. 92320).
The dry jet gun can be operated by
hand or on a stand. In both cases,
it is important to make sure that the
dry jet gun is aligned correctly (see
chapter 9.1).
9.1. Alignment of the dry jet
gun
Comply with the following points to
obtain optimum results
■ Point the at fan nozzle at the
sprayed surface [3-1]/ [3-6].
■Point the dry jet gun at the
sprayed surface (optimum clear-
ance: 30 cm – 50 cm [3-3]/[3-4],
angle: 20° - 40° [3-2]/ [3-5]).
9.2. Hand-held operation
■ Turn the air ow control [1-3] to
the right as far as it will go.
■Connect the dry jet gun to the
compressed air circuit with the

57
EN
Operating instructions SATA dry jet 2 Operating instructions SATA dry jet 2
connection nipple [1-5].
■ Turn the air ow control to the left
to adjust the required air ow.
■Hold the dry jet gun in the re-
quired working position, making
sure it is aligned correctly (see
chapter 9.1).
■To stop blowing, turn the air ow
control to the right as far as it will
go and disconnect the dry jet gun
from the compressed air circuit.
9.3. Stand version
Notice!
These operating instruc-
tions describe operations with
the SATA dry jet 2 stand with
height-adjustable holder and 2
dry jet guns (Art. No. 223008).
All other extensions and vari-
ations by SATA can be used
as alternatives. For example,
SATA dry jet 2 stand jumbo (Art.
No. 223503).
■Set the stand up in the correct
position and alignment [4-4],
[4-9].
■Connect the stand to the com-
pressed air circuit with the con-
nection nipple [4-3].
■ Turn the air ow control of the dry
jet guns to the right as far as it
will go.
■Connect the dry jet guns [4-1],
[4-8] to the quick couplings
[4-2], [4-7] and align them cor-
rectly.
■ Turn the air ow control of the dry
jet guns to the left to adjust the
required air ow.
■To stop blowing, turn the air ow
control of the dry jet guns to the
right as far as it will go, then take
the dry jet guns off the stand or
disconnect the stand from the
compressed air circuit.
10. Maintenance and Care
Warning!
Risk of injuries from compo-
nents coming loose
Components may come loose
unexpectedly when performing
maintenance to the dry jet gun
while this is still connected to the
compressed air circuit.
→Always disconnect the dry jet
gun from the compressed air cir-
cuit before performing any main-
tenance work.
Spare parts are available for carry-
ing out repairs (see chapter 13).
10.1. Replace flat fan nozzle
Remove at fan nozzle
■Pull the at fan nozzle [2-6] off
the front nozzle [2-7] of the dry
jet gun.
Insert the new at fan nozzle
■Push the at fan nozzle [2-6]
onto the front nozzle [2-7] of the
dry jet gun until locks in place.
10.2. Replace connection
nipple
Remove connection nipple

58
EN
Operating instructions SATA dry jet 2
■Unscrew connection nipple
[2-5] from the air connection of
the dry jet gun [2-4].
Insert new connection nipple
■Screw connection nipple
[2-5] onto the air connection
of the dry jet gun [2-4] (torque:
1 Nm).
10.3. Replace sieve
Remove sieve
■Take sieve [2-1] out of the lter
holder [2-2].
Insert new sieve
Notice!
The sieve is symmetrical in de-
sign. It can be tted in any direc-
tion.
■Press sieve [2-1] into the lter
holder [2-2] .
10.4. Replace filter holder
Remove lter holder
■Pull the lter holder [2-2] off the
rear nozzle [2-3] of the dry jet
gun.
Insert new lter holder
■Push the lter holder [2-2] onto
the rear nozzle [2-3] of the dry
jet gun.
10.5. Clean dry jet gun
Attention!
Tool damage caused by in-
correct cleaning
The dry jet gun can be damaged
if immersed in solvent or cleaning
agent or if cleaned in an ultrasonic
cleaning machine.
→Do not place the dry jet gun in
solvent or cleaning agent.
→Do not clean the dry jet gun in
an ultrasonic cleaning machine.
Notice!
The dry jet gun will quickly be-
come soiled if it is not protected
from impurities during the spray-
ing process.
Notice!
The sieve is not suitable for clean-
ing and must be replaced when
clogged (see chapter 10.3).
■Clean the dry jet gun on the
outside with a cloth soaked in
cleaning agent.
11. Malfunctions
The following table describes mal-
functions, their causes and corre-
sponding remedies.
If it is not possible to remedy the
malfunctions with the described
corrective action, send the dry jet
gun to the SATA customer service
department. (For address see
chapter 12).

59
EN
Operating instructions SATA dry jet 2 Operating instructions SATA dry jet 2
Malfunc-
tion
Cause Correc-
tive ac-
tion
Irregular
air ow.
Sieve
clogged.
Replace
sieve.
Weak air
ow.
Dirt par-
ticles on
sprayed
surface.
Sieve
missing.
Insert
sieve.
Impurities
in air.
Use SATA
lter 484.
12. After Sale Service
Accessories, spare parts and tech-
nical support may be obtained from
your SATA dealer.

60
EN
Operating instructions SATA dry jet 2
13. Spare Parts
13.1. SATA dry jet 2
Art.
No.
Description Number
[1-1] 222232 Filter holder 1 pc.
[1-2] 222125 Sieve for SATA dry jet 2, pack with 10
sieves
1 set.
[1-5] 6981 Connection nipple 5 pcs.
[1-6] 223834 Flat fan nozzle 1 pc.
13.2. SATA dry jet 2 stand
Art.
No.
Description Number
[4-5] 83840 Stand 1 set.
[4-4],
[4-6],
[4-7]
86165 Conversion kit 1 pc.
[4-9] 123786 Cross piece 1 pc.
-84145 Stand extension approx. 1.2 m (not
shown)
1 pc.
-84145 Stand extension for 3rd dry jet gun (not
shown)
1 pc.

DW-222109/4030-14
SATA GmbH & Co. KG
Domertalstraße 20
70806 Kornwestheim
Deutschland
Tel. +49 7154 811-0
Fax +49 7154 811-196
www.sata.com
Other manuals for dry jet 2
2
Table of contents
Other SATA Dryer manuals
Popular Dryer manuals by other brands

Whirlpool
Whirlpool YWED94HEAC installation instructions

Miele
Miele TOUCHTRONIC T 8012 C Operating and installation instructions

Bosch
Bosch WTH83008IT Installation and operating instructions

GE
GE GFD85 Owner's Manual & Installation Instructions

LG
LG DLEY1901*E owner's manual

Hotpoint
Hotpoint Aquarius VTD00 Instructions for installation and use