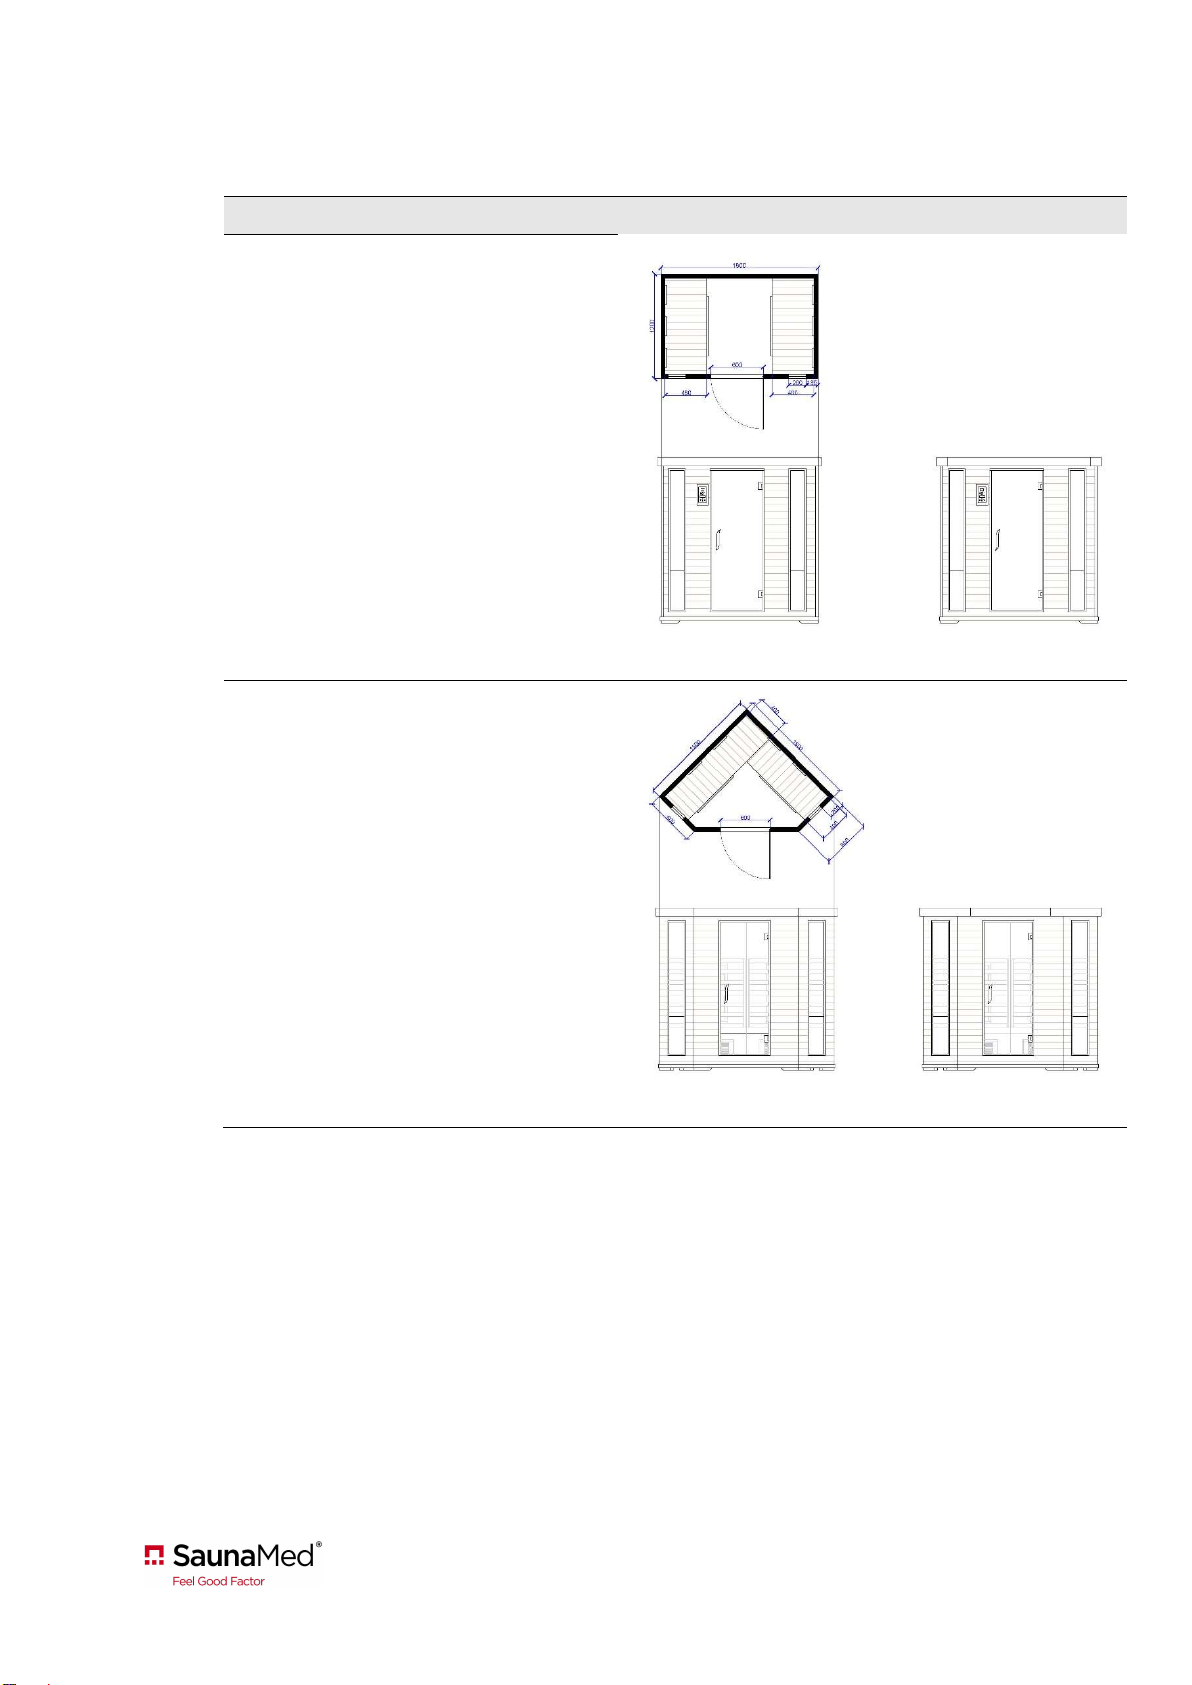
SaunaMed FIR-1 User manual

1
FIR
-
1/2/3/4/6
LUX-1/2/3/4/6
FS-2/3/6
Consumer manual

2
Dear Customer,
Thank you for purchasing a SaunaMed Sauna.
Before using your new sauna please read this consumer’s manual carefully.
Contents
Preview
3
Operations
4
Specifications
5
Safety
7
Assembly and installation
9
Instructions for use
2
5
Ti
ps for use
34
Troubleshooting guide
35
Circuit diagram
39
Warranty
40

3
WARNING
DISCONNECT THE SAUNA FROM THE MAINS POWER SUPPLY
BEFORE CHANGING ANY PARTS OR CARRYING OUT A SERVICE.
All growth depends on sunlight. But 40% of the ultraviolet and the high energy rays of
the sun are harmful to the human body; the remaining 60% of the sun’s energy is
beneficial, comprising infrared rays.
Our infrared sauna uses these invisible (5.6-15μm) infrared rays to increase cell tissue
resonance, accelerate blood circulation and improve organic functions.
Infrared sauna therapy is becoming increasingly popular and accepted across the
medical profession, with more studies now supporting the science behind this exciting
new technology.
An infrared sauna can help relieve pain and improve wound healing and recovery by
increasing blood circulation. The increased metabolic rate experienced in an infrared
sauna actually burns calories as the body works to sweat. This aids fat burning,
improves cardiac fitness, strengthens the heart, helps eliminate toxins and improves
cellulite and general skin tone. A 30-minute session in an infrared sauna burns the
same calories as a 10-kilometer run.
The quality stereo system fitted in our saunas aids relaxation with sound therapy and
helps relieve stress.
Preview

4
Operating temperature range 5 - 40°C (ambient)
Humidity < 85%
Pressure 700 - 1060 hpa
Power supply 220V - 240 V
Frequency 50 Hz
EU Standard
Indoor use only: SaunaMed Saunas are primarily aimed at the domestic market.
Although a SaunaMed may be suitable for light commercial use, we do not recommend a SaunaMed
for heavy commercial use, for example, public gyms, spas, and leisure centres.
Please contact us for information on site-specific suitability and commercial grade saunas.
Do not install closer than 12.7mm (0.5 inches) to a wall.
Operating conditions
Features
Wooden construction
Digital microprocessor controlled
Temperature adjustable from 20°C – 60°C (5°C increments)
Adjustable dwell time from 0 to 60 minutes
Digital temperature sensor
Soft touch keypad
Long-life DuraWaveTM EMR NeutralTM pure ceramic FAR infrared heaters
Maintenance
Clean the sauna room with a soft wet cloth or sauna cleanser. NEVER use alcohol, benzene
or any other corrosive chemical to clean the unit.
No maintenance or service of electronic components is required unless faulty. Please consult
with the retailer or a qualified electrician if in doubt.
Transportation and storage
Avoid exposure to rain, snow, or other harsh environments during transport.
When in transit, handle the sauna unit with care.
Do not store in damp or humid environments.
Ensure that the unit is installed on a level surface. Uneven surfaces may result in pooling and
water ingress if the unit is installed in a bathroom; this can cause warping of the wooden
floor module.
If the surface on which the unit is installed is uneven and/or likely to be frequently exposed
to moisture, place the unit on levelling supports to raise it above the floor.
Operation
s

5
Model Dimensions (mm) Plans and elevations (same plan for FIR and LUX)
FIR-001 / LUX-001
(1-person
Classic/Luxury)
900 x 900 x 1900
FIR-1 LUX -1
FIR-002 / LUX-002
(2-person
Classic/Luxury)
1200 x 1000 x 1900
FIR-2 LUX -2
FIR-003 / LUX-003
(3-person
Classic/Luxury)
1500 x 1200 x 1900
FIR-3 LUX -3
Specifications
Dimensions

6
Model Dimensions (mm) Plans and elevations (same plan for FIR and LUX)
FIR-004 / LUX-004
(4-person
Classic/Luxury)
1800 x 1200 x 1900
FIR-4 LUX -4
FIR-006 / LUX-006
(6-person
Classic/Luxury)
1500 x 1500 x 1900
FIR-6 LUX -6
Specifications
Dimensions

7
Model Dimensions (mm) Plans and elevations (same plan for FIR and LUX)
FS-002
(3-person Full
Spectrum)
1100 x 900 x 1900
(w x d x h)
FS-003
(3-person Full
Spectrum)
1400 x 1250 x 1900
(w x d x h)
FS-006
(6-person Full
Spectrum)
1800 x 1500 x 1900
(w x d x h)
Specifications
Dimensions

8
Safety
General Safety Rules
All wiring to the sauna heater and accessories must be routed away from any direct
radiation from the sauna heater.
DO NOT place receptacles, flammables, and combustibles inside the sauna unit.
DO NOT spray water or any other liquids onto the interior or exterior surfaces of the sauna
unit.
DO NOT install any plumbing fixtures (such as taps, showers, steam generators etc.) in the
sauna unit.
DO NOT install any locking and/or latching system on the door, as the malfunction of these
parts can cause entrapment inside the sauna.
If located in a bathroom, ensure that the bathroom is well ventilated.
SaunaMed sauna units are only suitable for zone 3 or above (see diagram below). Installing
a sauna in a wet location with insufficient ventilation can result in electrical faults and
w
arranty invalidation.
Zone 1 Zone 2
Zone 0
Zone 2
0.6m
Zone 3
(Outside zones)
2.25m
3m

9
Safety Precautions
DO NOT dry clothes or leave towels in the sauna.
DO NOT touch the heating elements with bare hands or metal tools.
DO NOT touch the light when it is on.
DO NOT enter the sauna when wet.
DO NOT use the sauna if you have or suffer from any of the following conditions:
o Open wounds or serious burns
o Eye conditions
o Heat sensitivity
o Obesity
o Heart disease
o High and/or blood pressure
o Circulatory system problem
o Diabetes
DO NOT use the sauna if you are, or think you may be, pregnant.
DO NOT place pets in the sauna.
DO NOT use the sauna after drinking excessive alcohol.
This appliance is not intended for use by persons (including children) with reduced physical,
sensory, or mental capabilities, or lack of experience and knowledge, unless they have been
given supervision or instruction concerning use of the appliance by a person responsible for
their safety.
Children should be supervised to ensure that they do not play with the appliances.
Be careful when using the appliance in places where there are combustible materials.
DO NOT use in an explosive atmosphere.
Be aware that heat may be conducted to combustible materials that are out of sight.
DO NOT leave the appliance unattended when it is switched on.
Safety
IF THE POWER SUPPLY CABLE IS DAMAGED, IT MUST BE REPLACED BY A QUALIFIED ELECTRICIAN OR
AS A COMPLETE ASSEMBLY AVAILABLE FROM THE MANUFACTURER OR ITS SERVICE AGENT.

10
Assembly and ins
tallation
Pre-assembly checklist
Items required for installation
1 x screwdriver
(included)
1 x spacer for wall
alignment (included)
1 x base panel
1 x front panel
1 x back panel
1 x LHS panel
(2 x LHS panels for FIR/LUX 6)
1 x RHS panel
(2 x RHS panels for FIR/LUX 6)
1 x door handle
1 x set of screws for
installing the door handle
2 x bench units
(4 x bench units for FIR/LUX 4/6)
Roof panel
30 to 60mins assembly
time

11
Assembly and insta
llation
Pre-assembly notes
Two Persons are recommended for safe assembly.
Please pay attention to the following before installation.
Position the sauna on a flat and level surface.
DO NOT splash the exterior with water. If the floor is damp, install a floor separator to keep
the sauna dry.
DO NOT store any flammable objects or chemical substances near the sauna.
The example shown in these instructions is the model FIR-001 (1-person Classic). Other
models vary in design but the procedure remains the same. For diagrams of the 4 and 4-6
person models, please refer to the following 2 pages.

12
Assembly and installat
ion
Using the spacer
To connect the wall sections together easily, use the wooden spacer (refer to images below)
to bring the ‘male’ and ‘female’ connector pins into alignment.
When connecting the side panels to the back panel, ensure that one assembler holds the
back panel in place while the other assembler places the spacer on the edge of the floor
section before placing the side wall on top of the spacer. This will raise the height of the
male pins in the side wall to the same height as the female pins in the back without the need
for lifting.
Once the pins are pushed together and secure, remove the spacer from under the wall
section. The wall panel will drop and lock into place.
Check that both the top and bottom pins are fully connected before moving onto the next
section.
Spacer
Male and female
connector pins

13
Assembly and installation
Assembly sequence for 4-person saunas
There are 2 benches for the 4-person / 4 – 6 person sauna models. Horizontal bench guides
are located on the front and back panel; these will indicate the position of the 2 benches.
When installing the benches, slide the bench modules all the way in until it touches the side
panels on three sides and is securely in place.
Please install the front panel prior to installing the bench heaters on all 4-person models.

14
Assembly and installation
Assembly sequence for 4 – 6 person saunas
Please install the benches before installing the front section when assembling
4 – 6 person saunas.

15
Assembly and installation
Assembly process
Step 1
Position the base section in the location where sauna is to be installed
(please obey safety distances).
Ensure the ‘Front arrow’ sticker is facing up and is to the front.

16
Assembly and installation
Assembly process
Step 2
Position the rear panel with pre-installed back rest at the back of the base section.

17
Assembly and installation
Assembly process
Step 3
Install left hand side panel.
Ensure that hidden internal connectors are aligned. The panel then drops down to lock in place.

18
Assembly and installation
Assembly process
Step 4
Install the right hand side panel.

19
Assembly and installation
Assembly process
Step 5
Install the under bench heater and bench panel as shown in the images below.
Ensure that the heater connections are secure.

20
Assembly process
Step 6
Install front sauna panel with pre hung door making sure that all panels are sat flush with the sauna
base.
Assembly and installation
This manual suits for next models
12
Table of contents
Other SaunaMed Plumbing Product manuals
Popular Plumbing Product manuals by other brands

Symmons
Symmons Duro 362SH Operation & maintenance manual

Pfister
Pfister Pasadena LF-049-PD Maintenance & Care Guide

Franke
Franke 7612979002157 Installation and operating instructions

Grohe
Grohe EUROSTYLE 23 577 installation instructions

Nobili
Nobili OZ113/1T2CS Using instructions

DURAVIT
DURAVIT 791247 00 0 00 1000 Mounting instructions