Scan Coin SC-8100 User manual

SC-8100 Note Counter
User’s Guide
050063-000 Rev.04

i
SC-8100 – 050063-000 Rev.05
Contents
General Information. . . . . . . . . . . . . . . . . . . . . . . . . . . 1
Declaration of Conformity . . . . . . . . . . . . . . . . . . . 1
Environmental Compliance. . . . . . . . . . . . . . . . . . . 1
WEEE Directive (valid in the EU only) . . . . . 1
Responsibility . . . . . . . . . . . . . . . . . . . . . . . . . . . . . 1
Safety Precautions. . . . . . . . . . . . . . . . . . . . . . . . . . . . 2
Introduction . . . . . . . . . . . . . . . . . . . . . . . . . . . . . . . . . 3
Software Version . . . . . . . . . . . . . . . . . . . . . . . . . . . 3
Accessories and Options . . . . . . . . . . . . . . . . . . . . . 3
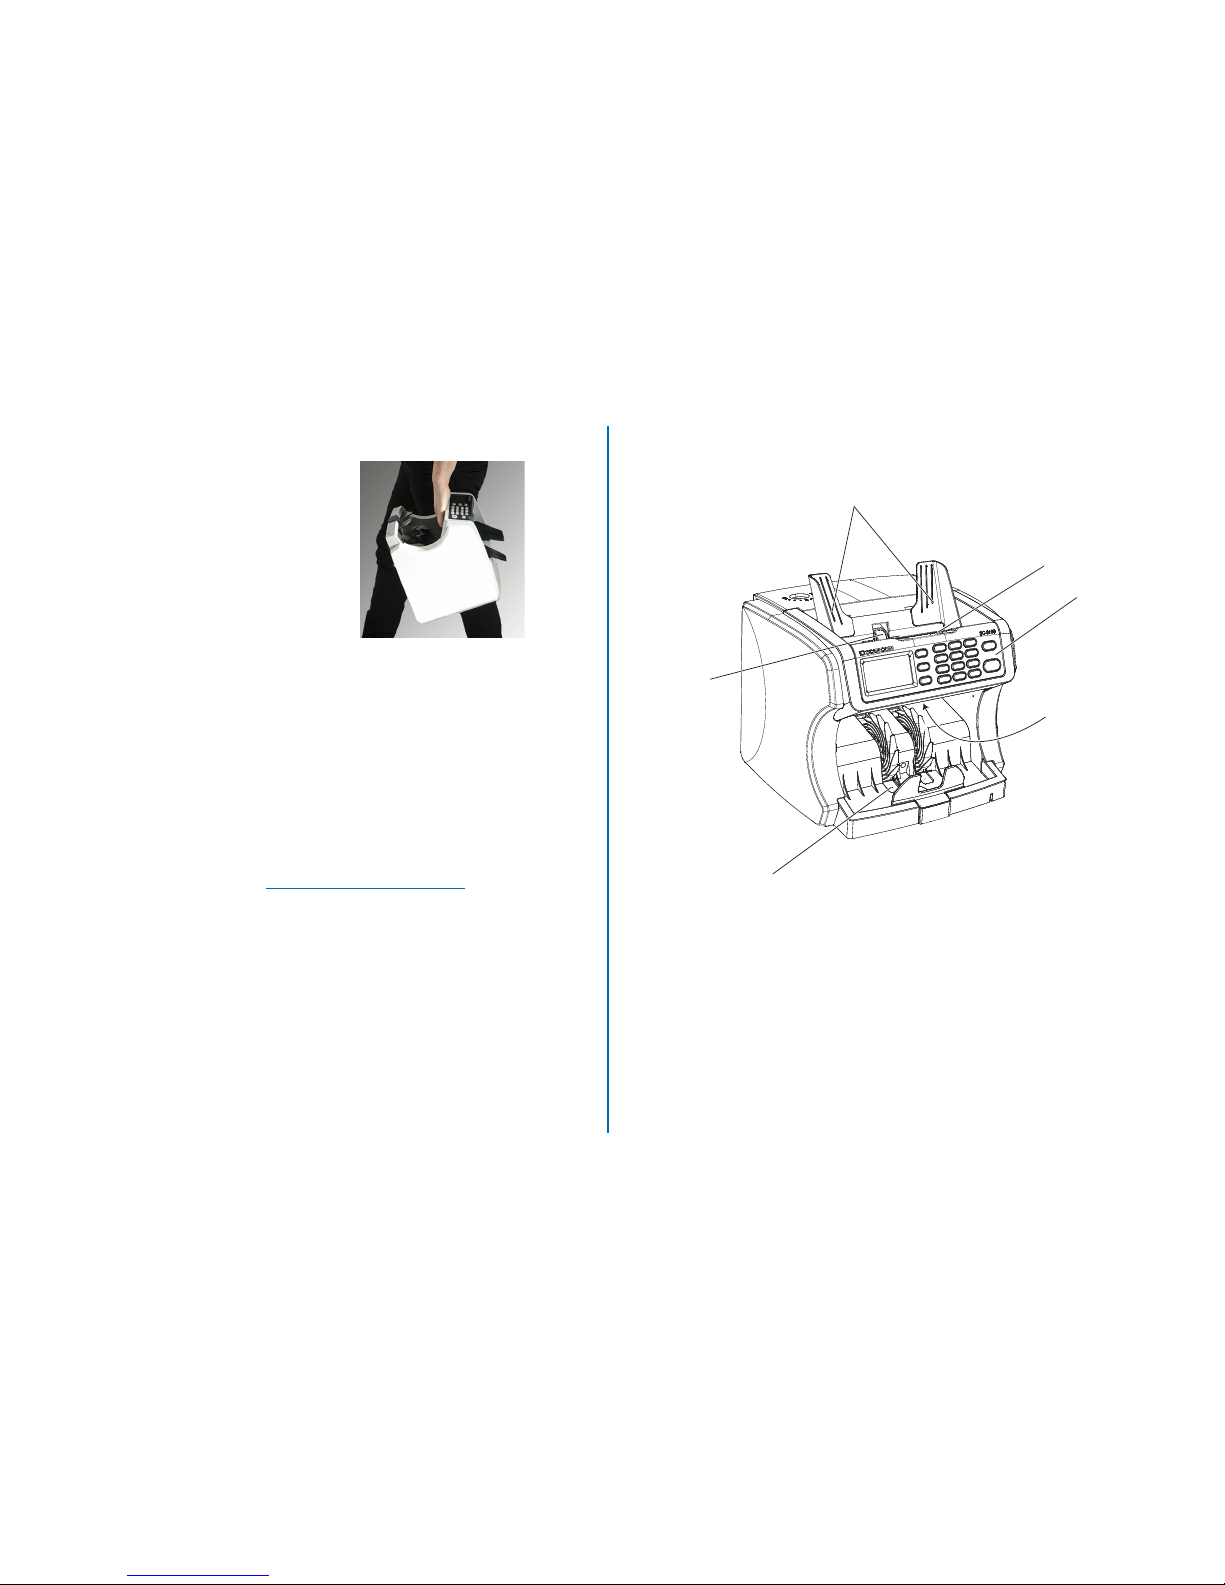
Machine Part Terminology . . . . . . . . . . . . . . . . . . . 3
Front view . . . . . . . . . . . . . . . . . . . . . . . . . . . 3
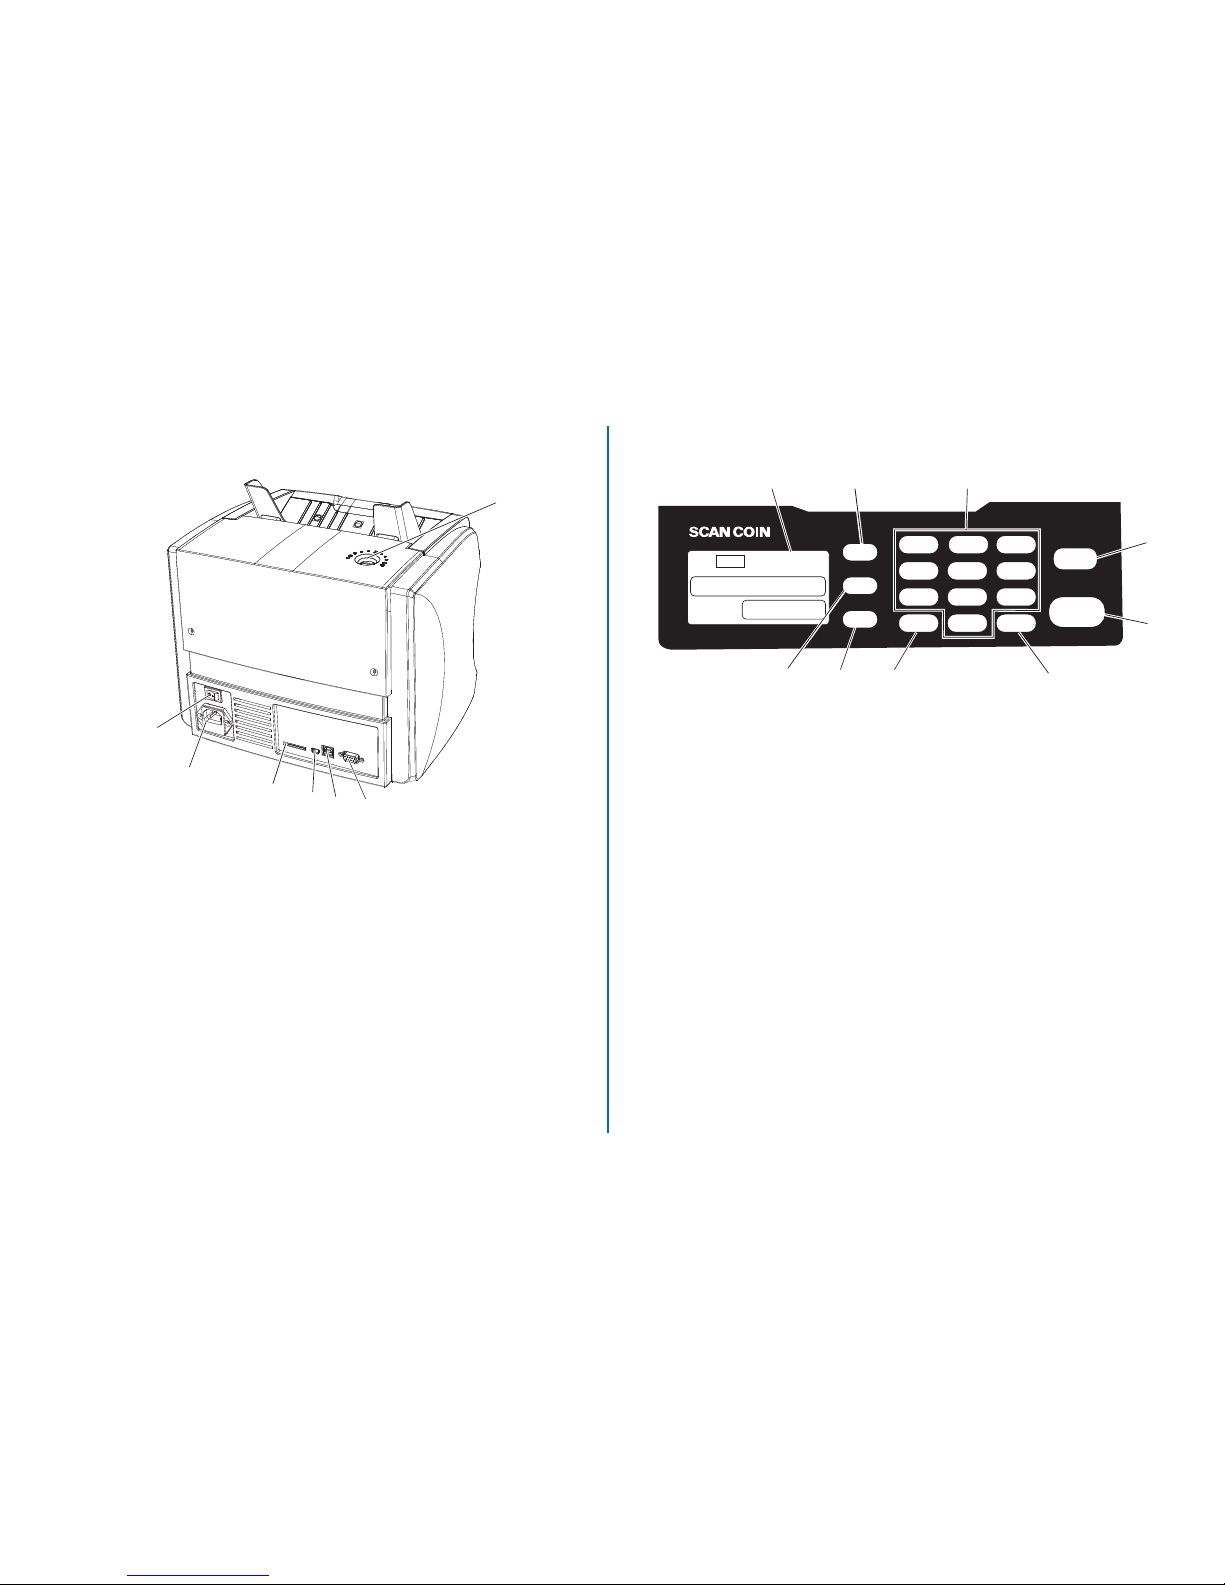
Rear view . . . . . . . . . . . . . . . . . . . . . . . . . . . . 4
Positional References . . . . . . . . . . . . . . . . . . . . . . . . 4
Control Panel . . . . . . . . . . . . . . . . . . . . . . . . . . . . . 4
LCD Screen. . . . . . . . . . . . . . . . . . . . . . . . . . . . . . . 5
Currency mode . . . . . . . . . . . . . . . . . . . . . . . 5
Detection off mode . . . . . . . . . . . . . . . . . . . . 5
SET menu . . . . . . . . . . . . . . . . . . . . . . . . . . . 5
Settings menu . . . . . . . . . . . . . . . . . . . . . . . . 5
Advanced Setting . . . . . . . . . . . . . . . . . . . . . . 5
Installation . . . . . . . . . . . . . . . . . . . . . . . . . . . . . . . . . . . 6
Installing and Removing Note Guides . . . . . . . . . . . 6
Machine Label. . . . . . . . . . . . . . . . . . . . . . . . . . . . . 6
Modes of Operation. . . . . . . . . . . . . . . . . . . . . . . . . . . 7
Counting Modes. . . . . . . . . . . . . . . . . . . . . . . . . . . 7
Operation . . . . . . . . . . . . . . . . . . . . . . . . . . . . . . . . . . . 7
Getting Started . . . . . . . . . . . . . . . . . . . . . . . . . . . . 7
Switching Off . . . . . . . . . . . . . . . . . . . . . . . . . . . . . 7
Inserting Banknotes. . . . . . . . . . . . . . . . . . . . . . . . . 8
Functions . . . . . . . . . . . . . . . . . . . . . . . . . . . . . . . . 8
LCD Screen. . . . . . . . . . . . . . . . . . . . . . . . . . . . . . . 9
Print a Receipt. . . . . . . . . . . . . . . . . . . . . . . . . . . . . 9
Counting. . . . . . . . . . . . . . . . . . . . . . . . . . . . . . . . . 9
Settings in the SET Menu . . . . . . . . . . . . . . . . . . . . 9
Counting Speed. . . . . . . . . . . . . . . . . . . . . . . 9
Settings . . . . . . . . . . . . . . . . . . . . . . . . . . . . . 9
Add . . . . . . . . . . . . . . . . . . . . . . . . . . . . . . . . 9
Auto Start On/Off . . . . . . . . . . . . . . . . . . . 10
Detection Off Mode . . . . . . . . . . . . . . . . . . 10
UV detection . . . . . . . . . . . . . . . . . . . . . . . . 10
Size detection . . . . . . . . . . . . . . . . . . . . . . . 10
MG detection . . . . . . . . . . . . . . . . . . . . . . . 10
Double detection. . . . . . . . . . . . . . . . . . . . . 11
Batch Counting. . . . . . . . . . . . . . . . . . . . . . . . . . . 11
Adjustments . . . . . . . . . . . . . . . . . . . . . . . . . . . . . . . . 11
Contrast . . . . . . . . . . . . . . . . . . . . . . . . . . . . . . . . 11
Back Light. . . . . . . . . . . . . . . . . . . . . . . . . . . . . . . 12
Sounds . . . . . . . . . . . . . . . . . . . . . . . . . . . . . . . . . 12
Alarm . . . . . . . . . . . . . . . . . . . . . . . . . . . . . 12

ii
SC-8100 – 050063-000 Rev.05
Key Beep . . . . . . . . . . . . . . . . . . . . . . . . . . . 12
Exchange Table . . . . . . . . . . . . . . . . . . . . . . . . . . . 12
Advanced Setting. . . . . . . . . . . . . . . . . . . . . . . . . . 13
Switch On mode . . . . . . . . . . . . . . . . . . . . . 13
Print Paper. . . . . . . . . . . . . . . . . . . . . . . . . . 13
Print BPS . . . . . . . . . . . . . . . . . . . . . . . . . . . 13
Stacker Full Quantity. . . . . . . . . . . . . . . . . . 14
List Mode Order . . . . . . . . . . . . . . . . . . . . . 14
Sort Mode . . . . . . . . . . . . . . . . . . . . . . . . . . 14
Batch Add Mode . . . . . . . . . . . . . . . . . . . . . 15
Device Information . . . . . . . . . . . . . . . . . . . . . . . . 15
Thickness Setting. . . . . . . . . . . . . . . . . . . . . . . . . . 15
Troubleshooting . . . . . . . . . . . . . . . . . . . . . . . . . . . . . 16
Maintenance . . . . . . . . . . . . . . . . . . . . . . . . . . . . . . . .17
Cleaning . . . . . . . . . . . . . . . . . . . . . . . . . . . . . . . . 17
SD Update . . . . . . . . . . . . . . . . . . . . . . . . . . . . . . 17
Technical Data. . . . . . . . . . . . . . . . . . . . . . . . . . . . . . . 18

1
SC-8100 – 050063-000 Rev.05
General Information
SUZOHAPP reserves the right to revise and improve its products as it sees
fit. This publication describes this product at the time of publication and
may not reflect the product in the future.
This publication, or parts thereof, may not be reproduced in any form
whatsoever other than for the purchaser’s personal use without the express
permission of SUZOHAPP.
Declaration of Conformity
We, SUZOHAPP, declare under our sole responsibility, that the product in
this manual, is in conformity with the following standards and/or other
normative documents:
• EN 60 950-1:2006/A11:2009/A1:2010/A12:2011;
• EN 61 000-3-2:2006/A1:2009/A2:2009;
• EN 61 000-3-3:2008;
• EN 55 022:2010;
• EN 55 024:2010;
following the provisions of:
• Low Voltage Directive 2006/95/EC;
• EMC Directive 2004/108/EC;
• RoHS 2 Restriction of Hazardous Substances Directive 2011/65/EU.
Environmental Compliance
WEEE Directive (valid in the EU only)
Waste Electrical and Electronic Equipment Directive 2012/19/EU.
Equipment marked with this symbol must be treated
separately and in accordance with any local legislation
requiring proper treatment, recovery and recycling of used
electrical and electronic equipment.
Contact your SUZOHAPP representative for further details.
Responsibility
The supplier of the equipment accepts no responsibility for injury or
damage to personnel or equipment if the equipment is altered in any way
or used in a manner for which it was not intended at the time of delivery.
If the conditions for use of the equipment are changed, the supplier must
be contacted or the declaration of conformity is invalidated.

2
SC-8100 – 050063-000 Rev.05
Safety Precautions
This guide contains hazard information which must be read by all users.
The hazard information is presented as a warning as follows:
WARNING!
Risk of personal injury!
Warnings indicate a potential hazard to the health and safety of
users. They clearly state the nature of the hazard and how to
avoid it. The warning symbols appear at their points of
application in this guide.
Caution!
Cautions indicate a hazard to the machine, but not a danger to personnel.
They clearly state how to avoid the hazard. They appear at their points of
application in this guide.
WARNING!
Risk of electric shock!
Lethal voltages exist in the machine when connected to mains
power. Make sure you disconnect the power cord before
cleaning or servicing the machine.
WARNING!
Risk of electric shock!
The machine is of metal construction and must therefore
always be earthed to the supply. Ensure that both the plug on
the supply lead and the supply source are earthed. This is a
requirement for this type of equipment and if not adhered to
will contravene the national and international standards of
Health and Safety in the work place.
WARNING!
Risk of jamming!
This machine contains moving parts and sharp edges. Always be
careful. Do not touch the components inside the machine while
it is running.
WARNING!
Risk of entanglement!
Keep long sleeves, ties, necklaces and long hair that can trigger
the autostart sensor away from the machine. If the autostart
function is enabled, the machine may start.

3
SC-8100 – 050063-000 Rev.05
Introduction
The SC-8100 is a compact note counter, light
to carry and easy to operate. The easy access
to the note path and sensor area makes it
simple to clean the area and to remove
jammed notes.
Notes to be counted are placed on the
hopper on top of the machine. As the notes
are fed into the machine they are counted
and then collected onto the stacker pocket at
the bottom front.
Updates are done by inserting an SD card in the SD card slot at the back
of the SC-8100. Machine upgrades, for example adding another currency, is
done by a technician through the USB connection and a PC software. Five
different currencies can be installed simultaneously.
The sensors module include:
•IR–InfraredSensor
•MG–MagneticSensor
• UV – Ultra Violet Sensor
Software Version
This User’s guide relates to main software version 001.108. For information
about the currency version see “Device Information” on page 15.
Accessories and Options
For information about the accessories and options available for this
machine, contact your SUZOHAPP representative.
Machine Part Terminology
Front view
1
2
3
4
5
6
1 Stacker pocket
2 Kicker roller
3 Note guides
4 Hopper
5Controlpanel
6 Carrying handle

4
SC-8100 – 050063-000 Rev.05
Rear view
1
2
3456
7
1Mainswitch
2Mainssocket
3SDcardslot
4Displayport
5USBdeviceport
6 Serial printer port
7 Thickness adjustment knob
Positional References
Unless stated otherwise, positions and directions such as left, right, upper,
lower, rear, clockwise and counterclockwise are given with respect to the
machine when viewed from the front.
Control Panel
SC 8100
12 3
4 5 6
7 8 9
0
CUR SET
DISP
MODE
PRNT
C
START
EUR
MIX
25
€
0
0
pcs
12 3
4
5
6
78
9
1 LCD screen
2 DISP - select screen view/left and up navigation
3Numberkeys
4 Clear - revert to the previous setting/back navigation
5START
6SET-SETmenu
7 CUR - select a currency or deactivate the detection
8 PRNT - confirm a selection
9 MODE - select a sorting mode/right and down navigation

5
SC-8100 – 050063-000 Rev.05
LCD Screen
Currency mode
EUR
MIX
řŘŘ
€
ř
ř
pcs
1
234
5
6
1Currency
2Sortingmode
3Addmode
4Batch
5Value
6Amount
Detection off mode
0
PCS
D1 S3
12 3 4
5
1UVdetection
2MGdetection
3Doubledetection
4 Size detection
5Amount
SET menu
UV
Size
MG
SET: Exit
P2
7:
8:
9:
S1
Page 2
Speed
Settings
ADD
SET: Exit
Ś
:
Ŝ
:
ŝ
:
Ş
:
Auto
Medium
Off
On
Př
Page 1
Page 2 of the SET menu is only
available when the detection is
deactivated - Detection Off
mode. Toggle between the two
pages with DISP.
Settings menu
^ĞƫŶŐƐ
89
10
11
12
^ĞƫŶŐƐ
Ŝs
12 34
5
6
7
1Contrast
2Backlight
3Sounds
4 Exchange table
5 Confirm a selection
6 Right navigation
7Leftnavigation
8Advancedsetting
9 Device information
10 Confirm a selection
11 Right navigation
12 Left navigation
Advanced Setting
Advanced ^ĞƫŶŐ
Switch On Mode
Print Paper
Print BPS
Page 1
Advanced ^ĞƫŶŐ
Stacker Full Qty
List Mode Order
Sort Mode
Page 2
Advanced ^ĞƫŶŐ
Batch Add Mode
Page 3

6
SC-8100 – 050063-000 Rev.05
Installation
WARNING!
Risk of electric shock!
Follow the “Safety Precautions” on page 2.
Caution!
The machine must be protected by a fuse or circuit breaker in the electrical
circuit.
The machine must be installed by an authorised SUZOHAPP
representative.
Please also note the followingwhen installing the machine:
• Operating temperature 15–35 °C
• Operating humidity 20–90% R.H.
(non-condensing)
Do not place the machine close to any radiators. Make sure there is some
free space around the machine to allow the air to circulate.
Place the machine in a clean environment and on a stable place.
The socket-outlet shall be installed near the equipment and shall be easily
accessible.
If the plug on the supply lead to the machine has a fuse, make sure it has
the correct rating in amps.
Although this machine has been tested and complies with the national and
international standards/regulations, it is recommended that no equipment
which generates a high level of electromagnetic interference (EMI) or
vibration is placed close to the machine.
Installing and Removing Note Guides
Install and remove the note guides according to the pictures below.
Rear view Press forward to release the guide
Machine Label
The label below is an example of the information available on the
machine.
100-240 VAC
0.350-0.175 A
60/50 HZ
M/c No.
Serial No.
Assembled 2014 in China
Fuse 5 A
MALMÖ-SWEDEN
RoHS
SD Card
SC 8100
Ext. Disp PC COM1
8910 11
1
2
3
4
5
67
12
13
14
15
16
1Machinetype
2MachineNo.
3SerialNo.
4 WEEE-symbol*
5CE-symbol
6FC-symbol
7SDCard
8RoHS
9Ext.Disp
10 PC
11 COM1
12 Year and place of
manufacture
13 Fuse
14 Frequency
15 Current consumption
16 Supply voltage
* See “Environmental Compliance” on page 1.

7
SC-8100 – 050063-000 Rev.05
Modes of Operation
Counting Modes
•Mixedcounting
Counts a bundle of mixed genuine banknotes of the selected currency.
• Single counting (DD)
Counts only the first denomination detected, all others are rejected.
•Freecounting
Counts a number of documents using the sensors activated in the SET
and MODE function.
Note!
The first banknote in a bundle is always the reference note.
Operation
WARNING!
Risk of jamming!
Follow the “Safety Precautions” on page 2.
Caution!
Do not press the buttons with sharp objects.
Getting Started
a) Connect the mains power cord to the mains socket at the rear of the
machine. See, “Rear view” on page 4.
b) Start the machine by setting the main switch to on (I).
Note!
Images are only examples and can be different depending on the setup.
Switching Off
a) Confirm that all counting results are saved.
b) Switch off the machine by setting the main switch to off (0).

8
SC-8100 – 050063-000 Rev.05
Inserting Banknotes
Avoid counting wet, dirty or spoiled banknotes.
a) Check for foreign matter mixed with the banknotes for example paper
chips, rubber bands, clips and dust.
b) Straighten the folds or corners of the banknotes before insertion.
c) Put the banknotes on the hopper as shown below.
INCORRECT
CORRECT
d) Adjust the note guides according to the longest banknote in the stack.
Functions
By default counting starts when the banknotes are placed on the hopper.
• To change the setup to start counting by pressing START
see “Auto Start On/Off” on page 10.
Note!
Make changes only when there is no banknote on the hopper and in the
stacker. However, the functions DISP and PRNT can be used when
banknotes are in the machine.
Function Description
DISP
DISP
Select the type of display.
Left and up navigation.
MODE
MODE
Select a sorting mode. Sort modes are set in the Advanced
setting menu see “Sort Mode” on page 14.
Right and down navigation.
PRNT
PRNT
Print a receipt.
Confirm selections.
SET
SET
Displays the SET menu in Currency mode and Detection
Off mode.
2
Number keys
Select menu items.
Enter digits.
CUR
CUR
Select between the installed Currency modes and
the Detection Off mode.
C
C
Clear the result.
Delete the last input.
Return to the previous menu.
START
START
Start counting manually.

9
SC-8100 – 050063-000 Rev.05
LCD Screen
EUR
MIX
Śŝ
Ř
Total:
EUR
MIX
Śŝ
€
Ř
Ř
pcs
The Main view of the screen displays the
value and number of counted banknotes.
The List view displays the information as
a list with information on value, quantity
and number of counted banknotes.
• Press DISP to toggle between the
two views.
Print a Receipt
a) Connect a thermal printer to the
printer port. See “Rear view” on page 4.
b) Press PRNT.
The receipt is printed.
Counting
a)
EUR
MIX
Śŝ
€
Ř
Ř
pcs
OFF
Śŝ
Ř
PCS
Press CUR to select a currency or
deactivate the detection (OFF) -
Detection Off mode.
Note!
The function of CUR is only available in
the Main view.
b) Press MODE to select a sorting
mode.
The sorting modes available
depends on the settings done in the
Advanced Setting see “Sort Mode”
on page 14.
c) Start counting.
Note!
Currency and value icons are displayed when a currency is selected and
detection is activated.
When Detection Off mode is selected only the quantity will be displayed.
Settings in the SET Menu
Note!
When Detection Off mode is selected press DISP to toggle between the
first (P1) and second page (P2) of the SET menu, see “Detection Off
Mode” on page 10.
Speed
Settings
ADD
SET: Exit
Ś:
Ŝ:
ŝ:
Ş:Auto
Low
On
Off
Př
Counting Speed
a) Press SET.
Page 1 (P1) of the SET menu is
displayed.
b) Press 2several times to toggle
between the three counting speeds
Low, Medium and High.
c) Press SET to exit.
Settings
For information about the menu option Settings see “Adjustments” on
page 11.
Add
EUR
MIX
řŘŘ
€
ř
ř
pcs
When Add is activated the counting
results of different bundles are
accumulated automatically.
a) Press SET.
b) Press 5to set Add On or Off.
c) Press SET to exit.
The Add icon is displayed when Add is activated.

10
SC-8100 – 050063-000 Rev.05
Auto Start On/Off
Activate Auto Start to start counting
when the banknotes are placed on the
hopper.
Speed
Settings
ADD
SET: Exit
Ś:
Ŝ:
ŝ:
Ş:Auto
Low
On
Off
Př
a) Press SET.
b) Press 6to turn on or off Auto Start.
c) Press SET to exit.
Detection Off Mode
0
PCS
D1 S3
When the detection is deactivated the UV, Size and MG detections can be
activated if needed. Settings can be done in the Main view or via the SET
menu.
In the Main view:
Press DISP or PRNT to activate UV and MG respectively.
In the SET menu:
a)
OFF
UV
S1
OFF
Size
MG
SET: Exit
P2
7:
8:
9:
UV
Size
MG
SET: Exit
P2
7:
8:
9:
S3
Press SET.
Page 2 (P2) of the SET menu is
displayed.
b) Press 7, 8or 9to activate UV, Size
and MG respectively.
OFF - the detection is deactivated.
c) Press SET to exit.
Note!
Press DISP to go to the first page (P1)
of the SET menu.
UV detection
Press 7/DISP to select one of the two UV detections.
UV detection.
UV detection. The UV strength
is defined by the first banknote
of the batch.
Size detection
a) Press SET
b) Press 8several times to toggle between the different levels of Size
detection.
There are level S1 to level S7 to select between. Level S7 is the most
strict size detection level. Default setting is S3.
0
PCS
D1 S3
MG detection
Press 9/PRNT to activate the magnetic detection.
Magnetic detection icon.

11
SC-8100 – 050063-000 Rev.05
Double detection
Press MODE to toggle between the different levels D1 to D5.
Default setting is D2.
Level D5 is the strictest.
0
PCS
D1 S3
Batch Counting
Count a preset number of banknotes from 1 to 999.
In the counting screen:
a) Press 0–9to enter the desired
quantity.
EUR
MIX
řŝŘ
€
Ř
Ř
pcs
The preset batch is displayed in the
upper right corner of the screen.
b) Start counting.
To clear the batch:
a) Press START.
b) Press 0.
c) Press START to confirm.
To cancel the batch and revert to the previous setting:
• Press C.
Adjustments
In the Settings menu different adjustments can be done.
a) Press SET.
Speed
Settings
ADD
SET: Exit
Ś:
Ŝ:
ŝ:
Ş:Auto
Low
On
Off
Př
b) Press 4to enter the Settings menu.
c) To navigate in the menus use
DISP ( left or up),
MODE (right or down) and
PRNT (confirm).
SC 8100
12 3
4 5 6
7 8 9
0
CUR SET
DISP
MODE
PRNT
C
START
^ĞƫŶŐƐ
4
s
Contrast
Adjust the contrast of the LCD screen from level 1 (light) to level 7 (dark).
a) Highlight the Contrast icon.
^ĞƫŶŐƐ
Ŝs
Contrast
Ŝ
b) Press PRNT.
c) Adjust the contrast up or down with
DISP or MODE.
d) Press PRNT to confirm and return
to the Settings menu.
Press Cto revert to the previous
setting and return to the Settings
menu.
e) Press Cto return to the Main view.

12
SC-8100 – 050063-000 Rev.05
Back Light
^ĞƫŶŐƐ
Ŝs
Back Light
1
0
on
a) Highlight the Back Light icon
b) Press PRNT.
c) Set the back light on or off with
DISP or MODE.
d) Press PRNT to confirm and return
to the Settings menu.
Press Cto revert to the previous
setting and return to the Settings
menu.
e) Press Cto return to the Main view.
Sounds
Suspicious
Alarm On
ůĂƌŵKī
Alarm
Sounds
Alarm
Key Beep
^ĞƫŶŐƐ
Ŝs
a) Highlight the Sounds icon
b) Press PRNT.
Alarm
Alarm gives a warning when a suspicious
banknote is detected.
a) Highlight Alarm.
b) Press PRNT.
c) Use up (DISP) or down (MODE) in
the list and make a selection.
Alarm Off - warning is turned off.
Suspicious - alarm is turned on and
gives a warning when there is a
suspicious banknotes.
Alarm On - alarm is turned on and
gives a warning when any notice occurs.
d) Press PRNT to confirm and return to the Sounds menu.
Press Cto revert to the previous setting and return to the Sounds
menu.
e) Press Cto return to the Settings menu.
f) Press Conce again to return to the Main view.
Key Beep
Sounds
Alarm
Key Beep
Key Beep
1
0
ON
a) Highlight Key Beep.
b) Press PRNT.
c) Set the back light on or off with
DISP or MODE.
d) Press PRNT to confirm.
Press Cto revert to the previous
setting.
e) Press Cto return to the Settings
menu.
f) Press Conce again to return to the
Main view.
Exchange Table
^ĞƫŶŐƐ
Ŝ
s
Exchange Table
EUR: řŘ
USD: řŘ
It is possible to set an exchange rate in
a local currency for a foreign currency.
The result is only shown on the printed
receipt (see “Print a Receipt” on
page 9).
a) Highlight the Exchange Table
icon.
b) Press PRNT.
c) Press MODE to highlight the
currency for which a currency will
be set.
d) Press 0–9 to insert the current rate
(up to six digits).
Press PRNT for the decimal separator.
Press DISP to delete the last digit.
e) Press START to return to the Settings menu.
f) Press Cto return to the Main view.

13
SC-8100 – 050063-000 Rev.05
Advanced Setting
^ĞƫŶŐƐ
Advanced ^ĞƫŶŐ
Switch On Mode
Print Paper
Print BPS
In the Advanced Setting there are
several different setups.
a) Highlight the Advanced Setting
icon.
b) Press PRNT
c) To navigate in the menus use
DISP (up),
MODE (down) and
PRNT (confirm).
d) Press Cto return to the Settings
menu.
e) Press Conce again to return to the
Main view.
Switch On mode
Advanced ^ĞƫŶŐ
Switch On Mode
Print Paper
Print BPS
Switch On Mode
Default
dƵƌŶŽī^ƚĂƚƵƐ
Configure a preferable restart up.
a) Highlight Switch On Mode.
b) Press PRNT.
c) Select the desired mode.
Default - starting up the machine
with factory default settings.
Turn off Status - starting up the
machine with the last settings.
d) Press PRNT to confirm.
Press Cto revert to the previous
setting.
e) Press Cto return to the Settings menu.
Print Paper
Print Paper
W57.5
W79.5
Advanced ^ĞƫŶŐ
Switch On Mode
Print Paper
Print BPS
Setup the paper size of the connected
thermal printer.
a) Highlight Print Paper.
b) Press PRNT.
c) Select the paper size.
W57.5: 2 inches paper.
W79.5: 3 inches paper (default).
d) Press PRNT to confirm.
Press Cto revert to the previous
setting.
e) Press Cto return to the Settings
menu.
Print BPS
Print BPS
9600
38400
115200
Advanced ^ĞƫŶŐ
Switch On Mode
Print Paper
Print BPS
Setup the baud rate for printing out
receipts.
a) Highlight Print BPS.
b) Press PRNT.
c) Select the baud rate.
9600: 9 600 bps.
38400: 38 400 bps.
115200: 115 200 bps (default).
d) Press PRNT to confirm.
Press Cto revert to the previous
setting.
e) Press Cto return to the Settings menu.

14
SC-8100 – 050063-000 Rev.05
Stacker Full Quantity
Stacker Full Qty
50
100
150
200
Advanced ^ĞƫŶŐ
List Mode Order
Sort Mode
Stacker Full Qty
Setup the maximum capacity of
banknotes.
a) Highlight Stacker Full Qty.
b) Press PRNT.
c) Select the desired maximum
capacity.
50:50pcs
100: 100 pcs
150: 150 pcs
200: 200 pcs (default)
d) Press PRNT to confirm.
Press Cto revert to the previous setting.
e) Press Cto return to the Settings menu.
List Mode Order
List Mode Order
Large to Small
Small to Large
Advanced ^ĞƫŶŐ
List Mode Order
Sort Mode
Stacker Full Qty
Setup the sort order of the list when the
LCD screen is in List Mode see “LCD
Screen” on page 5.
a) Highlight List Mode Order.
b) Press PRNT.
c) Select the desired sort order Small
to Large (default) or Large to
Small.
d) Press PRNT to confirm.
Press Cto revert to the previous
setting.
e) Press Cto return to the Settings
menu.
Sort Mode
Sort Mode
DD
Face+DD
Ornt+DD
Emisn+DD
Sort
Face
Ornt
Emisn
Off
Off
Off
Off
Advanced ^ĞƫŶŐ
List Mode Order
Sort Mode
Stacker Full Qty
Setup the sorting mode. (Default sorting
mode is DD.)
a) Highlight Sort Mode.
b) Press PRNT.
c) Use: DISP (up), or MODE
(down) to select a row
d) Press 4or 6to make a selection in
the current row.
DD
Banknotes are counted with the
denomination of the first detected
genuine banknote. Counting stops
when a different value or suspicious banknote is detected.
Sort
Banknotes are counted with the denomination of the first detected
genuine banknote. Counting stops when a different value or suspicious
banknote is detected. The counting is then continued with the
denomination of the second detected genuine banknote.
Face
Banknotes are counted with the face of the first detected genuine
banknote. Counting stops when a different face or suspicious
banknote is detected.
Ornt
Banknotes are counted with the orientation of the first detected
genuine banknote. Counting stops when a different orientation or
suspicious banknote is detected.
Emisn
Banknotes are counted with the emission of the first detected genuine
banknote. Counting stops when a different emission or suspicious
banknote i detected.
e) Press PRNT to confirm.
Press Cto revert to the previous setting.
f) Press Cto return to the Settings menu.

15
SC-8100 – 050063-000 Rev.05
Batch Add Mode
Batch Add Mode
1
0
on
Advanced ^ĞƫŶŐ
Batch Add Mode
When Batch Add Mode is activated the
current sum of banknotes are added to
the total counting.
a) Highlight Batch Add Mode.
b) Press PRNT.
c) Set Batch Add Mode on or off with
DISP or MODE.
d) Press PRNT to confirm.
Press Cto revert to the previous
setting.
e) Press Cto return to the Settings
menu.
Device Information
^ĞƫŶŐƐ
EUR: ŘŘřŘŘŠ
USD: ŘŘřřŘś
s
TN
FV
MD
SN
CN
A
IRTE
NC 3501–B02NE
001.054
2013.10.10
001691
8204
001 .002
001 .002
:
:
:
:
:
:
:
s
To retrieve the currency version and
machine detail information.
a) Highlight the Device Information
icon.
b) Press PRNT.
The first page displays the currency
version.
c) Press DISP or MODE to go to the
second page which displays machine
detail information:
TN: machine type name
FV: firmware version
MD: production date
SN: serial number
CN: total count
d) Press Cto return to the Settings
menu.
Thickness Setting
Thickness setting must always be adjusted to achieve a proper and smooth
feeding of banknotes/documents. The thickness is adjusted with the
thickness adjustment knob found on the top of the machine, see “Rear
view” on page 4.
• If the machine stops frequently and displays Error-Double Sheet:
Turn the adjustment knob slightly counter-clockwise to decrease the
gap between the feed rollers.
• If the banknotes run too hard or too slow:
Turn the adjustment knob clockwise to increase the gap between the
feed rollers.

16
SC-8100 – 050063-000 Rev.05
Troubleshooting
If a fault remains or reoccurs, contact your SUZOHAPP representative.
Error Message Description/Action
Error-Dimension Odd sized banknote/document detected.
Check and remove the banknote.
Error-Denomination Wrong denomination detected in DD mode.
Error-Double Sheet Double fed banknotes/documents detected.
Check and recount all banknotes/docu-
ments.
Adjust the thickness, see “Thickness Setting”
on page 15.
Error Emission Wrong emission detected in emission sorting
mode.
Error-Paper Jam A banknote/document is stuck inside the
machine.
Open up and clear the jammed banknote/
document.
Make sure no pieces remain
Error Image Image of banknote not found in database.
Can be caused by dirty or damaged bank-
notes.
Error Ornt Incorrect orientation detected in orientation
sorting mode.
Error-SlantNote Skew fed banknote/document.
If the problem reoccurs - check thickness
adjustment and/or check for dirt in the
machine. See “Thickness Setting” on page 15
and “Cleaning” on page 17.
Error-Timeout Speed too high when connected to PC Suite.
Reduce speed to Medium.
Error Wrong Face Incorrect face detected in face sorting.
Remove the banknote.
Unknown document Unknown document detected in the stacker.
Remove the document.
Reject Reason Message Description/Action
Batch not completed Final batch in bundle did not reach the set
batch size.
Chain Error Chain fed banknotes/documents detected.
Check banknotes/documents and recount all
banknotes/documents.
Check Bill Path Problems detected in bill path.
Open up the bill path and check all sensors
for dirt and pieces of paper.
Clean the sensors.
See “Cleaning” on page 17.
Check Stacker Check and remove all banknotes/documents
from the stacker.
Check Hopper Check and remove all banknotes/documents
from the hopper.
Remove stacker notes Banknotes/documents detected in stacker.
Remove all banknotes/documents.
Stacker Full The number of banknotes/documents in the
stacker have reached the maximum set quan-
tity.
Change and set correct batch size.
SuspiciousNote-IR Banknote with IR image not found, suspect
banknote.
SuspiciousNote-MG Banknote with MG image not found, suspect
banknote.
SuspiciousNote-UV Banknote with UV image not found, suspect
banknote.
Wrong Ornt Detected a banknote with the wrong
orientation.
Remove the banknote.

17
SC-8100 – 050063-000 Rev.05
Maintenance
Cleaning
Clean the machine daily to prevent
from accumulation of dirt, since this
may cause too many banknotes to be
rejected.
Use an air brush to blow away dirt
from the sensors.
Caution!
Only use cleaning materials and tools
which do not scratch.
a) Clean the outside of the machine
with a soft cotton towel.
b) Open up the bill path with a
firm drag with one hand.
c) Clean the bill path with a brush
or a soft cotton towel.
SD Update
a)
^ĞƫŶŐƐ
EUR: ŘŘřŘŘŠ
USD: ŘŘřřŘś
s
Speed
Settings
ADD
SET: Exit
Ś:
Ŝ:
ŝ:
Ş:Auto
Low
On
Off
Př
OK
Please reset machine
NG
Sd Upgrade
Upgrading
Please wait for upgrading
Press SET.
b) Press 4to enter the Settings menu.
c) Highlight Device Information.
d) Press PRNT.
e) Insert the SD card in the SD card
slot. See “Rear view” on page 4.
f) Press PRNT.
– The upgrade starts.
– Wait approximately 3 minutes.
– Do not operate or turn off the
machine.
– When the upgrade is finished the
screen will display OK.
g) Reset the machine by switching it
off and then on again.
The machine will start with the
normal start screen.
Note!
If the upgrade does not work the screen
will display NG. Do the upgrade one
more time. If it still does not work
contact your SCAN COIN
representative.
Table of contents