ScentAir ScentWave SWD1001 User manual

ScentWave™ SWD1001
SCENT DELIVERY SYSTEM
Installation and Operation Instructions

2
PART#-31600035-LIT-SWD1001-MANUAL-REV.A
TABLE OF CONTENTS
Required Tools .............................................................................................................2
About..........................................................................................................................2
System Overview..........................................................................................................2
Default Settings............................................................................................................ 3
Installation
Determine Mounting Locations..................................................................................4
Wall Mount Plate Installation..................................................................................... 4
Wall Mount Arm Installation......................................................................................5
Cartridge Installation................................................................................................ 6
System Control Unit
Functions.................................................................................................................7
Operation ...............................................................................................................7
REQUIRED TOOLS
• Phillips Screwdriver
• Pencil
• Drill/Roto-Hammer
• 1/4” Drill Bit/Masonry Bit
ABOUT
The ScentWave™ is a simple and flexible solution that is ideal for creating impression-based
scent experiences in any environment. It uses a dry-air technology that releases fragrance
without sprays, aerosols or messy oils. Adjustable duration and intensity settings and
built-in 24-hour timer make it easy to customize the scent output for any environment. The
ScentWave™ offers multiple installation options and is easy to maintain.
Each ScentWave™ functions by loading a scent cartridge. These cartridges are easily
replaced, enabling you to change scents to coordinate with new themes or seasons.
SYSTEM OVERVIEW
1. ScentWave™ System
2. Fragrance Cartridge
3. Power Plug
4. Wall Mounting Plate
5.
6. Wall Mounting Arm
7. 4x #8 Plastic Drywall Anchor
8. 4x Wood / Machine Screw
9. 4x #6 Hex Head slotted screw
10. Lock Nut 12
3 4 5
7 8 9
6
10

3
PART#-31600035-LIT-SWD1001-MANUAL-REV.A
INSTALLATION
Determine Proper Mounting Location
Always review the air flow characteristics of the property before starting an installation. First
identify the location to be scented and then locate the supply air vents near the area to be
scented. The ScentWave™ should be located between these two locations to ensure airflow
will carry the fragrance to the desired location.
The ScentWave™ is best positioned near the entrace with the highest traffic so guests
experience scent as they first enter the space.
The ScentWave™ should NOT be located near:
•Exhaust Vent •Open Doors •Open windows •HVAC Return Grill
The system should be mounted so that the output crosses the path of airflow if possible.
The ScentWave™ system comes standard with a wall mounting plate, wall mounting arm
and hardware for each. Mount the ScentWave™ in a discrete location, out of the reach of
children. A good rule of thumb is to mount low to the ground when possible
1
Main Entrance
2
3
Secondary Entrance
DEFAULT SETTINGS
Your ScentWave™ system comes pre-programmed with the Time of Day set to Eastern
Standard Time (UTC -5) and Event 1 programmed to run on AUTO for 60 seconds ON and
60 seconds OFF, begining at 9:00am and ending at 5:00pm. The fragrance knob will be
at the 12:00 posiiton. This default setting will ensure your scent cartridge lasts 30 days. The
ScentWave™ functions best when the cartridge is changed everytime you receive a shipment.
Each of these settings can be changed to help create a scented environment best suited
for your space. You can also program Event 2 to create another scent event at a different
time of the day or delete the default settings to create your own. The combination of proper
placement and programming of the ScentWave™ system can help create a welcoming
environment in any space.

4
PART#-31600035-LIT-SWD1001-MANUAL-REV.A
Wall Mounting Plate Installation
1. Install preparation: FIG. A
• Ensure that the wall mounting plate is level and mark two hole locations with
a pencil. Choose the best two hole options, choosing either the small or large
openings.
• Use your screwdriver to drive the provided white plastic anchors into the wall.
• Drive the screws into the anchors leaving .25” (7.5mm) between the top of the
screw and the wall.
FIG. A
2. Attach the Mounting Arm to the ScentWave™: FIG. B
• Attach the mounting plate to the bottom of the ScentWave™ using the provided
plate screws and pilot holes.
.25” (7.5mm)
3. Attach the assembly to the wall: FIG. C
• Line up the slots in the mounting plate with the screws in the wall and slide into
place.
• Adjust the wall screws as necessary for a tight fit.
FIG. B
4. Power the ScentWave™
• Plug the power cord into both the wall outlet and ScentWave™.
• Extra power cord can should be secured out of sight.
FIG. C

5
PART#-31600035-LIT-SWD1001-MANUAL-REV.A
Wall Mounting Arm Installation
1. Install preparation: FIG. D
• Remove the mounting ring from the base by loosening the retainer ring on the
universal mount arm.
• Hold the base in the desired location on the wall, mark three screw holes with
pencil.
• Use your screwdriver to drive the provided white plastic anchors into the wall.
2. Attach the Mounting Arm to the ScentWave™: FIG. E
• Attach the mounting plate to the pivot end of the wall mounting bracket through
the center hole using the provided lock nut and screw.
• Attach the mounting plate assembly to the bottom of the ScentWave™ using the
provided plate screws and pilot holes.
3. Attach the assembly to the wall: FIG. F
• Hold the mounting arm base over the anchors and use your screwdriver to drive
the screws into the anchors
• Attach the wall mounting arm to the base using the retainer ring on the arm.
• Adjust the pivot end as necessary for a correct angle and secure fit.
4. Power the ScentWave™
• Plug the power cord into both the wall outlet and ScentWave™.
• Extra power cord can should be secured out of sight.
Pivot Adjustment
FIG. D
FIG. E
FIG. F

6
PART#-31600035-LIT-SWD1001-MANUAL-REV.A
Cartridge Installation
1. Locate the scent cartridge that was shipped with the system and remove the cartridge
from the shipping container.
2. Remove the shrink-wrapped plastic from the cartridge.
3. Plug the scent cartridge cord into the connection on the inside bottom front of the
ScentWave™. FIG. G
4. Insert the scent cartridge completely into the ScentWave™ by lining up the notches on
the cartridge with the openings on the system. Lock by turning clockwise. FIG. H
NOTE: To help maintain the life of the ScentWave™, when changing your cartridge, always
make sure to clean the back of your system to remove any dust that has accumulated on the
rear grille.
FIG. G
FIG. H

7
PART#-31600035-LIT-SWD1001-MANUAL-REV.A
SYSTEM CONTROL UNIT
Functions
• MASTER POWER: TIMER will utilize the internal programming and provide coverage at
customizeable times. Up to two (2) daily events can be programmed. ON will cause the
system to run only on the selected MODE option. OFF shuts down the system.
• MODE: MOTION will utilize the 30º, 25’ range motion detector to activate the system.
AUTO will utilize only the AUTO INTERVAL settings. Both AUTO and MOTION utilize the
adjacent AUTO INTERVAL controls to determine the amount of time the system fan will
run and how long it will remain off. These can be selected in 15, 60 and 180 seconds.
Use CONTINUOUS to have your machine run constantly.
NOTE: Setting your system to CONTINUOUS will drastically reduce the life of your scent
cartridge and ScentWave™ system.
• VOLUME: Turn between MIN and MAX to adjust the speed of the fan and how far scent
is projected.
• TIMER (OVERRIDE): Allows you to override the settings if it is currently ON or OFF
• PROGRAM: Use +, - and SET to create a customized scent cycle.
Operation
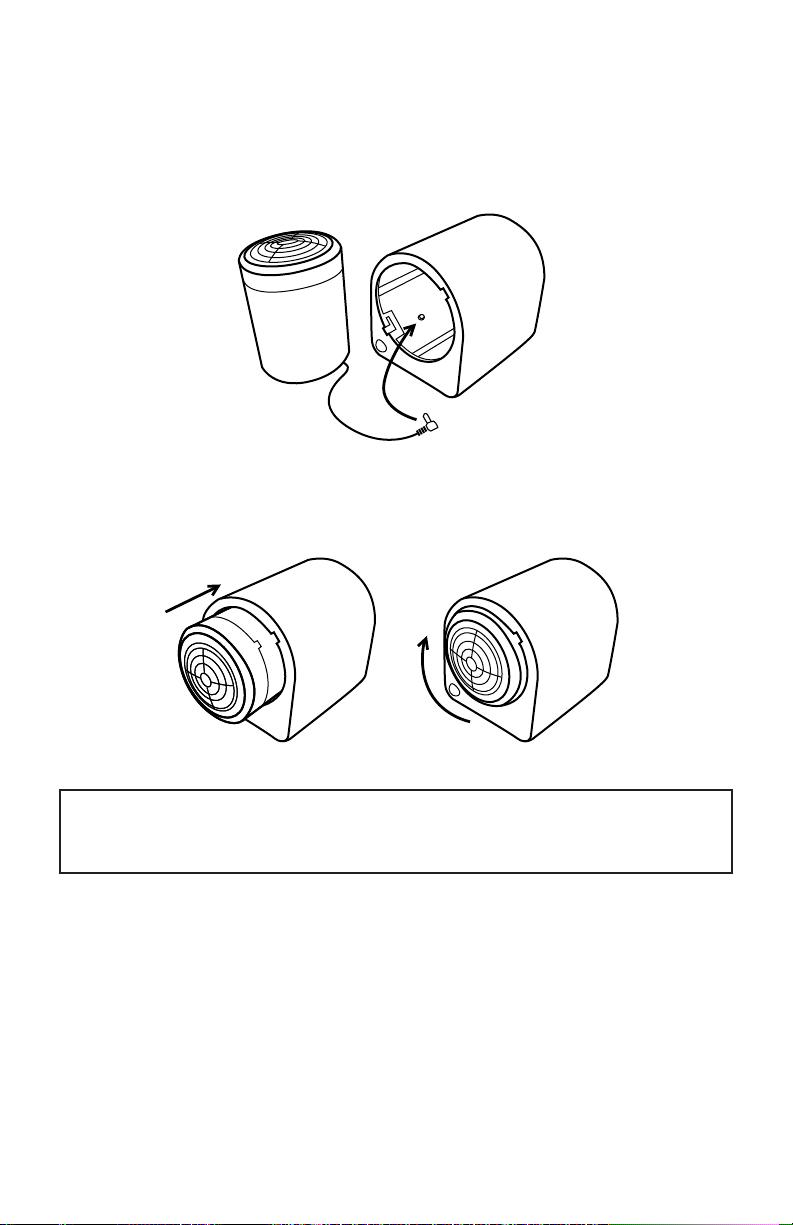
1. Ensure the system is connected to the closest available power source and that a scent
cartridge is inserted into the machine.
2. Set the MASTER POWER to TIMER
• Set the TIME OF DAY - Press SET until AM/PM begins to flash. Use + / - to adjust
the system to the appropriate time if not set already.
• Set the ON time - This is the time of day when the system wil begin operating.
Press SET until Event 1 ON begins to flash. Use + / - to adjust the time.
• Set the OFF time - This is the time of day when the system will shut down. Press
SET until Event 1 OFF begins to flash. Use + / - to adjust the time.
NOTE: The ScentWave™ can have up to 2 seperate programmed events. To delete a
previous event, press both + & - on the desired event’s set ON or OFF time.
NOTE: In order to preserve the life of your scent cartridge, program the TIMER so your
ScentWave™ is only active for 10 hours per day.
3. Set the MODE
• The ScentWave™ is designed to cycle ON and OFF during its programmed Event
settings. This is to help control the amount of scent projected by the system.
• Begin with both Auto Interval ON and OFF at 60 seconds and adjust the settings
as needed after the system has been running for an hour.
4. Set the VOLUME
• This knob is designed to adjust fan speed and scent projection.
• Begin with the knob at the 12:00 position and adjust the setting as needed after
the system has been running for an hour.

For further assistance please contact Client Relations at:
866.723.6824
clientrelations@scentair.com
Table of contents