Schäfer ergoSTYLE STEELFORCE 90 User manual

English / German
RNDA22206-PLA007-0A-SSI (Draft A)
Assembly Manual
Read this manual thoroughly and store in a safe place.
Betriebs– und Montageanleitung
Bitte sorgfältig lesen und sicher aufbewahren.
EN
DE
STEELFORCE 90°
SLS 050 SF / SLS 170 / SLS 270
Left side mounting
Linksseitig montiert

2
EN DE
Content / Inhaltsverzeichnis
1GENERAL / ALLGEMEINES..........................................................................................................................3
1.1 Local value of the assembly/operating manual / Stellenwert der Betriebs– und Montageanleitung .................... 3
1.2 Intended use / sachgemäße Verwendung................................................................................................. 3
1.3 Improper use / sachwidrige Verwendung ................................................................................................. 3
1.4 Danger / Gefahr .................................................................................................................................. 3
1.5 Content box / Lieferumfang................................................................................................................ 4-5
2SAFETY INFORMATION / SICHERHEITSHINWEISE .....................................................................................6
2.1 Symbols/warnings / Symbol– und Hinweiserklärungen............................................................................... 6
2.2 Symbols used on the workstation frame / verwendete Symbole am Tischgestell ............................................ 6
2.3 Maximum weight allowed on frame / Zulässiges Gesamtgewicht auf dem Tischgestell ....................................6
2.4 Maximum weight allowed per column / Zulässiges Gesamtgewicht pro Säule ................................................7
2.5 Organizational measures / organisatorische Maßnahmen............................................................................ 7
2.6 Informal safety measures / Empfohlene Sicherheitsmaßnahmen ................................................................. 7
2.7 Note for those assembling the workstation / Hinweise zur Montage ............................................................. 7
2.8 Transport and assembly / Transport und Montage..................................................................................... 7
2.9 Use of the workstation frame / Benutzung des Tischgestells ....................................................................... 7
2.10 Specific dangers / Besondere Gefahrenstellen .......................................................................................... 8
2.11 In an emergency / Hinweise für den Notfall.............................................................................................. 8
2.12 Maintenance and upkeep / Wartung und Instandhaltung ............................................................................ 8
2.13 Cleaning / Reinigung ............................................................................................................................ 8
2.14 Persistent risks / Restrisiken.................................................................................................................. 8
3ASSEMBLY / MONTAGE ..............................................................................................................................8
3.1 Checking the items supplied / Überprüfen des Lieferumfangs ...........................................................8
3.2 Packaging / Verpackung ...................................................................................................................8
3.3 Tightening torques for screws used / Hinweise zum Verschrauben der Beschläge.............................8
3.4 Assembly of the workstation / Montage des Tischgestells .................................................................9
3.4.1 Recommended Top Sizes / Empfohlene Tischplattenmaße........................................................................ 9
3.4.2 Pre-assembly of the Crossbars / Vormontage der Traverse ...................................................................... 9
3.4.3 Mounting the Feet / Montage der Kufen............................................................................................... 10
3.4.4 Mounting the Feet on column / Montage der Kufen an die Säule.............................................................. 10
3.4.5 Mounting the short feet/ Montage der kurzen Kufe................................................................................ 11
3.4.6 Mounting the the crossbar Montage der Traverse.................................................................................. 11
3.4.7 Mounting the Top Support / Montage der Plattenträger.......................................................................... 12
3.4.8 Mounting add on pack 90°/ Montage des 90° Auslegers......................................................................... 12
3.4.9 Mounting the Top Support / Montage der Plattenträger.......................................................................... 13
3.4.10 Mounting add on to frame / Montage des Auslegers am Tischgestell ........................................................ 13
3.4.11 Mounting the Cover / Montage der Abdeckung...................................................................................... 14
3.4.12 Mounting the Accent Cover/ Montage der Akzentblende ......................................................................... 15
3.4.13 Adjustment of the Frame Width / Einstellung und Verschraubung der Gestellbreite .................................... 16
3.4.14 Mounting the Spacer / Montage der Abstandhalter ................................................................................ 16
3.4.15 Mounting the Cable Clips / Befestigen Sie die Kabelhalter ...................................................................... 17
3.4.16 Connecting the Electrical Components / Anschluß elektronischer Komponenten......................................... 18
3.4.17 Mounting the table top / Montage der Tischplatte.................................................................................. 19
3.4.18 Mounting the power supply underneath the table top / Montage der Steuerung unter Tischplatte................. 19
3.4.19 Mounting Cable Clip / Montage Kabelclip ............................................................................................. 20
3.4.20 Frame Test without table top / Test ohne Tischplatte............................................................................. 21
3.4.21 Clearance around the table top / Freiraum um die Tischplatte................................................................. 22
4 CORRECT POSITION OF SEAT / RICHTIGE SITZHALTUNG .........................................................................23
5TECHNICAL SPECIFICATIONS / TECHNISCHE DATEN...........................................................................24-27
6OPERATION AND INDICATORS / BETRIEBSHINWEISE .............................................................................28
6.1 Indicators / Fehlfunktionen ............................................................................................................28
7TROUBLESHOOTING / FEHLERBEHEBUNG ................................................................................................29
8EU-DECLARATION OF CONFORMITY / EG-KONFORMITÄTSERKLÄRUNG................................................30-32
9CUSTOMER SERVICE / KUNDENDIENST....................................................................................................33
10 MANUFACTURER / HERSTELLER ...............................................................................................................33
11 RECYCLING / ENTSORGUNG.....................................................................................................................33
11.1 Taking the workstation out of active duty / Tischgestell außer Bterieb nehmen...............................33
11.2 Taking the workstation apart / Tischgestell demontieren................................................................33
11.3 Recycling / Entsorgung...................................................................................................................33
11.4 WEEE - Waste of Electrical and Electronic Equipment / WEEE - Elektro und Elektronikgeräte-Abfall. 34

3
EN DE
Allgemeines
1.1 Stellenwert der Betriebs- und Montageanleitung
Grundvoraussetzung für den sicherheitsgerechten Umgang
und den störungsfreien Betrieb dieses Tischgestells ist die
Kenntnis der grundlegenden Sicherheitshinweise und der
Vorschriften. Diese Betriebs– und Montageanleitung enthält
die wichtigsten Hinweise, um das Tischgestell
sicherheitsgerecht zu montieren und zu bedienen. Diese
Betriebs– und Montageanleitung, insbesondere die
Sicherheitshinweise, sind von allen Personen zu beachten, die
das Gestell aufbauen und an dem fertigen Tisch arbeiten.
Darüber hinaus sind die für den Einsatzort geltenden Regeln
und Vorschriften zur Unfallverhütung zu beachten.
1.2 Sachgemäße Verwendung
Das vorliegende Gestell dient ausschließlich der Verwendung
als elektromotorisch höhenverstellbarer Sitz-/Steharbeitsplatz
in geschlossenen Räumen. Das Gestell ist somit auch nur für
diesen Verwendungszweck bestimmt. Eine andere oder
darüber hinausgehende Benutzung gilt als nicht
bestimmungsgemäß. Beachten Sie hierzu unbedingt das
Kapitel 2 Sicherheitshinweise“. Kinder können die vom
Tischgestell ausgehenden Gefahren nicht einschätzen, wenn
sie sich unbeaufsichtigt in der Nähe des Tisches aufhalten. Für
hieraus entstehende Schäden haftet der Hersteller nicht.
Zur bestimmungsgemäßen Verwendung gehört auch:
• das Beachten aller Hinweise aus der Betriebs- und
Montageanleitung und
• das Verbot von jeglichen An- und Umbauten am Tisch.
1.3 Sachwidrige Verwendung
• Verwenden Sie das Tischgestell niemals zum Heben
von Personen oder Lasten!!!
• Belasten Sie das Tischgestell nur bis zur maximalen Last
(siehe Kapitel 5 „Technische Daten“).
• Verwenden Sie das Tischgestell nur in gewerblichen
Räumen.
• Das Schreibtischgestell darf nur mit dem im Lieferumfang
enthaltenen Netzgerät betrieben werden.
1.4 Gefahr
Ein falscher Anschluss des Erdungsleiters des Workstation-
Rahmens kann einen Stromschlag zur Folge haben. Fragen Sie
im Zweifelsfall einen qualifizierten Elektriker, ob das Produkt
richtig geerdet ist. Nehmen Sie an dem mit dem Produkt
gelieferten Stecker keine Veränderung vor.
Sollte die Netzschnur beschädigt sein, muss sie durch eine
Spezialschnur oder -einheit ersetzt werden, die beim Hersteller
oder dessen Servicevertretung erhältlich ist.
ACHTUNG: Jegliche nicht ausdrücklich durch den
Hersteller erlaubte Veränderungen oder Modifikationen
führen zum Erlöschen der Garantie und das Gestell darf
dann nicht mehr benutzt werden.
General
1.1 Local value of the assembly/operating manual
The guiding principle for safe use and trouble-free opera-
tion of this workstation frame is knowledge of basic safety
information and regulations. This assembly/operating man-
ual contains the most important information needed for
assembling and operating the workstation frame safely.
This assembly/operating manual, in particular the safety
information contained herein, must be observed by any
person building the frame and working on the finished sur-
face. More importantly, the rules and regulations applying
to accident prevention in the locality in which the work-
station frame is to be used must be observed at all times.
1.2 Intended use
The workstation frame must be used only as an electrically
height-adjustable workstation for sitting/standing use in
offices or other enclosed areas. The frame must be used for
this purpose only. Any other use than the above shall be
deemed improper. Please observe the provisions of Section
2, Safety Information. Children may be unaware of the
dangers presented by the workstation frame if unsuper-
vised. The manufacturer can in no way be held liable for
damage arising from improper use.
Intended use shall also include:
• Observation of all information from the assembly/
operating manual and
• Prohibition of any sort of addition to/conversion of the
workstation.
1.3 Improper use
• Never use the workstation frame to lift people or
loads!!!
• Do not exceed the maximum load of the workstation
frame (see Section 5, Technical Specifications).
• Do not use the workstation frame in the home; alter-
natively, use it only in offices.
• Operate workstation only with power supply unit which
is included in delivery.
1.4 Danger
Improper connection of the workstation frame grounding
conductor can result in a risk of electric shock. Check with a
qualified electrician if you are in doubt as to whether the
product is properly grounded. Do not modify the plug pro-
vided with the product.
If the supply cord is damaged, it must be replaced by a
special cord or assembly available from the manufacturer
or its service agent.
WARNING: Any changes or modifications not ex-
pressly approved by the manufacturer could void the
user’s authority to operate the equipment.

4
1.5 Content Box / Lieferumfang
Assembly requires 2 people!
Montage mit 2 Personen!
1
Columns / Säulen
2x
8
4x
7
EN DE
3x
270 SLS
2x 1x
050 SF 170 SLS
3x
or / oder or / oder
Items/ Bauteile
2x
22x
5
2x
6
1x
3
1x
4
1x
91x
11
2x
12
1x
10
3x

5
Electric components / Elektrische Bauteile
Use only for 170 / 270 / Verwendung nur bei 170 / 270
10
0
optional
EN DE
Mounting Hardware Kit / Montagezubehör
Tools / Werkzeug
8x
H
M10x35
12x
F
M6x16
14x
E
M8x50
4x30
4x
J
4.5x20
18x
E 14x
I(170/270)
(050)
2x
G
M6x8 4.5x16
2x
K
1x
13 1x
14
1x
15
or/
oder or/
oder or/
oder
3x
16 3x
17
3x
18 3x
19 6x
20
(170)
(270)
(170)
(270)
6x
A4x
B2x
C8x
D

6
Do not exceed the maximum permitted load of 150 kg (including tabletop) on the workstation frame. Avoid unbalanced
load, distribute the weight evenly, otherwise overload may occur. Overloading a frame may cause breakage and close
by individuals may suffer serious injuries as a consequence.
Belasten Sie das Tischgestell nur mit der maximal zulässigen Last 150 kg (inklusive Tischplatte). Vermeiden Sie
einseitige Beladungen, verteilen Sie das Gewicht soweit wie möglich gleichmäßig. Eine Überlastung kann zum
Zusammenbruch des Gestells führen und bei nahestehden Personen schwere Verletzungen verursachen.
This symbol indicates an immediate threatening situation for any person’s life or health. Failure to adhere to such
information may have serious consequences for health, or could even result in life-threatening injury or death.
Dieses Symbol weist auf eine unmittelbar drohende Gefahr für das Leben und die Gesundheit von Personen hin. Das
Nichtbeachten dieser Hinweise kann schwere gesundheitsschädliche Auswirkungen zum Beispiel lebensgefährliche
Verletzungen bis hin zur Todesfolge haben.
This symbol indicates important information. Failure to adhere to such information could lead to damage to the work-
station.
Dieses Symbol deutet auf einen wichtigen Hinweis hin. Das Nichtbeachten kann zu Schäden am Gestell führen.
Do not place objects or parts of the body under the workstation frame or between the cross members. This could
cause serious injury or even result in death.
Bringen Sie keine Gegenstände oder Körperteile unter das Tischgestell bzw. zwischen die Traversen. Eine
Nichtbeachtung kann zu schweren Verletzungen oder zum Tod führen.
2.2 Symbols used on the workstation frame 2.2 Verwendete Symbole am Tischgestell
2 Safety Information
2.1 Symbols/warnings
The assembly/operating manual uses the following terms and
signs to indicate dangers:
2 Sicherheitshinweise
2.1 Symbol- und Hinweiserklärungen
In der Betriebs- und Montageanleitung werden folgende
Hinweise und Symbole für Gefährdungen verwendet:
2.3 Maximum weight allowed on frame 2.3 Zulässiges Gesamtgewicht auf dem Tischgestell
All weight should be distributed evenly.
Das gesamte Gewicht sollte gleichmäßig verteilt warden.
150 kg
Example / Beispiel
>150 kg
EN DE

7
2.5 Organizational measures
• The workstation frame can best be assembled by two
people. Turning the frame, once the work surface has
been fitted, is a task in particular which requires two
people!
2.6 Informal safety measures
• Keep the assembly/operating manual in the place where
the workstation frame is used at all times.
• Make sure that all safety information on the table (see
Section 2.2, Symbols used on the workstation frame,
page 5) is legible, replacing the same if necessary.
2.7 Note for those assembling the workstation
• The workstation must be assembled/worked on by per-
sons over the age of 16.
• The persons referred to above must have read and un-
derstood the assembly/operating manual.
2.8 Transport and assembly
• The workstation frame must be moved by two persons
only, and in such cases must be retracted.
• Do not drag or pull the workstation frame over the floor.
• Assemble the workstation frame with the supplied tools
only. They are the only tools which ensure that the
screws can be tightened to the correct torque.
2.9 Use of the workstation frame
• Do not allow children to use the workstation frame unsu-
pervised. Children may be unaware of the dangers pre-
sented by the workstation frame. They would be in seri-
ous danger of injuring themselves, possibly even with
fatal consequences.
• The workstation frame must only be used in appropriate
areas (see Section 5, Technical Specifications).
• Do not use the workstation frame on an uneven surface.
In such conditions it will not be steady.
• Never exceed the maximum load on the workstation
frame (see Section 5, Technical Specifications).
2.5 Organisatorische Maßnahmen
• Montieren Sie das Tischgestell am besten mit zwei
Personen. Speziell das Umdrehen des Gestells mit
montierter Tischplatte muss mit zwei Personen erfolgen.
2.6 Empfohlene Sicherheitsmaßnahmen
•
Bewahren Sie die Betriebs- und Montageanleitung ständig in
der Nähe des Einsatzortes des Tischgestells auf.
• Halten Sie alle Sicherheits- und Gefahrenhinweise an dem
Tisch (siehe Kapitel 2.2 „Verwendete Symbole am
Tischgestell“) in lesbarem Zustand und aktualisieren Sie
diese gegebenenfalls.
2.7 Hinweise zur Montage
• Aufbau des Tischgestells oder Arbeiten am Tischgestell darf
nur durch Personen mit einem Alter ab 16 Jahren erfolgen.
• Die Monteure müssen die Betriebs- und Montageanleitung
gelesen und verstanden haben.
2.8 Transport und Montage
• Bewegen Sie das Tischgestell nur mit zwei Personen und in
niedrigster Tischhöhe.
• Kippen oder ziehen Sie das Tischgestell nicht den Kufen
über dem Boden entlang.
• Montieren Sie das Tischgestell nur mit dem beigefügten
Werkzeug. Nur so ist sichergestellt, dass die Schrauben
einwandfrei angezogen werden.
2.9 Benutzung des Tischgestells
• Lassen Sie Kinder nicht unbeaufsichtigt an das Tischgestell.
Kinder können die Gefahren des Tischgestells nicht
einschätzen. Es besteht die Gefahr von schweren
Verletzungen mit Todesfolge.
• Benutzen Sie das Tischgestell nur in der dafür
vorgesehenen Umgebung (siehe Kapitel 5 "Technische
Daten").
• Benutzen Sie das Tischgestell nicht auf einem unebenen
Untergrund. Es besteht die Gefahr des Umkippens.
• Belasten Sie das Tischgestell nicht über das zulässige
Gewicht, beachten Sie die maximal zulässige Flächenlast
(siehe Kapitel 5 "Technische Daten").
2.4 Maximum weight allowed per column 2.4 Zulässiges Gesamtgewicht pro Säule
50 kg
Do not exceed the maximum permitted load of 50 kg (including tabletop) on a column. Overloading a frame
may cause breakage and close by individuals may suffer serious injuries as a consequence.
Belasten Sie eine einzelne Säule mit nicht mehr als der maximal zulässigen Last von 50 kg, (inklusive
Tischplatte). Eine Überlastung kann zum Zusammenbruch des Gestells führen und bei nahestehden Personen
schwere Verletzungen verursachen.
EN DE

8
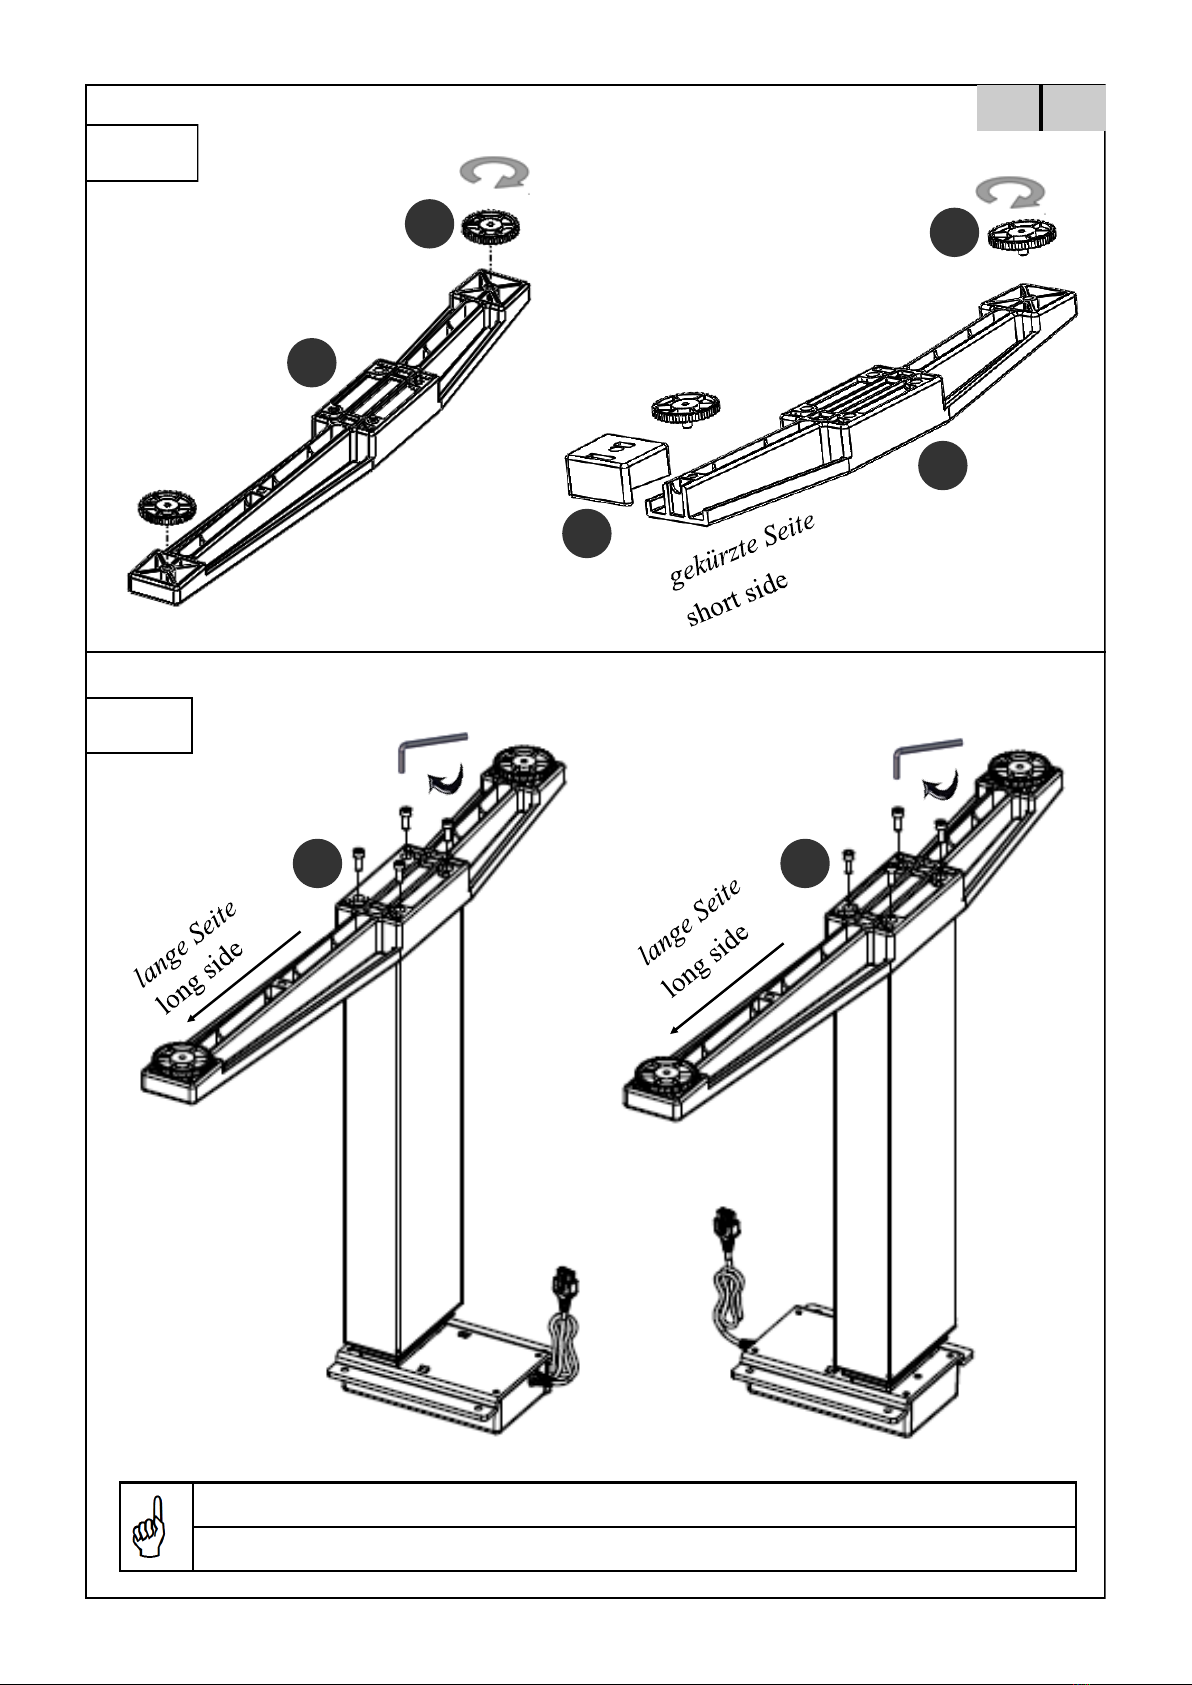
3 Assembly / Montage
Before attempting assembly, read the safety information in Section 2.
Bitte beachten Sie vor der Montage die Sicherheitshinweise in Kapitel 2.
3.1 Checking the items supplied
• Carefully open the cardboard packaging.
• In doing so, do not use any long knife blades. They may
damage the components inside.
• Check the parts supplied against the list in section 1.5
Items supplied.
• Do not attempt to assemble the workstation frame if
there is any damage or if there are any incorrect compo-
nents.
3.2 Packaging
• Remove the packaging. Treat as household waste/paper.
• Observe national legislation.
3.3 Tightening torques for screws used
• Assemble the workstation frame with the tools supplied
only.
3.1 Überprüfung des Lieferumfangs
• Öffnen Sie den Karton vorsichtig.
• Verwenden Sie hierzu keine langen Messerklingen.
Dabei können Teile im Inneren beschädigt werden.
• Überprüfen Sie, ob alle in der Liste in Kapitel 1.5
angegebenen Teile vorhanden sind.
• Versuchen Sie nicht, das gelieferte Tischgestell zu
montieren, wenn Sie Beschädigungen oder eine
fehlerhaften Lieferumfang feststellen.
3.2 Verpackung
• Entfernen Sie die Verpackung und entsorgen Sie diese als
Haus-/Papiermüll.
• Beachten Sie die nationalen Rechtsvorschriften.
3.3 Hinweis zum Verschrauben der Beschläge
• Montieren Sie das Tischgestell ausschließlich unter
Verwendung der mitgelieferten Werkzeuge.
2.10 Specific dangers
• When adjusting the height of the frame there is danger
of injury. Make sure that there is no-one else in the im-
mediate surroundings of the frame.
• When assembling the workstation frame, make sure
there is ample space to avoid collisions (i.e. inclination of
roof, fixed objects, filing cabinets, waste-paper bins etc.)
in all imaginable directions.
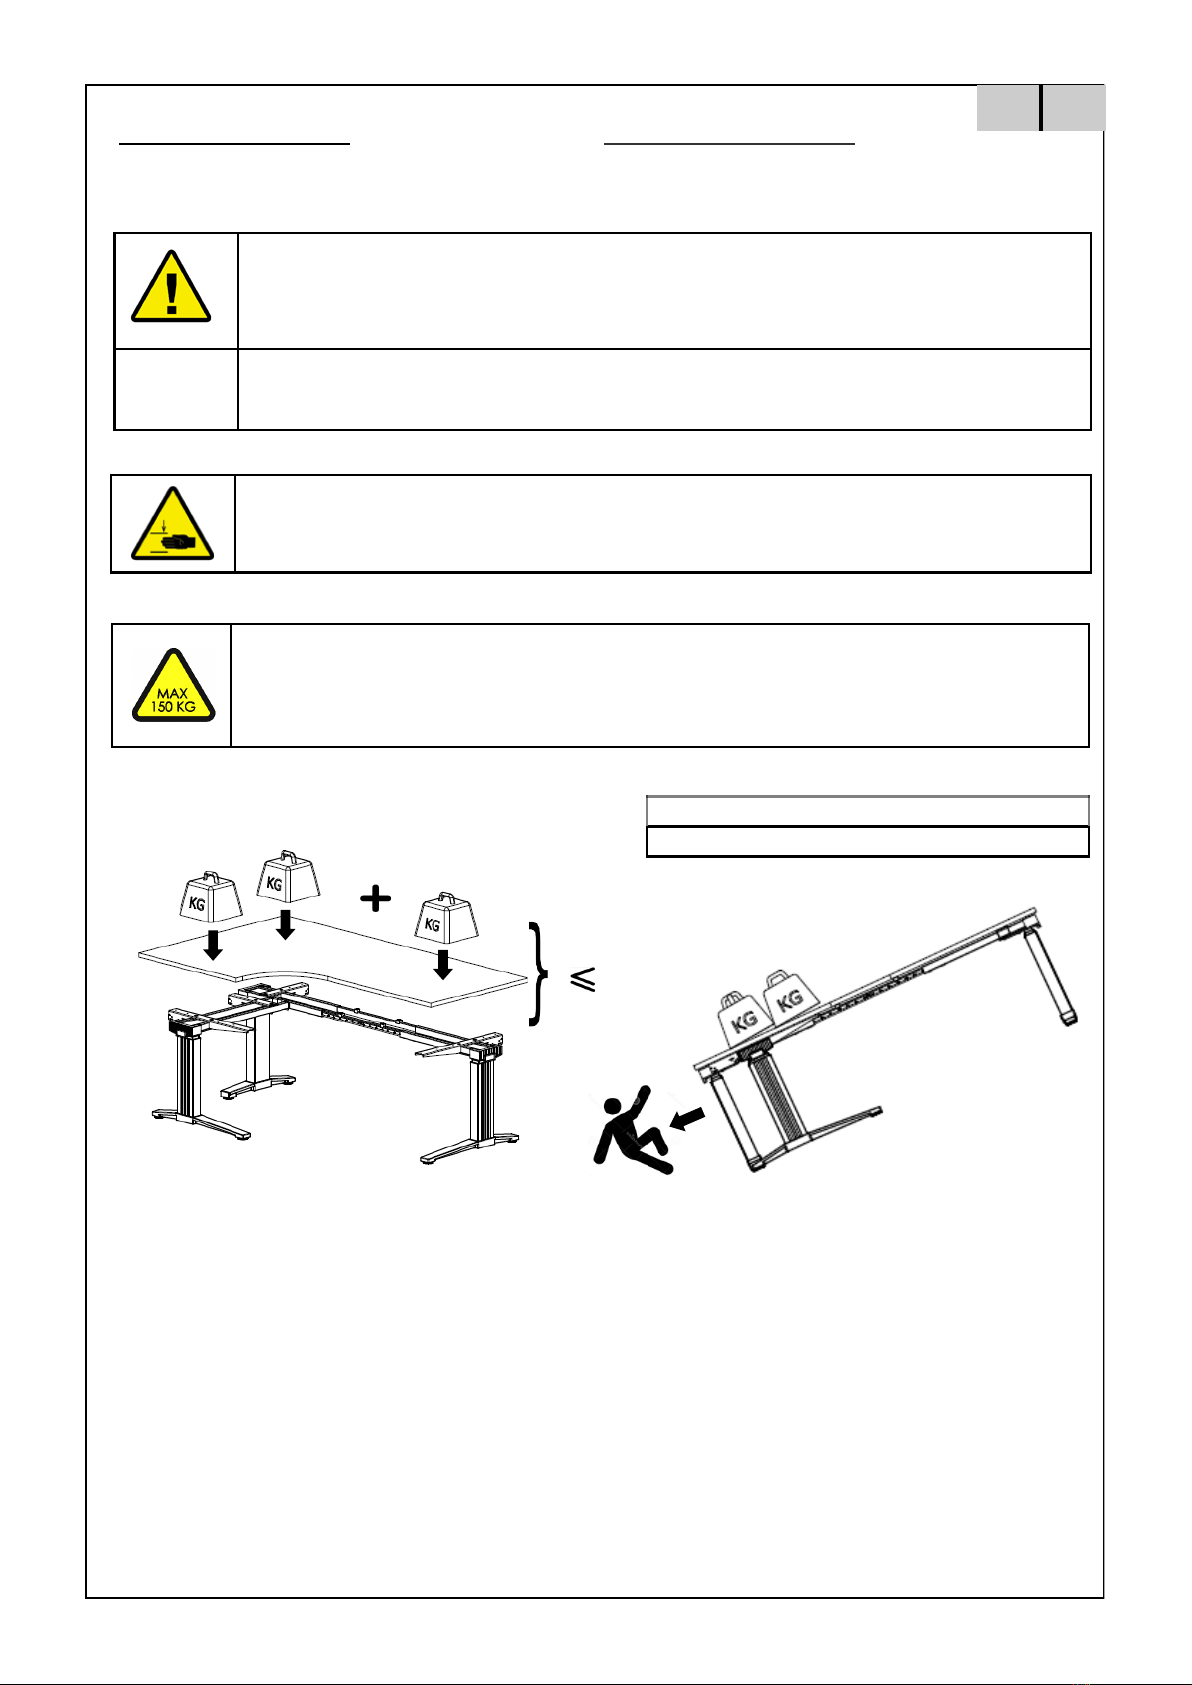
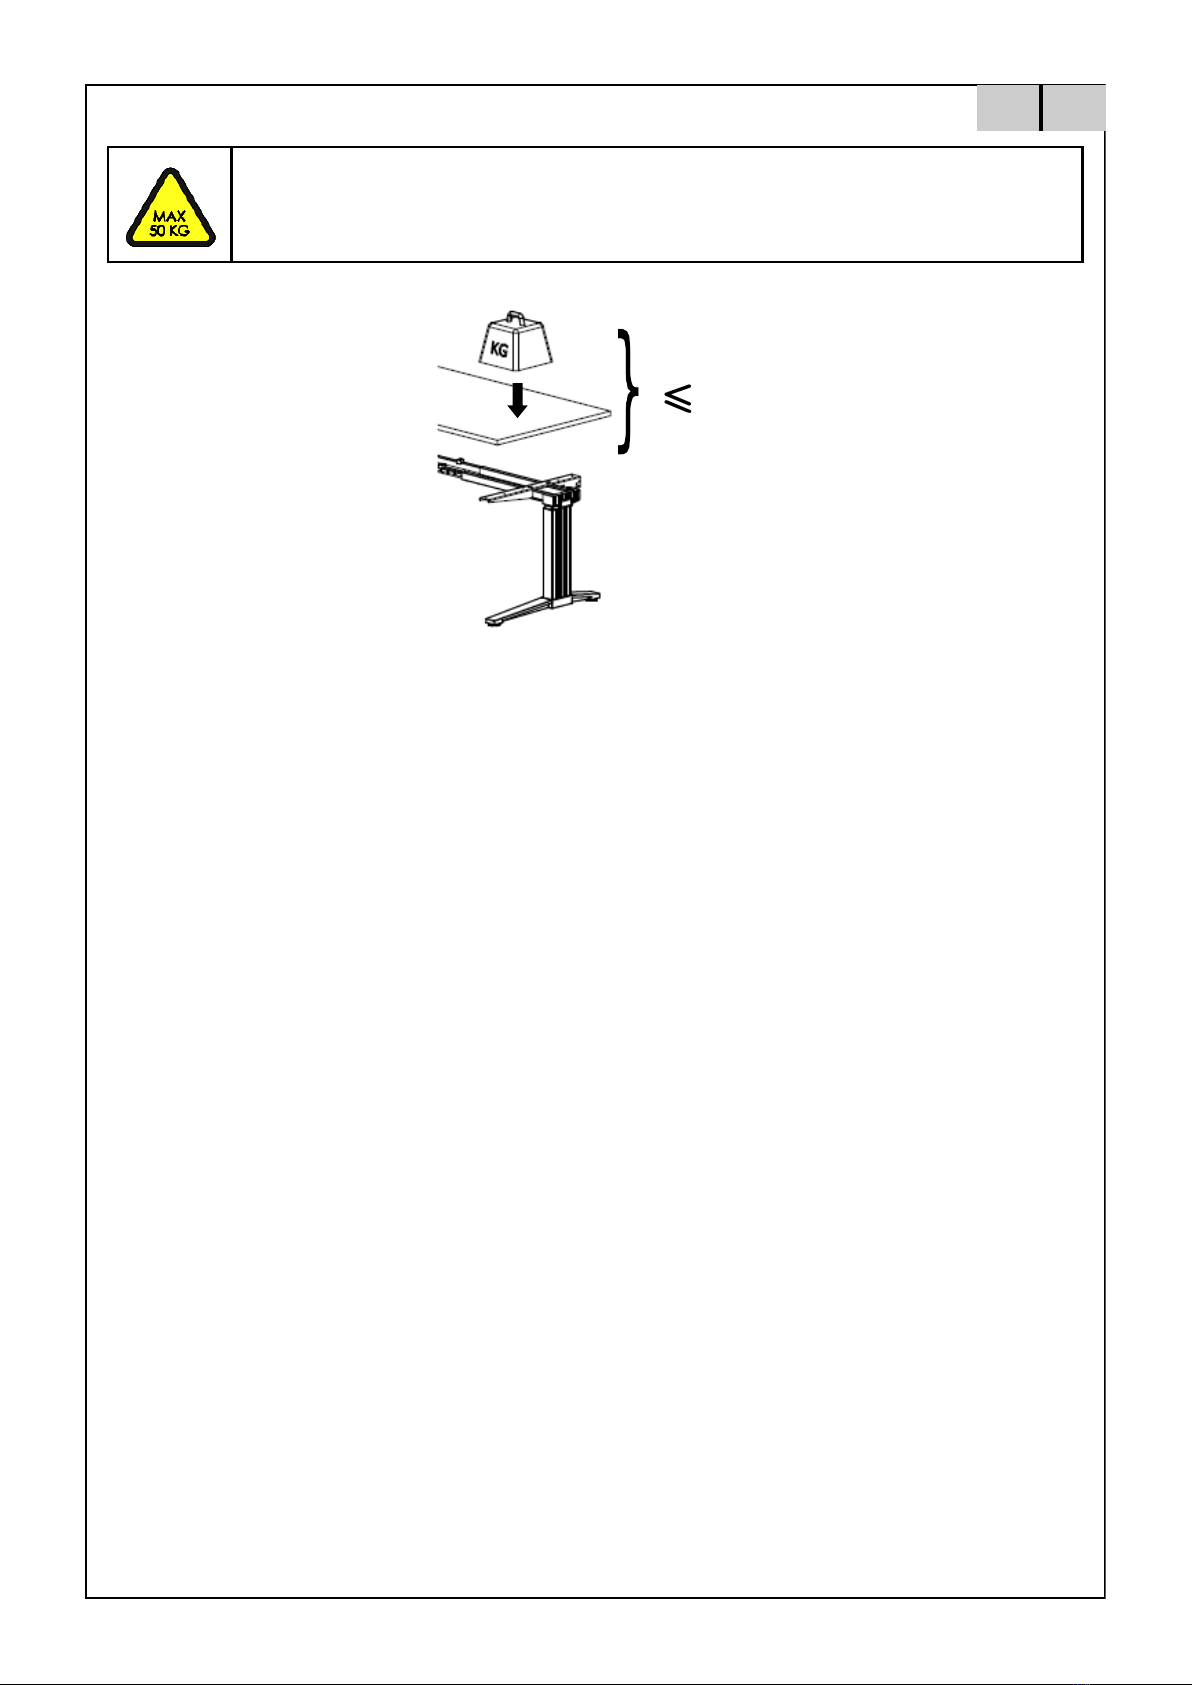
• Make sure there is ample space to avoid collisions if
there are objects on the work surface such as computers
or computer peripherals.
• Make sure there is clearance of at least 25mm from all
other furniture, all around the workstation frame.
2.11 In an emergency
• Have the workstation frame repaired by specialists. Re-
frain from using the workstation frame until it has been
successfully repaired.
• Stop using the workstation frame at once if you notice
anything unusual (strange sounds, smoke, etc.).
2.12 Maintenance and upkeep
• Do not perform any repairs on the work station frame or
other components yourself.
• Do not alter the construction of the work surface or its
frame.
• Any faulty components removed must be replaced with
new, original components from the manufacturer. Use
only original replacement parts made by the manufactur-
er. Have any such work carried out by a specialist, mak-
ing reference to this assembly/operating manual.
2.13 Cleaning
• Dust the workstation frame once a week with a dry
cloth.
• Clean the workstation frame with a damp cloth and a
weak solution of cleaner once a fortnight.
2.14 Persistent risks
This workstation frame has been built to the state of the art
and to recognized safety regulations. Nonetheless, its use
may constitute a risk to the health and safety of users or
third parties, damage to the workstation frame or to other
items. The workstation frame must be used only:
• for the purpose for which it was intended.
• if it is completely safe to do so.
2.10 Besondere Gefahrenstellen
• Achten Sie bei der Verstellung des Tischgestells darauf,
dass sich keine Personen in der Nähe des Tischgestells
aufhalten. Es besteht Verletzungsgefahr.
• Achten Sie bei der Aufstellung des Tischgestells auf
vollständige Kollisionsfreiheit (z. B. Dachschräge, bauliche
Gegebenheiten, Rollcontainer, Papierkorb, usw.) in allen
möglichen Verstellpositionen.
• Achten Sie auch auf Kollisionsfreiheit, wenn sich
Gegenstände- z. B. EDV-Geräte – auf dem Tisch befinden.
• Halten Sie einen seitlichen Sicherheitsabstand vom
mindestens 25 mm zu jedem anderen Möbelstück ein.
2.11 Hinweise für den Notfall
• Lassen Sie das Tischgestell durch einen Fachbetrieb
reparieren. Nehmen Sie das Tischgestell erst wieder nach
erfolgter Reparatur in Betrieb.
• Nehmen Sie das Tischgestell sofort außer Betrieb, wenn
ungewöhnliche Vorkommnisse (Geräusche, Qualm, Rauch,
usw.) am Tischgestell entstehen sollten.
2.12 Wartung und Instandhaltung
• Führen Sie keine Reparaturen am Tisch oder den
Komponenten selbst durch.
• Nehmen Sie keine baulichen Veränderungen am Tisch vor.
• Tauschen Sie defekte Komponenten des Tischgestells nur
gegen neue Originalteile des Herstellers aus. Verwenden
Sie bitte ausschließlich Originalersatzteile des Herstellers.
Beachten Sie dabei diese Montageanleitung.
2.13 Reinigung
• Stauben Sie das Tischgestell mit einem trockenen Lappen
einmal pro Woche ab.
• Reinigen Sie das Tischgestell mit einem feuchten Tuch
und mildem Reinigungsmittel alle 2 Wochen.
2.14 Restrisiken
Das Tischgestell ist nach dem Stand der Technik und den
anerkannten sicherheitstechnischen Regeln gebaut.
Dennoch können bei Verwendung Gefahren für Leib und
Leben des Benutzers oder Dritte bzw. Beeinträchtigungen
am Tischgestell oder an anderen Sachwerten entstehen.
Das Tischgestell ist nur zu benutzen:
• für die bestimmungsgemäße Verwendung.
• in sicherheitstechnisch einwandfreiem Zustand.
EN DE

9
3.4.1 Recommended Top Sizes
Recommended Top Sizes / Empfohlene Tischplattenmaße
Frame set-up /
Gestellbreite
Wdth / size table top /
breite Tischplatte
Depth / size table top /Tischtiefe Table top thickness/
Stärke
197.5 cm 200 cm 80 cm 2.5 cm
1
7
H
7
8
8
3.4 Assembly of the workstation
• Assemble the components from page 4 and 5 on the
following pages:
3.4 Montage des Tischgestells
• Montage der Bauteile von Seite 4 und 5 auf den folgenden
Seiten:
Do not yet tighten the set screws on the crossbars!
Ziehen Sie die Gewindestifte noch nicht fest!
3.4.1 Empfohlene Tischplattenmaße
3.4.2 Pre-assembly of the Crossbars
Assemble the following components:
3.4.2 Vormontage der Traversen
Montieren Sie folgende Komponenten:
EN DE

10
2
3.4.3 Mounting the feet / Montage der Kufen
3
2
2x
3.4.4 Mounting the feet on column / Montage der Kufen an die Säule
1x
1x
1x
For 050 SF, put the adjustment screw on the back to the short foot side.
Bei 050 SF, die Einstellschraube nach hinten zur kurzen Kufenseite montieren.
EN DE
AA
F
4
F
3

11
F
1x
3.4.5 Mounting the short feet / Montage der kurzen Kufe
F
Option 1 for left assemply
Variante 1 für linksseitige Montage
Option 2 for right assemply
Variante 2 für rechtsseitige Montage
3.4.6 Mounting the Crossbar / Montage der Traverse
5
Option 1 left assembly or Option 2 right assembly
Variante 1, linksseitig oder Variante 2, rechtsseitig
Picture shows left assembly
Bild zeigt linksmontiert
Assembly of the crossbars (see page 9)
Montage der Traverse (siehe Seite 9)
4
For 050 SF, put the adjustment screw on the back to the not shortend foot side.
Bei 050 SF, die Einstellschraube nach hinten zur nicht gekürzten Kufenseite montieren.
or
1x
EN DE

12
7
3.4.7 Mounting the Top Support / Montage des Plattenträgers
6
E
5
E
3.4.8 Mounting add on pack 90° / Montage des 90° Auslegers
Picture shows left assembly
Bild zeigt linksmontiert
Picture shows left assembly
Bild zeigt linksmontiert
EN DE
6
10
9
2
3
2

13
3.4.9 Mounting the Top Support / Montage des Plattenträgers
8
11
E
E
5
3.4.10 Mounting add on to frame / Montage des Auslegers am Tischgestell
9
G
Picture shows left assembly
Bild zeigt linksmontiert
Picture shows left assembly
Bild zeigt linksmontiert
12
EN DE
6
2

14
10
3.4.11 Mounting the Cover / Montage der Abdeckung
3x
E
Picture shows left assembly
Bild zeigt linksmontiert
EN DE
17
16
18

15
3.4.12 Mounting the Accent Cover / Montage der Akzentblende
11
12
10
19
3x
Stick the magnetic tape to the accent cover and then centrally positioned on the column.
Die Magnet Klebestreifen auf die Akzentblende kleben und diese dann mittig auf der Säule positionieren.
Picture shows left assembly
Bild zeigt linksmontiert
Optional / Optional
EN DE
20

16
1
3.4.13 Adjustment of the Frame Width /
Einstellung und Verschraubung der Gestellbreite
3.4.14 Mounting the Spacer / Montage der Abstandhalter
14
13
Picture shows left assembly
Bild zeigt linksmontiert
Picture shows left assembly
Bild zeigt linksmontiert
EN DE
Adjust the frame into the desired width. Tighten the set screws on the crossbar with
Allen key M3.
Schieben bzw. drücken Sie das Gestell in die gewünschte Breite. Ziehen Sie mit Hilfe des
Sechskantschlüssel die Gewindestifte an der Traverse.
B

17
3.4.15 Mounting the Cable Clips / Befestigen Sie die Kabelhalter
15
16
17
EN DE
D
D
D

18
Keep in mind that the desk which you are assembling is height adjustable. The
cables of the electrical components must be able to freely follow the movement of
the desk.
Bedenken Sie unbedingt, dass ihr Tischgestell höhenverstellbar ist. Die Kabel der
elektrischen Komponenten dürfen während der Höhenverstellung nicht
eingeschränkt sein und müssen der maximalen Verstellhöhe folgen können.
18
3.4.16 Connecting the electrical components /
Anschluß der elektronischen Komponenten
Initial start on next page.
Erstinbetriebnahme siehe nächste Seite.
Only by SLS 170 / 270 /
Anzuwenden nur bei SLS 170 / 270
EN DE
13
14
15
13
14
15

19
Total 4x
J
Total 18x
I
3.4.17 Mounting the table top / Montage der Tischplatte
3.4.18 Mounting the power supply underneath the table top /
Montage der Steuerung unter der Tischplatte
Picture shows left assembly
Bild zeigt linksmontiert
Only by SLS 170 / 270 / Anzuwenden nur bei SLS 170 / 270
19
EN DE
2x
I
2x
I
80 cm
1.25 cm
1.23 cm 1.23 cm
120 cm
200 cm
80 cm
2x
I 4x
I
2x
I 2x
I

20
3.4.19 Mounting Cable clip / Montage Kabelclip
20
Only by SLS 170 / 270 /
Anzuwenden nur bei SLS 170 / 270
EN DE
D
K
D
C
Mount the wire clips for cable. Place wire into each wire clip.
Zum montieren des Kabelclips. Stecken Sie alle Kabel in den Kabelclip.
This manual suits for next models
4
Table of contents
Other Schäfer Indoor Furnishing manuals
Popular Indoor Furnishing manuals by other brands

Liberty Furniture
Liberty Furniture 626-OT1030 Assembly instruction

Lamp
Lamp AZ-AT230-HL installation instructions

Permobil
Permobil ROHO DRY FLOATATION Operation manual

Coaster
Coaster 193531 Assembly instructions

Notável Móveis
Notável Móveis NT 5170 Assembly instructions

CB2
CB2 Dwight 5-Shelf Bookcase Assembly instructions

IKEA
IKEA GIMÅN COUNTER TOP+2 COVER PANELS instructions

Signature Hardware
Signature Hardware FREY 949568 Install

Board Game Tables
Board Game Tables Jasper Assembly guide

BCP
BCP SKY6144 instruction manual

Hausmann
Hausmann 4300 Installation & operation instructions

Baxton Studio
Baxton Studio NL2020810-NS Assembly instruction