Schlage GWE User manual

*P517-057*
P517-057
Gateway
Installation Instructions
User Guide
Model GWE
For the latest Installation Instructions and User Guide for the ENGAGE Gateway and all
other ENGAGE enabled devices, visit:
Para obtener las últimas Instrucciones de Instalación y la Guía del Usuario para la
Gateway ENGAGE y otros dispositivos provistos por ENGAGE, visite el sitio:
Pour les instructions d’installation et le manuel de l’utilisateur les plus récents pour la
Gateway d’ENGAGE et tous les autres dispositifs actionnés par ENGAGE, rendez-vous
à l’adresse :
Para español, pág. 16.
Pour l’anglais, voir la page 30.
www.allegionengage.com

2
Table of Contents
Port Guide 3
Installation Instructions 4
Quick Start Guide
Create a new ENGAGE account
Download the ENGAGE mobile application
Install and commission locks
Determine the location
Mounting Options 5
Power Options 6
Commissioning and Linking 7
Host/Panel Communication with Gateway
Linking Locks and Gateways
Device Linking Responses
Gateway to Access Control Panel
Connection 8
Access Control Panel Connections 9
Typical Gateway to ACP wiring diagrams 10
Cable/Wire Specications 12
Factory Default Reset (FDR) 12
LED Indicator Guide 13
Troubleshooting 14
UL Statements 15
FCC Statements 15
General Architecture
The ENGAGE Gateway can work in two modes.
1. RSI Mode
In this mode, the Gateway communicates with
an access control panel (ACP) and alliance
partner access control software to control
the system. Power is supplied by the ACP
power connector (12 or 24V) or the wall power
supply. Data is supplied by either 2 or 4 wire
RS-485 connection from the ACP.
2. IP Mode
In this mode, the Gateway communicates with
an IP-based host. Power is supplied by either
POE on the Ethernet cable or the wall power
supply that is included with the Gateway. Data
is supplied over Ethernet.
Features
Power Status
Power status is indicated by the status LED located
on the top face of the ENGAGE Gateway.
Communication Status
When the Gateway is congured to communicate
with an RS-485 access control panel, the transmit
and receive status is indicated with two LEDs,
located on either side of the RS-485 connector.
When the Gateway is congured to communicate
with an IP-based host over Ethernet, the status of
the LAN link is indicated on the Ethernet port of the
Gateway.
Customer Service
1-877-671-7011 www.allegion.com/us

3
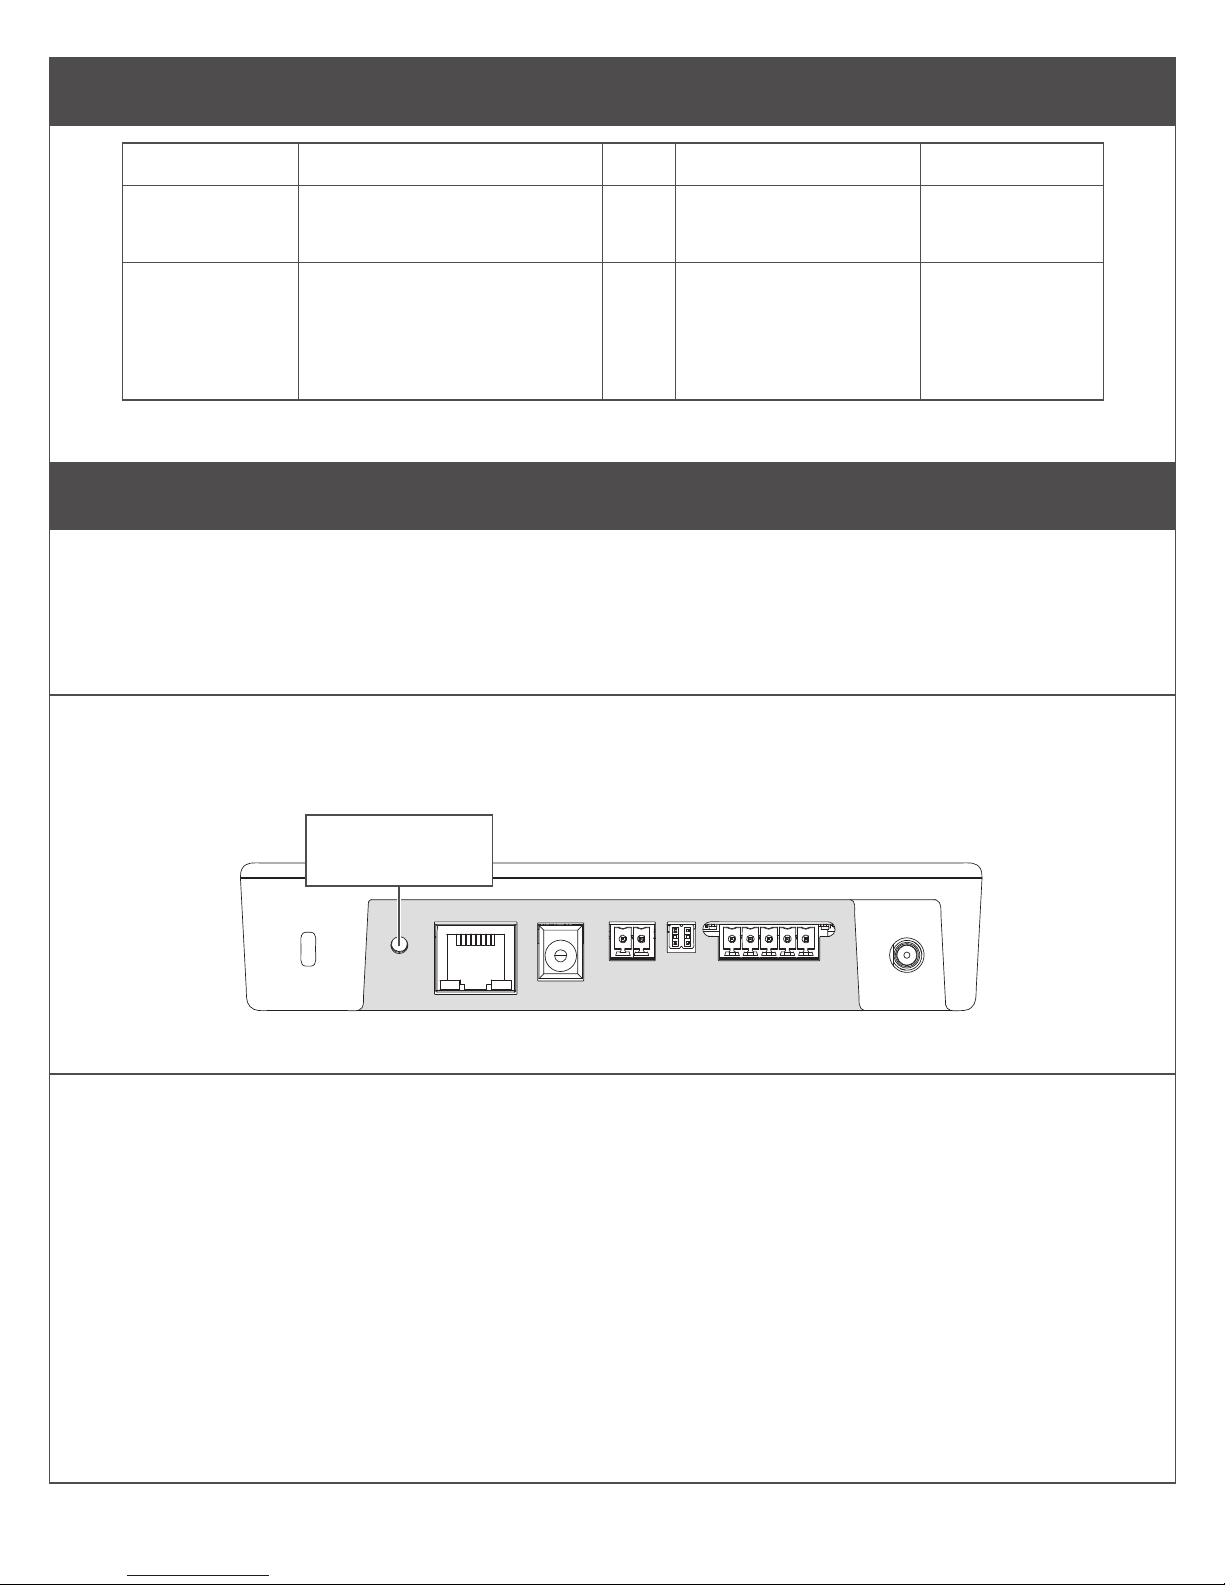
Port Guide
Antenna
RS-485 connector
ACP power connector
Wire guard
cover
24V DC
power cord
Ethernet
cable
Security screw
(optional)
Top View
Kensington
lock slot
Factory
Default
Reset
button
PoE/
Ethernet
Port
Power port
ACP DC
power
input
RS-485
Port
Antenna
*not supplied

4
Installation Instructions
Quick Start Guide
1. Create an ENGAGE account at:
https://portal.allegionengage.com/partner
See “Create a new ENGAGE account” below.
Do NOT use the mobile app to create your
account.
2. Install locks.
3. Commission locks using the ENGAGE mobile
application. See the User Guide that came with
the lock.
4. Select installation location for the Gateway. See
Determine the location on page 4.
5. Mount and select a Gateway power option and
wire Gateway to host or ACP. See Mounting
Options on page 5and Typical Gateway
to ACP wiring diagrams on page 10.
6. Commission the Gateway using the ENGAGE
mobile application. See Commission the
Gateway on page 7.
7. Conrm that the Gateway is communicating
with access control host or access control
panel. See Host/Panel Communication with
Gateway on page 7.
8. Link locks and Gateways. See Linking Locks
and Gateways on page 7.
Create a new ENGAGE account
An account is required to use the ENGAGE cloud-
based web and mobile tools.
Create an ENGAGE account on the web at
http://portal.allegionengage.com/partner
After creating a new account, you will receive a
verication email. You must click on the link
in the message to verify your account. This is
required to keep your account active.
NOTE
For IP Mode: You have created an ENGAGE
partner account. The alliance partner access
control software provider will need to create a
unique site for you and invite your account to have
access to this site before you can add any devices.
When logging into your account, if you have
access to multiple sites you will be prompted to
select the site in which you want to work.
Download the ENGAGE mobile
application
WARNING
Do not create a new ENGAGE account from
the ENGAGE mobile app. Navigate to
http://portal.allegionengage.com/partner
to set up your account, then sign into the app.
Search for “Allegion ENGAGE” on the App Store
(iOS) to download.
Install and commission locks
Reference the Installation Instructions and User
Guide that came with the lock. Documentation
for all ENGAGE enabled devices can be found at
www.allegionengage.com.
Determine the location
The Gateway communicates wirelessly using
Bluetooth to ENGAGE enabled locks. Wireless
signals are diminished by walls, distance, metal
objects or barriers. Consider the following when
placing the Gateway:
• Communication may be possible up to 100
feet (30.5 meters) when clear line-of-sight is
available.
• Do not mount the locks and the Gateway on
different oors. The signal may be degraded
and functionality could be severely limited.
• Do not mount the Gateway on a metal surface.
A separation of at least one inch must be
maintained in all directions from any metal.
• Signal will not pass through metal walls or
metal mesh in the walls (stucco).
• The Gateway wireless antenna should be
vertically oriented.
Locations and wiring methods shall be in
accordance with the National Electrical Code,
ANSI/NFPA 70 for U.S. and Canadian Electrical
Code for Canada.

5
Mounting Options
1 Remove mounting plate from
Gateway.
Slide mounting plate down to remove.
2 Choose mounting option.
There are four different mounting options.
2 2
3 4
4
4
4 3
1Desk mounting: Does not require screws.
Replace mounting plate, and place on at
surface, mounting plate down.
2Wall mounting: Place the mounting plate
against the wall in the desired location and
mark the indicated holes with a pencil.
3Single gangbox mounting: Place the
mounting plate with the holes aligned with
the screw holes in the gangbox.
4Double gangbox mounting: Place the
mounting plate with the holes aligned with
the screw holes in the gangbox.
3 Route wires.
Route wires through top hole in mounting plate.
Wire hole
IMPORTANT
Leave some slack when routing wires through
mounting plate to avoid damaging wires.
4 Secure mounting plate.
Use #6 screws to secure mounting plate to wall or
gangbox. Use the holes indicated on step 2.
5 Install wire cover.
Align the notches on the wire cover to the
Gateway, then slide straight in. Do not pinch
wires!

6
6 Slide Gateway onto mounting plate.
Taking care not to pinch wires, slide Gateway
straight down until it is rmly seated on the
mounting plate.
Install optional security screw for added security.
Power Options
The Gateway can be powered in three ways.
Use only 1 power option at a time!
1 Power over Ethernet (PoE)
Power is supplied through Ethernet port. Category
5e cabling required. Facility must have compatible
powered Ethernet connection.
1a Plug powered Ethernet cable into
Ethernet port.
1b Check Gateway for LED indicator.
2 Supplied 24V power adapter
2a Plug power adapter into wall socket.
CAUTION
Use only Schlage supplied power supply.
2b Plug power cord into socket.
2c Check Gateway for LED indicator.
3 Using ACP 2-wire DC power input
Power is supplied by an access control panel or
access control power supply. See next section for
detailed instructions.

7
Commissioning and Linking
Commission the Gateway
1. Power the Gateway.
The Gateway will go through a power on
self-test. When the light on the Gateway turns
solid red, it is ready to be commissioned.
2. Select “Connect” from the tab bar in the
ENGAGE application.
3. Select the “+” icon in the upper right corner to
look for available ENGAGE devices.
4. Select the ENGAGE Gateway.
5. Follow the commissioning wizard.
Only select and populate the tab for the
appropriate mode selection screen (RSI or IP).
NOTE
For IP Mode: You have created an ENGAGE
partner account. The alliance partner access
control software provider will need to create a
unique site for you and invite your account to
have access to this site before you can add any
devices. When logging into your account, if you
have access to multiple sites you will be prompted
to select the site in which you want to work.
Host/Panel Communication with
Gateway
The Gateway supports RSI and IP data
connections.
IP Mode
To use the Gateway with an IP connection, use an
Ethernet connection for data. Use alliance partner
access control software to congure the Gateway.
IP communication will depend on installation site
and network topology. Schlage recommends that
the Gateway is connected to a network behind a
rewall.
RSI Mode
Connect ACP to Gateway using either 2 or 4 wire
RS-485 connections. Use your ACP to congure
the Gateway.
The Gateway has RS-485 communication status
two LED indicators located near the RS-485
port. The green LED will ash when the Gateway
detects RS-485 trafc. The red LED will ash when
the Gateway is transmitting data back to the ACP.
See your access control software documentation
for more information.
Linking Locks and Gateways
The linking process for an ENGAGE Gateway and
ENGAGE enabled lock requires remote linking
by the IP-based access control host or RSI-
enabled access control panel. The steps to link will
depend on the host conguration of the Gateway.
See below for either IP Mode or RSI Mode link
instructions
IP Mode
1. Conrm that both the Gateway and locks are
commissioned into the same ENGAGE site.
2. Using IP-host commands, issue a scan request
of the Gateway.
Note: make sure that the ENGAGE mobile
application is not connected to any locks
during this scan request.
3. Using ENGAGE IP-host commands, issue a
link creation command to the Gateway.
4. Wait for the link procedure to complete.
5. The Gateway will ash green three times after
successful link. The lock should also indicate a
successful link.
RSI Mode
1. Conrm that both Gateway and the locks are
commissioned into the same ENGAGE partner-
managed site.
2. Put the Gateway into link mode by having the
ACP issue a set link command to the Gateway
over the RSI protocol. The Gateway will start
ashing, alternating red then blue while it is in
link mode.
3. Put the desired lock into link mode. See page 8
for instructions.
4. The Gateway will ash green three times after
successful link. The lock should also indicate
a successful link.

8
Enter link mode for Schlage NDE-Series locks
1. Hold the interior lever.
2. While holding interior lever, apply a credential.
3. Wait until the lock begins to ash alternating
red and green, then release the interior lever.
It should take approximately 8 seconds to
start ashing after the credential presentation.
Device Linking Responses
Model Link Mode Lights/Beeps
NDE80
Success green ashes
4 beeps
Fail 4 red ashes
4 beeps
If linking is unsuccessful:
1. Conrm that both devices have been
commissioned on the same ENGAGE site.
2. Move the Gateway 1 to 2 feet (30 to 60 cm)
in any convenient direction until all locks link
successfully. If still not successful, move the
Gateway closer to the locks and repeat the pre-
installation test, or add more Gateways.
WARNING
The lock will not show up in the Connect
screen of the ENGAGE mobile app after linking
to the Gateway.
To reconnect to NDE, while holding the interior
lever, apply a credential. Then release the
lever. Refreshing the Connect screen in the
app will connect to the lock for up to
30 seconds.
Gateway to Access Control Panel
Connection
CAUTION
Disconnect the Access Control Panel power and
batteries before wiring the Gateway to the panel.
WARNING
Because every Access Control Panel is
different, always check the panel’s instruction
manual for appropriate interface wiring.
The EIA RS485 specication labels the data wires
as “A” and “B”, however, many RS485 products
label their wires “+” and “-”. Some products
associate the “+” signal with “A”, some with “B”.
Reversing polarity will not damage either RS485
device, it will just not communicate; if it does not
work, switch the connections.
• The wires from the Access Control Panel must
be a shielded twisted pair.
• For compliance with UL 294, product must
be used with a UL 294 Listed Access Control
Panel or unit, respectively.
• Must be used with a UL294 Listed power-
limited Power Supply capable of sourcing at
least 250mA @ 12 or 24 VDC.

9
Access Control Panel Connections
Gateway
Connector Gateway Access control
panel signal Description
Power
+ 12 or 24 VDC
• Gateway inputs for 12 or 24 VDC power.
• Draws 250mA max.
• If the Access Control Panel (ACP) reader
power outputs do not source enough current
for the Gateway, use the ACP main regulated
12 VDC power supply or a separate UL294
Listed 12 or 24 VDC power-limited power
supply.
• Power input is non polarized.
– DC Ground
RS485
Rx – – Receive Data • 4-Wire or 2-Wire bi-directional RS485
communication port for interface to Access
Control Panels.
• 2-Wire installation: Both 2|4 wire jumpers
should be added.
• 4 -Wire installation: Both 2|4 wire jumpers
should be removed.
• Refer to following pages for typical wiring
diagrams.
Tx – – Transmit Data
Rx + + Receive Data
Tx + + Transmit Data
GND Signal Ground

10
Typical Gateway to ACP wiring diagrams
WARNING
The diagrams included show typical ACP to
Gateway wiring. Refer to your ACP documentation
for specic wiring information.
B+
GND
+
−
Power Supply
UL294 or ULCS318/
ULCS319 Listed power limited
250mA 12 or 24 V DC
Access Control Panel
A_
Shielded
2 Wire Diagram
Power Supply
UL294 Listed power limited
250mA 12 or 24 V DC

11
Tx+
Tx-
Rx+
Rx-
GND
+
−
Power Supply
UL294 or ULCS318/
ULCS319 Listed power limited
250mA 12 or 24 V DC
Access Control Panel
Shielded
Remove
jumper
4 Wire Diagram
Power Supply
UL294 Listed power limited
250mA 12 or 24 V DC
12
Cable/Wire Specications
Application Part number AWG Description Max distance
DC Power
Input Belden 8760 or equivalent 18 2 Conductor 1000 Feet
(305 meters)
RS485
Belden 9841 or 9842 or
equivalent, or as specied
by local electrical codes or
the ACP provider
24 2 or 4 Conductor
shielded
4000 Feet
(1219 meters)
Factory Default Reset (FDR)
A Factory Default Reset (FDR) will return the ENGAGE Gateway settings to the original settings as
shipped from the factory. A FDR removes congurations, databases, and requires the device to be
recommissioned. A FDR will not remove the device from your ENGAGE account. If you wish to move
the Gateway to a different ENGAGE site, you must also login to the other site and recommission after
completing a FDR on the Gateway and deleting it from the previous site.
A Press and hold the FDR button.
Hold the button until the Gateway Status LED ashes green two times and remains solid. After the
indicator ashes twice, you may release the FDR button.
Factory Default
Reset button
Top View
B Wait for the Gateway to complete FDR.
After starting the FDR process the Gateway indicator will be solid green for a moment and reboot. The
reboot process can take a few minutes. During the boot process the Gateway indicator will be solid amber.
The Gateway will be in a factory default state when the indicator is solid red.

13
LED Indicator Guide
Status LED Meaning Type of LED User
Interface
Solid amber Gateway is booting up State
Long ash amber, repeating Gateway Wi-Fi access point is active State
Fast ash x2, repeating for 1 minute Factory default reset did not complete
successfully
Status code
Fast ash x3, repeating for 1 minute Power on self test failure Status code
Solid blue Gateway is commissioned, normal
operation
State
Long ashing blue Mobile application is connected to
Gateway
State
Fast ash blue, repeating Gateway is in link mode - connected
and linking to new lock
State
Alternating long ashing blue and red Gateway is in link mode - searching
for new lock
State
Solid red Factory Default State /
Uncommissioned
State
Fast ash red x4 Linking to lock was not a success Status code
Alternating green and red long
ashes, repeat
Gateway is updating its rmware State
Solid green Gateway is in process of reseting to
default settings
State
Fast ash green x2 Gateway will begin a factory default
reset
Response to user
action
Fast ash green x3 Linking to lock was a success
FW upgrade succeeded
Status code
Status LED
Data Send/
Receive LEDs

14
Troubleshooting
Problem Possible cause Solution
The Gateway does
not communicate
with the Access
Control Panel.
The RS-485 cable between the
Gateway and the Access Control
Panel may be damaged.
Replace the RS-485 cable between the
Gateway and the Access Control Panel.
The RS-485 signals between the
Gateway and the Access Control
Panel may be wired incorrectly.
Refer to Gateway wiring diagrams and
ACP system documentation for proper
wiring instructions.
The RS-485 address of the Gateway
may not match the RS-485 address
assigned in the Access Control Panel.
Change the RS-485 address of the
Gateway to match the RS-485 address
assigned within the Access Control
Panel.
The 2 | 4 wire jumpers (P5) may be
improperly installed for communication
with Gateway 4-Wire or improperly
removed for communication with RS-
485 2-Wire.
Install the 2 | 4 wire jumpers when
communicating with RS-485 2-Wire.
Remove the 2 | 4 wire jumpers when
communicating with RS-485 4-Wire. Refer
to typical Gateway wiring diagrams.
The Gateway does
not communicate
with Wireless
Access Point
Modules (WAPMs)
The Gateway antenna may not be
properly installed.
Ensure that the Gateway antenna is
installed and properly seated.
Wiring may cause interference with
the antenna
Check to ensure that wiring is properly
routed and the area around the antenna
is clear of any wire. See wire routing
diagrams for more information.
The Gateway may not be linked to
the lock
Link the Gateway to the lock. See
Linking Locks and Gateways on page
7.
Customer Service
1-877-671-7011 www.allegion.com/us

15
UL Statements
Environmental Ratings tested to: Ambient 0 and 49 C, 85%
Humidity at 30 C.
UL294 Access Control Levels tested to:
Destructive Attack LV 1
Line Security LV 1
Endurance LV 4
Standby Power LV 4
The unit is intended to be installed within the Protected Area.
The unit is not intended for connection to outside wiring,
covered in Article 800 in NEC/NFPA 70.
The control unit must be powered by a Listed UL 294 Class 2
power limited power supply, or UL 294, UL294B Listed PSE/
PoE Injector rated 48V dc nominal, with range of 37 - 57 V
dc capable of providing 4 h of standby power. The minimum
conductor gauge permitted to connect between the PoE PSE
or power injector and the PD shall be 26 AWG.
Provided A/C adaptor not for use with UL 294 Listed Gateway.
ACP DC power input, RS485, PoE/Ethernet are Class 2.
Port Voltage Current
RS485 data
terminal block
-7VDC to
+12VDC
+/-100uA
RS485 power
terminal block
+12VDC to
+24VDC
0.25A
Barrel Plug +24VDC 0.25A
PoE +48VDC 58mA
Compliance with IEEE 802.3 (af) specications was not
vered as part of UL 294 / UL 294 B.
The unit has been tested for compatibility with a UL 294
Listed, NDE-Series, Model NDE80 Schlage Engage Wireless
Lock.
The IP Mode of the ENGAGE Gateway was not evaulated by
UL to provide access control functions between the ACP and
locks.
Locations and wiring methods shall be in ac cordance with
the National Electrical Code, ANSI/NFPA 70 for U.S. and
Canadian Electrical Code for Canada.
FCC Statement
This equipment has been tested and found to comply with
the limits for a Class B digital device, pursuant to Part 15
of the FCC Rules. These limits are designed to provide
reasonable protection against harmful interference in a
residential installation. This equipment generates, uses, and
can radiate radio frequency energy and, if not installed and
used in accordance with the instructions, may cause harmful
interference to radio communication. However, there is no
guarantee that interference will not occur in a particular
installation. If this equipment does cause harmful interference
to radio or television reception, which can be determined by
turning the equipment off and on, the user is encouraged to try
to correct the interference by one of the following measures:
Reorient or relocate the receiving antenna.
Increase the separation between the equipment and receiver.
Connect the equipment into an outlet on a circuit different
from that to which the receiver is connected.
Consult the dealer or an experienced radio/TV technician for
help.
FCC Caution: Any changes or modications not expressly
approved by the party responsible for compliance could void
the user’s authority to operate this equipment.
This device complies with Part 15 of the FCC Rules.
Operation is subject to the following two conditions: (1) This
device may not cause harmful interference, and (2) this device
must accept any interference received, including interference
that may cause undesired operation.
FCC Radiation Exposure Statement
To comply with FCC/IC RF exposure requirements for mobile
transmitting devices, this transmitter should only be used or
installed at locations where there is at least 20 cm separation
distance between the antenna and all persons.
Industry Canada Statement
Under Industry Canada regulations, this radio transmitter
may only operate using an antenna of a type and maximum
(or lesser) gain approved for the transmitter by Industry
Canada. To reduce potential radio interference to other users,
the antenna type and its gain should be so chosen that the
equivalent isotropically radiated power (e.i.r.p.) is not more
than that permitted for successful communication.
Industrie Canada Déclaration
Conformément à la réglementation d’Industrie Canada, le
présent émetteur radio peut fonctionner avec une antenne
d’un type et d’un gain maximal (ou inférieur) approuvé pour
l’émetteur par Industrie Canada. Dans le but de réduire les
risques de brouillage radioélectrique à l’intention des autres
utilisateurs, il faut choisir le type d’antenne et son gain de
sorte que la puissance isotrope rayonnée équivalente (p.i.r.e.)
ne dépasse pas l’intensité nécessaire à l’établissement d’une
communication satisfaisante.
Industry Canada Radiation Exposure Statement
This Device complies with Industry Canada License-exempt
RSS standard(s). Operation is subject to the following two
conditions: (1) this device may not cause interference,
and (2) this device must accept any interference, including
interference that may cause undesired operation of the
device.
Industrie Canada l’exposition aux radiations
Le présent appareil est conforme aux CNR d’Industrie
Canada applicables aux appareils radio exempts de licence.
L’exploitation est autorisée aux deux conditions
suivantes : (1) l’appareil ne doit pas produire de brouillage, et
(2) l’appareil doit accepter tout brouillage radioélectrique subi,
même si le brouillage est susceptible d’en compromettre le
fonctionnement.
Table of contents
Other Schlage Gateway manuals


Popular Gateway manuals by other brands


Juniper
Juniper SRX4100 Hardware guide

Crestron
Crestron DM-TX-401-C quick guide

Cisco
Cisco VG224 - Analog Phone Gateway Hardware installation guide

ZyXEL Communications
ZyXEL Communications MAX208M quick start guide

DAVIS
DAVIS EnviroMonitor 6805 user manual

Quintum
Quintum DX Series DX2008 supplementary guide


