SCHMELZ-KOBOLD 440 600 User manual

Heinrich König & Co. KG | An der Rosenhelle 5 | D-61138 Niederdorfelden | Fon +49 (0) 6101. 53 60-0 | www.heinrich-koenig.de
SCHMELZ-KOBOLD
440600
BETRIEBSANLEITUNG
ELECTRIC HEATING IRON Operating InstructionsEN
FER À FONDRE ÉLECTRIQUE Instructions d‘utilisationFR
FUNDIDOR ELECTRICO Manual de InstruccionesES
FONDITORE ELETTRICO Istruzioni per l’usoIT
ELEKTRISCHE SMELTER Gebruiksaanwijzing
NL

BETRIEBSANLEITUNG | OPERATING INSTRUCTIONS
1 Trafostation
1.1 Netzschalter
1.2 Skala m. Temperaturbereichen
1.3 Anschlussbuchse für Schmelzer
1.4 Heizkontrolle: LED
2 Schmelzer mit 2,5 m Zuleitung
2.1 Anschluss-Stecker
2.2 Ablage
2.3 Schmelzfuß
2.4 Schmelzfußhaltefeder
1 Transformer Station
1.1 Mains on/o switch
1.2 Graduated temperature scale
1.3 Iron plug in socket
1.4 Heating Control: LED
2 Iron with 2.5m lead
2.1 Connection plug
2.2 Rubber ring
2.3 Iron tip/applicator
2.4. Retaining spring for tip
1. Poste transformateur
1.1 Interrupteur principal
1.2 Echelle température
1.3 Prise du fer à fondre
1.4 Contrôle de chauage DEL
2. Fer avec 2,5 m conduite d’alimentation
2.1 Fiche de raccordement du fer à fondre
2.2 Support
2.3 Panne
2.4 Ressort de retenue
1 Transformador
1.1 Interruptor
1.2 Escala de temperatura
1.3 Enchufe para el fundidor
1.4 Control de calefacción: LED
2 Fundidor con 2,5 m red de conducción
2.1 Clavija del Fundidor
2.2 Apoyo
2.3 Punta del soldador
2.4 Muelle de jación de la cabeza
1. Trafo
1.1 Netschakelaar
1.2 Temperatuurschaal
1.3 Aansluitpunt voor smelter
1.4 Warmtecontole: LED
2. Smelter totale lengte 2,5 m
2.1 Aansluitstekker
2.2 Standaard
2.3 Smeltvoet
2.4 Houder voor smeltvoet
1. unità trasformatore
1.1 interruttore di rete
1.2 scala con intervalli di temperatura
1.3 presa di collegamento per spatola a caldo
1.4 controllo temperatura: LED
2. Fonditore con 2,5 m linea di alimentazione
2.1 connettore di collegamento
2.2 supporto
2.3 punta a caldo
2.4 molla di ritenzione punta a caldo
ENDE FR
ES ITNL
12
3
41
2
3
4
1.Trafostation 2. Schmelzer

440600 Schmelz-Kobold | Stand 22/17
DE SCHMELZ-KOBOLD
ANWENDUNG:
ZumSchmelzenvonKönig-Füllstoen(Weichwachs,Hartwachs,HartwachsPLUS,
Hartwachs Matt, Kerami-Fill® sowie zum Glätten und zum Farbmischen.
TECHNISCHE DATEN:
Schmelzer:
Spannung:12 V • Leistung: 12,5W • Zuleitung: 2,5 m
Trafo-Station:
Primärspannung:230V,50/60Hz• Sekundärspannung:12V •Nennleistung:max.32
W•Temperatureinstellung:Stufenlos•Funktionsanzeige:LEDrot•Zuleitung-Netz:
1,4 m
VOR INBETRIEBNAHME:
Gebrauchsanweisung und Sicherheitshinweise ganz durchlesen!
Die Netzspannung muss mit der auf demTypenschild angegebenen übereinstim-
men.
Achtung: Die Schmelzspitze wird im Betrieb heiß -Verbrennungsgefahr!
Für sicheren Stand derTrafostation sorgen - vor Fallschäden schützen!
Zum Ablegen des Schmelzers immer die Ablage benutzen!
GEBRAUCHSANWEISUNG:
1. Anschluss-Stecker des Schmelzers mit derTrafo-Station verbinden.
2. Schmelzer ablegen. Darauf achten, dass der Schmelzfuß nicht mit dem Netz-
bzw. Zuleitungskabel oder sonstigem in Berührung kommt. Die Ablage sorgt für
ausreichenden Abstand zur Ablageäche.
3. Netzstecker mit Steckdose verbinden und Netzschalter einschalten.
4.Diedem zuverarbeitendenFüllstoentsprechendeSchmelztemperaturmitdem
Regler einstellen. Das folgende Pulsieren der LED signalisiert, dass die Tempera-
tur-Steuerelektronik arbeitet.
5. Die Betriebstemperatur ist nach ca. 2 - 3 Minuten erreicht. Immer nur kleine
Mengen des Füllstoes abschmelzen. Dabei den Füllsto nicht abtropfen lassen,
sondern mitderSchmelzspitzeaufnehmen und indieSchadstelledrücken.Soist ein
präzisesArbeitenmöglich.NachderBefüllungdieÜberständemitder achenSeite
desSchmelzfußesglättenoderverteilen.EntwickelnsichwährendderVerarbeitung
Blasen oder Rauch, muss die Temperatur heruntergeschaltet werden.
6.DieSchmelzspitzegrundsätzlichnachGebrauchmitfeinerStahlwolleabwischen,
umeinEinbrennenderFüllstoeoderSchlackenbildungzuvermeiden.Spitzenicht
mitStechbeitel,MesseroderLackziehklingesäubern.Schmelzfuß gelegentlichvom
StabdesHeizelementesabziehen,diesenreinigen,umdieleichteAustauschbarkeit
zu erhalten.
LIEFERBARE ERSATZTEILE:
Trafo-Station Art.-Nr. 440 604
Schmelzer mit Schmelzfuß Art.-Nr. 440 605
Schmelzer ohne Schmelzfuß Art.-Nr. 440 602
Schmelzfuß Art.-Nr. 440 603
AUSWECHSELN DES SCHMELZFUSSES:
Den Wechsel nur im ausgekühlten Zustand vornehmen.
FedervonderhinterenPosition(2)aufdievorderePosition(1)schieben.Schmelzfuß
vorsichtig,mitHilfeeinerZange,abziehen.Den neuenSchmelzfußbiszumAnschlag
auf den Stab des Heizelementes schieben, Feder von der vorderen Position (1) auf
diehinterePosition(2)schieben.Darauf achten, dass derSchmelzfuß festaufdem
Heizstab sitzt.
SICHERHEITSHINWEISE:
1.Beinichtbestimmungsgemäßem GebrauchundEingrienindasGerätverlöschen
Garantie- und Haftungsansprüche seitens des Herstellers.
2. Kontrollieren Sie vor Gebrauch alle Komponenten. Lassen Sie beschädigteTeile
nur vomFachmann reparieren odernutzen Sie denKönig Reparatur-Dienst.Wenn
Reparaturen unsachgemäß durchgeführt werden, besteht Unfallgefahr für den
Benutzer. Für Reparaturen stets Original-Ersatzteile verwenden.
3.PrüfenSievordemAnheizendesSchmelzers,obderSchmelzfuß ordnungsgemäß
mit dem Heizelement verbunden ist. Der heiße Schmelzfuß darf nicht mit Haut,
Haaren oder mit hitzeempndlichen und brennbaren Materialien inVerbindung
gebracht werden.
4. Stellen Sie sicher, dass Unbefugte, insbesondere Kinder, keinen Zugang zum
Schmelz-Kobold haben.
5. Benutzen Siedie Anschlussleitung nichtzum Ziehen des Netzsteckersoder zum
Tragen desGerätes.AchtenSiedarauf,daßAnschlussleitungennichtmitdem heißen
Schmelzfuß, Öl oder scharfen Kanten in Verbindung kommen. Beschädigte An-
schlussleitungenkönnenBrände,KurzschlüsseundelektrischeSchläge verursachen.
6.SchützenSieIhr GerätvorallenFlüssigkeitenundFeuchtigkeit.Andernfallsbesteht
die Gefahr von Feuer oder elektrischen Schlägen.
7. Nationale und Internationale Sicherheits-, Gesundheits- und Arbeitsschutzvor-
schriften sind zu beachten.
EN ELECTRIC HEATING IRON
USES:
To melt dierent llers (e.g. Soft Wax, Hard Wax, Hard Wax PLUS, Hard Wax
Matt, Ceramic-Filler). Also for levelling and colour mixing.
TECHNICAL SPECIFICATION:
Iron:
Voltage:12 V • Wattage: 25 W • Lead: 2,5 m
Transformer Station:
Primary Voltage: 230 V, 50/60 Hz • Secondary Voltage: 12 V • Power rating:
max. 32 W • Temperature setting: innitely varable • Function display: LED
red • Mains lead: 1,4 m
BEFORE SETTING TO WORK:
Read entire operating and safety instructions! Please check wether the supply
voltage is in accordance with the voltage stated on the type plate.
Attention: Melter tip becomes hot - danger of burning!
Takecareofsafepositionofthe transformerstation–avoiddamagebydropping!
The heating element has got a sensitive ceramic core. Avoid strong vibrations
caused e.g. by beating the heating element on the edge of the table.
Always put down iron on the stand.

BETRIEBSHINWEISE | OPERATING NOTES
OPERATING INSTRUCTIONS:
1. Connect the plug of the iron to the transformer station.
2. Put down iron. Take care that tip does not get in touch with the lead cables
or other things. Due to the stand allows for sucient distance to the support.
3. Connect mains plug to mains socket and actuate mains switch.
4. Set melting temperature with the temperature control according to the
ller material. The following ickering of the LED signals that the temperature
electronic is working.
5. Operation temperature at the tip after 2 - 3 minutes. Always melt o little
portionsof ller. Donot letthe llerdrop, buttake it withthe irontip andpress
itinto thedamage. Thusmakes aprecise work possible.When damageis lled,
level or spread projectings with the at side of the tip. If bubbles or smoke
develop temperature of the iron has to be reduced.
6. Always clean iron tip with ne wire wool after use to avoid burning in of the
ller and development of slag. Neither clean heating tip with a chisel nor with
a knive nor with the Special Scraper. From time to time pull o tip and heating
element to ensure an easy replacement of the tip.
AVAILABLE SPARE PARTS:
Transformer station art.no. 440 604
Heater with iron tip art.no. 440 605
Heater without iron tip art.no. 440 602
Iron tip art.no. 440 603
CHANGING THE IRON TIP:
Replace when cooled down, only.
Move spring from rear (2) to front position (1). Carefully take o iron tip using
pliers. Push the iron tip as far as it will go over the bar of the heating element.
Move spring from front (1) to rear position (2). Take care iron tip sits tightly
on the heating bar.
SAFETY ADVICE:
1.Theguaranteeissuedbythe manufacturerandany liabilityclaimsagainstthe
manufacturershall berendered null and void ifthe deviceis useda mannernot
in accordance with its designated use or if alterations are made to it.
2. Check all components before use. Have any damaged parts repaired by a
specialistoruse theKönigrepairservice.Incorrectly performedrepairsrepresent
a risk of accidents for the user. Always use genuine spare parts for any repairs.
3.Before heatingupthe melter,checkthat themelter tipiscorrectly connected
to the heating element. Do not allow the hot tip touch your skin, your hair or
any materials which are heat-sensitive and ammable.
4. Make sure that the Electric heating iron is not accessible to any unathorized
person, in particular children.
5.Do notuse the connectioncable topull outthe plugor asa means of carrying
the device. Make sure that connection cables neither get in touch with the hot
meltertip,oil orsharpedges.Damaged connectioncablesrepresentapotential
cause of re, short circuits and electric shocks.
6. Protect your device against all liquids and moisture. Failure to do this repre-
sents a risk of re or electric shocks.
7. Comply with national and international regulations governing health and
safety at work.
FR FER À FONDRE ÉLECTRIQUE
DOMAINE D’APPLICATION :
La fonte des produits de remplissage König (Cire Malléable, Cire Dure, Cire
Dure PLUS, Kerami-Fill®) et pour égaliser et mélanger les couleurs.
CARACTÉRISTIQUES TECHNIQUES :
Fondeur :
Tension:12 V • Puissance: 25 W • Conduite d’alimentation: 2,5 m
Poste électrique :
Tension primaire : 230 V, 50/60 Hz • Tension secondaire: 12V • Puissance nomi-
nale: max. 32W • Réglage de la température: en continu • Achage fonction:
LED rouge • Réseau d’alimentation : 1,4 m
AVANT LA MISE EN SERVICE :
Veuillez lire le mode d’emploi et les consignes de sécurité en totalité.
La tension secteur doit correspondre à celle indiquée sur la plaque indiquant
le type.
Attention: La panne chaue lors du fonctionnement - risque de brûlure !
Veiller à ce que le poste transformateur soit placé de façon stable et protégé
contre les chutes !
Toujours utiliser le support pour déposer le fer!
MODE D’EMPLOI :
1. Relier la che de raccordement du fondeur à la station du transfo.
2. Poser le fondeur. Faire attention à ce que la panne du fer à fondre n’entre
pas en contact avec les feeders ou autres. Le support permet un écart susant
avec la surface de pose.
3. Relier la prise mâle à la prise femelle et commuter l’interrupteur.
4. Régler à l’aide du régulateur la température de fusion correspondant à la
matière de remplissage à transformer. La pulsation de la LED signalise que
l’électronique de commande de la température est active.
5. La température de service est atteinte après 2 à 3 minutes. Faire toujours
fondre de petites quantités du produit de remplissage pour garantir un travail
précis.Après leremplissage dupoint défectueux,égaliser ourépartir lessaillies
avec la face plate de la panne du fer à fondre électrique.
6. Après utilisation, enlever les restes de matière de remplissage de la panne
du fer à fondre avec la brosse en laiton ou la laine à polir le vernis pour éviter la
formation de scories. A l’occasion, retirer la panne du fer à fondre de l’élément
thermique et nettoyer ce dernier pour conserver une interchangeabilité aisée.
PIÈCES DE RECHANGE DISPONIBLES:
Station de transformateur no.art. 440 604
Elément de fondre avec tête chauante no.art. 440 605
Elément de fondre sans tête chauante no.art. 440 602
Tête chauante no.art. 440 603
CHANGEMENT DE LA PANNE :
N’eectuer ce changement qu’à froid.
Pousser le ressort de la position nale (2) à la position frontale (1). Retirer la
tête chauante avec précaution à l’aide d’une tenaille. Mettre la nouvelle tête

chauante à fond sur la barre de l’élément de chauage. Repousser le ressort
de la position frontale à la position nale. La tête chauante doit être bien
arrêtée sur la barre chauante.
CONSEILS DE SÉCURITE :
1.Lesdroits degarantieetde responsabilitéduconstructeur prennentnencas
d’emploi non conforme de l’appareil et d’interventions eectuées sur celuici.
2. Contrôler tous les éléments avant utilisation. Ne faire réparer les pièces
endommagées que par un spécialiste ou proter du service de réparation
König. Il existe un danger d’accident pour l’utilisateur si les réparations ne
sont pas eectués de manière conforme. Utiliser toujours des pièces d’origine
pour les réparations.
3. Avant de chauer le fondeur, contrôler si la panne du fer à fondre est cor-
rectement reliée à l’élément thermique. La panne brûlante ne doit entrer en
contact ni avec la peau, ni avec les cheveux, ni avec des matières sensibles à la
chaleur ou inammables.
4. S’assurer qu’aucune personne non autorisée, en particulier des enfants, n’a
accès au fer à fondre électrique.
5. Ne pas utiliser la conduite de raccordement pour tirer la prise ou porter
l’appareil. Faire attention à ce que les conduites de raccordement n’entrent
pas en contact avec la panne brûlante du fer, l’huile ou des arêtes tranchantes.
Lesconduites deraccordementdéfectueuses peuventcauser desincendies,des
courts-circuits et des décharges électriques.
6. Protéger l’appareil de tous les liquides et de l’humidité. Sinon, il y a danger
d’incendie ou de décharges électriques
7. Respecter les règlements nationaux et internationaux de sécurité, de santé
et de protection du travail.
ES FUNDIDOR ELECTRICO
ÁMBITO DE UTILIZACIÓN:
Se puede utilizar para fundir los materiales de relleno König. Se puede usar
para alisar y mezclar colores.
DATOS TÉCNICOS:
Fundidor:
voltaje:12 v • potencia: 25 w • red de conducción: 2,5 m
Extación-Trafo:
voltaje primario: 230 v, 50/60 Hz • voltaje secundario: 12 v • potencia nominal:
max. 32 w regulación de la temperatura: sin escalonamiento • indicación de la
función: LED rojored de conducción: 1,4 m
ANTES DE LA PUESTA EN MARCHA:
¡Lea las instrucciones de uso y de seguridad en su totalidad!
La tensión de red debe coincidir con la tensión indicada en la placa de
características.
Atención: ¡Durante el servicio, la punta de fusión se calienta - peligro de
quemaduras!
¡Cuidar de un apoyo seguro de la estación transformadora - proteger de daños
por caídas!
¡Para depositar el fundidor utilizar siempre el apoyo!
MANEJO DE INSTRUCCIONES:
1. Unir la clavija del fundidor con la Estación-Trafo.
2. Apoyar el fundidor. Observar, que la punta de fusión no entre en contacto
con los cables de red o bien de acometida u otros. El apoyo cuida de suciente
distancia a la supercie de la base.
3. Unir la clavija de alimentación con la toma de corriente y encendeer el
interruptor.
4.Elegirlatemperaturadefundiciónadecuada con elreguladorparalasmaterias
de empaste a tratar. A continuación pulsar LED, con lo cual se indica que la
electrónica de manejo de la temperatur está en marcha.
5. Se alcanza la temperatura de funcionamiento aproximadamente en 2 o 3
minutos. Para un trabajo más ecaz, fundir siempre pequeñas cantidades de
materias de empaste. Después de rellenar el sitio dañado, alisar o distribuir con
la parte plana del pie del fundidor la materia sobrante.
6.Trássuutilización despojarelpiedelfundidor delosrestosdelosmaterialesde
empaste con el cepillo de latón o con lana de acero para evitar escoria. Separar
devez encuando elpie del fundidordel elementode calentamientoylimpiarlo
para mentener la capacidad de intercambio.
REPUESTOS DISPONIBLES:
Estación transformadora Art.Nº 440 604
Fundidor con punta de fusión Art.Nº 440 605
Fundidor sin punta de fusión Art.Nº 440 602
Punta de fusión Art.Nº 440 603
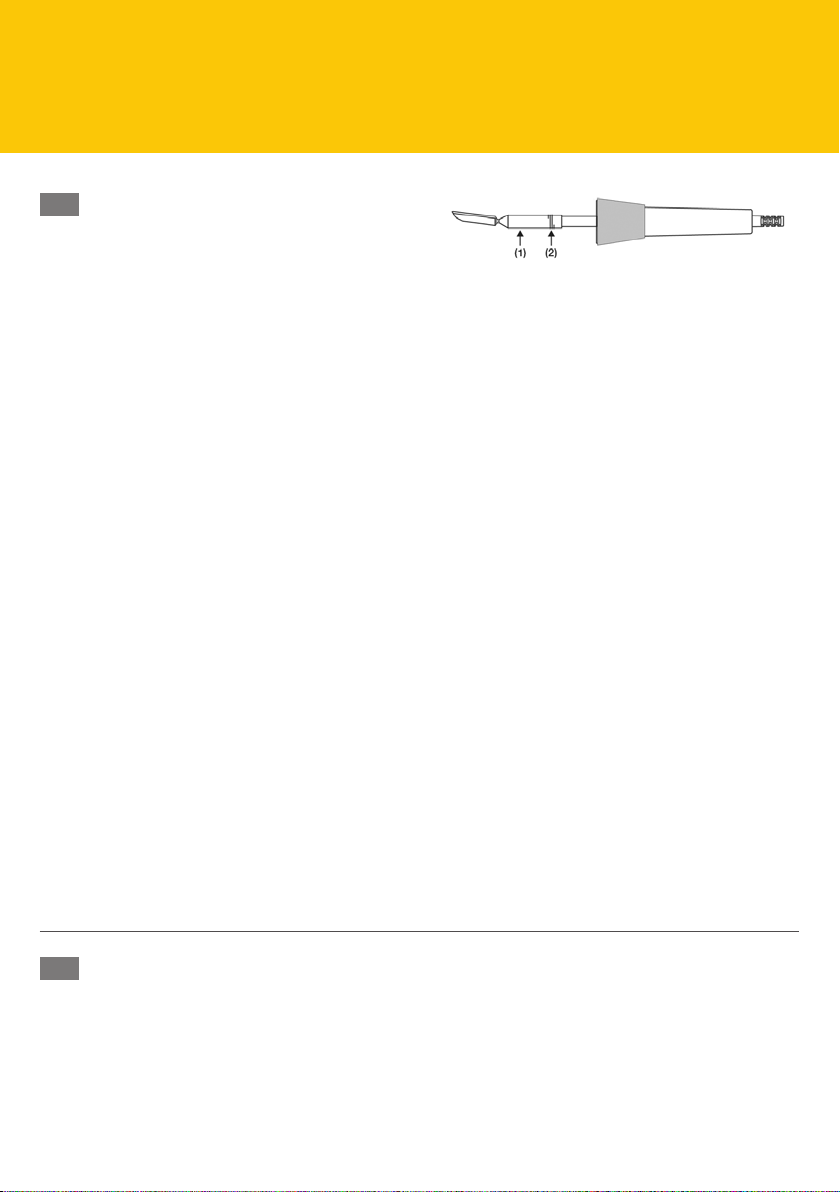
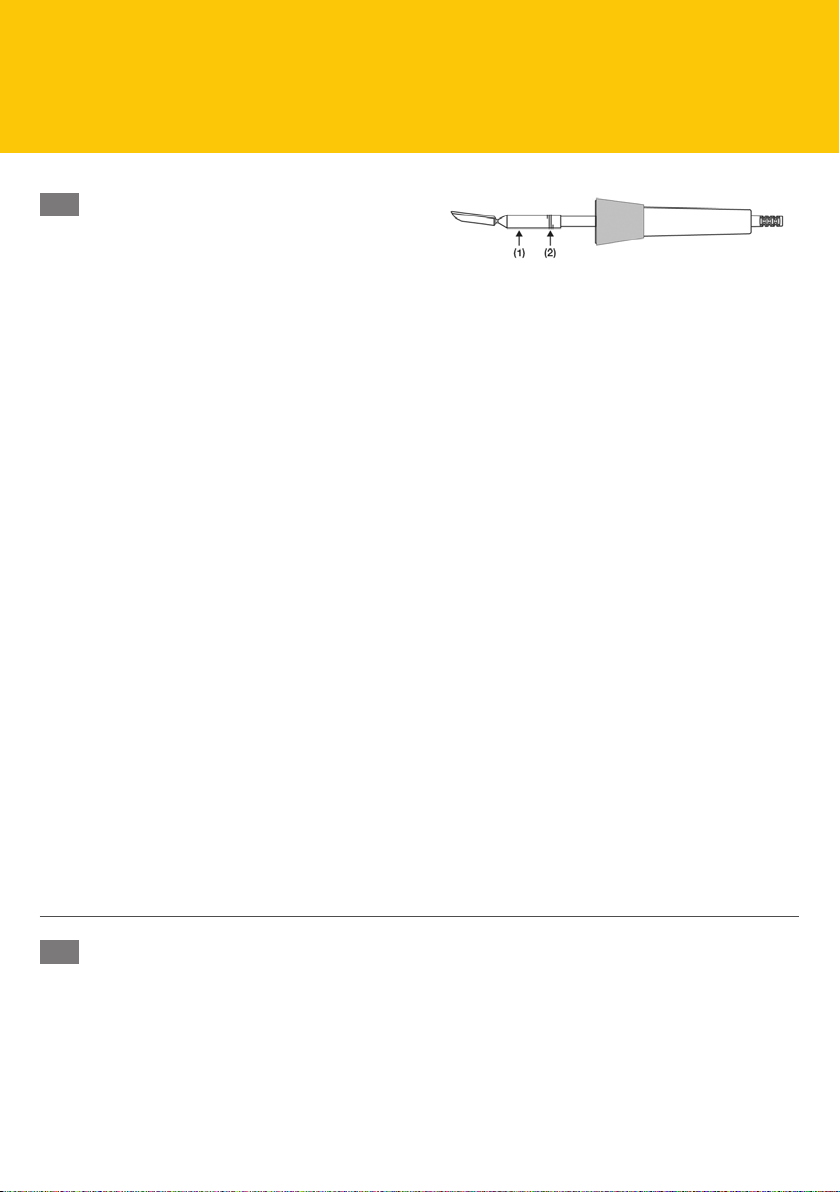
SUSTITUCIÓN DE LA PUNTA DEL SOLDADOR:
Realizar la sustitución sólo en estado frío.
Deslizarelmuelle desdelaposicióntrasera(2) alaposicióndelantera(1).Retirar
cuidadosamentelapuntade fusiónconayudadeunos alicates.Deslizarhasta el
tope la punta de fusión nueva sobre la varilla del elemento calefactor, deslizar
el muelle de la posición delantera (1) a la posición trasera (2). Observar que la
punta de fusión asiente rmemente sobre la varilla calefactora.
CONSEJOS DE SEGURIDAD:
1. Tanto la garantía como el derecho a ella quedarán anulados por parte del
fabricante si se lleva a cabo una utilización y manejo inadecuados.
2.Antesdesuutilización revisartodosloscomponentes,Piezasdañadasdeberán
serreparadasporun expertoopor elservicio dereparacióndeKönig.Sisellevan
a cabo reparaciones inadecuadas el asuario corre riesgos de accidente. Utilizar
siempre piezas de repuesto originales.
3. Aseguarse de que antes del calentamiento del fundidor el pie de éste se
encuentre correctamente unido al elemente de calentamiento. Cuando el pie
del fundidor se caliente no debe entrar en contacto con la piel, el pelo ni con
materiales inamables y sensibles al calor.
4. Comprobar que personas no autorizazas, especialmente niños, no tengan
acceso al fundidor eléctrico.
5.No utilizarla línea deconexiónparar tirarde laclavija dealimentación opara
transportar el aparato. Prestar atención a que las líneas de conexión no entren
en contacto con el pie del fundidor caliente, con aceite o con cantos agudos.
Líneas de conexión dañadas pueden provocar incendios, cortos circuitos o
choques eléctricos.
6.Protegerelaparatode sustanciaslíquidasy delahumead paraevitarpeligros
de incendios y de choques eléctricos
7. Atenerse a las disposiciones nacionales e internacionales sobre la protección
a la seguridad, a la salud y al trabajo.

BETRIEBSHINWEISE | OPERATING NOTES
NL ELEKTRISCHE SMELTER
TE GEBRUIKEN BIJ:
Tevens te gebruiken om gevulde schade glad te maken en kleuren te mengen.
Bij gebruik van bovengenoemde vulstoen, aub. de gebruiksaanwijzing van
de vulstoen volgen.
TECHNISCHE GEGEVENS:
Smelter:
spanning:12V • vermogen: 25W • totale lengte: 2,5 mtr.
Trafo:
primaire spanning: 230 V, 50/60 Hz • secundaire spanning: 12V • nominaal
vermogen: max. 32W • temperatuurinstelling: draaien in functie • in functie:
LED rood • snoer: 1,4 mtr.
VOORDAT MEN HET APPARAAT GAAT GEBRUIKEN:
Gebruiks- en veiligheidsaanwijzingen helemaal doorlezen!
Aub. controleren of de netspanning met de aanduiding op het apparaat
overeenkomt.
Let op: de smeltpunt wordt tijdens gebruik warm – verbrandingsgevaar!
Zorg dat de trafo op een veilige plaats ligt – tegen vallen beschermen!
Het apparaat niet gebruiken zonder de standaard gummiring.
GEBRUIKSAANWIJZING:
1. Aansluitpunt van de smelter met de trafo verbinden.
2. Smelter neerleggen. Erop letten, dat de smeltvoet niet met de kabel in
aanraking komt.
3. Stekker met de stekkerdoos verbinden en de netschakelaar aanzetten.
4. De warmteregelaar op de juiste stand zetten, zodat de te gebruiken vulstof
makkelijk smelt.
5. De verkerkingstemperatuur is na ca. 2-3 minuten bereikt. Altijd kleine hoe-
veelheden van de vulstof smelten, daardoor wordt precisiewerk mogelijk. Na
het vullen van de schade, het overschot met de vlakke kant van de smeltvoet
egaliseren of verdelen.
6.Smeltvoetna gebruikmetjnestaalwolschoonmaken.Smeltvoetregelmatig
van verwarmingselement scheiden, deze reinigen, zodat het makkelijker is om
de voet te verwisselen.
LEVERBARE RESERVEONDERDELEN:
Trafostation Art.nr. 440 604
Smelter met smeltvoet Art.nr. 440 605
Smelter zonder smeltvoet Art.nr. 440 602
Smeltvoet Art.nr. 440 603
VERWISSELEN VAN DE SMELTVOET:
Alleen wisselen als smeltvoet afgekoeld is.
Veer van de achterste positie (2) op de voorste positie (1) schuiven. Smeltvoet
voorzichtig,metbehulpvaneen tang,verwijderen.De nieuwesmeltvoettotaan
het begin van de staaf van het warmte-element schuiven, veer van de voorste
positie (1) op de achterste positie (2) schuiven. Let er wel op dat de smeltvoet
vast op de warmtestaaf zit.
VEILIGHEIDSVOORSCHRIFTEN
1. Bij oneigenlijk gebruik en het zelf repareren van het apparaat vervalt de
garantie van de producent.
2.Controleert uvoor gebruikalle componenten.Laatbeschadigde delenalleen
dooreenvakmanreparerenofmaakgebruikvan de reparatie-servicevanKönig.
Indienreparatiesonzorgvuldiguitgevoerdworden,bestaatongevalgevaarvoor
de gebruiker. Bij reparaties alleen originele onderdelen gebruiken.
3. Test vóór het verwarmen van de smelter, of de smeltvoet op de juiste wijze
methetverwarmingselementverbondenis.Dewarmesmeltvoetmagnietmet
huid, haren of met warmtegevoelige of brandbare mate rialen in verbinding
gebracht worden.
4. Geen onbevoegden, speciaal kinderen, mogen geen gebruik maken van de
elektrische smelter.
5. Bij het dragen de hele smelter in de hand nemen, en niet meenemen aan
de snoeren. Het verwarmde smeltvoetje niet in aanraking laten komen met
olie of scherpe kanten. Beschadigde snoeren kunnen branden, kortsluiting of
elektrische schokken geven.
6.Bescherm hetapparaatvoorallevloeibaremiddelenen vocht.Andersbestaat
er kans op brandgevaar of elektrische schokken.
7. Nationale en internationale veiligheids-, en gezondheids- en werkbescher-
mingsvoorschriften in acht nemen.
IT FONDITORE ELETTRICO
CAMPO D’APPLICAZIONE:
Per fondere i seguenti prodotti König. Per lisciare e mescolare i colori. Per l’uti-
lizzo dei singoli prodotti vedi le relative istruzioni.
DATI TECNICI:
spatola a caldo:
tensione:12V •potenza:12,5W •Cavodialimentazione:2munità trasformatore:
tensione primaria: 230 V, 50/60 Hz • tensione secondaria: 12 V • potenza no-
minale: max. 32W • impostazione temperatura: a variazione continua • spia di
funzionamento: LED rosso • Cavo per rete alimentazione: 1,4 m
PRIMA DELLA MESSA IN FUNZIONE:
Leggere attentamente le istruzioni per l’uso e le indicazioni di sicurezza!
La tensione di rete deve coincidere con quanto specicato sulla targhetta dati.
Montarel’anellodiappoggioingomma sullaspatolaacaldo;farscorrerel’anello
“da dietroattraversoilcavo”sulbordobombatodell’elementoriscaldante,vedere
gura. Non utilizzare l’apparecchio senza l’anello di appoggio in gomma.
Attenzione! Durante l’uso la punta si scalda molto - pericolo di ustione!
Assicurarsi che l’unità trasformatore appoggi in modo stabile; proteggerla dal
rischio di caduta!
Per appoggiare la spatola a caldo utilizzare sempre il supporto!
ISTRUZIONI PER L’USO:
1. Collegare il connettore della spatola a caldo all’unità trasformatore.

2. Appoggiare la spatola a caldo. Assicurarsi che la punta non entri in contatto
con il cavo di rete, la linea di alimentazione o altro. Il supporto garantisce una
distanza suciente dalla supercie di appoggio.
3. Collegare il connettore alla presa e accendere l’interruttore di rete.
4.Conilregolatoreimpostarelatemperaturadifusionedello stuccodalavorare.
In seguito il LED che lampeggia segnala che il dispositivo di controllo della
temperatura è in funzione.
5. La temperatura d’esercizio viene raggiunta dopo circa 2 - 3 minuti. Fondere
sempre solo piccole quantità di stucco. Non lasciare gocciolare lo stucco;
raccoglierlo con la punta e premerlo nel punto danneggiato. Questa procedura
consentedilavorareinmodo preciso. Dopoilriempimento,levigareodistribuire
ilmaterialein eccessoconillatopiattodella puntaacaldo.Sedurantela lavora-
zione si sviluppano bolle o fumo occorre ridurre la temperatura.
6. Dopo l’uso passare accuratamente la punta a caldo con lana d’acciaio ne
per evitare la combustione dello stucco o la formazione di scorie. Non pulire la
puntaconunoscalpelloda legno,uncoltelloounraschiettoper sverniciare.Ogni
tanto rimuovere la punta a caldo dal corpo dell’elemento riscaldante e pulirla
per garantire una facile sostituzione.
RICAMBI DISPONIBILI:
unità trasformatore cod. 440 604
spatola con punta a caldo cod. 440 605
spatola senza punta a caldo cod. 440 602
punta a caldo cod. 440 603
SOSTITUZIONE DELLA PUNTA A CALDO:
Eettuare la sostituzione solo ad apparecchio freddo.
Spostare la molla dalla posizione posteriore (2) a quella anteriore (1). Slare
delicatamentelapuntaacaldo conl’aiutodiunapinza. Spingerelanuovapunta
acaldonoall’arrestosulcorpodell’elementoriscaldante,spingerelamolladalla
posizione anteriore (1) a quella posteriore (2). Assicurarsi che la punta a caldo
sia posizionata bene sul corpo di riscaldamento.
INDICAZIONI DI SICUREZZA:
1. In caso di uso non conforme alla destinazione d’uso e interventi sulla parte
interna dell’apparecchio decadono la garanzia e qualsiasi responsabilità del
costruttore.
2.Primadell’uso controllaretuttiicomponenti.Farripararelepartidanneggiate
solo da un tecnico oppure avvalersi del servizio riparazione König. In caso di
riparazione scorretta c’è pericolo di infortunio per l’utente. Per le riparazioni
utilizzare sempre ricambi originali.
3.Prima diriscaldarela spatolavericareche lapuntaa caldosia correttamente
collegataall’elementoriscaldante.Lapuntamoltocaldanondeve essereportata
a contatto con pelle, capelli o con materiali sensibili al calore o inammabili.
4. Impedire alle persone non autorizzate, in particolare i bambini, l’accesso alla
spatola a caldo“Kobold”.
5.Nonutilizzareilcavodicollegamentoper slareil connettoreoper trasportare
l’apparecchio.Attenzioneanon mettereicavi dicollegamentoa contattocon la
puntacalda,olio ospigolitaglienti.Lineedi collegamentodanneggiatepossono
causare incendi, cortocircuiti e folgorazione.
6. Proteggere l’apparecchio dai liquidi e dall’umidità. Pericolo di incendio o
di folgorazione.
7. Attenersi alle direttive nazionali e internazionali sulla sicurezza, la salute e la
protezione da infortuni sul lavoro.

NOTIZEN | NOTES
Table of contents