sComm UbiDuo 3 SGD User manual

User Manual for Models TTS1,
TTS2, and SGD
November 2020

Page 1of 21
Table of Contents
Table of Contents..................................................................................................................................................1
Welcome...............................................................................................................................................................3
FCC ........................................................................................................................................................................3
Compliance Statement (Part 15.19) .................................................................................................................3
Warning (Part 15.21) ........................................................................................................................................3
FCC Interference Statement (Part 154.105 (b))................................................................................................3
Specific Absorption Rate (SAR) .........................................................................................................................3
A Note From the sComm CEO & Co-Founder .......................................................................................................4
Important Information..........................................................................................................................................5
Separating the Two Halves of the UbiDuo 3.........................................................................................................5
Power and Ports Panel..........................................................................................................................................6
3.5mm Audio Socket.........................................................................................................................................6
USB-A Flash Storage Port..................................................................................................................................6
USB-C Charging Port .........................................................................................................................................6
Mini HDMI Port.................................................................................................................................................6
External Speaker for the UbiDuo 3 SGD................................................................................................................7
Powering the UbiDuo 3 “ON” and “OFF”..............................................................................................................7
Main Menu Icons and Accessible Functions.........................................................................................................8
Conversation Icon/Split Screen.........................................................................................................................8
Scrolling Through a Conversation.................................................................................................................8
Exiting the Split Screen Chat.........................................................................................................................8
Settings Icon......................................................................................................................................................9
Navigating Within the Settings Icon .............................................................................................................9
Appearance...................................................................................................................................................9
Brightness/Sleep Timer.................................................................................................................................9
Screen Options..............................................................................................................................................9
Changing the Split Screen Font and Color ..................................................................................................10
Text-to-Speech (Only on Accessory Model -SGD Half) ...................................................................................10
Voices (only on SGD model)........................................................................................................................11
Volume (only on SGD model)......................................................................................................................11
Speed (only on SGD model) ........................................................................................................................11
Pronunciation (only on the SGD model) .....................................................................................................11
Time (only on SGD model) ..........................................................................................................................11

Page 2of 21
Length (only on SGD model) .......................................................................................................................11
Saved Icon –Save, View, and Delete Conversations ......................................................................................12
Viewing Saved Conversations .....................................................................................................................12
Transferring a Saved Conversation to a Computer.....................................................................................12
Deleting a Saved Conversation ...................................................................................................................13
Setting the Time and Date..................................................................................................................................13
UbiID –Naming Each Half of the UbiDuo 3 ........................................................................................................14
About ..................................................................................................................................................................14
In Range ..............................................................................................................................................................14
Inviting Other UbiDuo 3 Devices to Chat....................................................................................................14
Holding a 3-Way or 4-Way Conversation....................................................................................................15
No Units In Range .......................................................................................................................................15
Setting Pre-Programmed Messages....................................................................................................................15
Administrator Icon..............................................................................................................................................15
Wireless Enabled.........................................................................................................................................15
Allow Chat Save ..........................................................................................................................................15
Start in Conversation Screen.......................................................................................................................16
Software Update.........................................................................................................................................16
USB Port......................................................................................................................................................16
Updating the UbiOS Software.............................................................................................................................16
Features for People with Low Vision ..................................................................................................................17
Charging the Batteries ........................................................................................................................................17
Function Keys, Shortcuts, and Emoticons...........................................................................................................17
Fn (Function) Key Shortcuts:.......................................................................................................................18
Emoticons ...................................................................................................................................................18
Control Keys................................................................................................................................................19
Shift Keys.....................................................................................................................................................19
Special Functions ........................................................................................................................................19
Customer Service and Technical Support...........................................................................................................19
Warranty Information.........................................................................................................................................20

Page 3of 21
Welcome
We are excited to welcome you to the sComm family of UbiDuo users! Whether you have recently purchased
a UbiDuo 3 Wireless, UbiDuo 3 Wired, UbiDuo Text to Speech 1 (TTS1) or a UbiDuo 3 Text to Speech 2 (TTS2),
we hope you find this User Manual helpful in making changes to maximize the use of your UbiDuo 3 and
make it easy for those who are deaf, hard of hearing or hearing to use.
FCC
If trouble is experienced with this equipment, for repair or warranty information, please contact sComm toll free at
866-505-7008 (voice), or 816-527-9079 (video phone.)
There are no user serviceable components within this equipment.
Compliance Statement (Part 15.19)
This device complies with Part 15 of the FCC Rules.
Operation is subject to the following two conditions:
1. This device may not cause harmful interference, and
2. This device must accept any interference received, including interference that may cause undesired
operation.
Warning (Part 15.21)
Changes or modifications not expressly approved by the party responsible for compliance could void the user’s
authority to operate the equipment.
FCC Interference Statement (Part 154.105 (b))
This equipment has been tested and found to comply with the limits for a Class B digital device, pursuant to Part
15 of the FCC Rules. These limits are designed to provide reasonable protection against harmful interference in a
residential installation. This equipment generates, uses and can radiate radio frequency energy and, if not
installed and used in accordance with the instructions, may cause harmful interference to radio communications.
However, there is no guarantee that interference will not occur in a particular installation. If this equipment does
cause harmful interference to radio or television reception, which can be determined by turning the equipment off
and on, the user is encouraged to try to correct the interference by trying one of the following measures:
-Reorient or relocate the receiving antenna
-Increase the separation between the equipment and the receiver
-Connect the equipment into an outlet on a circuit different from that to which the receiver is
connected.
This portable transmitter with its antenna complies with FCC’s RF exposure limits for general
population/uncontrolled exposure.
Specific Absorption Rate (SAR)
This portable equipment with its antenna complied with FCC’s RF radiation exposure limits set forth for an
uncontrolled environment. This equipment has shown compliance with FCC’s Specific Absorption Rate (SAR) limits.
To maintain compliance, this transmitter must not be co-located or operating in conjunction with any other
antenna or transmitter.

Page 4of 21
A Note From the sComm CEO & Co-Founder
Thank you for purchasing a UbiDuo 3, the next generation UbiDuo 3, the World’s Most
Ubiquitous Communication Device for people who are deaf, hard of hearing, and hearing who
interact with each other face-to-face every day. It is not only for the deaf and hard of hearing,
but also for those who have communication barriers. The UbiDuo 3 has opened the door for
many people and has given them a sense of freedom and independence like nothing else. With
the UbiDuo 3, you’ll be able to communicate directly, without an interpreter and without writing
notes back and forth on paper or reading lips, anywhere anytime and, most importantly, be able
to interact with each other directly without barriers.
For those of you who have purchased a UbiDuo 3 to better serve clients or employees who are
deaf or hard of hearing, congratulations. The UbiDuo 3 empowers deaf and hard of hearing
employees to interact with hearing co-workers and managers in addition to interpreters. While
there may be some situations like staff meetings or workshops in which an interpreter might be
necessary, you now will be able to hold impromptu conversations, quick training sessions or
meetings without worrying about an interpreter not being available.
Please remember though, the UbiDuo 3 is designed specifically for face-to-face communication.
We hope that every worker who is deaf or hard of hearing in America will have a UbiDuo 3 on
their desk or in their work area so that they too can experience the kind of spontaneous
conversations that hearing people engage in every day.
We’d love to hear your feedback about the UbiDuo 3, whether you’re a person who is deaf or
hard of hearing using it in personal or professional settings, or whether you’re a business owner
who bought the UbiDuo 3 for an employee who is deaf or hard of hearing. We’d love to hear
from agencies who have recommended the UbiDuo 3 to clients who are deaf or hard of hearing
who interact with the deaf. More information about how to contact us is included later in this
manual.
Communicating freely,
Jason Curry
CEO & Co-Founder

Page 5of 21
Important Information
When using electrical appliances, basic safety instructions should always be followed.
-Read all instructions before using the UbiDuo 3.
-To protect against risk of electrical shock, do not put the UbiDuo 3 or its cord or plug in water or other
liquids.
-Do not operate either side of the UbiDuo 3 with a damaged cord or plug, or after either side has been
damaged in any manner. Contact sComm Tech Support if the UbiDuo 3 is damaged in any way.
-Do not let cords touch hot surfaces and where possible, do not let cords hang over the edge of a table, desk
or counter.
-The use of accessories not recommended by the manufacturer may cause fire, electric shock or injury.
The UbiDuo 3 is designed and manufactured to be rugged and durable, however it should still be treated with the
same care one would give to a laptop computer. Do not drop it, do not spill liquids on it, and do not unscrew any
part of the UbiDuo 3 to remove the casing.
Only use the UbiDuo 3 power cord to charge the units. The UbiDuo 3 charger operates on 120 volts AC; if you are
traveling overseas, you will need an appropriate converter.
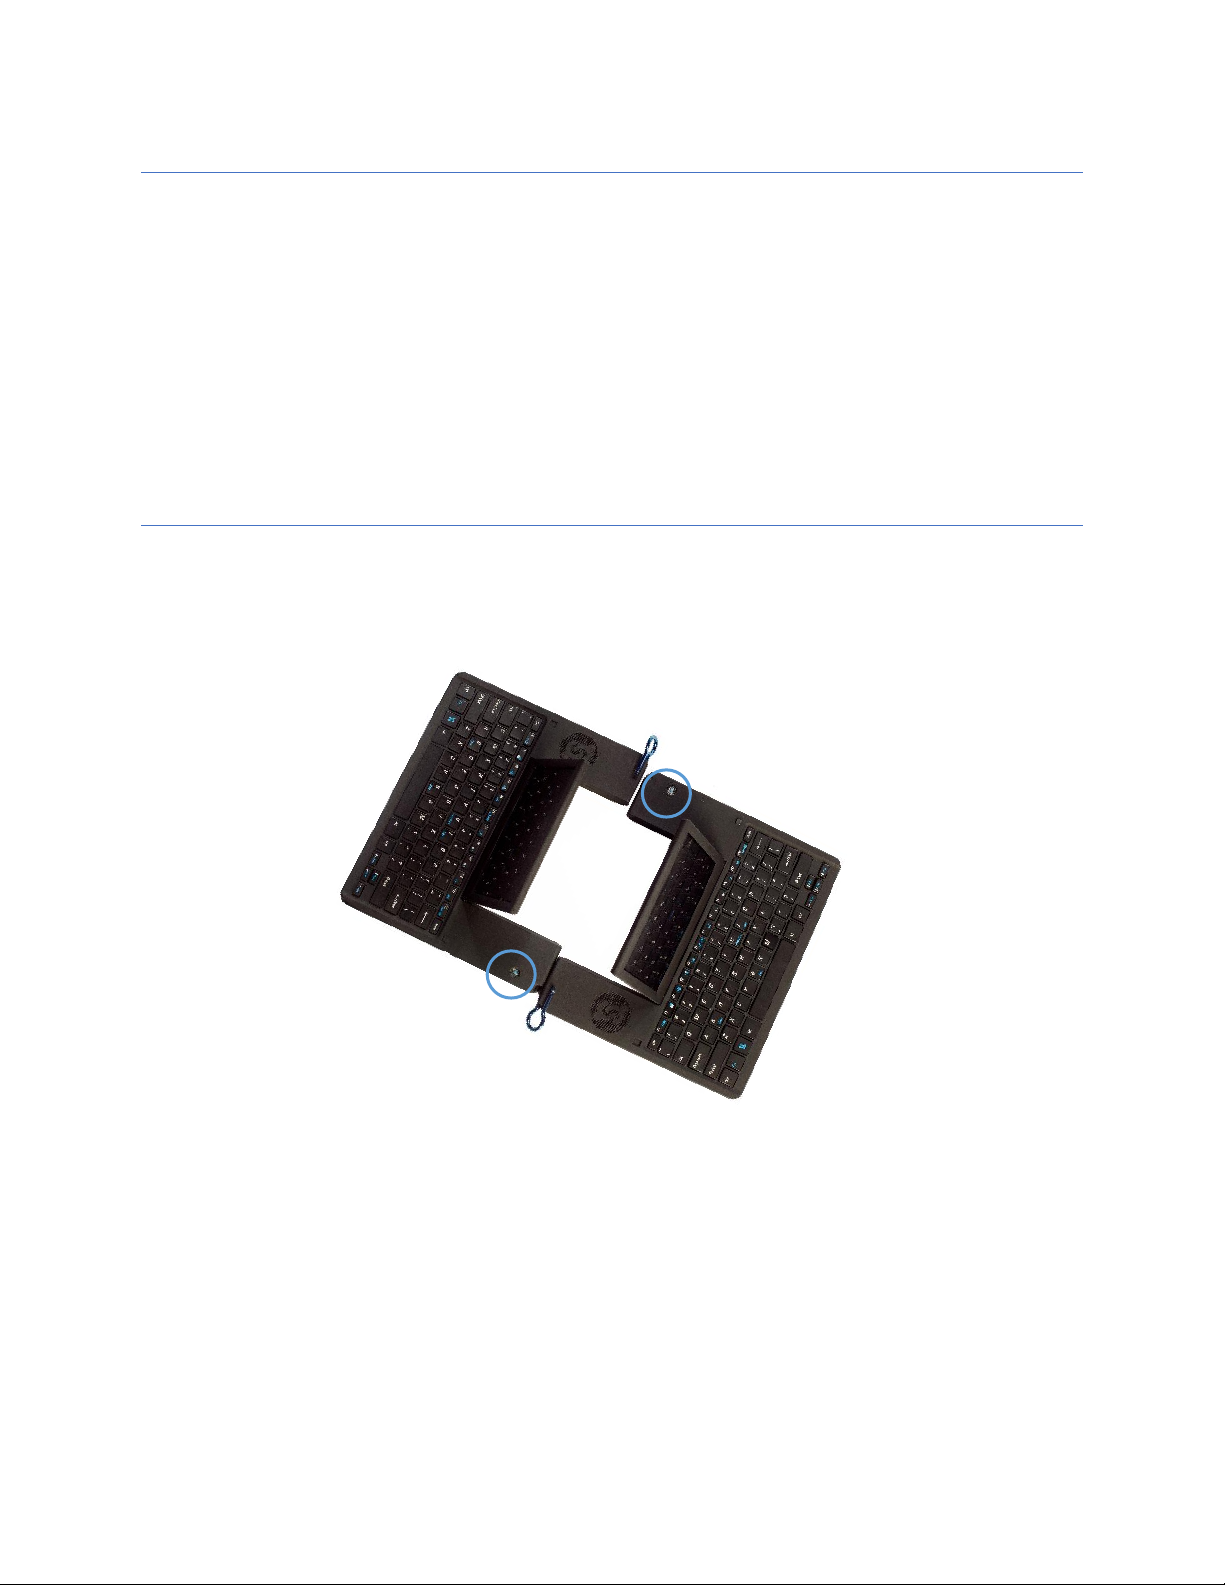
Separating the Two Halves of the UbiDuo 3
To separate the two halves of the UbiDuo 3 without damaging the internal parts, always lay the UbiDuo 3 on
a flat, hard surface such as a desk or a table.
Grasp the two blue mental hinges and pull them away from each other (as seen below).
Follow the same manner in putting the UbiDuo 3 back together by using a flat, hard surface. When you push
the blue mental hinges into their slot you will hear or feel a click to let you know the device halves are
securely together.
Page 6of 21
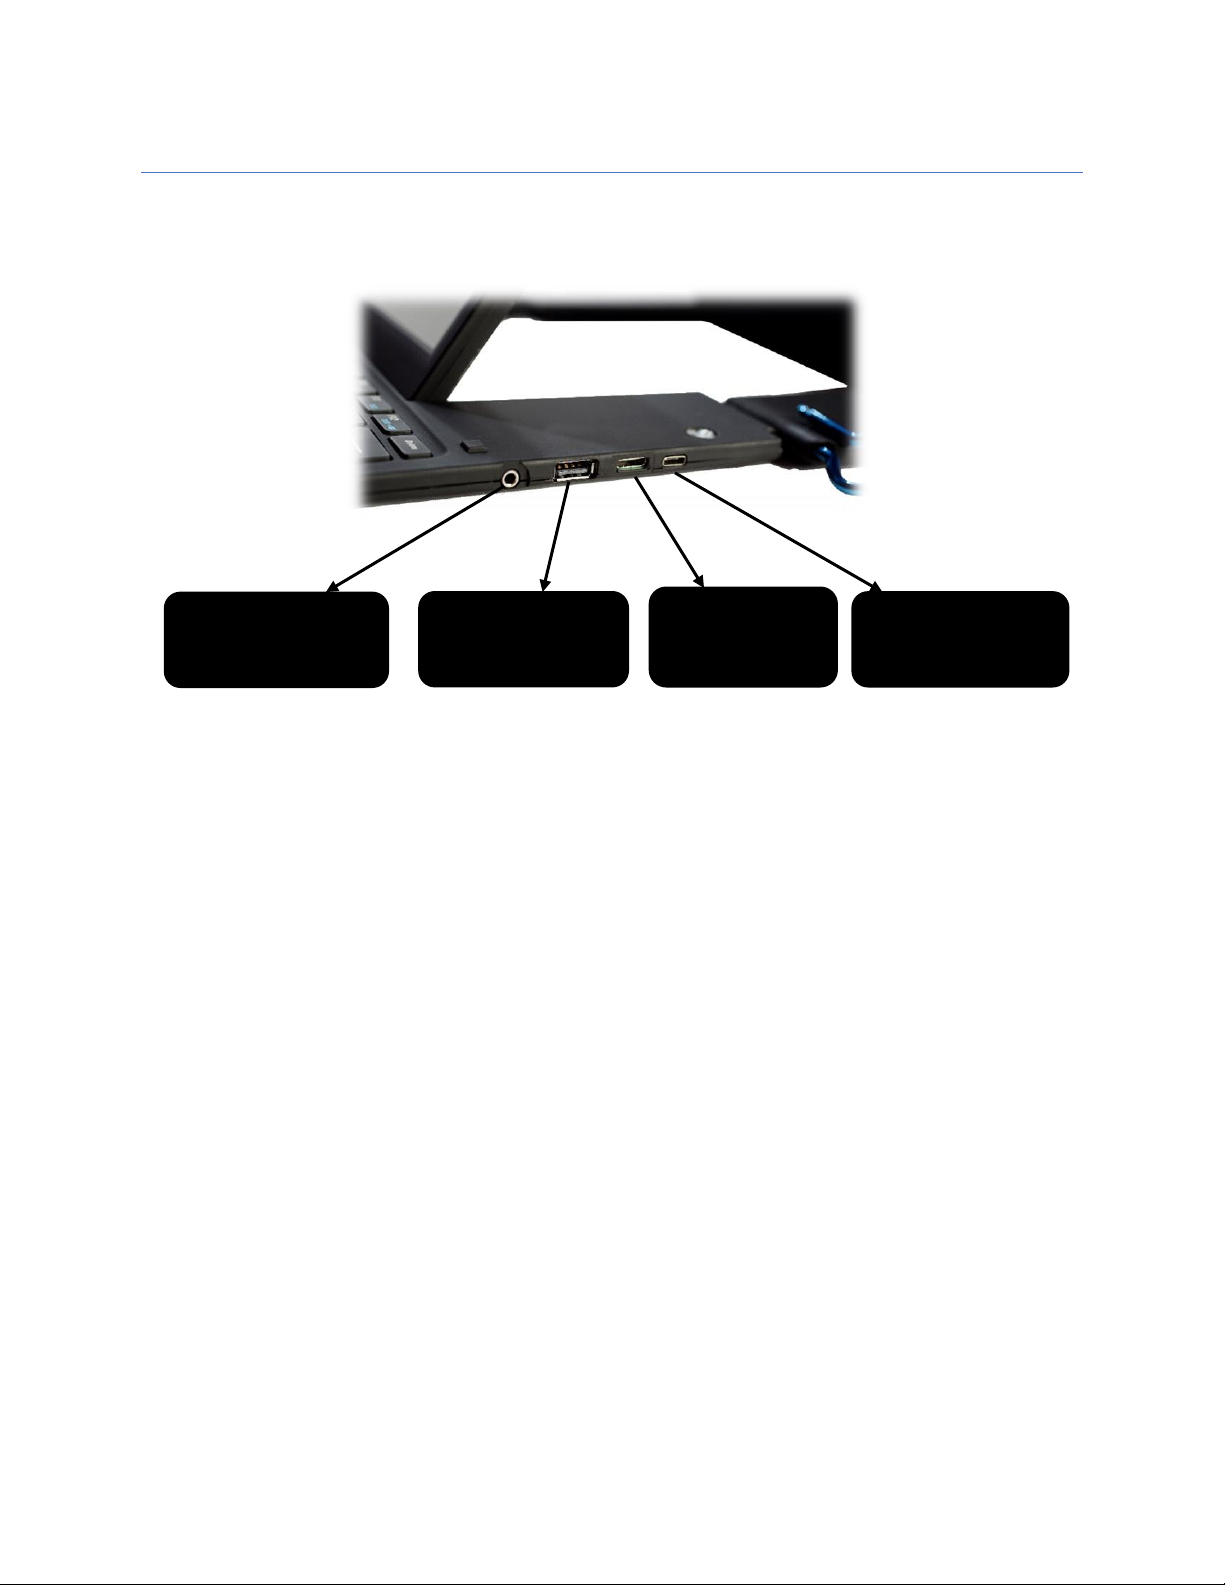
Power and Ports Panel
This section describes the panel on the right-hand side of the UbiDuo 3. Here you will learn about the Power
Button and different ports.
3.5mm Audio Socket
Used to connect or attach an external speaker source or headphones (only SGD/TTS models provide speech
generating capability).
USB-A Flash Storage Port
Used to insert a flash drive/USB stick to the UbiDuo 3 to allow export of saved conversations and install
firmware upgrades. If you are using an external speaker that is equipped with a USB connector, you can use
this USB port as external power for this same speaker.
USB-C Charging Port
Used to charge the UbiDuo 3 batteries with the supplied Y-cable cord and power adapter. On select models
this port is also used in conjunction with the Y-cable to provide a “wired” connection between the two halves
of the UbiDuo 3 in environments where a wireless connection is not permitted for security reasons.
Mini HDMI Port
Allows the attachment of a television, external monitor or projected screen for easy viewing or to allow user
to communicate with a large group of people.
3.5 mm audio socket to
connect to an external
speaker or sound system
USB-A port to connect
flash storage / install
firmware upgrades
USB-C charging port
Mini HDMI port to
connect TV, projector
or external monitor
Page 7of 21
External Speaker for the UbiDuo 3 SGD
The UbiDuo 3 SGD with UbiDuo 3 Accessory is a pair with one half being a TTS (Text-to-Speech) device with
capabilities to generate synthesized voice with the other half being a non-TTS that cannot generate a
synthesized voice.
To identify which half of the pair is the SGD model, it will have the Speaker Output Port/audio socket while
the Accessory model will not.
You can connect an external speaker to the Speaker Output Port/audio socket. The USB port is able to
provide power for the external speaker if equipped with a USB connector.
Powering the UbiDuo 3 “ON” and “OFF”
The power button is located at the upper right-hand corner of each half of the UbiDuo 3.
To power “ON” the UbiDuo 3, press and hold the power button for 2 to 3 seconds until the blue power light
indicator is illuminated and then release.
To power “OFF” the UbiDuo 3, press and release the illuminated power button.
NOTE: If any existing conversation have not be explicitly saved, turning the UbiDuo 3 “OFF” wipes them from
the device’s memory.

Page 8of 21
Main Menu Icons and Accessible Functions
On this screen you will find several indicators and icons. These include:
•Current date and time.
•Auto Link Indicator –provides a visual confirmation that
one half of the UbiDuo 3 is connected to another half.
•Charging Indicator –displays when the half of the
UbiDuo 3 is plugged into an electrical outlet.
•Battey Indicator –shows the charge remaining.
•Three main icons.
•Three square background color selection icons for the
Main Menu screen (see image below for more
information).
At the bottom of the Main Menu screen, immediately below the Settings icon, there are 3 (three) square
boxes. These are used to select the background color of the Main Menu screen only.
To select which function to use, simply tab the desired icon on the screen, or use the arrow keys to move the
highlighted outline to the desired icon and press Enter.
Press the Esc (Escape) key to return to the Main Menu, or touch the return icon ( ) at the top right of the
screen.
Conversation Icon/Split Screen
This function allows for both users of the UbiDuo 3 to communicate
simultaneously with each other; and is the reason for the UbiDuo’s existence.
When a key is pressed on one half of the UbiDuo 3, its corresponding character
is immediately transmitted to the second half and displayed on the screen. This
gives each user the ability to type and read simultaneously without having to
wait for the other user to finish typing.
The Enter key does not function as a command to send a line of text; it only
commands the UbiDuo 3 to start a new line of text.
Both halves of the UbiDuo 3 must be turned on for a split screen chat to be initiated. The two halves will
automatically connect with each other when the split screen chat is selected on one of the halves.
The text you type will appear at the top of the screen. The text the other user types will appear at the bottom
half of the screen.
Scrolling Through a Conversation
To review your own chat, use the up, down, left, and right arrows to scroll through the conversation.
To review your partner’s chat, press the Tab key to switch to your partner’s chat window; then use the up,
down, left, and right arrow keys to scroll through the conversation.
Press the TAB key again to toggle back to your own chat window.
Exiting the Split Screen Chat
To exit the split screen chat and return to the Main Menu without saving
your conversation, press the Esc key.
Page 9of 21
Settings Icon
The Settings screen enables the UbiDuo 3 to be configured to suit your
preferences. Changes made in this screen will persist even after the UbiDuo 3 is
turned “OFF.”
Each UbiDuo 3 half can be configured separately. This allows you to customize the
other half to better suit your chat partner if, for example, a different contrast
between the background and text is desired.
To enter the Settings screen, tap the Settings icon, or press the Tab key until the
Settings icon on the Main Menu is highlighted and then press Enter.
Navigating Within the Settings Icon
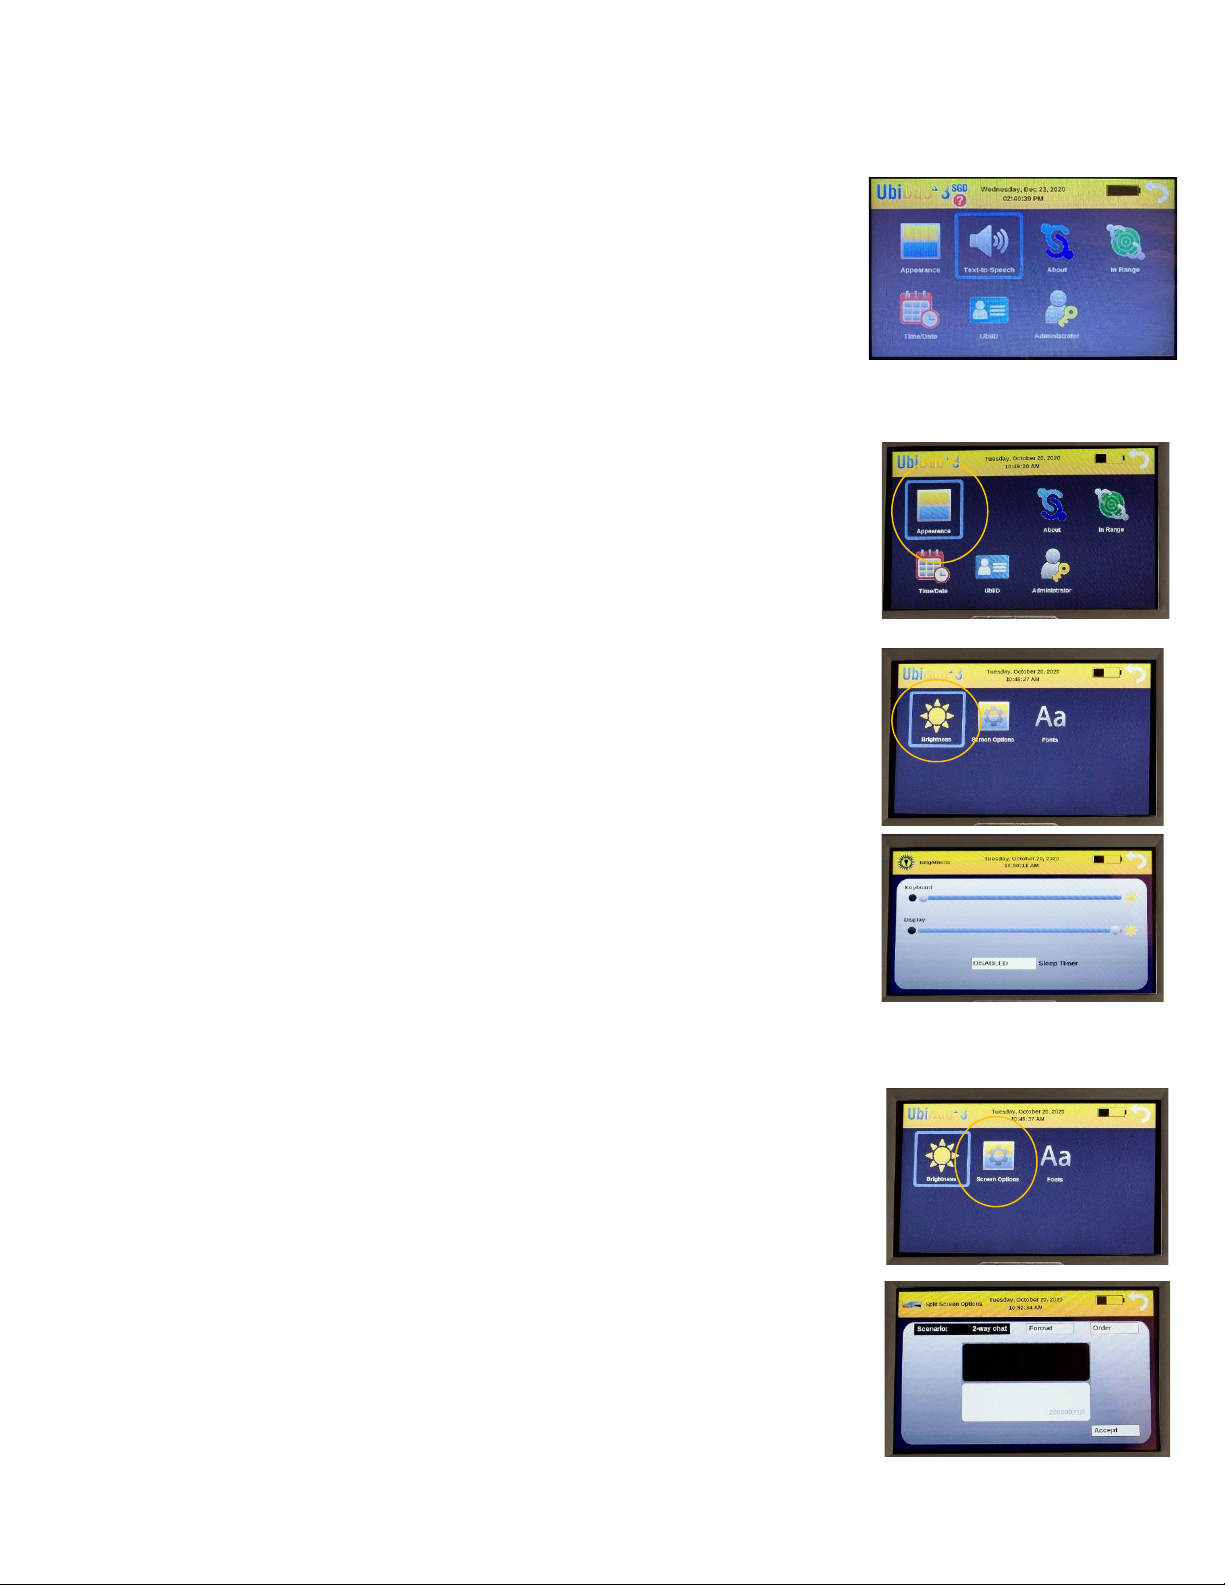
Appearance
In the Appearance icon you are able to view and change the screen’s Brightness,
Split Screen Options, and Fonts.
Brightness/Sleep Timer
The Brightness setting controls the brightness of the screen’s backlight. There are
two ways to change the Brightness setting on the UbiDuo 3.
The first is to use your finger to slide the brightness adjust left or right on the
screen. The second is to use the left and right arrow keys to move the adjustor.
When the desired brightness is reached, tap the return icon at the top right of the
screen. Alternatively, you can use the Esc key to return to the previous menu.
Whenever you turn “ON” your UbiDuo 3, the screen brightness will be set to the
new level.
The UbiDuo 3 keyboard also has backlight built in that lights up the keyboard from
underneath to making using easier in low light conditions.
In this mode you also have the capability to adjust the Sleep Timer for your display screen.
Screen Options
In the Screen Options you can modify the Conversation screen display to your
preferences.
Scenario –Select 2-way, 3-way, and 4-way settings for customization.
Format –Rearranges the Conversation screen horizontally or vertically.
Order –Toggles the location of your chat window. In horizontal mode, it will toggle
your chat window from the top half of the screen to the bottom half. In vertical mode,
it will toggle your chat window from left to right.
Page 10 of 21
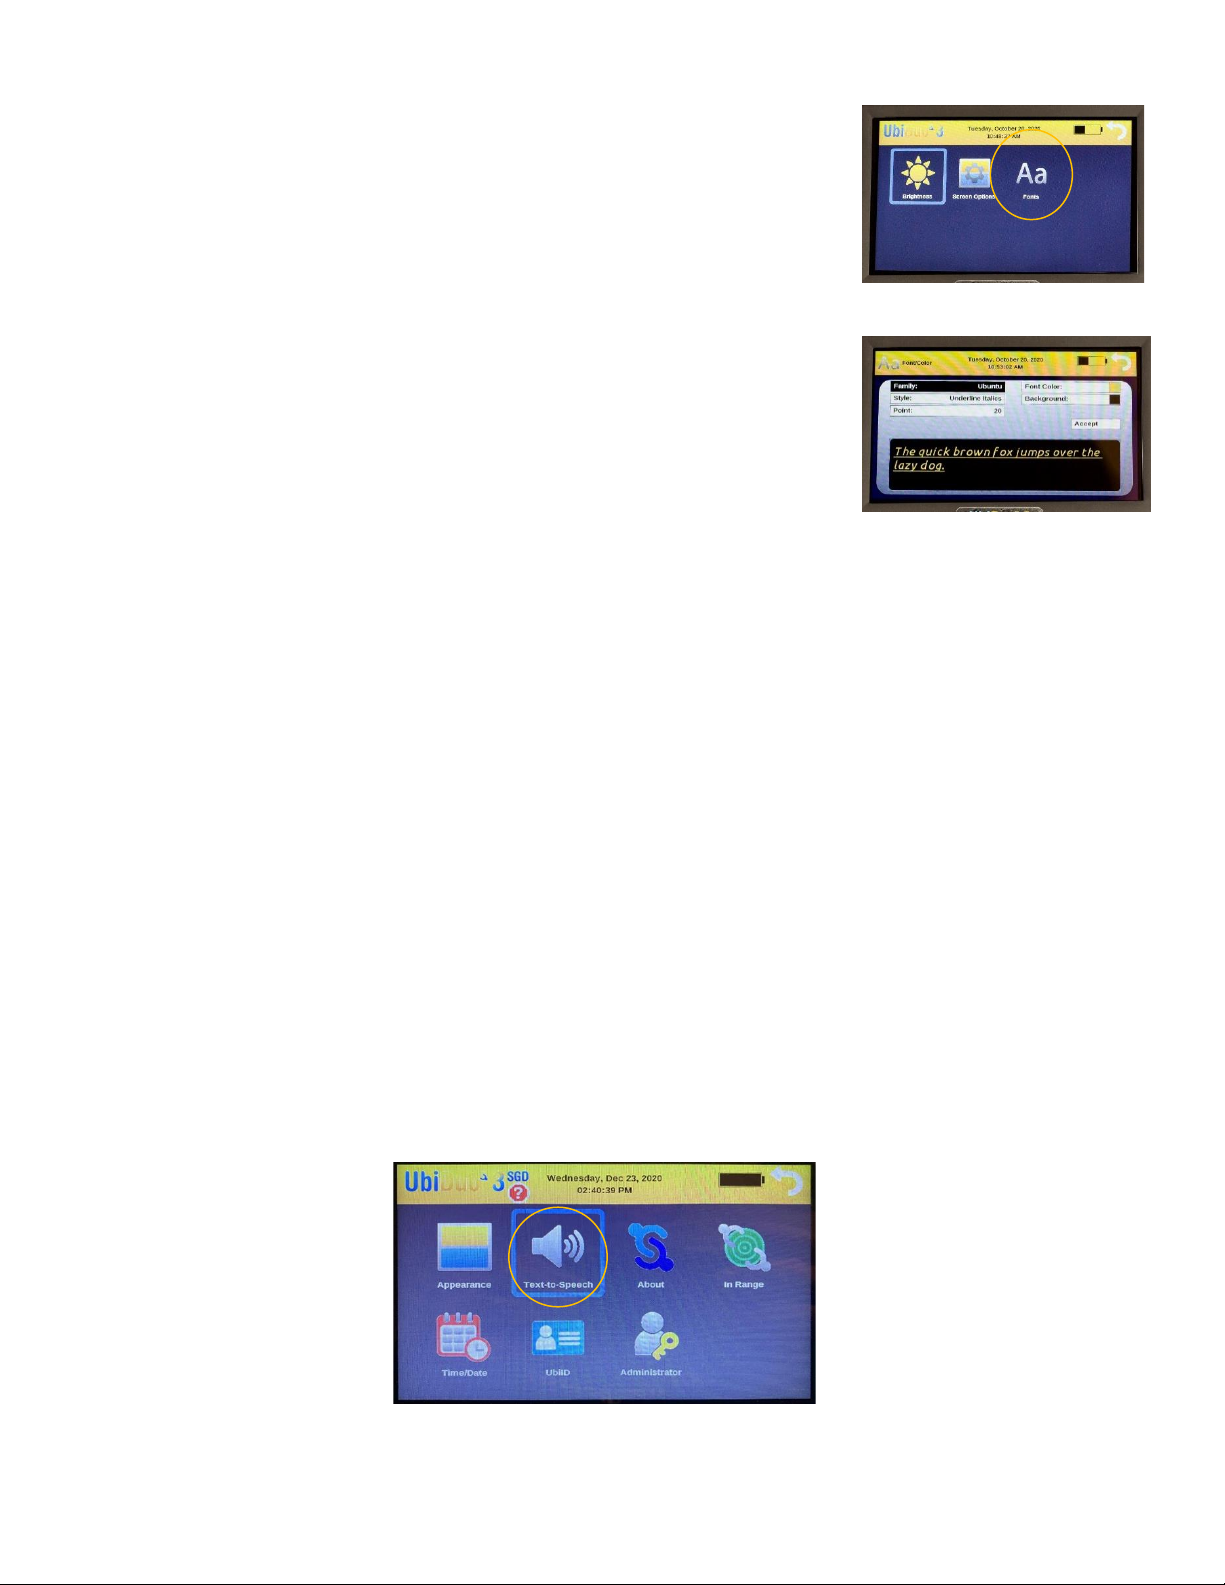
Changing the Split Screen Font and Color
Each chat window in the split screen can be customized with its own fonts and
colors. Tap the desired chat window to display its configuration screen where you
can customize the display to your preference. Changes made in the font, size, and
color will be displayed in the sample window at the bottom of the configuration
screen.
Family –tap the Family bar on the screen to cycle through the fonts until the
desired one is indicated, or press the Tab key to highlight the Family bar, press
Enter to cycle through the fonts until the desired one is indicated.
Style –Tap the Style bar on the screen to cycle through the font styles until the
desired one is indicated, or press the Tab key to highlight the Style bar, then
press Enter to cycle through the font styles until the desired one is indicated.
The available Styles include: Normal, Underlined, and Italic.
Point –Tap the Point bar on the screen to cycle through the font sizes until the desired one is indicated, or
press the Tab key to highlight the Point bar, then press Enter to cycle through the font sizes until the
desired one is indicated. The available font sizes range from 12 point to 72 point.
Font Color - Tap the Font Color bar on the screen to cycle through the font colors until the desired one is
indicated, or press the Tab key to highlight the Font Color bar, then press Enter to cycle through the font
colors until the desired one is indicated.
Background - Tap the Background bar on the screen to cycle through the available background colors until
the desired one is indicated, or press the Tab key to highlight the Background bar, then press Enter to cycle
through the available colors until the desired one is indicated.
Accept –To accept all changes and return to the split screen/conversation mode, tap the Accept bar or
press the Tab key until the Accept bar is highlighted, then press Enter.
Sample Window –This window, displayed at the bottom of the settings screen, allows you to view the
effects of any changes made to the font family, style, size, and colors prior to accepting change.
NOTE: You must touch Accept to apply any changes.
Text-to-Speech (Only on Accessory Model -SGD Half)
There are 7 (seven) options to configure for the device to use the built-in Text-to-Speech function (only on
the SGD model).
Page 11 of 21
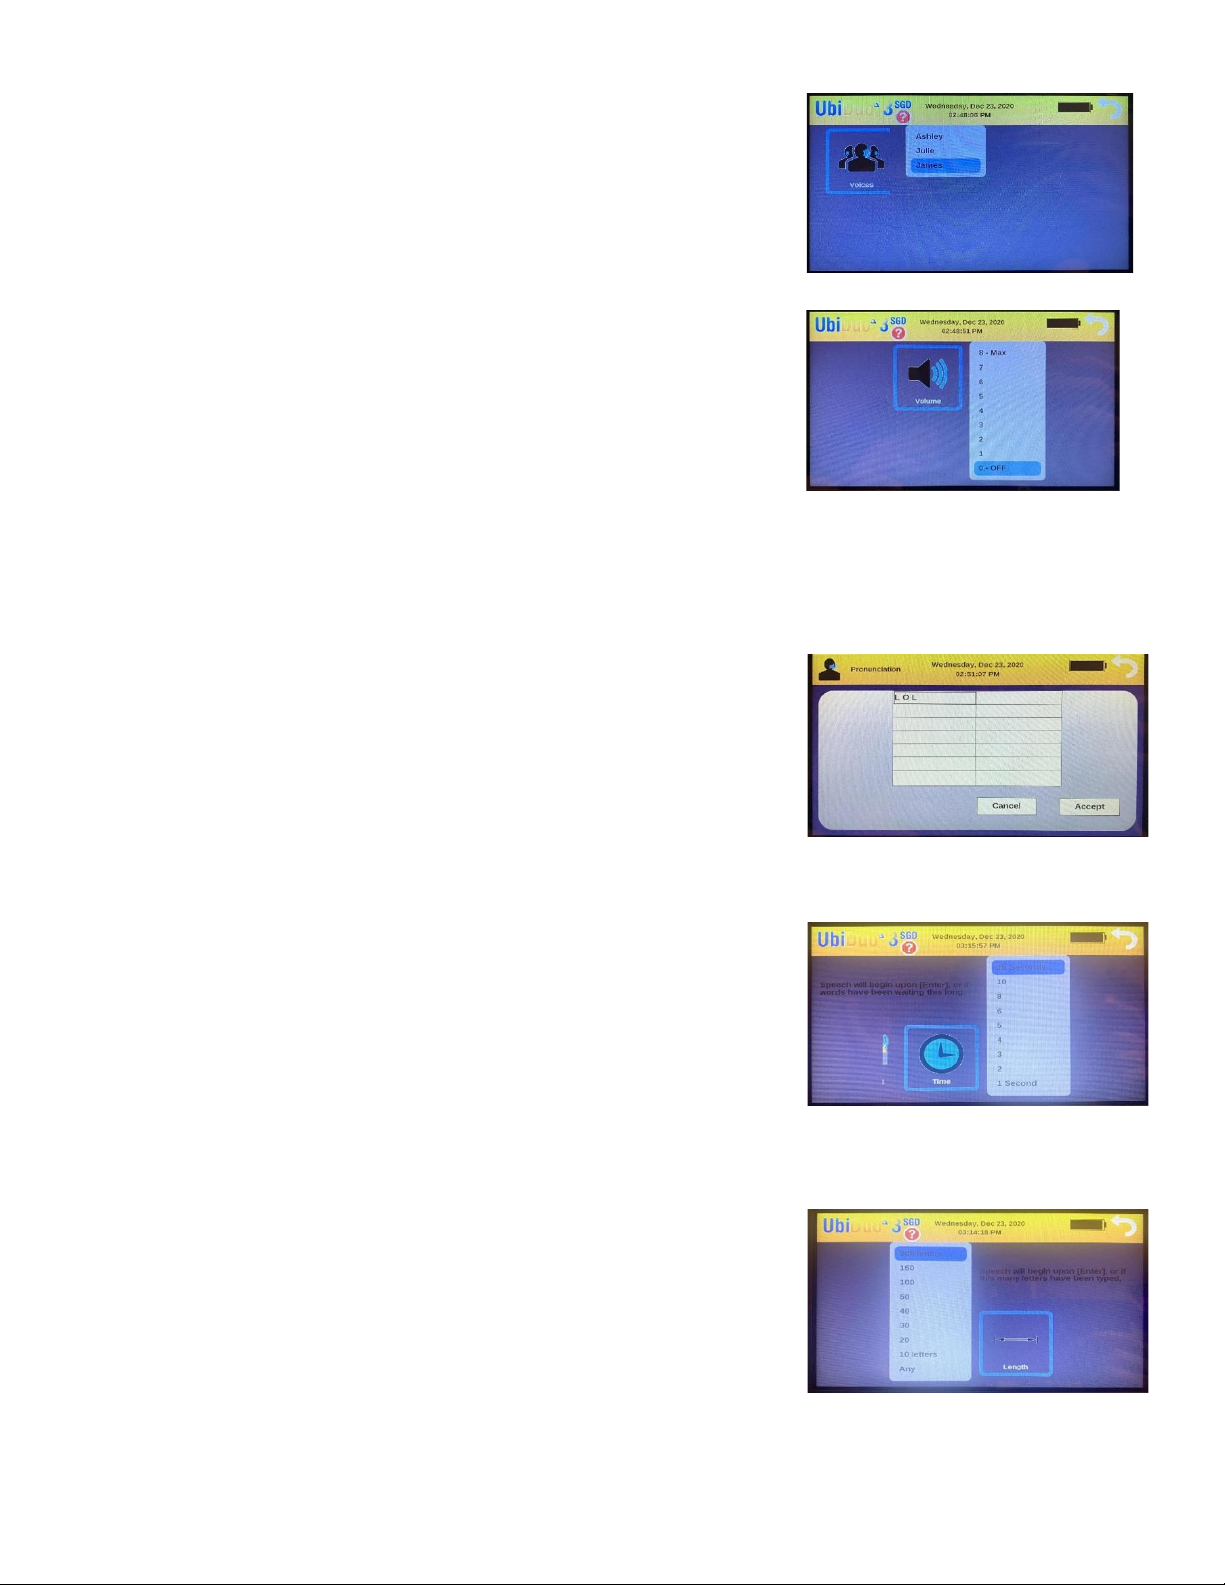
Voices (only on SGD model)
This feature offers you a list of voices for your device to use to synthesize
after the text is typed out. There are both male and female humanized
voices to choose from.
Volume (only on SGD model)
This gives you a list of volume range to use including the ability to turn the
voice off. The higher the number is set, the louder it is. The lower the
number is set, the quieter it is.
Speed (only on SGD model)
This offers you the list of words per minute options. It is to control the speed of the voice to be pronounced.
The higher the number is set at, the quicker the voice speaks. The lower the number is set at, the slower it
speaks.
Pronunciation (only on the SGD model)
This offers you a way to replace a typed word with a different word to be
spoken out from the speaker. The word that is on the left side column will
be replaced with the pronunciation of the word on the right-side column
on the same row.
Time (only on SGD model)
After the Enter key is pressed, the device will synthesize the text into
speech. If the Enter key has not been pressed, the synthesized speech will
not occur until you pass the length in letters; then it will automatically
synthesize the text into speech.
There is a short time delay after pressing Enter before the text-to-speech
begins.
Length (only on SGD model)
This option allows you choose when the voice will begin its synthetization
of the typed conversation based on the number of letters being typed.
For example, if you choose 200 letters, the voice synthetization will begin
as soon as the 200th letter has been typed.
Another example, if you choose 20 letters, the voice synthetization will
begin after the 20th letter has been typed.

Page 12 of 21
Saved Icon –Save, View, and Delete Conversations
When the UbiDuo 3 is powered “OFF,” any existing conversation is cleared from
its memory and lost unless the device is explicitly instructed to save them first. If
you wish to save a conversation, press “Ctrl-S” simultaneously; or use the “Fn+S”
keys as an additional shortcut to save a conversation. You will be asked for a file
name, and once you enter the information and press Enter, the conversation will
be saved under that name until you delete it yourself from the UbiDuo 3. To view
a saved conversation, touch the Saved icon on the Menu screen.
Saved conversations can be reviewed on the UbiDuo 3 or can be copied to a USB flash drive for transfer to a
computer for printing or archiving.
Viewing Saved Conversations
When you save a conversation, you can only read it on the half of the UbiDuo 3 you used during the
conversation. At the Main Menu, use the Tab key or arrow keys to highlight the Saved icon on the right side
of the screen; touch to enter into this mode or press Enter. This will open a dialogue box asking you if you
wish to SAVE to a USB flash drive, VIEW the saved conversation, or DELETE the saved conversation.
Use the down arrow key to select the conversation you want to look at and press Enter. The selected
conversation will show on the screen.
User prompts at the beginning of each person’s sentences show who said what during the conversation. Use
the up and down arrows to scroll through the text. Press the Esc key to return to the Main Menu.
Remember that conversations are saved as long as the UbiDuo 3 does not fully run out of power. If you are
using the UbiDuo 3 without plugging it in, and the battery dies, your conversation may be lost. You must keep
the battery charged even a little bit to safely ensure you are able to keep your conversations.
Your UbiDuo 3 is equipped with 4 MB of storage space which is 32,000 Megabits. This is a significant amount
of storge space so you are able to store important conversations on your device. We strongly encourage
transferring saved conversations to prevent accidental delete or accidental loss of data.
Transferring a Saved Conversation to a Computer
A USB flash drive must be used to copy saved conversations to a computer. Unlike the original UbiDuo, the
UbiDuo 3 cannot be connected directly to a computer via the USB port.
To copy saved conversations, insert a formatted USB flash drive into the UbiDuo 3’s USB-A port.
After transferring saved conversations to the flash drive, remove it from the UbiDuo 3 and insert it into an
available USB port on a computer. The computer recognizes the USB flash drive as the E: drive (Removable
Disk). If the E: drive window does not automatically pop up when you plug in flash drive, go the Start button
on the computer ribbon tool bar and click it. Select My Computer from the menu. When the window opens,
search for the E: drive. Double-click the E: drive link/icon to open the drive. You should see a Log File in the
dialog box.
Double-click on the Log File to open it. Any conversations you have saved on the flash drive will be in the Log
File saved as .txt files. Double-click on the .txt file you wish to open, then click on the File menu on the top
left side of the box. Select Save As to save it to your computer. You may also highlight the text, press “Ctrl-C”
to copy it, open a blank Word document, and press “Ctrl-V” to paste it into Word and save to your computer.
NOTE: The UbiDuo 3 must be powered on in order for you to be able to use the USB flash drive.
Page 13 of 21
Deleting a Saved Conversation
If you wish to delete a conversation that you have saved on your UbiDuo 3, use the Tab or arrow keys to
highlight the Saved icon on the Main menu, then press Enter. The list of conversations you have saved will
appear. Tab or use the arrow keys to select the conversation you wish to delete and press Enter. You can
then select DELETE to remove the conversation from the UbiDuo 3. The Confirm File Delete box will appear;
press Enter to permanently delete the conversation. If you wish to not delete a conversation, Tab to NO and
press Enter to cancel the activity.
NOTE: The conversation will show in the list until you shut down the UbiDuo 3. When you power the UbiDuo
3 back “ON,” the conversation will be gone.
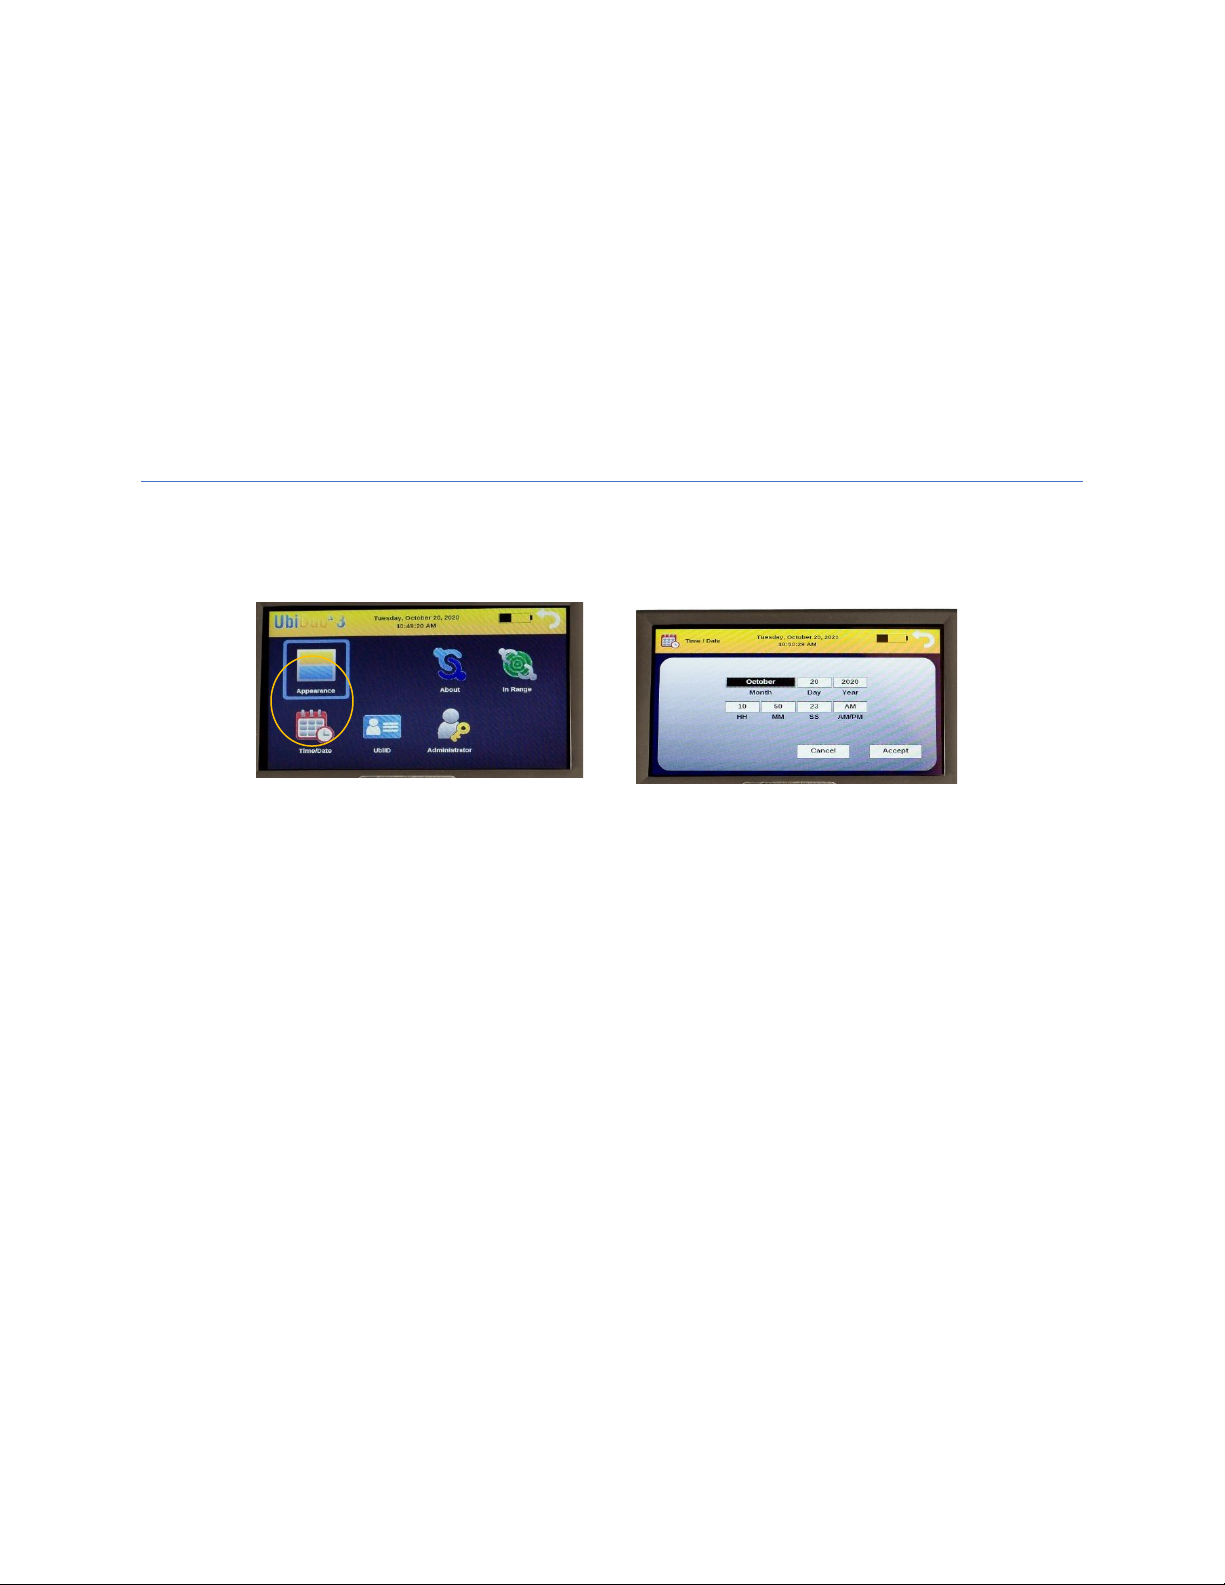
Setting the Time and Date
Your UbiDuo 3 has been designed to allow you to set the exact date and time. This is beneficial when saving
conversations to your UbiDuo 3 as the exact time and date of the conversation is included in the conversation
transcript.
To change or set the time and date, click on the Time/Date icon in the Settings Menu.
To change the month, press the Tab key, or the left and right arrow keys, until the month bar is highlighted
then use the up and down arrow keys to set the desired month.
To change/set the day, year, hour, minute, and second values, tap the corresponding bar, key in the desired
number on the keyboard and press Accept.
To change/modify the AM/PM setting, tap the AM/PM bar until the desired setting is displayed, or press the
Tab key until the AM/PM bar is highlighted and then touch Accept.
When done, tap the Accept bar to save any changes, or Cancel to abandon the changes.
NOTE: Each half of the UbiDuo 3 will need to be programmed. You will also need to set a reminder to update
your time when Daylight Savings Time changes as the UbiDuo 3 does not automatically do this.

Page 14 of 21
UbiID –Naming Each Half of the UbiDuo 3
To set the ID of the current half of the UbiDuo 3, tap the UbiID icon on the
screen or press the Tab key to highlight the UbiID icon, the press Enter. The
UbiID is simply a name you assign to each half of the UbiDuo 3 to make it easier
to tell them apart and to also reflect “who said what” during a conversation
that has been saved.
Providing a name for each half of the UbiDuo 3 is required if you want your
UbiID to appear in the “In Range” setting of other UbiDuo 3 devices when you
are within range (300 feet).
Simple Three-Step process:
1. Clear the current default data by using your “backspace” key;
2. Type in the name you wish to assign to your half of the UbiDuo 3 in the Unit ID field; then
3. Tap Accept, or use the Tab key to highlight the Accept bar, then press Enter.
NOTE: You must name each half of the UbiDuo 3 separately.
About
The current version of the UbiOS and other UbiDuo 3 software can be viewed here, as well as battery voltage
and charging percentages.
In Range
The In Range function lets you detect whether or not other UbiDuo 3
units are within a 300-foot perimeter of your UbiDuo 3. While you can
view a list of these other units on your device, they will not be able to
connect to your device and engage in conversation unless you explicitly
send them a chat invitation and it is accepted.
Inviting Other UbiDuo 3 Devices to Chat
When you tap the In Range icon in the Settings menu, or press the Tab
key until the In Range icon is highlighted; then press Enter, a list of
potential Chat Partners will appear. The other half of your UbiDuo 3 will
always be listed and you will always have connection to it. If other
UbiDuo 3 devices are within a 300-foot range and have been assigned
UbiIDs they will also be listed. UbiDuo 3 devices that have not been
assigned device IDs will not be listed.

Page 15 of 21
To invite another UbiDuo 3 to chat, tap its name or use your up and down arrow keys to move to the
highlight bar to the desired name; then press Enter. A menu of options will then appear on the screen:
•Add to Chat Session: Invite another UbiDuo 3 to join your current chat session
•Always: Automatically sets your UbiDuo 3 to accept a chat request from another UbiDuo 3.
•Accept: Allows you to select whether you want to join another chat session.
•Cancel: Allows you to decline joining another chat conversation.
NOTE: If a chat request is accepted, the Conversation screen will appear.
Holding a 3-Way or 4-Way Conversation
The UbiDuo 3 is designed to enable up to four (4) separate halves to engage in a single conversation. To invite
additional UbiDuo 3 devices to join your chat, simply follow the same procedure as outlined in Inviting Other
UbiDuo 3 Devices to Chat. When those additional devices accept your invitation, the screen will divide into
three (3) or four (4) parts.
No Units In Range
If there are no other UbiDuo 3 devices within a 300-foot range, the list of available devices will be blank.
Setting Pre-Programmed Messages
The UbiDuo 3 has been designed with the capability to have a series of pre-set messages that appear on the
screen each time the device is powered “ON.” This gives you the option to create your own custom messages
specific to your business.
To create a custom message:
•Simultaneously press the FN and F11 keys;
•Type in your personal greeting; then
•Enter to Accept
You are able to change and/or modify this anytime you need or would like to by following the same
procedure. Each time your device is powered “OFF” and then back “ON,” the greeting/custom message will
appear until you change or remove it.
Administrator Icon
To enter the Administration menu, tap the Administrator icon on the screen, or press the Tab key to highlight
the Administrator icon; then press Enter. The Administrator menu is where changes to the UbiDuo 3’s
security are made.
Wireless Enabled
On select UbiDuo 3 packages, a direct wired connection with the USB cable is
used for secured communication. Wireless can be disabled and locked out for
additional security. This option is only available on the high security UbiDuo.
Please call us for more information on the high security UbiDuo.
Allow Chat Save
If your security policy does not allow for Chat Save, this option can be disabled here. This option is only
available on the high security UbiDuo. Please call us for more information on the high security UbiDuo.

Page 16 of 21
Start in Conversation Screen
By default, the UbiDuo 3 displays the Conversation screen when both halves are turned “ON” and connected
by wire or wirelessly. Use this option if you wish to have the Main Menu displayed in lieu of the Conversation
screen.
Software Update
This option is used to update the UbiOS software that controls the UbiDuo 3. From time-to-time sComm will
release bug-fixes, performance enhancements, and new features to improve the performance and
functionality of the UbiDuo 3. Please refer to Updating the UbiOS Software section of this manual for a full
description of the update procedure.
USB Port
For additional security, this option allows the USB port to be disabled to prevent it from being used to save
the Chat Log or install software updates. This option is only available on the high security UbiDuo. Please call
us for more information on the high security UbiDuo.
Updating the UbiOS Software
From time-to-time sComm will release bug-fixes, performance enhancements, and new features to improve
the functionality of the UbiDuo 3. As updates are made available, you will be notified at the email address
that was provided when your UbiDuo 3 was purchased. Each UbiDuo 3 device includes one (1) year of free
software updates from the date of purchase. After that period expires, a Service Agreement may be
purchased to obtain further software updates.
NOTE: You will need a formatted USB flash drive (not provided) to download software to your UbiDuo 3.
SPECIAL NOTE BEFORE YOU START A SOFTWARE UPGRADE: Any conversations you have saved on the
UbiDuo 3 will be deleted when you download updated software to the UbiDuo 3. Before updating your
software, transfer any saved conversation that you wish to preserve to a USB flash drive. If they become
deleted there is no way for them to be recovered.
To update the UbiDuo 3’s software, first visit the website link included in the email to download the new
firmware.bin package. Save this file on your computer. Next, prepare a formatted USB flash drive and plug it
into your computer. Transfer or copy the firmware.bin file to your flash drive. Once the copy finishes,
perform the “safely remove” procedure to protect the data on your flash drive; remove flash drive from the
computer.
Make sure both halves of the UbiDuo 3 are powered “OFF.” Insert the USB flash drive into the USB port of
one of the halves, then press the power button to turn it “ON” and boot it from the USB flash drive. You will
see a white screen with a thin green progress bar moving from left to right. When this bar reaches the end on
the right side, the UbiDuo 3 will start its normal boot process.
The upgrade file will now need to be installed into the UbiDuo 3’s memory. To complete this process, at the
Main Menu, tap the Settings icon or press the Tab key to highlight the Settings icon; then press Enter. When
the Settings menu is displayed, tap the Administrator icon or press the Tab key to highlight that icon; then
press Enter.
You may now press the power button to turn “OFF” the UbiDuo 3. Once it is off, remove the USB flash drive.
Press the power button to turn the UbiDuo 3 “ON” and tap the Settings icon or press the Tab key to highlight
it; then press Enter. Next, tap the About icon or press the Tab key to highlight it; then press Enter. In the
About icon you will be able to verify that the UbiDuo 3 is loaded with the latest updated version of UbiOS.

Page 17 of 21
Once you have completed the update procedure on one half of the UbiDuo 3, repeat the same procedure on
the other half; each half needs to be done separately.
Features for People with Low Vision
The UbiDuo 3 contains several features that are intended to make it easier for those who have low vision and
are deaf or hard of hearing to use.
▪Brightness –increasing or decreasing the screen brightness can sometimes improve readability. To
adjust the brightness setting, press the Esc key until the Main Menu is displayed. Then tap the
Settings icon or use the Tab key to highlight the Settings icon; then press Enter. When the Settings
Menu is displayed, tap the Brightness icon or use the Tab key to select it; then press Enter. Then
adjust the brightness to suit you and/or your chat partner’s preference.
▪Font –the screen font size can be adjusted from 12 points to 72 points to improve readability. The
default size on the UbiDuo 3 screen is 12 points. To make it larger or smaller, press the Esc key until
the Main Menu is displayed, the tap the Settings icon or use the Tab key to select it; then press
Enter. When the Settings menu is displayed, tap the Fonts/Colors icon or use the Tab key to select it;
then press Enter.
If you are already in the Conversation split screen chat, press SHIFT+F5 simultaneously to change the font size
on your half the UbiDuo 3. Each half will need to be programmed individually based on user’s needs.
Charging the Batteries
You will need to charge the batteries as soon as you unpack your UbiDuo 3 from the box. Plug the two small
ends of the Y-cable, included in your box, into the USB-C charging port on the right side of each half of the
UbiDuo 3, then plug the other end into a wall outlet. The batteries will be fully charged after 10 hours.
The UbiDuo 3’s battery will last for 8 to 12 hours, depending on its usage.
You can recharge the UbiDuo 3’s batteries every night – even if they are not full drained. Plugging the UbiDuo
3 into a wall outlet will charge the batteries even if the device is actively being used.
Function Keys, Shortcuts, and Emoticons
Function key settings are available for quick shortcuts to make modifications and changes to the UbiDuo 3.
You can use the function keys or F keys across the top of the UbiDuo 3’s keyboard either by themselves or in
conjunction with another key to perform a specific task swiftly.
On the UbiDuo 3, the function keys are set up to show emoticons. There are three other key combinations
used with the function keys. They are the Shift key, the Ctrl (Control) key, the Fn (Function), and the Alt key.
As you have probably noticed, the keyboard layout is a standard Qwerty keyboard just like that found on a
computer keyboard so you can quickly jump right into using your keyboard without having to search for any
different key placement.
On the next page you will find a list of key functions and shortcuts available on the UbiDuo 3.

Page 18 of 21
Fn (Function) Key Shortcuts:
Emoticons
F1 Help
F2 Smile
F3 Sad
F4 Shocked
F5 Question
F6 Tease
F7 Sick
F8 Angry
F9 Secret
F10 Cool
F11 Wink
F12 Love
<Fn> + F1 Help
<Fn> + F2 Font/Color Screen
<Fn> + F3 In Range
<Fn> + F4 Close all chat connection
<Fn> + F5 Increase font size in chat window
<Fn> + F6 Increase font size in DCP chat window
<Fn> + F7 Brightness and Sleep Timer screen
<Fn> + F8 Increase brightness screen
<Fn> + F9 Decrease brightness screen
<Fn> + F10 Unit ID screen
<Fn> + F11 Set custom greeting
<Fn> + F12 Display custom greetings

Page 19 of 21
Control Keys
Shift Keys
Special Functions
Customer Service and Technical Support
If you experience any problems with your UbiDuo 3 and are unable to resolve them, please contact sComm
Support by calling us at the numbers below:
Toll Free (866) 505-7008
Videophone (816) 527-9079
In the Kansas City area: (816) 350-7008
Or contact via email: support@scomm.com
Representatives are available Monday through Friday, 8:00 am to 5:00 pm, Central Standard Time.
<Ctrl> + B Bold
<Ctrl> + F Change chat format
<Ctrl> + I Italics
<Ctrl> + O Change chat window order
<Ctrl> + S Save chat
<Ctrl> + U Underline
<Shift> + F7 Clear both UbiDuo screens
<Shift> + F8 Clear your UbiDuo screens
<Shift> + F9 Clear partner’s UbiDuo screen
<ESC> On Main Menu - will return to chat session
<PgUp> Scrolls conversation up one page at a time
<PgDn> Scrolls conversation down one page at a time
<Up Arrow> Scrolls conversation up one line at a time
<Down Arrow> Scrolls conversation down one line at a time
This manual suits for next models
6
Table of contents
Other sComm Hearing Aid manuals


