Scooty COUNTRY 28 User manual

ELECTRIC BIKE
SCOOT160 - SCOOTY COUNTRY 28
Instruction manual
Please read this manual carefully before rst use
Original Instructions


Languages
ENGLISH 05
FRENCH 27
SPANISH 53
ITALIAN 79
PORTUGUESE 105
DUTCH 131
GERMAN 157
RUSSIAN 183
CHINESE 209


05
EN
Thank you for your purchase.
Welcome to Scooty
Table of contents
1. SAFETY GUIDELINES 06
2. CONTENTS AND TECHNICAL SPECIFICATIONS 11
3. USE 12
4. MAINTENANCE AND CLEANING 20
5. FAQ & WARRANTY 26
Before using this product, carefully read the user guidelines. These will allow
you to properly understand, use and service this product, and to get to know its
performances and features.
Keep this manual for future reference. If selling or giving this product to someone
else, please ensure you include this manual along with it.

06
EN 1. SAFETY GUIDELINES
1. This device is designed to transport one person, and is intended for use by
teenagers and adults.
Cleaning, maintenance and all other handling of the device must be performed
by someone over the age of 12.
This device may be used by children aged 12 and up, and may also be used
by persons with physical, sensory or mental disabilities, on condition that
adequate supervision is provided or they have been instructed on how to
operate the device safely and are aware of any potential risks. Children should
not be allowed to play with the device. Cleaning and user maintenance should
not be performed by unsupervised children. Parents should not let their child
use this device unsupervised. The product should be stored out of the reach
of children.
The charger may be used by children aged 8 years or older and by persons
with reduced physical, sensory or mental capabilities or without experience
or knowledge, if they are properly supervised or if they have been given
instructions on how to use the device safely and if the risks involved have
been understood. Make sure that only the charger supplied with the product
is used.
Do not transport an additional person, children, or goods. Exceeding the weight
limit may cause injuries and damage the device. That the user is within the
weight limit does not mean they are tall enough to maintain control of the
device.
2. This is an individual transportation device. It is therefore not suitable for
competitions or extreme sports, and must never be used in a skate park.
Do not use the device to go up or down stairs, perform jumps, jump over
obstacles, or perform tricks or dangerous acts. This device is neither a toy nor
a tness device.
This product has not been designed for professional or commercial use, such
as: rentals, forming a eet of vehicles, business trips.
3. This device should be used with caution on a surface that is at, clean,
dry and free of gravel and grease, as there needs to be friction between the
wheels and the ground to move forward. Avoid obstacles, holes, bumps, and

07
EN
sewer grates that may cause accidents. Slow down for speed bumps.
Stay away from other road users and observe trafc rules. You are not safe
from the risks posed by the behaviour of others. Anticipate obstacles and
trafc by driving at an appropriate speed. The stopping distance is correlated
with your speed, so take care to anticipate braking distances in wet weather
and/or on wet roads. Avoid abrupt manoeuvres and sudden braking; the
device may skid, lose its balance, or fall, even on a smooth, at surface. You
must always remain vigilant and stay away from pedestrians and other users
on public roads or thoroughfares, who may cross without having seen you.
WARNING! Never use the product outside the areas permitted by regulations.
4. Caution! This appliance is designed for outdoor use. It is your responsibility
to know and comply with the regulations in force on the public and private
thoroughfares where you use the device.
5. Learn how to use the device in an open and at location without many
other road users around you, and make sure you wear a helmet.
Always wear sturdy shoes and trousers when using this device. Do not
operate this device if you are barefoot or wearing open sandals. Avoid wearing
clothing that is excessively loose or has dangling cords or ties, scarves, etc.,
which could be caught in the wheel. This could lead to choking, falling, and/
or a collision.
6. Do not ride in rain, snow, puddles, mud, or other wet areas with a water
depth of over 2 cm that would allow water to seep into the device. To clean
your device, follow the advice in section 4.3.
Do not use this device if visibility is poor. If you are riding at night or in dark
weather, we recommend wearing reective clothing or equipment, such as
a high-visibility jacket or armband. In addition to this recommendation, you
should refer to the applicable equipment requirements in the location and
country of use.
7. Do not use this device under the inuence of alcohol or other drugs. For
your safety, such use is strictly prohibited.
8. Do not leave the product within the reach of anyone who could start it
without the authorisation of the main user or without prior information and

08
EN knowledge of these safety measures/guidelines and use.
If you lend the device to someone, ensure the other person knows how to use
it and explain to them all the safety guidelines. The person you are lending
the device to must be reminded to follow trafc regulations and to wear
protective gear while riding.
To prevent unauthorised use, be sure to remove the key from the ignition
between uses, in order to prevent unintentional or intentional misuse.
9. A mobility device is subject to physical constraints depending on its
purpose, design and use. Given this, the unit must be inspected before each
use and you must double check that all safety features work properly (brakes,
lights). The various points of inspection and maintenance to be carried out on
your appliance are detailed in section 4.2.
The folding mechanism must be securely locked into its vertical driving
position.
If you notice any pieces have come loose, low battery level alerts, at tyres,
excessive wear and tear, strange noises, improper functioning or any other
abnormality, stop using the device immediately and seek professional
assistance.
10. DO NOT USE THE DEVICE OR CHARGE ITS BATTERY IN THE FOLLOWING
CIRCUMSTANCES:
• The product is damaged.
• The battery is emitting an abnormal smell and heat.
• Brake controls, or other braking or safety devices (lights) are damaged.
Discontinue use and do not touch any liquid leaking out of the device. Do not
expose the device’s battery to excessive heat.
11. The battery must not be replaced by the user. Please contact your retailer or
the brand’s after-sales service for any device modications or maintenance.
12. The batteries must be disposed of appropriately. If you are unable to
return your product to your retailer, place it in the containers provided for this

09
EN
purpose (see the brand’s manual for more information) in order to protect the
environment.
13. Any opening of the device or product may modify the safety of the device
or product, and the brand does not take responsibility for this. Please note
that opening the device will void the warranty of the device or product. Should
you nevertheless wish to carry out repairs on your device yourself, the brand
does not take any responsibility for the reliability of the repairs and potential
damage these may incur. Accidents that may occur as a result of these
repairs are not the brand’s responsibility. In case of doubt or when in need of
assistance, contact an authorised retailer or the brand’s customer support.

10
EN Pictogram Meaning
Always read the instructions carefully.
Weight of the product alone.
Maximum weight for the user of the product.
Motor power of the device (in kW)
Maximum speed of the device (in km/h)
The exclamation point within an equilateral triangle is intended to alert the
user to the presence of important operating and maintenance (servicing)
instructions in the user’s manual.
This unit should not come into contact with water. Do not store the unit in a
wet location.
The lightning ash with arrowhead symbol within an equilateral triangle is
intended to alert the user to the presence of «dangerous voltage» within the
product’s enclosure that may be of sufcient magnitude to constitute a risk
of electric shock.
This symbol indicates that this equipment has double electrical isolation
between the (dangerous) voltage of the power source and the parts accessible
by the user.
Caution! Protective equipment including wrist guards, gloves, knee pads,
helmet and elbow pads must be worn.
Electrical and electronic equipment must be sorted and disposed of
separately. Do not dispose of electrical and electronic equipment with
normal, unsorted household waste, but bring it to a selective sorting center.
This marking is used on the nameplate to indicate that the equipment
operates on direct current only or to identify the corresponding terminals.
This marking is used to identify the electronic device comprising the
transformer and the electronic circuit, which converts electrical energy to
one or more output connectors.

11
EN
2. CONTENTSANDTECHNICAL SPECIFICATIONS
This pack contains:
• Scooty COUNTRY 28 electric bike
• Tools
• Original mains charger
• Battery lock key
• User manual
• Warranty manual
• CE declaration
• Warranty card TO BE KEPT (it contains the device’s serial number and
manufacture date, essential information for warranty purposes)
Technical specications:
Battery : Lithium-ion 13.4Ah 36V
Charging time : ~ 7h
Autonomy : 70 km max with assistance*
Speed : 25 km/h*
Motor : 250W Nominal 36V
Charger : Input : 100-240V ~ 1.8A 47-63 Hz
Output : 42V 2A 84 W
Maximum weight supported : 120 kg
Device weight : 22 kg
Device dimensions : 1840x690x1110mm
Model reference : GT-EM-500
Charger reference : DPLC084V42Y
* Generally speaking, range and speed are given as an indication. These
vary according to the weight of the user and the conditions of use (slope,
outside temperature, humidity, speed and motor load). Specications may
change. These speed and range guidelines do not constitute a contractual
commitment on the part of the retailer or the CIBOX INTERACTIVE company.

12
EN 3. USE
3.1. DEVICE OVERVIEW
1
6
2
7
3
4
5
89
10
11
(1). Saddle (2). Saddle adjustment (3). Rear disc brake, motor and gears (4). Kickstand
(5). Derailleur (6). Pedal (7). Removable battery (8). Screen (9). Brake handles (10).
Suspension (11). Front disc brake
15
12
13
14
18
17
19
20
16
(12). ON/OFF button (13). Change assistance mode and mileage (14). Changing
assistance mode and mileage (15). Instantaneous speed (16). ODO: total mileage
/ TRIP: trip mileage (17). Lights, brake and error indicators (18). Battery power (19).
Assistance level (20). Battery level
Engine trouble indicator
Throttle problem indicator
Controller problem indicator
Braking indicator. Activated during braking.
Light activation indicator.

13
EN
Modes of assistance:
The device has 5 assistance modes. The electric assistance system is
activated by 1 to 1.5 turns of the pedals. The higher the mode, the greater the
electric assistance.
Speeds :
The device is equipped with 8 speeds.
You should change to a smaller number as soon as the effort becomes
important. Conversely, to avoid the sensation of pedalling «in a vacuum», a
higher number should be selected.
Use the gear lever on the handlebars to change gears.
Lighting :
The lighting system is a safety feature of your bike, it must be obligatory on
your bike. Check that your lighting system is working and that your batteries
are charged before riding.
Doorbell :
A bell is installed on your handlebars. The bell is a safety device on your bike,
it must be obligatorily present on your handlebars.
Brakes :
The right-hand handle activates your rear brake.
The left handle activates the front brake.
3.2. UNPACKING AND ASSEMBLING THE DEVICE
To unpack the product, it is recommended to have a clear surface that is
large enough to unpack and prepare the device. Take the device out of its
packaging, making sure to not injure yourself or damage other products or
your surroundings. Have someone help you if the product is too heavy for you
to handle on your own (the weight of the device is indicated on the packaging).
An adult must unpack and assemble the device.
Mounting the pedals :
Use the R (right) and L (left) markings to identify them.
1. Mount the right pedal on the right crank arm. Tighten the pedal clockwise
using the wrench provided.
2. Then screw the left pedal onto the left crank arm counterclockwise.

14
EN Mounting the handlebar :
1. First orient the handlebars in the right direction.
2. Tighten the xing screw on the stem using the wrench provided.
3. Check that the handlebars are correctly oriented.
Assembly and adjustment of the saddle:
Loosen the nut on the seat post clamp to be able to change the height of the
seat post in the frame.
Select a height and tighten the seat post clamp nut. When adjusting the
saddle to its lowest position, make sure that the saddle does not touch any
component of the bicycle such as the battery cover. Also, be sure not to
exceed the minimum seat tube insertion mark. This insertion mark should
never be visible when using the bike.
IMPORTANT : To determine your saddle height, sit on the bicycle and place a
heel on the pedal in the down position with the crank parallel to the seat post.
When your leg is extended the saddle height is correct.
Recommended saddle height and user size:
Wheel dimensions Maximum height of
the saddle
Minimum saddle
height
Recommended user
size*
27.5’’ 96 cm 84 cm 165 - 185 cm
* Size for an «optimal» use of the device.
15
EN
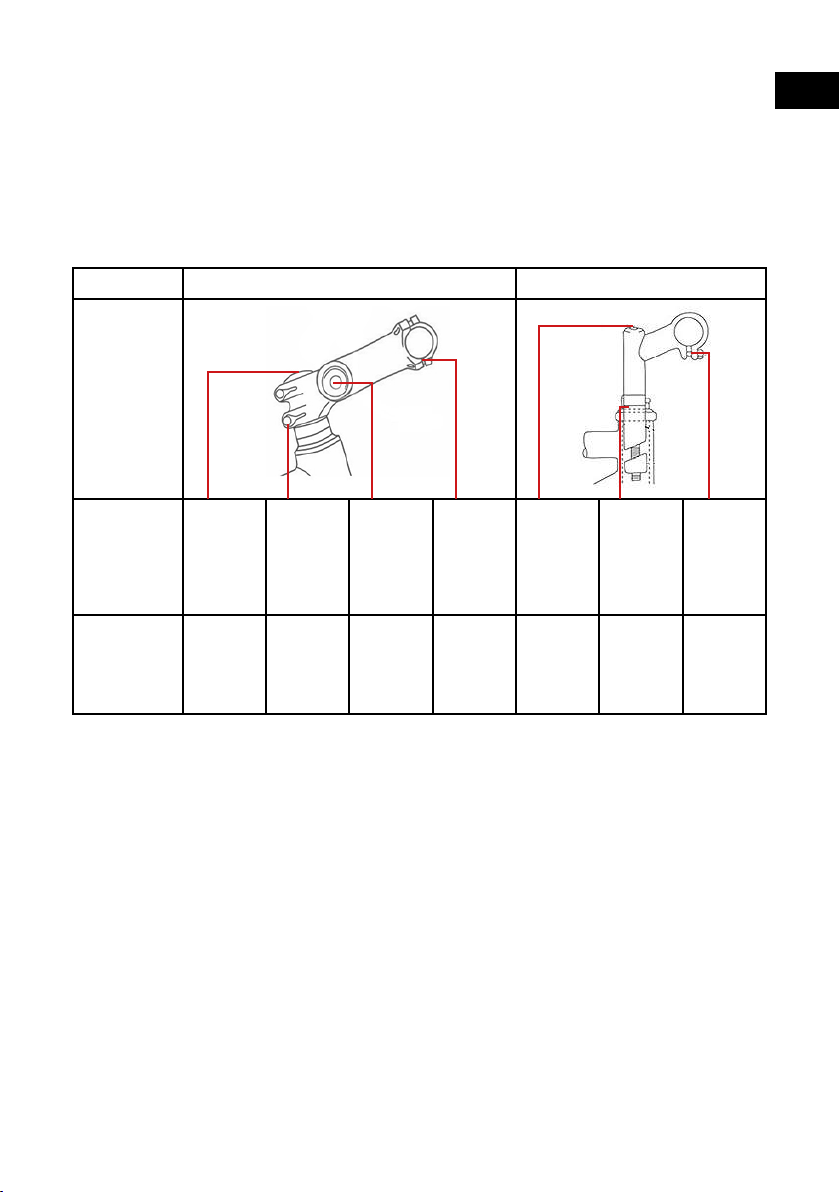
Recommended tightening for handlebar, stem, saddle, seatpost and wheel
components :
To ensure proper attachment of the handlebars, stem, saddle, seatpost and wheels,
it is recommended to use appropriate tightening wrenches and to apply a tightening
force in accordance with the specic tightening torques for each of the components
of the following different bicycle models (in Nm):
Stem and handlebars :
MODEL with AHEADSET stem MODEL with Plunger Stems
Model Stem on
vertical
screw
frame
head
Stem on
frame
head
(fork)
Height
Adjustment
Stem
Handle-
bars on
stem
Stem on
vertical
screw
frame
head
Stem nut
on frame
head
(fork)
Handle-
bars on
stem
GT-EM-500
Commercial
name : Scooty
Country 28
20 4.1 / 5.2 / / /
Caution: The use of an aerodynamic or other extension placed on the handlebars can
have a negative inuence on the rider’s response time during braking and cornering.

16
EN Saddle and wheels :
SADDLE WHEELS
Model Saddle and
seatpost
Seat post and seat
tube (frame)
Rear wheel to
frame
Front wheel to fork
GT-EM-500
Commercial
name : Scooty
Country 28
17.1 quick lock 35 25
Caution: Under certain conditions, the controller, the charger, the mechanical
disks and some parts of the product can reach high temperatures. Therefore, avoid
contact or protect yourself (gloves, protections,...) before touching these parts within
minutes after using the product. Do not expose the product to temperatures above
50°C. Beyond this range the autonomy will be affected. Furthermore, in a conned
environment, high temperatures will affect the composite materials of the product.
3.3. CHARGING AND BATTERY INDICATOR
Charge the battery before rst use. To do so, charge the device using the
charger supplied.
IMPORTANT: Only charge the device with the original charger supplied with
the device by the manufacturer. In case of doubt, loss or malfunction, avoid
charging the device with another charger. It is advised you obtain a new
charger from your dealer. You will nd the email address to contact customer
support on the last page of the warranty manual.
Next, check the battery charge level before use, using the battery level
indicator (20).
There are two ways to recharge the battery:
1. Remove the battery to recharge it.
2. Recharge the battery directly from the battery pack attached to the bike.

17
EN
In any case, it is advisable to make the connections in the following order:
1. Connect the charger output plug to the battery rst, then connect the
charger input plug to the household electrical outlet.
2. Disconnect the input plug from the house power outlet rst, then the output
plug from the battery.
Note: We recommend recharging the battery after each use and at least once
a month. The battery should be recharged indoors.
3.4. PREPARATION
For your own safety, we recommend you use this device in comfortable
conditions, wearing protection equipment such as a helmet and appropriate
protective gear for your joints (knee pads, elbow pads). For your own safety
as well as that of others, drive the device wearing closed and preferably at
shoes to ensure you have a good grip and stability.
Helmet
Elbow support
Wrist guard
Knee pad
3.5. HOW TO USE THE DEVICE (READ BEFORE FIRST USE)
HELMET WEARING
We strongly advise you to equip yourself before riding the bike with at least
one helmet, which must comply with the regulations on personal protective
equipment and must be attached.
WARNING: The user must comply with the requirements of national
regulations when using the bicycle on public roads, including compliance
with the Highway Code.
WARNING: The user is obliged to install lighting, signalling and warning
devices on the bicycle.
- It is forbidden to ride on the sidewalk, otherwise the bicycle must be held

18
EN in the hand.
- Do not wear earphones or any device that may emit sound, or use a hand-
held telephone.
The wearing of a certied retro-reective vest is mandatory for all cyclists
and passengers riding outside the city at night or when visibility is poor. The
manufacturer declines all responsibility if the driver of the bicycle does not
comply with the regulations in force.
3.6. FIRST USE
Before each use, please check the general condition of your bike.
The good condition of wearing parts such as brakes, tires, steering,
transmission, rims, etc. must be checked by the user before every use and
regularly checked, serviced and adjusted by a qualied mechanic.
Be sure to properly maintain your bike according to the instructions in the
user’s manual.
The ideal temperature range for the use of electric bicycles is between 5 and
25°C. Using your electric bicycle in low temperatures, less than 5°C, will not
damage your battery but may reduce performance.
The device emits an average sound pressure of less than 70dB at the user’s
ears.
WARNING: Like any mechanical component, a bicycle is subject to high
stress and wear. Different materials and components can react differently to
wear and fatigue. If a component has exceeded its service life expectancy, it
may break off in a single blow, possibly causing injury to the cyclist. Cracks,
scratches, and discoloration in high stress areas indicate that the component
has exceeded its life expectancy and should be replaced.
1. Check that the battery is securely in place and locked with the key in the
«LOCK» position.
2. Turn on the unit by pressing the ON/OFF button on the control panel.
3. Start pedaling like a regular bicycle.
19
EN
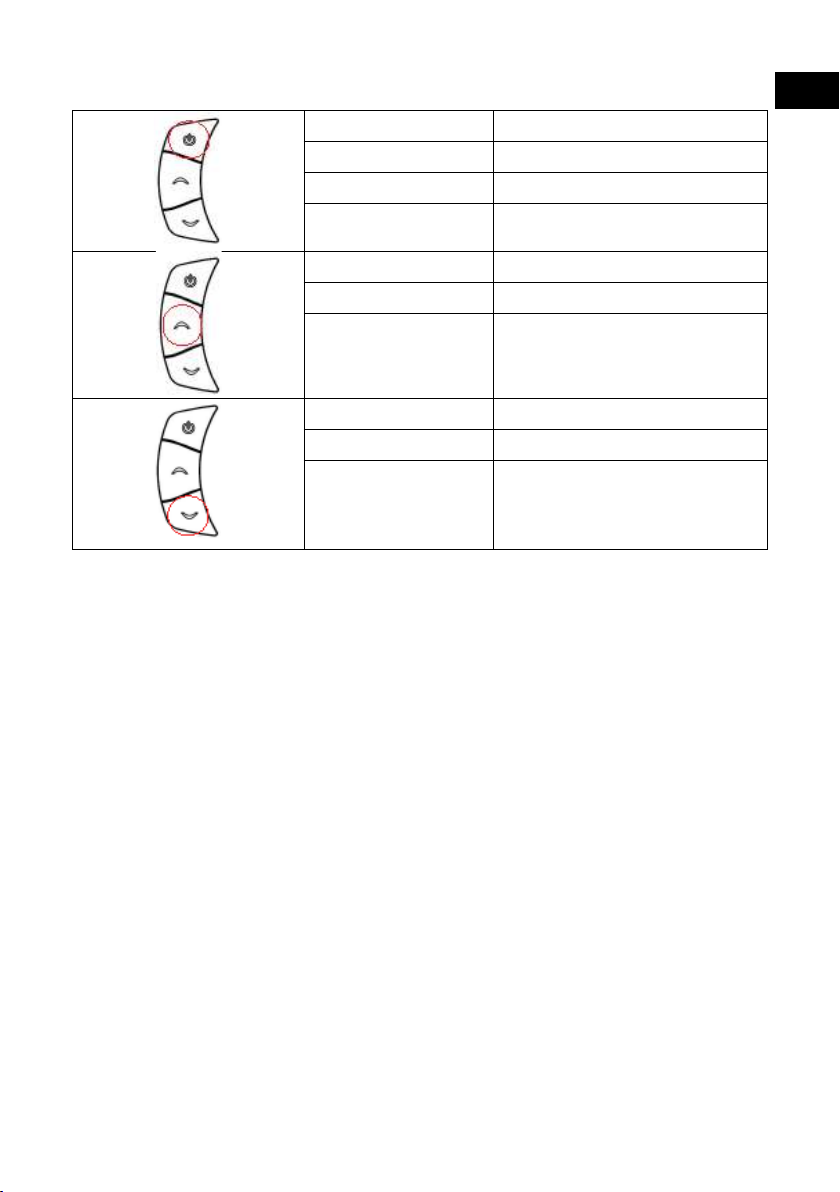
Using the screen:
1 short press Turn on the screen
1 short press (turn on) Turning on/off res
2 short supports Reset mileage to zero
1 long support Turn off the screen
1 short press Increase attendance
2 short supports Display total mileage
1 long support Reset total mileage to zero
1 short press Reduce attendance
2 short supports Display trip mileage
1 long support Enter pedestrian mode (limited to
6km/h)
3.7. HOW TO REMOVE AND REPLACE THE BATTERY
Turn the key to the right and then use the handle to unlock the battery and
remove it. To replace the battery, do the reverse.
3.8. ASSISTANCE, PARKING AND AUTONOMY
Pedaling assistance :
The bike is equipped with an electric pedaling assistance. The motor, located in
the hub of the rear wheel, starts once the user starts pedaling and completes
his efforts. The operation of the electric assistance depends on the speed of
the pedals and the speed of the bicycle. As stipulated by current European
legislation, the 250W motor stops at 25 km/h and switches off as soon as the
user stops pedaling.
To increase or decrease the power of the motor and therefore of the electric
assistance, press the buttons (13). and (14). on the control panel.
Parking :
- Turn off the power by pressing the ON/OFF button on the control panel.
- Lock the battery with the key or remove it and take it with you when the unit
is not in use.

20
EN - It is advisable to attach the unit when not in use to prevent theft.
- Never park the unit outside when it rains or snows. Prefer a garage that is
dry and well ventilated. After a trip in rain or snow, take the unit to a sheltered
place and wipe off any moisture with a clean, dry towel.
Mileage/Autonomy :
Many factors affect the rate of electric power usage and range as outlined in
Part 4.
In order to maximize the range of your unit, it is important to take note of the
following points:
- Fully charge the battery before a long trip.
- The advertised autonomy is measured under optimal conditions of use. User
weight, driving speed, rough roads and hilly terrain, tire pressure, headwind,
frequent changes in speed and braking (in town) and outside temperature are
all factors that affect the range of the device.
- Driving with properly inated tires and a clean, well-lubricated unit saves
energy.
- Regularly check the brake settings and make sure both wheels are moving
freely (that the brakes do not rub the wheel while driving).
- Battery capacity decreases as it ages.
3.9. SPEED LIMITS
The product is designed to travel at a maximum speed of 25 km/h.
Ensure you are following the usage restrictions of this product in terms of the
road safety norms of the country where you are using it.
3.10. DRIVER WEIGHT
The driver’s weight cannot exceed 120 kg.
Note: not respecting this weight limit increases the risk of falling or damaging
the product.
4. MAINTENANCE AND CLEANING
4.1. BATTERY
The capacity of lithium batteries decreases after several charging and
recharging cycles throughout its lifespan. The concept of life cycle exists for
lithium batteries (for example, about 300 on a scooter).This means that from
300 COMPLETE cycles of charges and discharges, the battery will begin to
lose its capacity (similar to a smartphone battery).
This manual suits for next models
1
Table of contents
Languages:
Other Scooty Scooter manuals

Scooty
Scooty DRIVE PRO User manual

Scooty
Scooty EVO 2 User manual

Scooty
Scooty CITY 4 User manual

Scooty
Scooty CITY GRAN Operation instructions

Scooty
Scooty RIde Plus User manual

Scooty
Scooty eKicker User manual

Scooty
Scooty Kick User manual

Scooty
Scooty SCOOT151 User manual

Scooty
Scooty SCOOTY CITY 26 + User manual


