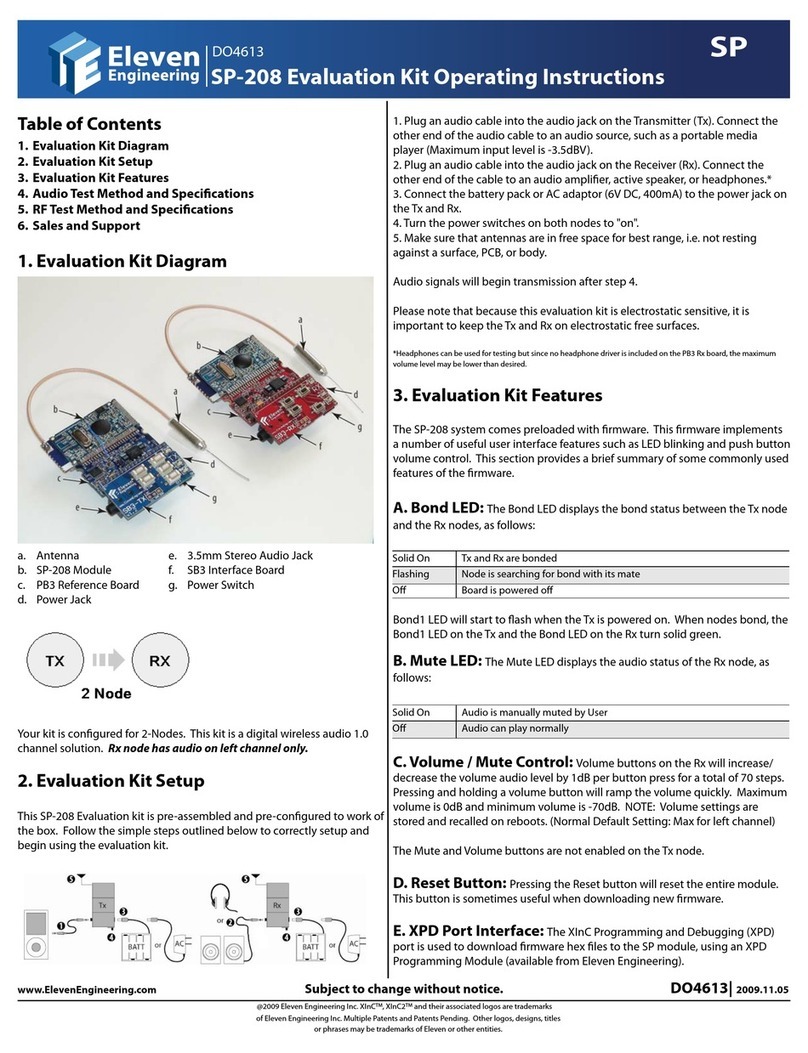
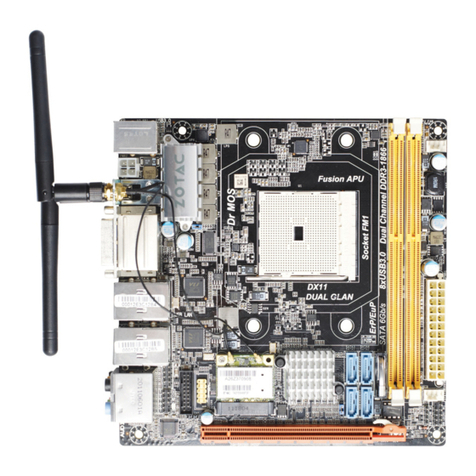
ScopeDome Arduino Card User manual

2019 - Copyright ScopeDome - Poland
ScopeDome
Arduino Card
PCB ver. 1.3.0, firmware ver. 4.9
Manual
- built-in BlueTooth HC-05 module
Compability with the Arduino environment (Arduino Mega clone)
- driver compable with Windows 7, 8, 10 (32 i 64 bit)
Powered by an external power supply
Two modules can be connected via BlueTooth in Master and Slave modes
Specificaon
The Master module controls the dome's rotaon, the Slave module controls the
dome's shuer
Control via Ethernet or USB
Open Source communicaon protocol
- module compable with Arduino Mega (AtMega2560-16)
- built-in Ethernet module (W5200)
Main features
Module designed to control the astronomical observatory
- network configuraon: stac IP address or DHCP
- 7 x logic inputs
- module power supply: external 12V / 2A power supply
- 2 x inputs for communicaon with a PC: Ethernet and USB
- built-in pressure gauge
- 7 x electromechanical relays 230V / 5A
- 2 x SPI inputs
- weight: 230 g
- 4 x OneWire inputs
- touch screen connector
Useful links
- SDK of the communicaon protocol with the card
- electrical diagrams of the card
- built-in thermometer
- 2 x analog inputs
- control method: USB cable or Ethernet network
- default IP address: 192.168.1.120 (port 80)
- 2 x Open Kolektor 12V / 2A power outputs with PWM control
- working temperature range: -10 ° C to 30 ° C
- 230V AC power detecon input
- dimensions: 113 x 114 x 20 mm
- ScopeDome Driver ver. 5.5.5.11

2019 - Copyright ScopeDome - Poland page: 2
Dome and Shutter Motor with Encoder
Limit Swiches Home Sensor in Box Dome Inverter
Observatory automation system components
ScopeDome Cloud and Rain Sensor
ScopeDome Arduino Card PCB
(master or slave)
ScopeDome Arduino Keyboard PCB
Shutter Inverter
Emergency Keys PCB
Higrometer Thermometer Motor Heater (12VDC or 230V AC) Box Heater (12V or 230V)
Hot
12VDC 1A Power Supply
* if you plan to use mirror heaters it should be minimum 3A/12V DC
Power Contacts for 4M and 55M Dome

2019 - Copyright ScopeDome - Poland page: 3
Dome observatory controll by ScopeDome Arduino Card
main and slave
part connected
by BlueTooth
Internet
Telescope
PC
Computer
Ethernet
Hub
ScopeDome Card
Master
ScopeDome Card
Slave
Dome Shuer
USB
IP
Dome
Motor
Shuer 1
Motor
Shuer 2
Motor
Block diagram ScopeDome driver window

2019 - Copyright ScopeDome - Poland page: 4
RollOffRoof observatory controll by ScopeDome Arduino Card
Internet
Telescope
PC
Computer
Ethernet
Hub
ScopeDome Card
Slave
RollOffRoof
USB
IP
Shuer 1
Motor
Shuer 2
Motor
Block diagram ScopeDome driver window

2019 - Copyright ScopeDome - Poland page: 5
Clamshell observatory controll by ScopeDome Arduino Card
Internet
Telescope
PC
Computer
Ethernet
Hub
ScopeDome Card
Slave
Clamshell
USB
IP
Block diagram
Clamshell
Relay Board
Shuer 1
Motor
Shuer 2
Motor
Shuer 3
Motor
ScopeDome driver window

2019 - Copyright ScopeDome - Poland page: 6
The ScopeDome Arduino Card is a specialized PCB compable with the Arduino plaorm. The card and soware allow to control any type of
observatory, not just ScopeDome producon. Through the ASCOM plaorm it cooperates with popular telescopes. ScopeDome driver
has built-in communicaon with the most popular cloud sensors and many weather staons. This allows the observatory to close
automacally when weather condions require it.
b) To control the RollOffRoof or Clamshell observatory, only one module programmed as Slave is required.
a) Two ScopeDome Arduino Shield plates are required to control the dome. One programmed as Master, the other as Slave. The Master
system controls the dome, the Slave system controls the dome's shuer. The systems connect via radio via the BlueTooth module.
2. Basic funcons of the card
- communicaon with a PC via the Internet (IP / Ethernet) or via USB
- rotang the dome in CW or CCW direcon for a given number of encoder pulses
- opening or closing the observatory flaps (it is possible to control up to three flaps)
- dome Home Sensor posion search
- counng the encoder pulses connected to the dome rotaon motor
1. Info
c) The card can also be used as a simple relay controller controlled via the Internet or USB.
a) no pulses counng the posion of the dome appear on the encoder for a set me
- Telescope AtHome sensor allows blocking the opening of the shuer or sliding roof when the telesckop is not parked
- the card protects the engines by not allowing too fast switching the direcon of movement of the dome or shuer
- heang control for the telescope's engines, electronics and mirrors
- together with the ScopeDome Cloud Sensor detecon of clouds and rain
- the card automacally resets when it is suspended (so-called WatchDog)
- UPS baery voltage measurement and the shuer closing when the voltage is too low
- built-in Limit Switch connectors interrupt the motor control signal in hardware
3. Addional security
- enabling or disabling one of the relays
b) the dome posion counter exceeds the programmed maximum value
- Open / Close sensors stop the engine when the shuer close or open signal appears
- the card automacally turns off the shuer or roof control motors when the set me limit expires
- the card automacally deacvates the dome control engines when:
- the card detects a 230V power outage allowing the dome to be closed when powered by UPS
- aer detecng clouds or rain it is possible to close the dome automacally

2019 - Copyright ScopeDome - Poland page: 7
4. Descripon of connectors on the card
3. 12V DC card power input
2. USB input - programming or card control
1. Ethernet (IP) input - card control
- plus the power necessary to heat mirrors from PWM outputs
4. PWM2 - heang of the telescope mirror (max 2A)
5. PWM1 - heang of the telescope mirror (max 2A) or cloud sensor
6. Ow1 - engine thermometer
- power supply minimum 2A / 30W,
7. Ow2 - thermometer for measuring the outside temperature (Out)
18. Pt100 - addional resistance temperature sensor
Display Connector - the card has a built-in connector for
20. Close Limit Switch - the limit switch input for closing the damper
26. Relay controlling camera power supply
28. Router power control relay (WatchDog)
touch LCD display connecon working on the SPI bus.
11. Pyrometer - input for connecng the ScopeDome Cloud sensor
23. Dome or shuer direcon control relay (CW/Com/CCW) or
Open/Com/Close)
8. Ow3 - mirror thermometer 1
24. Heang control relay (Motor / Com / Electronics)
PCB with necessary buons and LEDs to allow control the relays.
15. Cloud Sensor - input of an external cloud sensor - eg AAG
19. Close Sensor - input of the damper closing sensor
Buon and Led Connector - dedicated cards can be connected to this
14. Telescope At Home Sensor - telescope parking sensor input
22. Open Limit Switch - limit switch opening for flap opening
12. Encoder - dome posion measurement
9. Ow4 - mirror thermometer 2
25. 230V AC supply sensor
13. Dome At Home Sensor - input indicang zero for the encoder
17. Voltage 64V - input for measuring beteria voltage from UPS
27. Telescope power supply relay
16. Rain Sensor - rain sensor input, eg AAG or ScopeDome
10. Higrometer - temperature and humidity in the dome
21. Open Sensor - shuer opening sensor input
BlueTooth
Module
(HC-05)
Buttons and LED
connector
Display
connector
(FT811)
1 2 3
4
5
6
7
8
9
10
12
13
14
151617181920
21
22
23
24
25
26
27
28
11

2019 - Copyright ScopeDome - Poland page: 8
6. Soware installaon
Note: Connect the card to your computer only aer installing the soware below.
c) ScopeDome Driver: hp://www.scopedome.com/en/download-program.aspx
With this opon you can also force the driver to work in simulator mode.
during their start-up.
a) (Oponal) ArduinoIDE: hps://www.arduino.cc/en/Guide/windows
If you bought the card directly from ScopeDome you will receive it with programmed Master and Slave modules and paired BlueTooth modules.
At this me, the card should be recognized by Windows and assigned to one of the free COM ports.
a) via USB
The card will not require addional programming. The IP address will be set to 192.168.1.120.
b) via the Internet
If you want to program the card's advanced features - including the IP address, you must connect the card via USB during configuraon.
Select the appropriate opon in "Connect By" in the Config-> Card-> ScopeDome Arduino Card window.
The Arduino card can work with a PC in two ways:
In our opinion it works much more stable when controlling dome motors. This type of control is more resistant to interference from three-phase motors arising
Aer installing all soware modules, you can connect the card to a PC via a USB port.
7. Card configuraon
8. Configuring the connecon with PC in the ScopeDome Driver program
We recommend connecng via the Internet.
The soware must be installed in the order listed:
b) ASCOM plaorm: hps://ascom-standards.org

2019 - Copyright ScopeDome - Poland page: 9
9. Searching the Arduino card in the local network in the ScopeDome Arduino Card - Test App
The search may take about 3 minutes. Then select the appropriate item from the Chose Arduino device list and press the Save Sengs buon.
Press Find Arduino IP buon and wait unl the list of available devices appears in the Chose Arduino device list.

2019 - Copyright ScopeDome - Poland page: 10
The card's IP address is also displayed in the Com Arduino IDE port monitor aer enabling the Log to Console opon and reseng the card.
Note: the Log to Console opon must be disabled during normal operaon of the ScopeDome driver, it can be enabled only for tesng.
setLogging=1
resetSo
setLogging=0
IP change:
setIp=192.168.1.119
The sequence of commands in the Arduino Ide:

2019 - Copyright ScopeDome - Poland page: 11
In the browser's address line, enter:
password: default
You will be asked to enter your username and password, enter:
xxx.xxx.xxx.xxx - replace with your Arduino card's IP address
- run ScopeDome Arduino - Test App
- select the USB port to which the card is connected
- press Connect buon
- in the Command drop-down list there is a list of all available orders supported by the card. You can run the selected command using Run Command buon.
a) as Master - controlling the dome:
user: scopedome
Przed zaprogramowaniem karty należy połączyć ją z komputerem poprzez łącze USB, a w oprogramowaniu sterującym wybrać odpowiedni numer portu COM.
- select the opon Communicaon By: USB
- select the opon: Ethernet Shield
- press Card Preset> As Master
getStatus|OK|1:1:1:1:1;32000:32000;1:1:1:1:1;0:0:0:0#1:1:1:1:0;32000:32000;1:1:1:1:1;0:0:0:0 (....)
hp://xxx.xxx.xxx.xxx/?switchOffRelay=1
- select the communicaon method with the card (USB or Ethernet) and enter the appropriate IP address or COM port number
- in the /Doc/ScopeDome_Arduino_Info_4.9.pdf file you will find a detailed descripon of the available orders.
- press the Get Status buon in the Command Monitor window. The card status should display, e.g.
11. Tesng the card in a web browser
Programowanie trybu działania karty oraz ustawień połączenia internetowego jest możliwe tylko poprzez port USB.
Programming the card operaon mode and Internet connecon sengs is only possible via the USB port.
Before programming the card, connect it to your computer via USB, and select the appropriate COM port number in the control soware.
10. Tesng the card operaon in the ScopeDome Arduino program - Test App
- press Save Sengs buon
12. Programming the card operaon mode in the ScopeDome Arduino program - Test App
hp://xxx.xxx.xxx.xxx/?switchOnRelay=1
b) as Slave - dome shuer control:
- select the USB port to which the card is connected
- deselect the opon: Ethernet Shield
- press Card Preset> As Slave
- run ScopeDome Arduino - Test App
- press Card Preset> As Slave
- select the Communicaon By: USB opon
- select the opon Communicaon By: USB
c) as Slave - controlling the RollOffRoof or Clamshell observatory
- select the USB port to which the card is connected
- select the opon: Ethernet Shield
- run ScopeDome Arduino - Test App

2019 - Copyright ScopeDome - Poland page: 12
15. Restore standard card sengs
a) Master
- pairing will take about one minute
14. Advanced programming of card operaon mode
- if both BlueTooth modules communicate correctly, they will start to signal it by flashing synchronously on both cards with an LED
b) Slave
Aenon:
Set the parameters as in the picture below and press As Master buon
- turn the power of both cards off and on
- on both cards press the Pair buon
Set the parameters as in the picture below and press As Slave buon
- program the cards - one as Master, the other as Slave
- wait about 30 seconds
d) pairing BlueTooth modules of Master and Slave cards
You can find more informaon on this topic in the file: ScopeDome_Arduino_Info_4.9.pdf in sub-directory /DOC
in the Flash-Flash rhythm - Break (flash - 0.5s, break 1s)
- connect the power supply for both cards
- the MAC and IP address of the card provided by you will also be programmed in this way.
- remember that Master and Slave cards will be assigned different Com port numbers - by programming them you should change the COM port sengs
- aer changing the COM port number, click Save Sengs
- Preset As Master and Preset As Slave opons work only when connected to the card via USB

2019 - Copyright ScopeDome - Poland page: 13
Card dimensions
66.0 mm
89.0 mm
ScopeDome Arduino Keyboard PCB
51.9 mm
83.2 mm
24.0 mm
32.0 mm
Emergency Keys PCB
18.1 mm
20.2 mm
ScopeDome Arduino Card PCB (Master or Slave)
94.4 mm
106.2 mm
107.2 mm
116.0 mm
114.2 mm

2019 - Copyright ScopeDome - Poland page: 14
Dome
Inverter
Direction
P1 P2 COM
Rel1 Rel2 Rel3 Rel4 Rel5
N L
Rel6 Rel7
230V
Detect
LS Open
O1 O2 GNDOSCW CCW
COM
LS Close
C1
C2
GND
CS
Pt100
GND
ADC13
Voltage
0-64V DC
GND
ADC14
Rain
GND
In1
Cloud
GND
In2
+5V
GND
In3
T@H
+5V
GND
In4
D@H
+5V
GND
In5
Encoder
+5V
GND
SDA
Pirometer
SCL
+5V
GND
SDA
Higrometer
SCL
+5V
GND
Ow4
Ow4
+5V
GND
Ow3
Ow3
+5V
GND
Ow2
Ow2
+5V
GND
Ow1
Ow1
PWM1
GND
PWM1
PWM2
GND
PWM2
+12V
GND
12VDC
USBIP
ScopeDome
Arduino Card ver 1.3.0
Main
UPS
Piure Sinus
600W for 3M dome
1000W for 4M or 55M dome
230V Output
L N PE
230V Input
L N PE
GND
+12
Battery
230/12VDC
2A
230V Input
L N PE
Encoder
Dome
GND
OS
V+
Dome
At Home
GND
OS
V+
+5V
GND
Ow1
Motor
Therm.
Heater
Motor
230V
Heater
Box
230V
230V Motor
L N PE U V W PE
12V Output
+ -
L1 L2 L3
Motor
230V
PE
L N
L N
230V
Main Power
L N PE
+5V
GND
Ow1
Mirror1
Therm.
+5V
GND
Ow1
Mirror2
Therm.
+ -
Mirror
Heater
12V
+ -
Mirror
Heater
12V
230V Out
to slip ring
or power
contacts
LS Open
LS Close
A230V
A230V
B230V
A230V
B230V
12VDC
12VDC
Dome part
Rel3
Rel2
Rel1 Rel2 Rel3
A230V
Telescope
230V Power
CCD
230V Power
CCW CW
Reset Telescope CCD
InBox
Heater
Motor
Heater
Rain
Sensor
Cloud
Sensor
Telescope
At Home
Dome
At Home
Encoder
Output
Input
Limit Switch
Communication
Box
Thermometer (on PCB)
Barometer (on PCB)
Power
Reset
+5V
GND
SDA
Higrometer
SCL
Diagram for 3M, 4M, 55M

2019 - Copyright ScopeDome - Poland page: 15
Shutter
Inverter
Direction
P1 P2 COM
Rel1 Rel2 Rel3 Rel4 Rel5
N L
Rel6 Rel7
230V
Detect
LS Open
O1 O2 GNDOSCW CCW
COM
LS Close
C1
C2
GND
CS
Pt100
GND
ADC13
Voltage
0-64V DC
GND
ADC14
Rain
GND
In1
Cloud
GND
In2
+5V
GND
In3
T@H
+5V
GND
In4
D@H
+5V
GND
In5
Encoder
+5V
GND
SDA
Pirometer
SCL
+5V
GND
SDA
Higrometer
SCL
+5V
GND
Ow4
Ow4
+5V
GND
Ow3
Ow3
+5V
GND
Ow2
Ow2
+5V
GND
Ow1
Ow1
PWM1
GND
PWM1
PWM2
GND
PWM2
+12V
GND
12VDC
USBIP
ScopeDome
Arduino Card ver 1.3.0
Slave
230/12VDC
2A
230V Input
L N PE
Encoder
Shutter
GND
OS
V+
+5V
GND
Ow1
Motor
Therm.
Heater
Motor
230V
Heater
Box
230V
230V Motor
L N PE U V W PE
12V Output
+ -
L1 L2 L3
Motor
230V
PE
L N
L N
230V
Main Power
from slip ring
or power contacts
L N PE
+5V
GND
Ow1
Out
Therm.
+12V
GND
SDA
ScopeDome
Cloud/Rain Sensor
SCL
Heat
Rain Rain
Rain
Dome Front
Close Sensor
Limit Switch
Open Sensor
Limit Switch
Dome Top
A230V
A230V
A230V
A230V
12VDC
12VDC
+12V
PWM1
PWM1
Shuer part
Rel1
Rel3
Rel2
Rel1 Rel2 Rel3
A230V
Light
230V Power
Fan
230V Power
CloseLS OpenLS
OpenLS
CloseLS
Open Close
Reset Light Fan
InBox
Heater
Motor
Heater
Box
Thermometer (on PCB)
Barometer (on PCB)
Power
Reset
Diagram for 3M, 4M, 55M
Rain
Sensor
Cloud
Sensor
Telescope
At Home
Dome
At Home
Encoder

2019 - Copyright ScopeDome - Poland page: 16
Shutter
Inverter
Direction
P1 P2 COM
Rel1 Rel2 Rel3 Rel4 Rel5
N L
Rel6 Rel7
230V
Detect
LS Open
O1 O2 GNDOSCW CCW
COM
LS Close
C1
C2
GND
CS
Pt100
GND
ADC13
Voltage
0-64V DC
GND
ADC14
Rain
GND
In1
Cloud
GND
In2
+5V
GND
In3
T@H
+5V
GND
In4
D@H
+5V
GND
In5
Encoder
+5V
GND
SDA
Pirometer
SCL
+5V
GND
SDA
Higrometer
SCL
+5V
GND
Ow4
Ow4
+5V
GND
Ow3
Ow3
+5V
GND
Ow2
Ow2
+5V
GND
Ow1
Ow1
PWM1
GND
PWM1
PWM2
GND
PWM2
+12V
GND
12VDC
USBIP
ScopeDome
Arduino Card ver 1.3.0
Slave
230/12VDC
2A
230V Input
L N PE
Encoder
Shutter 1
GND
OS
V+
+5V
GND
Ow1
Motor
Therm.
Heater
Motor
230V
Heater
Box
230V
230V Motor
L N PE U V W PE
12V Output
+ -
L1 L2 L3
Motor
230V
PE
L N
L N
230V
Main Power
L N PE
+5V
GND
Ow1
Out
Therm.
Rain
Close Sensor
Limit Switch
Open Sensor
Limit Switch
A230V
A230V
A230V
A230V
12VDC
12VDC
PWM1
With One Shuer Controll
Rel1
Rel3
Rel2
Rel1 Rel2 Rel3
A230V
Telescope
230V Power
Light
230V Power
CloseLS OpenLS
OpenLS
CloseLS
Open Close
Reset Scope Light
InBox
Heater
Motor
Heater Encoder
Box
Thermometer (on PCB)
Barometer (on PCB)
Power
Reset
Diagram for RollOffRoof observatory
Rain
Sensor
Cloud
Sensor
Telescope
At Home
Dome
At Home
+5V
GND
Ow1
Mirror1
Therm.
+5V
GND
Ow1
Mirror2
Therm.
+5V
GND
SDA
Higrometer
SCL
+12V
GND
SDA
ScopeDome
Cloud/Rain Sensor
SCL
Heat
Rain Rain
+12V
PWM1
Pirometer
Pirometer
Scope
At
Home
GND
OS
V+

2019 - Copyright ScopeDome - Poland page: 17
Shutter 1
Inverter
Direction
P1 P2 COM
Rel1 Rel2 Rel3 Rel4 Rel5
N L
Rel6 Rel7
230V
Detect
LS Open
O1 O2 GNDOSCW CCW
COM
LS Close
C1
C2
GND
CS
Pt100
GND
ADC13
Voltage
0-64V DC
GND
ADC14
Rain
GND
In1
Cloud
GND
In2
+5V
GND
In3
T@H
+5V
GND
In4
D@H
+5V
GND
In5
Encoder
+5V
GND
SDA
Pirometer
SCL
+5V
GND
SDA
Higrometer
SCL
+5V
GND
Ow4
Ow4
+5V
GND
Ow3
Ow3
+5V
GND
Ow2
Ow2
+5V
GND
Ow1
Ow1
PWM1
GND
PWM1
PWM2
GND
PWM2
+12V
GND
12VDC
USBIP
ScopeDome
Arduino Card ver 1.3.0
Slave
230/12VDC
2A
230V Input
L N PE
Encoder
Shutter 1
GND
OS
V+
+5V
GND
Ow1
Motor
Therm.
Heater
Motor
230V
Heater
Box
230V
230V Motor
L N PE U V W PE
12V Output
+ -
L1 L2 L3
Motor 1
230V
PE
L N
L N
230V
Main Power
L N PE
+5V
GND
Ow1
Out
Therm.
Rain
Dome Front
Close Sensor 1
Limit Switch
Open Sensor 1
Limit Switch
Dome Top
Dome Front
Close Sensor 2
Limit Switch
Open Sensor 2
Limit Switch
Dome Top
Shutter 2
Inverter
Direction
P1 P2 COM
230V Motor
L N PE U V W PE
L1 L2 L3
Motor 2
230V
PE
A230V
A230V
A230V
A230V
12VDC
12VDC
Shutter
Inverter 2
With Two Shuers Controll
CloseLS1 OpenLS1
OpenLS1
CloseLS1
Open 1 Close 1
Reset Open 2 Close 2
InBox
Heater
Motor
Heater
Box
Thermometer (on PCB)
Barometer (on PCB)
Power
Reset
Diagram for RollOffRoof observatory
CloseLS2 OpenLS2
A230V
OpenLS2 CloseLS2 Shutter
Inverter 2
Cs2
Os2
Cs2Os2
Gnd
Gnd
Encoder
Rain
Sensor
Open 2
Sensor
Telescope
At Home
Dome
At Home
+5V
GND
Ow1
Mirror1
Therm.
+5V
GND
Ow1
Mirror2
Therm.
+5V
GND
SDA
Higrometer
SCL
Pirometer
+12V
GND
SDA
ScopeDome
Cloud/Rain Sensor
SCL
Heat
Rain Rain
+12V
PWM1
Pirometer
Scope
At
Home
GND
OS
V+

2019 - Copyright ScopeDome - Poland page: 18
Rel1 Rel2 Rel3 Rel4 Rel5
N L
Rel6 Rel7
230V
Detect
LS Open
O1 O2 GNDOSCW CCW
COM
LS Close
C1
C2
GND
CS
Pt100
GND
ADC13
Voltage
0-64V DC
GND
ADC14
Rain
GND
In1
Cloud
GND
In2
+5V
GND
In3
T@H
+5V
GND
In4
D@H
+5V
GND
In5
Encoder
+5V
GND
SDA
Pirometer
SCL
+5V
GND
SDA
Higrometer
SCL
+5V
GND
Ow4
Ow4
+5V
GND
Ow3
Ow3
+5V
GND
Ow2
Ow2
+5V
GND
Ow1
Ow1
PWM1
GND
PWM1
PWM2
GND
PWM2
+12V
GND
12VDC
USBIP
ScopeDome
Arduino Card ver 1.3.0
Slave
+5V
GND
Ow1
Motor
Therm.
Heater
Motor
230V
Heater
Box
230V
L N
L N
+5V
GND
Ow1
Out
Therm.
Rain
A230V
A230V
12VDC
PWM1
Clamshell dome
S1 S2 S3
OCC
UPS
Piure Sinus
600W for 3M dome
1000W for 4M or 55M dome
230V Output
L N PE
230V Input
L N PE
GND
+12
Battery
230/12VDC
2A
230V Input
L N PE
12V Output
+ -
230V
Main Power
L N PE
SE-O-1
SE-C-1
A230V
SE-O-2
SE-C-2
SE-O-3SE-C-3
12VDC
-12V DC (Ground)
Box
Thermometer (on PCB)
Barometer (on PCB)
Diagram for Clamshell 3M Open Close
S1 S2 S3
InBox
Heater
Motor
Heater Close 3
Sensor
Rain
Sensor
Open 2
Sensor
Telescope
At Home
Open 3
Sensor
+5V
GND
SDA
Higrometer
SCL
+5V
GND
Ow1
Mirror1
Therm.
+5V
GND
Ow1
Mirror2
Therm.
Pirometer
+12V
GND
SDA
ScopeDome
Cloud/Rain Sensor
SCL
Heat
Rain Rain
+12V
PWM1
Pirometer

2019 - Copyright ScopeDome - Poland page: 19
PE
L1 L2 L3
Motor
1B
Shutters
Inverter
Direction
P1 P2 COM
230V
Motor
L N PE
U V W PE
Clamshell Relay Board
I-U
I-V
I-W
PE
P1 P2 COM
230V
AC
L N PE
Clamshell Relay Board
U
M1
V
M1
W
M1
PE
M1
PE
L1 L2 L3
Motor
1A
PE
L1 L2 L3
Motor
2B
PE
L1 L2 L3
Motor
2A
PE
L1 L2 L3
Motor
3B
PE
L1 L2 L3
Motor
3A
Shutter 1
Motor
Open-1-LS
LSO-A1
Open-1 LS
U
M2
V
M2
W
M2
PE
M2
Shutter 2
Motor
U
M3
V
M3
W
M3
PE
M3
Shutter 3
Motor
LSO-B1
SEO-G1
Close-1-LS
LSC-A1
Close-1 LS
LSC-B1
SEC-G1
Open-2-LS
LSO-A2
Open-2 LS
LSO-B2
SEO-G2
Close-2-LS
LSC-A2
Close-2 LS
LSC-B2
SEC-G2
Open-3-LS
LSO-A3
Open-3 LS
LSO-B3
SEO-G3
Close-3-LS
LSC-A3
Close-3 LS
LSC-B3
SEC-G3
Shutter 3
button
Shutters select buttons
BS.3
BS.3
Shutter 1
button
BS.1
BS.1
Shutter 2
button
BS.2
BS.2
Shutter
Close
Button
B.Close
Com
Shutter
Open
Button
B.Open
Com
S1 S2 S3
Open
Com
Close
Card Shutter
select
Card Direction
select
Manual Shutter
select
Manual Direction
select
230V
AC
LN
PE
12V
DC
+ - +-
12V
DC
Rel
S1
Rel
S2
Rel
S3
Rel
Open
Rel
Close
OCC
SE-C-1
SE-C-2
SE-C-3
SE-O-1
SE-O-2
SE-O-3
SEO-A1
SEC-A1
SEO-A2
SEC-A2
SEO-A3
SEC-A3
S1S2S3
A230V
12VDC
Diagram for Clamshell 3M
12VDC
for
arduino
Main
Power

2019 - Copyright ScopeDome - Poland page: 20
12V PWM
MOTOR
Direction
CW CCWCOM
Rel1 Rel2 Rel3 Rel4 Rel5
N L
Rel6 Rel7
230V
Detect
LS Open
O1 O2 GNDOSCW CCW
COM
LS Close
C1
C2
GND
CS
Pt100
GND
ADC13
Voltage
0-64V DC
GND
ADC14
Rain
GND
In1
Cloud
GND
In2
+5V
GND
In3
T@H
+5V
GND
In4
D@H
+5V
GND
In5
Encoder
+5V
GND
SDA
Pirometer
SCL
+5V
GND
SDA
Higrometer
SCL
+5V
GND
Ow4
Ow4
+5V
GND
Ow3
Ow3
+5V
GND
Ow2
Ow2
+5V
GND
Ow1
Ow1
PWM1
GND
PWM1
PWM2
GND
PWM2
+12V
GND
12VDC
USBIP
ScopeDome
Arduino Card ver 1.3.0
Main
UPS
Piure Sinus
600W for 3M dome
1000W for 4M or 55M dome
230V Output
L N PE
230V Input
L N PE
GND
+12
Battery
230/12VDC
15A
230V Input
L N PE
Encoder
Dome
GND
OS
V+
Dome
At Home
GND
OS
V+
+5V
GND
Ow1
Motor
Therm.
Heater
Motor
230V
Heater
Box
230V
Motor
+ -
12V Output
+ -
L N
L N
230V
Main Power
L N PE
+5V
GND
Ow1
Mirror1
Therm.
+5V
GND
Ow1
Mirror2
Therm.
+ -
Mirror
Heater
12V
+ -
Mirror
Heater
12V
12V Out
to slip ring
or power
contacts
LS Open
LS Close
A230V
B230V
A230V
B230V
12VDC
Dome part
Rel3
Rel2
Rel1 Rel2 Rel3
A230V
Telescope
230V Power
CCD
230V Power
CCW CW
Reset Telescope CCD
InBox
Heater
Motor
Heater
Rain
Sensor
Cloud
Sensor
Telescope
At Home
Dome
At Home
Encoder
Output
Input
Limit Switch
Communication
Box
Thermometer (on PCB)
Barometer (on PCB)
Power
Reset
+5V
GND
SDA
Higrometer
SCL
Diagram for 2M
+-
12V/15A
12V
150W
Dome Motor
Open
LS
Close
LS
(71) (72)
(73)
(77)(83)
12VDC
12VDC
Table of contents

