ScubaJet Pro User manual

1
USER MANUAL SCUBAJET PRO
V1.0

2 3
CONTENTS
I Introduction .....................................3
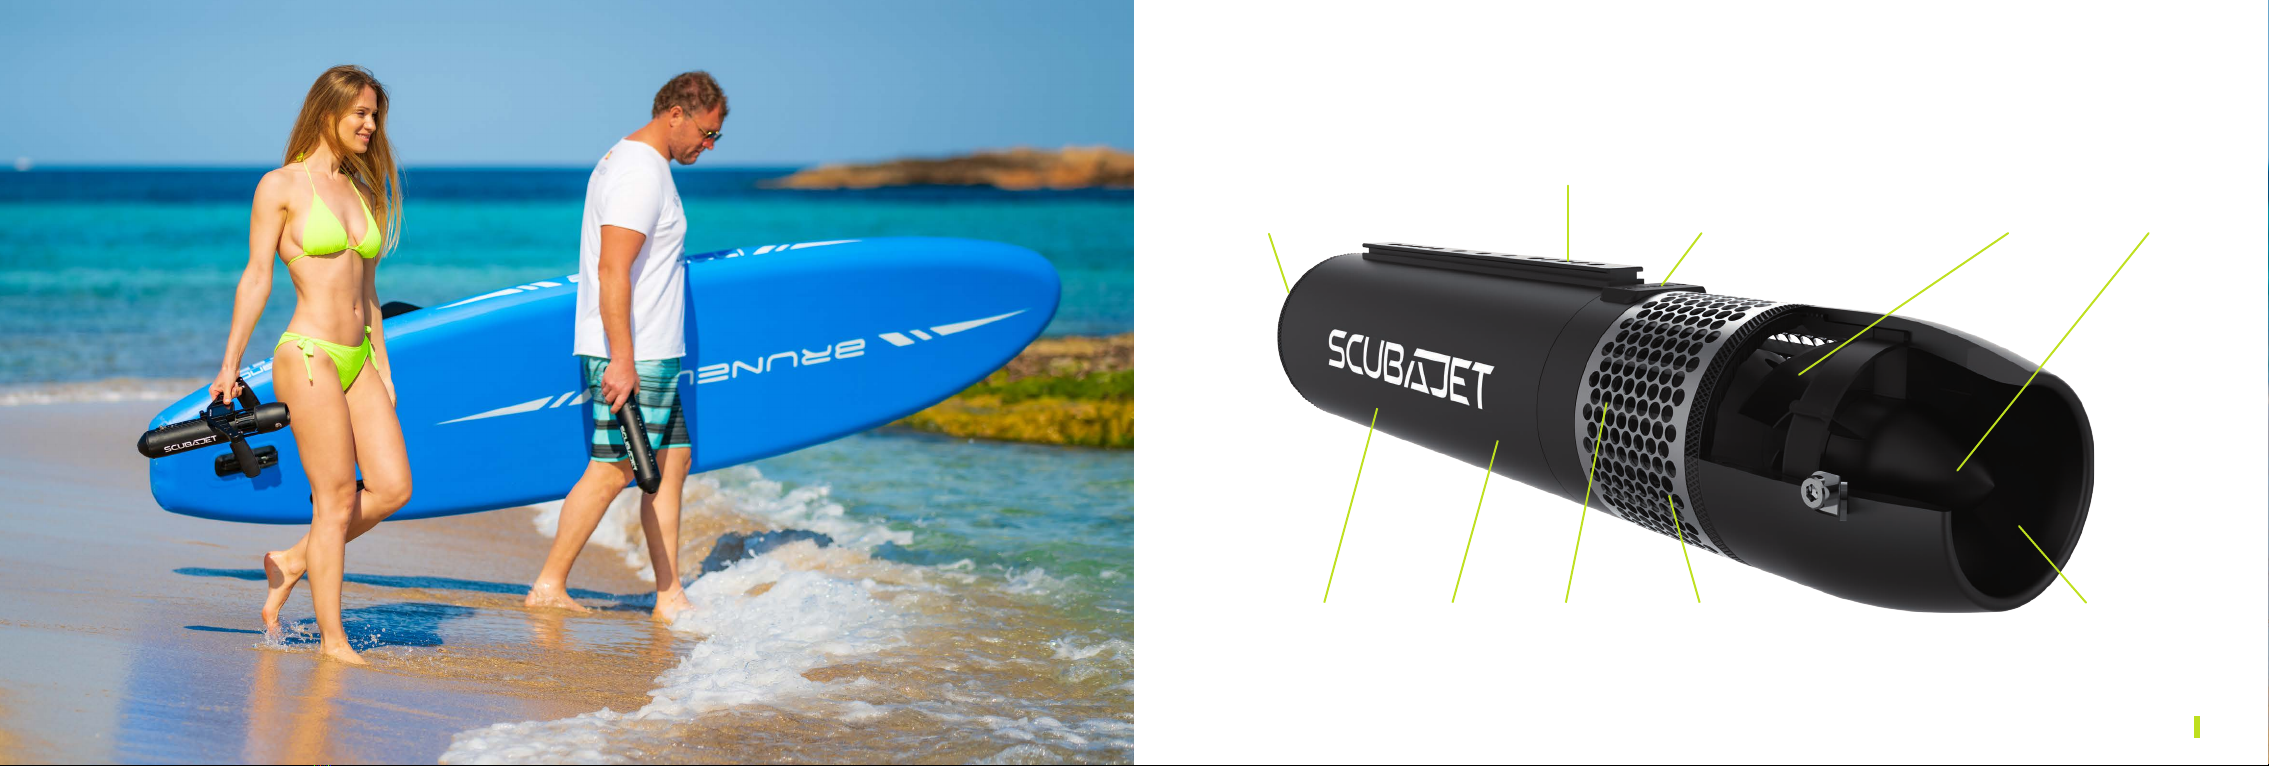
II Product Details ...................................5
III PartsandTechnicalSpecicationsSJPRO ...........6
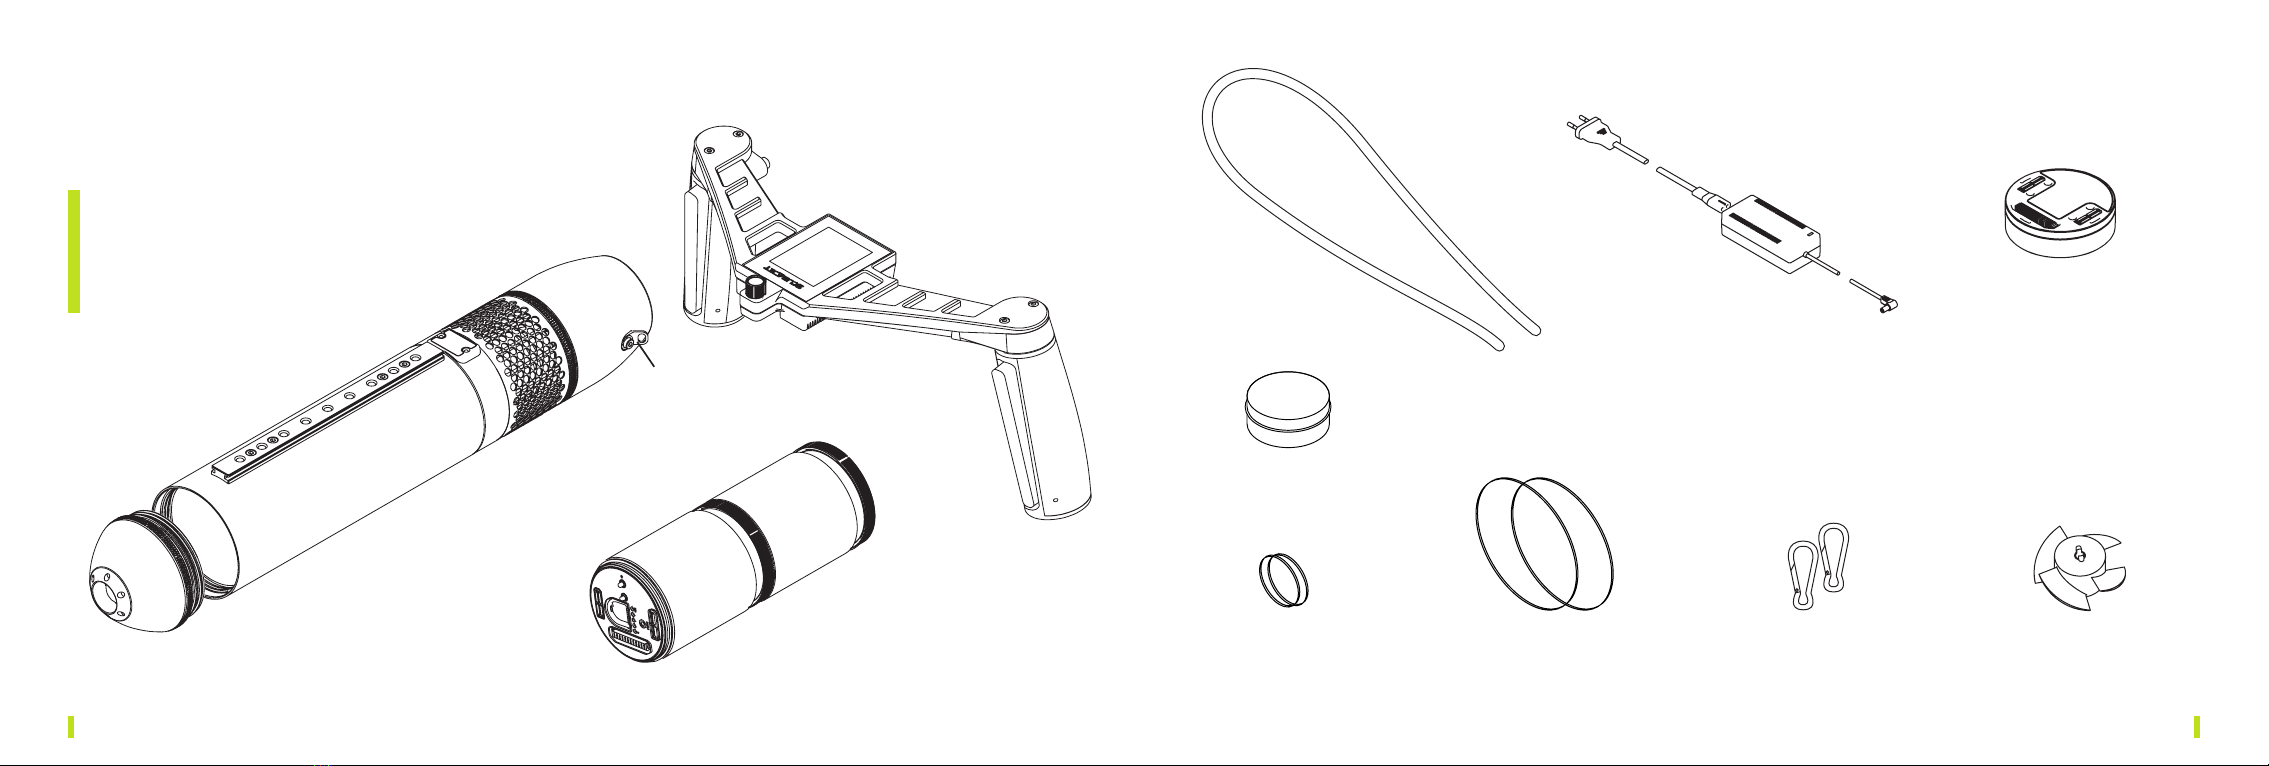
3.1. Contents of SJ PRO DIVE package ....................6
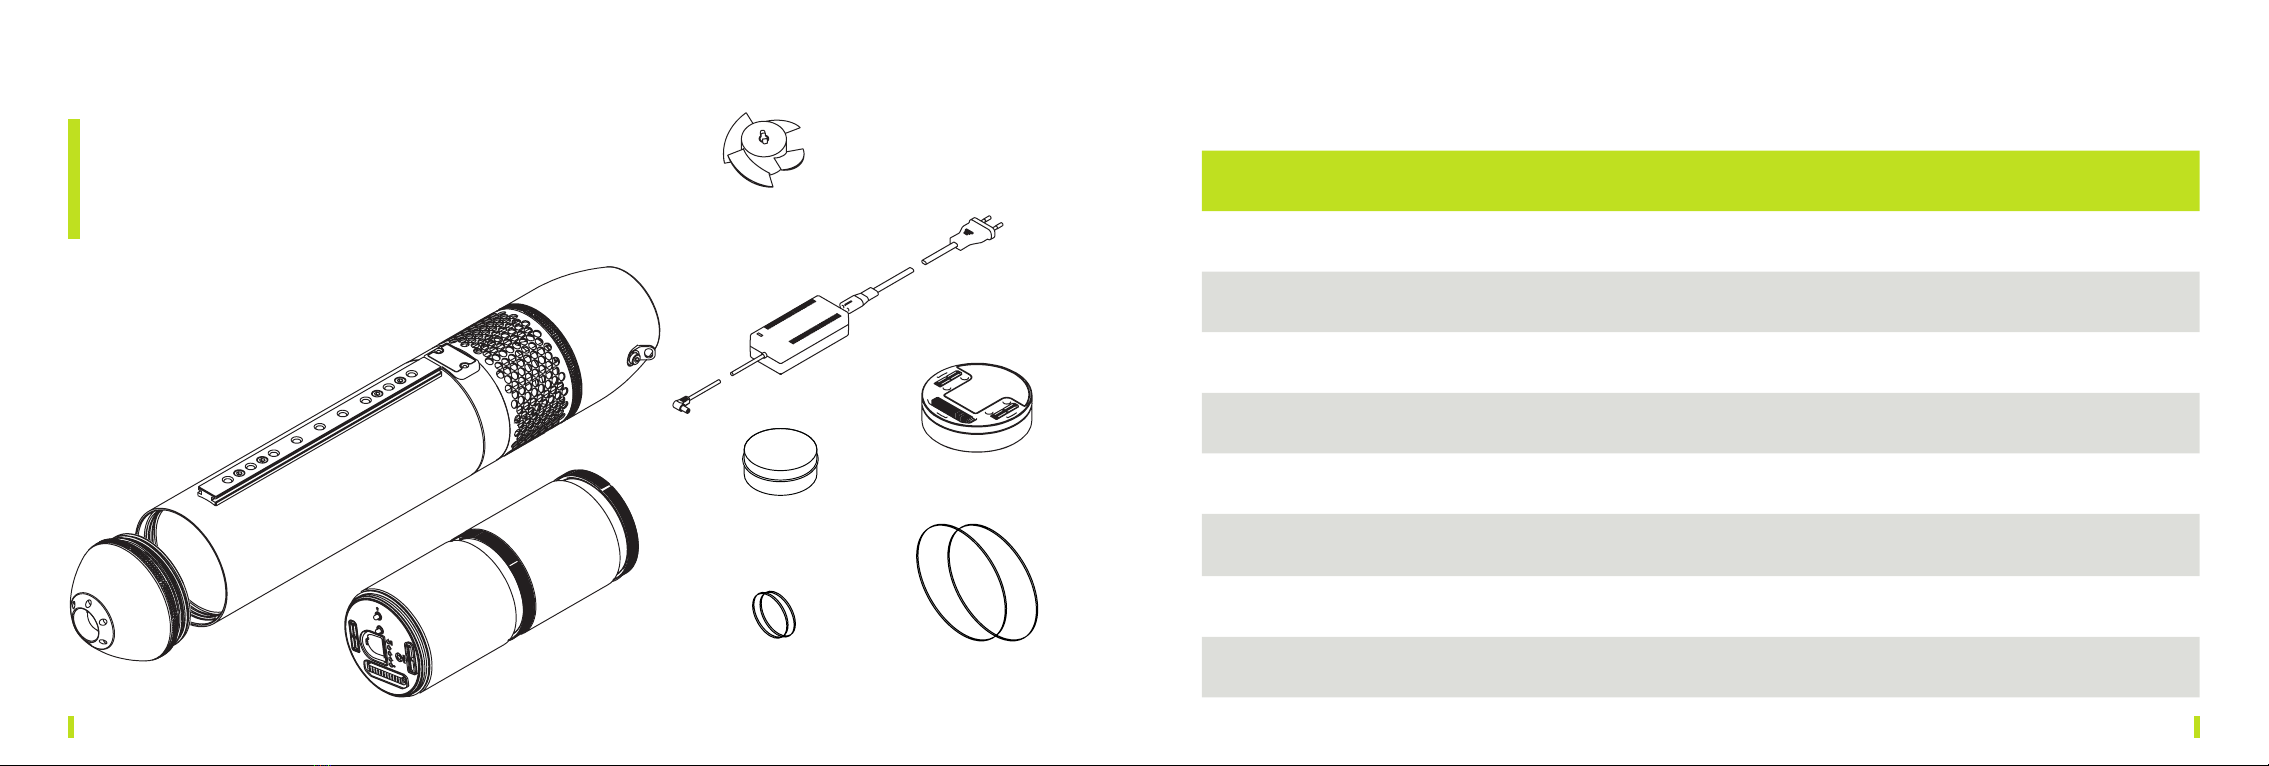
3.2. Contents of SJ PRO SUP package.....................8
3.3.TechnicalSpecications ............................9
IV SCUBAJETinuse ................................ 10
4.1. Introduction......................................10
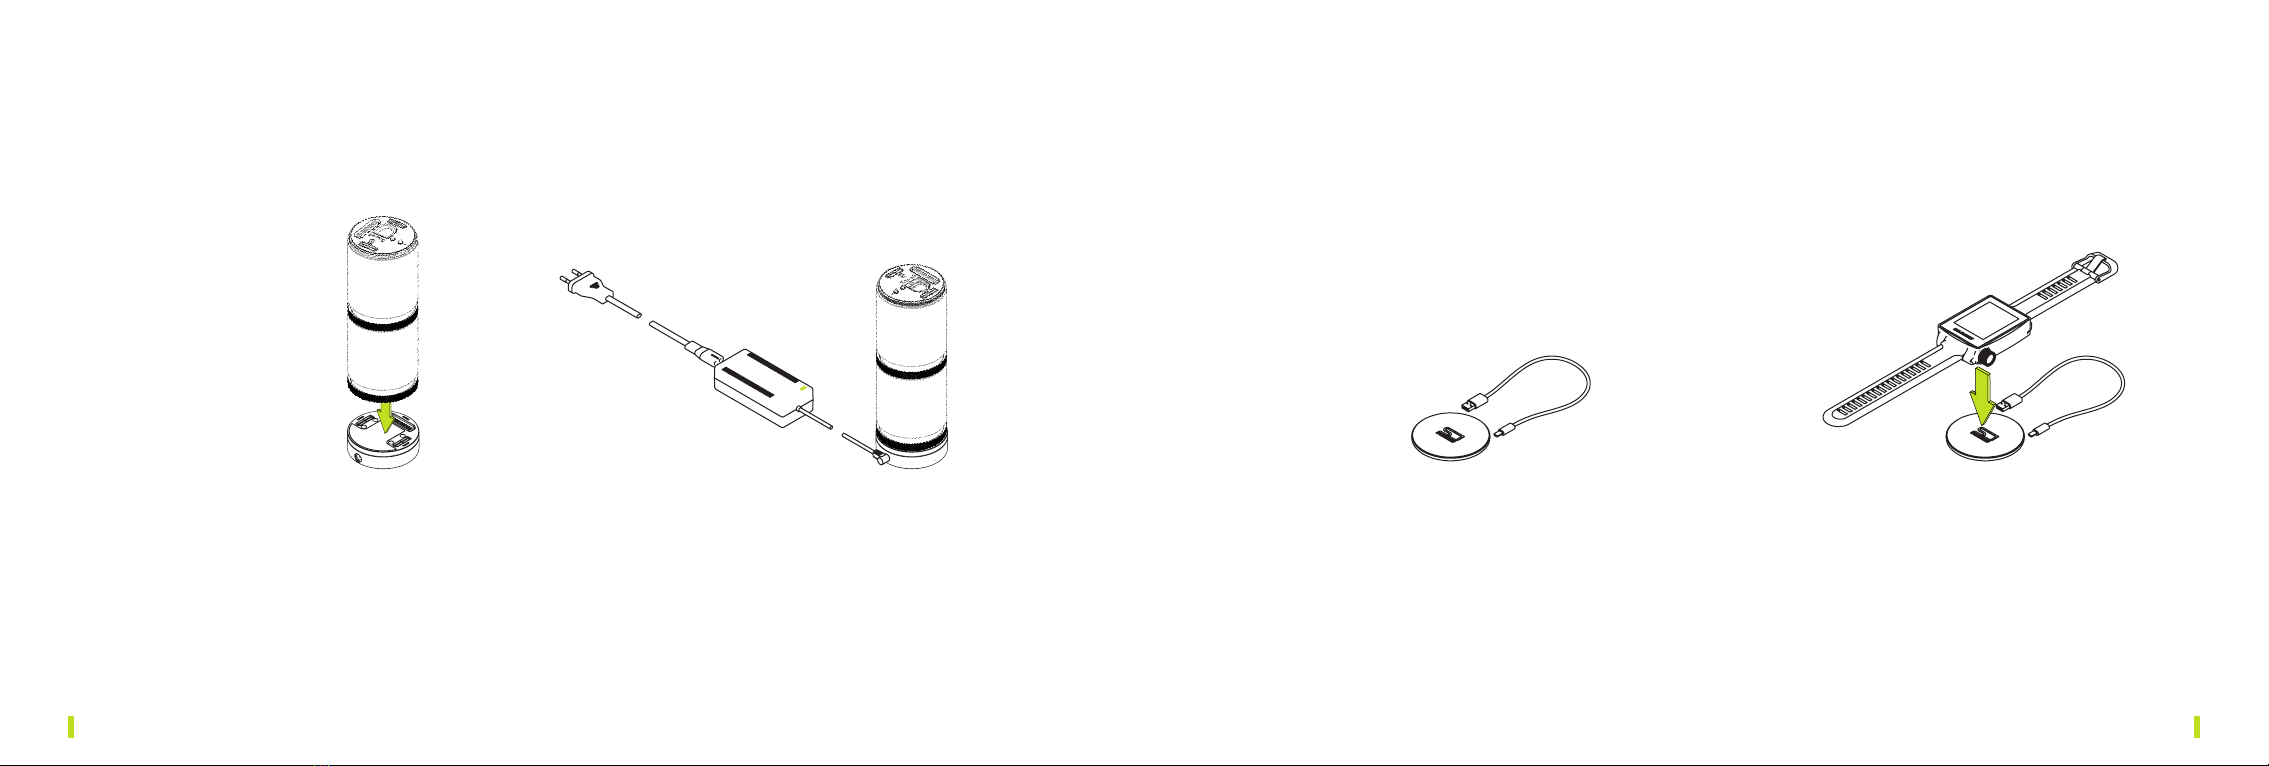
4.2. Preparing the Scubajet ............................11
4.3. Charging the SCUBAJET batteries with the battery charger . 12
4.4. Charging the remote control for use on SUP .........13
V UsingtheSCUBAJETonyourSUP. . . . . . . . . . . . . . . . . . 14
5.1. Contents of Remote Controller Pro Bundle...........15
5.2. Using the Finbox Adapter and BT Link on your SUP ...16
5.3. How to use the Remote Control ....................18
5.4. Display Remote Controller .........................20
5.5. Menu Remote Controller ..........................21
VI UsingSCUBAJETwhilediving,snorkelingandswimming..22
6.1. Contents of Dive Controller Dual Hand ..............23
6.2. Using the Dive Controller on the SCUBAJET ..........24
6.3. Display Dive Controller PRO ........................26
6.4. Menu Dive Controller Pro .........................27
VII AfterusingSCUBAJET............................ 28
7.1. Changing the tube ................................30
VIII BatteryUse&CareInformation .................. 32
8.1. Battery use ......................................33
8.2. Charging batteries ................................34
8.3. Storing batteries .................................35
8.4. Buying batteries ..................................35
IX ImportantSafety&OperatingInformation ........ 36
9.1. Danger Warning for Risk of Injury to Yourself
or Others .......................................36
X WarrantyTerms................................ 44
10.1. Warranty Process................................46
XI TransportationoftheSCUBAJET .................. 47
I INTRODUCTION
Dearcustomer,
Thank you for choosing SCUBAJET. Our goal is to make water
sports activities more awesome. SCUBAJET is the most versatile
and easy to handle water jet for paddle boarding, canoeing, diving,
snorkeling and swimming, and it turns almost any existing water
sports equipment into a powerful electric jet-assisted product
within seconds.
Ourproductsaremadetothehighestspecicationswhenit
comes to technology and design, featuring cutting-edge engines,
innovational battery systems, and exceptional water jet propulsion
technology.
We want to make sure you stay safe while using your SCUBAJET,
so we created this manual with a lot of care. Now it’s up to you,
to read it carefully, so you may use your SCUBAJET properly and
enjoy it for a long time.
If you have any comments, questions or issues please don't
We wish you a lot of fun with your SCUBAJET products!
ELECTRICALLYOPERATED
PRODUCT&WATERSUCTIONEFFECT
Not recommended for children under 16 years of age.
As with all electrical products, precautions should be
observed during handling. In addition, water suction at the
water intake may suck in hair, body parts or loose items.
DANGER

4 5
Nosecap
Optional:
500 Lumen LED light / 1500 Lumen LED light
Li-Ionbattery
200 wh / 400 wh battery
Accessoryrail
SSCBTLink
Scubajet Smart Connect for Accessories
WaterintakeOptional
SilverMesh
(not included)
Impeller Diuser
MotorunitTube
II PRODUCT DETAILS

6 7
III PARTS AND TECHNICAL SPECIFICATIONS SJ PRO
3.1. CONTENTS OF SJ PRO DIVE PACKAGE
If you ordered a SJ PRO Dive Package,
you control the SCUBAJET on the Dive
Controller YOUDON’TNEEDTHE
REMOTECONTROL.
1×Battery
1×DiveControllerPRO
DualHand
1×LED-Nose
1×Motorunit
incl. Tube
Harness
mountingpoint
1× Charger
2×spareO-Rings
forNose
2×spareO-Rings
forImpeller
1×O-RingGrease
1×spareImpeller
1×DiveLeash 1×Powersupply
2×Snaphooks

8 9
3.2. CONTENTS OF SJ PRO SUP PACKAGE
In order to activate your SCUBAJET
and adjust the speed on a SUP board,
you need the remotecontrol (parts
included on page 15).
1× Charger
2×spareO-Rings
forNose
2×spareO-Rings
forImpeller
1×O-RingGrease
1×Battery
1×spareImpeller
1×LED-Nose
1× Tube
1×Motorunit
1×Powersupply
3.3. TECHNICAL SPECIFICATIONS
Data Sheet SJPRO200 SJPRO400
Diameter 8 cm | 3.14 inch 8 cm | 3.14 inch
Length 43 cm | 17 inch 61 cm | 24 inch
Weight 3,2 kg | 7.1 lbs 4,7 kg | 9.3 lbs
Maximumthrust 15 kg | 33.1 lbs 15 kg | 33.1 lbs
Performance 1.000 W 1.000 W
Maximumdepthrating 60 Meter | 197 ft 60 Meter | 197 ft
Buoyancy 1 kg | 2.2 lbs negative (200 wh unit) 2 kg | 4.4 lbs negative (400 wh unit)
Warranty SCUBAJET: 2 years, BATTERY: 6 months SCUBAJET: 2 years, BATTERY: 6 months

10 11
NOGAP!
NOGAP!
IV SCUBAJET IN USE
4.1. INTRODUCTION
This section applies to the proper use of the SCUBAJET. Please follow each of the steps
carefully in order to start your SCUBAJET.
Once the SCUBAJET is set up, go to the relevant section with your activity as follows:
For the use while snorkeling, swimming and diving go to section 6.
For the use on a SUP go to section 5.
4.2. PREPARING THE SCUBAJET
GREASE
GREASE
2 Makesurethenoseissucientlylubricated.
Assure that there's no gap between the tube and the nose,
otherwise the SCUBAJET will be damaged while using
in the water.
1 Make sure the battery is fully charged. Insert the battery.
Rotate the battery clockwise by using the metal ring until the
battery locks in place. Push the battery in until you hear a click,
otherwisethethenosewillnottontothetube.
Assure, that the battery locks completely.

12 13
4.3. CHARGING THE SCUBAJET BATTERIES
WITH THE BATTERY CHARGER
4.4. CHARGING THE REMOTE CONTROL
FOR USE ON SUP
1 Put the battery in
vertical position on
the charger
2 As soon as the
battery is fully
charged the light
turns green.
1 Connect the USB cable to the standard USB outlet. 2 Put the remote in the middle of the charger until the light changes
from red to blue. Only when the light turns blue it starts to charge.

14 15
V USING THE SCUBAJET ON YOUR SUP
YouarenowabletoenhanceyourSUPboardwithwaterjetpower.WithyourSCUBAJETnbox
adapter, you can take your SUP board onto the next level. Train your balance and strength on
your SUP and go longer distances and at higher speed with your brand new SCUBAJET.
Nowyouareabletoenjoypaddlingtothefullest.Youwillbereadytostartowithinseconds!
Readonandndout,howyoucanmounttheadaptertoyourboardandattachtheSCUBAJET.
5.1. CONTENTS OF REMOTE CONTROLLER PRO BUNDLE
2×screwplates1× Velcro 2×screwsM4x25mm 2×screwsM4x35mm
1×RemoteControllerPRO
1×FinboxAdapter
1×ChargerRemoteControl
1×MountingSet 1×SSCBTLink

16 17
5.2. USING THE FINBOX ADAPTER AND BT LINK ON YOUR SUP
click
2 Attach the SSC BT Link to the SCUBAJET rail
on the tube by holding the SCUBAJET upside.
Wait until the SJ logo is blinking, then it’s ready
for pairing.
3 Make sure the SCUBAJET does not protrude
over the edge of the SUP board.
4 The SSC BT Link has to be placed on top
of the board above the water surface.
1A SlideInFinbox: No screws necessary for
the SlideIn Finbox. The clip must engage.
1B USFinbox: Tighten the screws
with the Allen key.
click
Velcro SSC BT
Link
1 Put the SUP with the
SCUBAJET in the water
and make sure that you
have enough space and
that you do not hit any
obstacles.
2 Stand or kneel on
the SUP and take the
remote control.
3 Attach the remote
control to your wrist,
paddle, lanyard or
the equipment so you
cannot lose it in case
youfallo.
4 Ifyoufallotheboard,
the SCUBAJET will stop
when the distance
between remote and
SCUBAJET becomes
too far.
Ifyoufallotheboardassurethattheremotealsofallsinto
the water, otherwise the SCUBAJET won't stop.
ATTENTION
TIP
Put the
board upside
down in the
water before
mounting the
SCUBAJET.

18 19
5.3. HOW TO USE THE REMOTE CONTROL
1×RemoteControllerPRO
1×SSCBTLink
With your SCUBAJET SUP Package you will receive
a remote control and the SSC BT link.
RL
ON/OFF
STEP1
0%
speed
STEP2
2×click
1 Toturnon/otheremotecontrolpressthebutton
for 5 seconds.
2 Turn it right to speed up or turn it left to slow down. 3 Activiate/Deactivate the menu after setting the speed to 0%
and press the button twotimes.
You can adjust the menu settings with the button.
Scroll to the item and click to change.

20 21
5.4. DISPLAY REMOTE CONTROLLER 5.5. MENU REMOTE CONTROLLER
To access settings menue page, set the speed to 0% and press the button on the right two
times. Double-click again to return to regular display.
100%
1 LED Status 1 Settings
2 Brightness: 0–100%
3 Units: metric or US
4 Display: 0°/180°
5 Battery: 200 or 400 Wh
6 Software Version
7 Light:on/o
2 Bluetooth
4 GPS
5 Remote battery status
6 Power
7 Remaining runtime
8 SCUBAJET battery status
Settings
> <
Brightness 80%
Units metric
Display 0°
Battery 200 Wh
Info
Light o
Send Track
Debug o
You can go through the menu and
change the settings by turning the
button on the Remote Controller.
3 Motorcontroller
problem
73%
1h 20 min
8 Debug:on/o

22 23
VI USING SCUBAJET
WHILE DIVING,
SNORKELING AND
SWIMMING
You are holding the world’s smallest
dive scooter in your hands. By
using your SCUBAJET with the Dive
Controller Dual Hand, your underwater
experience while diving, snorkeling or
swimming will be enhanced. You will
bereadytostartowithinseconds!
Readonandndout,howtousethe
SCUBAJET with your diving equipment
and how to handle on your next
underwater adventure.
6.1. CONTENTS OF DIVE CONTROLLER DUAL HAND
Allenkey4xscrewsM3×16mm
Display
Railscrew
Trigger left
Trigger right
Button 1
Button 2

24 25
6.2. USING THE DIVE CONTROLLER ON THE SCUBAJET
1 Attach the Dive Controller to the
adapter rail on the tube.
Fix the controller by turning the screw
on the Dive Controller clockwise.
2 TurntheSCUBAJETon/obypressing
the 2 buttons on the dive controller
for5seconds.Toturnon/otheLED
nose light, press/release both silver
buttons simultaneously.
4 You need at least 4% power to start the motor.
To start, press both triggers on the Dive Controller. Once both
triggers are squeezed to activate power, you can release one
hand if desired and power will remain on until other trigger is
released too. To stop the SCUBAJET, release both triggers.
5 MakesureSCUBAJETiscompletelyunderwater, and that
you have enough space so that you won’t hit any obstacles.
When using for snorkeling, do not dive deeper than you would
usually do to ensure you can get back to the surface safely!
Do not stick body parts, clothing or other objects into the water intake (grille) of the SCUBAJET. Loose body parts (e.g. hair etc.) or
owingclothingorequipmentcouldbedrawnintothewaterintake(grille)duetocausedsuction!
NEVERrunScubajetoutsideofwaterformorethan1second.
CAUTION
3 Push the right button to speed up
or the left button to slow down.
R
L

26 27
6.3. DISPLAY DIVE CONTROLLER PRO
100%
59.5m
20%
1h 10 min
15 °C
1 Bluetooth 1 Settings
2 Brightness: 0–100%
3 Units: metric or US
4 Display: 0°/180°
5 Battery: 200 or 400 Wh
6 Software Version
2 LED Status
4 Water temperature
5 Power
6 Remaining runtime
7 Depth
8 Battery charge status
Settings
> <
Brightness 80%
Units metric
Display 180°
Battery 200 Wh
Scuba Dive Adapter V1.19 (NW:3)
BT MAC: FC-88-7A-FC-F6-5F
SCUB: NW:0xFB V1.3
MOT:V3.66, NW:68 [ ]
You can go through the menu
and change the settings by
pressing the left or right button
on the Dive Controller.
6.4. MENU DIVE CONTROLLER PRO
To access settings menue page, double-click both triggers simultaneously while the
SCUBAJET is on. Double-click again to return to regular display.
3 Motorcontroller
problem

28 29
VII AFTER USING SCUBAJET
Remember, sun and salt water can harm
your skin. So they may harm your SCUBAJET
aswell.Readonandndout,whattoconsider
when your SCUBAJET is not in use.
1 Rinse the SCUBAJET with
fresh water after using.
2 Try to keep the SCUBAJET in
a shadowy place.
5 Keep the battery in a dry and
shadowy place.
3 Wait until the SCUBAJET is dry.
4 Remove the battery.
Useacontainerlledwithfresh
water to rinse the SCUBAJET. Put
the SCUBAJET in the container and
turn it on for about 10 seconds.
INFO

30 31
7.1. CHANGING THE TUBE
In case you'd like to change the model from SJ 200 to SJ 400 or reverse,
please follow these steps.
1 Twist the nose counterclockwise to
open the SCUBAJET.
2 Remove the battery. 4 Put on the other tube and twist it
clockwise to close it, then use the
Allen key to put the lockings screw
back into place.
5 Insert the battery. 6 Close the nose cap by twisting it
clockwise by hand.
Take care: NO GAP!
3 Remove the lockings screw with the
Allen key, then unscrew the motor
unit counterclockwise to remove the
tube.

32 33
VIII BATTERY USE & CARE INFORMATION
Your SCUBAJET works with a Li-Ion battery, that needs to be handled with care. Please read
this manual carefully and follow the instructions below to prevent accidents and injuries.
8.1. BATTERY USE
To ensure proper use of battery, read the following.
Keep the battery in a dry area with enough ventilation where
children do not have access and overheat. Ignition cannot
happen.
The lifespan of the battery is longer when it is not stored
in too hot environments for longer than necessary. Heat
damages the battery.
Do not put the battery in your SCUBAJET until shortly
before use.
Before removing the battery, open the nose and allow two
minutes for any explosive gases to escape.
Do not use the battery in temperatures above 60ºC (140ºF)
asexcessiveogassingmayoccur.Keepthebatteryandthe
SCUBAJET in the shadow when not in use.
Always ensure the SCUBAJET is dried thoroughly before
opening the nose.
Never short circuit the battery or battery connectors.
If the battery appears damaged or will not charge fully, the
battery must be replaced.
If battery life is noticeably reduced, the battery should be
replaced.
YourSCUBAJETworkswithaLi-Ionbattery that needs
to be handled with care. Potentially explosive gases might
bereleasedduringitsnormalcycleofuse(ogassing).
Make sure that you read the manual carefully. Failure to
do so can result in an explosion.

34 35
8.3. STORING BATTERIES
To ensure proper storing of battery, read the following:
Do not store the battery in temperatures above 45ºC (113ºF)
assignicantogassingmayoccur.
Keep the battery and SCUBAJET in a dry and shady spot when
not in use.
If the battery is not to be used for an extended period of time,
store it in a well-ventilated area and away from children, heat
and ignition sources and recharge it every two months to
maintainchargeandavoidexcessogassing.
DO NOT store the battery inside the SCUBAJET.
8.4. BUYING BATTERIES
Additional batteries may be purchased separately.
Go to our online shop on www.scubajet.com for
more information.
8.2. CHARGING BATTERIES
To ensure proper charging of the battery:
Always make sure the charger is dry before use.
Recharge the battery after use within 24 hours and recharge
the battery at least every 2 months.
Always charge your battery to the fullest before using
your SCUBAJET.
Only use the charger supplied with your SCUBAJET package .
Do not charge the battery in temperatures above 45ºC (113ºF)
assignicantogassingmayoccur.
Keep the battery and SCUBAJET in a dry and shadowy spot
when not in use.Always connect the charger to the battery
rstandthenplugthechargerintothemains.
Aftercharging,disconnectfromthemainsrstandthen
disconnect the battery from the charger.
Afterchargingiscompletethebatterywillcontinuetoogas.
You should wait at least 30 minutes after charging before
removing the battery from the charger. Failure to do so could
result in an explosion.
Do not charge the battery while it is still inside the SCUBAJET.
Do not charge the battery near water.
The charger gets quite warm while in use.
If in doubt of the state of the battery, recharge it until
the indicator on the battery charger indicates a full charge
(green light).
Charging should only happen in a well-ventilated area,
awayfromchildrenandopenamesorotherignition
sources (cigarettes, sparks). .

36 37
IX IMPORTANT SAFETY & OPERATING
INFORMATION
9.1. DANGER WARNING FOR RISK OF INJURY TO YOURSELF OR OTHERS
We guarantee that our products meet the highest security and safety standards
as long as they are used as suggested in our user manual.
Children under the age of 16 should not be allowed
to operate the SCUBAJET. Note that only healthy
and experienced swimmers are allowed to use
SCUBAJET.
Do not use SCUBAJET while tired or under the
inuenceofalcohol,drugsormedication.
A moment of inattention may result in serious
personal injury.
Using the SCUBAJET during pregnancy is
not allowed.
Rinse with fresh water after each use, especially
after use in salt water.
Alwayschargethebatteryonanon-ammablebase.
Ignoring the instructions in this
manual or mishandling the SCUBAJET
could cause malfunction, operational
problems to the device, damage, or
personal injury. SCUBAJET accepts
no liability for any damage caused by
actions that contradict this operating
manual.

38 39
Mind the water intake
Never stick body parts, clothing or other objects into
the water intake (grille) of the SCUBAJET or even bring
themclosetoit.Donotwearlooseorowingclothing
or equipment that could be drawn into the water
intake (grille) due to the caused suction.
Particular care should be exercised when using the
SCUBAJET by someone with long hair or near anybody
with long hair. Users with long hair should tie it up or
wear a swimming cap when using the SCUBAJET. The
suction of the water intake may draw in loose body
parts.
Always check that no stones, rope, dirt or sand gets
into the SCUBAJET and clean up those parts which are
within easy reach regularly if necessary.
Never stick body parts, clothing or other objects into
the nozzle on the back of the SCUBAJET.
Do not point the water jet towards your own or
somebody else’s face.
Be aware of your surroundings
Always inspect the swimming area to ensure it is free
of hazards or obstacles such as boats and swimmers
before using the SCUBAJET.
Be aware of appropriate water levels, tidal changes,
dangerous currents, weather changes and strong
oshorewinds.Alwaysscoutunfamiliarwater.
Be careful not to hit other items when diving with the
SCUBAJET. Make sure to stay away from boats, bridges,
rocks or any items which could hurt you.
Handle SCUBAJET with care
Ensuresucientbatterychargeremainsforreturntoshoreorsurface.
Never open the battery casing (do not loosen the 3 screws on the bottom of the
battery). Protect the battery from mechanical damage. If the battery casing is
damaged:
FDonotusethebatteryanymoreanddonotchargeit.Thereisariskofre.
FIf electrolytes leak from the damaged battery, avoid skin contact and
breathing in the gases. If you come into contact with the electrolytes leaking
fromthebattery(e.g.ontheskinoreyes),rinsetheaectedareathoroughly
with clear water. Contact a doctor immediately.
FContact SCUBAJET for appropriate disposal advice of the damaged battery.
Only charge the battery at environmental temperatures between 0°C (32°F) and
45°C (113°F).
Please note that since 2009 lithium batteries with a capacity of >100 wh
(per unit) may no longer be carried as luggage in passenger planes.
Thebatteryofyour
SCUBAJEThasbeendeclared
ahazardousitem.Shipping
companies must use original
packaging to transport the
product. Private transport is
notaectedbythisrule.When
undertaking private transport,
ensure that the battery casing is
not damaged.
Table of contents
Other ScubaJet Diving Instrument manuals
Popular Diving Instrument manuals by other brands

INTERSPIRO
INTERSPIRO Divator Lite user manual

Kirby Morgan
Kirby Morgan 77 Operation and maintenance manual

Aeris
Aeris ATMOS ai operating manual

Dive Gear Express
Dive Gear Express DGX Gears FIRST First Stage Service Manual

Seagow
Seagow 200 User manual & Safety instructions

Nautilus
Nautilus Marine Rescue GPS user manual