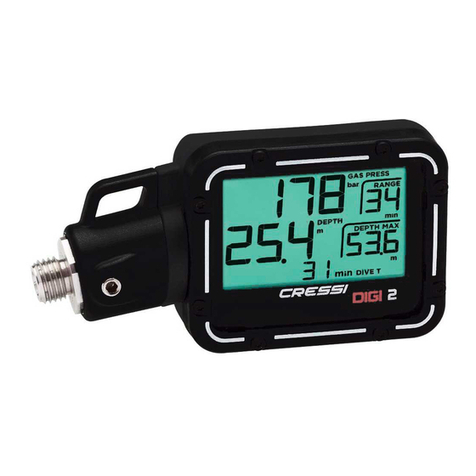
Cressi DIGI 2 User manual

DIGI 2
Manuale d’uso
User Manual
Manuel d’utilisation
Manual de uso
Benutzerhandbuch
用户手册
Manual do usuário
Via Gelasio Adamoli, 501 - 16165 - Genova - Italia
Tel. +39 010 830.79.1 - Fax +39 010 830.79.220
rev_02_2019

22
EN
P90-20191122A
IMPORTANT RECOMMENDATIONS: .................................................. 23
READING INFORMATION ON THE SCREEN........................................ 25
INTRODUCTION AND MAIN FEATURES ............................................. 26
What the DIGI 2 console is not: ....................................................... 26
What the DIGI 2 console is: ............................................................. 26
HOW TO CONNECT THE DIGI 2 CONSOLE......................................... 26
HOW TO ACTIVATE THE DIGI 2 CONSOLE ......................................... 27
LAUNCH SEQUENCE AFTER ACTIVATION .......................................... 27
SURFACE SCREEN (PRE-DIVE) ......................................................... 27
DIVE SCREEN.................................................................................. 28
SURFACE SCREEN (POST-DIVE) ....................................................... 29
AUTOMATIC DISPLAY SWITCH-OFF.................................................. 30
BATTERY ........................................................................................ 30
CHANGING THE BATTERY ................................................................ 32
“SMART COVER” FUNCTIONS.......................................................... 35
CHANGING THE UNIT OF MEASURE ................................................. 36
CHANGING COLORED PROTECTED COVER....................................... 37
MAINTAINING THE DIGI 2 CONSOLE................................................. 38
TECHNICAL INFORMATION .............................................................. 39
REGULATORY REFERENCES............................................................. 40
PRODUCT DISPOSAL....................................................................... 40
TABLE OF CONTENTS

23
EN
P90-20191122A
WARNING!
Cressi Sub S.p.A. recommends using the DIGI 2
console only after having read and understood this instruction manual.
WARNING! Cressi Sub S.p.A. reserves the right to refuse to
provide service under the warranty if the maintenance instructions
provided in this manual are not followed.
WARNING! Cressi Sub S.p.A. recommends that the DIGI 2
console be used only by those who have successfully completed
a diving course and who have obtained the required diving license
at the end of said course.
WARNING! Cressi Sub S.p.A. declines all responsibility for
damage resulting from improper use of the DIGI 2 console.
WARNING! Never dive alone! The DIGI 2 console is not a
replacement for a dive buddy.
WARNING! The DIGI 2 console is a tool that should be used
strictly for recreational and sport diving, and not in a professional
environment.
WARNING! Diving in areas with particularly poor visibility
could make it difficult or impossible to read the DIGI 2 console.
Avoid diving in these conditions.
WARNING! Do not dive with the smart cover inserted into the
display housing! Removing it at depth would cause the instrument
to turn on belatedly, resulting in incorrect measurements of the
parameters for depth, maximum depth, range, and dive time! Pay
the utmost attention!
WARNING! Before diving always check that the units of
measure are set correctly. Incorrect settings could lead to
confusion and an incorrect interpretation of the information
provided, with possible serious harm to the health of the user.
WARNING! Cressi Sub S.p.A. strongly recommends that you
consult the data provided by the DIGI 2 console frequently during
your dive. Conditions such as temperature, any physical exertion
greater than a standard dive, or dives when under significant
emotional stress can significantly vary air consumption, and divers
can only prevent potential problems by carefully and frequently
checking this information.
IMPORTANT RECOMMENDATIONS:

24
EN
P90-20191122A
WARNING! Only use breathable air that meets the
requirements of UNI EN 12021.
IMPORTANT! Do not exceed the equipment operating limits.
The pressure gauge is certified for use at pressure no greater than
300 bar. The maximum operating pressure of the gauge is shown
on the back of the instrument. Failure to take these precautions
can result in serious injury or even death.
IMPORTANT! Do not exceed the equipment operating limits.
Keep in mind that open-circuit compressed-air diving apparatuses
are certified to 50 m in depth under standard EN 250:2014. The
purpose is to ensure a minimum level of safe operation for the device
to a maximum depth of 50 m, given that teaching methodologies
set a maximum depth of 40 m for recreational dives, and exclude
the performance of any type of underwater work.

1CURRENT CYLINDER PRESSURE (set in BAR or PSI)
2CURRENT DEPTH (set in m or ft)
3RANGE
4Battery status indicator (see BATTERY chapter)
5
DIVE TIME (minutes) of the previous dive
or TEMPERATURE (set in C° or F°).
This information appears in rotation on the screen.
6MAXIMUM DEPTH reached in the previous dive
(set in m or ft)
25
EN
P90-20191122A
6
1
2
3
5
4
READING INFORMATION ON THE SCREEN

26
EN
P90-20191122A
INTRODUCTION
AND MAIN FEATURES
Congratulations,
Cressi Sub S.p.A. congratulates you on your purchase of a DIGI 2
console, a complete and sophisticated device designed in our Research
and Design Department and manufactured in Cressi Sub S.p.A.
factories in Italy to guarantee sporting and recreational divers the
maximum efficiency and reliability in the measurement and display of
the main parameters needed to conduct a dive in complete safety.
WARNING! Cressi Sub S.p.A. recommends that the DIGI 2
console be used only by those who have successfully completed
a diving course and who have obtained the required diving license
at the end of said course
What the DIGI 2 console is not:
WARNING! In order to prevent improper use, it absolutely
imperative to understand that the DIGI 2 console is not a dive
computer.
WARNING! The DIGI 2 console makes no calculations, nor
does it display any information regarding: decompression time
and/or stops; no-decompression limits; ascent rate alarms; no-fly
and/or post-dive desaturation times.
What the DIGI 2 console is:
The DIGI 2 console is a modern, DIGITAL, interpretation of the
classic two-instrument analog console. It features a pressure gauge,
depth gauge, and digital timer, all highly precise and certified, that
guarantee accurate monitoring of tank pressure, depth, dive time, and
other information helpful to the diver.
HOW TO CONNECT THE DIGI 2 CONSOLE
WARNING! Whenever assembling or disassembling the
regulator, make sure that it is not mounted to the tank valve. In
the event that it is, make sure that the first stage/regulator unit is
completely depressurized.
First, unscrew and remove the cap marked HP (7/16 UNF" thread)
from the unpressurized 1st stage. Then, after checking that both the
regulator housing and the hose O-ring are clean, manually screw the
instrument's HP hose to the regulator 1st stage, and then tighten with
an appropriate size wrench or crescent wrench, taking care not to
exceed torque of 8 Nm.
IMPORTANT! If you have any trouble connecting or
assembling the DIGI 2 console, this operation must be performed
by a qualified Cressi Sub S.p.A. technician. You can also contact
your trusted merchant, so long as they are certified and authorized
to work on Cressi Sub S.p.A. equipment.

27
EN
P90-20191122A
SURFACE SCREEN (PRE-DIVE)
After the launch sequence, the surface screen appears with the
following information:
1. CURRENT CYLINDER PRESSURE (set in BAR or PSI)
2. CURRENT DEPTH (set in m or ft)
3. MAXIMUM DEPTH reached in the previous dive (set in m or ft)
4. DIVE TIME (minutes) of the previous dive
– TEMPERATURE (set in C° or F°).
This information appears in rotation on the screen.
5. BATTERY STATUS (see BATTERY chapter).
WARNING! Cressi Sub S.p.A. declines all responsibility for any
malfunction and/or damage resulting from incorrect or improper
connection/assembly of the DIGI 2 console to the first stage/
regulator unit!
IMPORTANT! Cressi Sub S.p.A. recommends that you
arrange the DIGI 2 console within your preferred configuration in
an optimal hydrodynamic position using the fasteners provided to
prevent accidental knocks or snags.
HOW TO ACTIVATE THE DIGI 2 CONSOLE
Remove the smart cover (see the "SMART COVER" FUNCTIONS).
The DIGI 2 console activates automatically when the first stage/
regulator group connected to the cylinder is pressurized.
Tank pressure must be greater than 10 BAR.
WARNING! Do not dive if the DIGI 2 is not correctly connected
to a pressurized scuba unit.
LAUNCH SEQUENCE AFTER ACTIVATION
Immediately after it is activated, the DIGI 2 console will run the
launch sequence, during which it will display, in order:
1. Switch on all segments
2. Version of FIRMWARE INSTALLED
3. TOTAL NUMBER OF DIVES TAKEN WITH THE DIGI 2 CONSOLE
4. Result of the most recent seal test: PASS/FAIL (see the
CHANGE BATTERY chapter).
1 second
5 seconds

28
EN
P90-20191122A
DIVE SCREEN
If the DIGI 2 console is active, the dive will begin once a depth of 1.2
meters is exceeded.
WARNING! Do not dive with the smart cover inserted into the
display housing! Removing it at depth would cause the instrument
to turn on belatedly, resulting in incorrect measurements of the
parameters for depth, maximum depth, range, and dive time! Pay
the utmost attention!
WARNING! Do not dive if the DIGI 2 console display shows
any unexpected values, and contact a Cressi support center.
WARNING! Never bring the smart cover on the dive or get it wet.
Once a depth of 1.2 m is exceeded, the DIGI 2 console will show the
following data:
1. Current cylinder pressure (set in BAR or PSI); the number will
flash when the pressure falls below 50 BAR
2. Current depth (set in m or ft)
3. Maximum depth (set in m or ft)
4. Dive time (minutes) - temperature (set in c° or f°).
This information appears in rotation on the screen
5. Range (minutes): indicates time remaining until the threshold of
50 BAR is reached, calculated from the current depth and based
on average air consumption detected in the preceding minutes.
Battery status (see BATTERY chapter).
WARNING! The dive is considered concluded after two
minutes on the surface (depth of less than 0.8 m). If you should
descend again during this period of time, the DIGI 2 console will
continue to increase the time (dive time preceding the second
descent), considering it a single dive.
WARNING! Cressi Sub S.p.A. strongly recommends ending
the dive with air reserves of at least 50 BAR. This amount of air is
provided only for any unplanned emergencies. Below 50 BAR, the
value indicated will flash.
1 second
5 seconds

29
EN
P90-20191122A
WARNING! Cressi Sub S.p.A. strongly recommends that you
consult the data provided by the DIGI 2 console frequently during
your dive. Conditions such as temperature, any physical exertion
greater than a standard dive, or dives when under significant
emotional stress can significantly vary air consumption, and divers
can only prevent potential problems by carefully and frequently
checking this information.
WARNING! When the “replace” low battery warning appears,
replace it with a new one.
SURFACE SCREEN (POST-DIVE)
When the dive is complete, two minutes after reaching the surface
(depth < 0.8 m), the DIGI 2 console switches back to surface mode
(see chapter SURFACE SCREEN [PRE-DIVE]). Thus it will show the
following information:
1. CURRENT CYLINDER PRESSURE (set in BAR or PSI)
2. CURRENT DEPTH (set in m or ft)
3. MAXIMUM DEPTH reached in the previous dive (set in m or ft).
1 second
5 seconds

30
EN
P90-20191122A
4. DIVE TIME (minutes) of the previous dive – TEMPERATURE
(set in C° or F°).
This information appears in rotation on the screen
5. BATTERY STATUS (see BATTERY chapter).
BATTERY
The DIGI 2 provides information about the battery power level through
the following steps in the display of the Battery Replace icon “ ”
AUTOMATIC DISPLAY SWITCH-OFF
The DIGI 2 console switches off automatically after 2 minutes of
inactivity when not under pressure.
IMPORTANT!
After the dive, always depressurize the scuba unit.
1. “ ” off: the instrument has optimum power
to operate normally.
2. “ ” on: the battery is low.
Change the battery.
3. “ ” on with the rest of the display off:
in this condition the battery is not able to ensure the proper
operation of the DIGI 2 console. For this reason the display does
not show any information and all functions are disabled. The
battery must be removed to avoid possible damage.

31
EN
P90-20191122A
WARNING! Keep in mind that planning one or more dives
in cold water, or any time that the DIGI 2 console spends outside
during the winter or inclement weather, will result in reduced battery
power. Therefore, consider replacing it in advance as a precaution,
or carry a ready battery replacement kit in case of need.
IMPORTANT!
Under ideal conditions, the battery lasts more
than three years with an average of 50 dives a year, or one
year with approximately 700 dives. Power consumption and the
resulting life of the battery depend on its quality, any actions
taken to safeguard the charge, and the external low-temperature
conditions to which the DIGI 2 console may be subjected that can
potentially decrease performance. We recommend employing all
precautions provided in this instruction manual to safeguard the
battery capacity. We recommend you keep in mind that planning
one or more dives in cold water and/or time spent in areas with
winter weather or harsh temperatures can result in reduced battery
power. Therefore, consider replacing it in advance as a precaution,
or carry a ready battery replacement kit in case of need.

32
EN
P90-20191122A
CHANGING THE BATTERY
Follow these steps to replace the battery:
1. Remove the smart cover.
2. Use a coin of appropriate thickness to unscrew the battery
compartment cover on the back of the DIGI 2 console.
4. Gently insert a pointed object (a small flat-head screwdriver) into
the cavity, and carefully and delicately lever up the used battery.
3. Change the O-ring on the closure cap with a new one, and
grease it lightly, using silicone grease ONLY.

33
EN
P90-20191122A
5. Change the CR2450 battery, taking care to position the new one
the same way, with the positive pole facing outward without
reclosing the cap.
6. Check that the display turns on, and wait for the countdown to
begin with the battery compartment still open.
7. Within one minute of the countdown beginning, reclose the
battery compartment closure cap.
When the operation is complete, the DIGI 2 console will run the
instrument seal test, which lasts a few minutes.
9. FAIL. The test was negative; the battery change must be
repeated because the instrument is not safe from flooding.
REPEAT THE STEPS TO CHANGE THE BATTERY
When the test concludes, the DIGI 2 console will provide a response
regarding the battery change that was just performed:
8. PASS. The test was positive; the battery change was effective.

34
EN
P90-20191122A
IMPORTANT! The result of the battery change test (pass or
fail) can be viewed at any time after the battery is changed by
simply reactivating the launch sequence via the smart cover or by
pressurizing the DIGI 2 console (see chapter LAUNCH SEQUENCE
AFTER ACTIVATION).
IMPORTANT! Do not dispose of the used battery in the
environment. Cressi Sub S.p.A. recommends that you dispose of it
according to the regulations in force.
WARNING! Cressi Sub S.p.A. recommends that you always
replace and grease the battery cap O-ring each time it's
necessary to open the compartment.
WARNING! Cressi Sub S.p.A. recommends replacing the dead
battery with the original kit, which is certified for the quality of
its components. Kits are available from technical centers and/or
trusted dealers authorized by Cressi Sub S.p.A.
WARNING! If you should notice any humidity on the inside of
the glass, immediately bring the DIGI 2 console to an authorized
Cressi center. It is strictly forbidden to disassemble the console
or its components; doing so will immediately void the warranty.
Cressi Sub S.p.A. is not responsible for damage caused by an
incorrect battery change and/or tampering with the DIGI 2 console
by anyone not certified for this type of instrument.

35
EN
P90-20191122A
“SMART COVER” FUNCTIONS WARNING! Before diving, always check that the units of
measure have been set correctly. Incorrect settings could lead
to confusion and an incorrect interpretation of the information
provided, with possible serious harm to the health of the user.
WARNING! The smart cover is not an integral part of the
product, and must always be removed when connecting to the
first stage/cylinder regulator unit.
WARNING! Because it is temporary, switching on the
display using the smart cover does not allow for use of the DIGI
2 if it has not been correctly connected and activated (HOW TO
CONNECT THE DIGI 2 CONSOLE and HOW TO ACTIVATE THE DIGI 2
CONSOLE).
To protect the instrument from accidental blows and to reduce
battery consumption as much as possible, attach the smart cover as
shown in the illustration below, checking that it is oriented correctly
and pressing until it clicks in place.
WARNING! Do not dive with the smart cover inserted into the
display housing! Removing it at depth would cause the instrument
to turn on belatedly, resulting in incorrect measurements of the
parameters for depth, maximum depth, range, and dive time!
The “smart cover” protects the instrument from accidental blows,
saves the battery when the device is not being used, allows you to
change units of measure, and lets you temporarily switch on the
display for a few minutes to check the battery power or to familiarize
yourself with the device before the dive.
WARNING! Do not take the smart cover on dives or get it wet.

36
EN
P90-20191122A
When the smart cover is removed, after a few seconds the display
will switch on automatically, running the launch procedure and
remaining on for two minutes.
After two minutes it will switch off automatically unless the DIGI 2
console is pressurized during that time, in which case it will remain
on for use.
CHANGING THE UNIT OF MEASURE
To change the system for units of measure from metric (BAR, meters,
degrees Centigrade) to Imperial (PSI, feet, degrees Fahrenheit) or vice
versa depending on your needs, proceed as follows:
1. When the DIGI 2 console is switched on, turn it off by resting the
smart cover against it, respecting the orientation in the figure.
Remove the smart cover.
2. Wait for the launch sequence and repeat step 1.
3. Wait for the launch sequence and repeat step 1. Upon the next
relaunch, the units of measure will be different from those
shown before the procedure.

37
EN
P90-20191122A
CHANGING COLORED PROTECTED COVER
The DIGI 2 console is covered by a silicone shell that gives the
product its special look while also protecting it from accidental blows.
Users or an authorized center can replace the shell by following these
steps:
• Disconnect the device from the first stage/regulator group.
• Separate the shell from the body of the instrument, beginning
with the point shown.
• Pull gently outward, undocking the cover from the four perimeter
anchor points.
• At this point, slide the cover to be replaced over the hose.
• Slide on the new cover, taking care to insert all the stops in their
respective grooves.
• Reconnect the instrument as explained in chapter:
“HOW TO CONNECT THE DIGI 2 CONSOLE”.

38
EN
P90-20191122A
MAINTAINING THE DIGI 2 CONSOLE
The DIGI 2 console should be protected against crushing, blows, or
friction from dragging along the ground or with any material that may
compromise its functional and aesthetic characteristics.
During storage and transport, the high-pressure hose should not be
overly forced in the stowage with folds exceeding a 4 cm radius.
The DIGI 2 console should be rinsed thoroughly with fresh water after
every dive.
IMPORTANT! Do not use chemical products to wash the DIGI
2 console. Only use fresh water!
IMPORTANT! Do not use jets of compressed air to dry the
product, as these could damage the pressure sensor.
IMPORTANT! A Cressi Sub Authorized Center must test the
instrument calibrations once a year.
IMPORTANT! Before every dive check that the instrument is
in good condition, has no condensation under the glass, and that
there are no air leaks.
The DIGI 2 console must not be left in locations with temperatures
lower than –20° or higher than +70°.
During periods when the device is not in use, we recommend storing
it in a dry and well-ventilated location with the smart cover in place.
WARNING! It is strictly prohibited to replace the hose originally
assembled on the DIGI 2 console with another of a different type or
model. Doing so will immediately void the warranty.
WARNING! If you should need to disconnect the hose from
the first stage/regulator unit from the DIGI 2, first make sure that
there is absolutely no pressure in the hose.
WARNING! Failure to observe the inspection and maintenance
procedures can cause serious injury or even lead to death!

39
EN
P90-20191122A
TECHNICAL INFORMATION
• PRESSURE GAUGE OPERATION: Operating pressure: 0-300
BAR
• DEPTH GAUGE OPERATION: Depth displayed:
0-120 meters
• TEMPERATURE MEASUREMENT: Range of measurement:
from – 10°C to + 50°C
Resolution: 1°C
Accuracy: +/- 2°C
• STORAGE TEMPERATURE: from -20 to 70 °C
• TIMER: Digital timer, dive time up to 999 minutes.
• BATTERY: User-replaceable CR 2450 battery.
Lifetime of the battery: 3 years with an average of 50 dives/year,
or 700 dives in one year.
An original Cressi Sub S.p.A. battery kit is available, complete
with all components to be replaced.
• BACKLIGHTING: The DIGI 2 console features a
photoluminescent display. If illuminated by an external light
source, it remains luminescent depending on exposure, so it can
be consulted correctly in poor lighting conditions.
LIMITED WARRANTY
Cressi Sub S.p.A. guarantees the good operation of this product. Your
Cressi Sub equipment is guaranteed for 2 years from the date of
purchase by the original purchaser against clear manufacturing and/
or assembly defects in the product or its individual parts, material not
considered suitable that causes the equipment to malfunction, clear
errors in the design, or instructions and warnings that are incorrect or
inadequate.
The warranty period begins on the date of the initial retail purchase
as demonstrated by a receipt or invoice.
The warranty does NOT cover: damage caused by improper use
of the equipment, poor maintenance, negligence or modifications,
conversions, adaptations, or tampering with the finished product,
or damage resulting from repairs performed by personnel not
authorized by Cressi Sub.
The warranty is forfeited automatically should any of these conditions
occur.
During the warranty period, Cressi Sub, or a Cressi Sub authorized
service center, according to their exclusive judgment, will remove any
defect in terms of material, design and workmanship, free of charge,
by means of repair or replacement of the product according to this
limited warranty.
Requests for repair under warranty will be satisfied free of charge by
Cressi Sub or by a Cressi Sub authorized service center, according to
their sole judgment, and the product will be repaired or replaced
within a reasonable time.
If the product is deemed non-compliant with the terms and conditions
of this limited warranty, Cressi Sub or a Cressi Sub authorized service
center reserve the right to charge service and/or repair costs.
The warranty cannot be transferred by the first purchaser to a third
party. A purchase receipt (with purchase date) from an authorized
Cressi Sub dealer is required for warranty service.
Any repairs not covered by the warranty will be carried out at the
owner's expense.
The warranty does not include any document or warranty granted by

40
EN
P90-20191122A
retailers or agents beyond the terms of this warranty.
No retailer or agent is authorized to make any changes to this
warranty or to grant an additional one.
For warranty repair, send the product, carriage forward, to your Cressi
Sub retailer or to an authorized Service Center. Provide your full name
and address, and enclose the purchase receipt or invoice.
You can find your authorized Cressi Sub center by asking your dealer
or Cressi Sub S.p.A. itself by sending an e-mail to:
Cressi Sub assumes no responsibility for any work carried out by
personnel not authorized by Cressi Sub.
The instructions and directions found in this manual are based on
the most up-to-date information about the equipment available
before printing. Cressi Sub reserves the right to make changes to the
content at any time.
REGULATORY REFERENCES
This instrument is compliant with the requirements of Directive
2014/30/EU electromagnetic compatibility.
This instrument satisfies the requirements set by UNI EN 250:2014
(pressure gauges for diving and Category III PPE); the latter in
compliance with Regulation (EU) 2016/425, which sets out the
conditions for marketing and essential minimum safety requirements
for Personal Protective Equipment (PPE).
It therefore bears the CE marking followed by identification of the
certification authority 0474 identifying RINA, the registered testing
agency that conducted the testing and tests its manufacture pursuant
to module B+C2 of EU Regulation 2016/425.
The certification is valid to 50m in depth, as defined by UNI EN
250:2014.
This device was designed to satisfy the requirements set forth under
standard UNI EN 13319:2000 regarding Depth Gauges and Combined
Depth and Time Measuring Devices.
PRODUCT DISPOSAL
Consider the device to be electronic waste.
Do not throw it away with regular rubbish.
Deliver it to the special dedicated municipal areas or return it to
Cressi Sub S.p.A.
Other manuals for DIGI 2
1
Table of contents
Other Cressi Diving Instrument manuals
Cressi
Cressi MC9 S.C. Manual
Cressi
Cressi DONATELLO User manual

Cressi
Cressi Leonardo Manual
Cressi
Cressi NEPTO User manual

Cressi
Cressi SUB series User manual

Cressi
Cressi Archimede User manual

Cressi
Cressi MC9 S.C. Manual
Cressi
Cressi PORTER User manual

Cressi
Cressi Leonardo Manual
Cressi
Cressi Aquapro Manual
Cressi
Cressi IZ750094 User manual
Cressi
Cressi NEWTON Reference guide
Cressi
Cressi Bluetooth Interface User manual
Cressi
Cressi CARTESIO User manual

Cressi
Cressi EDY User manual
Cressi
Cressi Michelangelo User manual

Cressi
Cressi GIOTTO User manual
Cressi
Cressi Archimede II User manual
Cressi
Cressi BT Interface User manual

Cressi
Cressi DRAKE User manual


