SDX Audio SPOT 3 User manual

SPOT 3
User's Guide
By SDX Business Systems Limited
38GDE00001SCA - Issue 2


SPOT 3 User's Guide – iii
Getting Started................................................1
Using this Guide................................................1
What is SPOT? .................................................2
SPOT Telephone Features...............................3
SPOT Fax/Modem Features.............................4
Installing SPOT................................................5
Unpacking & Checking......................................5
Connecting SPOT to a Telephone Socket........6
Connecting SPOT to Your PC...........................7
Installing the SPOT Software............................8
Registering Your SPOT.....................................9
Using SPOT as a Normal Phone..................10
Dialling & Ringing Setup.................................10
Switching from LD to MF During a Call...........10
Making Calls....................................................11
Answering Calls ..............................................11
Switching Between Handsfree & Handset......11
Muting Calls.....................................................11
Handsfree Volume...........................................11
Working with PC Applications.....................12
General Application Notes..............................12
Windows Cardfile............................................13
Windows Terminal...........................................15
Using SPOT as an Answering Machine..........15
Appendix A: SPOT Commands...................17
Introduction.....................................................17
Hayes AT Commands.....................................18
S-Register Values...........................................19
AT Command Result Codes...........................20
ATV Commands .............................................21
SPOT Telephony Commands.........................22
Appendix B: SPOT Connectors...................24
SPOT Serial Cable.........................................24
Telephone Cable.............................................24
Appendix C: UK Statutory Requirements..25
Approval Requirements..................................25
Power requirement..........................................25
Safety requirements........................................25
Description of Port Types...............................25
Suitability for use ............................................26
Dialling modes................................................26
Ringer Equivalent Number (REN) ..................27
Dialling Recommendations.............................27
Available facilities...........................................28
Stored numbers..............................................28
Glossary of Terms........................................29
Index...............................................................30
CONTENTS


Getting Started - Page 1
SPOT 3 User's Guide
Getting Started
Using this Guide
QUICK START:
1. Go directly to page 5to install your SPOT.
2. Then go to page 8to install the SPOT software.
3. Then go to page 9to register your SPOT for 12 months free
telephone support.
We hope that this guide helps you to install and start using
your SPOT. It cannot cover all the applications with which
you can use SPOT. The example applications provided on
the SPOT software disk include their own help files to
guide you.
This chapter outlines the main features of SPOT. The other
chapters are:
–
"Installing SPOT"
This is the place to start.
–
"Using SPOT as a Normal Phone"
Making and answering normal calls, working handsfree,
changing volume, etc.
–
"Working with PC Applications"
Covers the general modem and fax settings that should
allow SPOT to work with any PC applications.
–
"SPOT Commands"
Lists all the modem and other commands that SPOT can
understand. Hopefully you won't need to use these.
–
"UK Statutory Requirements"
A section of 'stuff' we are required to give you.

Page 2
SPOT 3 User's Guide
What is SPOT?
SPOT software:
SDX supply a range of
software packages that use
the features of SPOT. Each
of these includes its own
help files.
Welcome to SPOT, the handsfree telephone that you can
control directly from your computer. With SPOT you can
dial calls automatically from your PC applications, send
and receive faxes, use voicemail and answering machine
software, and access on-line information services.
All this functionality is provided within SPOT, which
simply connects to your PC's serial port. You do not need
to dismantle your PC in any way (which might invalidate
your PC warranty).
This User's Guide explains how to install SPOT and
provides guidelines for using telephony aware packages
with SPOT.
Getting Started - Page 3
SPOT 3 User's Guide
SPOT Telephone Features
On its own, SPOT works as a standard telephone with a
range of additional features. SPOT provides you with
handsfree operation, mute and volume controls and redial.
SPOT can operate as a normal handsfree telephone
without the PC lead being connected.
Telephone Specification:
–On-hook dialling
–Handsfree speech
–Last number redial
–Handset and handsfree mute
–Time break recall (TBR)
–Ringer volume control
–Handsfree speaker volume control
–DTMF dialling
–Alpha-numeric keypad
–BABT approved
–Standard BT telephone jack plug

Page 4
SPOT 3 User's Guide
SPOT Fax/Modem Features
With your SPOT connected to your PC you have true
Computer Telephony Integration (CTI ) at the desktop.
Your SPOT can be a modem, a fax machine, an answer
phone, an autodialler; almost whatever your PC's software
requires. This is all done via a single cable between SPOT
and the PC.
Modem Specification:
–Hayes AT compatible
–1200 or 2400 bits per second
–BABT approved
–Compatible with V21, V22, V22bis
–RS232C serial lead (9 PIN D-type connec tor)
–Power from DC power supply unit (supplied)
Fax Specification:
–Group 3, Class 2 Send/Receive Fax
–Fax speed 9600bps
Voice Specification:
–Voice data at 19.2 Kbps
–Encoding/decoding: 8-bit linear
–Compression: CVSD 14.4
–Sampling rate: 7300Hz
Computer Telephony Integration (CTI) Specification:
–SPOT supports the Microsoft/Intel TAPI standard

Installing SPOT - Page 5
SPOT 3 User's Guide
Installing SPOT
Unpacking & Checking
Note:
The number of manuals and
software disks may vary
according to your SPOT
supplier.
Before starting, first check that you have received all parts
required as listed below. Then go to page 6.
SPOT includes:
–SPOT Telephone with captive serial cable
–SPOT Handset
–Phone lead
–Power supply unit with lead
–9-pin to 25-pin serial connector adapter
–Manual(s) (see note)
–Software disk(s)
You also require:
–BT jack socket
–PC with free 9-pin or 25-pin D-type serial port (see
below"PC Requirements")
–Domestic mains power socket (230V 50Hz.)
–SPOT installation normally requires no tools
PC Requirements
SPOT requires a PC with the following specification:
–Minimum: 486SX 25MHz processor and 4MB RAM.
–Recommended: 486DX 50MHz processor with 8MB RAM.
–Windows 3.1, 3.11 or Windows 95.
–A free 9-pin or 25-pin D-type serial port.
–At least 3MB of hard disk space.

Page 6- Installing SPOT
SPOT 3 User's Guide
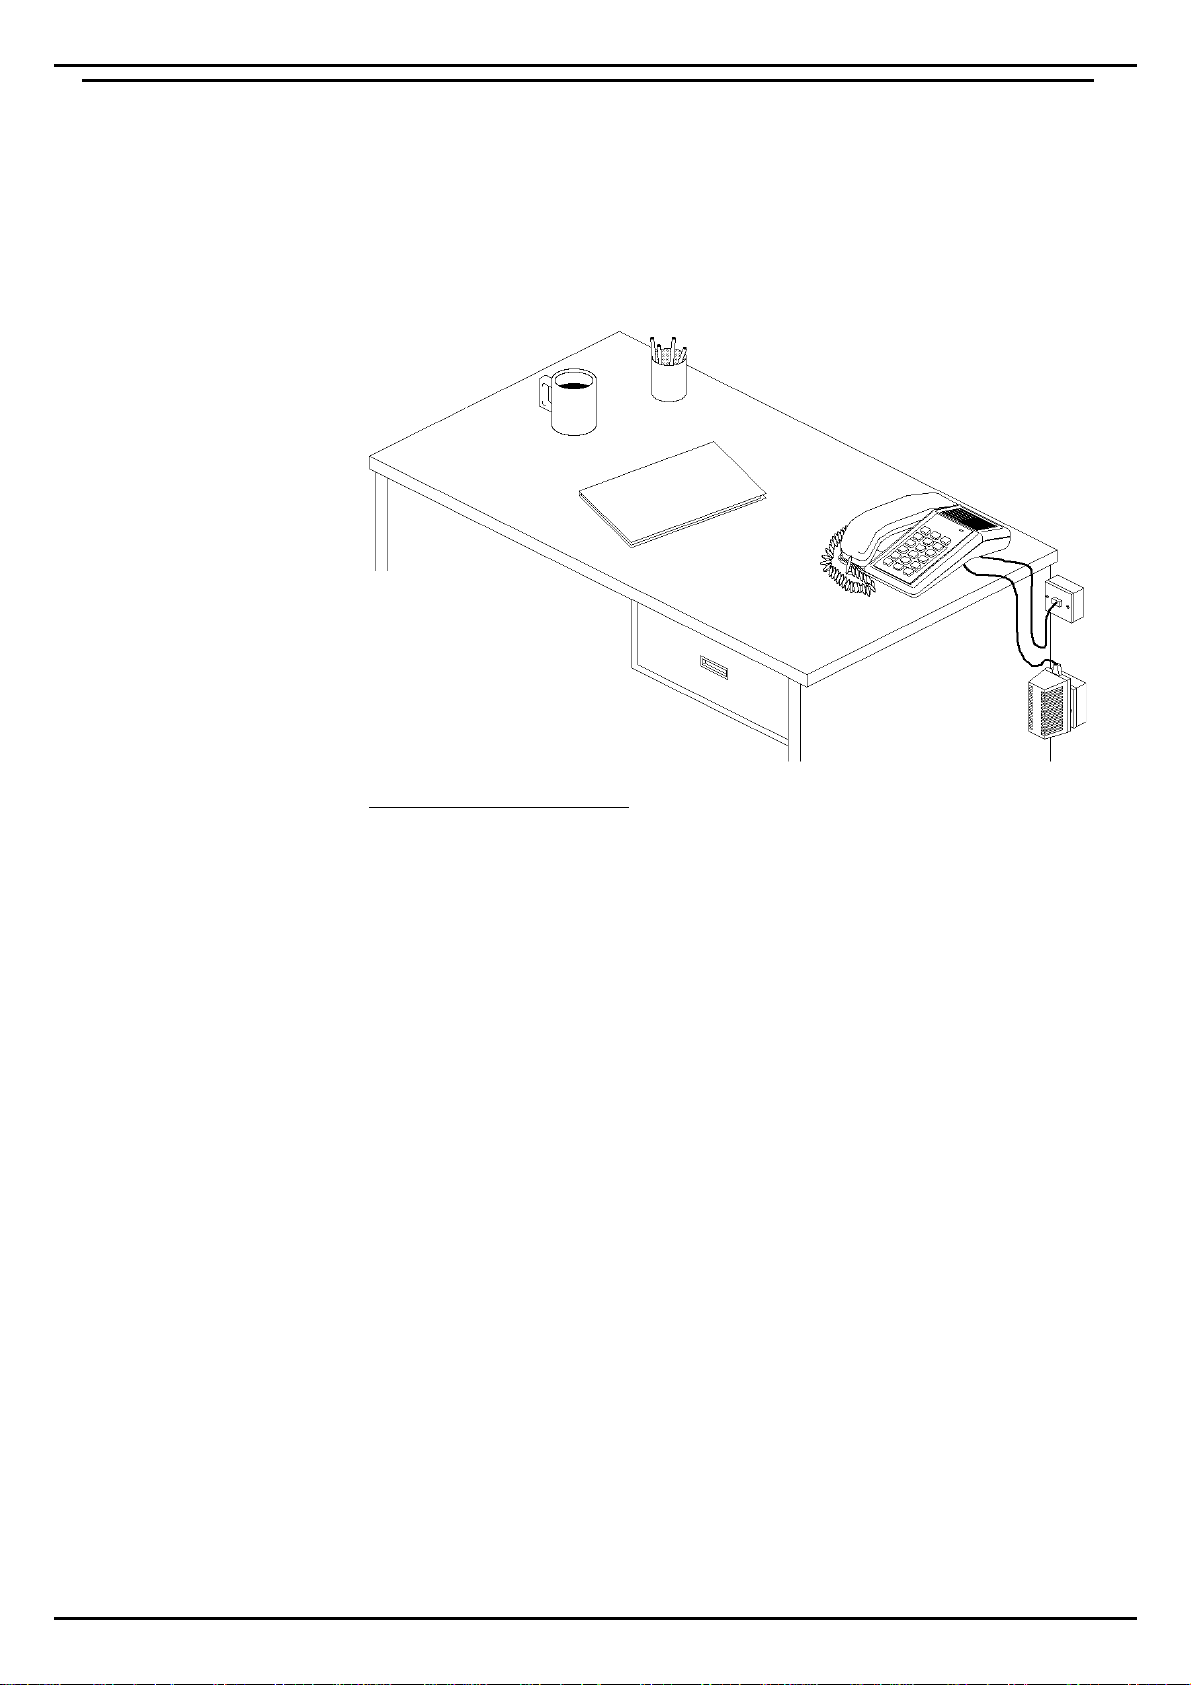
Connecting SPOT to a Telephone Socket
SPOT plugs into a modern style telephone jack socket. If
you do not have this type of socket, contact your
telephone line provider to have a suitable socket installed.
To connect SPOT as a telephone:
1. Plug the SPOT phone lead into the
LINE
socket under the
SPOT phone.
2. Plug the SPOT handset lead into the
H/SET
socket under
the SPOT phone.
3. Use the channels in the base of the SPOT phone to route
the cables as you prefer.
4. Plug the SPOT phone lead into your telephone socket.
5. Plug the SPOT power supply unit into a mains supply
socket and switch on.
6. Plug the power supply cable into the socket under the
SPOT phone.
7. Test the connection by making a normal phone call. If
this does not work check the cable connections first. If
the cables are okay, switch the SPOT from MF (tone)
dialling to LD (pulse) dialling (see page 10). If it still does
not work, try making a call with another phone in the
same socket.
8. Go to "Connecting SPOT to Your PC" on page 7.
Phone Ringing Problems
Every piece of telephone equipment has a REN value. The
total REN of the all the equipment connected to a line must
not exceed 4 to guarantee proper ringing and operation.
When the SPOT power supply unit is connected and on,
SPOT has a REN of 1.5.
Installing SPOT - Page 7
SPOT 3 User's Guide
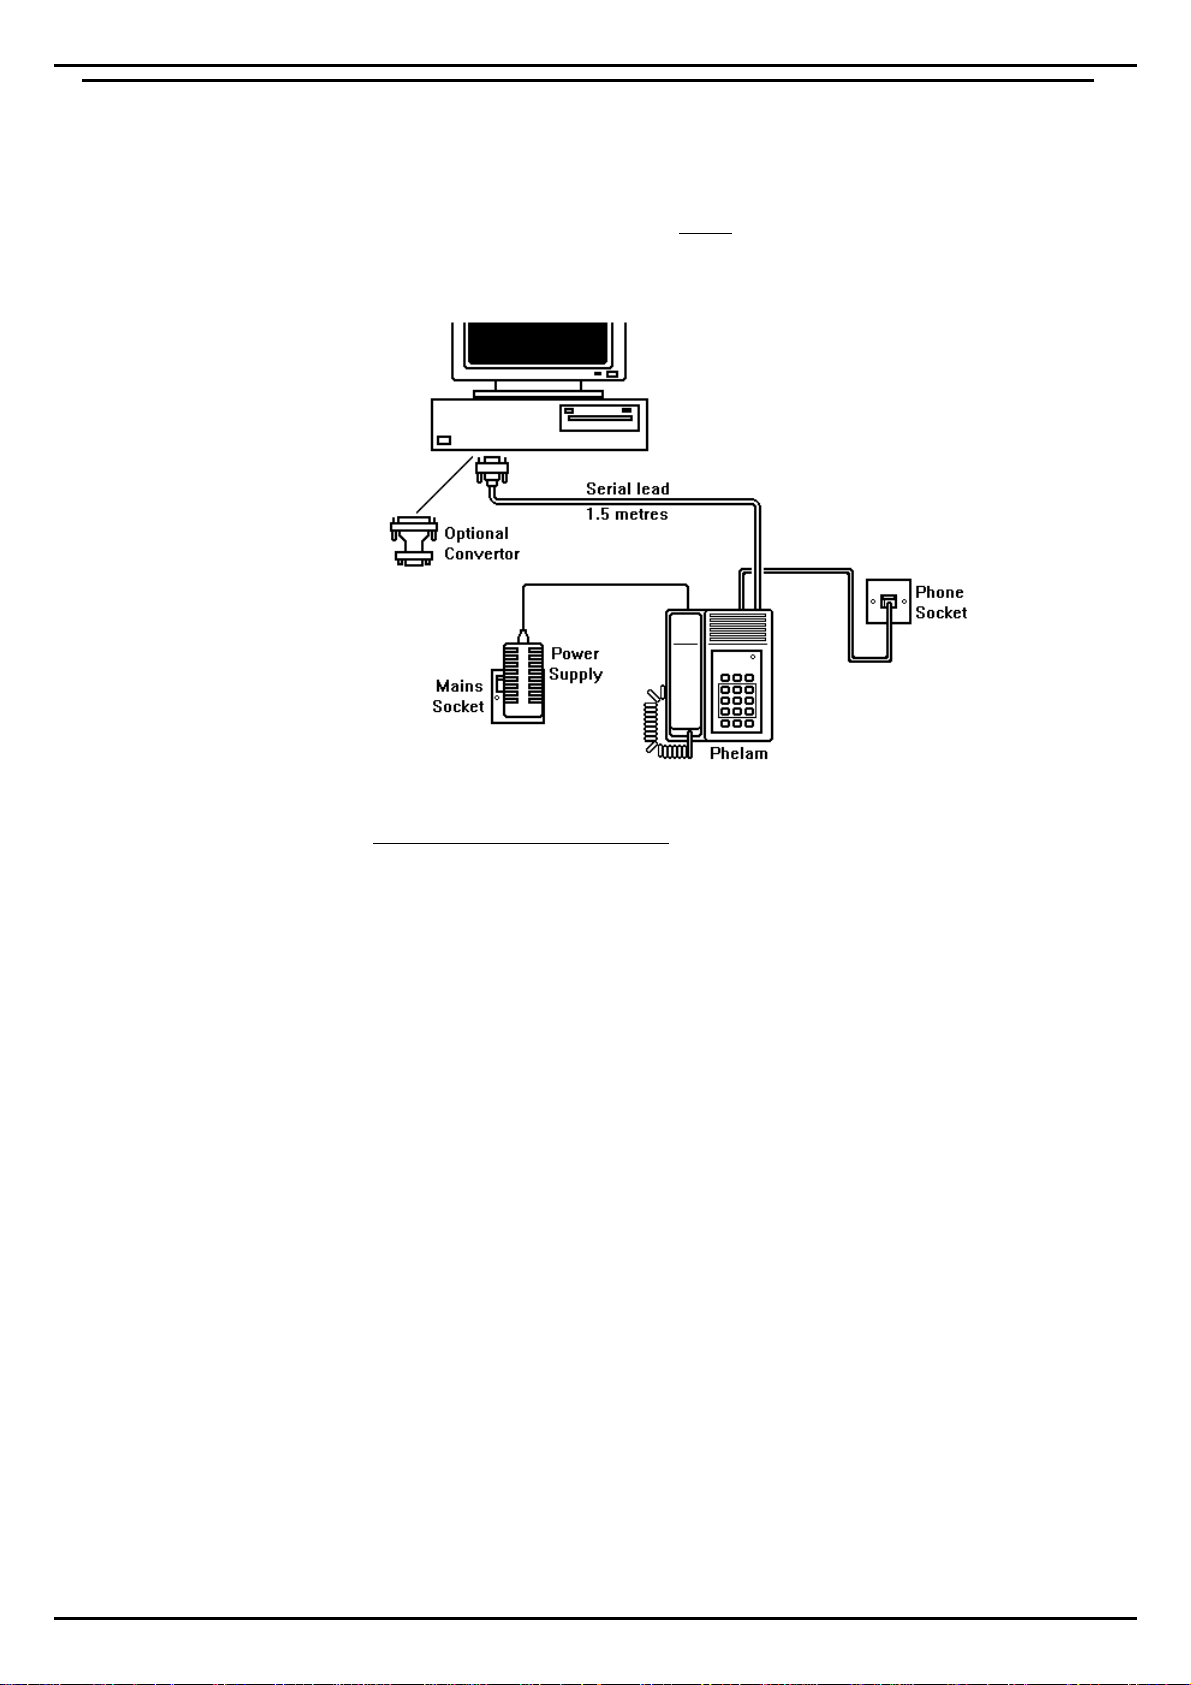
Connecting SPOT to Your PC
To operate SPOT under PC control, it needs to connect to
one of your computer's serial ports. These ports are also
called COM ports (from communication) ports. They are
normally 9 or 25-pin D-type sockets. Refer to the PC
manufacturers instructions to identify the correct ports.
To connect SPOT to the PC:
1. First follow the instructions in "Connecting SPOT to a
Telephone Socket" on page 6.
2. Plug the SPOT power supply unit into a suitable mains
supply socket and switch on.
3. Plug the power supply cable into the socket under the
SPOT phone.
4. Locate a free serial port on your PC (refer to your PC
manufacturers information). If it is not a 9-pin serial port,
you need a 9-pin to 25-pin serial adapter.
5. Connect the SPOT serial cable to the serial port (use the
9-pin to 25-pin serial adapter if necessary).
6. Hand-tighten the securing screws on the serial cable
plug (and adapter if used).
7. Go to "Installing the SPOT Software" on page 8.

Page 8- Installing SPOT
SPOT 3 User's Guide
Installing the SPOT Software
The SPOT software disk does several things;
–Installs the drivers which will allow SPOT to work with
a range of applications
–Installs a set of example of applications.
–Installs this guide as a Help File
–Runs the registration program for 12-months free SPOT
support.
To install the SPOT software for Windows 3.1 or 3.11:
1. First follow the instructions in "Connecting SPOT to
Your PC" on page 7.
2. Switch your PC on and run Windows 3.1 or 3.11.
3. From the menu bar, select
File
and then
Run
.
4. Enter
a:\install.exe
(or
b:\install.exe
) and then click on
OK
.
5. Follow the on-screen instructions.
6. When the SPOT Registration screen appears, go to
"Registering Your SPOT" on page 9.
To install the SPOT software for Windows 95:
1. First follow the instructions in "Connecting SPOT to
Your PC" on page 7.
2. Switch your PC on and run Windows 95.
3. Click on the
My Computer
icon.
4. In the group that appears, click on
Control Panel
icon.
5. In the group that appears, click on the
Add/Remove
Program
icon.
6. Enter
a:\install.exe
(or
b:\install.exe
) and then click on
OK
7. Follow the on-screen instructions.
8. When the SPOT Registration screen appears, go to
"Registering Your SPOT" on page 9.

Installing SPOT - Page 9
SPOT 3 User's Guide
Registering Your SPOT
Registering your SPOT will give you 12-months of free
telephone support. You can also choice to receive further
information about SPOT and SPOT related products. The
registration program runs automatically when you install
the SPOT software disk. If it cannot register at that time
(line busy) or you chose not to register, you can run
registration at a later date.
Registering your SPOT:
1. Enter information for any items highlighted in b lue.
2. The SPOT serial number is located on the label on the
base of the SPOT. Enter the number that follows the
marking
S/N
.
3When you have entered all the information and checked
the phone line, serial port and dial method settings,
click on
Register
(otherwise click on
Finished
to register at
another time).
To rerun registration at another time:
1. Locate the
SPOT
group and click on the
Register
icon.

Page 10 - Using SPOT as a Normal Phone
SPOT 3 User's Guide
Using SPOT as a Normal Phone
Dialling & Ringing Setup
You can configure various aspects of your SPOT.
LD or MF Dialling:
All phone lines in the UK support LD dialling which uses
a series of clicks for each number dialled. Almost all lines
also support MF dialling which uses a tone for each
number dialled. MF dialling is faster, more reliable and
provides access to special services. SPOT starts in MF
mode by default. If it does not appear to dial properly,
switch to LD dialling. If this cures the problem, then you
have a LD only telephone line.
To setup SPOT dialling & ringer controls:
1. Without picking up the handset, press
SETUP
. Whilst the
lamp flashes (for approximately four seconds), select
one
of the following options:
–To set LD dialling, press
1
.
–To set MF dialling, press
2.
–To switch the ringer off, press
5
.
–To switch the ringer on, press
6
.
2. After the four seconds, the lamp stays on. Press the
SPEAKER
key to put the SPOT back to idle.
Switching from LD to MF During a Call
If you use LD dialling, after your call connects you can
switch to MF dialling. You need to do this if you dial a
service which expect you to use MF keys.
To switch from LD to MF during a call:
1. Press ∗∗. Any following key presses send MF tones to the
telephone line rather than LD pulses.
2. When the call ends, this setting automatically cancels
and returns the SPOT to LD dialling.

Using SPOT as a Normal Phone - Page 11
SPOT 3 User's Guide
Making Calls Before making a call, check that the red lamp is off. If the
lamp is on, SPOT may be on a call controlled by your PC.
To make a handset call:
1. Lift the handset and listen for dial tone.
2. Dial the number you require or
3. Press
REDIAL
to dial the last number used.
To make a handsfree call:
1. Dial the number you require or
2. Press
REDIAL
to dial the last number dialled.
Answering Calls To answer a call:
1. Press SPEAKER to answer handsfree or lift the handset.
Switching Between Handsfree & Handset
You can switch between handsfree and handset use a call.
To switch from the handset to handsfree:
1. Press SPEAKER and replace the handset.
To switch from handsfree to the handset:
1. During the call, simply pick up the handset.
Muting Calls Mute allows you to talk to other people without the caller
hearing (though you can still hear them).
To mute a call:
1. During the call, press MUTE. You can still hear the other
end but they cannot hear you.
2. To cancel the mute, press MUTE again (or switch between
handset and handsfree).
Handsfree VolumeYou can change the handsfree volume during a handsfree
call (or by going off-hook at any time).
To change the handsfree volume:
1. During the call, press VOLUME to select the next level.
2. Repeat to cycle SPOT through its 4 volume levels.

Page 12 - Working with PC Applications
SPOT 3 User's Guide
Working with PC Applications
General Application Notes
This section of the guide shows a common settings that
will work for most standard software programs.
SPOT Modem Settings
Baud rate:
2400 or 1200
Parity:
None
Data bits:
8
Flow control:
None
Stop bits:
1
Hayes AT Dialling Settings
If the program uses AT commands as settings, set;
AT Dial prefix
ATDT
AT Hangup prefix
+++
AT Dial suffix
;
AT Hangup suffix
ATH0
Note: Some dialling applications automatically insert the
appropriate prefixes and suffixes (eg. Windows cardfile).
If the application does not support an AT dialling suffix,
either set the AT Dial prefix to ATDTV or put a Vat the
beginning of all telephone numbers.
Most Hayes AT autodialling applications expect to control
a modem that shares a socket with a phone. Thus they do
not provide a way of ending calls, expecting the user to
replace the telephone handset to end the call themselves.
The hang-up button of these applications usually just
signals to the application to stop its call timer. These
applications cannot end a SPOT phone call even though
SPOT has an 'end call' PC command.
If you want your applications to have total control of
SPOT, use a version of the application that supports TAPI.
The application will then intergrate more tightly with all
the features of SPOT.
SPOT Fax Settings
Baud rate:
9600
Carrier detect:
Off
Fax machine type:
Class 2 Send/Receive
Dial tone detect:
Off
Busy detect:
On
Working with PC Applications - Page 13
SPOT 3 User's Guide
Windows Cardfile
To run Cardfile:
Click on the Cardfile icon,
normally found in the
Accessories group.
Microsoft supply Cardfile as a standard part of Microsoft
Windows 3.1/3.11. You can use it to store information in
simulated card indexes (refer to your Windows User Guide).
A typical use is storing numbers for dialling by SPOT, ie. a
card index of addresses or business contacts.
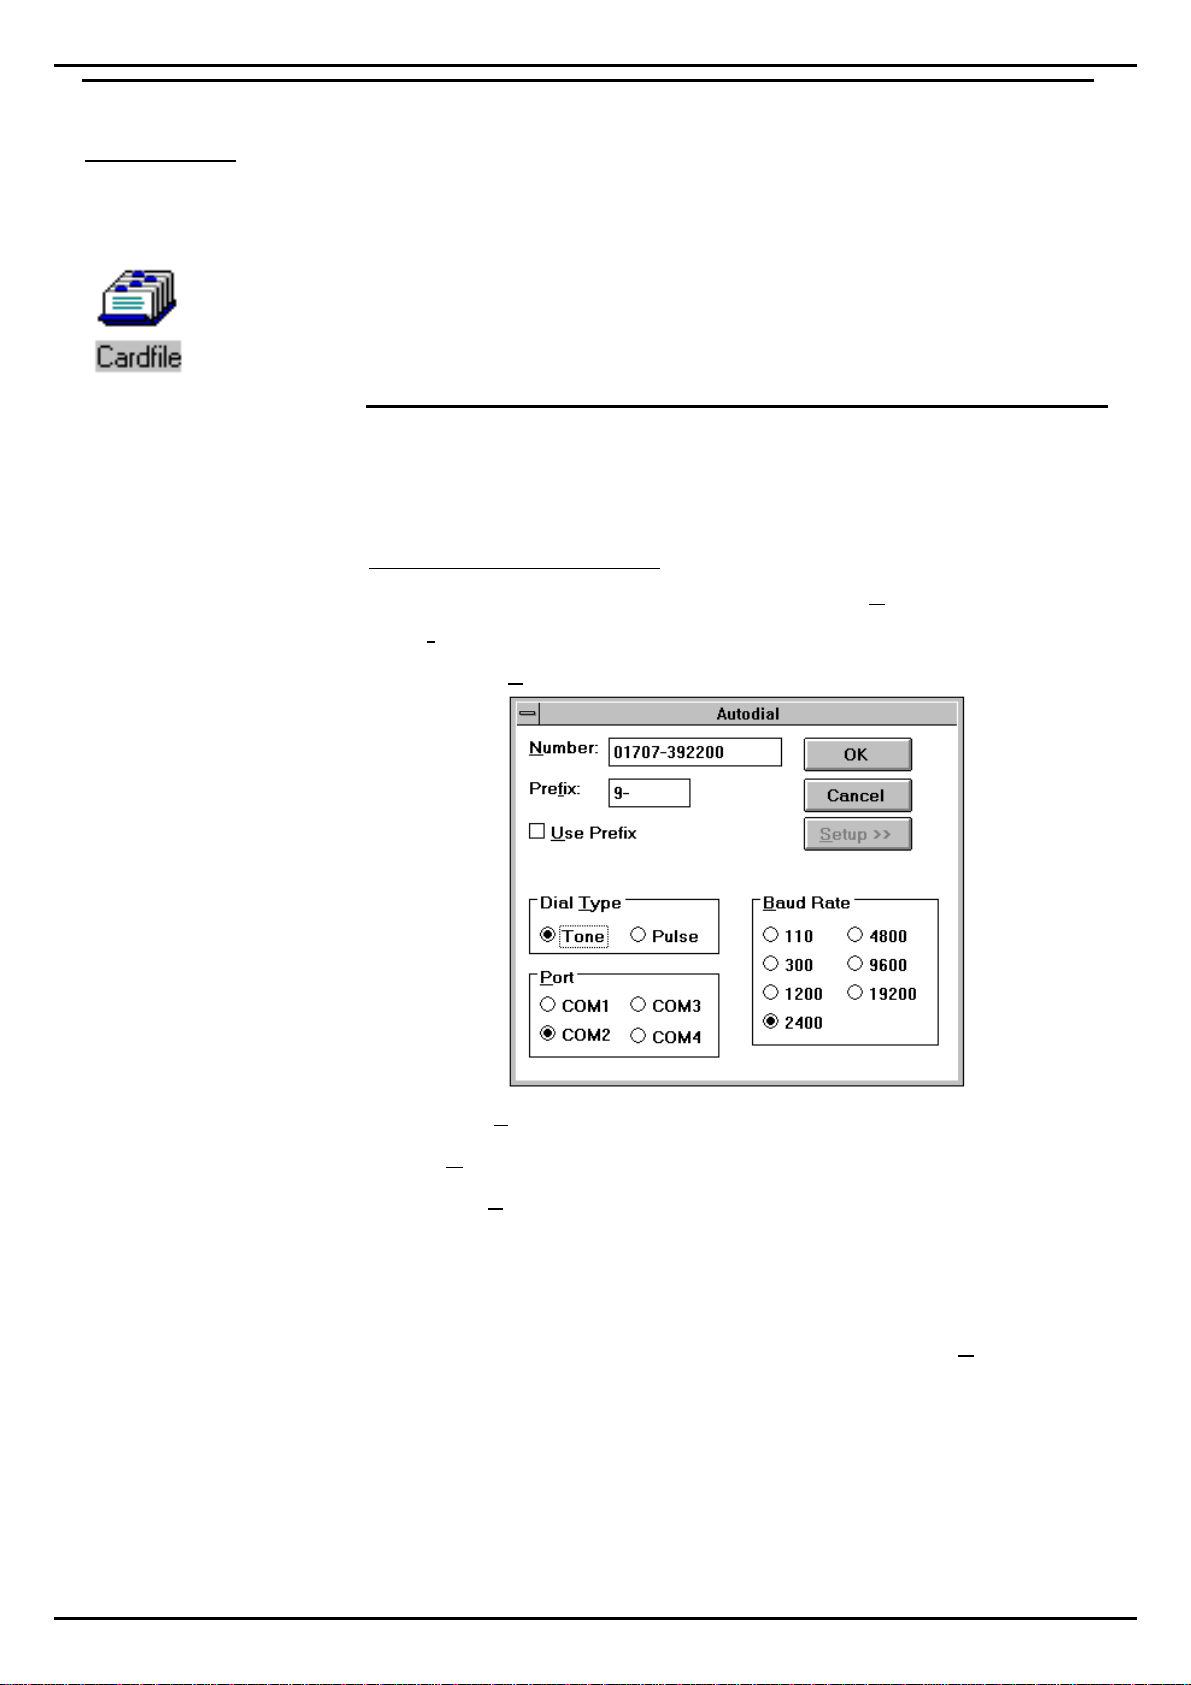
Cardfile Setup
Before dialling numbers from Cardfile, you must tell it
about SPOT. Cardfile saves the settings for all future calls.
To setup Cardfile for SPOT:
1. Start Cardfile and press F5 or click on Card and then
Autodial.
2. Click on Setup >>.
3. For Dial Type select Tone.
4. For Baud Rate select 2400.
5. Set the Port to the serial (COM) port to which your SPOT
is attached.
6. If your calls are always prefixed with the same
number(s), you can enter this in the prefix box. To then
dial the prefix ensure that there is a Xnext to Use Prefix.
7. To save the setup, click on OK (otherwise click on Cancel).

Page 14 - Working with PC Applications
SPOT 3 User's Guide
Dialling from Cardfile
When you ask Cardfile to dial a number, it uses the first
number on the front card. Before dialling it, you have the
opportunity to change the number.
To autodial from Cardfile:
1. Select the index card containing the number to dial.
2. Press F5 or click on Card and then Autodial.
3. If necessary, change the number (and optional prefix).
4. At this point, you can click on Setup >> to view and
change the SPOT setup if necessary (see "Cardfile Setup").
5. Click on OK to dial the number.
6. You should hear SPOT dialling the digits and making a
handsfree call for you. Pickup the handset if desired.
7. Click on OK when SPOT has finished dialling.
8. To end the call, either replace the handset or if calling
handsfree, press the SPEAKER key.

Working with PC Applications - Page 15
SPOT 3 User's Guide
Windows Terminal
To run Terminal:
Click on the Terminal icon,
this is normally found in the
Accessories group.
Microsoft supply Terminal as part of Microsoft Windows
3.1/3.11. It is a program to you to pass commands, text
messages and files to other modems. You can use it to
connect your PC to another PC with a modem. For full
details refer to your Windows User Guide.
Terminal Setup
Terminal supports multiple setups, which you can save as
files and then load when required. The setup may vary
according to the service being accessed at the other end.
To setup Terminal for SPOT:
1. Start Terminal and then select Setting and Communications.
2. Set the Baud rate to 2400.
3. Set Data bits to 8, Stop bits to 1and Parity to none.
4. Set the Flow control to Hardware.
5. Leave Parity Checkand Carrier Detect off (no X).
6. Set the Connecter to the port to which your SPOT is
connected.
7. Click on OK after making all the changes necessary.
8. Click on File and then Save as. Enter a suitable file name
(eg. spot.trm) and click on OK.

Page 16 - Working with PC Applications
SPOT 3 User's Guide
Using SPOT as an Answering Machine
The details for this type of application depend upon the
Answering Machine software you use. However, we
advise that when recording your announcement, it should
start within 3 seconds, it should contain your full
telephone number and it should invite the caller to leave a
message. When recording an outgoing message through
SPOT, you can do so either through the handset or
through the handsfree microphone.
Table of contents


