Toa N-SP80MS1 Installation guide

QUICK MANUAL
SIP MULTIMEDIA STATION N-SP80MS1
This is a quick manual for the N-SP80MS1.
Be sure to see the separate "N-SP80 Series Instruction Manual" before using the N-SP80MS1.
The latest version of the "N-SP80 Series Instruction Manual" can be downloaded from the TOA product
data download site (http://www.toa-products.com/international/).
TABLE OF CONTENTS
1. SAFETY PRECAUTIONS ............................. 2
2. GENERAL DESCRIPTION ........................... 2
3. FEATURES ................................................... 2
4. HANDLING PRECAUTIONS ........................ 2
5. NOMENCLATURE AND FUNCTIONS ......... 3
Front .............................................................. 3
Rear ............................................................... 4
Right side ...................................................... 4
6. CONNECTION .............................................. 5
7. SYSTEM SETTING USING A BROWSER ... 6
Thank you for purchasing TOA’s N-SP80MS1 SIP Multimedia Station.
Please carefully follow the instructions in this manual to ensure long, trouble-free use of your equipment.

2
1. SAFETY PRECAUTIONS
• Beforeinstallationoruse,besuretocarefullyreadallthe instructionsinthis sectionforcorrectand safe
operation.
• Besuretofollowalltheprecautionaryinstructionsinthissection,whichcontainimportantwarningsand/or
cautions regarding safety.
• Afterreading,keepthismanualhandyforfuturereference.
• UsethespeciedACadapterandPoEswitchinghubfortheunit.Notethattheuseofanotheradapterand
PoEswitchinghubmaycauseare.
2. GENERAL DESCRIPTION
The N-SP80MS1 is a touch-panel type Multimedia station using Google’s Android platform designed for use in
combination with the SIP (Session Initiation Protocol) Intercom system.
The station can be used not only in SIP server mode but also in peer-to-peer mode: the former enables the
station to work by connecting to the SIP server and the latter enables it to work without using the SIP server.
Note: Android is a trademark of Google Inc.
3. FEATURES
• FullycompliantwithSIP.
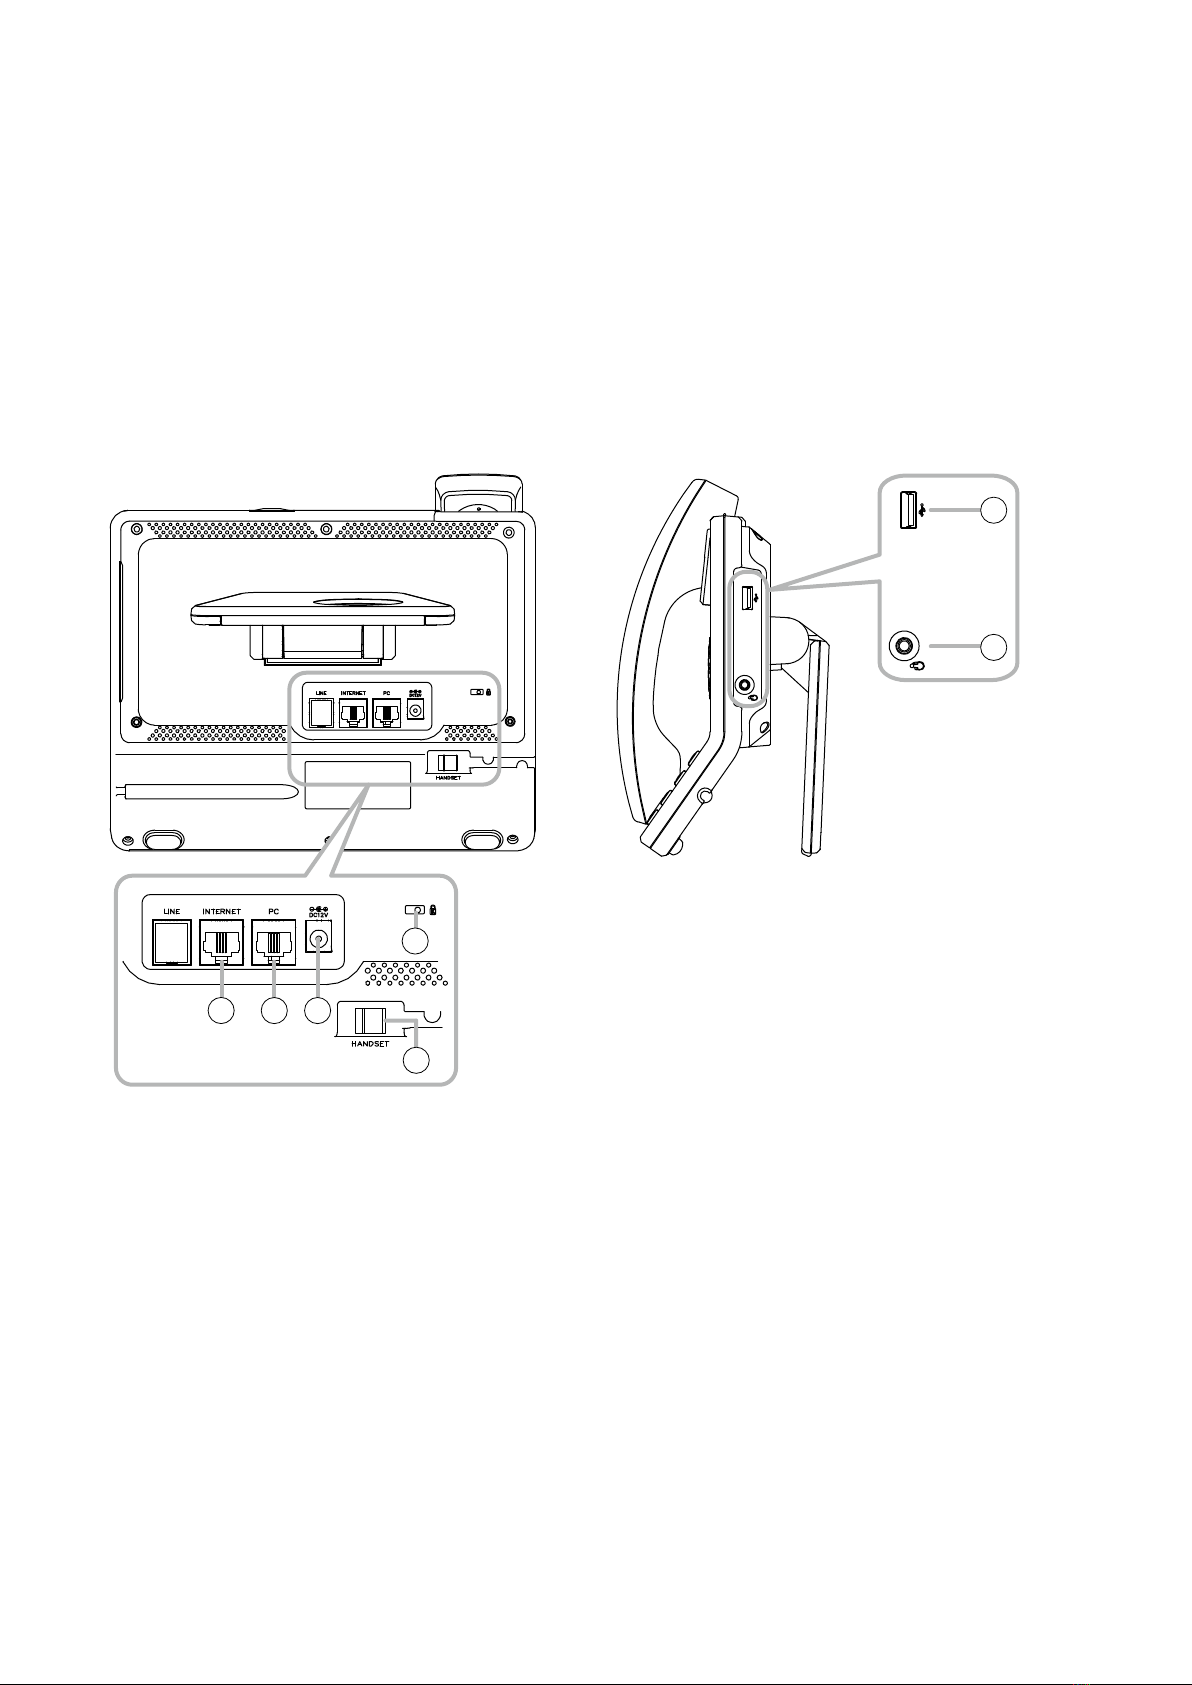
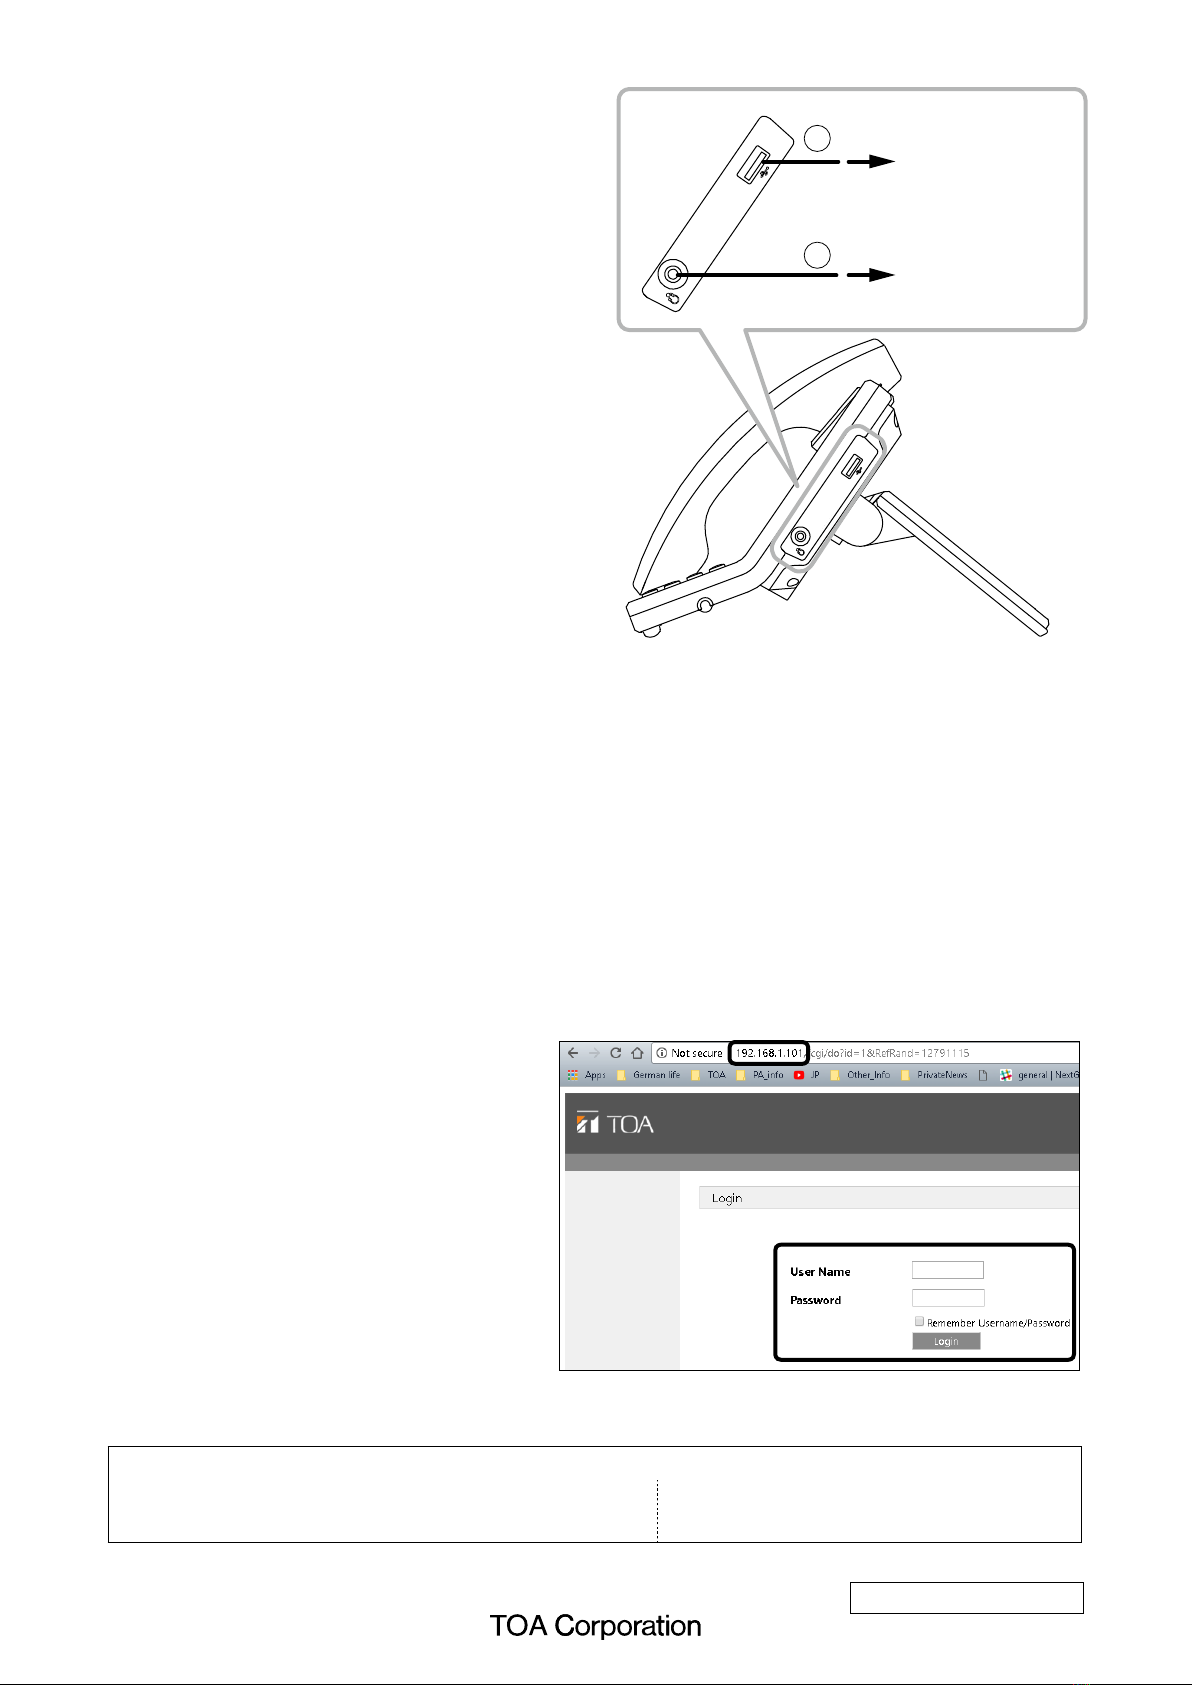
• ConnectedtothenetworkviaEthernet.
• Supports2waysofconnection:ConnectiontotheSIPserverusingSIPandpeer-to-peerconnection.
• Supportsthefollowingaudiocodecs:G.711,G.722,G.729,L16,andOpus.
(AudiocodecisxedtoG.722wheninpeer-to-peerconnection.)
• CanbepoweredbymeansofPoEorfromtheDCpowersupplyunit.
• EasytooperateonthescreenthankstoatouchpanelandGUI(GraphicalUserInterface)design,andin
addition, usable as a telephone by intuitive dial operation with a ten-key pad.
• Selectable one of 3 conversation methods: handset conversation, hands-free conversation, and headset
conversation.
• CompatibilitywithforCUCMobtainedbyCiscosystems.
• Easyconversationsbetweenstationsevenunderhighnoiseenvironment.
Note: CiscoSystemsisaregisteredtrademarkofCiscoSystems,Inc.intheUnitedStatesandcertainother
countries.
4. HANDLING PRECAUTIONS
The transmission quality of the internet is not always guaranteed.
Therefore, when this system is connected via the internet, the following symptoms may happen when the
network is congested.
• Packetloss
• Interruptionofspeechvoice
• Generationofnoise
Indicates a potentially hazardous situation which, if mishandled, could
result in moderate or minor personal injury, and/or property damage.
CAUTION

3
5. NOMENCLATURE AND FUNCTIONS
• Desktopdesign
• Handset,Hands-free(withAECfunction),Headsetconnectable
• Built-intouchpanel
• PoE-compatible(IEEE802.3afcompliant)
• Built-incamera
[Front]
1
2
3
45
6
7
8
9
10 11 12
13
14
15
16
17
18
19
20
1. Power ON/OFF button
Press this button to turn on the power and pressing
it again will place the unit in sleep state.
Holding it down for 1 second or more allows the
selection of either restarting the unit or setting the
manner mode.
2. Indicators
Indicate the following operation states.
: Indicates the unit’s power ON or OFF state.
The unit is operating when the indicator is
lit, and not operating when it is unlit.
: Indicates the network connection state.
ConnectiontoaLANisestablishedwhen
the indicator is lit, and not established
when it is unlit.
: Indicates the absence incoming call/
unread message state.
The absence incoming call or unread
messages are present when the indicator
isashing,andnotpresentwhenitisunlit.
3. Camera
Abuilt-incamerawith2megapixels.
Usedwhenmakingconversationbetweenmultimedia
stations.
4. Handset
Usedforhandsetconversation.
5. Touch panel
A7"touchpanelscreen.
6. Home button
Returns the display to the home screen.
7. Menu button
Indicates the setting items on the screen.
8. Back button
Returns the display to the last screen you viewed.
9. Speaker button
Press this button to start hands-free conversation.
10. Sleep button
Press this button to place the unit in sleep state.
Holdingitdownfor1secondormoreallowsthe
selection of either restarting the unit or setting the
manner mode.
11. Volume control button
Adjusts the volume level of the built-in speaker.
12. Numerical keypad
Usedtoenterthenumbers.
13. Delete button
Deletes one by one the dial numbers entered
when making a call or the characters entered
when registering.
14. Message button
Press this button to read or write the short message.
(Only when in the SIP server mode)

4
15. Conference button
Starts the three-party conversation function.
16. Transfer button
Starts the transfer function during conversation.
(Only when in the SIP server mode)
17. OK button
Conrmstheselectiononthescreenwhileinthe
touch panel operation.
18. Contact button
Press this button when registering or selecting
the telephone book.
19. Hold button
Starts the hold function during conversation.
20. Mute button
Mutes the hands-free microphone and the
handset microphone.
[Rear] [Right side]
21 22 23
24
25
26
27
21. LAN connection terminal
ConnecttheLANcabletothisterminal.
ThisterminalcanbeconnectedtoPoEswitching
hub.
22. PC connection terminal
ConnectaPCtothisterminal.
23. DC input terminal
ConnecttheACadapter*tothisterminal.
*UsetheoptionalAD-1215Poritsequivalent.
24. Security slot
Usedtoconnectthesecuritywiresuchasatheft
preventing wire.
This is a Kensington lock slot.
25. Handset connection terminal
Connectthehandsettothisterminal.
26. USB connection terminal
ConnectaUSBdevicetothisterminal.
27. Headset connection terminal
Connectaheadsettothisterminal.

5
6. CONNECTION
N-SP80MS1 unit (Rear)
To the switching hub
To a PC
To AC mains
Theft preventing wire
Supplied
handset
1
2
3
4
5
[Power supply connection]
PowerissuppliedfromtheACadaptororthePoE-compatibleswitchinghub.
Forthepowersupplyfromtheswitchinghub,seebelow"2.LANconnectionterminal."
1. DC input terminal
ConnecttheACadapter.*
*UsetheoptionalACadapterAD-1215Poritsequivalent.Asfortheusableadapter,consultyourTOAdealer.
Tip
IfboththeACadapterandthePoEswitchinghubareconnected,thepowerwillbesuppliedfromtheone
thathasstartedfeedingrst.
[Switching hub and PC connections]
2. LAN connection terminal
Connectthisterminaltothe100BASE-TX-compatiblenetwork.
UsetheEthernetRJ-45connectorforconnection.
AsthisterminalcanbeconnectedtoPoEswitchinghub,powercanbesuppliedfromthePoEswitchinghub
when this terminal is connected to it.
Inthiscase,usetheswitchinghubmeetingthefollowingspecication.
SpecicationoftheusablePoEswitchinghub:IEEE802.3afcompliant
Tip
IfboththeACadapterandthePoEswitchinghubareconnected,thepowerwillbesuppliedfromtheone
thathasstartedfeedingrst.
3. PC connection terminal
ConnectaPCtothisterminal.
UsetheEthernetRJ-45connectorforconnection.
Thisterminalcanalsobeconnectedtothe100BASE-TX-compatiblenetwork.
Note
ThisterminalisnotPoE-compatible.
TheuseoftheACadapterotherthanthespeciedonemaycause
are.
CAUTION
WhenpowerissuppliedfromthePoEswitchinghub,besureto
usetheonemeetingthespeciedspecication.
The useofthe switchinghub other than the speciedone may
causeare.
CAUTION

[Other connections]
4. Handset connection terminal
Connectthesuppliedhandsettothisterminal.
5. Security slot
Connect a commercially available theft preventing
wire to this slot as needed.
This is a Kensington lock slot.
[USB device connection]
6. USB connection terminal
Connect a USB device such as a USB memory to
this terminal.
ThisterminalisUSB2.0compatible.
[Headset connection]
7. Headset connection terminal
Connectaheadsettothisterminal.
Usableheadset:16/32Ω,
3.5 mm (0.14") dia. mini plug (3 pins)
URL:http://www.toa.jp/
Traceability Information for Europe
Manufacturer:
TOACorporation
7-2-1,Minatojima-Nakamachi,Chuo-ku,Kobe,Hyogo,Japan
Authorized representative:
TOAElectronicsEuropeGmbH
Suederstrasse282,20537Hamburg,Germany
To a USB device
(USB memory, etc)
To the handset
6
7
N-SP80MS1 unit (Right side)
7. SYSTEM SETTING USING A BROWSER
A browser is required to access the system settings to activate unit.
Connecttotheunit'sWebserverbyusingtheIPaddress.
ThedefaultIPaddressis192.168.1.101.(Subnetmaskis255.255.255.0.)
WhenusingthedefaultIPaddress,enter"http://192.168.1.101"toestablishtheconnection.
TheIPaddresscanbeconrmedbyselectingthe"Setting"iconontheunit'stouchpanel.
For the details, see the separate "N-SP80 Series Instruction Manual."
The latest version of the "N-SP80 Series Instruction Manual" can be downloaded from the TOA product data
download site (http://www.toa-products.com/international/).
Usernameandpasswordsettingsareasfollows.
Username: N-SP80
The user name is xed. It cannot
be changed.
Password: guest (default setting)
The password can be changed.
Enteritwithupto63characters.
Notes
•Unusablecharacters:&,%,',=
•Passwordiscase-sensitive.
133-06-00042-00
Other manuals for N-SP80MS1
2
Table of contents
Other Toa IP Phone manuals