Seagull EXELOR User manual

EXELOR
Notice d’assemblage
Assembly Instruction

1
1. Montage roues et essieux
Mounting wheels and axles
2. Gréer votre voile
Rig your sail
3. Entretien pour longévité
Maintenance for longer lasting
4. Comment prendre un « ris »
How to reef
Sommaire
Summary

2
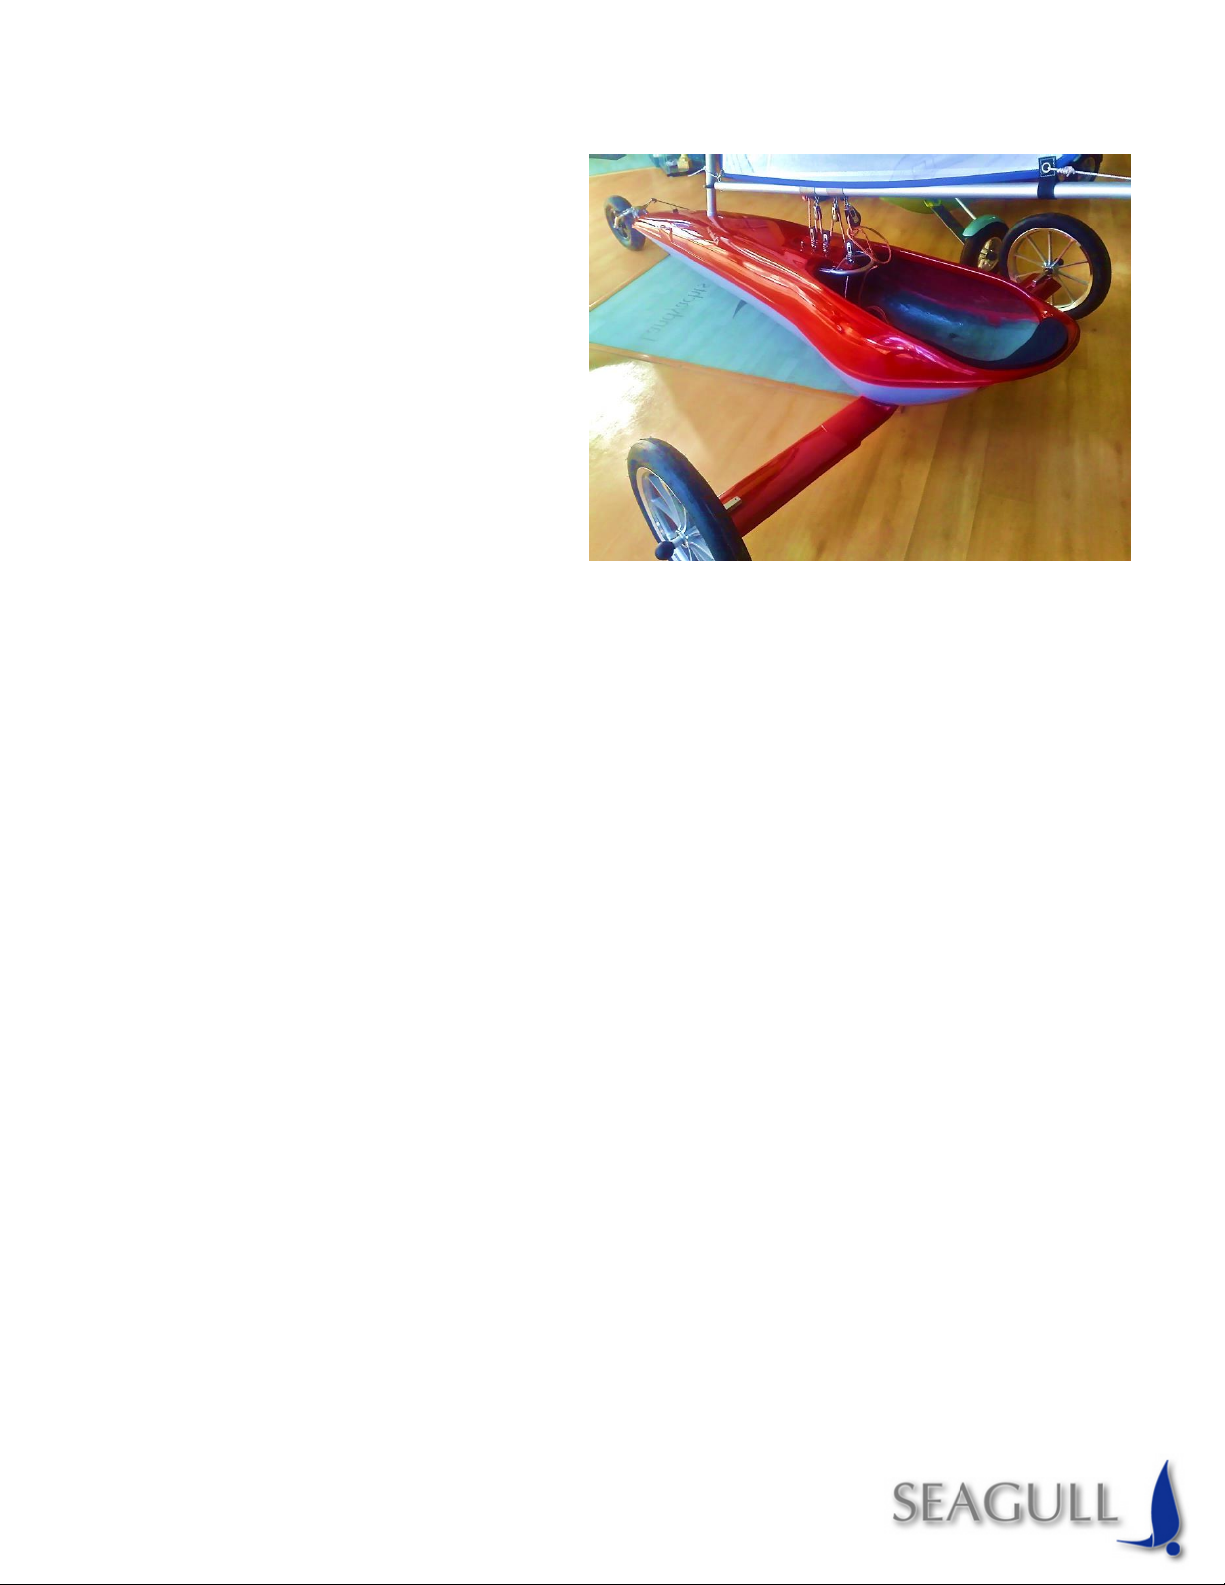
Montez les roues sur les essieux,
Petites ou Grandes roues arrière :
enfilez chaque roue sur la fusée en
centrant bien l’entretoise avec votre
index. Montez le support d’essieu
inox à la coque (2 écrous de 13 mm)
si ce n’est déjà fait.
Mount the wheels on the axles. Small or large back wheels: Insert the wheel in the
spindle by aligning the spacer tube with your index finger. Mount the axles support
to the body with 2 nuts of 13mm.
Montez les essieux sous le support
en enfilant l’embout caoutchouc
blanc au centre dessous et enfilez la
vis de 6 dans le trou en extrémité du
support. Ensuite serrez l’ecrou.
Mount the axles under the support
by inserting the rubber tip inside the
rectangle hole and thread the hole
at the extremity of the support with the screw of 6mm which is fixed on the axles.
Next step is to tighten the nut to secure the fixation.
Option: Essieux unique type GLIDER
en fibre de verre
Option: Single-body axles GLIDER type
fiberglass
Montage roues et essieux
Mounting wheels and axles

3
Assemblez les 3 parties de mât Milieu haut
par emboîtement* (2 grandes parties +
rallonge en haut) : les 2 longues parties
simplement emboitées jusqu’à faire
disparaître les 3 scotchs noir, et la rallonge
emboîté avec la lamelle d’emboîtement en
plastique rouge.
Assemble the 3 parts of the mast top middle
by interlocking* them into one another (2
long sections + top extension). Simply
interlocking the two long sections into one
another until it covers and hide the three
scotch tape markings. And for the top
extension, interlock it with the top middle
part using red plastic strip.
*2 types de mâts existent : Mât type XL comme photos et montage ici expliqué
(la partie basse de mât fait 2.5m de long)
Ou le mât style «2016 » (la partie basse fait 2m)
*There are 2 type of masts : XL type mast as shown in the photos (the mast base
around 2.5m long)
Or «2016 » type mast (the mast base around 2m long)
Gréer votre voile
Rig your sail
Bas de mât
Mast’s base
Milieu haut
Top middle

4
Enfilez le mât dans le fourreau de voile et
redressez le tout pour planter le
gréement dans la coque. N’oubliez pas le
petit cordage autour du mât.
Thread the sail’s sleeve with the mast.
And then plant the mast on the frame. Do
not forget to tie the cord around the mast. Please refer the photos.
Formez la têtière sangle comme sur les
3 photos ci-contre et ajustez la hauteur
de la voile (vous pouvez toujours
ensuite corriger la hauteur en
renversant votre char à voile et
réajuster).
Form the top webbing as shown in the
photos to the right and adjust the
height of the sail (The sail’s height is
adjustable. Just lay down the landyacht
to the ground and change the height
according to your need).
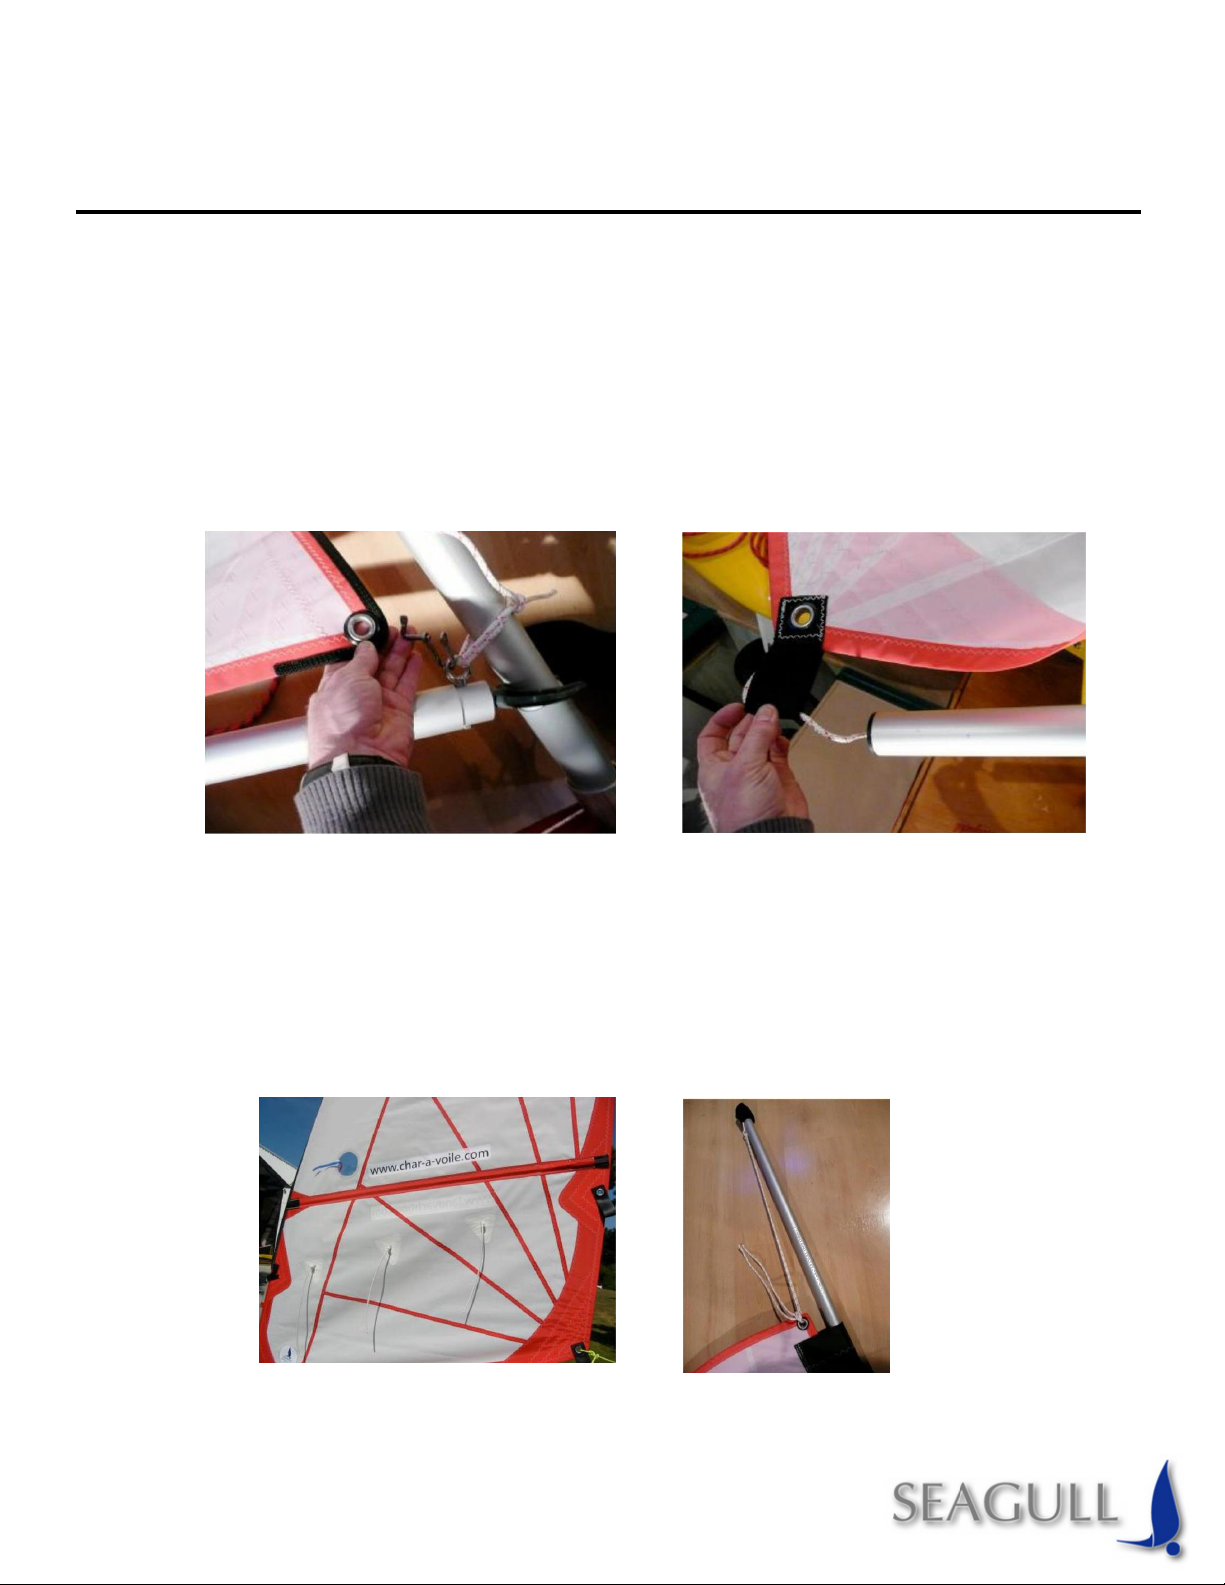
Voyez le passage de l’écoute de voile.
Situez vos deux supports de poulies sur
la bôme grâce aux vis papillon.
Réglage normale : les brins d’écoute
sont verticaux un peux vers l’arrière
pour être parallèle au mât afin de
tendre de la voile régulièrement. Eviter
de pousser vers l’avant, de tirer la
bôme vers l’arrière.
Par petit vent : Vous pouvez reculer
quelque centimètre vos supports de poulie sur la bôme pour tendre un peu la
chute.

5
Par gros vent : Avancez de quelque centimètre vos supports de poulie de manière
à libérer un peu la chute.
Look at how the cord is set. Locate your two pulley supports on the boom thanks to
the butterfly screw.
Default setting : The cord strand is in vertical but a little bit towards the back so that
it could be parallel to the mast. Avoid pushing and pulling the boom.
Small wind : You can pull back the pulley support for a few centimeters to easily
stretch the sail.
Strong wind : Push the pulley support towards the front for a few centimeters to
easily loosen the sail.
Réglez le palonnier de direction à votre taille
par le cordage au taquet (retendez parfois
l’élastique de rappel du palonnier (autre
taquet + à l’intérieur).
Set the foot bar/rudder according to your
height by adjusting the cord at the clamp
cleat (pull the cord to tighten up the foot bar.
Make sure your feet fit comfortably against
the foot bar).
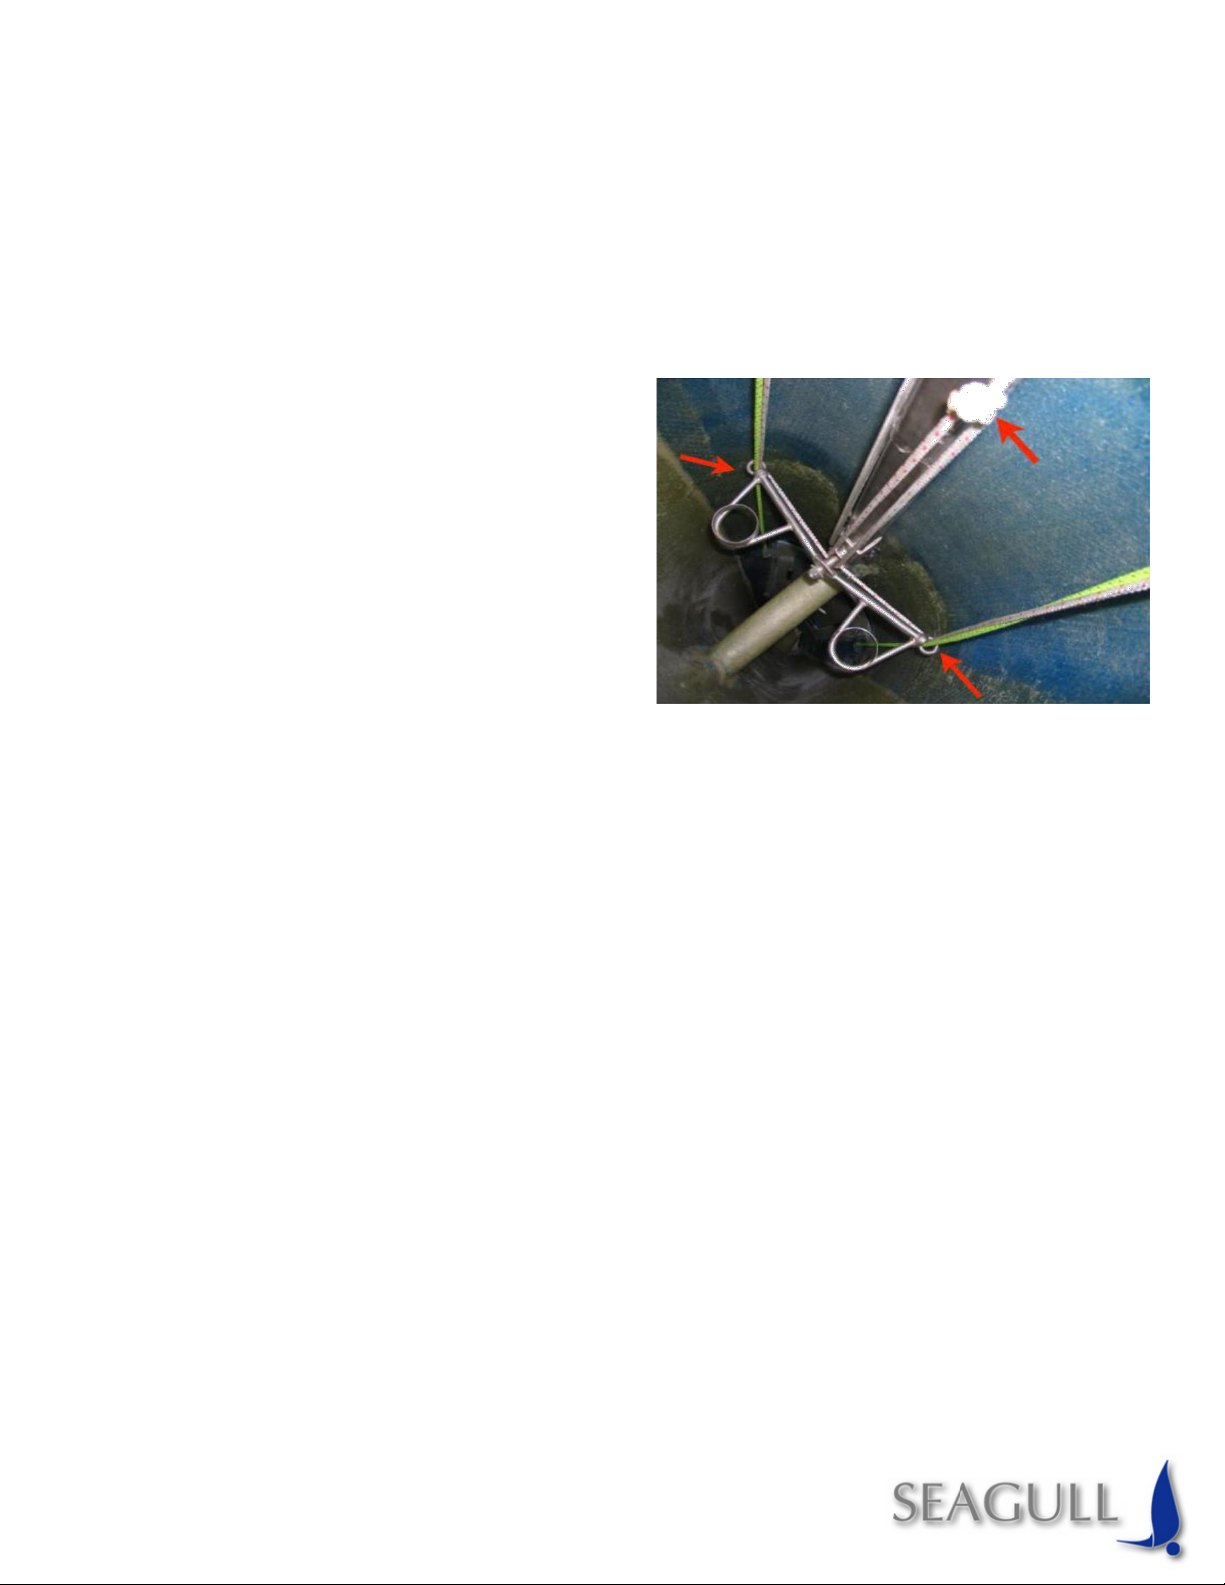
Vérifiez toujours le bon état des cordages de
direction, qu’ils soient bien protégés par le
tuyau caoutchouc transparent en sortie du
demi-volant. Par ces 2 vis « pointeaux » vous
pouvez ajuster le bon alignement du demi-
volant, du palonnier et de la roue directrice.
Faites attention à ne pas perdre les 2 petites
cales uréthane entre les vis pointeaux et les
cordages. Ces cales protègent les cordages.
Palonnier
Footbar/rudder
Taquet
Clamp cleat
2 Vis pointeaux
2 pressure screws
6
Always check the condition of the steering cordage. Make sure the rope is well
protected by a transparent rubber tube exiting the semi-steering. Thanks to this 2
pressure screws, you can adjust the alignment of the semi-steering, foot bar, and
the front wheel. Be careful not to lose 2 small chock urethane between the pressure
screw and the cord. These chocks helps to protect the cord.
Vérifiez dans la coque les endroits de
passage et de friction des cordages. Vérifiez
aussi le nœud de jonction (flèche rouge).
Retendez parfois les cordages de direction
aux nœuds à la fourche.
Check inside the hull, the passage and the
friction of the cord. Check also the node
junction (red arrows). Always retighten the
steering cords at the knots situated at the
fork.
7
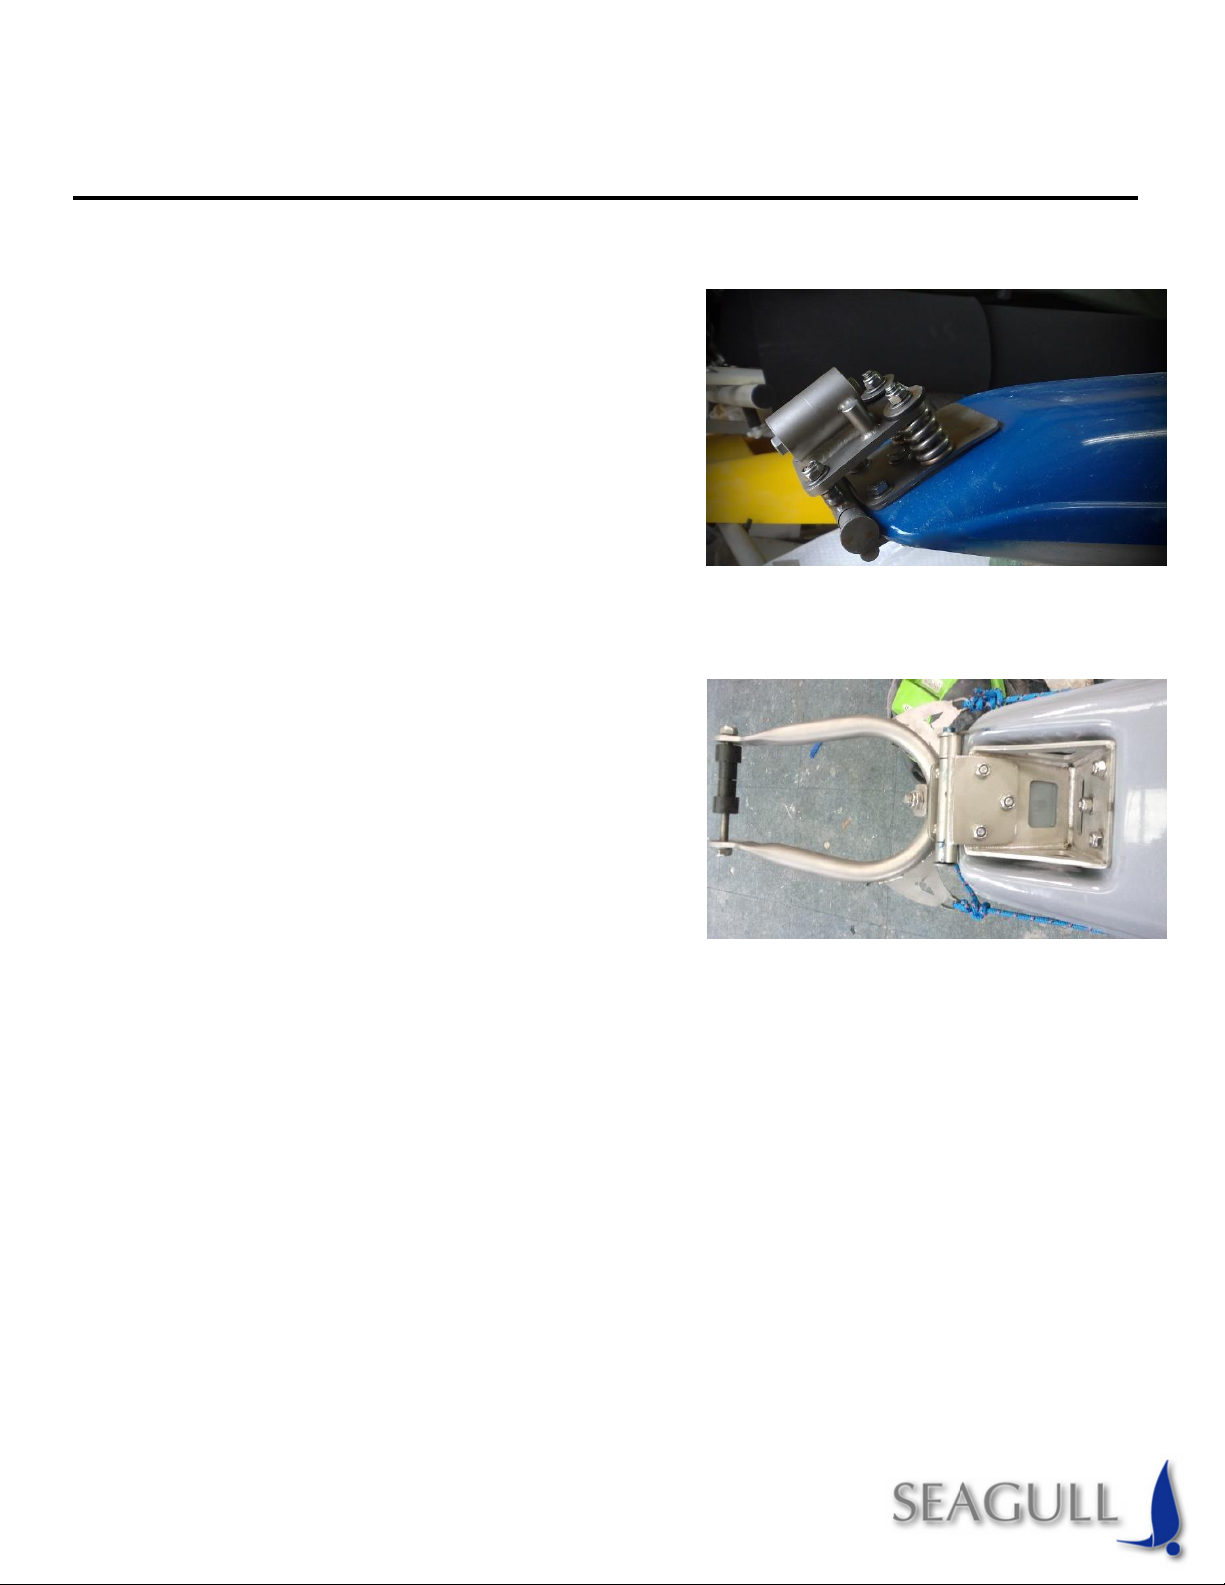
Vérifier de temps en temps le serrage des
boulons de suspension, cela permet aussi de
corriger la verticalité de la roue AV lorsqu’elle
est en ligne droite.
Check from time to time the tightening of the
bolt of suspension springs. It also allows to
correct the verticality of the front wheel.
Les axes de roues et la boulonnerie doivent
toujours être humectés d’huile ou graisse (pour
éviter le sable et le sel de sécher dans le pas de
vis).
The wheel axles and the bolts must always be
lubricated with oil or grease (to prevent sand
and sea salt to dry in the screw thread).
Faire « déjanter » le joint spi à l’aide d’une pointe ou lame de cutter (en prenant
soin de ne pas endommager le joint) et mettre quelques gouttes d’huile ou de la
graisse. Reclipser le joint par simple pression des pouces; lorsque vous désirez
changer les roulements il est alors également conseillé de changer l’entretoise.
Remove the water proof seal of the bearing using sharp object for example cutter
blade. Be careful not to damage the seal. After that put a few drops of lubricant oil
or some grease. Put back the seal and press it using your thumb to make sure it’s
fits. If you want to change the bearings, it is advised to verify the state of the spacer
tube and change it if the condition is not good.
Entretien pour longévité
Maintenance for longer lasting

8
Après le long de stockage, il arrive que le roulement soit bloqué. Si le roulement est
bloqué, mettez du dégrippant et débloquez le noyau pour remettre le roulement
en rotation. Ensuite, remplissez le de graisse remettez de joint de spi.
After a long time, it happens sometimes that the bearing is completely blocked. If
the bearing is blocked, use some penetrating oil for example WD 40. After that try
to unjam by forcing the inner ring to rotate. Put some grease inside the ball chamber
and put back the seal.
9
L’entretien de la coque en polyester :
Pour les grosses rayures, il existe le
pinceau de vernis au rayon auto. Cela
fait disparaitre des rayures
blanchâtres. Pour les zones
légèrement griffé et mattes. Un
simple polish auto mobile permettra
de retrouver la brillante origine. Pour
les accrochages opté plutôt pour les
réparations mastique et peinture en
bombe auto plutôt que du gelcoat. En
effet le gelcoat est plus difficile à
mettre en neuf pour une réparation.
The maintenance of the polyester hull:
For big scratches, you can use some varnish brush can be bought at auto shops. This
brush helps to cover and make the scratches invisible. For the zone which is slightly
scratched and mattes, car polish liquid can help to make it shiny. For the confusion
between spray paint and gelcoat, which one is better for mastic repair? Indeed
gelcoat is much harder process. But it is up to you.
10
Voile à ris = surface réductible par vent fort
Reefing = Reducing the surface area of the sail for strong wind
Défaire la bôme par la manille à l’avant et sortir l’arrière de la bôme de la sangle
arrière.
Undone the boom by releasing the sail from the front shackle and take out the boom
from the strap at the other end.
Couchez votre char à voile, défaites le nœud de têtière en de manière à baisser la
voile d’environ 80 cm, c'est-à-dire la hauteur du tissu en bas qui devra être roulée
pour réduire la surface de voile.
Lay down your land yacht, untie the top webbing on top of the mast. Pull the sail
downwards about 80cm, which is correspond to the height of the sail below that
needed to be rolled to decrease the surface area of the sail.
Comment « Prendre un ris »
How to reef

11
Maintenant, roulez les 80 cm de tissu du bas.
Suivez les instruction suivantes.
Now, roll the 80cm of the sail at the bottom.
Please follow the instruction below.
Remettez la bôme dans la sangle arrière (qui
se trouve environ 80 cm plus haut) et rattacher
la manille à l’avant, (environ 80 cm plus haut).
Re-insert the boom in the back strap which is
now 80cm higher than the original position.
Reattach the shackle in the front same 80 cm
higher than the original position.
« Repliez » le coin avant perpendiculaire à la
bordure (la bordure c’est le bas de la voile).
Fold inwards the front corner of the sail, as
shown in the photo on the right.
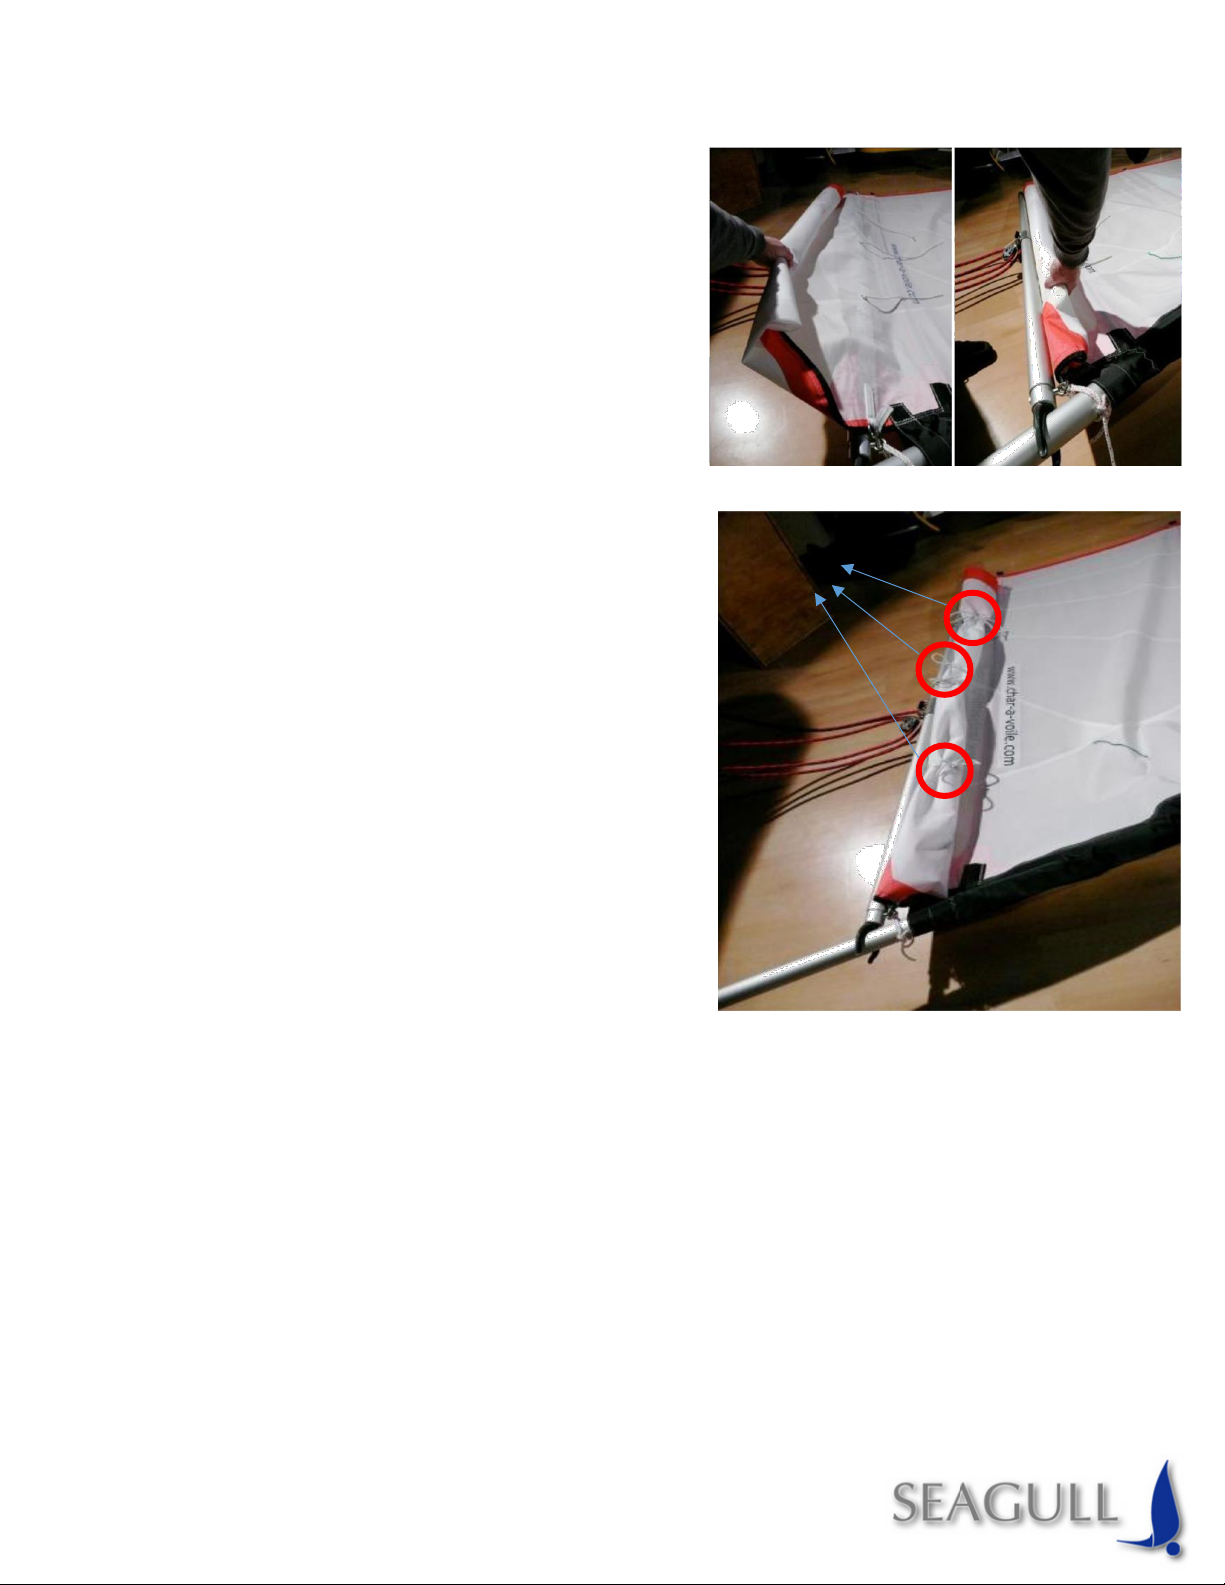
12
Ensuite roulez le tissu jusqu’à la bôme, le plus
serré possible.
Next, you need to roll the sail as tight as
possible until it reach the boom.
Serrez les 3 sandows (les élastiques), uniquement
autour du tissu, sans même y inclure la bôme.
Tie the 3 sandows around the rolled sail and not
including the boom.
Ça y est, vous êtes mieux équipé pour sortir par vent frais… mais restez vigilant,
une plus petite voile reste une voile rapide !!
Ok now you are well equipped for land yachting… But always be vigilant
because with small sail, it’s still go very fast!!
Sandow
Table of contents
Other Seagull Marine Equipment manuals

Popular Marine Equipment manuals by other brands

Hertz
Hertz Marine PowerSports HMR-3 owner's manual

Furuno
Furuno GP-1650DF Operator's manual

Bennett Marine
Bennett Marine ES2000 quick start guide

Moxa Technologies
Moxa Technologies MPC-2000 Series Hardware manual

NKE
NKE CARBOWIND HR USER GUIDE and INSTALLATION GUIDE

Simpson Lawrence
Simpson Lawrence Horizon 500 Owners installation, operation & servicing manual

B&G
B&G Zeus3 Glass Helm Operator's manual

Humminbird
Humminbird TS1-3 Operation manual

Raymarine
Raymarine SmartPilot X-5 Sport Installation & setup guide

Pyronix
Pyronix DELTABELL-WE installation guide

LASDROP
LASDROP Gen.II installation instructions

Pfannenberg
Pfannenberg DS10-SIL Instruction Manual/Safety Manual


