Seagull IV X-1F Operating manual

SEAGULL®IV X-1F
Drinking Water Purification System
NOTE: Read instructions completely before starting.
General Ecology’s X-1F drinking water purification system is designed to operate at pressures ranging from 25 to 125 psi. If pressure
surges are a possibility (municipal water supplies), install a Pressure Regulator or Surge Protector on the cold water supply line. This
system is intended to be installed to the cold water supply line, downstream of and above the cold water shut-off valve inside the
kitchen sink cabinet (see page 4). Be sure to close supply valves before installation. The Connector Hose will fit an Owner-Supplied
Connector T or our optional Saddle T Assembly or Male Run T shown on page 4. Connector branch of Owner Supplied T must have
aa
aa
a
" Male Compression Thread (
hh
hh
h
" - 24 Thread). The cold water supply line should be clean and free of construction debris. A
pp
pp
p
" to
1½" diameter hole is necessary for mounting the easily installed special Faucet furnished with this unit.
Follow steps 1through 9for installation. Steps Athrough Fare cartridge replacement instructions. An order blank is included for
assistance in obtaining replacement Cartridges. Configuration specifications are shown at the end of this guide.
Installation Instructions
INSTALLATION AND PRODUCT USE GUIDE
supersedes 200712Ax-1f-i&o
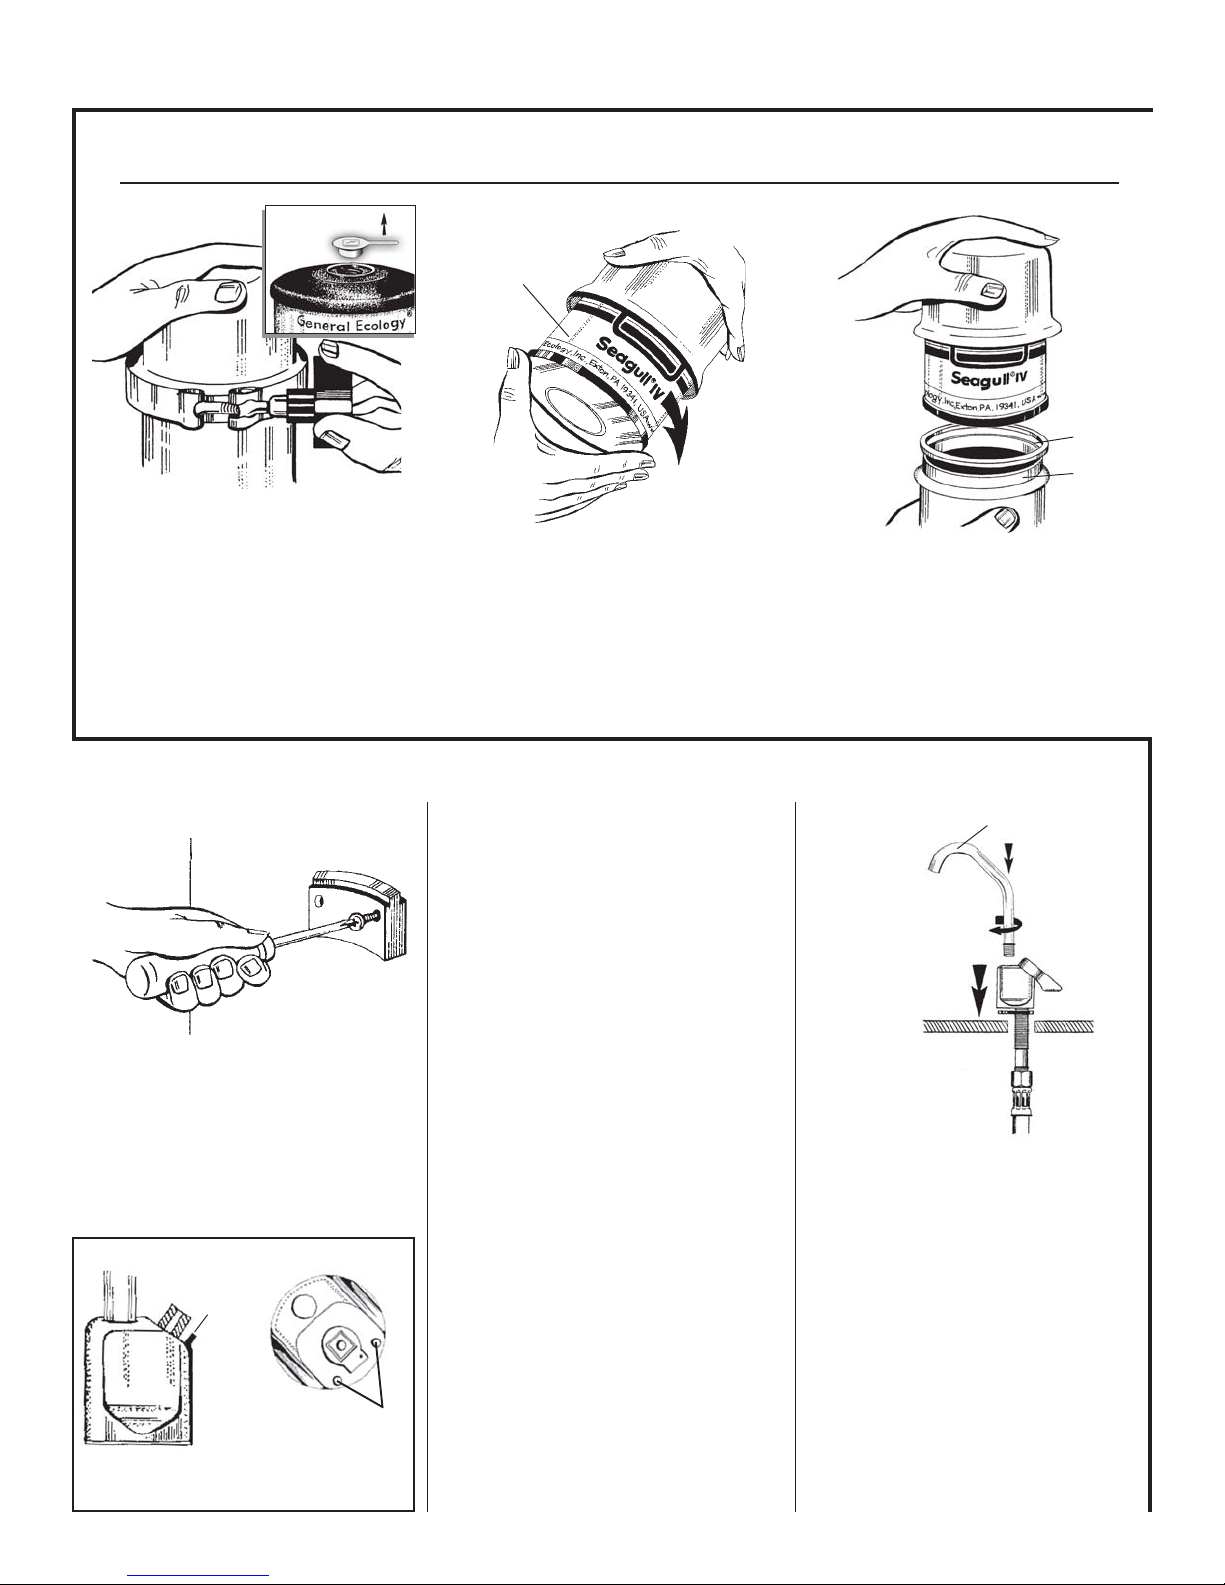
2. Install Cartridge. Thread Cartridge
(Fig.2) into top half of Pressure Vessel
(Be careful not to cross thread.) until
contact is first made with Rubber Seal.
Then tighten 44
44
4turn only. Do not
overtighten. Be sure Pressure Vessel
Flanges and Housing Gasket are clean
and free of dents, nicks or cuts.
3. Reassemble Pressure Vessel. Place
Gasket on Flange of lower half of
Pressure Vessel (Fig.3) and reassemble
V-Clamp, keeping Seagull IV logo
upright. The Wing Nut on the Clamp
shouldbe tightened snugly, by handonly.
Use no tools to tighten.
General Installation Instructions Please retain for future servicing of your SEAGULL®IV Water Purifier
Exclusive Feature — TOP MOUNT FAUCET!
6. ConnectHosedirectly toFaucet Stem
and tighten securely by hand. Do not
overtighten. Insert and thread Spout
into base, Do not over tighten
(figure 5).Drop free end of Connector
Hose through previously prepared
hole and position Faucet in hole.
Figure 4
4. Install Mounting Bracket. Position
black Mounting Bracket on the inside
wallof the sink cabinet.Usethe two Self-
Tapping Screws to securely install the
Bracket. Make sure the Bracket location
permits access to the cold water valve
location and easy access for Cartridge
changes.
To change “pull direction” of handle
To change “pull direction” of handle on faucet,
lift handle off stem and reposition stainless steel
pin to alternate location. Reinstall handle.
Stainless
steel pin
Place Pin on right
or left side
5. Install Faucet. The X-1F is furnished
with General Ecology’s exclusive “Top
Mount” Ceramic Disc Faucet. If a
suitable hole isn’t available, prepare a
¾" hole to install your faucet. Cut out
Mounting Pattern supplied on page
number 6 and use for rough positioning.
Tape pattern in place, then for final
positioning place Faucet on pattern on
top of sink and check for correct position
of faucet body, spout and lever. Make
sure of clearance, above and below sink
before drilling mounting hole. Porcelain
sinks require special care. For best
results we suggest you contact your
dealer or others with experience in
making cutout in porcelain sinks. We
have had good success with the
following procedure. First cover the area
being penetrated with masking or duct
tape and from beneath drill a d" pilot
hole upward...a ¼" hole and then a g"
hole and finally the ¾" hole necessary
to mount the faucet. For man-made and
stone products consult counter top
manufacturer’s guidelines. For stainless
steel sinks use a “Greenlee” type punch/
die tool. If you do not have a “Greenlee”
punch and are installing on stainless,
follow the same procedure as on
porcelain/cast iron sinks. Be sure sink
ledge at drill hole is “flat” and burr free.
2
Housing
Gasket
Flange
Figure 3
Cartridge
Figure 2
Figure 5
threaded
spout
Figure 1
1. OpenCanister.Remove V-Clamp and
separate Pressure Vessel upper and
lower halves.
2. Remove Cover. Remove small plastic
protective cover from your new
cartridge by pulling the tab end up
(Fig.1a).
V-Clamp
1a
Preliminary: If needed purchase from local hardware store and install Connector T or Saddle Valve
with a" compression outlet in cold water supply line.

Inlet Line
Outlet Line
Figure 6Figure 7
Cartridge Replacement Instructions
7. MountFaucet. Slideopen side of Faucet
Mounting Nut onto reduced diameter,
un-threaded section of Faucet Stem now
beneath the sink, and slide the Nut
upwards to contact the threads. Then
carefully engage the threads, being
careful to not cross thread. Hand tighten
as necessary to hold the Faucet in place,
but do not use tools and do not
overtighten. Check alignment and
position of Faucet, and adjust as
necessary. (We suggest you practice
threading the Nut to the Stem above the
sink, prior to the actual installation, to
become familiar with the method before
installing Faucet to sink.)
8. ConnectInlet andOutlet lines.Connect
free end of Thermoplastic Connection
Hosefrom Faucet Stemto Outlet (center)
Port on the Pressure Vessel. Tighten
securely. Do not overtighten. Connect
remaining Hose from fitting on cold
water supply line to Inlet (outside) Port
on top of Pressure Vessel. Do not
overtighten.
All Seagull®IV X-1 units employ a RS-1SG Cartridge. The rated average capacity for the RS-1SG
Cartridge is 1,000 gallons. Actual capacity will vary depending on operating conditions and the quality
of the water source. Cartridges should be replaced when the flow rate decreases or when foul tastes or
odors become apparent (evidence of extra heavy loading of sulfur, tannin, iron or contamination), or
annually otherwise. Installing a Cartridge is easily accomplished as follows:
A. Close cold water supply valve.
B. Open X-1F Faucet, and keep it open
until new Cartridge is installed and
operating.
C. Removeunit from Mounting Bracket,
place over a large sauce pan or other
container, remove V-Clamp and drain
loose water from Pressure Vessel. (If
PressureVessel halves remain attached
due to “set,” pull apart manually or
momentarily allow a small amount of
water to flow into the unit with the X-
1F faucet closed to separate the halves.
If X-1F faucet is closed, be sure and
reopen before continuing with next
step).
D. Remove expended Cartridge by
placing plastic bag over it and turning
counter clockwise. Close bag and
discard. Rinse inside of Pressure Vessel
9. Mount unit on Bracket by placing the
V-Clamp over the raised section on top
of the Bracket. Open the X-1F Faucet to
allow air to exhaust slowly. Open Valve
on cold water service line. Check for
leaks. Allow water to run for several
minutes to clear line and system of air
and any loose materials. Please note that
for the first few days you may see
entrapped air bubbles within the water.
This is perfectly normal and will cease
after the unit has processed several
gallons of water. Also, some black
“fines”from inside ofcartridge may flow
with the first few gallons of water.These
are harmless, if consumed, or may be
discarded.
Figure 8
3
Inlet Line
connects
to Cold Water
Supply.
Outlet Line
connects to
Pure Water
Faucet.
QUESTIONS?
Call 1-800-441-8166
for Customer service
with water and wipe clean with paper
towel Be sure thick White Rubber
Cartridge Seal is bonded in place inside
the top of the unit.
E. Align carefully, and being careful not
to cross thread, thread new Cartridge
into place UNTIL CONTACT IS
FIRST MADE WITH SEAL, THEN
TIGHTEN ONE QUARTER TURN
ONLY. DO NOT OVERTIGHTEN.
Please refer to Step 2 and Figure 2.
Reassemble the two stainless steel
halves together, making sure the
rubber Housing Gasket is in
place between the two halves.
IMPORTANT: Make sure Gasket is
not cut or nicked, and be sure
housing has not been dropped or dented
on either of the two mating halves.
F. Refer to Step 9 to place unit back in
service.
HELPFUL
HINTS
Ifyouhavedifficultyseparatingtheupperand
lower halves of the pressure vessel, water
pressure can help. Turn off cold water supply;
remove the V-clamp and close the pure water
faucet. With a pan ready to catch water from
theunit, slowly turnonthewatersupply.Once
the unit begins to separate, turn off the water
supply and proceed according to your
InstallationandOperations instructions.
You may apply a light coating of petroleum
jelly to the housing gasket to assure ease of
openingandclosingofthesystem.
Whenanewcartridgeisputintoservice,you
may see air bubbles and black particles in the
wateruntilthesystemhasstabilized.Theseare
harmless and will be purged from the system
within the first few liters or quarts of water.

1 Female Compression Thread 2 800344
a"Braided Connector Hose
2 Mounting bracket with 2 1 700063
Mounting screws
3 Purification 1 788000
Cartridge RS-1SG
4 X-1 Pressure Vessel 1 N/A
5 Housing Gasket 1 710540
6 V-Clamp for Housing 1 710534
7 Wing Nut for V-Clamp 1 710032
8 Faucet, FP threaded 1 707206
9 Faucet Mounting Nut 1 707106
Optional Accessories Not Included
No. Description Qty. Part No.
SEAGULL®IV X-1F System Parts List
If unable to locate a dealer, cartridges and other parts may be ordered by mailing this form, or fax to our 24
hour fax order line (610) 363-0412 (Please include a daytime phone number.) You may also call 1-800-441-8166
between 8:00 AM - 4:30 PM ET. Please supply the information requested below. No P.O. Boxes, please. U.P.S.
shipping charges and state taxes will be added where applicable.
Convenient Order Form
Name: _________________________________________
Address: _______________________________________
City: __________________________________________
State: ________________________ Zip:___________
Phone: (________ ) ______________________________
Please Print
(Circle One)
Charge my: VISA MasterCard American Express
Part No. Item Quantity
Send To:
GENERALECOLOGY, INC.
151 Sheree Blvd.
Exton, PA 19341 U.S.A.
www.generalecology.com
Expiration Date Signature 4
Manufactured by General Ecology, Inc., Exton, PA 19341
Made in U.S.A.
visit our web site and Order Online at www.generalecology.com
must be filled in
items within
dotted line are
included with
X-1F Purifier
Female a"Stainless Steel
Compression Cap Nut with
Gasket 800349
a"x a"x a" Stainless Steel
Compression T 714358
Seagull®IV X-1D Water Purifier
Diverter Configuration - Ideal for apartments,
condominiums or rental properties.
The Seagull IV X-1P configuration has a double acting pump for more water
with less work. Field serviceable pump disassembles for easy cleaning and
permitsthe X-1P water purifier tobe used with gravity feed assistance systems.
"Quick Disconnect" is identical to X-1D configuration for quick and easy
interchangeability.
Easy to install, easy to use. Simply remove aerator from standard kitchen
faucet and connect diverter valve. Attractive "Quick Disconnect" fitting
provides swivel movement of the connector hose, routed at right angles for
easy positioning and less clutter.
Our X-1D configuration includes two adapter bushings, enabling the diverter
to fit approximately 95% of the faucets made in the USA and many overseas.
Seagull®IV X-1P Water Purifier
Manual Pump Configuration - Ideal for camping,
emergency preparedness, and cottages,
anywhere pressurized water is not available.
5
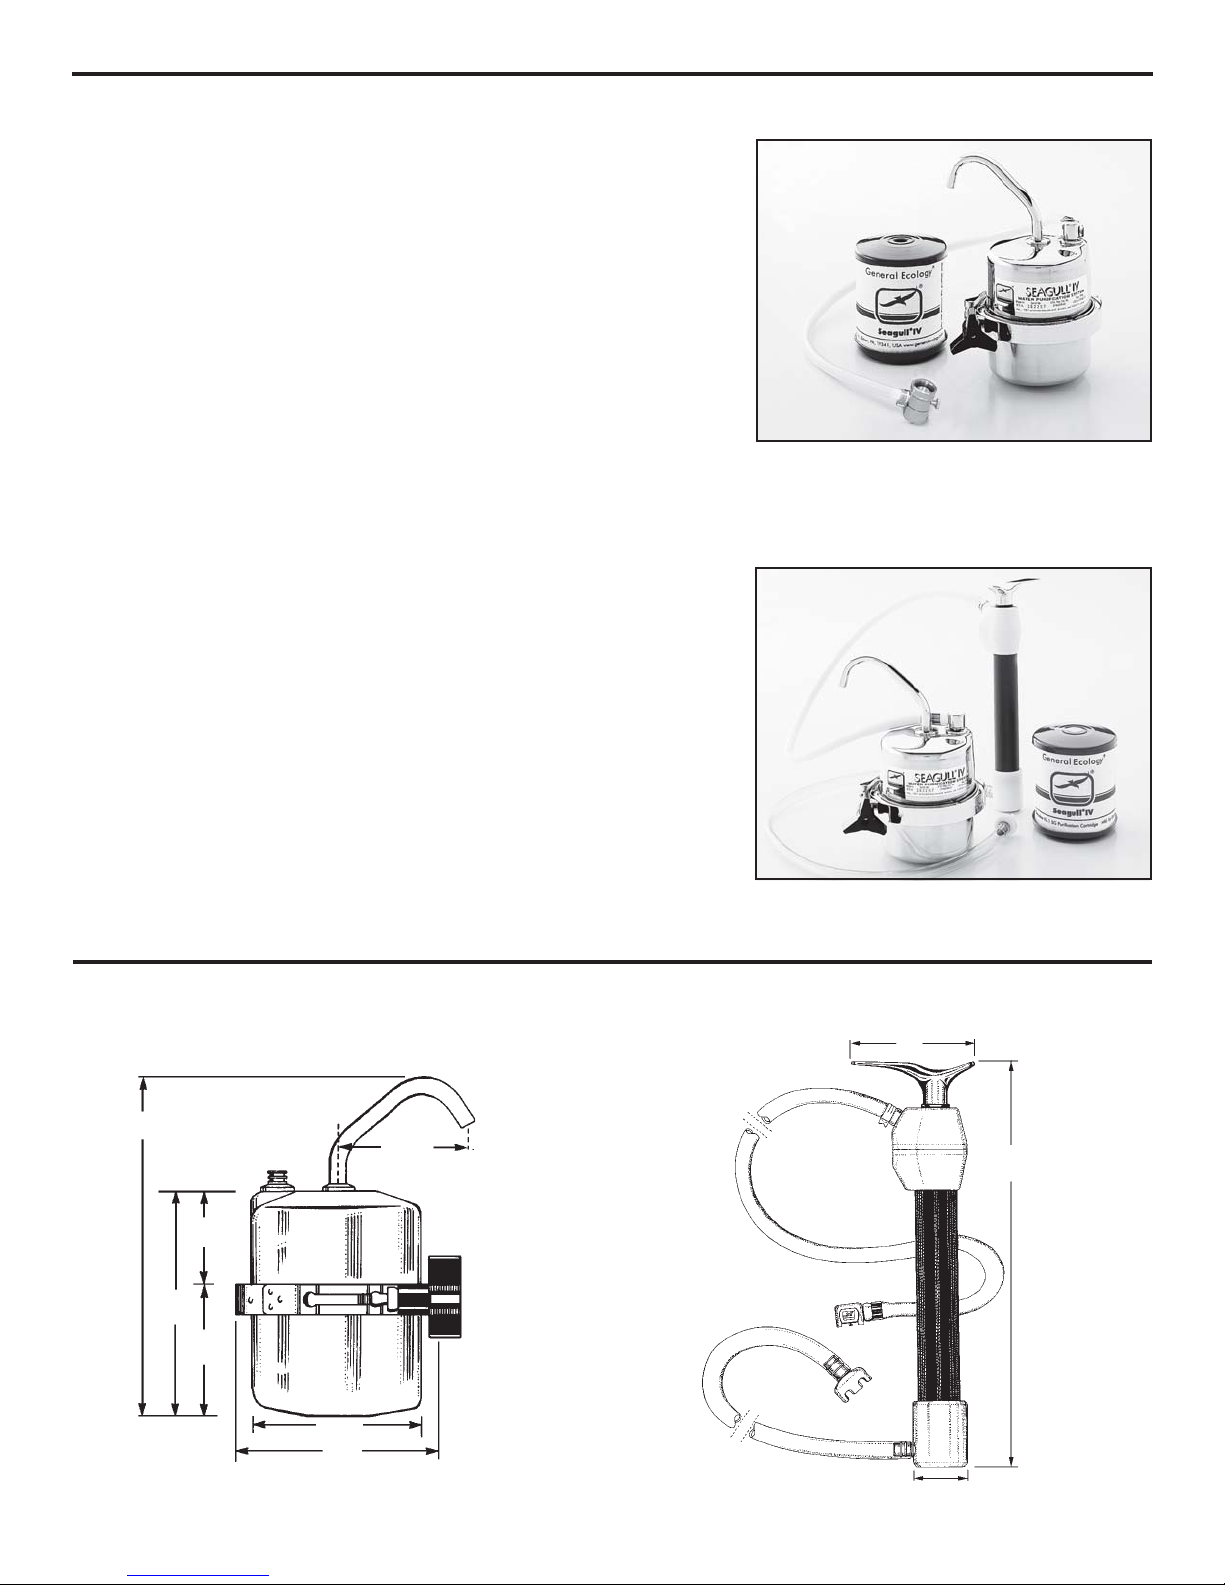
Dimensions of SEAGULL®IV X-1D Vessel and X-1P Pump
4.1"
(10.5 cm)
5"
(12.7 cm)
2.9"
(7.3 cm)
5.4"
(13.7 cm)
2.5"
(6.4 cm)
8.9"
(22.6 cm) 3.5"
(8.9 cm)
1.3"
(3.2 cm)
3.5"
(8.9 cm)
10.5"
(26.7 cm)
X-1P PUMP
X-1D/X-1P PRESSURE VESSEL

1.9"(4.8 cm)
FP FAUCET
PART NUMBER
Chrome 707203
.725" (1.9 cm)
7.4"
(18.8 cm)
6.0"
(15.3 cm)
2.1"
(5.3 cm)
4.1"
(10.4 cm)
Cutoutfaucetbasepatternanduseforroughposition. Tapepattern
in place. Then, for final positioning, place faucet on pattern on top
of sink and check for correct orientation of faucet body, spout and
handle. This final positioning is needed before making your
installationhole.
It is important to note control handle position and “throw” to
insure adequate clearance.
Alsonotethe“swingfeature”of the faucet’sspoutthatallowsmany
different mounting options.
Make sure of all clearances above and below sink before drilling
mountinghole.
Mounting Hole Pattern for
FP Faucet
PATTERN OF BASE OF FP FAUCET SHOWING HOLE
LOCATION (ACTUALSIZE)
Faucet Care Instructions
AllGeneral Ecology,Inc. purifiers featureleadfreeports and faucets.
Faucets are manufactured with the finest components available.
However, they require proper care to keep them looking their best.
If properly cared for, these finishes can provide a lifetime of elegance.
Chromefinishescanbe damaged by abrasive cleaners, inspiteoftheir
hardness. To clean faucet surfaces properly, use a small amount of a
non-abrasiveliquiddetergentandasoftwetcloth.Gentlyrubthesoiled
surface until the dirt is removed. Then rinse clean and wipe with a dry
soft cloth to remove water drops and to prevent spotting. Do not use
any abrasive or pumice type cleansers to clean the surfaces of these
faucets,oryoumaypermanentlyscratchorotherwisedamagethefaucet
coating. Hard water may leave mineral deposits or “water spots”. If
not cleaned regularly, these deposits may resist cleaning with simple
liquiddetergents.These can usuallybe removed using asmallamount
ofvinegarapplied directlyandrubbingwitha softcloth.Heavydeposits
may require repeated applications.
© 2004 General Ecology, Inc. • ®, ™ Trademarks of General Ecology, Inc. • All health claims not in accordance with local or state laws are hereby withdrawn. • 200712 revB 9/07
SEAGULL®IV X-1F Positioning and
Dimension Information
1.9" (4.8 cm)
Base Diameter
.75" (1.9 cm.) Hole Diameter
6
Other Great Products Available
from General Ecology, Inc.
(610) 363-7900 • fax (610) 363-0412 • www.generalecology.com
2.9"
(7.3 cm)
5"
(12.7 cm)
4.1"
(10.5 cm)
5.4"
(13.7 cm)
2.5"
(6.4 cm)
X-1F PRESSURE VESSEL
AS9100, ISO 9001 and FAA Quality Certified PMA Manufacturer
Table of contents
Popular Water Filtration System manuals by other brands


Unilever
Unilever pureit CR5240 instruction manual

Aqua Optima
Aqua Optima Compact Instructions for use

Jandy
Jandy JS Series Installation and operation manual

DeVillbiss Air Power Company
DeVillbiss Air Power Company DAD-504 quick start guide

Wasserhaus
Wasserhaus 12220 manual

Netafim
Netafim SANDSTORM installation manual

REXENER
REXENER Mass Filter Installation and maintenance manual

Vision Aqua
Vision Aqua Verdanium Geo instructions

Kenmore
Kenmore RO-550 owner's manual

Pacific Sun
Pacific Sun AR-PRO S manual

Schmalz
Schmalz STF Series Operating and maintenance instructions

BWT
BWT PERMAQ compact 4 Fitting and operating instructions