Seak LUMiCHARGER User manual

Quick Installation Guide
for Electric Vehicle Charger
LUMiCHARGER
LUMiCHARGER is electric vehicle charger, which can be installed as stand-alone
EV charger (one or two sockets), wallpoint EV charger or EV charger sockets
integrated into public lighting. LUMiCHARGER can work independently or
communicate with Seak lighting control system to negotiate the power available
for electric vehicle (EV) charging. During the day, street lighting remains in
standby mode and we use full line capacity for EV charging. At night part of line
capacity is used for lighting and the rest for cars. Further, the power saved by
dimming of luminaires is used to increase the charging rate we can deliver to
the EVs.
Introduction
1 Mounting
Thread the connection cables from the bottom through the column upwards
through the cable opening. We recommend that you place the stand-alone
charger on your own base as shown below.
Dimension in mm
4 Connect voltage supply
The 3F + N + PE cable type is used for installation, shielded cables are optional if
required by local law. The optional cable shielding must be attached to the PE
Rail at both ends of the cable. Shorten the connection wires to the appropriate
length (as short as possible). The protective conductor PE must be longer than
the other conductors!
1 Safety notes
Electric installation a must be hardwired to an existing domestic installation and
comply with the applicable national regulations. Local company is responsible
for design and installation according to local regulations.
Not observing the safety instructions can result in risk of death,
injuries and damage to the device! The device manufacturer
assumes no liability for resulting claims!
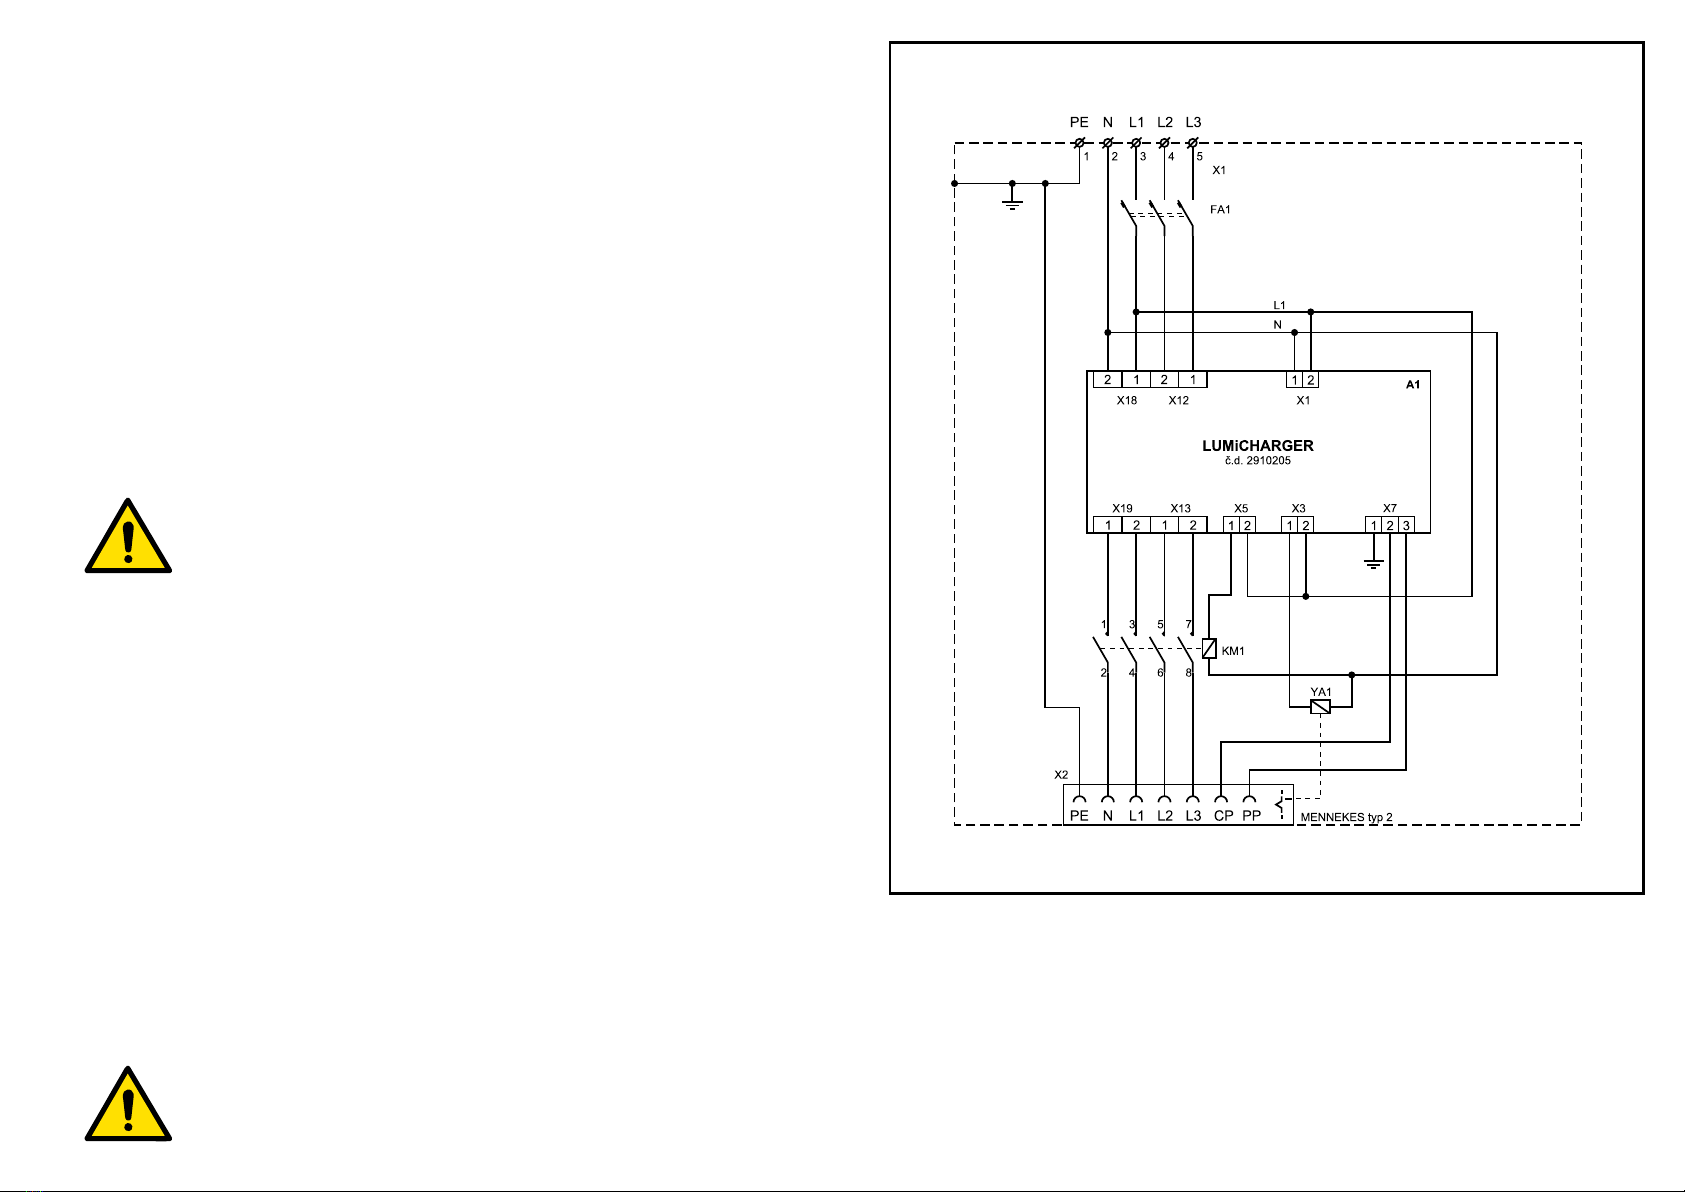
2 Power supply
The electrical connection should be led over the prepared concrete base with
sufficient reserve to connect the charger.
The power line with the EV chargers must be equipped with appropriate circuit
breakers and a current protector. LUMiCHARGER has a built-in current protector
function to temporarily disconnect single charger only and provide extra level of
protection. However, a standard RCD needs to be also installed on the line. Seak
recommends following types with parameters: Rated Current - 25 A, Rated
Residual Current - 30 mA, A type, 4-poles
3 Prepare cable insertion
Place the charging station on a stable surface. Open and unlock the door of the
charger and insert the cable glands into the corresponding cable insertion
openings and insert cable openings on the bottom side.
Make sure the main switch of the power supply group for the
product is set to the OFF position. Do a voltage check to make sure
there is no electrical power on the cables or on the system.
LUMiCHARGER is electric vehicle charger, which can be installed as stand-alone
EV charger (one or two sockets), wallpoint EV charger or EV charger sockets
integrated into public lighting. LUMiCHARGER can work independently or
communicate with Seak lighting control system to negotiate the power available
for electric vehicle (EV) charging. During the day, street lighting remains in
standby mode and we use full line capacity for EV charging. At night part of line
capacity is used for lighting and the rest for cars. Further, the power saved by
dimming of luminaires is used to increase the charging rate we can deliver to
the EVs.
Introduction

5 Connect PE of power cable
Cut the PE wire of the power cable to the correct length to reach the PE
connector. Use wire stripper pliers to remove 20 mm of the insulation from the
end of the PE wire. Attach a cable lug to the end of the PE wire. Loosen the bolt of
the PE connector. Attach the PE wire onto the PE connector and tighten the bolt.
6 Connect power cable
Cut the 3 phase, neutral wire of the power cable to the correct length to reach
the connectors. Use wire stripper pliers to remove 20 mm of the insulation from
the ends of the wires and attach the cable lugs. Insert the flat-head screwdriver
(5.5 mm) into the supply terminal as shown. The screwdriver must rest on the
housing. Press the screwdriver straight into the terminal until the contact opens
completely. Insert connection wire into the designated terminal opening. Pull
out the screwdriver straight.
7 Commissioning preparation
Before commissioning, all construction parts must be completed, as well as the
mounting of the charger and its connection. The owner of the charging station is
obliged to provide for a review of the charger in accordance with valid legislation.
The expert review is carried out by persons with professional competence to
perform the inspection of electrical equipment with qualification in accordance
with STN 33 1500 and with Coll. of Law. 508/2009.
8 Technical information
Parameter
Value
Input voltage
AC 3x230 V
Total maximum output power
22 kW
Maximum output current
3x32 A
Own consumption
max. 11 W
Communication interface
2-way powerline QM-50-SSI3 (asynchro)
Operating ambient temperature
-25 °C ~ +50°C
IG_291_LUMiCHARGER_220219
Specifications subject to change without notice
Copyright © All rights reserved www.seakenergetics.com
Popular Batteries Charger manuals by other brands


Solio
Solio Mono quick start guide

Elo TouchSystems
Elo TouchSystems M50 Quick installation guide

PowerBase
PowerBase C-521 user manual

Phoenix Contact
Phoenix Contact EV-T2MBIE12 ACDC-20A125A INFRA Series Safety, installation and operation notes

Intermec
Intermec AC1 quick start guide

Turnigy
Turnigy ACCUCELL-6 operating manual