Seal One 7300pro User manual

Seal One®7300pro
User manual

1 General
1.1 Seal One®– Security for Business Transactions
Congratulations for choosing a Seal One® device. To maximize its benets, please read the user manual
carefully before using.
1.2 Secure Authorization of Online Transactions with Seal One®
The Seal One® technology combines maximum security with effortless ease of use for the very rst time.
All Seal One devices are developed to authorize transactions through the use of digital signatures (e.g.,
as part of online / mobile banking or payments). Through a secure connection via USB or Bluetooth to a
compatible device with an internet connection, the Seal One 7300pro presents transactions on its own
display and lets you authorize them by the push of a button.
Please pay special attention to the following security advisory:
Always carefully review the transaction data on the device’s display before you authorize them by
pressing the button.
When connected via USB, the Seal One 7300pro is ready for immediate use (without additional software
installation) and offers comprehensive protection against viruses, trojans, phishing attacks, and other
types of malware during transaction authorization.
To use with Bluetooth on PC or with mobile devices, you will need the Seal One companion app. For
more information, see the instructions detailed in section 5.
The Seal One devices are compatible with all major operating systems, including many versions of
Microsoft® Windows, Mac OS®, Linux, Android, and iOS. For a complete, up-to-date listing of supported
operating systems, see https://www.seal-one.com/os.
1.3 Operation of the Seal One devices
The operation of Seal One 7300pro is simple, convenient and secure. After enrolling with an acceptance
partner, you can authorize a transaction following these 3 steps:
1. Connect: Turn on the device and connect to your mobile device or PC via USB or Bluetooth
after initiating a transaction from within an acceptance partner’s application.
2. Review: Validate the transaction data displayed on the device.
3. Conrm: Conrm the transaction by pressing the approve button (1 second).
1.4 Buttons of Seal One 7300pro
approve
ON / OFF
cancel
display
USB / charge
display previous / next

Approve: The button is used for 2 functions.
1. When transaction is displayed on the device.
Meaning: Approve transaction (pressing for 1 second)
2. When the connection is established and there is no transaction.
Meaning: Appeare Seal One ID (hold for at least 3 seconds until Seal One ID is displayed)
Display prevous / next:
Meaning: The information on the display is scrolled up or down.
(Button has no function for voice output)
Cancel:
Meaning: Cancel e.g. cancel transaction.
2 Enrollment with an acceptance partner
2.1 Seal One acceptance partner
Where can I use my Seal One device?
Seal One devices can be used in conjunction with any acceptance partner
of Seal One AG. An acceptance partner will indicate its partnership with
Seal One AG using the Seal One Acceptance Logo:
You can nd a list of acceptance partners at: https://www.seal-one.com/partner
2.2 Enrolling the Seal One device with an acceptance partner
The Seal One 7300pro must be enrolled with an acceptance partner prior to use. Since this process may
differ from one acceptance partner to another, we kindly ask you to follow the instructions outlined by the
respective partner.
Please contact the Customer Service of the acceptance partner should any questions or concerns arise
with regards to the enrollment of the Seal One device within their application.
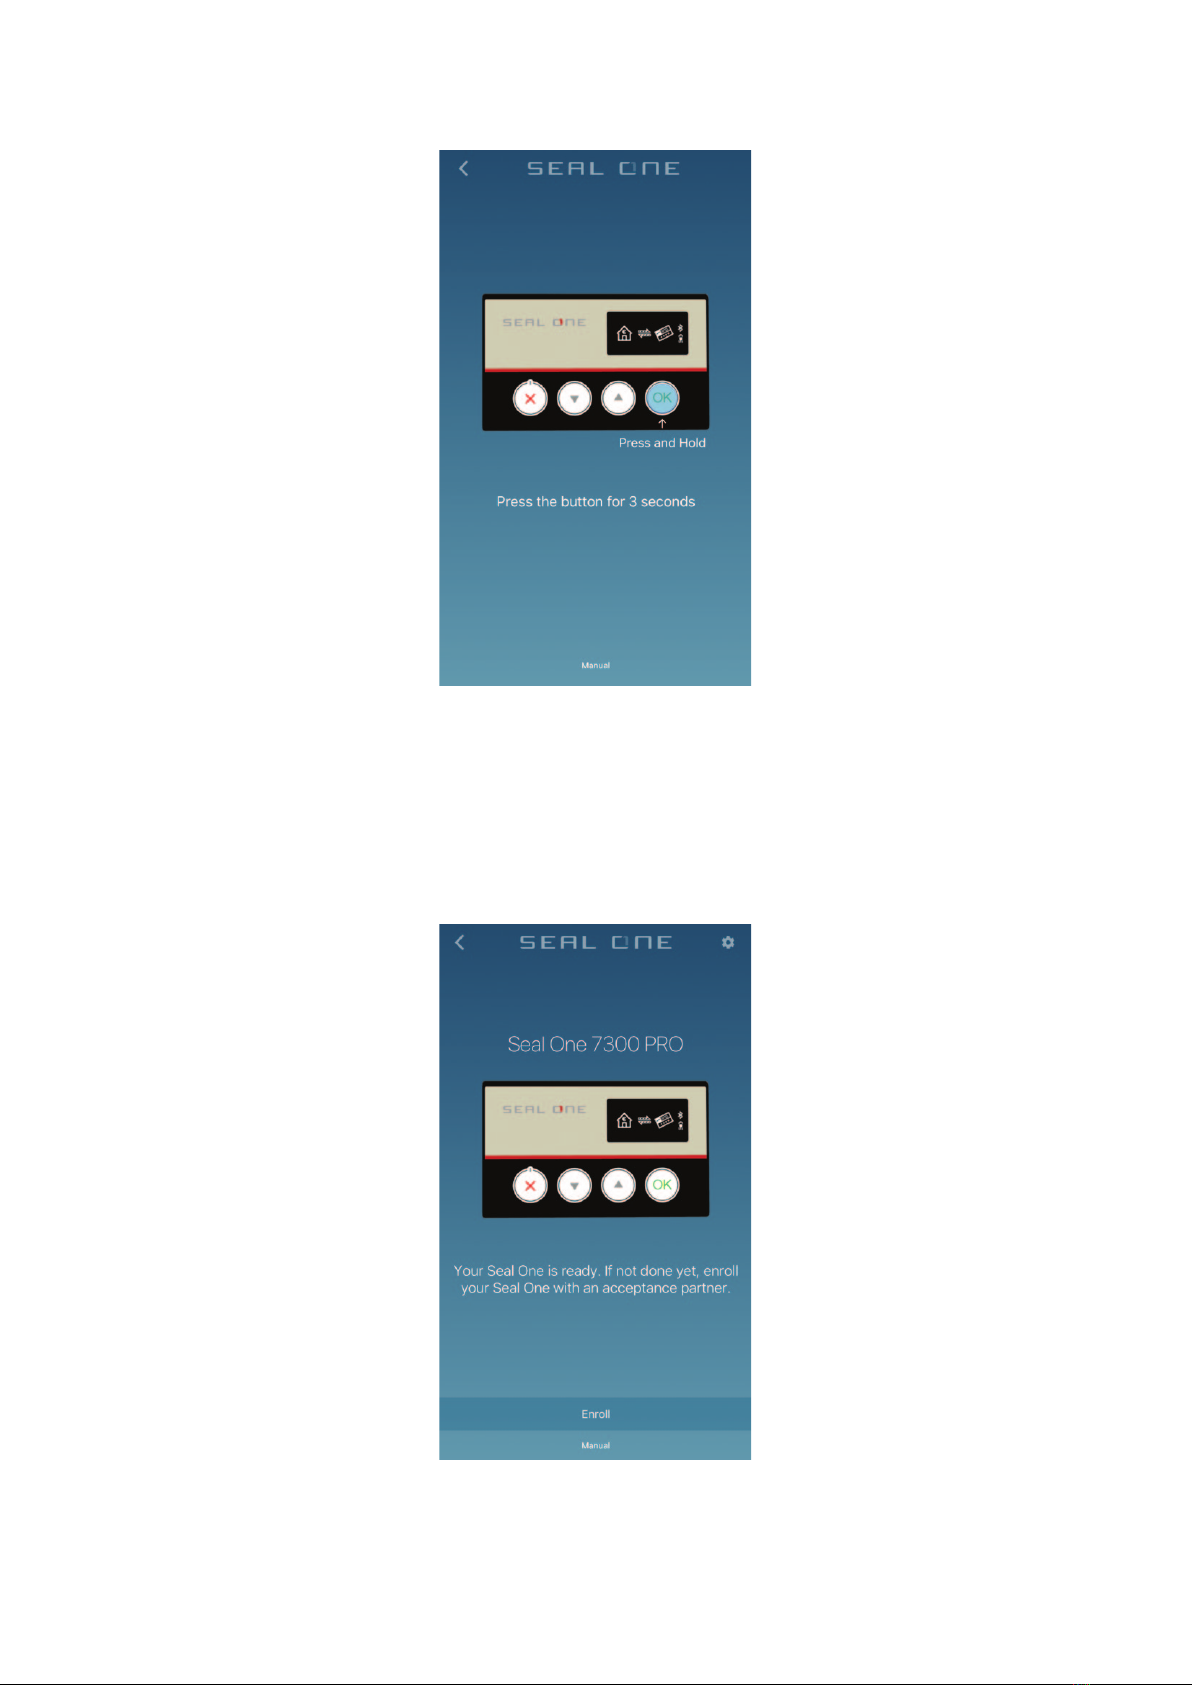
2.3 Display of the Seal One ID
The Seal One ID is needed in order to enroll the Seal One device with an acceptance partner. To see it on
the display, complete the following steps:
1. Make sure that there is no transaction displaying on the device
and that you see the following:
2. Press and hold the authorize button on your Seal One device for at least
3 seconds until you see the Seal One ID appear on the display.
The Seal One ID is shown in 3 blocks of 5 characters as exhibited here:
N.B: The following letters are NOT used: I (India), M (Mike), O (Oscar), W (Whiskey).
!

Display Description
The Seal One logo is shown on startup of the Seal One device. If the logo remains
permanently on the display during startup, the USB port on your PC is most likely
blocked or malfunctioning. In this case, please use the supplied Micro-USB cable
and / or another USB port on your PC. If the problem persists and you are using
a company PC, please contact your System Administrator (the Seal One device
might have to be specically unlocked based on USB Vendor / Product ID).
The Seal One 7300pro has established a USB connection to the PC, but the
Seal One companion application has not yet been started. Note: No CD is
required to start the application. For more information, please see Section 4.1.1
After the device is turned on, the Seal One 7300pro will attempt to connect via
Bluetooth to your mobile device. Note: The arrows are ashing. Make sure you
have installed the companion app on your mobile device and Bluetooth is ena-
bled. Alternatively, connect the device to your PC via USB (using the supplied
Micro-USB cable).
If a connection via Bluetooth is established, the Bluetooth icon will be shown in
the upper right corner.
An active bluetooth connection has been established, and the Seal One 7300pro
is connecting to the Internet. Note: the arrows are ashing.
The Seal One 7300pro is connected via Bluetooth to a device with an active inter-
net connection and is ready for use.
Note: The dots on the arrows are running in opposite directions.
There is no connection between the Seal One 7300pro and the internet.
Please check if you have an active connection to the internet.
Note: The warning sign is ashing.
The battery icon shows the charge level of the battery. Use the supplied
Micro-USB cable to charge the device.
The device is connected with a power supply and is charging.
The Seal One ID is needed to enroll with an acceptance partner. It will show when
you press and hold the authorize button for at least 3 seconds. As soon as your
Seal One device is successfully registered, it changes to the mode „ready to use“
Note: In case you want to discontinue displaying the Seal One ID without enrolling
with a partner, push the button for at least 3 seconds once more.
This text indicates an internal device failure. Switch off the device and turn it on
again. Note: If this message icon continues being displayed regardless of any
actions taken, please write to the following contact address:
The Seal One 7300pro device turns off after a few minutes of continued inactivity.
Using Bluetooth: Turn on the device. If this is not possible, charge it with the
supplied Micro-USB cable.
Using USB: If a transaction arrives while the device is in this state, the power
saving mode is automatically terminated and the transaction data is shown.
For more information visit: https://www.seal-one.com/service
3 Symbols and their meaning

4 Seal One Usage
4.1 Seal One 7300 pro with Windows
Step 1: Make sure that your PC is connected to the internet.
Step 2: Download and start the Seal One application:
https://www.seal-one.com/7300pro
A setup wizard will appear on application startup when no known devices are detected.
Alternative:
Connect the Seal One 7300pro to an available USB port on your PC and start the application on the
virtual CD drive (no actual CD is needed).
The device will display the following symbols one after another as shown below:
If the CD icon continues to show (e.g., because auto start is
disabled), you need to start the Seal One application manually.
Refer to section 4.1.1 for more information.
!

Step 3: Follow the instructions on the setup wizard to connect your Seal One 7300pro via USB or
Bluetooth.
N.B. If you do not see the option to connect via Bluetooth at this point, your computer or operating
system does not support Bluetooth LE (Low Energy). In this case, you must connect the Seal One device
to your PC via USB.
Once you have successfully established a connection to your PC via Bluetooth or USB, you will be
directed to a screen informing you that your Seal One is ready for use.
The following message will appear on the display of your Seal One device.
Note: The dots on the arrows are moving.
4.1.1 The CD symbol remains permanently on the display of the Seal One:
By default, the application launches directly from the Seal One device when you connect it to your PC via
USB. When the application does not start automatically after connecting via
USB (e.g., auto start is disabled), you must start the application manually.
Open Windows Explorer using the Explorer icon in the taskbar, or press the following two keys on your
keyboard at the same time:
The Seal One 7300pro is mounted as a virtual CD-ROM. Start the program by double
clicking the application icon labeled “SealOne”.
+E
or

4.1.2 Settings
The settings for your Seal One device are managed under the “Settings” menu option
(click the tray icon to display the full menu).
N.B. It is possible that the Seal One tray icon is hidden until you click the Up arrow to show all tray icons.
Available settings include changing the device’s name, adding / removing devices, and enabling
Quick Start.
4.1.3 Zoom Display
If the default font size of the displayed data on the Seal One device’s screen is too small for you, you
have the option to enlarge the font size. You can enable / disable display zoom
via the “Zoom Display” menu option of the tray icon.
4.1.4 Proxy-Server
By default, the proxy setting is “Automatically detect proxy settings for this network”. Normally, you
should not need to change this setting. In exceptional
cases, you may manual congure the
Proxy settings here.
If you have any questions with regards to Proxy settings,
contact your System Administrator.
When lines larger than the screen size are displayed, the font will be displayed as a horizontally
scrolling ticker.
!

4.2 Seal One 7300pro with Mac OS
Step 1: Make sure that your Mac is connected to the internet.
Step 2: Download and start the Seal One application.
https://www.seal-one.com/7300pro
A setup wizard will appear on application startup to help you set up your Seal One 7300pro.
Alternative:
Connect the Seal One 7300pro to an available USB port on your Mac and start the application on
the virtual CD drive (no actual CD is needed).
The device will display the following symbols one after another as shown below:
If the CD icon continues to show (e.g., because auto start is
disabled), you need to start the Seal One application manually.
Refer to section 4.2.1 for more information
!

Step 3: Follow the instructions on the setup wizard to connect your Seal One 7300pro via USB or
Bluetooth to your Mac.
N.B. If you do not see the option to connect via Bluetooth at this point, your Mac or operating system
version does not support Bluetooth LE (Low Energy). In this case, you must connect the Seal One device
to your Mac via USB.
Once you have successfully established a connection to your Mac via Bluetooth or USB, you will be
directed to a screen informing you that your Seal One is ready for use.
The following message will appear on the display of your Seal One device.
Note: The dots on the arrows are moving.
4.2.1 The CD symbol remains permanently on the display of the Seal One
The CD symbol will appear and persist on the display of your Seal One if the
Seal One application is not currently running. In this case, you will need to
manually start the application.
Open the Seal One application by double-clicking the Seal One CD icon on your Desktop.
Alternatively, you can use the “Finder” application to
nd a mounted virtual CD-ROM drive and start the
application there.
Start the Seal One application with another double-click on the
Seal One application icon. If you had to follow these steps to start the
application, you are now ready to proceed with Section 4.2 Step 3.

4.2.2 Settings - Mac OS
The settings for your Seal One device are managed under the “Settings” dropdown menu option
(click the icon in the Menu Bar to display the full menu).
Available settings include changing the device’s name, adding / removing devices, and enabling
Quickstart.
4.2.3 Zoom Display
If the default font size of the display data on the Seal One device’s screen
is too small for you, you have the option to enlarge the font size. You can
enable / disable display zoom via the “Zoom Display” dropdown menu option
of the Seal One Menu Bar icon.
4.3 Seal One 7300pro with Linux
The use of the Seal One 7300pro with Linux is only possible via USB. Depending on the Linux distribution
and conguration, the Seal One CD drive will automatically mount itself. When that’s not the case, you
must do this step manually. Once done, you can nd the drive from your File Manager and start the Seal
One application by double clicking on it.
In order to have a full featured experience on Linux, you will need a Linux Distribution which con-
tains the GTK graphics library. You can also use the application without a Graphical User Interface,
in which case you would need to manage the necessary settings for your Seal One device via the
command line. For more details, see the README.txt on the virtual CD ROM drive.
!
When lines larger than the screen size are displayed, the font will be displayed as a horizontally
scrolling ticker.
!

5. Seal One in combination with mobile devices
Please enable Bluetooth on your mobile device (without it, a connection to your Seal One device is not
possible). Make sure you have an internet connection.
Step 1: Download the Seal One companion app on your mobile device.
You can nd the download links here:
https://www.seal-one.com/7300pro
Or by scanning the following QR-Code:
Step 2: Start the application you downloaded in step 1. Click on the Seal One 7300pro device.
Step 3: You will be asked to turn your device on.
Step 4: Press and hold the authorize button for 3 seconds until the Seal One ID appears.
Step 5: The Seal One app is now connected to your mobile device via Bluetooth.
Step 6: To enroll your device with an acceptance partner, please follow the instructions you receive
when you click “Enroll”.

5.1 Settings - mobile devices
In this screen, you can change the name of your Seal One 7300pro as well as the font size on the
device’s screen (with the Zoom Display toggle). If you want to remove the device from the app, press the
“Remove” button and conrm your decision when presented a conrmation.
N.B. You can add / remove devices as often as you’d like.
When lines larger than the screen size are displayed, the font will be displayed as a horizontally
scrolling ticker.
!

6. Automatic Updates
To keep your Seal One 7300pro up-to-date, you will be notied of any available rmware updates. We
recommend that you always update to the latest version when prompted. When an update is available,
you will be presented with the following dialog asking if you would like to update now.
If you would prefer to defer the update to a later date, click “No” when in the dialog. The update prompt
will be displayed again in regular intervals.
During the update process, you will see a progress bar displayed in the update window and on the
device’s display.
Please take special care not to disconnect your device from USB or Bluetooth or turn it off during the
update process.
After a successful update, your Seal One will automatically restart, reconnect, and be ready for use.

7. Handling and safety instructions
CAUTION: Failure to observe the following safety guidelines may under certain circumstances result in
re, electrical shock, other injury or damage to the Seal One unit or other components. Please ensure that
children do not have any access to the hardware and packaging materials. Never let children play with the
device. Children can swallow the device and the accessories. Never throw the device in a re!
The device is designed and manufactured with great care and should be treated with care.
The following recommendations and operating instructions should help you to ensure a longlasting
operation:
- Avoid dropping the device and never open it.
- Protect against direct sunlight, high temperatures and severe temperature changes, this could
damage movable and electronic components and the functionality is no longer guaranteed.
- The housing of the device can break through substantial impact.
- The use of the device once it has been damaged is prohibited.
- Never charge the device in direct sunlight or in hot or cold environments.
- Only use computer USB Port or CE compliant 5V USB power supplies for charging.
- The device must be charged at least once every 6 month to prevent damage.
- Use the device at a clean and dry place.
- Protect the device from dust and vapors.
- Protect the device from humidity and liquids, and never put paint on it.
- Do not touch the contacts with spiky or metal objects.
- To clean, use slightly damp, lint-free cloth and do not use harsh cleaners or solvents.
7.1 Legal disclaimer
Seal One AG disclaims all liability for damages resulting due to improper use. Opening the Seal One
7300pro and any changes on the device are strictly prohibited and will void the warranty.
7.2 Disposal and recycling of batteries
This product contains a rechargeable battery. This symbol indicates that the battery must be
disposed of separately from household waste. The lifecycle of rechargeable batteries is very long,
anyway they must be disposed at one time. Consumers are legally obligated to bring batteries
to a suitable collection point, where they can be disposed free of charge. Batteries contain valuable raw
materials that can be recycled.
7.3 Disposal of old electrical and electronic equipment
This symbol indicates that according to local laws and regulations your product and its
rechargeable battery must be recycled separately from household waste. When this product
reaches its end of life, take it to a collection point designated by local authorities for the recycling
of electronic equipment.
The improper disposal of waste electronic equipment by the consumer may be subject to nes. The
separate collection and recycling of your product and its battery at the time of disposal will help conserve
natural resources and ensure that it is recycled in a manner that protects human health and the
environment. The device and its battery should be handed over to the appropriate collection point for the
recycling.

The package does NOT include a CD.
The entire operating software is already included on the Seal One.
The software is NOT available on a CD.
7.4 EC-Declaration of Conformity
EU Declaration of Conformity
hereby declares that Seal One 7300pro is in compliance with Directive 2014/53/EU and Radio
Equipment Regulations 2017. A copy of the Declaration of Conformity is available at the following Internet
address: www.seal-one.com/conformity
Information on frequencies and transmitting power:
2.4 GHz radio, version 4.0 LE
Frequency band used: ISM band 2.400 MHz to 2.483,5 MHz Lowest channel: 2.402 MHz, highest chan-
nel: 2.480 MHz, 40 channels, channel bandwidth: 1 MHz, channel spacing: 2 MHz, modulation: GFSK
Maximum radiated power: < 1 mW (-0.21 dBm E.I.R.P)
8. Return form
Please use a sturdy packaging for return, such as a padded envelope or
shipping bag. For the return form, return address, and further information, please visit:
https://www.seal-one.com/return
9. Package contents
• Seal One 7300pro
• Micro-USB cable
Please note that the Micro-USB cable is designed for exclusive use with Seal One 7300pro.
The manufacturer assumes no liability for any use not in connection with Seal One devices.
You can also use a standard Micro-USB cable with the Seal One 7300pro.
N.B. Don‘t use a Micro-USB charging cable
• User manual
This user manual contains all necessary steps for installation, usage and maintenance of your
Seal One 7300pro.
• The package does NOT include a CD
!

Mac OS is a registered trademark of Apple Inc.
Microsoft is a registered trademark of Microsoft Inc.
Seal One is a registered trademark of Seal One AG. Seal One® – Patented Technology
Seal One AG
Berliner Straße 44
60311 Frankfurt am Main
www.seal-one.com
Other manuals for 7300pro
1
Table of contents
Other Seal One Modem manuals


