Seamax PowerMax SMX2HP35 User manual

Seamax PowerMax Trolling Motor
User Manual
Thank you for choosing the Seamax SpeedMax brushless electric trolling motor. The quality
product is well designed, engineered, and manufactured to provide you portable superior
green power for years of enjoyment. To constantly improve the product, we reserve the right
to change parts and components without further notice.
INSPECT THE PRODUCT AND CAREFULLY READ THE INSTRUCTIONS
BEFORE OPERATING IT TO AVOID PERSONAL INJURY AND PRODUCT
DAMAGE. RETAIN THIS USER MANUAL FOR FUTURE REFERENCE.

2
PowerMax –3x LONGER RUN TIME IN AVERAGE
DIGITAL CONTROL FOR VARIABLE SPEED
This powerful new trolling motor is equipped with step-less adjustable speed control and a safety lanyard. Digital
technology provide stepless forward and reverse speed control and easy to reach max speed. Benefit the digital
controller, this variable speed PowerMax trolling motors let you dial in your exact speed, and they deliver only as
much power as you need, helping to conserve your battery for a full day of fishing.
HIGH EFFICIENCY BRUSHLESS AC MOTOR
Digital Speed Controller won’t waste your battery power, the motor won’t use the traditional copper resistance wire to
adjust the motor speed, otherwise there is up to 75% of power can be wasted when motor running in low speed. At
the mean time the efficiency of this brushless motor can be up to 90%, its efficiency is about 30% higer comparing
with a regular DC trolling motor.
This Digital Controlled Trolling motors equiped with a brushless 12V or 24V AC motor, it can provide 3 times longer
run times in average on a single battery charge. It is excellent for propulsion of wide range of boats and waterway.
Overall our Seamax PowerMax trolling motor

3
1. LIMITED WARRANTY INFORMATION
DURATION OF COVERAGE
All new Seamax SpeedMax electric trolling motors are warranted to the original purchaser to be free from defects in
material and/or workmanship for up to two (2) years from the date the product is sold. Warranty is NOT transferable
to any subsequent purchasers. The repair or replacement of parts, or the performance of service under this warranty,
does not extend the life of this warranty beyond its original expiry date.
HOW TO OBTAIN WARRANTY COVERAGE
To obtain warranty service, the original purchaser shall contact Seamax for return authorization before returning the
unit. The product to be returned by courier should be carefully packaged. Enclose a note describing the nature of the
problem and/or service requested, customer address, and phone number in the package. A copy of the sales receipt,
order form, or other proof of purchase is required with the return of the product for warranty consideration. Warranty
claims without purchase receipt will not be accepted.
The authorized seller will arrange for the inspection and any necessary repair. The purchaser shall pay for all related
shipping and transport charges. If the service provided is not covered by the limited warranty, purchaser shall also
pay for all related labor and materials, and any other expenses associated with that service.
CONDITIONS OF THE LIMITED WARRANTY
Warranty coverage is only available from an authorized dealer to distribute the product in the country in which the
sale occurred. Proper routine product maintenance is required to maintain warranty coverage. SEAMAX reserves the
right to make future warranty coverage possible only with proof of proper maintenance.
WHAT IS NOT COVERED
Seamax reserves the right to improve the design of the model without assuming any obligation to modify any trolling
motor previously manufactured. This warranty does not apply to normal worn parts, i.e., worn cables, adjustments, or
product damage due to 1) neglect, lack of maintenance, accident, abnormal operation or improper installation or
service; 2) abuse, i.e., bent metal columns, bent armature shafts, broken control cables, etc., accidents,
modifications, misuse, excessive wear or damage caused by an owner’s failure to provide reasonable and necessary
installation or care; 3) use of an accessory or part not authorized by seller; 4) alteration or removal of parts; 5)
opening the lower unit (motor) by anyone other than the authorized Factory Service Center will void this warranty.
This warranty will not apply to haul‑out, launch, towing and storage, transportation charges and/or travel time,
telephone or rental charges of any type, inconvenience, or loss of time or income, or other consequential damages.
6) Shipping or Transit cost when over 30 days of purchase.
LIMITED WARRANTY COVERAGE
AC Motor Rotor
Parts 2 Years Limited Warranty
Speed Controller System
Parts 2 Years Limited Warranty
Water Seal Components
Parts 2 Years Limited Warranty
Transom Mount and Tiller Handle
Parts 1 Years Limited Warranty
Other Parts
Parts 1 Years Limited Warranty

4
LIABILITY FREE CLAUSE
Damage caused by dropping, crashing, cuts, piercing or other man-made behaviors; The end-user did not follow the
instruction manual; The end-user ignored the SEAMAX warning information; Placed or changed the motors under
wet circumstances which may damage the batteries, the circuit or other electric parts. User used parts or accessories
that are not genuine SEAMAX components.
TERMINATION OF COVERAGE
Warranty coverage may be terminated for repossessed product, or product purchased at auction, from a salvage
yard, from a liquidator, from an insurance company, from unauthorized marine dealers or boat builders, or other third
party entities.

5
2. GENERAL INFORMATION
BOATER'S RESPONSIBILITIES
Choose a good weather for your outdoor activity. Personal life-jacket is needed at all
time. The operator (driver) is responsible for the correct and safe operation of the boat
and safety of its occupants and general public. It is strongly recommended that each
operator (driver) read and understand this entire manual before operating the trolling
motor. Be sure at least one additional person on board is instructed in the basic
operation of the trolling motor in case the driver is unable to operate the boat.
PROTECTING PEOPLE IN THE WATER
While you are trolling, it is very difficult for a person in the water to take quick action to
avoid a boat heading in their direction, even at slow speeds. Always slow down and
exercise extreme caution any time you are boating in an area where there might be
people in the water. While the boat is stationary, shut off the trolling motor before
allowing people to swim or be in the water near your boat.

6
A spinning propeller, a moving boat, or any solid device attached to the boat can
cause serious injury or death to swimmers. Stop the trolling motor immediately
whenever anyone in the water is near your boat.
Whenever the boat is in motion, observe the location of all passengers. A sudden reduction in boat speed, such as a
sharp change of boat direction, could throw them off the boat. In order to safely enjoy the waterways, familiarize
yourself with local and other governmental boating regulations and restrictions, and consider the following
suggestions.
▪Use flotation devices. It is the law to have an approved personal flotation device of suitable size for each
person aboard and have it readily accessible.
▪Do not overload your boat. Most boats are rated and certified for maximum load (weight) capacities, refer to
your boat capacity plate. If in doubt, contact your dealer or the boat's manufacturer.
▪Perform safety checks and required maintenance. Follow a regular schedule and ensure all repairs are made
properly.
▪Never be under the influence of alcohol or drugs while boating (it is the law). Alcohol or drug use impairs
your judgment and greatly reduces your ability to react quickly.
▪Passenger boarding. Stop the trolling motor whenever passengers are boarding or unloading.
▪Be alert. The operator of the boat is responsible by law to maintain a proper lookout by sight and hearing.
The operator must have an unobstructed view particularly to the front. No passengers, load, or fishing seats
should block the operators view when operating the boat.
▪Underwater hazards. Reduce speed and proceed with caution whenever navigating in shallow water.
▪Tripping hazards. To avoid a trip hazard, route all cables and wiring neatly and out of the way.
▪Report accidents. Boat operators are required by law to file a Boating Accident. Report with their state
boating law enforcement agency when their boat is involved in certain boating accidents. A boating accident
must be reported if 1) there is loss of life or probable loss of life, 2) there is personal injury requiring medical
treatment beyond first aid, 3) there is damage to boats or other property where the damage value exceeds
$500.00 or 4) there is complete loss of the boat. Seek further assistance from local law enforcement.
GENERAL PRACTICE
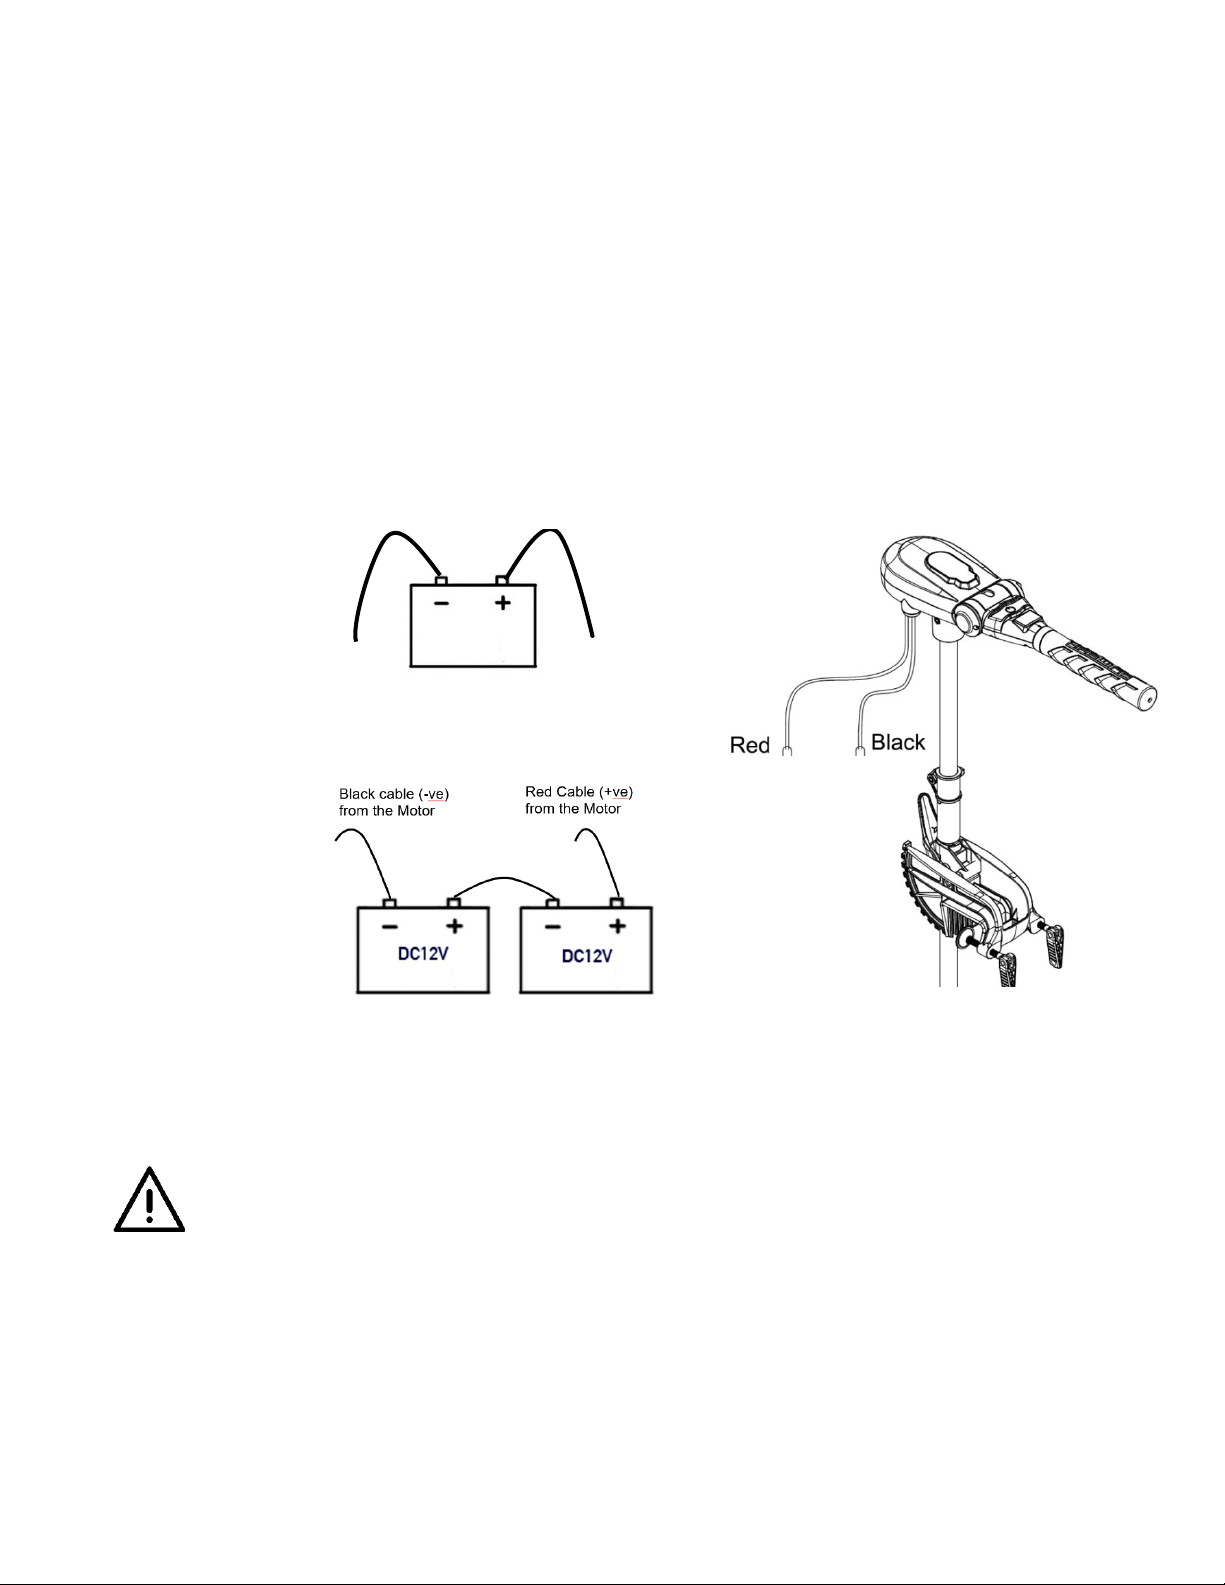
▪Not suggest to use the main engine battery to power the trolling motor. Use a
dedicated trolling motor battery or battery bank.
▪Ensure that the batteries are enclosed and secured within a battery box to prevent
accidental shorting of the battery terminals.
▪Route the trolling motor wires on the opposite side of the boat from other boat wiring.
▪Connect boat accessories directly to the main engine battery.
▪Do not charge the trolling motor batteries while the trolling motor is in the deployed
(down) position.
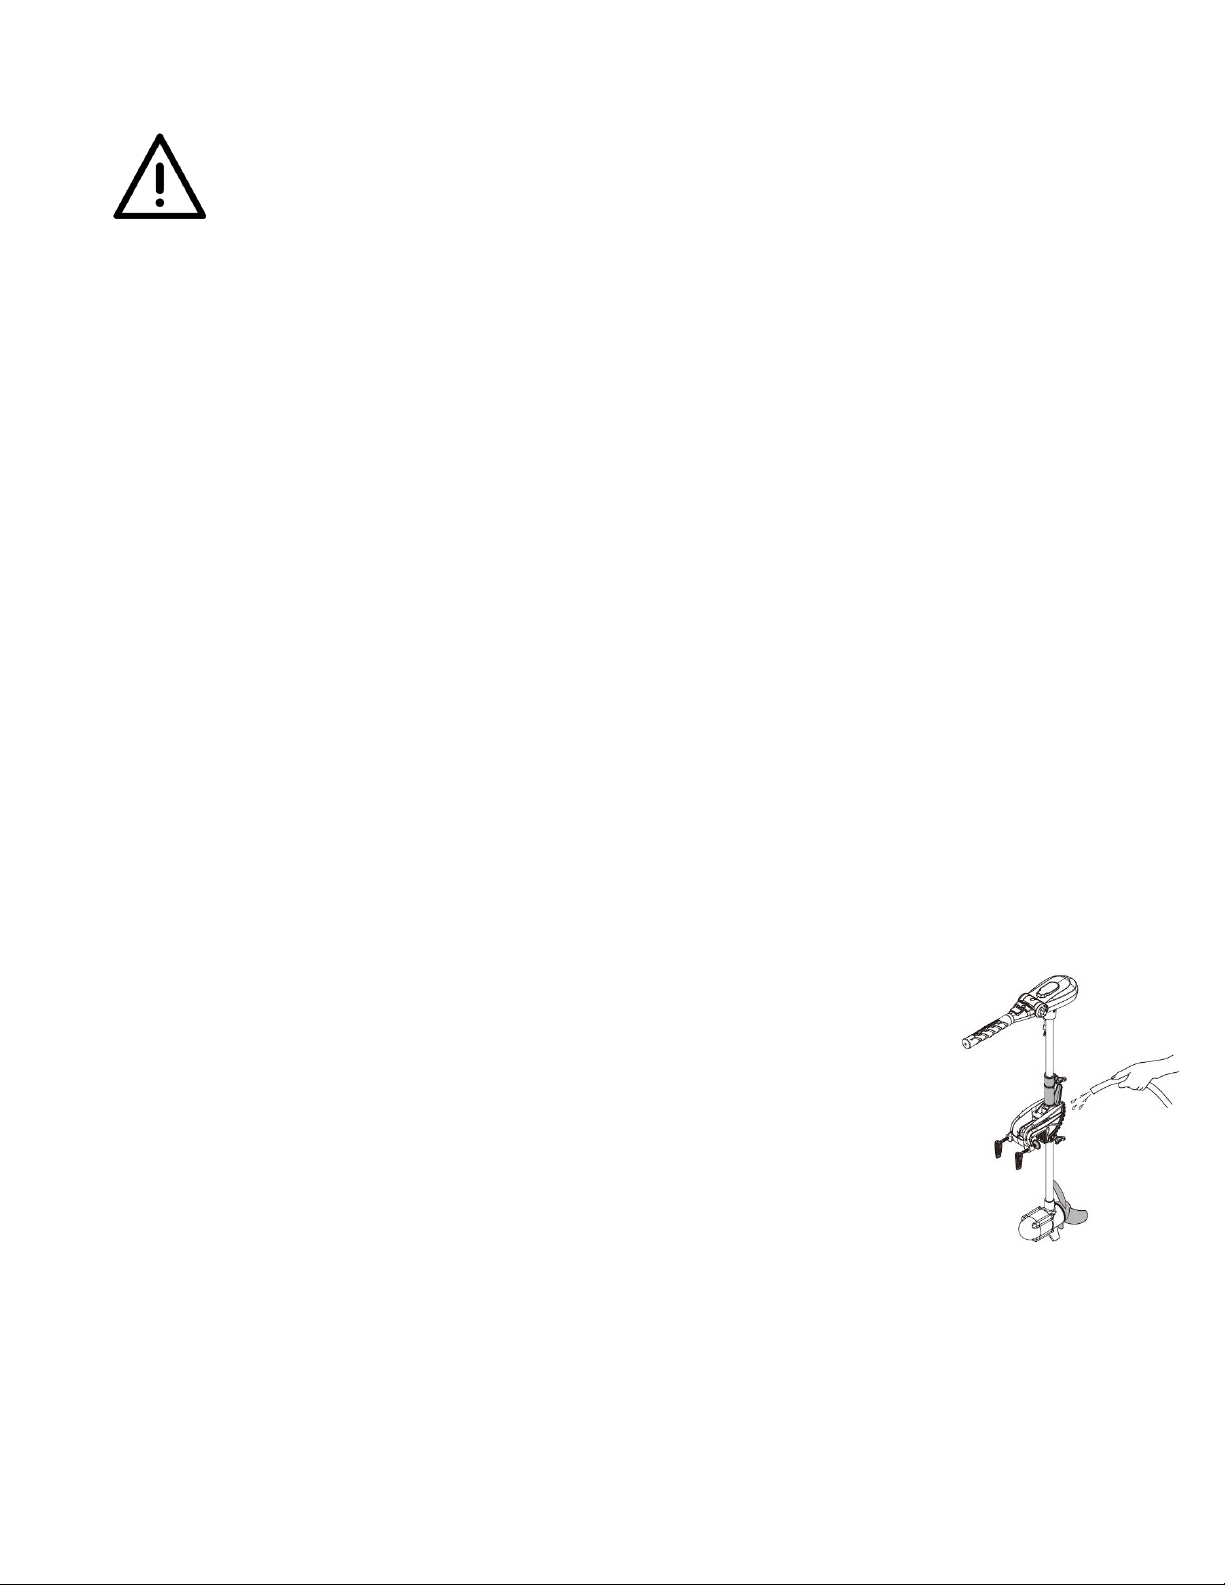
▪After each use, remove sundries from the propeller and rinse the motor by fresh
water.
CIRCUIT PROTECTION
It is recommended to install a manual reset circuit breaker in line with the electric trolling motor positive leads within
1.8m (72 Inches) of the battery(s). Using a circuit breaker could extend up to 2x times of electric motor’s life time.
Please read the spec sheet for your motor’s circuit breaker standard.
During the usage of the electric outboard motor, when the propeller is stuck by the weeds, small stones, fishing lines
or so forth, the circuit breaker will cut off the power automatically to prevent the damage of the electrical parts.

7
When the circuit breaker cuts off the power, disconnect the battery first, then check and clean any obstacles. At last,
press the reset button on the circuit breaker and reconnect the battery, the electric outboard motor is able to continue
the work.
SPECIFICATIONS
MODEL
THRUST / SHAFT /
OUTPUT
EQUIVALENCE
NET WEIGHT
VOLT / AMP
MAX POWER
SMX2HP35
65 Lbs / 35 inch
2HP
14 Lbs
12V / Max 50A
600W
SMX2HP40
65 Lbs / 40 inch
2HP
15 Lbs
12V / Max 50A
600W
SMX3HP35
85 Lbs / 35 inch
3HP
15 Lbs
24V / Max 40A
960W
SMX3HP40
85 Lbs / 40 inch
3HP
16 Lbs
24V / Max 40A
960W

8
PACKAGE CONTENTS
1x Trolling motor, Propeller and installation Kit with spare parts, User Manual
Propeller
Propeller
Wrench
Stainless
Washers
Drive
Pins
Nuts
Jumper
Wire
Sacrificial
Anodes
User
Manual
▪Unplug the trolling motor after each use and when charging the battery.
▪An operating or charging battery produces gas that can ignite and explode,
spraying out sulfuric acid, which can cause severe burns. Ventilate the area around
the battery and wear protective equipment when handling or servicing batteries.
▪Performing service or maintenance without first disconnecting the battery can cause
product damage, personal injury, or death due to fire, explosion, electrical shock, or
unexpected motor starting. Always disconnect the battery cables from the battery
before maintaining, servicing, installing, or removing motor components.
▪Do not allow children to operate the electric outboard motor.
▪Do not modify the unit in any way or add accessories not intended for this product.
▪Do not submerse the motor upper-unit controller box. If unit is accidentally
submersed disconnect battery right the way. The motor needs a full service within
24 hours if such a water damage.
▪Always disconnect power of the motor when replacing propeller or transport.
▪To prevent accidental damage of the fiberglass shaft, do not over tighten the
mounting bracket.
▪Only use this product between the temperatures of -20C to +45C (-4F to +113F).

9
WIRING AND BATTERY
Route the trolling motor wires on the opposite side of the boat from other boat wiring. Sensitive
electronics, such as depth finders, should be connected directly to the main engine battery. Single
battery systems require separate connection cables.
12V/2HP Power Capacity Display Light: Over 12.3V - 3 lights / 11.5V to 12.3V - 2 Lights / 9-11.5V - 1 Light
24V/3HP Power Capacity Display Light Over 24.6V - 3 lights / 23V to 24.6V - 2 Lights / 18-23V - 1 Light
Motor Unit Assembly & Replacement Parts Check List (2HP/12V)

10
BATTERY
12V Model: Min 1x 12V 105AH (Group 27) deep cycle marine battery, Suggest AGM or Lithium Battery
24V Model: Min 2x 12V 105AH (Group 27) deep cycle marine battery, Suggest AGM or Lithium Battery
To extend running time, use a larger capacity battery or an additional battery. As a general rule, deep cycle batteries
with a higher amp‑hour rating or reserve capacity rating will provide longer run time and better performance.
Do not power any depth sounders or fish finders from the trolling motor battery. Connecting electronic equipment to
the trolling motor batteries can cause electrical interference. Any depth sounders or fish finders must be powered
from the engine starting or accessory battery.
For better overall performance, it is recommended to fully charge the batteries after each use. Disconnect the
batteries from the motor before charging. Frequently charge the batteries to capacity to keep in good condition.
12V DC
BATTERY
CONNECTION
24V DC
BATTERY
CONNECTION
The red wire should connect to positive; the black wire should connect to negative. It is recommended install a circuit
breaker in line with positive lead. The battery should always be kept in a well ventilated location.
USE DEEP CYCLE BATTERY FOR THE MOTOR. IMPROPER USE OF BATTERY
WOULD CAUSE DAMAGE. TURN ALL SWITCHES TO “OFF” BEFORE ATTEMPTING
TO CONNECT TO THE BATTERY.
2HP/12V Motor - Max RPM 1250 Underwater / Decibel Level (db) < 55db
3HP/24V Motor - Max RPM 1350 Underwater / Decibel Level (db) < 55db
Note: for 24V model, one universal 12V battery series connection cable is included.
Black cable (-ve)
from the Motor
Red cable (+ve)
from the Motor
12V DC
DEEP CYCLE

11

12
3. INSTALLATION AND OPERATION
INSTALLING THE PROPELLER
▪Make sure the motor is disconnected from
the battery before installing or replacing
the propeller.
▪Use the provided propeller tool for the
installation. Use of inapproiate tool may
damage the motor and propeller.
▪Insert the drive pin into the shaft hole.
Align the pin with the propeller groove
horizontally. Once the propeller is in place,
install the sacrificial anode, washer, and
nut.
▪When it is safe, hold the propeller to
prevent it from revolving and use the
propeller tool to tighten the nut. To detach
the propeller, do the steps conversely.
MOUNTING THE MOTOR
▪Disconnect the motor from the battery
before mounting or dismounting the motor.
▪Attach the motor’s transom bracket to the
stern of the boat. Align the motor with the
boat’s center line.
▪Tighten both transom clamps. Do NOT
overtighten the clamps, or the bracket and
clamps may be damaged.
TILTING THE MOTOR
▪Use the mounting bracket’s tilting lever
adjust the shaft angle as needed. When
adjusting the tilt angle of the motor,
NEVER put your hands between the shaft
and the hull.

13
ADJUSTING THE DEPTH
▪The depth of the motor can be adjusted
up and down by loosening the adjustable
depth collar tension knob. Set the motor to
the desired depth then retighten the
tension.
ADJUSTING THE STEERING RESISTANCE
▪To adjust the steering resistance of your
motor, simply tighten or loosen the tension
knob. This solid 9-position bracket
features a quick-release lever lock and
reinforced composite material that resists
flexing, warping, and UV damage.
ADJUSTING THE STEERING RESISTANCE
▪To adjust the steering resistance of your
motor, simply tighten or loosen the tension
knob.
ADJUSTING THE HANDLE
▪The handle is tiltable and foldable.
Untighten the handle folding knob to
adjust it to a desired angle. The telescopic
handle can be extended up to 15.7
inches. easy, comfortable, intuitive
operation of your trolling motor
ADJUSTING THE SPEED
▪The motor is equipped with a stepless
speed controller. Motor stops at Mark
ZERO. Rotate the handle clockwise for
stepless forward speeds. Turn the handle
couterclosewise for backward speeds.

14
BATTERY INDICATOR
▪The battery indicator displays the realtime
battery level. Recharge the battery when
its power level is decreased to 20%.
KEY FEATURES
▪12V or 24V brushless electric motor to provide 65 or 85 pounds (2HP or 3HP equivalent) thrust output. Quiet
and smooth operation allows you to get closer to your fishes.
▪Lightweight and fully adjustable 35" or 40” powder coated marine grade aluminum shaft. Work great with
short or long shaft watercraft and as 2nd motor on the boat. Built-in sacrificial anode and saltwater ready.
▪New patented step-less speed controller with real-time battery capacity indicator to offer durability and
performance over many years. Anti-theft quick released taper-lock transom mount with effortless multi-
angles adjustment.
MAINTENANCE
▪You must disconnect the battery during maintenance.
▪Always thoroughly rinse your electric outboard motor with fresh water after every use. Only rinse the areas
that have been in contact with salt water, avoid getting the top cover wet as this may damage the circuitry
inside.
▪Check behind the propeller after each day for weeds, fishing line or other debris that may get wrapped
behind the propeller.
▪Lubricate all the pivot points with a non-aerosol lubricant. Never use an aerosol lubricant as many types
contain harmful propellants that can cause damage to various parts of your electric motor.
▪Check tightness of the battery lead connections.
▪Visually check condition of main battery cables.
▪Inspect for loose or corroded wiring connections.
▪Clean terminals with a wire brush and replace any frayed wires. Lack of maintenance may cause excessive
heat and loss of power.
▪Inspect for tightness of all nuts, bolts and screws.
▪Recharge batteries after each use. Follow the battery manufacture’s recommendations for battery
maintenance.
▪Be sure to choose a well ventilated and dry location when storing the motor for long periods. Never leave the
motor outside, as this may cause damaged to the magnet of the driving unit. During freezing temperatures,
when your electric motor is not being used, it should be stored in an area where it will not freeze.

15
4. TROUBLESHOOTING
MORE ATTENTION
During the usage of the electric outboard motor, the propeller is possible to get stuck by the weeds, fishing lines and
fishing webs, or sometimes due to the variance of the water depth, the propeller is covered by the silt. If those
situations stated above happen, please disconnect the battery in time and clean up the propeller. (Please DO NOT
rise steps and increase the thrust of electric outboard motor to solve the problem, or it may cause permanent
damages to the electric outboard motor.)
OPERATION ERROR INDICATION
The motor has an operation indicator function. Motor will automatically stop if the following errors occur.
▪Power indicator is off. Motor does not work. Check and make sure the power cable is well connected.
▪All power level lights are off. Only red light is on. Motor does not work. Check the battery voltage.
▪Motor internal voltage protection is on. Motor does not work. Check the battery voltage.
▪The speed control handle is not at the Neutral position. Turn it to the Neutral, and a “beep”will sound.
▪A running motor suddenly stops at the current speed. Return the speed control handle to its Neutral position
and start again.
▪A running motor frequently stops. Check the propeller to make sure nothing blocking it such as fishing line or
weeds. Otherwise, it may trigger the high current protection mode.
AUDIO PATTERN
AUDIO
CONDITION
3 Beep Sound
System ready, Motor stand by
Continuous short beep
High voltage protection triggered. Low voltage protection triggered. System ready
but speed control handle is not at Netural
Continous quick short beep
Motor running with high Amp current condition
Continuous long beep
Motor stops and waits for speed control handle back to Netural.
LACK OF POWER
▪Propeller may be fouled. Remove propeller, clean and replace.
▪Battery connections may be corroded.
▪Battery has low voltage, recharge.
▪Battery may be faulty. Check and recharge it.
▪Bad or faulty connection in boat wiring or electric motor wiring
▪Permanent magnet cracked or chipped. Motor will whine or grind.
MOTOR THRUST/ AMP CHAT:
2HP/12V - 65Lbs-50Amp / 50Lbs-35Amp / 40Lbs-22Amp / 30Lbs-17Amp / 20Lbs-6Amp
3HP/24V - 85Lbs-40Amp / 70Lbs-30Amp / 35Lbs-20Amp / 30Lbs-10Amp / 20Lbs-4Amp

16
HARD TO STEERING
▪Check if the steering tension screw is loosened.
▪Clean the motor shaft and apply lubricant to the fasterners and turning parts.
▪Make sure the underwater unit’s condition is in good condition and not blocked by any obstacles.
MOTOR VIBRATION
▪Make sure the propeller is in good condition and installed properly.
▪Inspect the propeller and the drive pin’s condition. Replace it when needed.
▪Disconnected the battery cable and examine it by turning the propeller manually. The motor should turn
freely with a slight magnetic drag. Internal damage might occur if the motor is blocked or locked. Do NOT
use the motor.
▪Bent armature. Remove propeller, set at medium speed, turn unit on and check for armature wobble.
MOTOR LOSES ONE OR MORE SPEEDS
▪Lose wire on rotary switch. Check wiring diagram.
▪Lose connection in top housing.
▪Rotary switch damaged.
▪Speed coils in lower unit may be burned.
RETURN TO SELLER
Demestic buyer can contact the original seller for your motor service. Online buyer can contact Seamax toll free
support line: 1-877-907-7766 or email su[email protected] for all your inquiries. Seamax can provide an
UPS return waybill to help buyer send the item to an authorized service depot if under warranty coverage.
Do not return the motor to Amazon for warranty claim. We can do better than Amazon. Thank you!
IMPORTED & DISTRIBUTED BY:
Seamax Marine and Outdoor
120-11791 Machrina Way, Richmond, BC, Canada V7A4V3
www.seamaxmarine.com sa[email protected]m
This manual suits for next models
3
Table of contents
Other Seamax Engine manuals