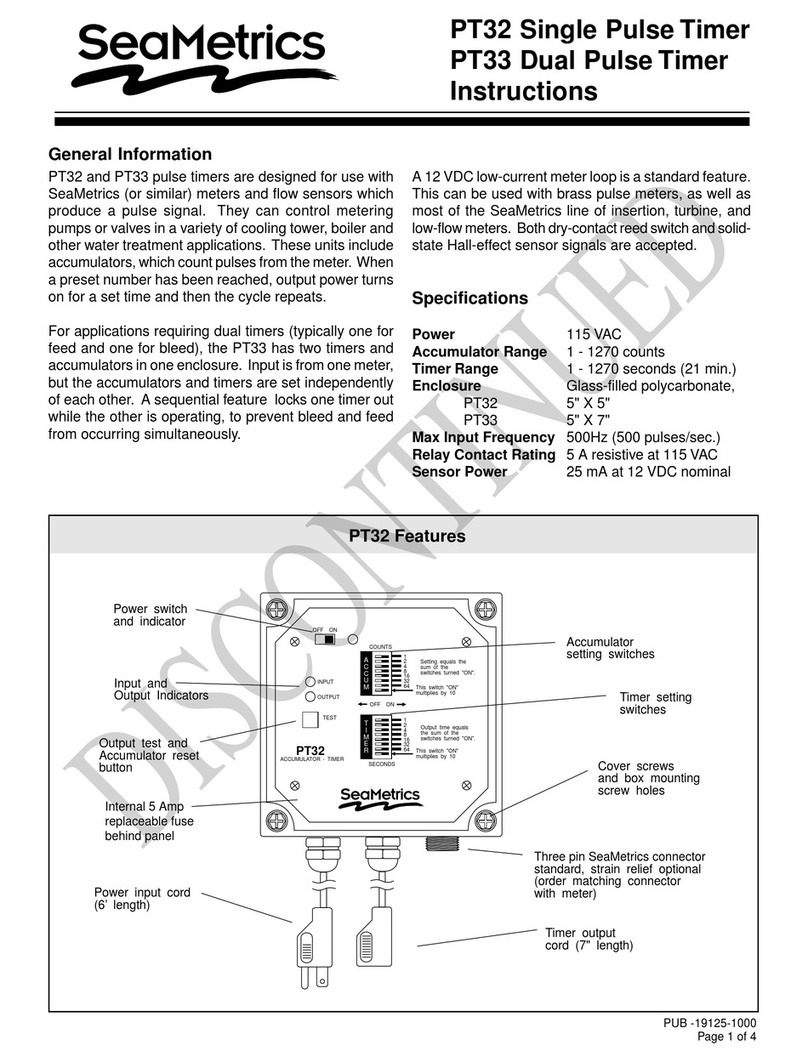
Seametrics PT35 User manual

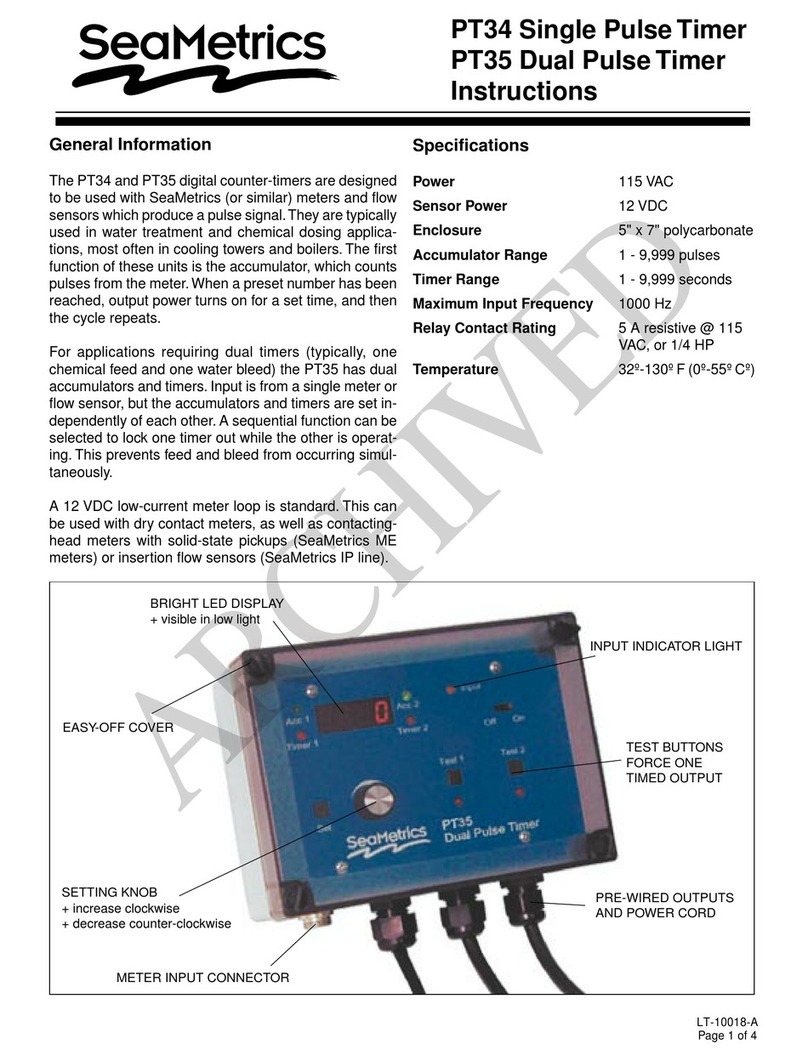
Input Indicator Light
Easy-Off Cover
Test Buttons
Force One
Timed Output
Pre-Wired Outputs
and Power Cord
Meter Input Connector
Setting Knob
+ increase clockwise
+ decrease counter-clockwise
Bright LED Display
+ visible in low light
PT35
DUAL PULSE TIMER
INSTRUCTIONS
PT35 DUAL PULSE TIMER INSTRUCTIONS
9001:2008
CERTIFIED COMPANY
ISO

Mounting. Use a secure surface that will accept screws.
Remove the front clear cover by use of the thumb screws to
access the mounting holes at the four corners. Using the box
as a template, mark the centers of the holes with a pencil and
drill. Insert screws through the four corner holes and tighten.
Connect the Meter. Because the PT35 comes standard with
a built-in meter connector, the simplest method of connect-
ing your Seametrics meter to the PT35 is to order a mating
“Seametrics connector” pre-installed on your meter or ow
sensor. If your meter does not have a Seametrics connector,
there are three alternatives: 1) Any wire ends can be con-
nected to the PT35 terminal block (see Connections diagram
at right). 2) A cable-with-connector can be factory-ordered
and eld-wired to your meter. 3) A connector can be factory-
ordered and eld-installed on your meter output cable (see
Connector Field Installation diagram below).
GENERAL INFORMATION
The PT35 digital counter-timer is designed to be used with
Seametrics (or similar) meters and ow sensors that produce a
pulse signal. It is typically used in water treatment and chemical
dosing applications, most often in cooling towers and boilers.
The PT35 serves as either a single or a dual timer, depending
on whether one or both of its independent accumulators and
timed outputs are used.
In single timer applications, one accumulator counts pulses
coming from the meter. When a pre-set number of pulses has
been reached, output power turns on for a set time, and then
the cycle repeats.
In dual timer applications (typically, one chemical feed and one
water bleed), both accumulators and timers are set to operate
independently with input from a single meter. A sequential
function can be selected to lock one timer out while the other
is operating. This prevents feed and bleed from occurring
simultaneously.
The PT35 can be used with dry contact meters (e.g. Seametrics
MJR meters), contacting-head meters with solid-state pickups
(e.g. Seametrics MJE meters), or insertion ow sensors (e.g.
Seametrics IP, TX, and EX Series).
Ground
Neutral
Hot
NO NC N G
NO NC N G
Hot Normally Open
Hot Normally Closed
Neutral
Ground
Ground
Neutral
Hot Normally Closed
Hot Normally Open
H V G
P
G
S
V
OUTPUT 1
OUTPUT 2
3AG-10A-SB
Fuse
POWER
GND
SIGNAL
EXTERNALLY- PACED
METERING PUMP
DRY CONTACT
TYPE METER
GND
GND
SIGNAL
SIGNAL
+12 Vdc
+12 Vdc
PUMP+
SOLID STATE
TYPE METER
SOLID STAT E
TYPE METER
INSTALLATION and CONNECTION
Connector Field Installation
3
2
11POWER GND
2 INPUT SIGNAL
3POWER OUTPUT +12
Vdc
INPUT CONNECTOR
To Connector Pin 1
BLACK
WHITE
RED
To Connector Pin 2
To Connector Pin
3
To Connector Pin 1
To Connector Pin 2
Hall-effect or transistor switch
Dry contact
Connect the Load. Two output cords are provided for connec-
tion of 115 Vac loads. The unit can be hard-wired if necessary,
using the terminals inside.
Connect Power. A power cord is provided. Connect by plugging
in to any standard grounded outlet. (See Connections Diagram
above for conduit connection.)
115 Vac
12 Vdc, unregulated @ 20mA max
115 Vac
5” x 7” polycarbonate
1 - 9999 pulses
1 - 9999 seconds
1000 Hz
5 A resistive @ 115 Vac, or 1/4 HP
32˚ - 130˚ F (0˚ - 55˚ C)
Power
Sensor Power
Outputs (2)
Enclosure
Accumulator Range
Timer Range
Maximum Input Frequency
Relay Contact Rating
Temperature
SPECIFICATIONS*
PT35 Connections Diagram
Input Connections
PT35
*Specications subject to change • Please consult our website for current
data (www.seametrics.com).

If the meter pulses once every gallon, set the
accumulator for the number of gallons desired
between timer cycles. For meters with multiple pulses
per gallon, multiply the desired number of gallons
by the pulses per gallon. For meters with multiple
gallons between pulses, divide the desired gallons by the
gallons per pulse.
Example:
The goal is one timer output every 60 gallons.
The meter has a 5 gallons per pulse (G/P) output.
60 gallons
5 gallons/pulse
How To Determine TIMER (Power On Time) Setting(s).
The TIMER time is set to release the desired amount
of chemical to be fed or water to be bled, and is
specic to the pump, valve, etc. being used. When deter-
mining the power on time, check that it isn’t more than
the expected time between cycles, to avoid feeding and
bleeding out of order or possible overlap conditions, by
calculating:
If this result is greater than the determined power on
time, enter the determined power on time into the TIMER
setting.
INSTALLATION and OPERATION
INSTALLATION
Setting. Using the thumb screws, remove the front cover.
Test for TImer Output. To test the timed output(s), press the
“TEST 1” or “TEST 2” button. The red output indicator should
light and remain on for the pre-set number of seconds.
How To Determine Accumulator Setting(s):
OPERATION
Press the SET button. The green ACC (accumulator) light
at the upper left corner of the display will begin blinking,
indicating that the accumulator is ready to be set.
Turn the knob clockwise to increase or counter-
clockwise to decrease until the desired number of
pulses is reached.
Press SET again. The red TIMER indicator will light.
Set the desired time in seconds for output power to
turn on.
Repeat the process to set Accumulator 2 and Timer 2
as needed.
Press SET again to display "SEq" (sequential).
Turn the knob in either direction to switch from "SEq" to
"nSEq" (non-sequential). Sequential operation prevents
the Timer 2 output from operating while Timer 1 is on,
so that chemical feed does not occur during bleed.
Non-sequential operation allows either timer to operate
immediately when its count is reached.
Press SET again to return to normal operation.
1)
2)
3)
4)
5)
6)
7)
8)
= 12 pulses (accumulator setting)
After setting (when the unit has returned to normal operation,
indicated by no blinking indicators), any display can be selected
at any time by turning the knob. Turning the knob clockwise
causes clockwise rotation among the indicator lights. Stop
turning the knob after arriving at the desired display. This is the
display that will remain until another display is selected.
Possible Overlap Conditions. If the power on time is longer
than the time between on cycles, the on time won’t elapse
before the next on cycle is supposed to start. If this happens,
the power output will remain on, and “OUF” (Overlap, Under
wait time, Failure) will appear on the screen, to alert the user
that a problem has occured. This situation can be avoided by
following the equation above in “How To Determine TIMER
(Power On Time) Setting(s)”. Also note that if in sequential
mode, the sum of the on time, must be less than the minimum
seconds between cycles. Otherwise, one relay will hold up the
other and an overlap condition will occur.
Accumulator Function. The accumulator adds received
pulses once every second, and when the accumulator number
is reached or exceded, the power will turn on. However, any
pulses above the accumulator number will not roll over to the
next cycle, so if the accumulator is set to 20, with 19 pulses
already having been received, and 2 more are received in the
next second, the accumulator will read 0 once the power is
turned on, and not 1.
Cycle Size (Gallons) 60 sec minimum seconds
Max. Flow Rate (GPM) Min. between cycles
X =

Problem Probable Cause Try...
On/Off switch is fully
in “On” position, but
display is not lighted
There is power, the
On/Off switch is fully
in “On” position, but
display is not lighted
There is power, the
On/Off swich is fully
in “On” position, the
fuse is good, but dis-
play is not lighted
The display is
lighted, but the unit
seems to be func-
tioning abnormally
Unit appears to be
functioning prop-
erly, the test button
causes the timer
indicator to light,
but the appropri-
ate output does not
become powered
Unit does not have power
Fuse may be blown
Circuit board component may be bad
No input from the meter
Unit improperly set
Output improperly connected to load
Possible relay failure
TROUBLESHOOTING
LT-65200311-081314
8/13/14
Seametrics Incorporated • 19026 72nd Avenue South • Kent, Washington 98032 • USA
(P) 253.872.0284 • (F) 253.872.0285 • 1.800.975.8153 • www.seametrics.com
Check for power at the cord and outlet
Remove front panel and check fuse. If it is
blown, replace with a 3AG-10A-SB fuse
Contact your supplier or the factory to
return unit for repairs
Check ow, check the input indicator light
(if the meter is set for a low pulse rate,
several minutes may pass between blinks)
Press the “Set” button to review each
setting
Press the approriate “Test” button to force
an output and check (each “Test” button is
located directly above the output it forces)
Contact your supplier or the factory to
return unit for relay replacement
Table of contents
Other Seametrics Timer manuals
