Sears BBQ-PRO 60076 User manual

Use and Care Guide
22.5" KETTLE A-F_ME CART
CHARCOAL GRILL
Sears item No, 60076
Kmart item No. 680-02482644-8
This Grill is for Outdoor Use Only
SAVE THESE iNSTRUCTIONS!
,, Read and follow all Safety, Assembly,
and Use and Care Instructions in this
Guide before assembling and cooking
with this grill.
, Failure to follow all instructions in this
Use and Care Guide may lead to fire or
explosion, which could result in property
damage, personal injury or death,
-Safety
• Parts
•Use and Care
•Assembly
Assembly Questions?
Call 1-866-561-0731
Tools needed for assembly:
Screwdriver (not provided)
Open end wrench (provided)
Sears, Roebuck and Co., Hoffman Estates, IL 60179 U.S.A.
See our extensive assortment of outdoor living products on-line at
'¢_w'vv.sears.com and 'v_.ww. k mart.com

Tips and Features fbr safety and ease of use
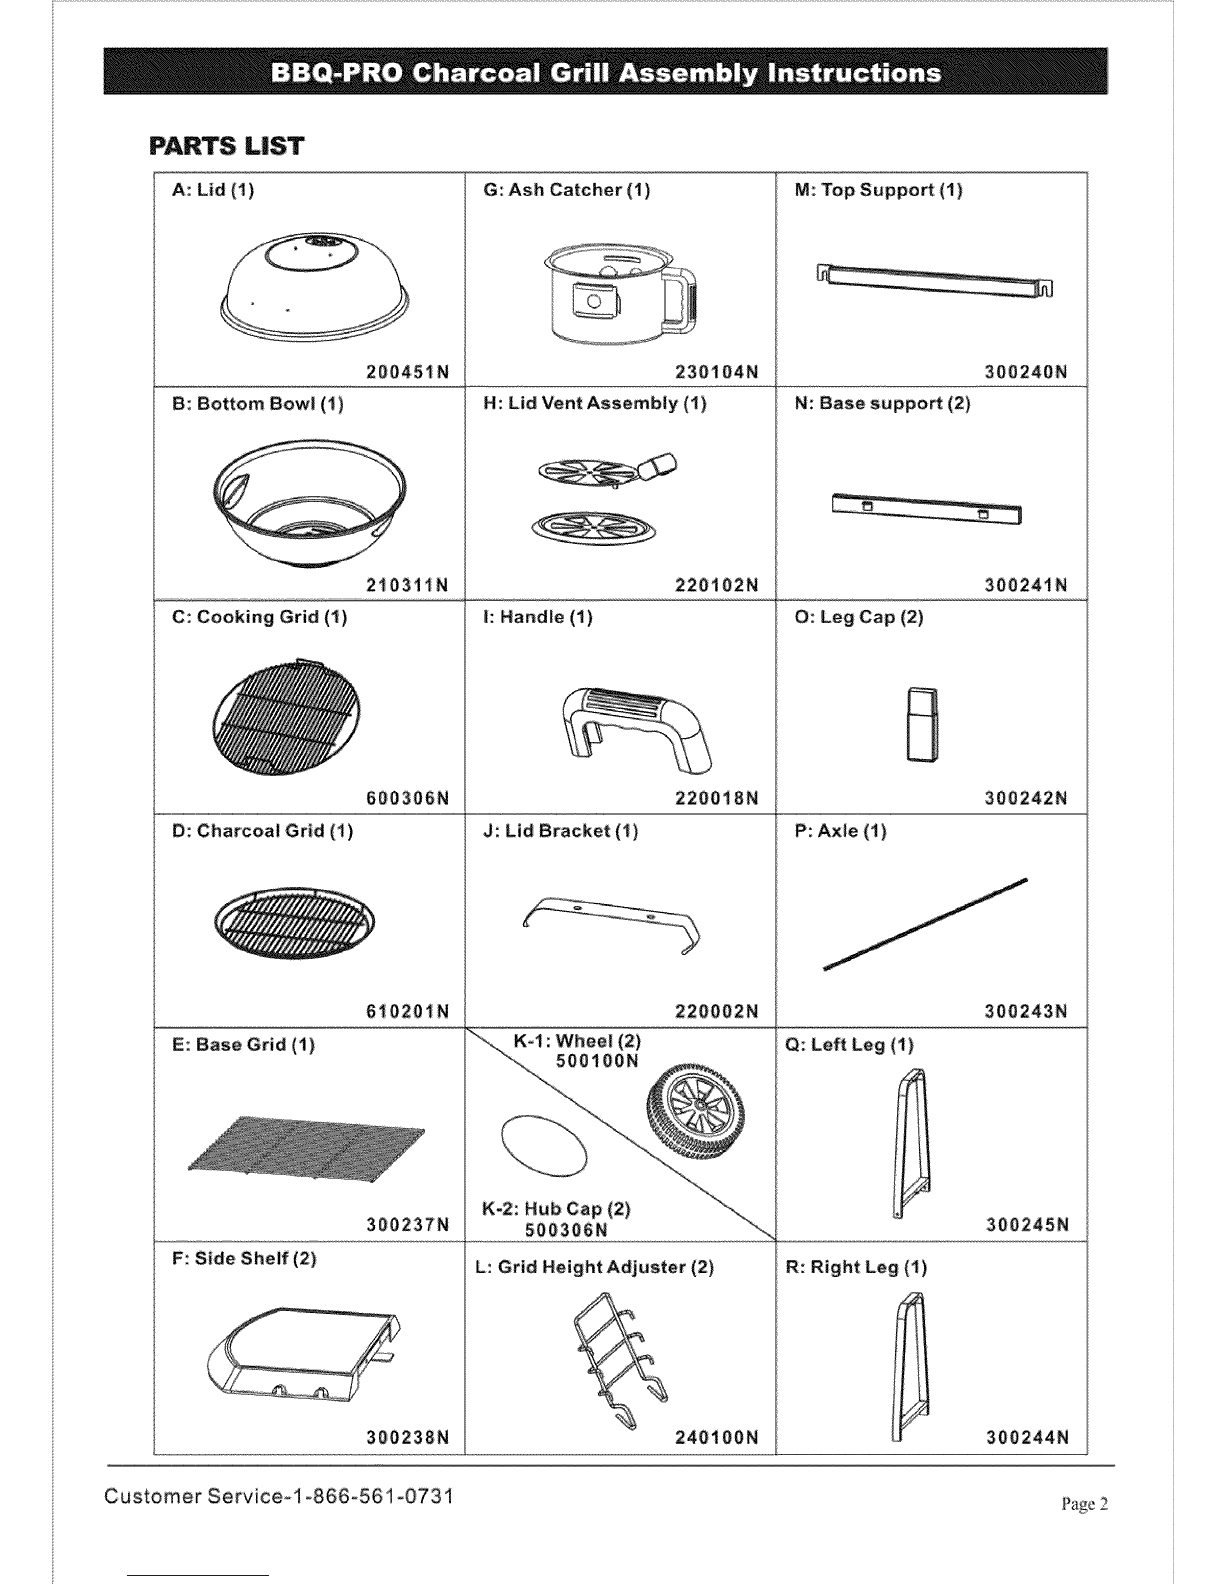
Verify that all parts are included with your grill before beginning assembly by checkb_g the Parts
List: inside. If all parts are not i:ncluded,, pl'ease...... eomail us ....atcnstomerse_'lce_i.yc!gus_£_!!!_''': _" ............ o_ call us
toll free 1o866o561o0731 (MoF 8:311 _4:30) (7I;
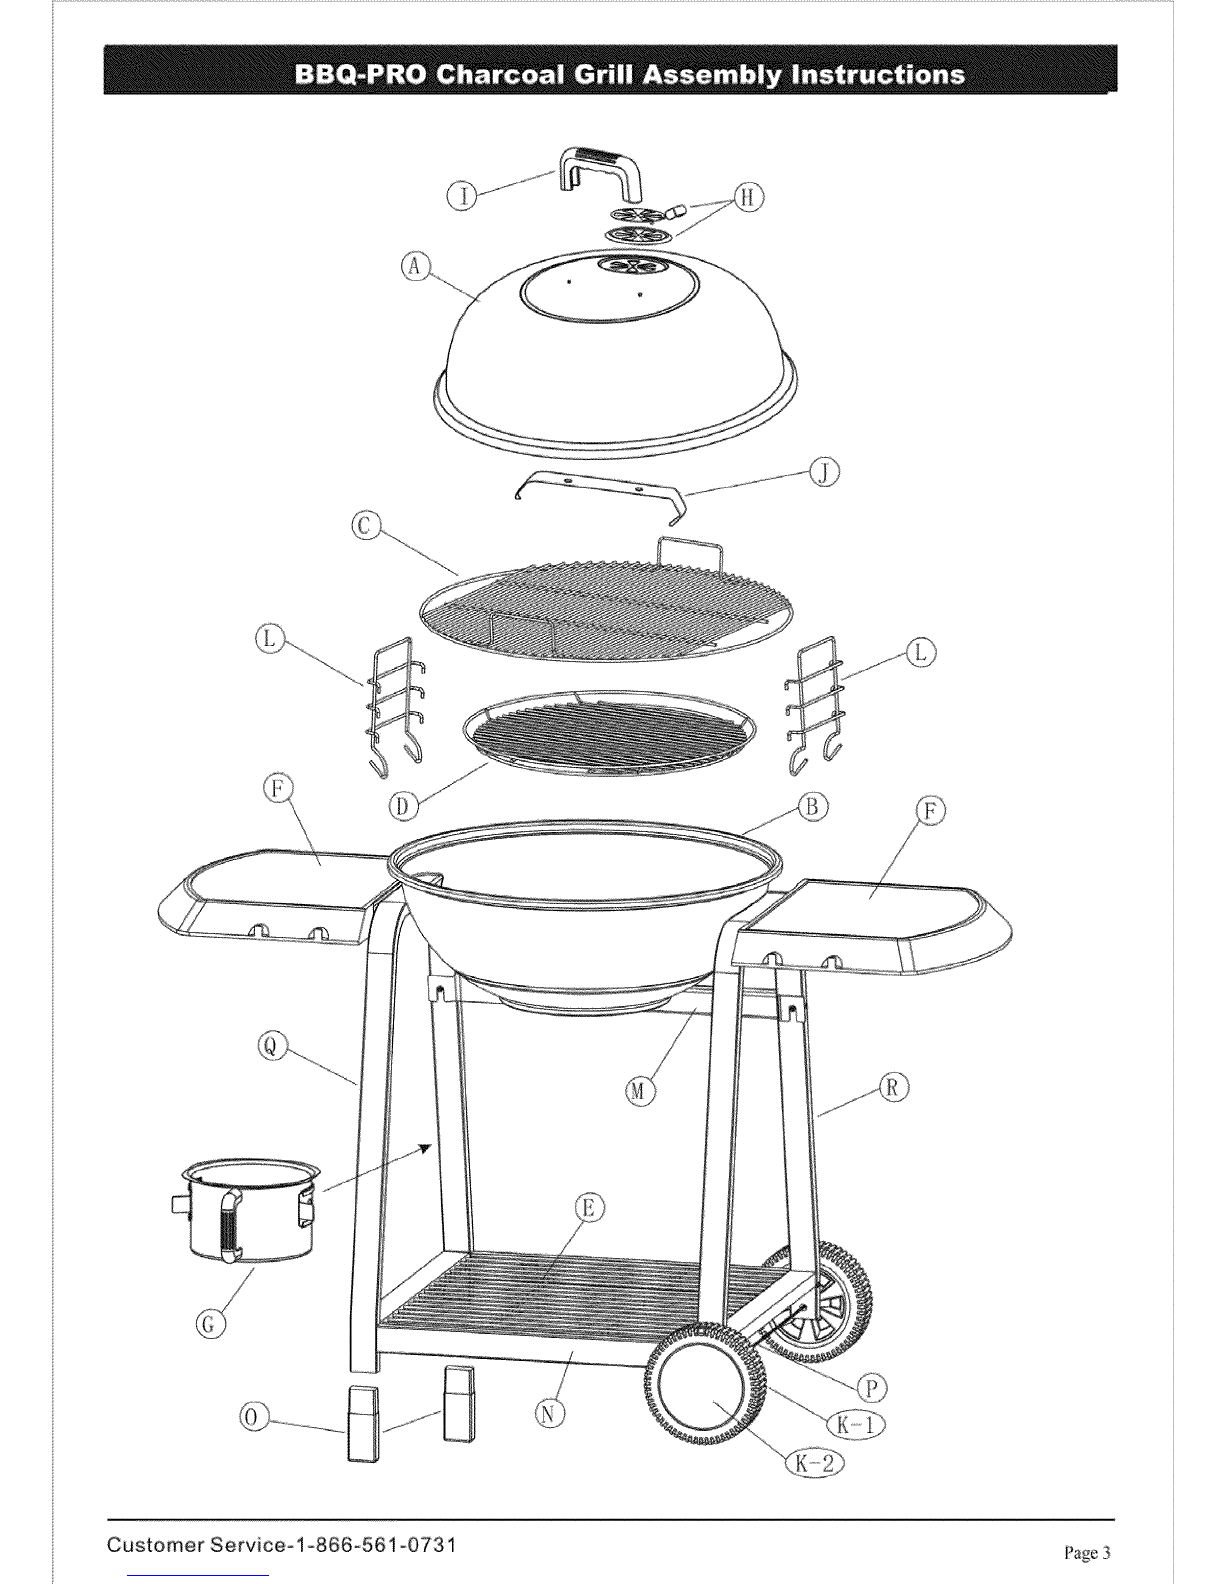
USE DIAGltJMM (S) PROVIDED FOR ASSEMBLY. Leave nuts half4ightened on the grill during
assembly until unit is completely assembled, then finish tightening nuts.
SAFETY GUIDELINES
1. This grill is intendcqJ for HOUSEHOLD OUTDOOR USE
ONUY. Do not attempt m use grill in enclosed areas or
under an overhead cx_ver _ff mV kind, including a tent or patio cover.
Your grill should never be used closer than 36 inches from wails on the back. and side(s) of grill.
2. Place your grill outdoors on a firm, level sarface_ Do not use this grill on a surface that will burn
or melt, such as a plastic or artificial sur/_lce or wood ruble. Keep grill away frorn wooden fences,
overhanNng trees, or other fiammaMe o[_jects beli._re adding and lighting charcoal.
3, DO NOT USE GASOLINE, ALCOHOL OR KEROSENE IN THIS . Use only commercial
charcoN lighter fluid with chalvoN briquettes or pre-soaked cha_oal bIiquetm;s. Prepare charcoal
according m the product's instructions. Do not cxcced 5 lbs of charcoal briquettes in this grill per use.
4. After lighting d_a;moal, do not leave grill unattended.
5. Remember to keep children and pets away from liI grill at all times.
6. NJ avoid hama to people, pets, or property,, do not move the grill once the cha_v:)al has been lit.
7. Once coals are lit, the grill and surrounding surti_.ces become yew hot. Use p_x_per outdoor cooking
mitts, umnsiN and avoid skin contact with NI hot surfaces on grill
8. _Ib extinguisih charcoal after cooking, dowse cons with sand or spray with a fine m-ist of watca'.
9. After your grill has cooled, remove ashes from the catcher aP_J cover, and store the grill when
not in use.
VCARN1NG! Combustion by-products produced when using this prodnct contain chemicals known
to the State of Caliibmia to cause cancer, birth deFecvs, and ether reproductive harm.
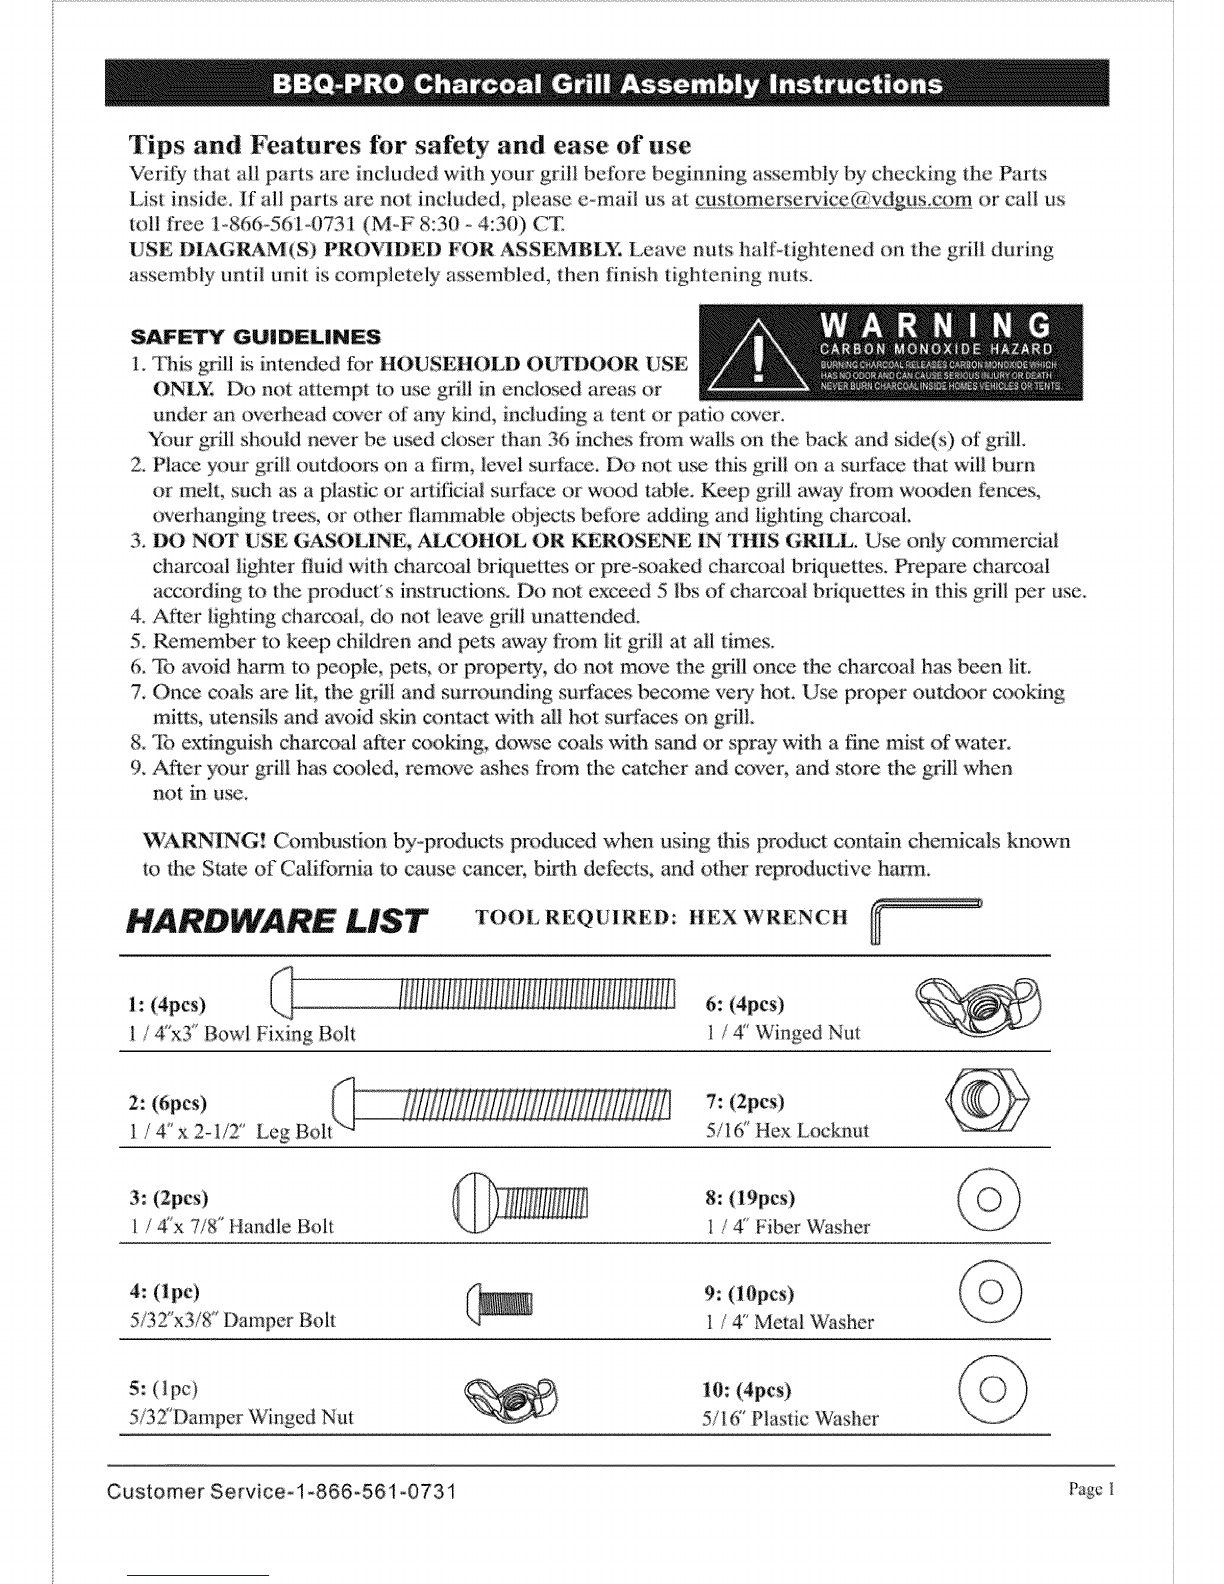
HARDWARE LIST TOOL REQUIRED: HEX WRENCH
I: (4pcs) _
l/4"xY Bow| Fixing B01t
6: (4pcs)
1/4" Winged Nut
2: (6pcs)
l/4" x 2-I/2 _ Leg B01t
7: (2pes)
5/1 (;_Hex Locknut
3: (2pes)
I/ 4x 7/8" Handle Bolt 8: (19pes)
1/4" Fiber Washer
4: (ipe) C_
5/32_x3/8" Damper Bolt 9: (lOpes)
1/4" Metal Washer
5: (lpc) 10: (4pes)
5/32"Damper Winged Nut 51(; _Plastic Washer
Customer Service-l-866-561-0731 Page !

PARTS LiST
A: Ltd (1)
B: Bottom Bowl (1)
C: Cooking Grid (i)
20045!N
2i0311N
G: Ash Catcher (1)
230104N
H: Lid Vent Assembly (1)
i: Handle (1)
220102N
N: Base support (2)
O: Leg Cap (2)
300240N
300241N
600306N 2200i8N 306242N
D: Charcoal Grid (I)
6t0201N 220002N
E: Base Grid (1)
F: Side Shelf (2)
300237N
300238N
J: Lid Bracket (1)
240100N
K-l:Whee|(2)
500100N
K-2:Hub Cap(2)
500306N
P: Axle (1)
Q: Left Leg (1)
R: Right Leg (1)
300243N
300245N
L: Grid Height Adjuster (2)
300244N
Customer Service- 1-866-561-0731 P_g_2

i
Customer Service-l-866-561o0731 Page 3

Remove all the parts from the carton.
and lay them out on a smooth, dean
surface. Verify the presence of aI1
parts by comparing to hardware
and Parts Lists o:n previous pages.
Do :not throw away any of tlhe packaging
until you locate all the parts.
STEP l_Set leg cap (O) to the end of
Iel?tleg (Q). Pm the slot of top suppoll (M)
on tl_e top round pole and put another slo_
of top support (M) on the top round pole
of left leg (Q) (see the diagram I).
Put the two base support (N)to the left &
rig_lt legs (Q)(R). Fix the top support (M)
and base support (N)m the left & right
legs (Q) (R) with 6 leg bolts (2) and 6 fiber
washers (8). Do not fully tighten all bolts temporarily.
I
STEP 2. inse_a axle (P) through d_e _om &
rear holes of right leg (R), put 2 plastic
washe_:s (I0), 2 wheels (K-l) and 2plastic
washers (10) each onto the ends of axle (P).
Screw the hcx locknuts (7) properly. Cover
hub caps (K-2) o_ both wheels (K-I), then
put the base grid: (E) onto base support (N).
Customer Service- 1-866-56 t-0731

STEP 3. Put the bottom bowl (B) in the middle
of|eft & right legs (Q)&(R). Attach side shelf(F)
to right leg (R) by inserting 2 bolts (1) througJa
2 metal washers (9), 2 fiber washers (8), r@_t
leg (R), bottom bowl (B), 2 fiber washers (8),
2 metal washers (9) and 2 winged nuts (6),
Repeat same procedure tbr the oNer side shelf.
B O t iiO _ F _:_O i_ i_
o (; i t ]
STEP4, Attach lid vent assembly (H)
by inserting damper bolt (4) through lid vent
assembly (H), lid (A)_ Inside of lid, place 1 fiber
washer (8), I damper winged nut (5) to damper
bolt: (4) and tighten.
Attach handle (I)by inserting 2handle
bolts (3) through 2 metal washers (9), lid
bracket (J), 2 fiber washers (8), lid (A),
2 fiber washers (8)into handle (I).
Customer Service- 1-866_561-0731 Pag_5

STEP 5. Hook bottom of grid height
adjusters (L) to side of charcoal grid (D),
slide grid height adjusters (L) through
the larger opening on the side of
cooking grid (CL
Insert cooking grid/charcoal
grid assembly imo bottom bow/(B),
Place top lid (A) on mp of bottom lid,
STEP6. Tighten all nuts and screws.
COOKING GRID!
CHARCOAL GRiD ASSEMBLY
Customer Service- 1o866-561-0731 Page 6

STEP 7. Slide ash catcher (G)
into the slots of bottom bowl (B).
Customer Service- 1-866o561-073 i Page7

ORDER PARTS #
a
B
C
D
1
1
1
E 1
F 2
G 1
H 1
R
i-10
LID
BOTTOM BOWL
COOKING GRID
CHARCOAL GRID
BASE GRID
SIDE SHELF
A SH CATCHER
LID VENT ASSEMBID[
200451 IN
210311N
610201N
300237N
300238N
230104N
220102N
I 1 HAN DLE 2200 ] 8N
J i LID BRACKET 220002N
K_ i 2 WHEEL 5001 ()ON
K._2 2 HUB CAP 500306N
L 2 GRID HEIGHT ADJUSTER 240100N
M I TOP S UPPORT 30024 ON
N 2 BASE SUPPORT 300241 N
O 2 LEG CAP 300242N
P 1 AXLE 300243N
Q 1 LEFT LEG 300245N
I RIGtIT LEG 300244 N
i HARDWARE PACK
WARNING: 'Tbensure that it is sa_e to eat, ff_od must be cooked
to {he minimmn internal temperatures listed in the mbe below.
USDA* Sail2 Minimmn Internal Temperatures
145 ° F
Egg Dishes
Steaks and Roasts of BeeI_ "v_zalof"Lamb
Veal or Lamb
Chicken Breast, etc._
*United States Department of Agdcultme
I60°F
145°F
160°F
165°F
165°F
90 Day Limited Warranty
If this BBQ-Pro product fails due to a defect in materiaI or workmanship within 90 days from
the date of purchase, return it to any Sears store or other BBQoPro outlet in the United States
with your proof of purchase for free replacemem,
This v_arramy gives you specific legal rights, and you may also have other rights which vary from
state to state.
Sears, Roebtick and Co., Hoffman Estates, IL 60179
For further inf0rmatiom comact the manufacturer, toll free at 1-866_561_0731.
Customer Service- 1-866-561-0731 Page 8
This manual suits for next models
1
Table of contents
Other Sears Grill manuals
Popular Grill manuals by other brands

Bestron
Bestron ASW113S instruction manual

Brinkmann
Brinkmann ALL IN ONE Owners manual assembly and operating instructions

SUNWIND
SUNWIND DISA 440526 user manual

Bravo
Bravo SearMagic Assembly and maintenance instructions

Brinkmann
Brinkmann Grand Elite Series 4905 owner's manual

Napoleon
Napoleon PRO 600 manual