Sears CRAFTSMAN 397.19340 User manual

Sears
Owner's
Manual
MODEL
NO
397.19340
SERIAL
NO.
_
MODELANDSERIAL
NUMBERMAYBEFOUND
ON THENAMEPLATE
LOCATEDONTHE
FRONTOFTHETOOL.
YOUSHOULDRECORD
BOTHMODELAND
SERIALNUMBERAND
RETAININA SAFE
PLACEFORFUTURE
USE.
DANGER
-
ForYour Own
Safety,Read
andUnderstand
thisManual
Before
Operating
Grinder.
CRAFTSMAN
1/2
H.P.
GRINDER
•
Assembly
•Operation
•Installation
•RepairParts
Sold
by
SEARS,ROEBUCK
AND
CO.,
Chicago,
IL
60684,
U.S.A.
Printedin
U.S.A.
5/77
PartNo.22005364C3564

RULES
FOR
SAFE OPERA TION
Readinstructionsbeforeusinggrinder
-FOR BENCHGRINDERS-
1.
EXAMINE GRINDING WHEELSFORCRACKSor5.DONOTFORCEWORKagainstthe grindingwheel!
otherdamagebefore operating.Excessivepressuremaycausedamageorbreakageof
REPLACECRACKEDWHEELIMMEDIATELY.the grinding
wheel,
resultingin injurytothe operator
or bystander.
2.
DONOTOVER-TIGHTENWHEELNUTS.
3. USEONLY WHEEL FLANGES FURNISHEDWITH
GRINDER.Useof otherflangesmaycausedamageor
breakagetothegrinding wheelandresultin injuryto
theoperator.
4. MOUNTTHE GRINDER SECURELYtoprevent
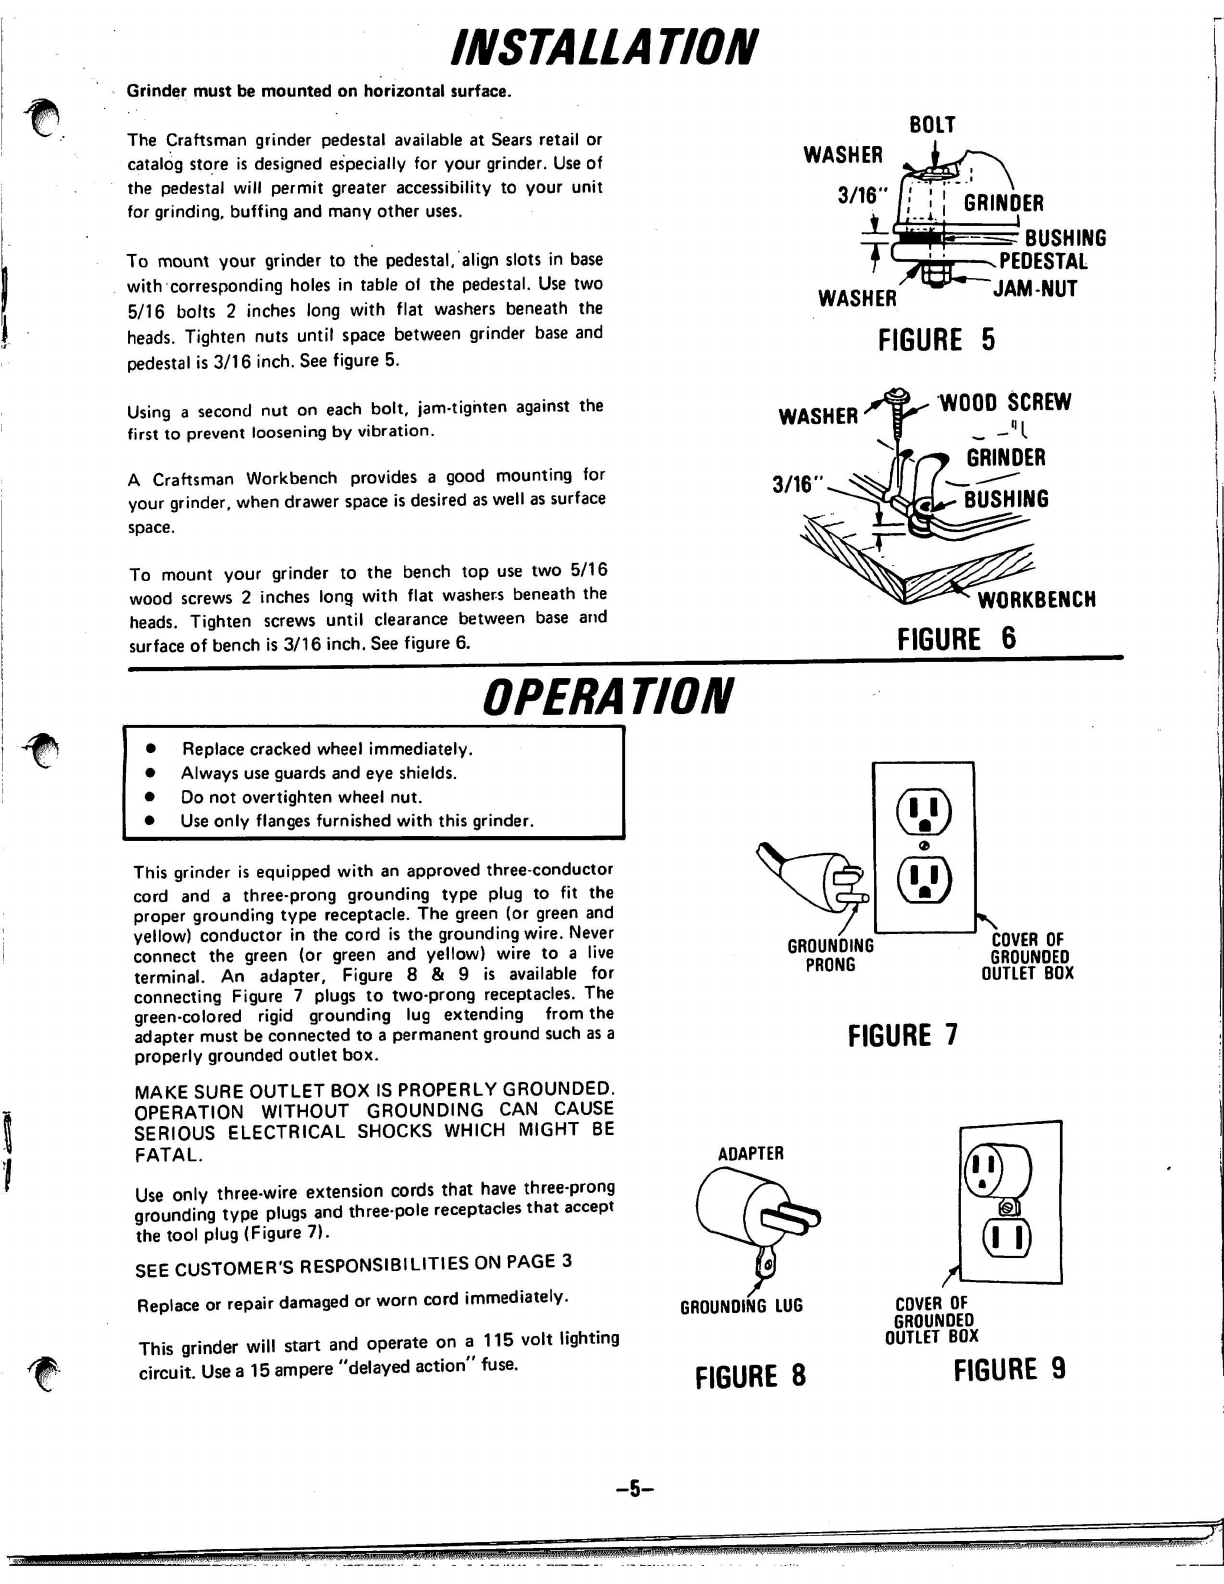
damage.See"INSTALLATION"page.
6. STOP GRINDER
ADJUSTMENTS.
BEFORE MAKING
7. ALWAYSUSE
GUARDS
AND EYESHIELDS.
8. ADJUSTDISTANCE BETWEENWHEELANDWORK
RESTto maintain1/16inchorlessseparationasthe
diameterofthewheeldecreaseswithuse.
-FORALLTOOLS-
1.
KEEPGUARDS
IN
PLACEandinworkingorder.
2.
REMOVE ADJUSTINGKEYSAND WRENCHES.
Form habitof checkingtoseethatkeysandadjusting
wrenchesareremovedfromtool beforeturningiton.
3. KEEPWORKAREA CLEAN.
benchesinviteaccidents.
Clutteredareasand
4. AVOID DANGEROUS ENVIRONMENT. Don'tuse
power toolsindamporwet locationsorexposethem
to
rain.
Keepworkareawell lighted.
12.
DON'T OVERREACH.Keepproper footingand
balanceatalltimes.
13.
MAINTAIN TOOLSWITH CARE.Keep toolssharp
andcleanforbestandsafest performance. Follow
instructionsfor lubricatingandchangingaccessories.
14.
DISCONNECT TOOLS before servicing;when
changingaccessoriessuchasblades,bits,cutters,etc.
15.
AVOID UNINTENTIONAL STARTING.Makesure
switchisin"Off" position beforepluggingin.
5. KEEPCHILDREN AWAY.All visitors shouldbekept
asafedistancefromworkarea.
6.
MAKE
WORKSHOP KID-PROOFwithpadlocks,
masterswitchesorby removingstarterkeys.
7. DON'TFORCE TOOL.Itwilldothejob betterand
saferattherateforwhichitwasdesigned.
8. USE RIGHT TOOL. Don't forcetoolor attachmentto
do a j o bitwasnotdesignedfor.
9.
WEARPROPER APPAREL.Noloose clothingor
jewelrytogetcaughtin moving parts.Non-slip
footwearis recommended.Wear protectivehair
coveringto containlonghair.
10.
USE SAFETYGOGGLES which complywithANSI
Z87.1-1968.
Alsousefaceordustmaskif cutting
operationisdusty.
11.
SECUREWORK.Useclampsora visetoholdwork
when practical.It'ssaferthanusingyourhandandit
freesbothhandstooperate
tool.
16.
USE RECOMMENDEDACCESSORIES.Consultthe
owner'smanualforrecommendedaccessories.Theuse
of improperaccessoriesmaycausehazards.
17.
NEVERSTANDONTOOL.Seriousinjury couldoccur
if
thetoolis tippedorifthe cuttingtoolis
unintentionally contacted.
18.
CHECK DAMAGED PARTS.Beforefurtheruseofthe
tool,
a guardor otherpartthatisdamaged shouldbe
carefullycheckedtoassurethatitwilloperate properly
and performits intended function—checkfor
alignmentof moving parts, bindingof moving parts,
breakingof parts, mounting,andany other conditions
thatmay affectits operation.A guardor otherpart
thatisdamaged shouldbe properlyrepairedor
replaced.
19.
GROUNDTHE OUTLETBOXto preventpossible
fatalshocks.See"OPERATION"page.
20.
NEVER LEAVETOOL RUNNING UNATTENDED.
JW\
powertoolinstitute,inc.
-2-

FULLONEYEARWARRANTYONCRAFTSMANGRINDER
If thisCraftsmanGrinderfailstogivecompletesatisfactionwithinoneyear
from
thedateofpurchase,returnittothenearestSearsstorethroughouttheUnited
StatesandSearswillreplaceitfreeofcharge.
Thiswarrantygivesyouspecificlegalrights,andyoumayalsohaveotherrights
whichvaryfromstatetostate.
SEARS,
ROEBUCKANDCO.
BSC41-3
SEARSTOWER
CHICAGO,
IL
60684
COMPARISONOFRATEDHORSEPOWERANDDEVELOPEDHORSEPOWER
A RATEDhorsepower motor normallyhas approximatelyTWICEthe breakdown torque strength,TWICEthe maximum
momentarypower output capabilityandTWICEthepoweroutputcapabilityfor prolongedoperationwithoutdamage,when
comparedtoa DEVELOPEDhorsepower motorofthesamehorsepower.
CUSTOMER'S RESPONSIBILITIES
WARNING:MAKESURERECEPTACLEBOXISPRO-
PERLY GROUNDED. OPERATION WITH-
OUT GROUNDINGCANCAUSESERIOUS
ELECTRICALSHOCKS WHICH MIGHTBE
FATAL.
Thisgrinderwill startandoperateona 115volt lighting
circuit.Usea
15
ampere"delayedaction"fuse.
Replacea damagedorworncord immediately.
WEARYOUR
SAFETY„ GOGGLES
FORESIGHTISBETTER
THANNOSIGHT
If
necessarytousean extension,useonly3-wirecords
whichhave3-prong groundingtypeplugsand
3-pole
receptacles whichacceptthe tool's
plug.
The following
chartoflengthsandwiresizes
must-be
followedforsafe
operation.
Lengthof
Extension
15
feetorless
50 feetorless
100feet
orless
WireSizeRequired
(AmericanWireGaugeNo.!
No.
14
No.
12
No.
10
THE OPERATIONOFANYPOWERTOOLCAN
RESULTIN FOREIGNOBJECTS BEING THROWN
INTOTHE EYES,WHICHCANRESULTINSEVERE
EYEDAMAGE.ALWAYSWEARSAFETYGOGGLES
WHICH COMPLYWITH AMERICAN NATIONAL
STANDARD (ANSI) Z87.1-1968BEFORECOM-
MENCINGPOWERTOOL OPERATION.
AdditionalfaceprotectionisavailablebyuseofWide-
VisionFaceMaskwhichmaybeobtainedatyourSears
RetailorCatalogStores.

ASSEMBLY
STEP1
INSPECT GRINDING WHEELSFOR DAMAGE BEFORE USING.
EYESHIELD
Attach wheel coversto wheel guards usingsix screws (8-32
x3/8HxHd) furnished.Seefigure1.
STEP
2
Attach spark arrestertotop frontof wheel guardasshown.
Notethatheadof screw (5/16-18x 1/2PanHd)with
lockwasher attached slidesintoslot provided. Adjust spark
arresterto
1/16
inchfrom wheeland tightennut.See figure
1.
STEP
3
Fasten eyeshieldtotopof wheelguard using bolts-
r/4-20
x2%)andwing nuts.See figure1.
r\r_MSB>^
WHEEL
COVER
SPARK
ARRESTER
I
r
FIGURE
1
STEP
4
Attach tool reststo bottom frontof wheel guards inserting
bolts- 5/16-18x 3/4from innersideof guardsasshown.
Add washersandwing nuts.Seefigure2.
STEP
5
Insert4 base bushingsin slots providedateach cornerof
baseas shownin illustration.Thick section of bushing
extends below grinder base. Seefigure2.
TOOL
REST
^~N.^E@
O^
BASE
BUSHING
FIGURE
2
STEP
6
Assemblelamp shade coverto metallamp shadewith screw
8-32
x 1/4PanHd. Clampthis assemblytolamp holder.
Either40watt "regular"or50watt "rough service"
bulbsare recommendedinyour grinder lamp.See figure3.
STEP
7
Mount quenchtrayto frontof coverbandin knockoutslot
provided.
Lipatsideoftray hooksinto slot.See figure3.
LAMP
SHADE
COVER
LAMP
SHADE
QUENCH
TRAY
FIGURE
3
STEP
8
Theillustration showshowthe washer spacersare assembled
to your grinderwhen buffing wheelsand other accessories
are used.See Figure4. Spacer washersarenotusedor
requiredwith standard grinding wheels.
WASHER
SPACERS
ACCESSORY
WHEEL
WHEEL
FLANGE
-4-
FIGURE
4

INSTALLATION
Grindermustbemountedonhorizontalsurface.
The Craftsman grinderpedestalavailableatSears retailor
catalogstoreisdesignedespeciallyforyourgrinder.Useof
thepedestalwill permitgreateraccessibilitytoyourunit
forgrinding,buffingandmany otheruses.
To mountyour grindertothe pedestal,alignslotsinbase
withcorrespondingholesintable
ol
the pedestal.Usetwo
5/16
bolts2 incheslongwithflatwashersbeneaththe
heads.
Tightennuts untilspace betweengrinderbaseand
pedestalis
3/16
inch.See figure5.
Usinga secondnutoneach bolt, jam-tightenagainstthe
firsttopreventlooseningby vibration.
A Craftsman Workbenchprovidesa good mountingfor
your grinder,when drawerspaceisdesiredaswellassurface
space.
To mountyour grindertothebenchtopusetwo5/16
woodscrews2 incheslongwithflatwashers beneaththe
heads.
Tightenscrews untilclearance betweenbase
and
surfaceof benchis
3/16
inch.Seefigure6.
BOLT
WASHER
3/16'
WASHER
FIGURE
GRINDER
BUSHING
PEDESTAL
JAM-NUT
WOODSCREW
GRINDER
WASHER
BUSHING
WORKBENCH
FIGURE
6
OPERA TION
•Replace cracked wheel immediately.
• Alwaysuseguardsandeyeshields.
•Donot overtighten wheelnut.
•Useonlyflanges furnishedwiththis grinder.
Thisgrinderisequippedwithan approved three-conductor
cordanda three-prong groundingtypeplugtofitthe
proper groundingtype receptacle.Thegreen(orgreenand
yellow) conductorinthecordisthe groundingwire.Never
connectthegreen(orgreenand yellow)wiretoa live
terminal.
An
adapter.
Figure8 & 9 isavailablefor
connecting Figure7 plugsto two-prongreceptacles.The
green-coloredrigid groundinglug extendingfromthe
adaptermustbeconnectedtoa permanent groundsuchas a
properly groundedoutletbox.
MAKESUREOUTLETBOXISPROPERLY GROUNDED.
OPERATION WITHOUT GROUNDINGCAN CAUSE
SERIOUS ELECTRICAL SHOCKS WHICH MIGHTBE
FATAL.
Useonly three-wire extensioncordsthathave three-prong
groundingtypeplugsandthree-polereceptaclesthataccept
thetoolplug(Figure7).
SEECUSTOMER'S RESPONSIBILITIESONPAGE 3
Replaceor repairdamagedorworncord immediately.
This grinderwill startand operateon
a
115volt lighting
circuit.Usea
15
ampere"delayed action"fuse.
GROUNDING
PRONG
N
COVEROF
GROUNOED
OUTLETBOX
FIGURE
7
ADAPTER
GROUNDINGLUG
FIGURE
8
COVEROF
GROUNDED
OUTLETBOX
FIGURE
9

OPERATION
-
CONT'D
1.
WARNING:
BE SAFE!PROTECTYOUR EYES.WEARAPPROVED
SAFETY GOGGLES WHICHCOMPLYWITHANSI
Z87.1-1S68.ASSEMBLEEYE SHIELDS FURNISHED
WITHYOUR GRINDER. STANDAWAYFROM
FRONTOF GRINDER DURING FIRST MINUTEOF
OPERATION.
THE OPERATIONOFANYPOWERTOOLCAN
RESULTIN FOREIGNOBJECTS BEING THROWN
INTOTHE EYES,WHICHCAN RESULTINSEVERE
EYE DAMAGE.ALWAYSWEAR SAFETYGOGGLES
BEFORECOMMENCINGPOWERTOOLOPERATION.
2.
Tostart,moveswitchto"ON"position.Ifgrinder
doesnotstartimmediately,disconnectpowerand
checkforvoltageatpowersource.
3. Thetoolrestsshouldbepositionedsecurelysothat a
clearanceofapproximately1/16inchcanbe
maintainedbetweenwheelandtoolrests.Adjustthe
toolrestsothatthematerialtobegroundwillcontact
thewheelslightlyabovecenter-lineofshaftatthe
desiredangle,
as
showninfigure10.
WARNING:
ADJUSTMENTS SHOULDBEMADEONLYWHEN
GRINDERHASSTOPPEDTOPROTECT AGAINST
INJURY.
I.
WARNING:
DO NOTGRINDONSIDEOFWHEEL.
DO NOT
FORQEWORK
AGAINSTTHE GRINDING
WHEEL!EXCESSIVEPRESSUREMAYCAUSE
DAMAGEOR BREAKAGETOTHE GRINDING
WHEEL, RESULTINGIN INJURYTOTHE
OPERATOROR BYSTANDER.
SEECUSTOMER'S RESPONSIBILITIESONPAGE 3
CLEARANCE
TOOLREST
SLIGHTLYABOVE
CENTER-LINE
OF SHAFT
FIGURE
10
MAINTENANCE
1.
Whenvitrifiedwheelsbecomeirregularorglazedfrom
use,
theymaybetruedandcleaned,returningthemto
near-newconditionwiththecuttingfacefreshand
square.Usea Searswheeldressertokeepyourwheels
in goodcondition.AvailableatSearsretailstoresor
throughcatalog.
WARNING: WHEEL GUARDANDCOVERMUSTBE
ASSEMBLEDWHEN WHEELDRESSERIS
USEDTO PROTECTOPERATORFROM
INJURY.
2.
Replacegrindingwheelwhendiameterhasbeenreduced
1 "
throughwear.Undersizewheelsarea hazardto
operatorsafetyasproperspark
arrestor
andtoolrest
adjustmentscannotbemaintainedwithundersize
wheels.Replacementwheelsare
available
atSears
retailorcatalogstores.
3. Examinereplacementgrindingwheelforcracksor
otherdamagebeforeassemblingtospindle.
4. Cleanoutanyaccumulationofcuttingsandabrasive
eachtimeouterwheelcoverisremoved.
5. WhenreplacinggrindingwheelsDONOT
OVER-
TIGHTENNUT. EXCESSIVEPRESSURECAN
DAMAGE WHEEL.Werecommendthatwheelnutsbe
tightenedto75inchpounds.Besureflangesandwheel
blottersarefreeofforeignparticles.Besurethemaxi-
mumspeedratingofyourreplacementwheelcorre-
sponds'to
orexceedstheratingofyourgrindername-
plate.
6. Lubricationwasprovidedatthefactoryforthelifeof
theballbearings.
BE SAFE-OBSERVEALLTHERULESFORSAFEOPERATION
!

CRAFTSMAN1/2H.P.GRINDER- MODEL NUMBER 397.19340
STARTING
HILM
IDÍNTIFIÍD
CONDUCTOR
SWITCH
3fi
-W
Key
1
2
3
4
5
6
7
8
9
10
11
12
13
14
15
16
17
18
19
20
21
22
23
24
25
26
27
PartNo.
22005336
STD600803
3160353
9428172
22001523
5201093
5353426
3160352
4988540
3167424
5211995
22005344
4990629
4978296
4971959
4971958
5219097
3187112
STD600802
4988542
5201092
STD541350
5375637
4971779
STD541110
3169206
22014998
PARTNAME
Rotorand Bearing Assembly
•Screw,
8-32x 3/8HexHd SJottedSelfTap
Wheel Cover
Nut,
%-20
Hex (L.H.Thread)
Wheel Flange
'Grinding
Wheel (Coarse-36 Grit) (L.H.)
•Screw,
%-20
x 1/2HexHdSelfTap
Wheel Guard
End Frame (L.H.)
Felt Washer
Ball Bearing Spring
StatorandCoil Assembly
Band
Gooseneck& Socket Assembly
Lamp Shade—Metal
Cover—Lamp Shade
•Nut (1/8-27
Pipe Thread)
*Lockwasher
Screw,8-32x
Y>
PanHeadSelfTap
End Frame (R.H.) CableEnd
•Grinding
Wheel (Fine- 60 Grit) (R.H.)
•Nut,
1
/4-20
Hex
•Spacer
(Accessory)
J4
I.D.
Thru Bolt, 10-32 Thread
•Nut, 10-32 Thread
Grommet
Name Plate
Qty.
1
8
2
1
4
1
6
2
1
2
2
1
1
1
1
1
1
2
1
1
1
1
4
3
3
1
1
Key
28
29
30
31
32
33
34
35
36
37
38
39
40
41
42
43
44
45
46
47
48
49
50
51
PartNo.
3161432
9437389
4984992
STD551108
5537401
4998257
STD541631
STD551031
STD523107
4998263
4998262
5336943
9434158
3168889
22005349
4978534
3161437
3161434
9437023
STD541625
3176154
3175504
442689
STD541031
22005364
PARTNAME
SpringClip
Screw,
8-32
x 1-3/4HxHdSelfTap
Switch
•Lockwasher,
No. 8
Base Bushing
ToolRestPack (Inc.R.H.& L.H.Set)
•Wing
Nut,
5/16-18
•Washer,
5/16Flat
"Bolt,
5/16-18
x 3/4HexHead
ToolRest (L.H.)
ToolRest (R.H.)
QuenchTray
•Screw,
8-15
x
%
HexHdSelfTap
Covers
Starting Relay
Cable Assembly
EyeshieldPack (Inc.2 ea.45,46,47)
Eyeshield
•Screw,
%-20
x 2%HxHead
•WingNut,
'¿-20
Thread
Spark ArresterPack (Inc.2 ea.49, 50,51)
Spark Arrester
Screwand
L.W.,
5/16-18
x
54
PanHead
•Nut,
5/16-18
Hex
Owner's Manual
•Standard Hardware
Items
— Maybepurchased locally.
Qty.
5
4
1
1
4
1
2
2
2
1
1
1
5
1
1
1
1
2
2
2
1
2
2
2

Sears
Owner's
Manual
MODELNO
397.19340
Sears
SERVICE
is at
YOUR
SERVICE
HOW
TO
ORDERREPAIRPARTS
The Model Numberwillbefoundonthename plate attached
to
the
front
ofthe
CoverBand
of
your Grinder. Always
mentionthe Model Numberwhen requestingservice
or
repair
partsforyour CRAFTSMAN GRINDER.
All parts listed hereinmay
be
orderedfromanySears,Roe-
buck
&
Co.
or
Simpsons-SearsLtd. retail
or
catalog store.
If
thepartsyouneedarenot stocked locally,your orderwillbe
electronically transmitted
to
Sears RepairParts Distribution
Centerfor expedited handling.
WHENORDERING REPAIR PARTS,ALWAYSGIVETHE
FOLLOWING INFORMATIONASSHOWNINTHIS LIST.
1.
The
PART NUMBER
2.
The
PART DESCRIPTION
3. The MODEL NUMBER
397.19340
4.
TheNAME
OF ITEM-
GRINDER
YourSearsmerchandise takeson added valuewhenyoudis-
coverthatSearshasover 2,000Service Unitsthroughoutthe
country.Each
is
staffed
by
Sears-trained, professional
tech-
niciansusingSearsapproved methods.
Sold
by
SEARS,ROEBUCK
ANDCO.,
Chicago,
IL
60684,
U.S.A.
PartNo.22005364 C3564
Printedin
U.S.A.
5 / 7 7
Table of contents
Other Sears Grinder manuals