Sears L-DN1737SST-C-T User manual

See our extensive assortment of outdoor living products
on-line at www.sears.com and www.kmart.com
Made in / Hecho en CHINA
Distributed by Sears, Roebuck and Co., Hoffman Estates, IL 60179
For questions or comments about product:
Please refer to part numbers when reordering
USE AND CARE GUIDE
Date of Purchase: _____/ _____/ _____
Back Painted 32 x32 Fire Pit
Product Code: D71 M56689
UPC Code: 841057143148
11in
17in
Caution: Carefully Read Instructions and Procedures for Safe Operation


1
Back Painted 32x32 Fire Pit
This appliance complies with “ANSI Z21.97-2014/CSA 2.41-2014, Outdoor Decorative Gas Appliances.
DANGER
If you smell gas:
1. Shut off gas to the appliance.
2. Extinguish any open flame.
3. If odor continues, keep away from the
appliance and immediately call your gas
supplier or fire department.
WARNING: For Outdoor Use Only.
WARNING:
Improper installation, adjustment, alteration,
service or maintenance can cause injury or
property damage. Read the installation,
operating and maintenance instructions
thoroughly before installing or servicing
this equipment.
WARNING
Do not store or use gasoline or other flammable vapors and liquids in the vicinity of this or
any other appliance.
An LP-cylinder not connected for use should not be stored in the vicinity of this or any other
appliance.
DANGER CARBON MONOXIDE HAZARD
This appliance can produce carbon monoxide which has no odor.
Usingitinanenclosedspacecankillyou.
Never use this appliance in an enclosed space such as a camper, tent,
car or home.
Propane tank not included
AA battery needed, not included

2
General information
Specification
Expanded view
Parts list
Installation
Location
Set up
Gas connection
Operation
Important safety information and precaution
.....................................................
.............................................................
.........................................................................
....................................................................
.......................................................
........................................................................
........................................................................
.................................................................
............
2
3
5
6
7-10
............................................................................ 11
11
3-4
11-12
12
Leak check ..................................................................... 12
Ignite lighting ........................................................... 12-13
Trouble shooting .......................................................... 14
Limited warranty ...................................................... 14
Cleaning and maintenance ........................................ 15
Storage and Maintenance ......................................... 13
Table of Contents
Thank you for your purchase!
General Information
Thank you for your purchase!
We are pleased that you have chosen Sears for your outdoor
gazebo purchase. We hope that you enjoy the unmatched
quality, comfort, and style of your new patio item. Every piece
is meticulously considered all the way down to the smallest
details, exclusively for you, by our world class design team.
We know you have a choice when it comes to your patio
gazebo needs, so from our team to yours, thank you for letting
us be a part of your outdoors.
IMPORTANT
Please take time to read these instructions thoroughly and follow each step carefully for
safe and easy operation. Keep this manual to consumer for installer and consumer future
reference/use.
We would like to hear from you with any comments or suggestions. In the continental U.S.,
you can call Sunjoy Toll Free number: 1-866-578-6569 from 8:00 AM EST to 8:00 PM PST
Monday to Friday.
15
Please do not return this product to the store. For technical assistance on
assembly or replacement parts call Sunjoy Group at 1(866) 578-6569 from
www.sunjoyonline.com to place your order or fax your parts replacement order
form together with your purchase receipt to 1 (740) 283-3549 for assistance.
Made in China
Clening and Maintenance
●
To enjoy outstanding performance of your appliance for years make sure to
perform the following maintenance activities on a regular basis.
●
Keep exterior surfaces clean.
●
Use warm soapy water for cleaning. Never use flammable, corrosive or abrasive
cleaners.
●
Clean the holes in the burner using a swab that is moistened with soapy water.
Keep the holes unobstructed by using a heavy-duty pipe cleaner. The burner
must be dry
before normal use. Cleaning period should be 1 year.
●
While washing your unit, be sure to keep the area around the burner and pilot
assembly dry at all times. If the gas control is exposed to water in any way, DO
NOT try to use it. It must be replaced.After a long break from operation, the unit
should be inspected for spiders, spider webs or other insects.
Air flow must be unobstructed, Keep controls, Burner and circulating air
passageways clean.
Signs of possible blockage include:
—Gas odor with extreme yellow tipping of flame.
—Table does NOT reach the desired temperature.
—Table flow is excessively uneven.
—Table makes popping noises.
—Spider and insects can nest in burner or orifices.
—Compressed air may help clear away smaller particles.

3
Specification
Imporatnt safety information and precaution
Product name Back Painted 32x32 Fire Pit
Model NO. L-DN1737SST-C-T
Rated Heat Output 35,000BTU/HR
Fuel Propane-LP
Gas Supply 20 lb. LP-Gas cylinder
Manifold Pressure 11 Inches W.C.
Orifice Size (diameter) 1.9mm
Gas Supply Pressure Max.250 PSI
●When the appliance is for connection to a fixed piping system, the installation
must conform with local codes, or in the absences of local codes with the
National Fuel Gas Code, ANSI Z223.1/NFPA54; International Fuel Gas Code,
Natural Gas and Propane Installation Code, CSA B149.1; or Propane Storage
and Handling Code, B149.2, as applicable.
●The LP gas supply cylinder to be used must be:
1-Constructed and marked in accordance with the U.S. Department of
Transportation (D.O.T.) Specifications for LP-Gas Cylinders, or the Standard
for Cylinders, Spheres and Tubes for transportation of Dangerous Goods
and Commission, CAN/CSA-B339 as applicable;
2-Provided with a listed overfilling prevention device;
3-Provided with a cylinder connection device compatible with the connection
for the appliance.
●Always place the appliance on a firm and level surface.
●Solid fuels shall not be burned in this gas appliance. When using decorative
Lava Rocks, use only the lava rocks we provided (INCLUDED).
●The appliance shall be used only outdoors in a well-ventilated space and
shall not be used in a building, garage or any other enclosed area.
●When in use, keep the appliance area clear and at least 40 inches / 101.6
cm side clearance from combustible materials, gasoline and other flammable
liquid and vapors. Do not use the appliance under overhead combustible
surfaces. Certain items or materials, when stored under the appliance or
nearby, will be subjected to radiant heat and could be damaged.
●Open the door and inspect the hose assembly and burner prior to each use.
If there is evidence of excessive abrasion or wear or if the hose or burner is
damaged, it must be replaced by appropriate part from the manufacturer.
14
If you want to replace the parts listed, please contact SUNJOY Customer Service Center.
Trouble Shooting
Subject to the conditions set out below, this product is warranted to the original
purchaser to be free from defects in workmanship and materials for one (1) year from
the date of purchase.
●
Satisfactory proof of the purchase date must be furnished at the time of notification
of the defect for any claim under the warranty to be enforceable.
●
This warranty covers all parts found defective in workmanship and/or materials during
the warranty period and can be repaired or replaced at the discretion of the manufacturer
at no cost to the original purchaser.
●
This warranty will be void if the product has not been assembled, installed or operated
according to the instructions, or subjected to abuse, improperly treated, neglected,
rusted by exposure to the elements, misused and/or if any repairs, maintenance, or
service has been done by an unauthorized person.
●
Returns must be properly packaged and returned to the dealer from whom the
product was acquired.
●
The manufacturer, distributor and retailer will not be liable for any incidental or
consequential loss or damage arising from the installation or operation of the product
and/or the failure of any part for any reason.
●
There are no other express or implied warranties, except for those stipulated herein.
This warranty gives specific rights and the original purchaser may have additional
rights and remedies in law.
●
This warranty does not cover commercial use.
Limited Warranty:
PROBLEM OBSERVED POSSIBLE CAUSE CORRECTIVE MEASURES
Gas odor Gas leak See “If you smell gas:” on front
cover of manual
Check all gas connections
Delayed ignition Low gas pressure
Clogged or dirty burner
ports Blocked orifice
Spent battery
Check gas supply pressure
Clean burner ports-see manual
section
Check orifice opening
Change new battery
Incorrect burner flame Incorrect gas supply or
pressure Blocked orifice
Clogged or dirty burner
ports
Check gas supply pressure
Check and clean orifice opening
Clean burner ports

Imporatnt safety information and precaution
4
●Inspect the gas connections of the appliance prior to each use. Do not to
operate the unit if there is a gas leak. Have the appliance inspected annually
by a qualified service person.
●The pressure regulator and hose assembly provided with the appliance must
be used. The replacement part must be the same as the part specified by
manufacturer.
●The assembly of LP-gas and leak checking please refer to the “Gas connection”
on page 8 and “leak Test” on page 9.
●Do not use the appliance if any part has been under water. Immediately call
a qualified technician to inspect the appliance and to replace any part of the
control system and any gas control which has been under water.
●LP-gas supply cylinder to be used must be constructed and marked in
accordance with the specifications for
LP-gas cylinders of the U.S. Department of Transportation (DOT).
●The cylinder supplies system must be arranged for
vapor withdrawal and the cylinder must include a collar
to protect the cylinder valve.
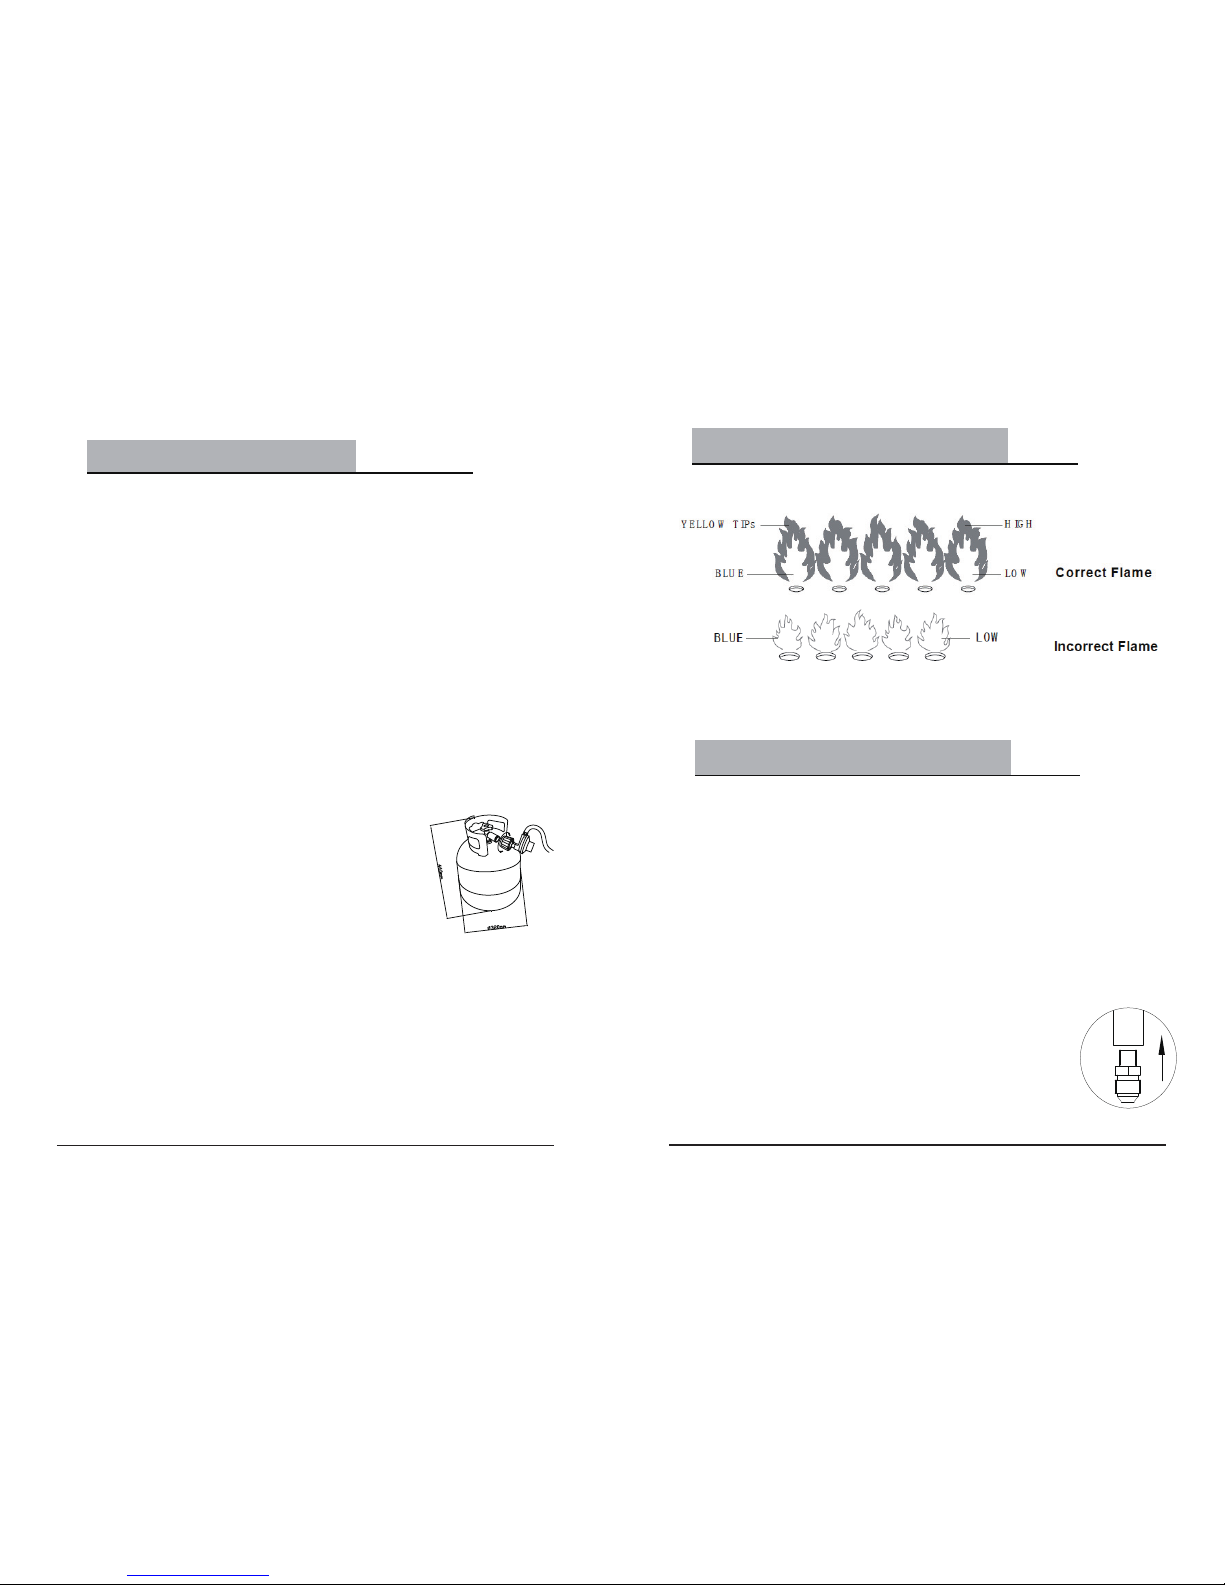
●Use only 20 lb / 9 kg LP-Gas cylinders.
●Do not burn wood or any other materials in this appliance.
●The appliance must be isolated from the gas supply
piping system by closing its individual manual shutoff valve
during any pressure testing of the gas supply piping system
at test pressure equal to or less than 1/2psi (3.5kPa).
●That other cylinder may be acceptable for use with the appliance provided
they are compatible with the appliance retention means and accompanied by
illustration(s) depicting the cylinder mounted to the appliance utilizing the
cylinder retention means and the point of contact between the cylinder and
the retention means.
●Properly place the hose out of pathways where people may trip over it or in
areas where there may be subject to accidental damage.
●The burner must be replaced prior to the appliance being put into operation
if it is evident that the burner is damaged. The replacement burner must be
the same as the part specified by manufacturer.
●The cleaning of the appliance including the burner, please refer to “Clean
and Maintenance” on page 14-15.
and should stay away to avoid burns or prevent clothing ignition.
area of the appliance.
be replaced prior to operation.
or placed on or near the appliance.
"
should be inspected before use and at least annually by a qualified service person.
More frequent cleaning may be required as necessary. It is imperative that the control
compartment, burner, and circulating air passageways of the fireplace be kept clean.
NOTE: While in use, the burner flame should be mainly blue in appearance with
a small amount of yellow. The flame can be identified by the following figure.
13
Lighting The Burners
To obtain the best performance from your fireplace, you must perform the following
storage and maintenance activities on a regular basis:
●
Allow disconnecting and removing the gas cylinder.
●
Store the gas cylinder in a dry, well-ventilated and sheltered area protected from
inclement weather and dust, out of the reach of children, and not in a building,
garage or any other closed area.
●
The fireplace may be stored indoors only if the cylinder is disconnected and removed.
●
Keep the fireplace area clear and free from combustible materials, gasoline and
other flammable vapors and liquids.
To obtain the best performance from your fireplace, you must perform the following
storage and maintenance activities on a regular basis:
#
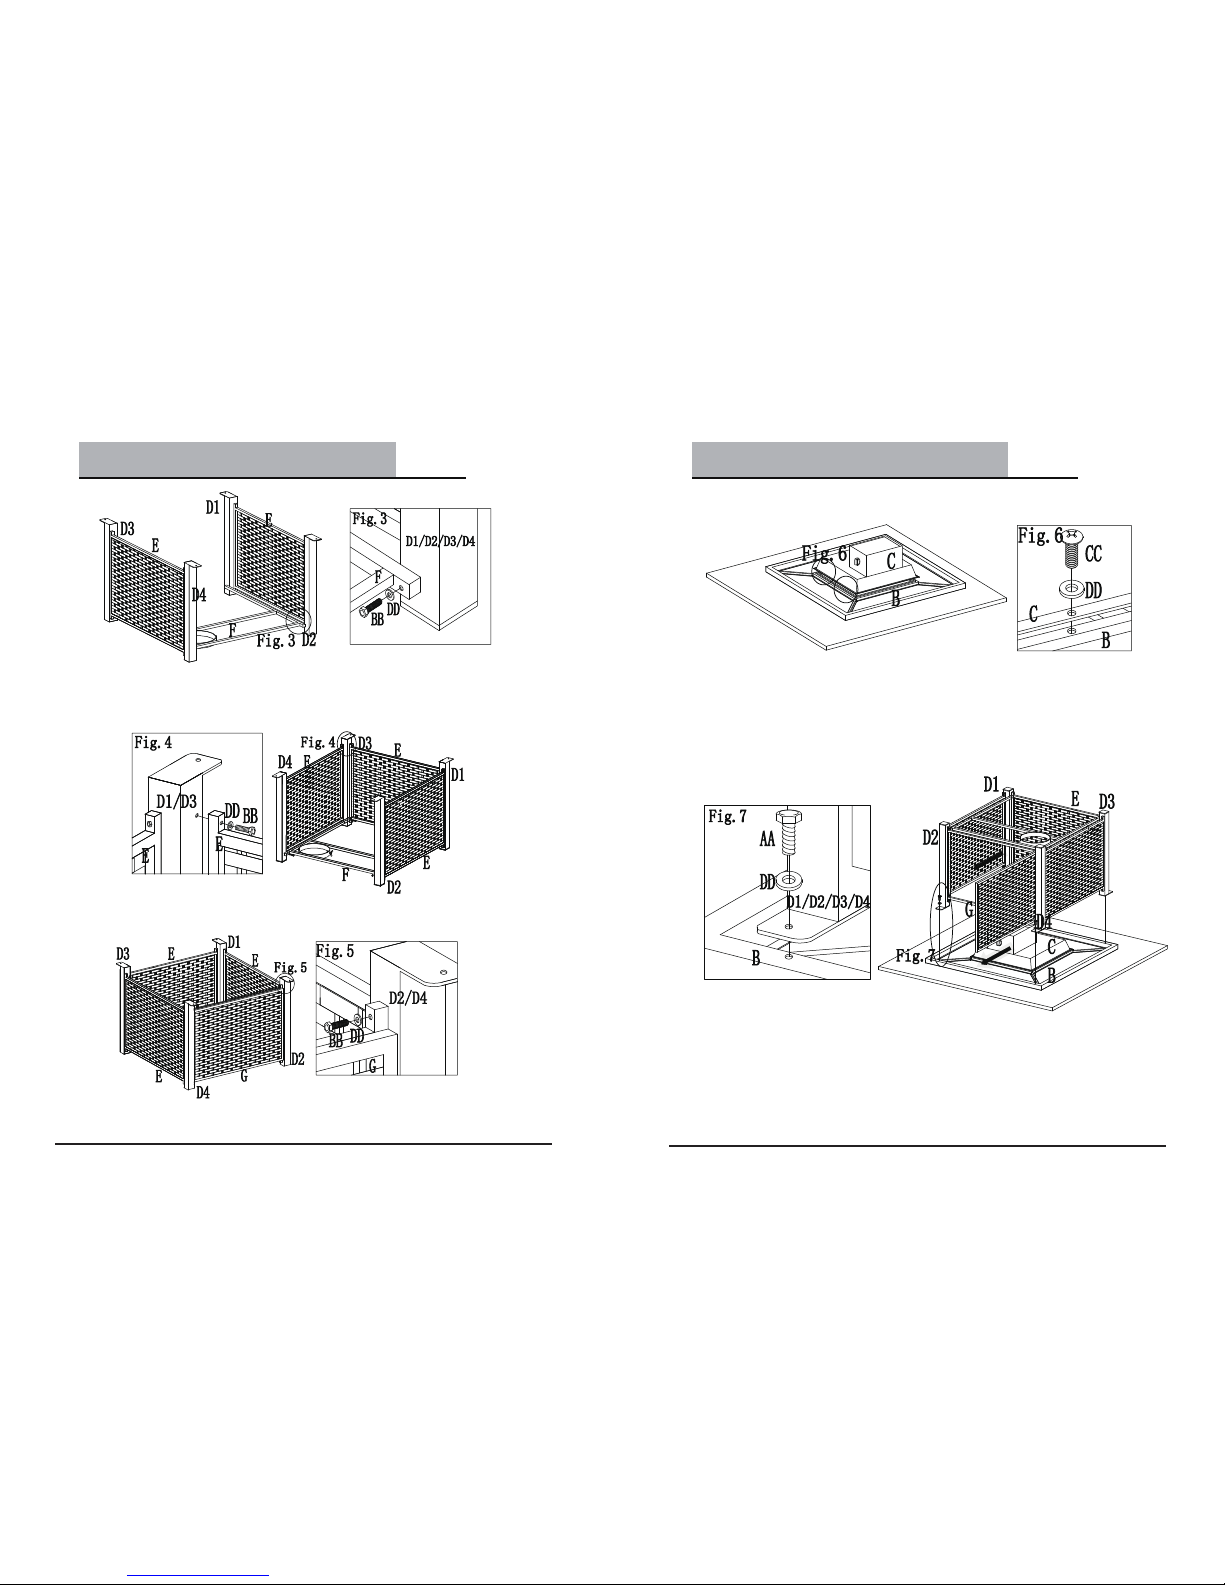
please reassemble it according to the picture on the right to
make sure the burner induction tunnel is on and exactly cover
the orifice base. It is imperative that the control compartment,
burner, and circulating air passageways of the fireplace be kept
clean. It is recommended not to disassemble the burner.
$
The fireplace should be inspected annually by a qualified service person.
Warning: Lighting the Fire Pit improperly could lead to an unsafe condition.
7. Press in and turn the control valve knob clockwise to OFF to shut down fireplace.
Close the gas cylinder valve when the fireplace is not in use.
(CAUTION: Do not kink flexible gas hose. If it is kinked, a gas leak could occur.)
Storage and Maintenance

5
Expanded View
1. Make sure the control knob is in the “OFF” position.
2. Make sure the gas cylinder is correctly and securely connected to the pressure
regulator, without over tightening.
3. Turn on the gas cylinder valve. Apply 50% soap and 50% water solution to
the gas hose and connections between the control knob and gas cylinder.
4. If something is leaking, you will see bubbles form. In case of leaks, turn off
the gas supply, undo the leaking connection, re-connect it and try again. If the
leak persists, consult Customer Service Center for assistance.
5. If the connection does not leak, continue to the next step.
1. Make sure control valve is OFF.
2. Turn on gas tank valve.
3. Press in and turn control valve knob counterclockwise
to LOW to light. See the figure to the right.
4. If burner is lit, continue pressing in the control valve
knob for a minute to heat the thermocouple.
5. When control valve knob is released, the burner should
be lit. If not, turn control valve knob clockwise to OFF. Wait
for 5 minutes then start with step 3 above.
6. Press in and turn control valve knob to desired heat output, LOW ~ HIGH.
LEAK TEST
12
Gas Connection
Operation:
Lighting The Burners
Fig 8
!!!WARNING!!!
zDo not use an open flame to check for leaks.
zDo not smoke during testing.
zDo not test indoors.
zA leak check must be performed whenever the gas cylinder is replaced.
2))
+,*+
0$;
%$6
$55(7
/2:

6
Parts List
Hardware Pack
NO. Description Qty NO. Description Qty
ALid 1IArmorPlateScreen1
BTable Top 1 J Ignition Wire 1
CFire Bowl 1 K Battery Box 1
D1 Leg1 1 L Pressure Regulator 1
D2 Leg2 1 M Thermocouple 1
D3 Leg3 1NControlValve 1
D4 Leg4 1OControlKnob 1
ESide Panel 3 P Corrugated pipe 1
FShelf 1Q Burner 1
GDoor 1 R Windshield 1
H1 Lava Rock 1(4KG)
No. Description Qty Image
AA M6x15 Bolt 4
BB M6x30 Bolt 20
CC M6x15 Screw 4
DD M6 Washer 28
EE Wrench 1
If you want to replace the parts listed, please contact Customer Service Center: 1-866-578-6569
Your Gas appliance must be installed on a flat, stable surface, away from
any combustible materials or construction.
1-Open the door and put the chain and control valve outside. See Fig 4.
2-Put the cylinder into the cylinder rack. See Fig 5.
3-Connect the regulator and the cylinder as per Fig.6. Make sure there is no
leakage or damage (please refer to “Leak Test” on page 9 and the damage
checking on page 4).
4-Turn the butterfly nut on the cylinder frame, so that the nut is held against
the bottom of the cylinder, to make sure the cylinder can be fixed. See Fig 7.
5-Disconnect the regulator and the cylinder as per Fig.8
Your Gas appliance comes assembled, ready for a Gas connection.
1-Remove the appliance from container box and place it on any level, outdoor,
non-combustible surface.
NOTE: Do not place this appliance on grass or dirt area. This may prevent
proper safety venting.
2-Open the gas door and put the cylinder inside.
3-Unscrew the battery box as shown in Fig 1.Insert the negative electrode
side of the battery into the bottom of battery box as shown in Fig 2. Then
screw the battery box as shown in Fig 3.
Note: If the battery of the pulse electronic igniter runs out of power, please
replace the new battery as above.
11
Location
Set-up
Gas Connection
Fig 1 Fig 2 Fig 3

Installation will be much easier with two or more people.
Step 2 (Fig. 2): Attach side panel (E) to legs (D3/D4), tighten through
the holes on the legs by bolt (BB) and washer (DD).
Step 1 (Fig.1): Attach side panel (E) to legs (D1/D2), tighten through
the holes on the legs by bolt (BB) and washer (DD).
7
Installation
Step 8: The Lava Rock (H1) should be put in the bottom of the fire
bowl (C) and come up just as high as the fire ring.
Step 9: Put the lid (A) on the Table Top (B).
10
Installation

Step 3 (Fig.3): Attach shelf (F) to legs (D1/D2/D3/D4) by bolt (BB) and
washer (DD), do not tighten at this step. (Note: please make sure
the circle on the Shelf (F) close to the Leg (D4))
Step 6 (Fig.6): Put the Table Top (B) and fire bowl (C) upside down, connect
them with Bolts (CC) and Washer (DD).
Step 7 (Fig.7): Attach table top (B) to the legs by bolt (AA) and washer (DD).
(Note: When assembling this step, please follow the direction as
the arrow showed. (Note: Before this step, please take out the
foam in the carton and put it underneath the table top to avoid
surface abrasion.)
Step 4(Fig.4): Attach the back side panel (E) to legs (D1/ D3); Tighten to
the legs by bolt (BB) and washer (DD). Tighten all Bolts here.
Step 5(Fig.5): attach door (G) to legs (D2/ D4); Tighten to the legs by bolt
(BB) and washer (DD). Tighten all Bolts here.
8
Installation
9
Installation
Table of contents
Popular Outdoor Fireplace manuals by other brands

Prism Hardscapes
Prism Hardscapes Piazza Installation, operation & maintenance manual

Coleman
Coleman 5062-707 Assembly and instruction sheet

Paloform
Paloform FOLD 72 Installation & owner's manual

Barbara Jean
Barbara Jean OB24MAP manual

Firegear
Firegear Key West KWCH-1 Owners & installation manual

Astria Fireplaces
Astria Fireplaces Odyssey36ZNM Product information

Firegear
Firegear FPB-29RBSAWS-N Installation and operating instructions

Bluegrass Living
Bluegrass Living BFPW30RH User guide and assembly instructions

Endless Summer
Endless Summer WAD1050SP owner's manual

Astonica
Astonica 40104202 instruction manual

Outdoor Plus
Outdoor Plus OPT-BLW60EKIT owner's manual

Mayer Barbecue
Mayer Barbecue HEIZA MFK-310 Assembly instructions