Seating Matters Sydney GoFlat User manual
Instruction Manual
Sydney GoFlatTM

This Instruction Manual is frequently updated to ensure safe use of your chair.
Visit seatingmatters.com where you can nd a free copy of the most up to date version.
Terminologies
Patient
The person sitting in the chair.
User
Competent person with responsibility for the persons sitting in the chair as well as the
suitability of the equipment for the Patient. The User is responsible for checking the chair
for faults during the course of its use.
All instructions must be read and understood before the chair may be used.

Contents
2Technical Specication
4Operating Instructions
4Back Angle Adjustment
5Leg Elevation
6Tilt in Space
7Seat Height Adjustment
8Preset Positions
9Arm Adjustment
10 Footplate Height
11 Footplate Stowage
12 Mattress Replacement
13 Charging Your Chair
14 Chair Movement
16 IV Pole & O2 Tank Holder Installation
17 Cleaning Instructions
18 Safety Instructions
19 Maintenance & Servicing
20 Recycling Policy
21 Warranty
22 Intellectual Property

2
Sydney GoFlatTM
Technical
Specication
E
ii
iii
iv
K
D

3
User Dimensions
ABack Height
B Seat Width
C Seat Depth
D Seat Height (High)
E Seat Height (Low)
35" / 900mm
21" / 535mm
22" / 550mm
37" / 950mm
21" / 540mm
Footplate Height (from seat)
FHigh
GLow
19" / 470mm
24" / 620mm
(Automatically retracts when lowering chair)
Arm Height Options (from seat)
HLow
IHigh
6" / 140mm
8" / 210mm
Chair Dimensions
J Overall Chair Height
K Overall Chair Length
L Overall Chair Width
55" / 1400mm
78" / 2000mm
32" / 795mm
Recline and Tilt Angles
ii Back Angle Recline
96° - 180°
84° range
iii Leg Rest Angle
-10° to horizontal
100° range
iv Tilt Range
0° - 17°
Chair Weight Unloaded
12.2 Stone / 78 Kg / 165 lb
Patient Weight Limit
31.5 Stone / 200 Kg / 440 lb
Legrest Weight Limit
10.3 Stone / 66 Kg / 145.5 lb
J
A
F
G
B
L
H
C
I
E
4
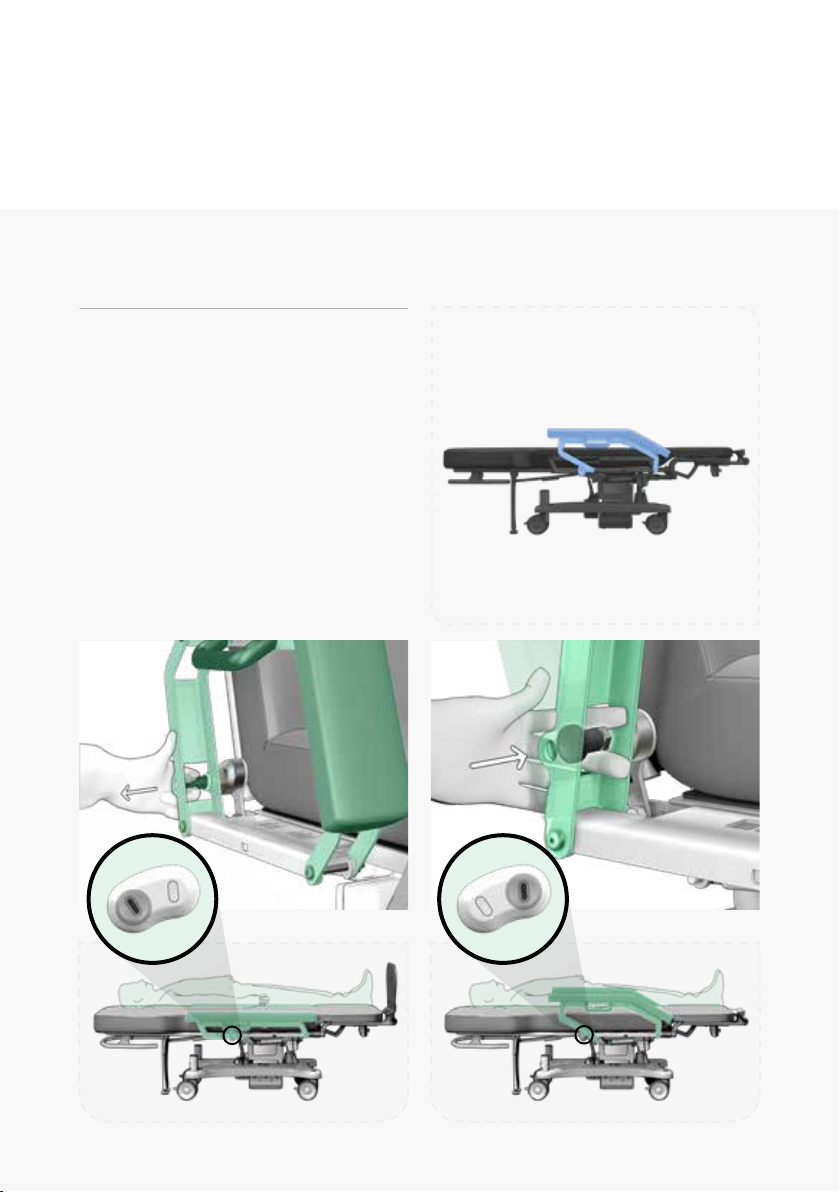
(g.1a) (g.1b)
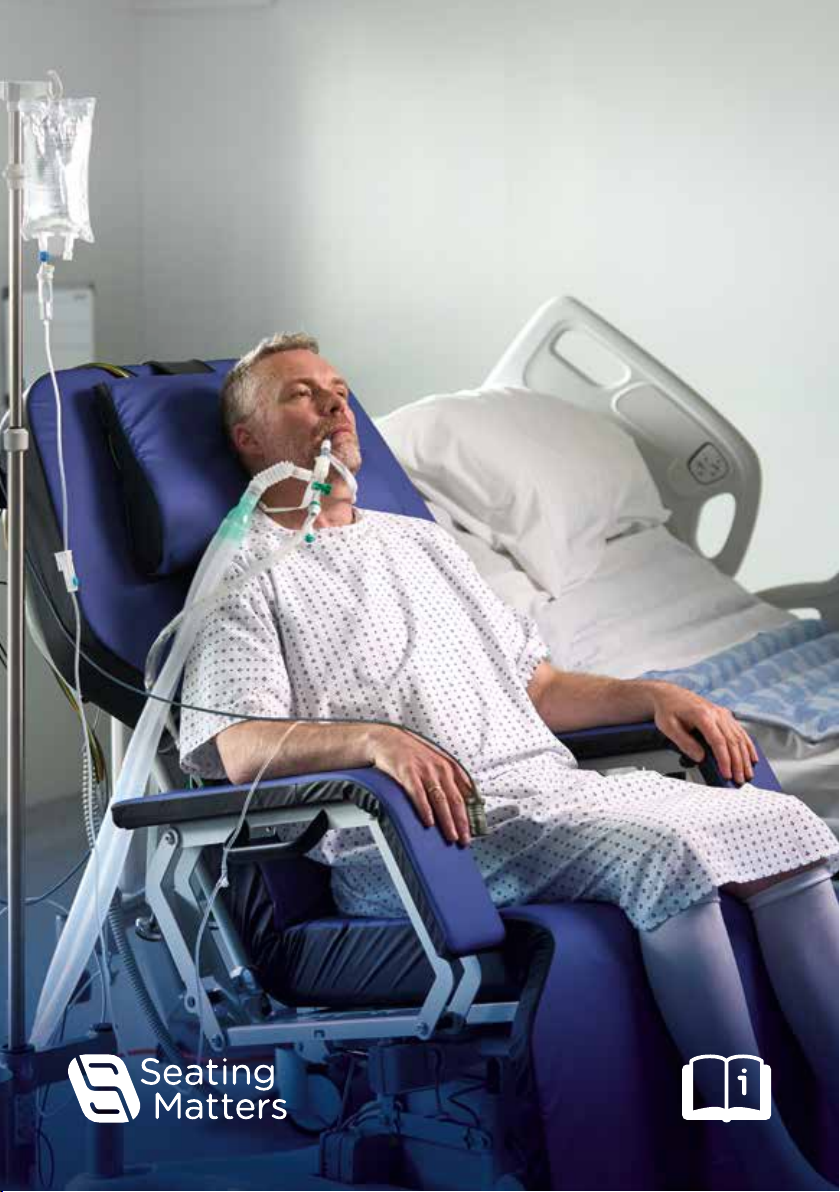
Back Angle Adjustment
To adjust the back recline of the chair
(g.1).
(g.1)
i. To 180˚ position (g.1a).
ii. To 96˚ position (g.1b).
i ii
Operating
Instructions

5
(g.2)
(g.2a) (g.2b)
i ii
Leg Elevation
To adjust the angle of leg rest elevation
(g.2).
i. To horizontal (g.2a).
ii. To -10˚ angle (g.2b).

6
(g.3a) (g.3b)
Tilt in Space
To adjust the tilt angle of the chair (g.3).
(g.3)
i. To 17˚ posterior tilt angle (g.3a).
ii. To 0˚ tilt angle (g.3b).
i ii
7
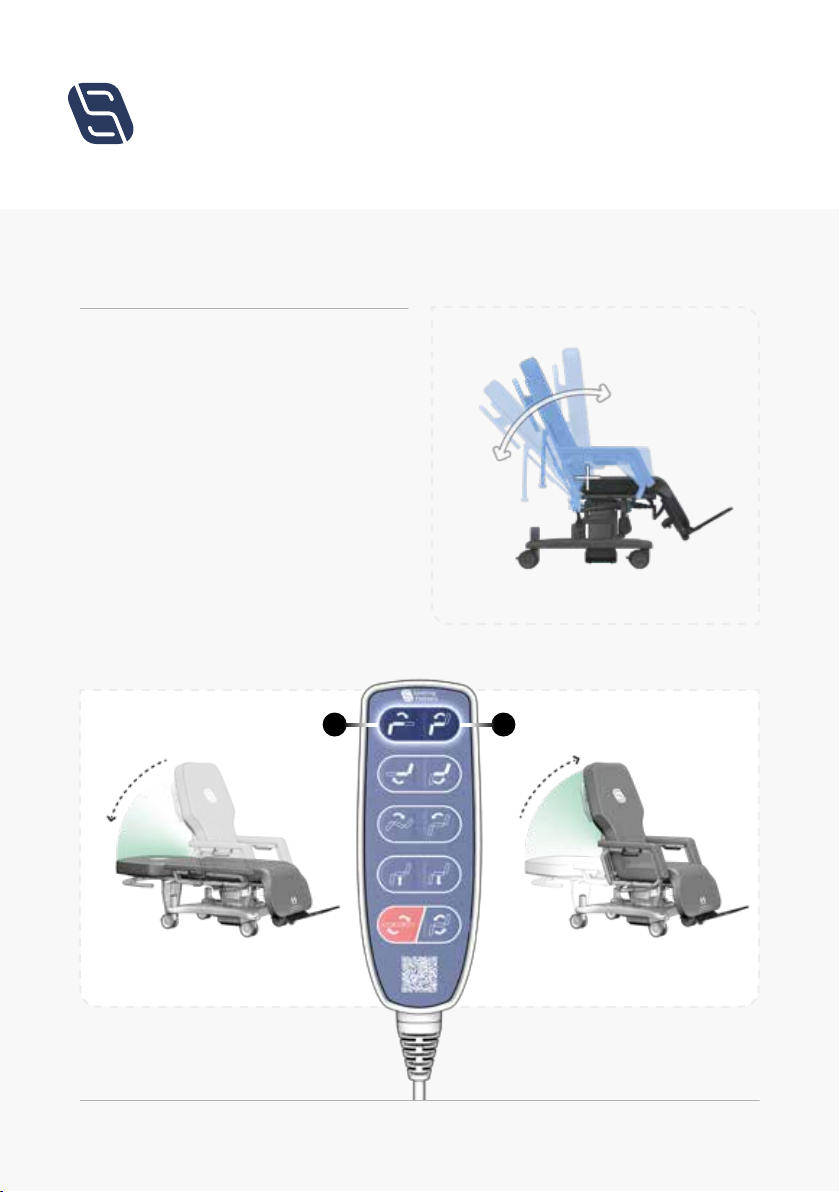
(g.4a) (g.4b)
Seat Height Adjustment
To adjust the seat height of the chair
(g.4).
(g.4)
i. To elevate the position of the seat
height (g.4a).
ii. To lower the position of the seat
height (g.4b).
i ii
8
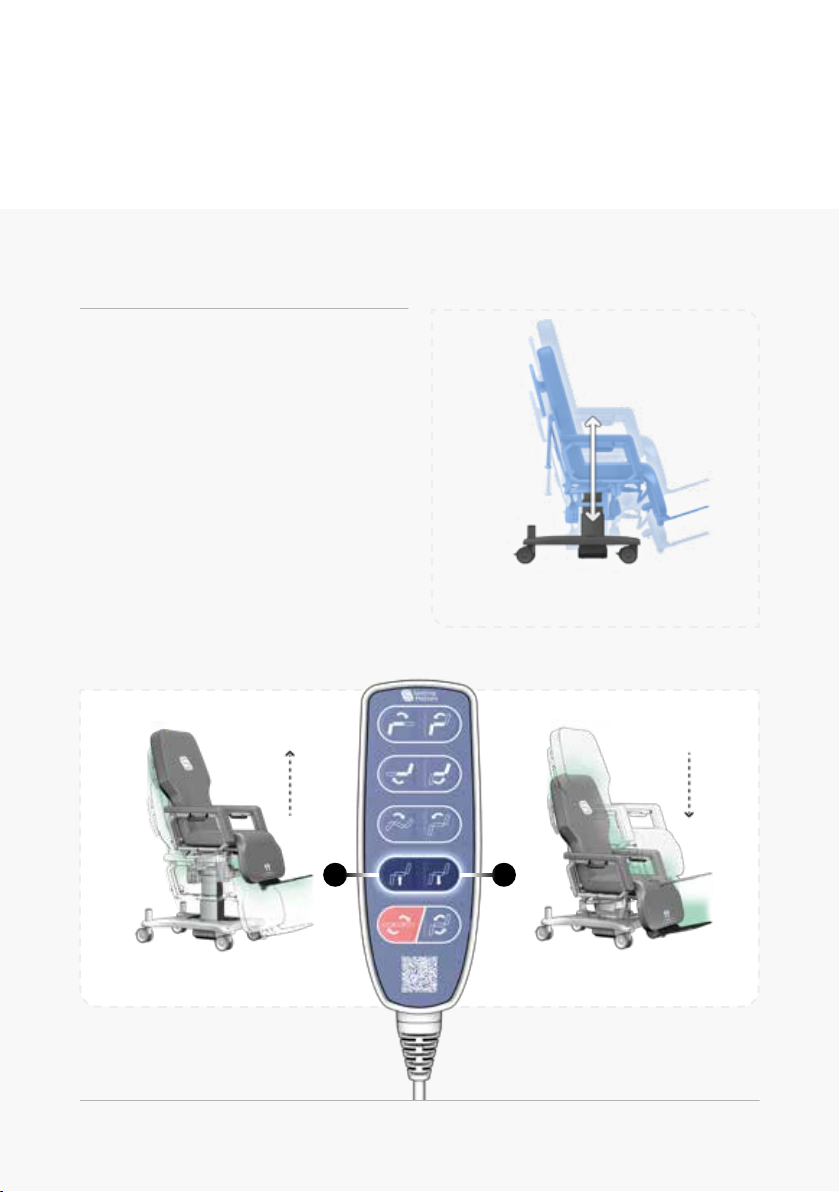
(g.5a) (g.5b)
Preset Positions
To move the chair to at transfer position
and upright sitting position (g.5).
(g.5)
i. To at transfer position (g.5a).
ii. To upright sitting position (g.5b).
i ii
9
Arm Adjustment
To adjust the position of the arm (g.6).
The arms of the chair are adjustable in
height and can fold down to achieve a fully
at position.
Disengage the spring plunger by pulling
it outwards (g.6a). With the plunger
disengaged, adjust the arm to the required
position.Release the plunger to lock the
arm into place (g.6b).
(g.6)
(g.6a) (g.6b)
10
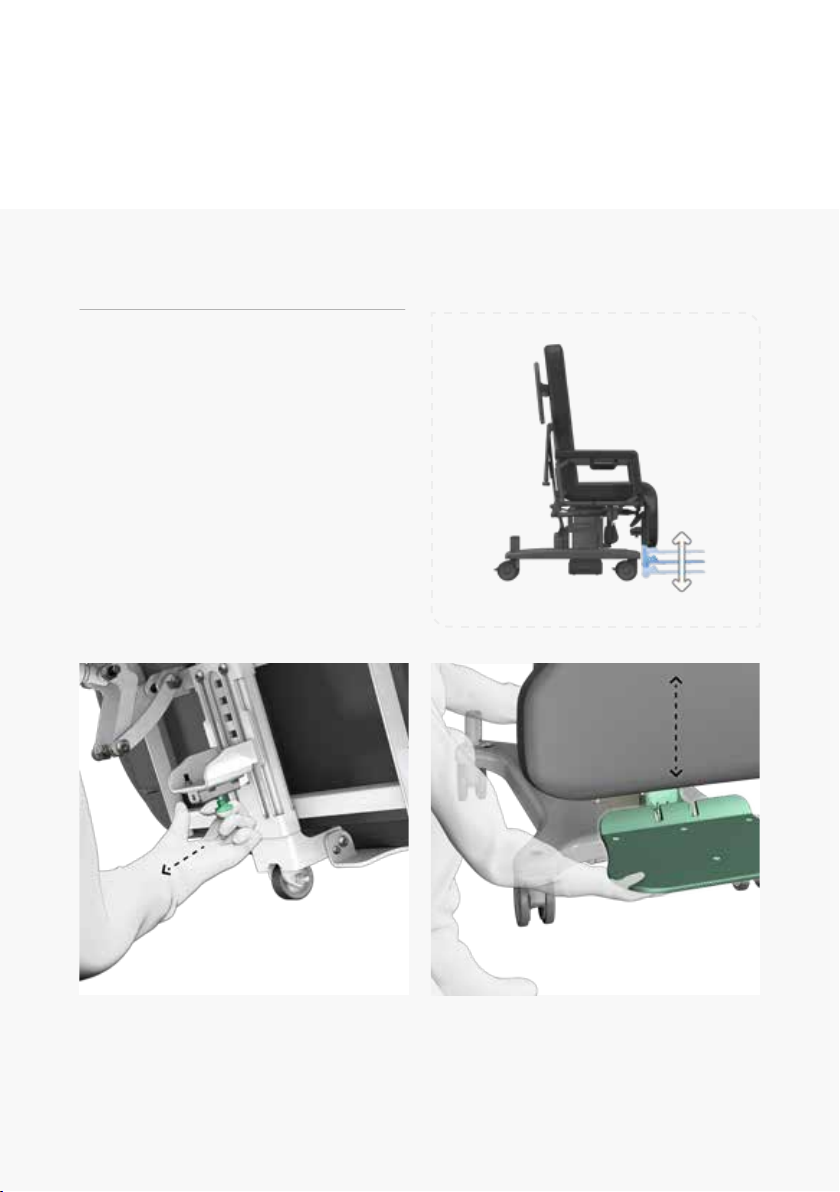
To adjust the height of the footplate
(g.7).
From behind the leg rest, locate the
footplate height plunger highlighted and
pull the plunger backward toward the
midline of the chair, to disengage the
mechanism (g.7a). While disengaged,
adjust the height of the footplate and
release the plunger allowing it to locate
into the next available height setting
(g.7b).
(g.7a) (g.7b)
(g.7)
Footplate Height
11
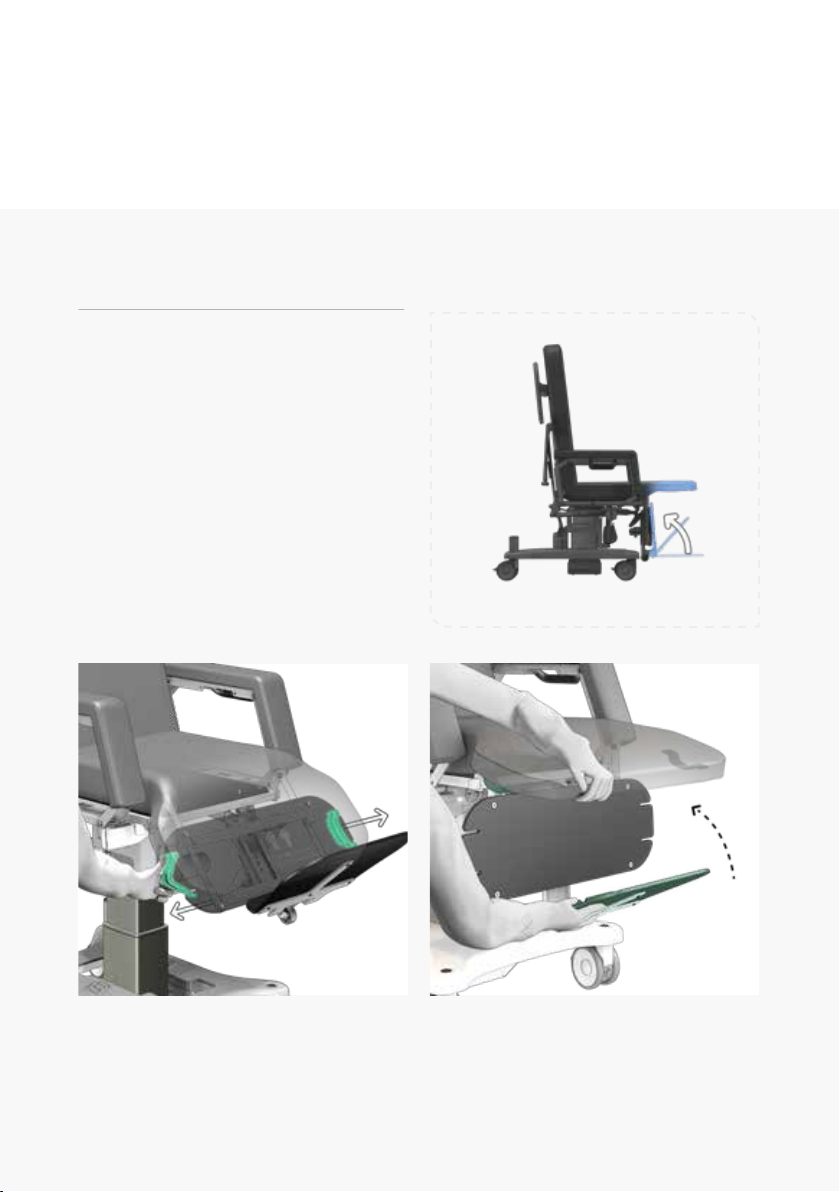
To stow the footplate away (g.8).
Unhook Sydney GoFlat™ calf pad strap at
either side of the calf pad (g.8a).
Lift the Sydney GoFlat™ mattress, ip the
footplate behind the mattress (g.8b) and
re-attach Sydney GoFlat™ calf pad straps.
(g.8a) (g.8b)
(g.8)
Footplate Stowage

12
(g.9a) (g.9b)
Mattress Replacement
Removal and tting of the Sydney GoFlat™
mattress (g.9).
Unhook Sydney GoFlat™ calf pad straps at
either side of the calf pad (g.9a). Loosen
and remove yellow grip knob (g.9b). Lift
mattress upwards until retaining bolt can be
removed from key slot on the back frame
(g.9c). Remove the mattress from the
chair (g.9d).
(g.9c) (g.9d)
(g.9)

13
Charging Status
Status lights are located on the left side
of the control box and battery. (g.10b).
(g.10a)
Charging Your Chair
Your chair will arrive fully charged.
It is recommended to charge your chair daily to maintain battery health.
Regional Plugs
The charger will arrive tted with a plug compatible with your region.
To charge your chair, plug the charger into a wall socket (g.10a).
Handset
Holder
Plug
Holder
(g.10b)
The buzzer will make a warning
when a button on the hand control
is pressed and the battery is low.
Control
Box
Battery
Monitor the charging status of your
chair using the status lights.
Plugged in, charging.
Control
Box
Battery
Plugged in.
Fully charged.
Control
Box
Battery
No lights.
Normal state.
Not in operation.
Control
Box
Battery
Chair in operation.
Using battery power.
Control
Box
Battery
Orange ashing light.
Error.
When error light shows switch o
and unplug your chair immediately.
Contact: technical@seatingmatters.com
14
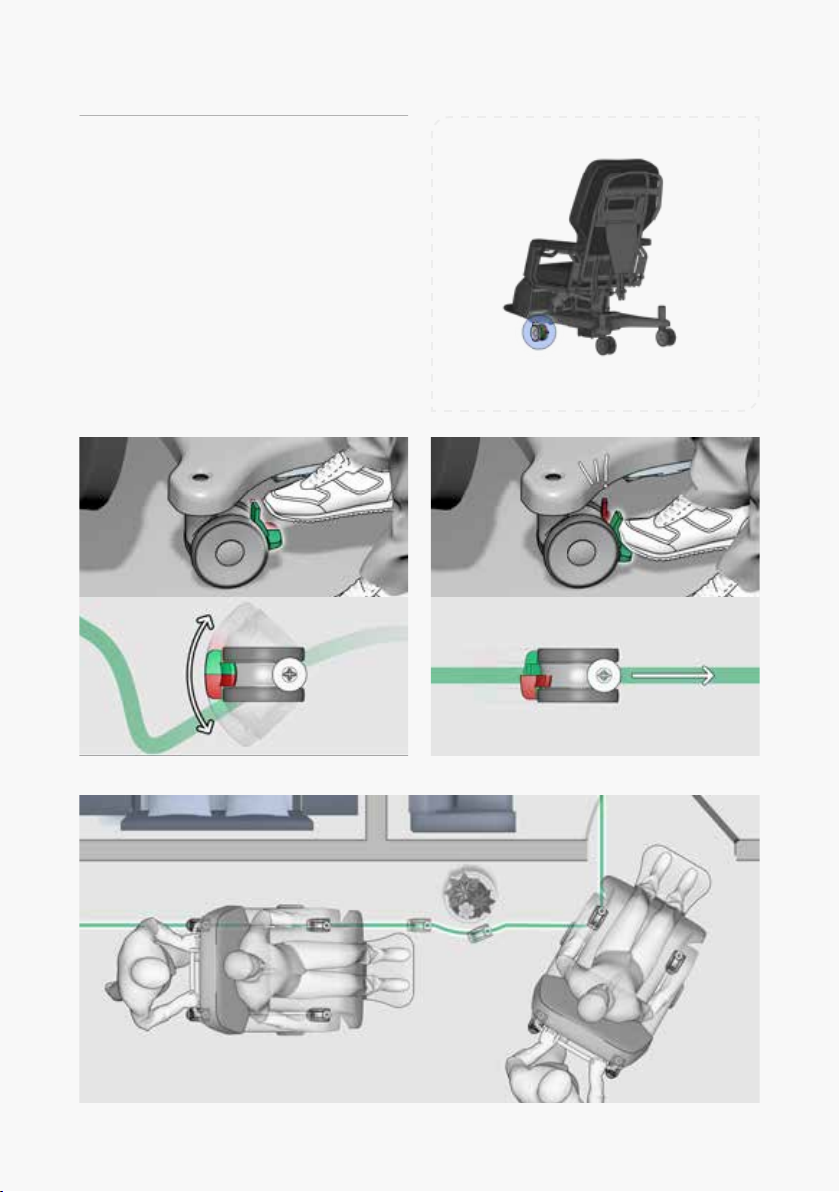
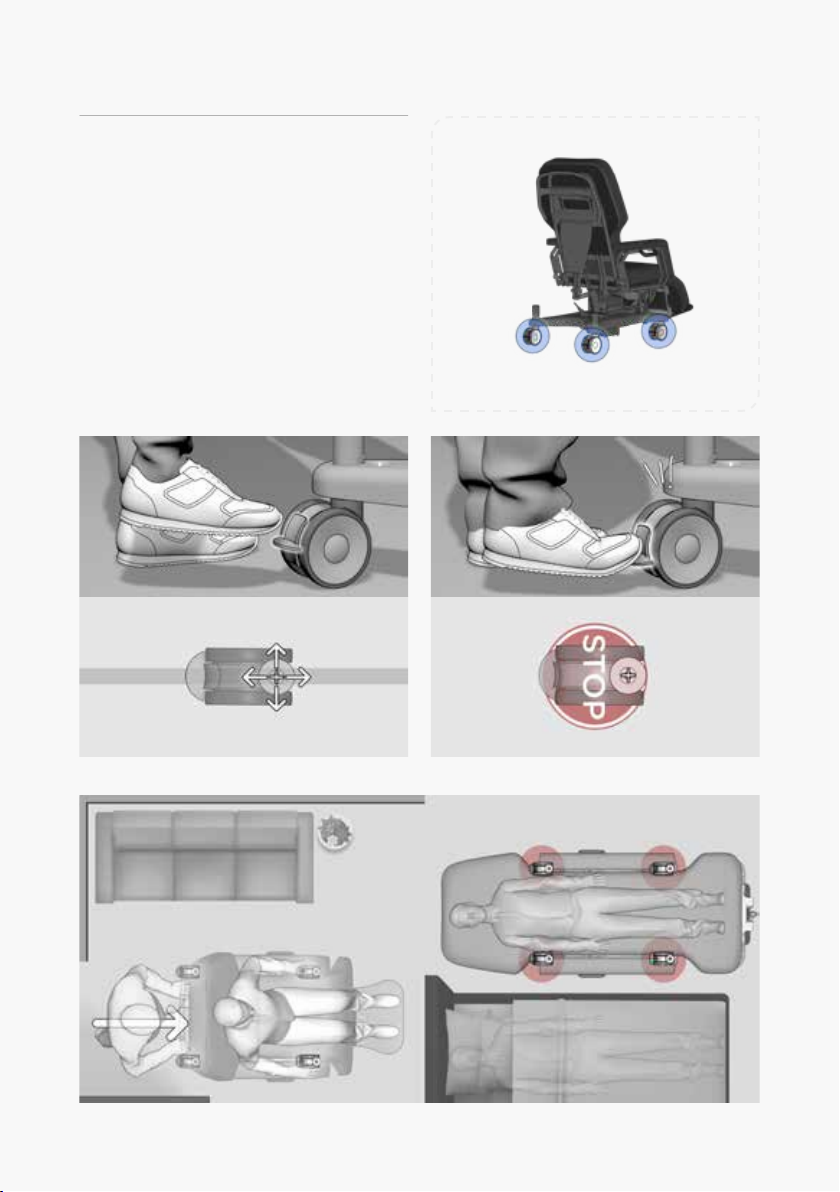
Chair Movement
For control of direction and
manoeuvrability while pushing the
chair (g.11c).
Combination Castor
The combination castor is located on the
front left side of the chair (g.11).
Directional Lock Only
To engage directional lock simply press
the green pedal with your foot (g.11a)
and swivel the castor until it clicks into the
forward line (g.11b).
Braking
Press red and green pedals simultaneously.
(g.11a) Directional lock disengaged. (g.11b) Directional lock engaged.
(g.11c) Image showing use of the directional lock to improve manoeuvrability.
(g.11)
15
(g.12a) All locks disengaged. (g.12b) Braking castors engaged.
(g.12c) Image showing chair in locked position.
Braking Castors
To lock the chair in position (g.12c).
All other castors on the chair are total lock
castors (g.12). When engaged, the swivel
and rotation of the castor will be locked.
To engage the braking castor simply press
the pedal with your foot until it clicks in
place (g.12b).
(g.12)

16
To attach an IV Pole and O2 Tank Holder to
the chair (g.13).
Installation
Insert the base of the IV pole into either of
the sockets at the head end of the chair.
(g.13a). Twist the IV pole while pushing
down, until it locks into position.
Attach IV equipment as required.
(g.13c) and (g.13d)
Adjustment
Push up the locking collar (g.13b) and
slide the top section of the IV pole up or
down to the required height.
(g.13a) (g.13b)
(g.13)
(g.13c) (g.13d)
IV Pole & O2 Tank Holder Installation
17
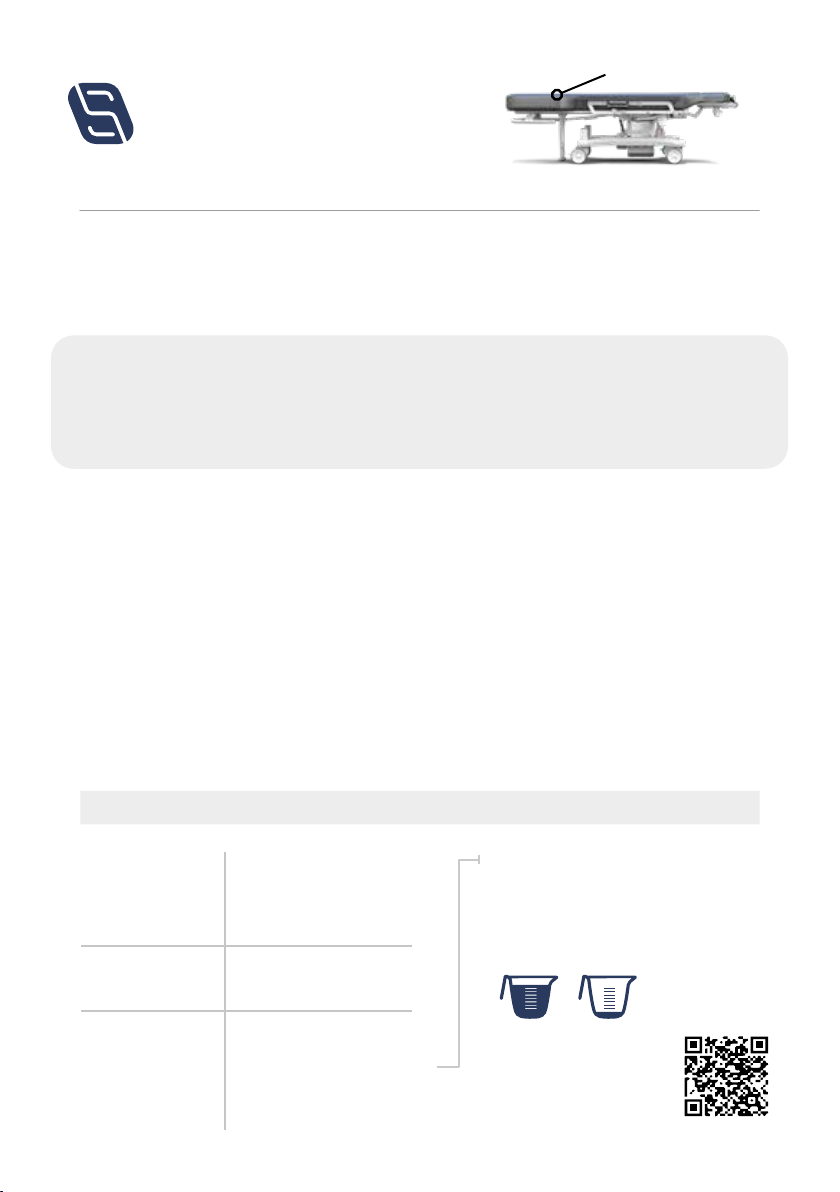
Your Seating Matters chair is upholstered with Dartex multi-stretch material. See
image above for how to identify this on your chair.
Dartex Multi Stretch Fabric
Properties
Dartex is waterproof, has the ability to be wiped clean and has biostatic (anti-mycotic)
coatings to provide an impenetrable barrier to virus and bacteria.
Cleaning
Supercial dirt may be removed by wiping with a soft cloth moistened with water containing a
neutral detergent. More persistent contamination may be treated by wiping with alcohols or
turpentine substitute, followed by hot water and detergent.
Routine cleaning and disinfection may be carried out on the coating with hand hot water and
a neutral detergent or with a bleach solution (0.1% or 1000 parts per million available chlorine).
The material is compatible with the 10,000ppm available chlorine in solution required for the
decontamination of blood spills. Excess solution must be removed and the surface thoroughly
rinsed and dried prior to reuse or storage.
Proprietary disinfectants may be used provided manufacturer’s instructions are followed.
All cleaning agents, and disinfectants, must be thoroughly rinsed o and
the item dried after cleaning.
Cleaning & Maintenance of Upholstery
What you can use:
1. Warm Soapy
Water
Use warm soapy water
to wash down your
chair. Bear in mind that
it is important to dry the
surface afterwards.
2. 70% Alcohol This can be used in line
with the manufacturer's
guidelines.
3. Bleach Concentrations of
bleach from 1,000ppm
to 10,000ppm available
chlorine, is likely to be
considered eective
cleaning.
Use bleach sparingly.
The ppm of available chlorine may vary
with each dierent brand of bleach.
Search online for its data sheet and
adjust your ratio accordingly to achieve a
dilution of approx. 1000ppm of available
chlorine.
For and in-depth guide to
cleaning, please consult
our Clinicians Guide to
Infection Control, available
on our website.
Example of Dilution Ratio
Water Bleach
Cleaning
Instructions
Dartex
18
Assembly, Installation, Warnings & Hazards
as set by their health professional with
regard to the use of tilt and recline for
appropriate pressure management.
The chair must be used on a level, plain,
hard surface with the brakes engaged to
avoid it moving during use and to ensure
stability. When the chair is not in transit, all
the braking castors on the product must
be engaged to prevent risk of injury when
being used.
The chair may not be left in an outdoor
environment. More information on fabrics
and their environment can be found later
in this manual.
Ensure there is more than one competent
person there when making adjustments
to ensure they are correct and safe for the
Patient.
If in doubt as to any the adjustments, feel
free to contact Seating Matters direct at
technical@seatingmatters.com.
Under no circumstances must the User or
Patient stand or sit on the footplate of the
chair.
The chair should not be transported in a
vehicle while the Patient is seated on the
chair.
This chair should not be lifted at any time
unless by competent persons trained in
such manual handling.
When operating the leg rest and recline
features on the chair please ensure there
is a 450mm / 18" gap around the chair to
prevent the back or leg rest coming into
contact with a wall or any other object.
On powered options, please ensure that
your chair is charged daily.
Please call your Seating Matters provider if
you have any questions on these points.
A competent person, or User, trained
in the use of the chair, who is either a
suitably qualied medical professional,
or is working under their guidance and
instruction, should make adjustments and
set up the chair according to the Patient
requirements and dimensions before the
Patient sits in the chair. Where possible,
adjustments should be made when the
Patient is not in the chair to avoid injury to
the User and Patient.
This chair, and its accessories, should be
used in accordance with local or regional
guidelines regarding the use of such
medical devices.
This chair should be fully assembled, all
xings secured and the chair checked for
safety by a competent person before use.
The User must ensure that the chair is in
good condition before use (check all nuts
and bolts are fastened, fabric in good
condition etc). If there are any problems,
these must be reported to your Seating
Matters provider and corrected before the
chair is put into use.
Keep all body parts away from the
mechanisms under the chair. Repairs and
maintenance should only be carried out by
fully trained technicians.
Exercise care in using the release lever for
the reclining mechanisms and adjustments
to avoid injury.
Pressure ulcer or pressure injury reduction
is not a guarantee with this equipment.
The User must ensure that the Patient has
a period out of the chair after prolonged
sitting to raise tissue oxygenation levels.
Although the chair oers pressure
management, the body tissue still needs
time to recover. In many places, local
or national guidelines recommend a
maximum of 2 hours sitting at any one
time. You must also observe Patient
specic recommendations and guidelines
15
16
14
11
12
13
10
9
8
7
6
5
4
3
2
1
Safety
Instructions
Table of contents
Other Seating Matters Medical Equipment manuals

Popular Medical Equipment manuals by other brands


ElectroCore
ElectroCore TAC-STIM user guide

Alaris Medical Systems
Alaris Medical Systems Medley 8000 Series Directions for use

Global Surgical
Global Surgical SMR S 4000 owner's manual

Nidek Medical
Nidek Medical Nuvo 10 quick start guide

MedGuard
MedGuard SUPER VEGA User instruction manual

LivaNova
LivaNova CP5 Service manual