Seav Easy Light User manual

EASY LIGHT
INTERRUTTORE CREPUSCOLARE
Interruttore crepuscolare Easy Light, consente l’attuazione di comandi in
assenza di luce, con varie modalità di funzionamento e tipologie di ali-
mentazione.
- Mod. Easy Ligth : Alimentazione 12-24VAC-DC
- Mod. Easy Ligth 230V : Alimentazione 230VAC
CARATTERISTICHE TECNICHE
- Alimentazione : Vedi modello
- Consumo max : 2W
- Contatto Relè : 30VDC 10A
- Temperatura di esercizio : -10÷55°C
- Dimensioni : 80x54x38mm
- Grado di protezione : IP 54
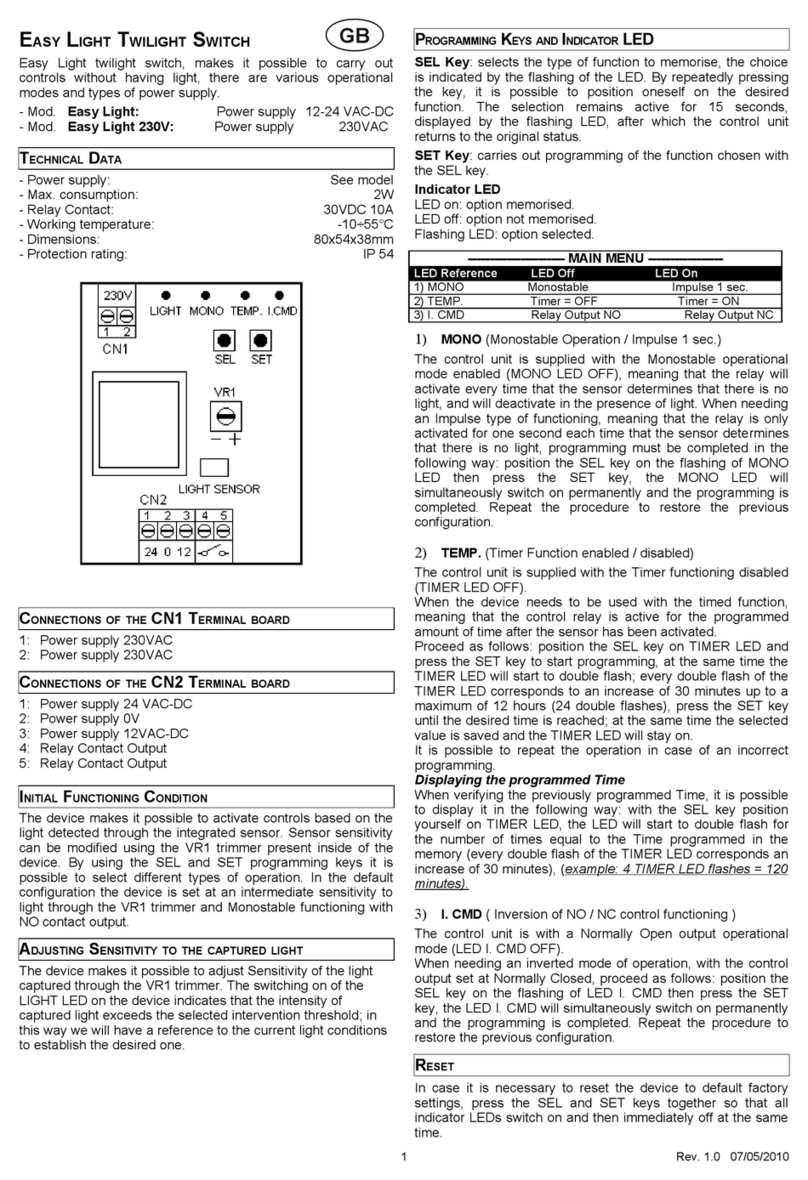
COLLEGAMENTI DELLA MORSETTIERA CN1
1: Alimentazione 230VAC
2: Alimentazione 230VAC
COLLEGAMENTI DELLA MORSETTIERA CN2
1: Alimentazione 24VAC-DC
2: Alimentazione 0V
3: Alimentazione 12VAC-DC
4: Uscita Contatto Relay
5: Uscita Contatto Relay
CONDIZIONE INIZIALE DI FUNZIONAMENTO
Il dispositivo consente l’attivazione di comandi in funzione della luce rile-
vata tramite sensore integrato. La sensibilità del sensore può essere
modificata tramite il trimmer VR1 presente all’interno del dispositivo.
Mediante l’utilizzo dei tasti di programmazione SEL e SET si potranno
selezionare diversi tipologie di funzionamento. Nella configurazione di
fabbrica il dispositivo presenta una regolazione intermedia della sensibi-
lità delle luce tramite trimmer VR1 e funzionamento Monostabile conusci-
ta contatto NA.
REGOLAZIONE SENSIBILITÀ DELLA LUCE CAPTATA
Il dispositivo permette la regolazione di Sensibiltà della luce captata tra-
mite il trimmer VR1. L’accensione del LED LIGHT sul dispositivo indica
che l’intensità del Luce captata supera la soglia d’intervento selezionata,
in questo modo avremo un riferimento alle attuali condizioni di luce per
stabilire quella desiderata.
TASTI DI PROGRAMMAZIONE E LED DI SEGNALAZIONE
Tasto SEL: seleziona il tipo di funzione da memorizzare, la scelta è indi-
cata dal lampeggio del Led. Premendo più volte il tasto è possibile posi-
zionarsi sulla funzione desiderata. La selezione resta attiva per 15 secon-
di, visualizzata dal LED lampeggiante, trascorsi i quali la centrale ritorna
allo stato originario.
Tasto SET: esegue la programmazione della funzione scelta con il tasto
SEL.
- 1 -
I

Led di segnalazione
Led acceso: opzione memorizzata.
Led spento: opzione non memorizzata.
Led lampeggiante: opzione selezionata.
MENU’ PRICIPALE
Rif. Led Led Spento Led Acceso
1) MONO Monostabile Impulso 1 sec.
2) TEMP. Timer = OFF Timer = ON
3) I. CMD Relay Output NA Relay Output NC
1) MONO ( Funzionamento Monostabile / Impulso 1 sec. )
La centrale è fornita con il modo di funzionamento Monostabile abilitato
(LED MONO OFF), ovvero, il relè si attiverà ogni volta che il sensore
determina la mancanza di luce, e si disattiva in presenza di luce. Nel caso
in cui occorre avere un funzionamento di tipo Impulsivo, ovvero l’attiva-
zione del relè solamente per 1 secondo ogni volta che il sensore determi-
na la mancanza di luce, la programmazione, deve essere eseguita nel
seguente modo: posizionarsi con il tasto SEL sul lampeggio del LED
MONO e premere il tasto SET; nello stesso istante il LED MONO si accen-
derà permanentemente e la programmazione sarà conclusa. Ripetere
l’operazione se si desidera ripristinare la configurazione precedente.
2) TEMP. ( Funzione Timer abilitata / disabilitata )
La centrale è fornita con il modo di funzionamento Timer disabilitato (LED
TIMER OFF).
Nel caso sia in cui occorre un funzionamento del dispositivo temporizza-
to; ovvero il relè di comando sarà attivo pari al tempo programmato, dopo
che il sensore si sia attivato.
Procedere nel seguente modo: posizionarsi con il tasto SEL su LED
TIMER e premere il tasto SET per avviare la programmazione, allo stesso
tempo il LED TIMER inizierà a fare un doppio lampeggio; ogni doppio
lampeggio del LED TIMER equivale ad un incremento di 30 minuti fino ad
un massimo di 12 ore ( 24 doppi lampeggi ), premere il tasto SET al rag-
giungimento del tempo desiderato; nello stesso momento si determinerà
la memorizzazione del valore selezionato e il LED TIMER rimarrà acceso.
E’ possibile ripetere l’operazione nel caso di un’errata programmazione.
Visualizzazione del Tempo programmato
Nel caso di una verifica del Tempo programmato in precedenza, è possi-
bile la visualizzazione nel seguente modo: posizionarsi con il tasto SEL su
LED TIMER, il led inizierà a fare un doppio lampeggio per un numero di
volte pari al Tempo programmato in memoria (ad ogni doppio lampeggio
del LED TIMER equivale un incremento di 30 minuti ), (esempio: 4 lam-
peggi di LED TIMER = 120 minuti).
3) I. CMD ( Inversione funzionamento comando NA / NC )
La centrale è fornita con il modo di funzionamento uscita comando
Normalmente Aperto ( LED I. CMD OFF ).
Nel caso in cui occorre avere un funzionamento invertito, uscita coman-
do Normalmente Chiuso, procedere nel seguente modo: posizionarsi
con il tasto SEL sul lampeggio del LED I. CMD e premere il tasto SET;
nello stesso istante il LED I. CMD si accenderà permanentemente e la
programmazione sarà conclusa. Ripetere l’operazione se si desidera
ripristinare la configurazione precedente.
RESET
Nel caso sia opportuno ripristinare il dispositivo alla configurazione di
fabbrica, premere i tasti SEL e SET insieme in modo da ottenere l’accen-
sione contemporanea di tutti i LED di segnalazione e subito dopo lo spe-
gnimento.
- 2 -

- 3 -
rev. 3.0 13/06/2016
I prodotti
EASY LIGHT - EASY LIGHT 230V
sono conformi alle specifiche delle Direttive
LVD 2014/35/EU, EMC 2014/30/EU.
NOTE PER L’INSTALLATORE
Il prodotto non presenta nessun tipo di dispositivo di sezionamento
della linea elettrica 230 Vac, sarà quindi cura dell’installatore prevede-
re nell’impianto un dispositivo di sezionamento. Esso deve essere
posizionato in modo da essere protetto contro le richiusure accidenta-
li secondo quanto previsto al punto 5.2.9 della EN 12453.
Il cablaggio dei vari componenti elettrici esterni al prodotto deve esse-
re effettuato secondo quanto prescritto dalla normativa EN 60204-1 e
dalle modifiche a questa apportata dal punto 5.2.7 della EN 12453. Il
fissaggio dei cavi di alimentazione e di collegamento, deve essere
garantito tramite l’assemblaggio di pressacavi fornibili “optional”.
Fare attenzione, in fase di foratura dell’ involucro esterno per far pas-
sare cavi di alimentazione e di collegamento, e di assemblaggio dei
pressacavi, ad installare il tutto in modo da mantenere il più possibile
inalterate le caratteristiche di grado IP della scatola.
Prestare inoltre attenzione a fissare i cavi in modo che siano ancorati in
modo stabile.
L’involucro nella parte posteriore è sprovvisto di opportune predispo-
sizioni per fissaggio a muro ( predisposizione per fori per fissaggio
mediante tasselli o fori per fissaggio mediante viti). Prevedere e imple-
mentare tutti gli accorgimenti per una installazione che non alteri il
grado IP.
IMPORTANTE PER L’UTENTE
- ATTENZIONE: conservare questo manuale d’istruzioni e rispettare le
importanti prescrizioni di sicurezza in esso contenute. Il non rispetto
delle prescrizioni potrebbe provocare danni e gravi incidenti.
- Il dispositivo non deve essere utilizzato da bambini o da persone con
ridotte capacità psico-fisiche, almeno che non siano supervisionati o
istruiti sul funzionamento e le modalità di utilizzo.
- Esaminare frequentemente l’impianto per rilevare eventuali segni di
danneggiamento. Non utilizzare il dispositivo se è necessario un inter-
vento di riparazione.
Attenzione
Tutte le operazioni che richiedono l’apertura dell’involucro (collega-
mento cavi, programmazione, ecc.) devono essere eseguite in fase di
installazione da personale esperto. Per ogni ulteriore operazione che
richieda nuovamente l’apertura dell’involucro (riprogrammazione, ripa-
razione o modifiche dell’installazione) contattare l’assistenza tecnica.

EASY LIGHT TWILIGHT SWITCH
Easy Light twilight switch, makes it possible to carry out con-
trols without having light, there are various operational modes and types
of power supply.
- Mod. Easy Light: Power supply 12-24 VAC-DC
- Mod. Easy Light 230V: Power supply 230VAC
TECHNICAL DATA
- Power supply: See model
- Max. consumption: 2W
- Relay Contact: 30VDC 10A
- Working temperature: -10÷55°C
- Dimensions: 80x54x38mm
- Protection rating: IP 54
CONNECTIONS OF THE CN1 TERMINAL BOARD
1: Power supply 230VAC
2: Power supply 230VAC
CONNECTIONS OF THE CN2 TERMINAL BOARD
1: Power supply 24 VAC-DC
2: Power supply 0V
3: Power supply 12VAC-DC
4: Relay Contact Output
5: Relay Contact Output
INITIAL FUNCTIONING CONDITION
The device makes it possible to activate controls based on the light
detected through the integrated sensor. Sensor sensitivity can be modi-
fied using the VR1 trimmer present inside of the device. By using the SEL
and SET programming keys it is possible to select different types of oper-
ation. In the default configuration the device is set at an intermediate sen-
sitivity to light through the VR1 trimmer and Monostable functioning with
NO contact output.
ADJUSTING SENSITIVITY TO THE CAPTURED LIGHT
The device makes it possible to adjust Sensitivity of the light captured
through the VR1 trimmer. The switching on of the LIGHT LED on the
device indicates that the intensity of captured light exceeds the selected
intervention threshold; in this way we will have a reference to the current
light conditions to establish the desired one.
PROGRAMMING KEYS AND INDICATOR LED
SEL Key: selects the type of function to memorise, the choice is indicat-
ed by the flashing of the LED. By repeatedly pressing the key, it is possi-
ble to position oneself on the desired function. The selection remains
active for 15 seconds, displayed by the flashing LED, after which the con-
trol unit returns to the original status.
SET Key: carries out programming of the function chosen with the SEL
key.
- 4 -
GB

Indicator LED
LED on: option memorised.
LED off: option not memorised.
Flashing LED: option selected.
MAIN MENU
LED Ref. LED Off LED On
1) MONO Monostable Impulse 1 sec.
2) TEMP. Timer = OFF Timer = ON
3) I. CMD Relay Output NO Relay Output NC
1) MONO (Monostable Operation / Impulse 1 sec.)
The control unit is supplied with the Monostable operational mode
enabled (MONO LED OFF), meaning that the relay will activate every time
that the sensor determines that there is no light, and will deactivate in the
presence of light. When needing an Impulse type of functioning, meaning
that the relay is only activated for one second each time that the sensor
determines that there is no light, programming must be completed in the
following way: position the SEL key on the flashing of MONO LED then
press the SET key, the MONO LED will simultaneously switch on perma-
nently and the programming is completed. Repeat the procedure to
restore the previous configuration.
2) TEMP. (Timer Function enabled / disabled)
The control unit is supplied with the Timer functioning disabled (TIMER
LED OFF).
When the device needs to be used with the timed function, meaning that
the control relay is active for the programmed amount of time after the
sensor has been activated.
Proceed as follows: position the SEL key on TIMER LED and press the
SET key to start programming, at the same time the TIMER LED will start
to double flash; every double flash of the TIMER LED corresponds to an
increase of 30 minutes up to a maximum of 12 hours (24 double flashes),
press the SET key until the desired time is reached; at the same time the
selected value is saved and the TIMER LED will stay on.
It is possible to repeat the operation in case of an incorrect programming.
Displaying the programmed Time
When verifying the previously programmed Time, it is possible to display
it in the following way: with the SEL key position yourself on TIMER LED,
the LED will start to double flash for the number of times equal to the
Time programmed in the memory (every double flash of the TIMER LED
corresponds an increase of 30 minutes), (example: 4 TIMER LED flashes
= 120 minutes).
3) I. CMD ( Inversion of NO / NC control functioning )
The control unit is with a Normally Open output operational mode (LED I.
CMD OFF).
When needing an inverted mode of operation, with the control output set
at Normally Closed, proceed as follows: position the SEL key on the
flashing of LED I. CMD then press the SET key, the LED I. CMD will simul-
taneously switch on permanently and the programming is completed.
Repeat the procedure to restore the previous configuration.
RESET
In case it is necessary to reset the device to default factory settings,
press the SEL and SET keys together so that all indicator LEDs switch on
and then immediately off at the same time.
- 5 -

- 6 -
Rev. 3.0 13/06/2016
The products
EASY LIGHT - EASY LIGHT 230V
comply with the specifications of the Directives
LVD 2014/35/EU, EMC 2014/30/EU.
IMPORTANT FOR THE INSTALLER
The product does not have any type of isolating device for the 230 Vac
line. It will therefore be the responsibility of the installer to arrange an
isolating device inside the plant. It must be positioned where it can be
protected from accidental closing, according to that prescribed in
point 5.2.9 of EN 12453.
Wiring of the various electrical components outside of the product
must be carried out in compliance with that prescribed in Standard EN
60204-1 and its amendments at point 5.2.7 of EN 12453. Power sup-
ply and connection cables must be fixed using the cable glands that
can be supplied as an optional.
Pay attention while making holes in the outside casing, when passing
cables for connection and power supply and assembling the cable
glands, that everything is installed in a way that keeps IP protection
characteristics of the panel unchanged as much as possible.
Pay careful attention when fastening the cables so that they are
anchored in a manner that is stable.
The back casing is not equipped with suitable predispositions for fix-
ing to a wall (predisposition for holes for fixing using anchors or holes
for fixing using screws). Plan and implement necessary solutions to
achieve an installation that does not alter the IP protection.
IMPORTANT FOR THE INSTALLER
- ATTENTION: keep this instruction manual and respect the important
safety prescriptions contained herein. The non compliance with the
prescriptions may cause damages and serious accidents.
- The device must never be used by children or persons with reduced
physical-psychological abilities, unless supervised or trained on the
functioning and the use modalities.
- Frequently examine the plant to detect any signs of damaging. Do not
use the device if a repair intervention is necessary.
Attention
All operations which require the opening of the casing (cables connec-
tion, programming, etc.) must be carried out by expert personnel dur-
ing installation. For any further operation which requires the casing to
be re-opened (re-programming, repair or installation amendments)
contact the after-sales assistance.

EASY LIGHT
INTERRUPTEUR CRÉPUSCULAIRE
Interrupteur crépusculaire Easy Light, permet l’activation des com-
mandes en absence de lumière, avec les différentes modalités de fonc-
tionnement et types d’alimentation.
- Mod. Easy Ligth : Alimentation 12-24VAC-DC
- Mod. Easy Ligth 230V : Alimentation 230VAC
CARACTÉRISTIQUES TECHNIQUES
- Alimentation: Voir modèle
- Consommation max.: 2W
- Contact Relais : 30VDC 10A
- Température d’exercice: -10÷55°C
- Dimensions: 80x54x38mm
- Degré de protection: IP 54
BRANCHEMENTS DE LA BARRETTE DE RACCORDEMENT CN1
1: Alimentation 230VAC
2: Alimentation 230VAC
BRANCHEMENTS DE LA BARRETTE DE RACCORDEMENT CN1
1: Alimentation 24VAC-DC
2: Alimentation 0V
3: Alimentation 12VAC-DC
4: Sortie Contact Relais
5: Sortie Contact Relais
CONDITION INITIALE DE FONCTIONNEMENT
Le dispositif permet l’activation des commandes en fonction de la
lumière relevée au moyen du capteur intégré. La sensibilité du capteur
peut être modifiée au moyen du trimmer VR1 présent à l’intérieur du dis-
positif. En utilisant les touches de programmation SEL et SET on pourra
sélectionner les différents types de fonctionnement. Durant la configura-
tion d’usine le dispositif présente un réglage intermédiaire de la sensibi-
lité des lumières au moyen du trimmer VR1 et le fonctionnement
Monostable avec sortie contact NA.
RÉGLAGE DE LA SENSIBILITÉ DE LA LUMIÈRE CAPTÉE
Le dispositif permet de régler la Sensibilité de la lumière captée au moyen
du trimmer VR1. L’allumage de la DEL LIGHT sur le dispositif indique que
l’intensité de Lumière captée dépasse le seuil d’intervention sélectionné,
de cette façon on se réfère aux conditions actuelles de luminosité pour
établir celui souhaité.
TOUCHES DE PROGRAMMATION ET LED DE SIGNALISATION
Touche SEL: elle sélectionne le type de fonction à mémoriser, le choix
est indiqué par le clignotement de la led. En appuyant plusieurs fois sur
la touche on peut se positionner sur la fonction souhaitée. La sélection
reste active pendant 15 secondes, visualisée par la led qui clignote, après
lesquelles la centrale revient à son état originaire.
Touche SET: elle effectue la programmation de la fonction choisie avec
la touche SEL.
- 7 -
F

Led de signalisation
Led allumée: option mémorisée.
Led éteinte: option non mémorisée.
Led clignotante: option sélectionnée.
MENU PRINCIPAL
Réf. LED LED Eteinte LED Allumée
1) MONO Monostable Impulsion 1 sec.
2) TEMP. Minuteur= OFF Minuteur= ON
3) I. CMD Relais Output NA Relais Output NC
1) MONO (Fonctionnement Monostable / Impulsion 1 sec.)
La centrale est fournie avec le mode de fonctionnement Monostable
activé (LED MONO OFF), c’est-à-dire, le relais s’activera à chaque fois
que le capteur détermine le manque de lumière et se désactive en pré-
sence de lumière. Dans le cas où il faut avoir un fonctionnement de type
Impulsif, c’est-à-dire l’activation du relais seulement pendant 1 seconde
toutes les fois que le capteur détermine le manque de lumière, la pro-
grammation doit être effectuée de la façon suivante: se placer avec la
touche SEL sur le clignotement de la LED MONO et appuyer sur la
touche SET; au même moment la LED MONO s’allumera de façon per-
manente et la programmation se terminera. Répéter l’opération si l’on
souhaite rétablir la configuration précédente.
2) TEMP. (Fonction Minuteur activé/désactivé)
La centrale est fournie avec le mode de fonctionnement Timer disabilitato
(Minuteur désactivé) (LED TIMER OFF).
Dans le cas où serait nécessaire un fonctionnement temporisé du dispo-
sitif; c’est-à-dire que le relais de commande est activé pendant toute la
durée programmée, après que le capteur se soit activé.
Procéder de la façon suivante: se placer avec la touche SEL sur LED
TIMER ensuite appuyer sur la touche SET pour lancer la procédure de
programmation, simultanément la LED TIMER commencera à faire un
double clignotement, à chaque double clignotement de la LED TIMER
équivaut une augmentation de 30 minutes à un maximum de 12 heures
(24 doubles clignotements), appuyer sur la touche SET une fois atteint le
seuil souhaité, au même moment se produira la mémorisation de la valeur
sélectionnée et la LED TIMER restera allumée *
On peut répéter l’opération dans le cas d’une programmation erronée.
Visualisation du Temps programmé
Dans le cas d’un contrôle du Temps programmé précédemment, la visua-
lisation est possible de la façon suivante: se positionner avec la touche
SEL sur LED TIMER, la LED commencera à faire un double clignotement
pour un nombre de fois égal au Temps programmé en mémoire (chaque
double clignotement de la LED TIMER équivaut à une augmentation de
30 minutes), (exemple: 4 clignotements de LED TIMER = 120 minutes).
3) I. CMD (Inversion fonctionnement commande NA / NC)
La centrale est fournie avec le mode de fonctionnement de sortie com-
mande Normalement Ouvert (LED I. CMD OFF).
Dans le cas où serait nécessaire un fonctionnement inversé, sortie com-
mande Normalement Fermé, procéder de la façon suivante: se placer
avec la touche SEL sur le clignotement de la LED I. CMD et appuyer sur
la touche SET; au même moment la LED I. CMD s’allumera de façon per-
manente et la programmation se terminera. Répéter l’opération si l’on
souhaite rétablir la configuration précédente.
REMISE À ZÉRO
S’il était nécessaire de rétablir le dispositif dans sa configuration d’usine
appuyer sur les touches SEL et SET ensemble de façon à obtenir l’allu-
mage simultané de toutes les LEDS de signalisation et immédiatement
après leur extinction.
- 8 -

- 9 -
Rev. 3.0 13/06/2017
Les produits
EASY LIGHT - EASY LIGHT 230V
sont conformes aux spécifications des Directives
LVD 2014/35/EU, EMC 2014/30/EU.
INFORMATIONS IMPORTANTES POUR L’INSTALLATEUR
Le produit ne présente aucun type de dispositif de sectionnement de
la ligne électrique 230 Vac, le technicien devra donc prévoir dans l’ins-
tallation un dispositif de sectionnement. Celui-ci doit être positionné
de façon à être protégé contre les fermetures accidentelles, conformé-
ment aux indications mentionnées au point 5.2.9 de la EN 12453.
Le câblage des différents composants électriques externes au produit
doit être effectué conformément à la norme EN 60204-1 et aux modi-
fications apportés à cette dernière au point 5.2.7 de l EN 12453. La
fixation des câbles d’alimentation et de branchement, doit être garan-
tie par l’assemblage des serre-câbles fournis en dotation.
Il faut faire attention, durant la phase de perçage du boîtier externe de
faire passer les câbles d’alimentation et de branchement, et d’assem-
blage des serre-câbles, à installer le tout de façon à maintenir inchan-
gées le plus possible les caractéristiques de degré IP de la boîte.
Il faut faire également attention de fixer les câbles de manière à ce
qu’ils soient fixés de façon stable.
Le boîtier est dépourvu, dans la partie arrière, de prédispositions adé-
quates pour la fixation au mur (prédisposition pour orifices pour la fixa-
tion au moyen de chevilles ou orifices pour la fixation au moyen de vis).
Prévoir et mettre en œuvre toutes les précautions pour une installation
qui n’altère pas le degré IP.
INFORMATIONS IMPORTANTES POUR L’UTILISATEUR
- ATTENTION: conserver ce livret d’instructions et respecter les impor-
tantes prescriptions de sécurité qui y figurent. Le non respect des
prescriptions pourrait provoquer des dommages et de graves acci-
dents.
- Le dispositif ne doit pas être utilisé par des enfants ou par des per-
sonnes aux capacités psychophysiques réduites, à moins qu’ils ne
soient surveillés ou instruits quant au fonctionnement et aux modalités
d’utilisation.
- Examiner fréquemment l’installation pour relever d’éventuels signes
d’endommagement. Ne pas utiliser le dispositif s’il nécessite une inter-
vention de réparation.
Attention
Toutes les opérations qui exigent l’ouverture du boîtier (raccordement
de câbles, programmation, etc.) doivent être effectuées au moment de
l’installation par le personnel qualifié. Pour toutes opérations succes-
sives exigeant la réouverture du boîtier (reprogrammation, réparation
ou modifications de l’installation) contacter le service d’Assistance
Technique.

EASY LIGHT
DÄMMERUNGSSCHALTER
Der Dämmerungsschalter Easy Light ermöglicht die Ausführung der
Steuerungen bei Abwesenheit von Licht, mit unterschiedlichen
Betriebsmodalitäten und Versorgungstypologien.
- Mod. Easy Ligth : Spannungsversorgung: 12-24VAC-DC
- Mod. Easy Ligth 230V Spannungsversorgung: 230VAC
TECHNISCHE MERKMALE
- Stromversorgung: Siehe Modell
- Max. Verbrauch: 2W
- Relaiskontakt : 30VDC 10A
- Betriebstemperatur: -10÷55°C
- Abmessungen: 80x54x38mm
- Schutzgrad: IP 54
ANSCHLÜSSE DER KLEMMLEISTEN CN1
1: Spannungsversorgung 230VAC
2: Spannungsversorgung 230VAC
ANSCHLÜSSE DER KLEMMLEISTEN CN2
1: Spannungsversorgung 24VAC-DC
2: Spannungsversorgung 0V
3: Spannungsversorgung 12VAC-DC
4: Ausgang Kontakt Relais
5: Ausgang Kontakt Relais
ANFÄNGLICHER BETRIEBSZUSTAND
Das Gerät ermöglicht die Aktivierung der Steuerungen gemäß der
Lichtermittlung durch den integrierten Sensor. Die Empfindlichkeit des
Sensors kann über den Trimmer VR1 im Inneren der Vorrichtung verän-
dert werden. Über die Programmierungstasten SEL und SET können
unterschiedliche Betriebstypologien ausgewählt werden. In der werksei-
tigen Konfiguration weist das Gerät dank des Trimmers VR1 eine mittlere
Lichtempfindlichkeit auf und einen monostabile Funktionsweise mit NA
Kontaktausgang.
EINSTELLUNG DER LICHTEMPFINDLICHKEIT
Das Gerät ermöglicht die Einstellung der Empfindlichkeit auf das Licht,
dem es ausgesetzt ist, dank des Trimmers VR1. Das Einschalten der LED
LIGHT am Gerät zeigt an, dass die aufgefangene Lichtintensität die aus-
gewählte Eingriffsschwelle überschreitet, auf diese Weise erhält man
einen Vergleich zu den aktuellen Lichtbedingungen, um die gewünschte
festzusetzen.
PROGRAMMIERUNGSTASTE UND LED-ANZEIGE
Taste SEL: Sie wählt den zu speichernden Funktionstyp aus, die Wahl
wird durch das Blinken der Led-Anzeige angezeigt. Bei mehrmaligem
Drücken der Taste kann man sich auf der gewünschten Funktion in
Stellung bringen. Der Wahlvorgang bleibt 15 Sekunden lang tätig, was
durch das blinkende Led ersichtlich ist. Wenn diese Zeit vergangen ist
- 10 -
D

- 11 -
kehrt die Zentrale auf den Ursprungsstand zurück.
Taste SET: Sie führt die Programmierung der durch die Taste SEL ausge-
wählten Funktion aus.
Led-Anzeige
Led an: Option gespeichert.
Led aus: Option nicht gespeichert.
Led blinkt: Option gewählt.
HAUPTMENÜ
Bezug Led Led aus Led an
1) MONO Monostabil Impuls 1 Sek.
2) ZEIT Timer = OFF Timer = ON
3) I. CMD Relay Output NA Relay Output NC
1) MONO ( Betrieb Monostabil / Impuls 1 Sek. )
Die Steuereinheit wird bereits mit der aktivierten monostabilen
Funktionsweise geliefert (LED MONO OFF), d.h. das Relais wird jedes
Mal aktiviert, wenn der Sensor einen Lichtmangel ermittelt und deakti-
viert, wenn Licht vorhanden ist. Will man eine Impuls-Funktionsweise,
d.h. eine Aktivierung des Relais für nur 1 Sekunde jedes Mal, wenn der
Sensor einen Lichtmangel feststellt, dann muss die Programmierung wie
folgt vorgenommem werden: Man positioniert sich mit der Taste SEL auf
das Blinklicht LED MONO und drückt die Taste SET; im selben Moment
schaltet sich das LED MONO fest ein und die Programmierung ist abge-
schlossen. Will man die vorhergehende Konfiguration wiederherstellen,
wiederholt man diese Operation.
2) ZEIT (Funktion Timer aktiviert/deaktiviert)
Die Steuereinheit ist mit der deaktivierten Timer-Funktion geliefert (LED
TIMER OFF).
Für den Fall, dass eine taktgesteuerte Funktionsweise nötig ist, d.h. das
dass Steuerrelais für die programmierte Dauer aktiviert ist, nachdem der
Sensor aktiviert wurde.
Man geht wie folgt vor: Man positioniert sich mit der Taste SEL auf LED
TIMER und drückt die Taste SET, um die Programmierung zu starten, im
selben Moment beginnt die LED TIMER zu blinken; jedes doppelte
Blinken der LED TIMER entspricht einem Zuwachs von 30 Minuten bis zu
einem Maximum von 12 Stunden (24 doppelte Blinkzeichen), hat man die
gewünschte Zeit erreicht, drückt man die Taste SET; im selben Moment
wird die Speicherung des gewählten Wertes beendet und die LED TIMER
bleibt eingeschaltet.
Im Falle einer fehlerhaften Programmierung kann die Operation wieder-
holt werden.
Visualisierung der programmierten Zeit
Will man die zuvor programmierte Zeit überprüfen, kann sie auf folgende
Weise visualisiert werden: Man positioniert sich mit der Taste SEL auf
LED TIMER, die Led-Anzeige beginnt ein doppeltes Blinken zu senden,
die Anzahl der Blinkzeichen entspricht der im Speicher programmierten
Zeit (jedem doppeltem Blinken der LED TIMER entsprechen 30 Minuten),
(Beispiel: 4 Blinkzeichen der LED TIMER = 120 Minuten).
3) I. CMD ( Inversion der Steuerfunktion NA / NC )
Die Steuereinheit wird mit dem Betriebsmodus Ausgang Steuerung
Normalerweise Offen geliefert (LED I. CMD OFF ).
Will man eine invertierte Funktionsweise, Ausgang Steuerung
Normalerweise Geschlossen, geht man wie folgt vor: Man positioniert
sich mit der Taste SEL auf das Blinklicht LED I. CMD und drückt die Taste
SET; im selben Moment schaltet sich die LED I. CMD fest ein und die
Programmierung ist abgeschlossen. Will man die vorhergehende
Konfiguration wiederherstellen, wiederholt man diese Operation.
RESET
Will man die werkseitige Konfiguration wiederherstellen, drückt man die
Tasten SEL und SET zusammen, um das gleichzeitige Einschalten aller
LED-Anzeigen und dann ihr sofortiges Ausschalten auszulösen.

- 12 -
Rev. 3.0 13/06/2016
Das Produkt:
EASY LIGHT - EASY LIGHT 230V
konform mit den Vorschriften der Richtlinien
LVD 2014/35/EU, EMC 2014/30/EU, ist.
WICHTIGE HINWEISE FÜR DEN MONTEUR
Die Steuereinheit verfügt über keine Art von Trennvorrichtung der elek-
trischen Linie 230 Vac. Es ist daher Aufgabe des Installateurs eine
Trennvorrichtung vorzusehen. Diese ist so zu installieren, dass sie vor
einem versehentlichen erneuten Schließen geschützt ist (Richtlinie EN
12453 Punkt 5.2.9).
Die Verkabelung der verschiedenen elektrischen Bauteile außen an der
Steuerung ist entsprechend den Vorschriften der Richtlinie EN 60204-
1 sowie den an dieser durch den Punkt 5.2.7 der EN 12453 vorgenom-
menen Änderungen durchzuführen. Die Befestigung der Versorgungs-
und Verbindungskabel muss durch die Montage von optional lieferba-
ren Kabelverschraubungen gewährleistet sein.
Bei der Montage (Bohrung des Außengehäuses zur Durchführung der
Versorgungs- und Anschlusskabel und Montage der
Kabelverschraubungen) muss darauf geachtet werden, dass die
Eigenschaften des Schutzgrades IP des Kastens erhalten bleiben.
Außerdem müssen die Kabel stabil verankert befestigt werden.
Das Gehäuse besitzt auf der Hinterseite keine geeigneten
Vorrichtungen zur Wandbefestigung (Vorbereitungen für Bohrungen
zur Befestigung mit Dübeln oder Bohrungen zur Befestigung mit
Schrauben). Bei der Installation alle Vorkehrungen treffen, damit der
Schutzgrad IP erhalten bleibt.
WICHTIGE HINWEISE FÜR DEN NUTZER
- ZUR BEACHTUNG: Bewahren Sie diese Bedienungsanleitung bitte
sorgfältig auf und halten Sie sich strengstens an die darin enthaltenen
Sicherheitshinweise. Bewahren Sie diese Bedienungsanleitung bitte
sorgfältig auf und halten Sie sich strengstens an die darin enthaltenen
Sicherheitshinweise.
- Diese Vorrichtung darf nicht von Kindern oder von Personen mit ein-
geschränkten psychophysischen Fähigkeiten bedient werden, es sei
denn, unter entsprechender Aufsicht oder Unterweisung hinsichtlich
des Gebrauchs des Gerätes.
- Kontrollieren Sie die Anlage regelmäßig und in kurzen Zeitabständen
auf Zeichen einer eventuellen Beschädigung. Verwenden Sie die
Vorrichtung nicht, wenn Reparatureingriffe erforderlich sind.
Achtung
Alle Operationen, die das Öffnen des Gehäuses nötig machen
(Anschluss der Kabel, Programmierung usw.) müssen in der
Installationsphase von Fachpersonal durchgeführt werden. Für weitere
Operationen, die erneut das Öffnen des Gehäuses erforderlich machen
(Wiederprogrammierung, Reparatur oder Installationsveränderungen)
kontaktieren Sie den Kundendienst.

EASY LIGHT
INTERRUPTOR CREPUSCULAR
Interruptor crepuscular Easy Light, permite ejecutar mandos en ausencia
de luz, con diferentes modalidades de funcionamiento y tipologías de ali-
mentación.
- Mod. Easy Ligth : Alimentación: 12-24VAC-DC
- Mod. Easy Ligth 230V : Alimentación: 230VAC
CARACTERÍSTICAS TÉCNICAS
- Alimentación: Vea modelo
- Consumo máx: 2W
- Contacto Relé: 30VDC 10A
- Temperatura de ejercicio: -10÷55°C
- Dimensiones: 80x54x38mm
- Grado de protección: IP 54
CONEXIONES DEL TABLERO DE BORNES CN1
1: Alimentación 230VAC
2: Alimentación 230VAC
CONEXIONES DEL TABLERO DE BORNES CN2
1: Alimentación 24VAC-DC
2: Alimentación 0V
3: Alimentación 12VAC-DC
4: Salida Contacto Relé
5: Salida Contacto Relé
CONDICIÓN INICIAL DE FUNCIONAMIENTO
El dispositivo permite activar mandos en función de la luz detectada
mediante el sensor integrado. La sensibilidad del sensor se puede modi-
ficar mediante el trimmer VR1 que está en el interior del dispositivo.
Utilizando las teclas de programación SEL y SET se pueden seleccionar
diferentes tipologías de funcionamiento. En la configuración de fábrica, el
dispositivo tiene una regulación intermedia de la sensibilidad de la luz
mediante trimmer VR1 y funcionamiento Monoestable con salida contac-
to NA.
REGULACIÓN DE LA SENSIBILIDAD DE LA LUZ CAPTADA
El dispositivo permite regular la Sensibilidad de la luz captada mediante
el trimmer VR1. El encendido del LED LIGHT en el dispositivo indica que
la intensidad de la Luz captada supera el umbral de intervención selec-
cionado, de esta manera tendremos una referencia a las condiciones
actuales de luz para estabilizar la deseada.
TECLAS DE PROGRAMACIÓN Y LED DE SEÑALIZACIÓN
Tecla SEL: selecciona el tipo de función que se va a memorizar, la selec-
ción la indica el parpadeo del Led. Presionando la tecla más de una vez
es posible posicionarse en la función deseada. La selección permanece
activa durante 15 segundos, visualizada por el LED intermitente, luego de
los cuales la central vuelve al estado inicial.
Tecla SET: ejecuta la programación de la función seleccionada con la
tecla SEL.
- 13 -
E

Led de señalización
Led encendido: opción memorizada.
Led apagado: opción no memorizada.
Led intermitente: opción seleccionada.
MENÚ PRINCIPAL
Referencia Led Led Apagado Led Encendido
1) MONO Monoestable Impulso 1 seg.
2) TEMP Timer = OFF Timer = ON
3) I. CMD Relay Output NA Relay Output NC
1) MONO ( Funcionamiento Monoestable / Impulso 1 seg. )
La central se entrega con el modo de funcionamiento Monoestable habi-
litado (LED MONO OFF), es decir, el relé se activa cada vez que el sen-
sor determina la falta de luz y se desactiva en presencia de luz. Si se
necesita un funcionamiento de tipo Por Impulso, es decir la activación del
relé solamente por 1 segundo cada vez que el sensor determina la falta
de luz, la programación se debe realizar de la siguiente manera: posició-
nese con la tecla SEL en el parpadeo del LED MONO y presione la tecla
SET; en el mismo instante el LED MONO se enciende de manera perma-
nente y la programación habrá finalizado. Repita la operación si desea
restablecer la configuración precedente.
2) TEMP. ( Función Temporizador activada / desactivada )
La central se suministra con el modo de funcionamiento Temporizador
desactivado (LED TIMER OFF).
Si se necesita un funcionamiento del dispositivo temporizado; es decir el
relé de mando se activará por el tiempo configurado, después de que se
haya activado el sensor.
Proceda de la siguiente manera: posiciónese con la tecla SEL en LED
TIMER y presione la tecla SET para iniciar la programación, simultánea-
mente el LED TIMER comenzará a realizar un doble parpadeo; a cada
doble parpadeo del LED TIMER corresponde un incremento de 30 minu-
tos hasta un máximo de 12 horas (24 dobles parpadeos), presione la
tecla SET hasta alcanzar el tiempo deseado; en el mismo momento se
determina la memorización del valor seleccionado y el LED TIMER que-
dará encendido.
En el caso de programación errónea, es posible repetir la operación.
Visualización del Tiempo programado
Si se desea controlar el Tiempo programado anteriormente, es posible
realizar la visualización de la siguiente manera: posiciónese con la tecla
SEL en LED TIMER, el led comenzará a hacer un doble parpadeo por un
número de veces igual al Tiempo programado en memoria (a cada doble
parpadeo del LED TIMER equivale un incremento de 30 minutos), (ejem-
plo: 4 parpadeos de LED TIMER = 120 minutos).
3) I. CMD ( Inversión del funcionamiento mando NA / NC )
La central se suministra con el modo de funcionamiento salida mando
Normalmente Abierto (LED I. CMD OFF ).
Si se desea obtener un funcionamiento invertido, salida mando
Normalmente Cerrado, proceda de la siguiente manera: posiciónese
con la tecla SEL en el parpadeo del LED I. CMD y presione la tecla SET;
en el mismo instante el LED I. CMD se enciende de manera permanente
y la programación habrá finalizado. Repita la operación si desea restable-
cer la configuración precedente.
RESET
En el caso en el que sea oportuno restablecer el dispositivo con la con-
figuración de fábrica, presione las teclas SEL y SET juntas, para obtener
el encendido simultáneo de todos los LEDs de señalización y luego el
apagado.
- 14 -

- 15 -
Rev. 3.0 13/06/2016
Los productos
EASY LIGHT - EASY LIGHT 230V
están en conformidad con las especificaciones de las Directivas
LVD 2014/35/EU, EMC 2014/30/EU.
NOTAS PARA EL INSTALADOR
El producto no cuenta con ningún tipo de dispositivo de secciona-
miento de la línea eléctrica 230 Vac, por tanto, será responsabilidad
del instalador posicionar un dispositivo de seccionamiento en la insta-
lación. El mismo se debe posicionar de manera tal que esté protegido
contra los cierres accidentales según lo previsto en el punto 5.2.9 de
la EN 12453.
El cableado de los diferentes componentes eléctricos externos al pro-
ducto, se debe realizar según lo previsto por la normativa EN 60204-1 y
las modificaciones aportadas por el punto 5.2.7 de la EN 12453. La fija-
ción de los cables de alimentación y de conexión, se debe garantizar
mediante el ensamblaje de sujeta-cables incluidos como “opcional”.
Durante la fase de perforación de la cubierta exterior para hacer pasar
los cables de alimentación y de conexión, y de ensamblaje de los suje-
ta-cables, asegúrese de instalar todo de manera que se mantengan
inalteradas las características de grado IP de la caja.
Además asegúrese de fijar bien los cables.
La cubierta en la parte trasera no tiene predisposiciones adecuadas
para la fijación en la pared (predisposición para agujeros para fijación
mediante tacos o agujeros para fijación mediante tornillos). Prevea y
tome todas las medidas que sean necesarias para una instalación que
no modifique el grado IP.
IMPORTANTE PARA EL USUARIO
- ATENCIÓN: guardar este manual de instrucciones y respetar las indi-
caciones sobre seguridad que contiene. El no cumplimiento de las
indicaciones podría generar daños y graves accidentes.
- El dispositivo no debe ser utilizado por niños o por personas con capa-
cidades psicofísicas reducidas, a menos que estén vigilados o hayan
sido instruidos sobre el funcionamiento y las modalidades de uso.
- Controlar periódicamente el equipo a fin de detectar posibles averí-
as. No utilizar el dispositivo si es necesario realizar una reparación.
Atención
Todas las operaciones que requieren la abertura de la cubierta (cone-
xión de cables, programación, etc.) deben ser realizadas en fase de
instalación por personal experto. Para cualquier otra operación que
requiera nuevamente la abertura de la cubierta (reprogramación, repa-
ración o modificación de la instalación) contacte la asistencia técnica.

EASY LIGHT
INTERRUPTOR CREPUSCULAR
O interruptor crepuscular Easy Light permite actuar comandos em
ausência de luz, com várias modalidades de funcionamento e tipos de
alimentação.
- Mod. Easy Light : Alimentação 12-24VAC-DC
- Mod. Easy Light 230V : Alimentação 230VAC
DADOS TÉCNICOS
- Alimentação: Ver modelo
- Consumo máx.: 2W
- Contacto relé: 30VDC 10A
- Temperatura de funcionamento: -10÷55°C
- Dimensões: 80x54x38mm
- Grau de protecção: IP 54
LIGAÇÕES À PLACA DE BORNES CN1
1: Alimentação 230VAC
2: Alimentação 230VAC
LIGAÇÕES À PLACA DE BORNES CN2
1: Alimentação 24VAC-DC
2: Alimentação 0V
3: Alimentação 12VAC-DC
4: Saída do contacto relé
5: Saída do contacto relé
CONDIÇÃO INICIAL DE FUNCIONAMENTO
O dispositivo permite a activação de comandos com base na luz identi-
ficada através de sensor integrado. A sensibilidade do sensor pode ser
modificada através do compensador VR1 que se encontra no interior do
dispositivo. Através da utilização das teclas de programação SEL e SET
podem ser seleccionados diversos tipos de funcionamento. Na configu-
ração de fábrica o dispositivo apresenta uma regulação intermediária da
sensibilidade de luz através do compensador VR1 e funcionamento
monoestável com saída contacto NA.
REGULAÇÃO DA SENSIBILIDADE DA LUZ CAPTADA
O dispositivo permite a regulação da sensibilidade da luz captada atra-
vés do compensador VR1. O acendimento do LED LIGHT no dispositivo
indica que a intensidade da luz captada supera o limite de intervenção
seleccionado e, neste modo, pode-se obter a referência das actuais con-
dições de luz para estabelecer aquela desejada.
TECLAS DE PROGRAMAÇÃO E LED DE SINALIZAÇÃO
Tecla SEL: selecciona o tipo de função que deve ser memorizada. A
escolha é indicada através da intermitência do Led. Pressionando a tecla
mais vezes é possível posicionar-se na função desejada. A selecção per-
manece activa por 15 segundos, visualizada pelo LED intermitente e,
após este período, a central retorna no estado original.
Tecla SET: efectua a programação da função escolhida com a tecla SEL.
Led de sinalização
Led aceso: opção memorizada.
- 16 -
P

Led desligado: opção não memorizada.
Led intermitente: opção seleccionada.
MENU PRINCIPAL
Ref. Led Led Desligado Led Aceso
1) MONO Monoestável Impulso 1 seg.
2) TEMP Temporizador = OFF Temporizador = ON
3) I. CMD Relé saída NA Relé saída NC
1) MONO (Funcionamento monoestável/Impulso 1 seg.)
A central é fornecida com o modo de funcionamento monoestável habi-
litado (LED MONO OFF), ou seja, o relé activa-se sempre que o sensor
determinar a falta de luz eléctrica, desactivando-se em presença de luz.
Se houver um funcionamento de tipo de impulso, ou seja, a activação do
relé por somente 1 segundo quando o sensor determinar a falta de luz, a
programação deve ser efectuada da seguinte maneira: posicionar-se
com a tecla SEL na intermitência do LED MONO e pressionar a tecla SET.
No mesmo instante, o LED MONO se acende permanentemente e a pro-
gramação terá sido terminada. Repetir a operação se desejar restabele-
cer a configuração anterior.
2) TEMP. (Função temporizador habilitada/desabilitada)
A central é fornecida com o modo de funcionamento Temporizador desa-
bilitado (LED TIMER OFF).
Se houver um funcionamento do dispositivo temporizado o relé de
comando será activo pelo tempo programado depois que o sensor for
activado.
Seguir as instruções abaixo: posicionar-se com a tecla SEL em LED
TIMER e pressionar a tecla SET para activar a programação e, ao mesmo
tempo, o LED TIMER inicia uma dupla intermitência. Cada intermitência
do LED TIMER equivale a um aumento de 30 minutos até um máximo de
12 horas (24 duplas intermitências) e pressionar a tecla SET quando for
obtido o tempo desejado. No mesmo instante, determina-se a memori-
zação do valor seleccionado e o LED TIMER permanece aceso.
É possível repetir a operação em caso de programação errada
Visualização do tempo programado
Em caso d verificação do tempo programado anteriormente é possível
visualizar seguindo as instruções abaixo: posicionar-se com a tecla SEL
em LED TIMER e o led inicia a piscar duplamente por um número de
vezes igual ao tempo programado em memória (a cada dupla intermitên-
cia do LED TIMER equivale um incremento de 30 minutos, (exemplo: 4
intermitências de LED TIMER = 120 minutos).
3) I. CMD (Inversão de funcionamento de comando NA / NC)
A central é fornecida com o modo de funcionamento de saída de coman-
do normalmente aberto (LED I. CMD OFF).
Se for necessário efectuar um funcionamento invertido, com saída de
comando normalmente fechada, seguir as instruções abaixo: posicionar-
se com a tecla SEL na intermitência do LED I. CMD e pressionar a tecla
SET. No mesmo instante, o LED I. CMD se acende permanentemente e
a programação terá sido terminada. Repetir a operação se desejar resta-
belecer a configuração anterior.
ZERAMENTO
Caso seja necessário restabelecer o dispositivo configuração da fábri-
ca, pressionar as teclas SEL e SET juntas para obter o acendimento
contemporâneo de todos os LEDS de sinalização e, logo a seguir, o
desligamento.
- 17 -

- 18
Rev. 3.0 13/06/2017
Os produtos
EASY LIGHT - EASY LIGHT 230V
estão em conformidade com as especificações das directivas
LVD 2014/35/EU, EMC 2014/30/EU.
NOTAS PARA O INSTALADOR
O dispositivo não apresenta nenhum tipo de dispositivo de secciona-
mento da linha eléctrica 230 Vac e será responsabilidade do instalador
providenciar este mesmo dispositivo de seccionamento no implante.
Este dispositivo deve estar posicionado de modo que seja protegido
contra os fechamentos acidentais de acordo com o que foi previsto no
ponto 5.2.9 da EN 12453.
A cablagem dos vários componentes eléctricos externos ao produto
deve ser efectuada como prescrito pela normativa EN 60204-1 e pelas
modificações nela realizadas a partir do ponto 5.2.7 da EN 12453. A
fixação de cabos de alimentação e de conexão deve ser garantido
através da montagem de prensa-cabos que podem ser fornecidos
como opcionais.
Prestar atenção, na fase de perfuração do invólucro externo, para que
passem os cabos de alimentação e de conexão e de assemblagem
dos prensa-cabos para efectuar a instalação de modo que sejam man-
tidas inalteradas as características de grau IP da caixa.
Além disso, prestar atenção para fixar firmemente os cabos.
O invólucro na parte posterior é desprovido de devidas predisposições
para a fixação na parede (predisposição para furos para a fixação atra-
vés de buchas ou furos para a fixação através de parafusos).
Providenciar e implementar todas precauções para efectuar uma ins-
talação que não altere o grau IP.
IMPORTANTE PARA O UTENTE
- ATENÇÃO: conservar este manual de instruções e respeitar as impor-
tantes prescrições de segurança nele contidas. A inobservância des-
tas prescrições pode provocar danos e graves incidentes.
- O dispositivo não deve ser utilizado por crianças ou pessoas com
reduzidas capacidades psicofísicas se não forem supervisionadas ou
treinadas para o funcionamento e a utilização do aparelho.
- Examinar frequentemente o implante para detectar sinais de danos.
Não utilizar o dispositivo se for necessário intervir para um conserto.
Atenção
Todas as operações que requisitam a abertura do invólucro (ligações
de cabos, programação, etc.) devem ser efectuadas durante a fase de
instalação por pessoal qualificado. Para cada ulterior operação que
solicite novamente a abertura do invólucro (reprogramação, conserto
ou modificações da instalação) contactar a assistência técnica.

EASY LIGHT
SKYMNINGSRELÄ
Detta skymningsrelä Easy Light gör det möjligt att aktivera styrutgångar
vid avsaknad av ljus och har möjlighet till olika funktionslägen och mat-
ningsspänningar
- Mod. Easy Light: Matningsspänning 12-24VAC-DC
- Mod. Easy Ligth 230V: Matningsspänning 230VAC
TEKNISK BESKRIVNING
- Matningsspänning: Se modell
- Max förbrukning: 2W
- Reläkontakt: 30VDC 10A
- Drifttemperatur: -10÷55°C
- Mått: 80x54x38mm
- Skyddsgrad: IP 54
ANSLUTNINGAR KOPPLINGSPLINT CN1
1: Matningsspänning 230VAC
2: Matningsspänning 230VAC
ANSLUTNINGAR KOPPLINGSPLINT CN2
1: Matningsspänning 24VAC-DC
2: Matningsspänning 0V
3: Matningsspänning 12VAC-DC
4: Utgång för reläkontakt
5: Utgång för reläkontakt
VILLKOR FÖR START AV FUNKTION
Med denna anordning kan kommandon aktiveras i enlighet med mäng-
den ljus som avläses av en inbyggd sensor. Med hjälp av varistorn VR1
på anordningens insida går det att ändra på sensorns känslighet. Med
hjälp av programmeringsknapparna SEL och SET går det att välja olika
funktionslägen. I fabriksutförande är anordningens ljuskänslighet inställd
på mellanläge genom varistorn VR1 samt monostabil funktion med styr-
utgångens kontakt NO.
JUSTERING AV KÄNSLIGHET FÖR AVLÄST LJUS
Anordningen tillåter inställning av känsligheten för avläst ljus med hjälp av
varistorn VR1. När lysdioden LIGHT tänds på anordningen betyder det att
den avlästa ljusstyrkan överskrider vald utlösningsgräns. På detta sätt får
du information om det aktuella ljusförhållandet så att du kan fastställa
önskat tillstånd.
PROGRAMMERINGSKNAPPAR OCH LYSDIODINDIKATORER
SEL-knapp: Används för att välja typen av funktion som ska lagras.
Utfört val indikeras av att tillhörande lysdiod blinkar. Genom att trycka
upprepande på knappen positionerar du dig på önskad funktion. Utfört
val förblir aktivt i 15 sekunder medan lysdioden blinkar. När tiden har löpt
ut återgår styrenheten till det ursprungliga läget.
SET-knapp: Används för att programmera funktionen som valts med
SEL-knappen.
- 19 -
S

Lysdiodindikatorer
Tänd lysdiod: Valet har lagrats.
Släckt lysdiod: Valet har inte lagrats.
Blinkande lysdiod: Valet har markerats.
HUVUDMENY
Lysdiod Släckt lysdiod Tänd lysdiod
1) MONO Monostabil Impuls 1 sek
2) TEMP. Timer = OFF Timer = ON
3) I. CMD Reläutgång NO Reläutgång NC
1) MONO (Funktionsläge monostabil / impuls 1 sek)
Vid leverans är det monostabila funktionsläget aktiverat på anordningen
(lysdioden MONO släckt), dvs. reläet aktiveras varje gång som sensorn
fastställer att ljus saknas och avaktiveras när ljus finns. Om du istället
föredrar att använda impuls-läget, dvs. att reläet aktiveras i endast 1
sekund varje gång som sensorn fastställer att ljus saknas, ska du göra på
följande sätt för att programmera in detta funktionsläge: Med SEL-knap-
pen väljer du den blinkande lysdioden MONO och trycker sedan på SET-
knappen. I samma stund övergår lysdioden MONO till fast sken och pro-
grammeringen är slutförd. Upprepa förfarandet om du vill återställa till
den föregående inställningen.
2) TEMP. (Aktiverad / avaktiverad timer-funktion)
Vid leverans från fabriken är styrenheten inställd på avaktiverad timer-
funktion (lysdioden TIMER släckt).
Det kan hända att du behöver aktivera en tidsinställd funktion på anord-
ningen, dvs att styrreläet förblir aktivt under en viss programmerad tid
efter att sensorn har påverkats.
Gör på följande sätt: Med SEL-knappen väljer du lysdioden TIMER och
trycker sedan på SET-knappen. Lysdioden TIMER övergår då till dub-
belblink. För varje dubbelblink av lysdioden TIMER kommer inställ-
ningstiden att öka med 30 minuter, upp till max 12 timmer (= 24 dubbel-
blinkningar). Tryck på SET-knappen när önskad tid uppnåtts. I samma
stund har den valda tiden lagrats i minnet och lysdioden TIMER förblir
tänd med fast sken.
Vid felprogrammering går det bra att upprepa förfarandet ovan.
Visualisering av programmerad tid
Gör på följande sätt om du behöver kontrollera hur lång tid som program-
merats i ett tidigare skede: Med SEL-knappen väljer du lysdioden TIMER.
Lysdioden börjar då att dubbelblinka lika många gånger som den tid som
lagrats i minnet (varje dubbelblink av lysdioden TIMER överensstämmer
med 30 minuter). (Exempel: Om lysdioden TIMER blinkar 4 gånger = 120
minuter).
3) I. CMD (Växling mellan funktioner NO / NC för styrutgång)
Vid leverans från fabriken är styrenheten inställd på normalt öppen funk-
tion på styrutgången (lysdiod I. CMD släckt ).
Gör på följande sätt om du behöver byta styrutgångens funktion till nor-
malt stängd: Med SEL-knappen väljer du den blinkande lysdioden I. CMD
och trycker sedan på SET-knappen. I samma stund övergår lysdioden I.
CMD till fast sken och programmeringen är slutförd. Upprepa förfaran-
det om du vill återställa till den föregående inställningen.
ÅTERSTÄLLNING
Vid behov att återställa anordningen till fabriksinställningarna, ska du
trycka samtidigt både på SEL- och SET-knappen. I samma stund tänds
samtidigt samtliga lysdiodindikatorer och släcks sedan igen.
- 20 -
Other manuals for Easy Light
1
This manual suits for next models
3
Table of contents
Languages:
Other Seav Switch manuals
