SeaWire ROUDEM User manual
ROUDEM
User Guide
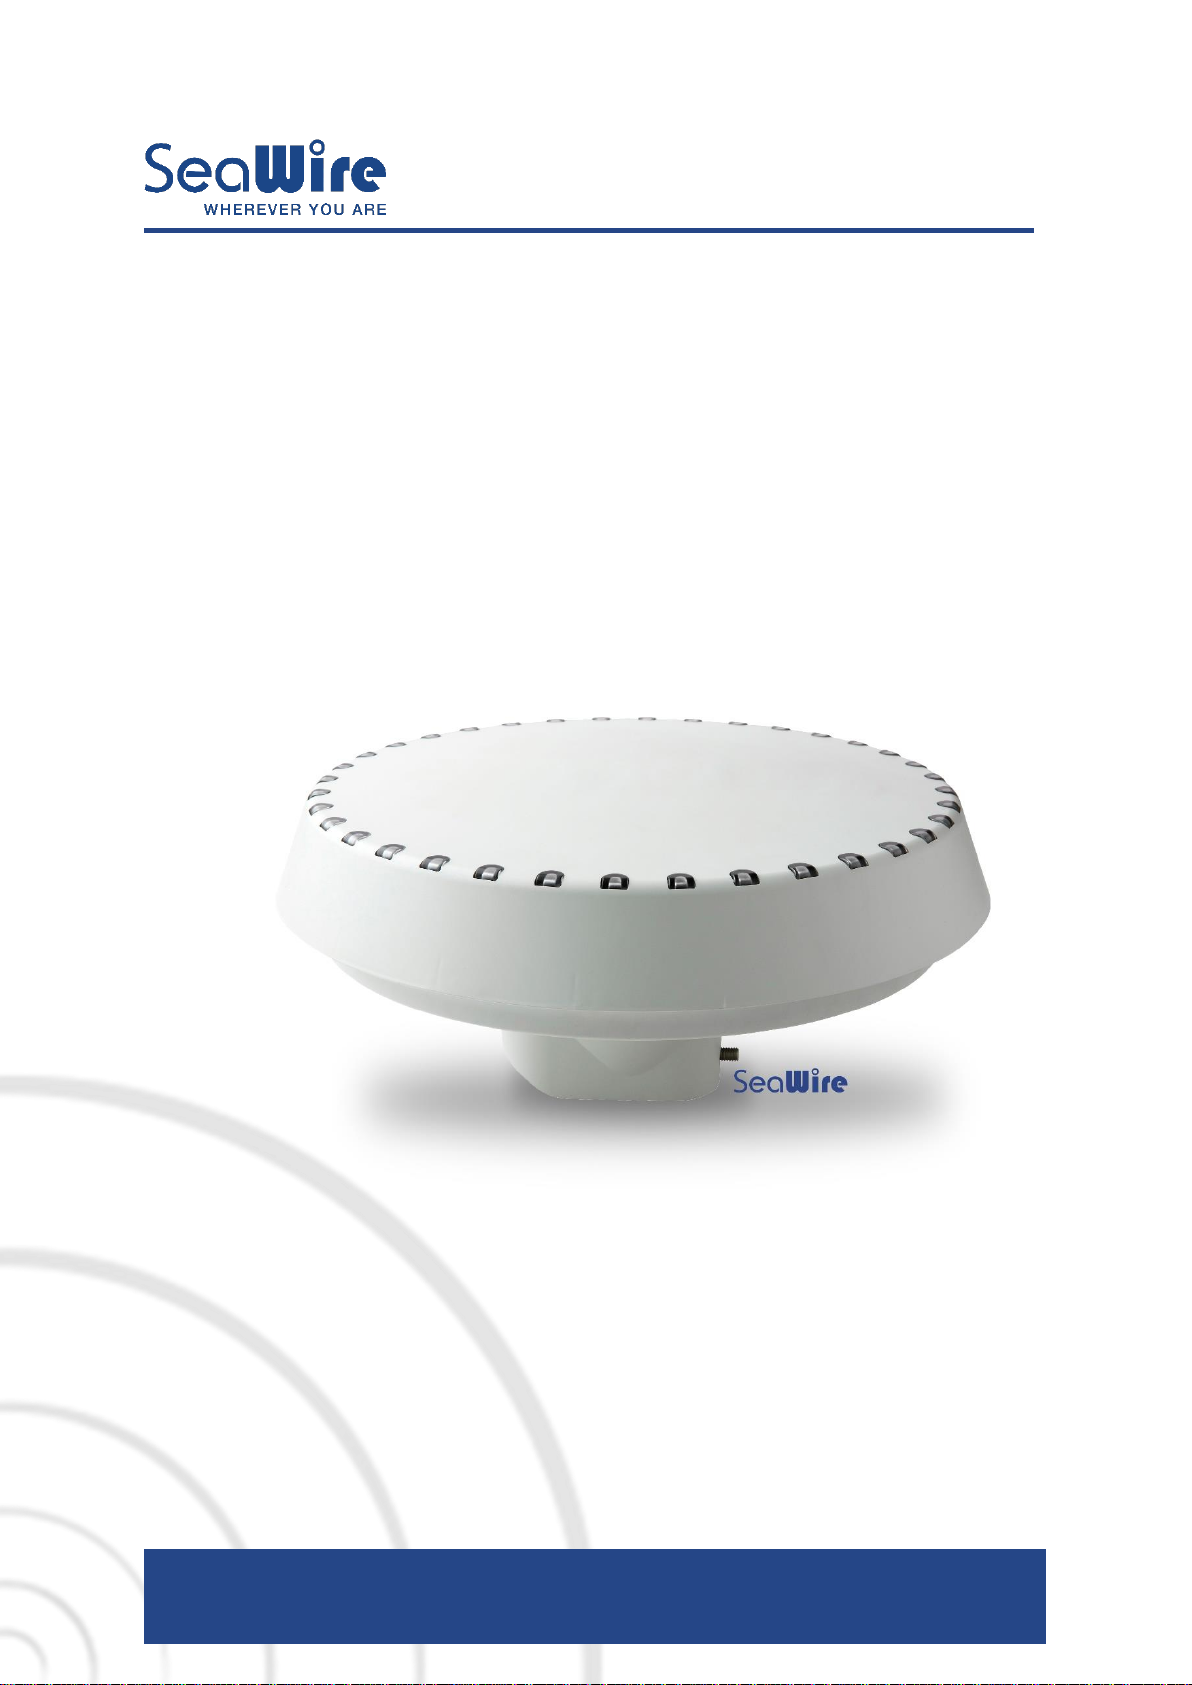
SeaWire RouDem
UserGuide_SeaWireRouDem_Rev.1.02
Developed and produced by MiWire ApS, Denmark
Diplomvej 381, DK-2800 Kongens Lyngby


Introduction User Guide SeaWire RouDem
MiWire ApS 1
This manual is applicable to the following solution/product
Description
P/N
Region, Category, Network
SeaWire RouDem CAT6
1315
EMEA, CAT6, LTE-A
SeaWire RouDem CAT4G
1357
Global, CAT4, LTE
Record of revisions
Rev.
Description
Release Date
Initials
1.00
Original
December, 2021
NF
1.01
Table of Contents mistake
SIM-card sticker updated
January, 2022
NF
1.02
Calibration note is added
Scan mode 4G-LTE only (default)
March, 2022
NF
Table of Contents
Introduction ......................................................................................................................................2
Safety information........................................................................................................................2
Required information for the reader.............................................................................................2
Package Content..........................................................................................................................3
Requirements...............................................................................................................................4
System Configuration...................................................................................................................4
Hardware Overview......................................................................................................................5
Ports SeaWire RouDem...........................................................................................................5
Ports PoE adapter....................................................................................................................5
LED’s............................................................................................................................................6
SeaWire RouDem.....................................................................................................................6
Installation of the SeaWire RouDem................................................................................................7
STEP 1 –Inserting the Micro-SIM card ...................................................................................7
STEP 2 –Preparing mounting bracket and connecting the ethernet cable.............................8
STEP 3 –Mounting the SeaWire RouDem..............................................................................9
STEP 4 –Cable wiring...........................................................................................................10
STEP 5 –Powering the RouDem...........................................................................................10
STEP 6 –Configuration of internet via SeaWire RouDem....................................................12
STEP 7 –Registration............................................................................................................12
MiWire user interface.................................................................................................................13
Specifications.................................................................................................................................19
FAQ/Troubleshoot..........................................................................................................................20
Service & Repair............................................................................................................................22

Introduction User Guide SeaWire RouDem
MiWire ApS 2
Introduction
Thank you for purchasing SeaWire RouDem. The SeaWire RouDem makes it possible to extend
the reach of mobile networks in coastal areas with an automatic directional turning antenna.
Safety information
Read, follow, and keep this instruction.
WARNING - Product installation
To ensure correct performance of this equipment, it is strongly recommended
that professionals with expertise, properly trained, and likewise authorized within
the industry is completing the installation.
WARNING –Do not disassemble
Do not disassemble or modify this equipment.
WARNING –Input Power
The input voltage range is 100-240 VDC.
CAUTION –Contains li-ion batteries
The product contains li-ion batteries. Must not be opened or be replaced by
unauthorized buddies.
CONFORMS TO THE FOLLOWING EUROPEAN DIRECTIVES
RoHS 2 Directive 2011/65/EU
R&TTE Directive 1999/5/EC
Standards to which conformity is declared:
EMC
ETSI EN 301 489-17 V3.1.1 (2017-02)
ETSI EN 301 489-1 V2.1.1 (2017-02)
Draft ETSI EN 301 489-52 V1.1.0 (2016-11)
RF Exposure
EN 62311:2008
Safety
IEC/EN 62368-1:2014
Radio
ETSI EN 300 328 V2.1.1 (2016-11)
FCC declaration
This equipment has been tested and found to be compliant with the emissions limits for a Class
B electronic device in accordance with FCC regulations, section 15.
Required information for the reader
IMPORTANT: Text marked ‘Important’ provides essential information to the reader and is key
information to the user for the equipment to work properly. Damage to the equipment can occur if
instructions are not followed.

Introduction User Guide SeaWire RouDem
MiWire ApS 3
Package Content
Name
Picture
Quantity
SeaWire RouDem
1
Mounting Bracket
1
PoE Power Supply
1
Screws M4x10mm
5
Unbraco 4 Key
1
Torx 10 Key
1
Privacy Policy
1
User Guide
1
Registration Information
1

Introduction User Guide SeaWire RouDem
MiWire ApS 4
Requirements
•Data subscription
To receive data via SeaWire RouDem you must have a subscription with a data provider
and a SIM card.
•Cable(s)
The package content DOES NOT include cables for cable run installations. To install
SeaWire RouDem one must follow these cable specifications when purchasing cables for
installation:
Network cable type
CAT6 or above, UV- and water resistant, double shielded,
grounded
Connector 1
RJ45 (male)
Connector 2
RJ45 (male)
Length
The length of the cable depends on the location for
installation. In the System Configuration section, you will find
an overview of the set up. Max. length is 100m.
•Mounting
Depending on the vessel mounting accessories can vary. The mounting should take
place at the highest spot possible and where possible with a good all-round view with
longest possible distance to other radiocommunication systems. The Mounting Bracket
interfaces to a pole of Ø38mm/1.5” (outer diameter). Read more about the mounting in
‘Installation of the SeaWire RouDem’-section, step 3.
System Configuration

Introduction User Guide SeaWire RouDem
MiWire ApS 5
Hardware Overview
PORTS SEAWIRE ROUDEM
❶SIM card slot
The slot is a Micro-SIM slot used for the SIM card from the data provider. The SIM card slot is
a click system.
❷Ethernet port
RJ45 cable port.
❸On/off button
The On/Off button is a push button. Press 1x for on/off. The LED will flash for on and off.
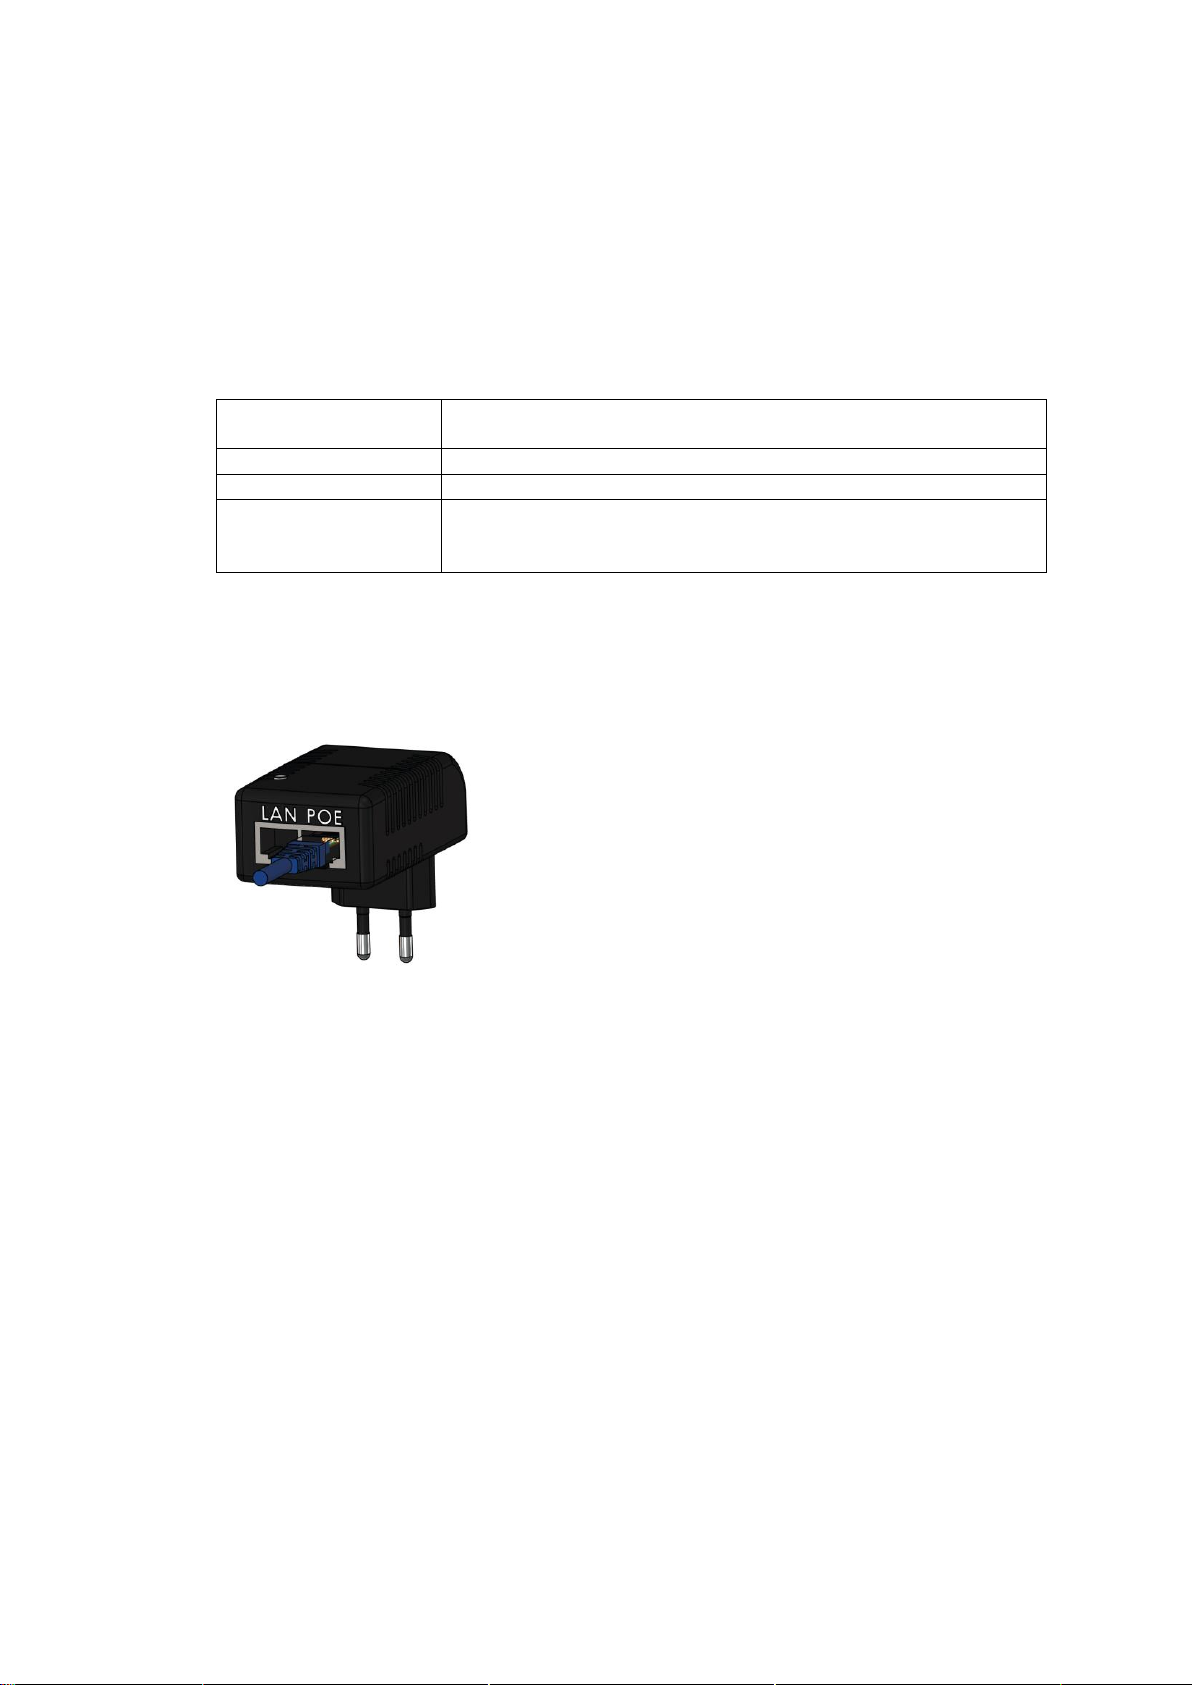
PORTS POE ADAPTER
❶PoE port (Power over Ethernet)
The RJ45 port is reserved for the ethernet cable from the RouDem.
❷LAN port
The RJ45 port is for optional LAN connection.
❸LED
When the PoE adapter is powered, the LED will light green.
IMPORTANT: Read
Step 1 in the section
about Installation of the
SeaWire RouDem.

Introduction User Guide SeaWire RouDem
MiWire ApS 6
LED’s
SEAWIRE ROUDEM
Red: When the device is starting the LED will light red while
it is calibrating the compass. The red light will remain on if
there are errors for example if there is no data on the SIM
card or APN is wrong.
Blue: When the device is connected to the network the LED
will light blue while it is turning around to scan for the best
operator towers.
Green: When the device is ready for use the LED will light
green. It indicates the direction of the operator tower it is
connected to. It is possible to turn off the LED. See how in
the section MiWire user interface > SIM > LED Settings

Installation of the SeaWire RouDem User Guide SeaWire RouDem
MiWire ApS 7
Installation of the SeaWire RouDem
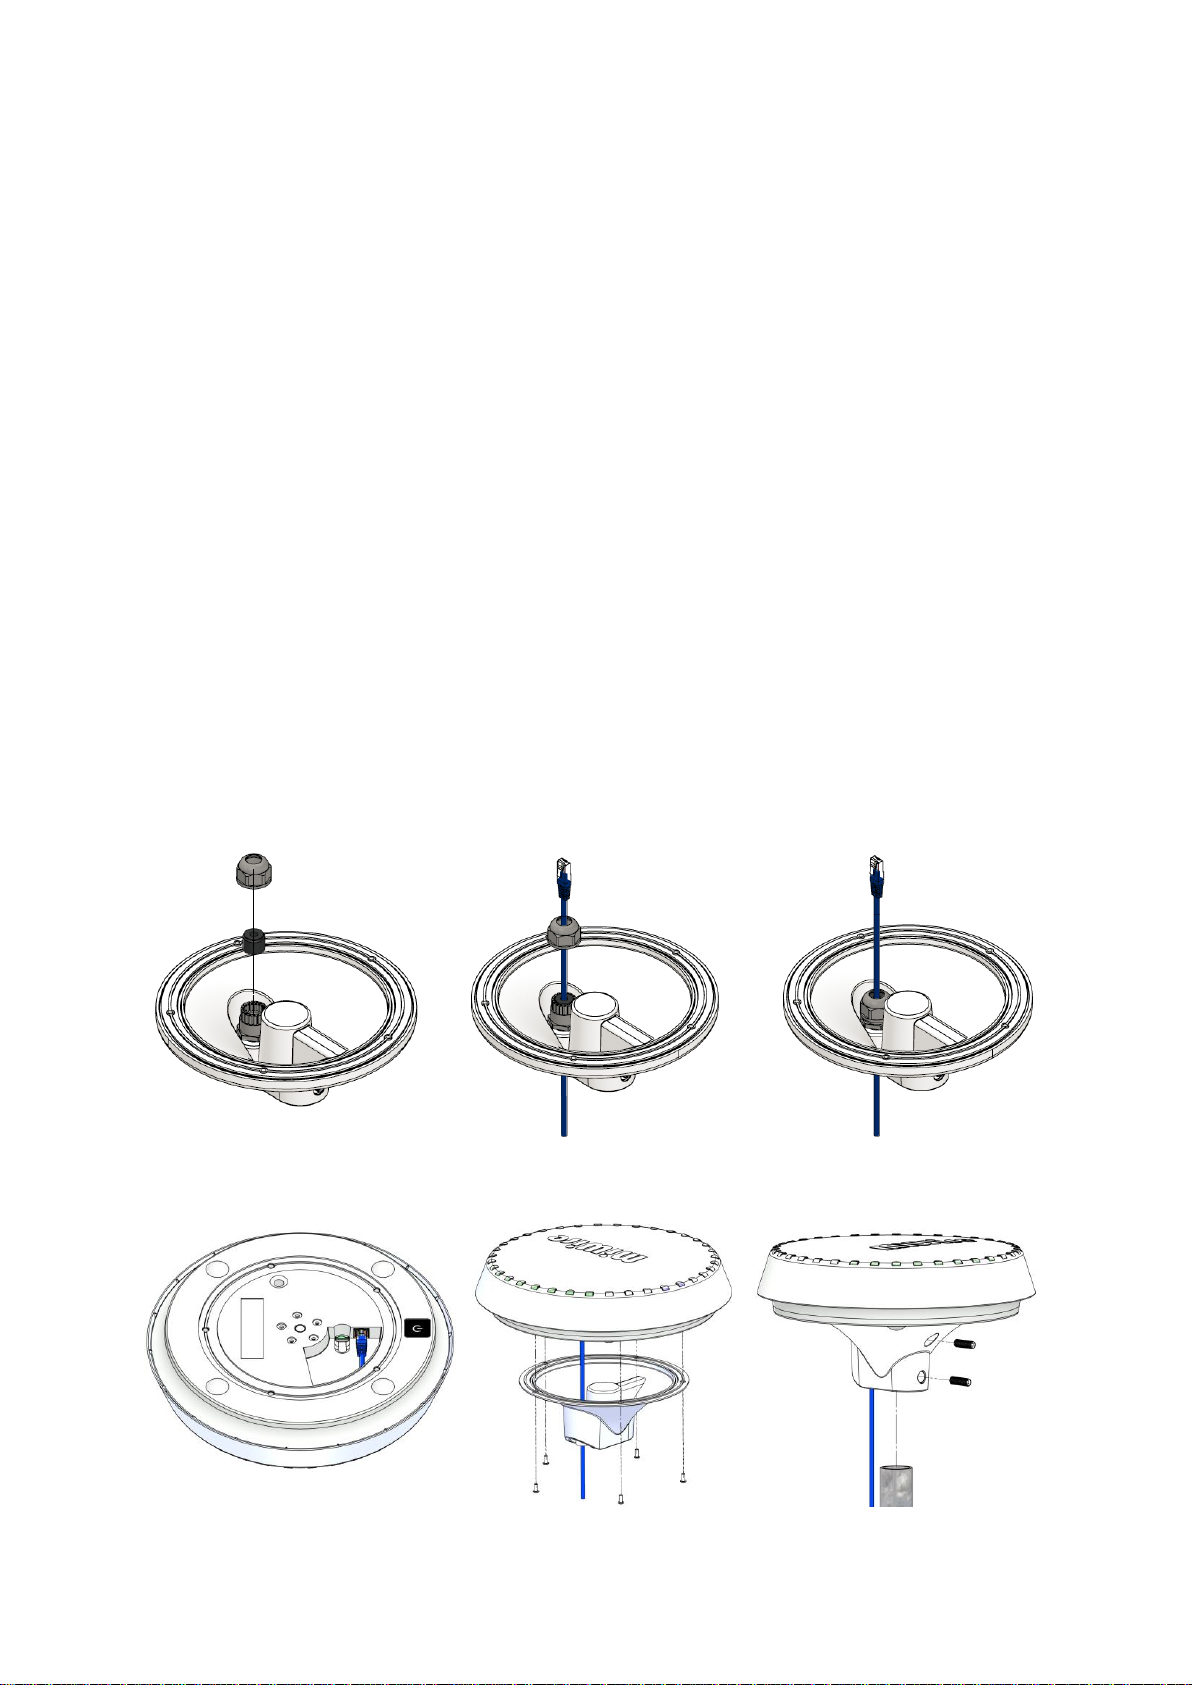
STEP 1 –INSERTING THE MICRO-SIM CARD
You find the SIM card slot at the bottom of the RouDem.
1. Carefully click out the SIM card in Micro SIM format.
IMPORTANT: press on the top of the SIM card to make sure there is a smooth surface.
2. RouDem’s SIM card slot is a click system. Do not use tweezers, pliers, or other tools to
force the SIM card in/out. Use the click system to gently insert/remove the SIM card by
using your fingers by clicking it into place and clicking it out. Any resistance other than
the smooth pressure of the spring is a warning that something is not correct. When
installing/removing the SIM-card the RouDem must be turned off.
a. IMPORTANT: Insert the SIM card with the angled corner facing the left and the gold
area facing down. When it is placed correctly you will hear/sense a ‘click’.
3. Check if the device is working with the purchased SIM card. Turn on the RouDem by
pressing the on/off button and wait for the LED to light green. It takes a few minutes. If
the LED remain red, please read the troubleshoot section.
Installation of the SeaWire RouDem User Guide SeaWire RouDem
MiWire ApS 8
STEP 2 –PREPARING MOUNTING BRACKET AND CONNECTING THE
ETHERNET CABLE
IMPORTANT: It is required to mount the mounting bracket to avoid humidity and dirt entering the
RouDem.
1. Pass the cable through the cable gland.
a. Unscrew the sealing nut and use a small tool such as an Allen key or a pen to get
the seal out.
b. Pass the cable through the body and the sealing nut, mount the seal on the cable
and place the seal back into the claw.
c. Screw on the sealing nut and make sure it is tightened very tight.
2. Connect the Ethernet cable to the Ethernet port in the RouDem.
3. Affix the mounting bracket to the RouDem with the five screws using the supplied Torx 10
Key. IMPORTANT: it is important that the mounting bracket is secured with all five
screws to maintain waterproofness.
4. Tighten the mounting bracket to a pole Ø38mm/1.5” pole by tightening the two grub
screws with the supplied Unbraco 4 Key.
❶a
❶b
❶c
❷
❸
❹

Installation of the SeaWire RouDem User Guide SeaWire RouDem
MiWire ApS 9
STEP 3 –MOUNTING THE SEAWIRE ROUDEM
In the following you can see examples of installation on different types of vessels. The installation
examples are for inspiration. Before installing the SeaWire RouDem permanently you should
determine the suitability of the location for installing.
Installation considerations:
•Install the SeaWire RouDem outdoors at the highest spot possible on a pole, a mast, or
another appropriate platform with opportunity to accommodate a pole of Ø38mm/1.5”.
•Place the RouDem where there is a good all-round view. It is rarely possible to place the
RouDem where a completely clear view in all directions are available, but as good as
possible to obtain best performance.
•The RouDem should always be installed in a horizontal position and upright.
•Where possible install the RouDem away from radiocommunications antennas,
radiotelephone equipment, satellite, VHF’s and GPS antennas to prevent electrical noise
and interference.
Fishing Vessel Example:
Yacht Example:
Installation of the SeaWire RouDem User Guide SeaWire RouDem
MiWire ApS 10
STEP 4 –CABLE WIRING
Cable wiring considerations:
•Where possible avoid routing the cables near other electrical equipment and cables.
•If possible, all cable routing must be done in a cable duct.
•Do not apply any load to the connectors.
•Cable specification:
Network cable type
CAT6 or above, UV- and water resistant, double shielded,
grounded
Connector 1
RJ45 (male)
Connector 2
RJ45 (male)
Length
The length of the cable depends on the location for
installment. In the System Configuration section, you will find
an overview of the set up. Max. length is 100m.
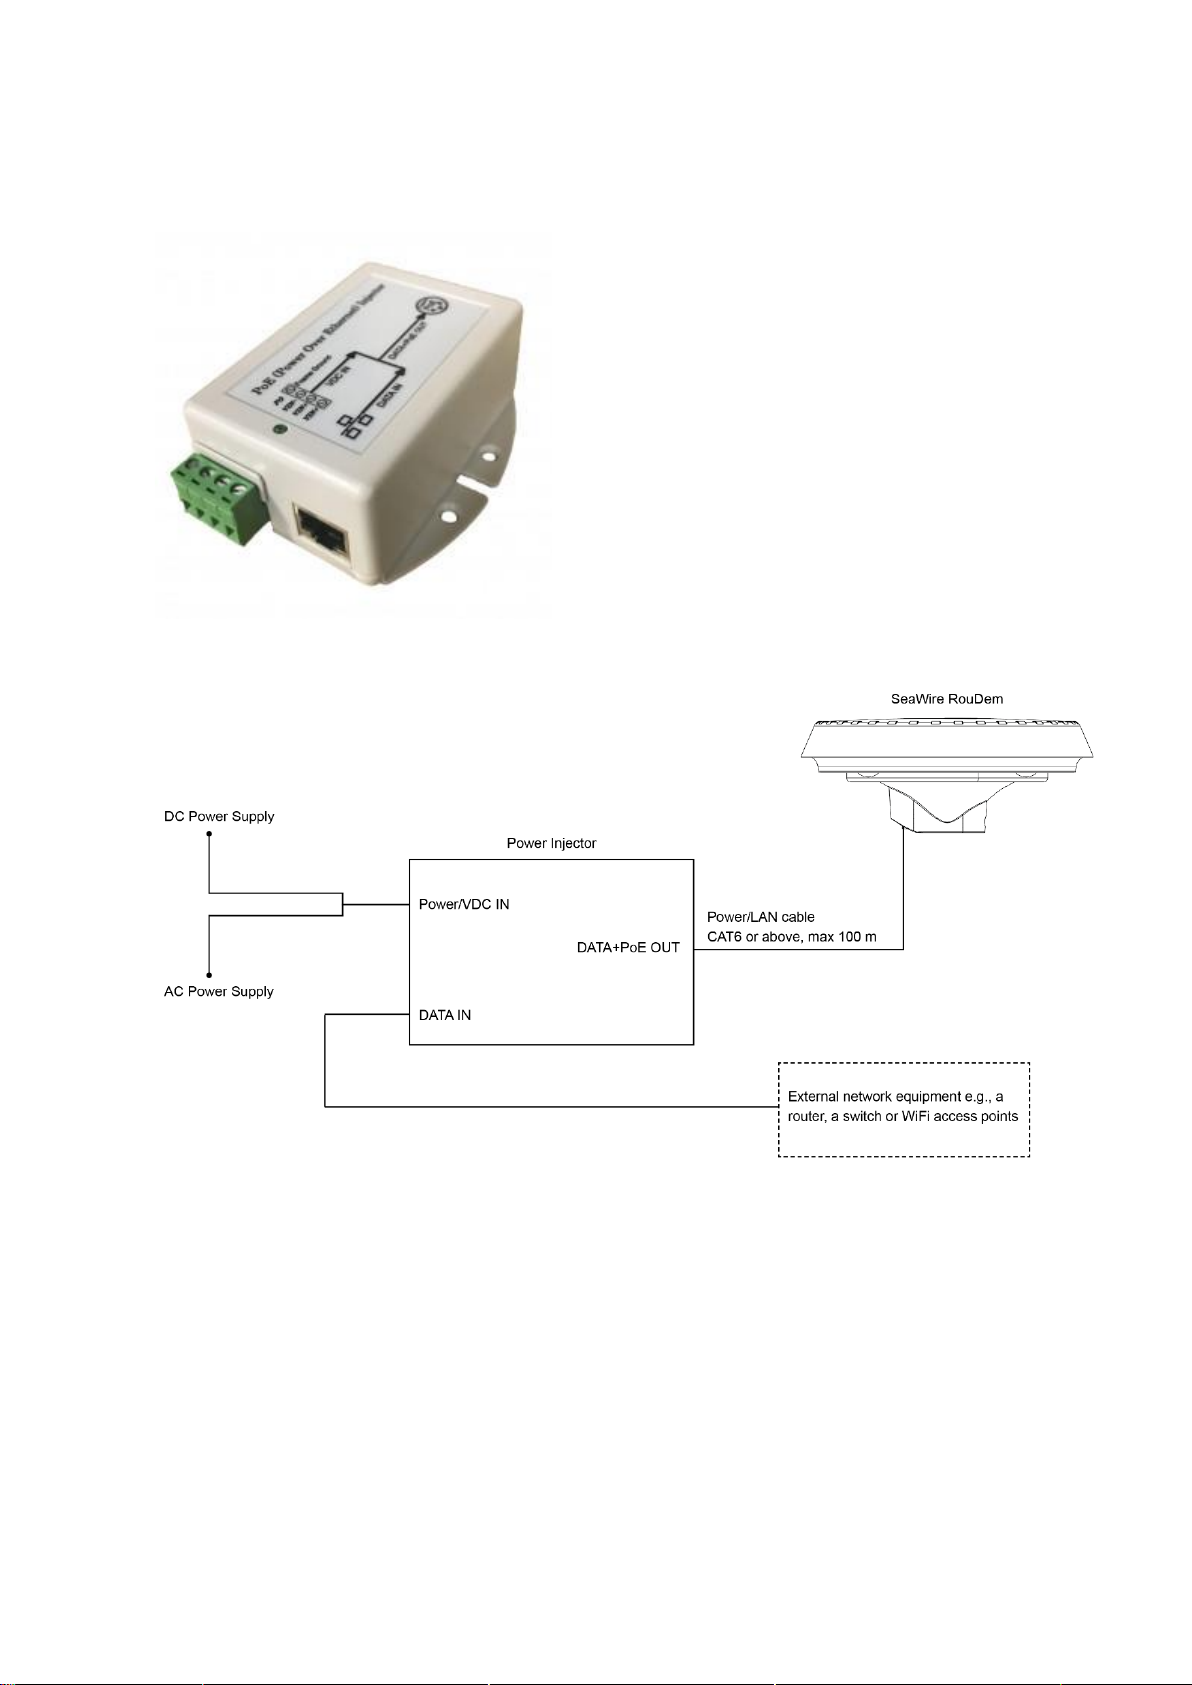
STEP 5 –POWERING THE ROUDEM
1. Connect the ethernet cable from the RouDem to the POE port of the PoE adapter.
2. Plug the PoE adapter into an indoor power outlet 100-240VDC. If not the RouDem is
already turned on or turns on automatically as it is powered, turn the RouDem on by
pressing the on/off button in the bottom of the RouDem. If you do not have access to the
on/off button please read the restart/reboot part in the troubleshoot section.
3. Optional: connect to local LAN/network equipment via the LAN port of the PoE adapter.
Battery feature:
In case of power outage, RouDem is battery powered. Full charging takes 4h 30min after which it
can operate for at least 8 hours on battery power. Note: the device will not charge at
temperatures below 10°C and above 45°C.
Installation of the SeaWire RouDem User Guide SeaWire RouDem
MiWire ApS 11
Powering the RouDem with a DC converter:
When purchasing SeaWire RouDem is it possible to buy a 12 V DC converter.
•Input Voltage 9-36VDC; Output 18V, 24V
or 48VDC, Max output 500mA
•12V / 24V Battery Systems
•Mounting Type: Chassis Mount
•Size / Dimension: 86.4mm L x 76.2mm W
x 35.6mm H
1. Connect the ethernet cable from the
RouDem to the PoE port of the converter.
2. Connect the DC Power Supply to the
VDC IN terminals.
3. Optional: connect to local LAN/network
equipment via the DATA IN port of the
DC converter.
System Configuration 12V PoE adapter

Installation of the SeaWire RouDem User Guide SeaWire RouDem
MiWire ApS 12
STEP 6 –CONFIGURATION OF INTERNET VIA SEAWIRE ROUDEM
Connect directly via RouDem’s WiFi and/or connect with a PC or external network equipment.
WiFi
1. Select WiFi settings on a compatible device e.g., a computer, a smartphone, or tablet.
The device will automatically search for available WiFi networks (make sure WiFi is on).
2. Choose the WiFi network with the name containing MiWire. The SSID (network name)
and WiFi key. Find the information on the unit label, which is found under the RouDem,
on the box or on the registration flyer.
PC and External network equipment
1. Connect SeaWire RouDem with a PC or external network equipment e.g., a router, a
switch or WiFi access points by using the LAN port in the PoE adapter.
STEP 7 –REGISTRATION
This step must be performed by the end-user of the product. When registering the RouDem you
can receive the best service and support. Follow the instruction on the registration flyer.
! IMPORTANT INSTRUCTION !
After the SeaWire RouDem is installed on the ship and connected to the PoE adapter/BDU Pro
the compass must be calibrated. This is done by the following procedure:
1. Connect the PoE adapters/BDU’s output LAN port to a PC
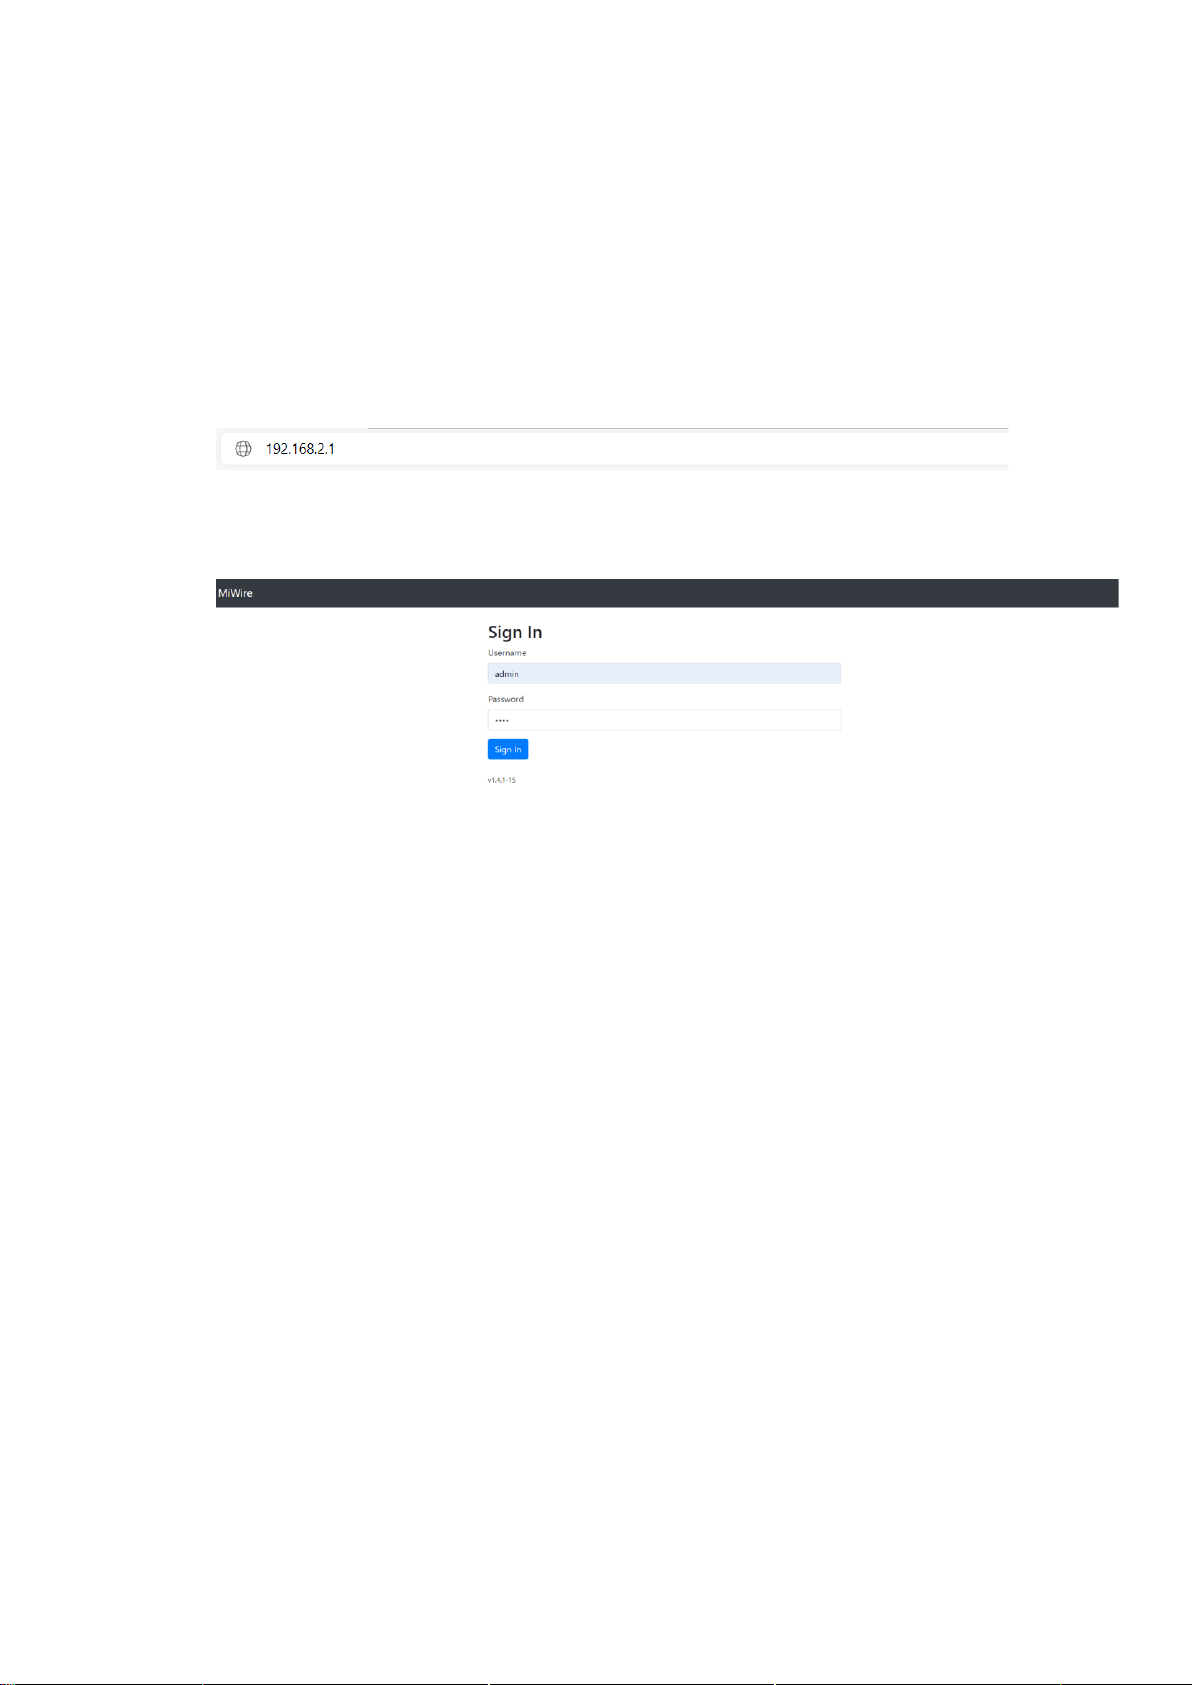
2. On PC open a browser
3. In the browsers URL line type: 192.168.2.1 and press enter
4. In sign in menu insert ‘admin’in Username field and ‘1234’ in Password field and click
‘Sign in
5. Click on tab ‘Compass & Map’
6. Click on ‘Calibrate’
7. The calibration takes approx. 1 min
Installation of the SeaWire RouDem User Guide SeaWire RouDem
MiWire ApS 13
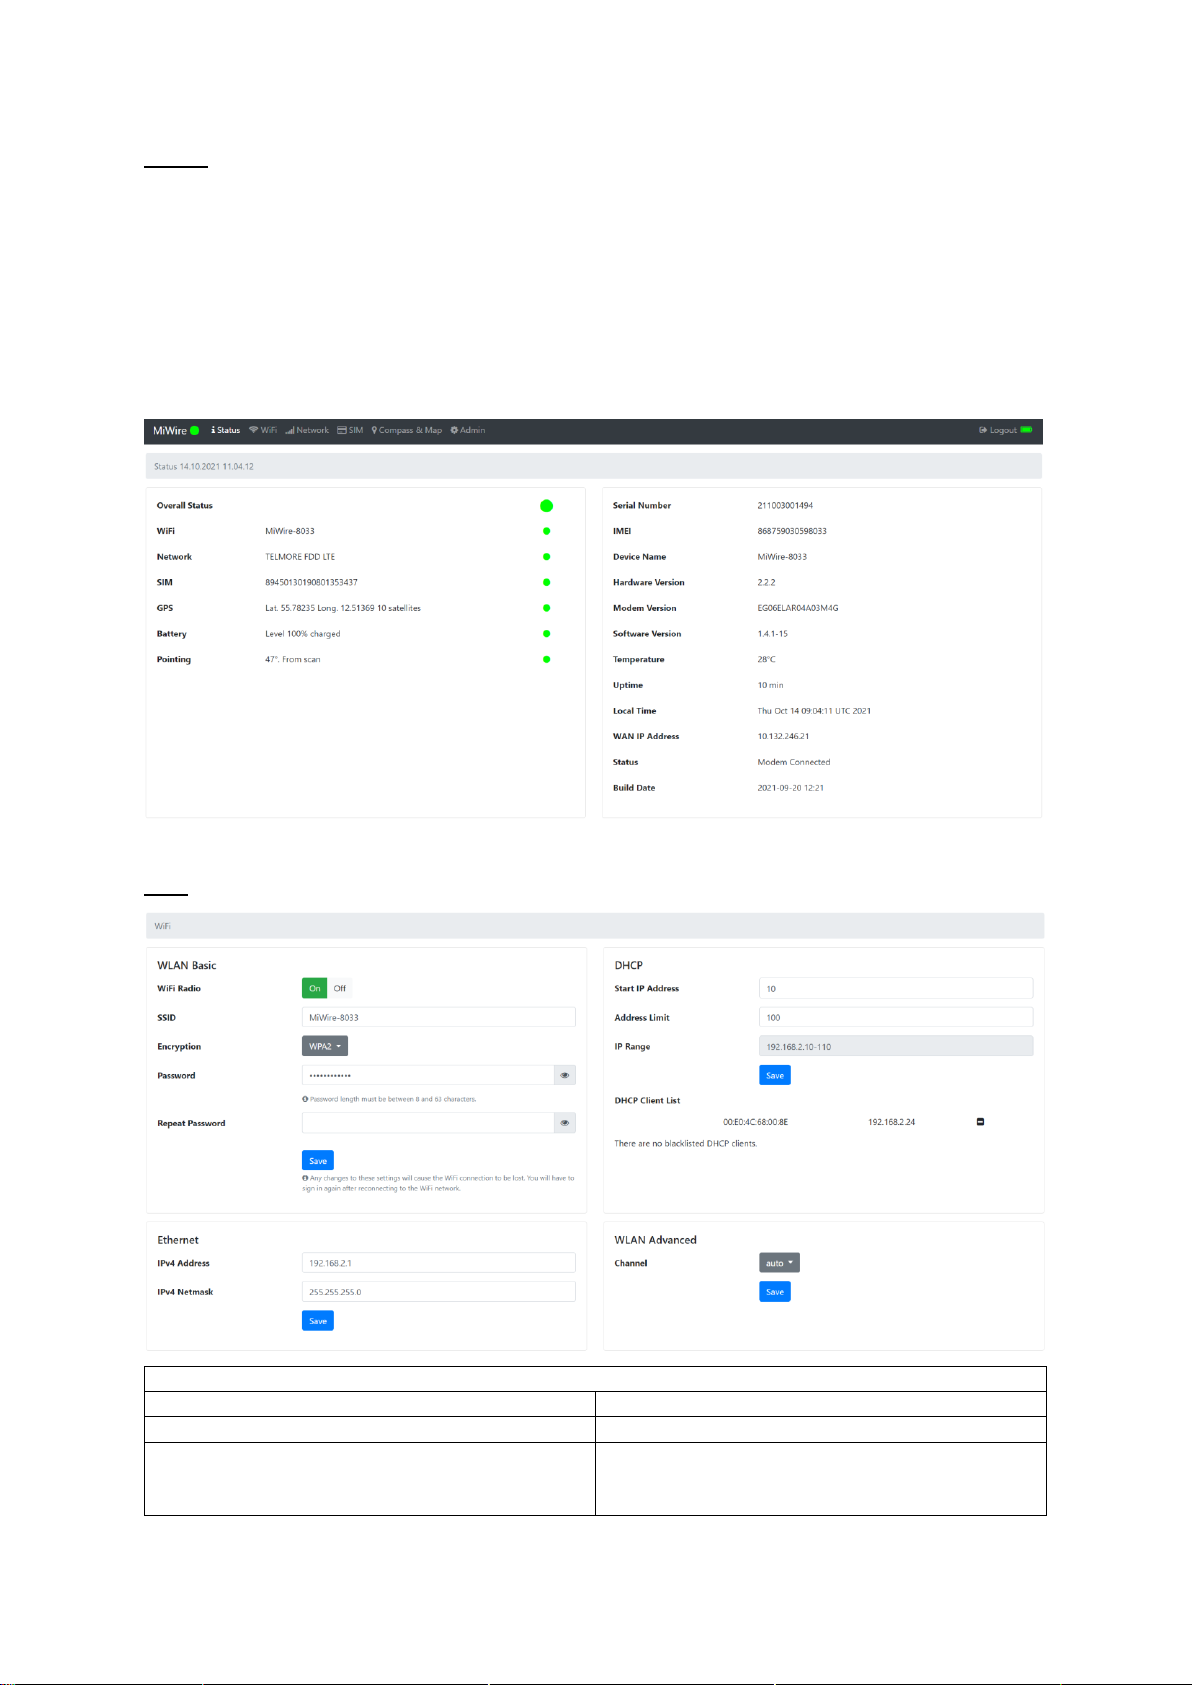
MiWire user interface
After installation of the SeaWire RouDem has been performed, the system is fully operational. In
this section there will be a description of system settings which are configurable from the Web
Server/MiWire user interface.
MiWire user interface presents an overall status of the RouDem and allow the user to configure
WiFi and network related settings, see SIM card information and perform device commands. You
can only access the user interface if you are connected to a MiWire related network either by
WiFi or cable.
1. Open MiWire user interface by entering 192.168.2.1 in a web browser.
2. Log in with Username: admin & Password: 1234 (IMPORTANT: for optimum security, we
recommend changing the password). The system will always be delivered from the
factory with this default log in.
3. The menu bar in the top of the page consists of six tabs: Status, WiFi, Network, SIM,
Compass & Map and Admin. We do not recommend changing the settings if you are not
familiar with the configurations parameters or have been trained or consulted with an
expert. In the following each menu tab will be explained. Settings noted with default and
marked with bold are factory settings.
Installation of the SeaWire RouDem User Guide SeaWire RouDem
MiWire ApS 14
Status
The status page presents an overall status of the RouDem. The lamps in the left side can light
red, yellow, and green (see the Troubleshoot section if some of the lamps are red). The right side
shows unique information for the specific RouDem. Your SeaWire RouDem is working correctly
when all lamps on the status page are green.
IMPORTANT: If there is no WAN IP Address shown it is most likely because the APN settings
are incorrect. Go to the Network tab and set the correct APN settings according to the current
operator. The information can usually be found by looking up the MCC and MNC at the internet.
Read more about setting the APN in the Network tab, ‘MyDefinedAPN’.
WiFi
WLAN basic
WiFi Radio
Turn WiFi ON (default)/OFF
SSID
Change SSID/WiFi name
Encryption
WPA2 (default)
WPA
None
Installation of the SeaWire RouDem User Guide SeaWire RouDem
MiWire ApS 15
Password/repeat password
Change WiFi password
Ethernet
IPv4 Address
Change of IP address. 192.168.2.1 (default)
IPv4 Netmask
Change of netmask. 255.255.255.0 (default)
DHCP
Start IP Address
10 (default)
Address Limit
100 (default)
IP Range
Result of values in Start IP Address and
Address Limit
DHCP Client List
List of registered clients. It is possible to block
clients from the list
WLAN Advanced
Channel
Change of WiFi channel. Select Auto
(default) or between 1-11.
Network
Installation of the SeaWire RouDem User Guide SeaWire RouDem
MiWire ApS 16
Network operator
Scan mode
Select between:
4G-LTE Only (default)
LTW-HS (High Speed)
LTE-800
LTE-1800
LTE-2100
LTE-2600
Auto 4G/3G
3G WCDMA Only
Network Discovery
Roaming
Turn Roaming ON (default)/OFF
APN List
Select between:
Internet (default)
MyDefinedAPN
Network APN
If you change the setting in the APN List to
MyDefinedAPN you can enter the APN Network
APN Username
If you change the setting in the APN List to
MyDefinedAPN you can enter the APN Username
APN Password
If you change the setting in the APN List to
MyDefinedAPN you can enter the APN Password
APN Authentication
If you change the setting in the APN List to
MyDefinedAPN you can change the APN
Authentication to:
None
PAP
CHAP
Both
Force APN
Turn Force APN ON/OFF (default)
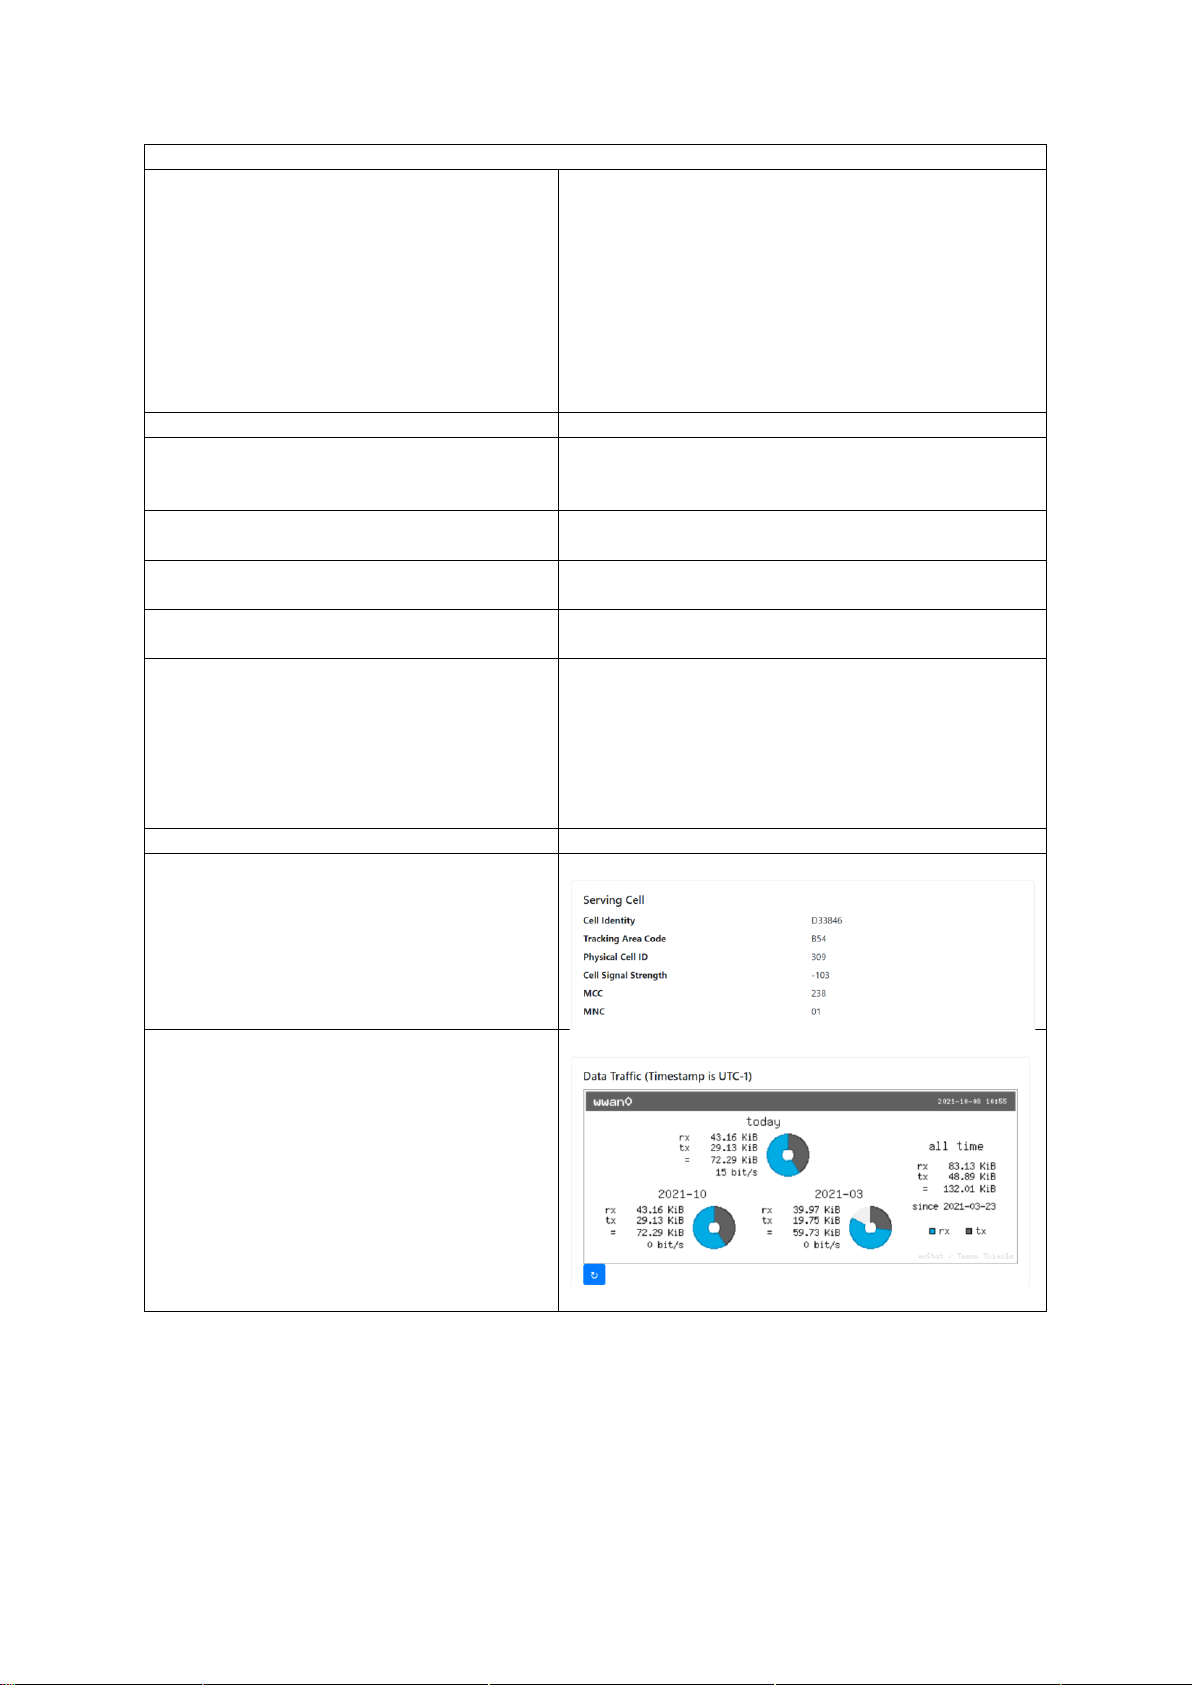
Serving Cell
Showing serving cell information
Data Traffic
Showing data consumption for specific periods

Installation of the SeaWire RouDem User Guide SeaWire RouDem
MiWire ApS 17
SIM
Status
ICCID (Integrated Circuit Card ID)
IMSI (International Mobile Subscriber Identity)
PIN Attempts
PUK Attempts
Enable / Disable PIN Protection
PIN
Enable or disable PIN. Disabled
(default). For your convenience, we
recommend disabling the PIN, as you will
otherwise need to enter the PIN every time
the device is rebooted or updated.
PIN Code
Enter PIN code in this filed if it is required and
press save.
Change PIN Code
When enabling PIN code, you get an
opportunity to change the PIN code.
LED Settings
Brightness
Select a value between 0 (off) and 255 (max)
to define the brightness of the external LED.
Compass & Map
Map
Shows the GPS position of the SeaWire
RouDem
Compass
Shows the direction the antenna is pointing.
Calibrate the antenna if needed

Installation of the SeaWire RouDem User Guide SeaWire RouDem
MiWire ApS 18
Heading
Enter value to fix antenna direction, enter -1
to unfix it. Depending on the software version
the heading will be reset if you reboot the
device.
Admin
Change Password
New Password/Repeat Password
Change password for MiWire user interface.
Upgrade System
Upload new SW directly.
Device commands
Reboot
You will lose connection to the device during
reboot. It takes a few minutes for the device
to reboot.
Shutdown
You will lose connection to the device if you
shut it down. Power on the device manually,
by pressing the button under the device, or by
removing and re-inserting the cable in the
PoE adapter three times.
Reset to factory settings
This will reset the RouDem to its factory
settings.
Get latest software
Check for new firmware. If a new firmware
version is available, then the unit will upgrade,
and you will lose connection to the device.
Table of contents


