Seco SX-600 User manual


2
Preface
Thank you for choosing our product, for a better understanding of the product, we recommend
you read the instruction and safety information before use.
Note:
Only place this DVR on a flat level surface, secure so it will not fall.
Make sure to install this unit in a properly ventilated area to prevent the device from
overheating
Do not block the vents on the DVR as this will drastically shorten the life space of the
hard drives
Do not disassemble this unit; repairs must be performed by qualified technician.
Do not put liquid on or around this device
This product is designed to operate between 32°F and 104°F, and 0% to 90% Humidity.
Do not install this device in conditions outside of its normal operating range as this will
void the warranty.
Statement:
We do our best to make sure this manual is error free, although errors or omissions
may still occur.
This document is a user manual only. It contains no implied or stated warranty or
guaranty for the product described herein.

3
The reproduction, transmission, plagiarism, translation into other languages, or
otherwise illegal act without written authorization is strictly prohibited.
Contents
1 System Startup ................................................................................................................... 5
1.1 System Startup ................................................................................................... 5
2 Setup Wizard .................................................................................................................... 5
2.1 Setup Wizard Interface ...................................................................................... 5
2.2 Setting the Administrators Password ................................................................5
2.3 Basic Setup .........................................................................................................6
2.4 Network Setup ..................................................................................................... 8
2.5 Network Testing................................................................................................. 8
2.6 DDNS & Port Setup ............................................................................................ 10
2.7 Record Mode & Record Setup ......................................................................... 11
2.8 HDD Setup........................................................................................................ 12
3 Basic Operations............................................................................................................... 13
3.1 Live View: ......................................................................................................... 13
3.2 The Menu Bar: ................................................................................................. 13
3.3 Logging in to the DVR:...................................................................................... 14
4 Main Menu ....................................................................................................................... 15
4.1 Basic Menu....................................................................................................... 15
4.1.1 System Menu .............................................................................................. 15
4.1.2 Date/Time ................................................................................................... 16
4.1.3 Display......................................................................................................... 17
4.1.4 Record ......................................................................................................... 19
4.1.5 Users ........................................................................................................... 20
4.2 Advanced Menu ............................................................................................... 21
4.2.1 Alarm........................................................................................................... 21
4.2.2 Network ...................................................................................................... 24
4.2.3 COMM ......................................................................................................... 26
4.2.4 P.T.Z............................................................................................................. 29
4.3 Search Menu .................................................................................................... 30
4.3.1 Searching for Video..................................................................................... 30
4.3.1 Video Playback Screen and Timeline Playback ...........................................31
4.4 Log Search Menu ............................................................................................. 34
4.4.1 Searching the System Log ...........................................................................34
4.5 Disk Menu ........................................................................................................ 35
4.5.2 Checking Hard Drive (HDD) ......................................................................... 35
4.6 Information Menu............................................................................................ 36
4.6.1 Device Information ..................................................................................... 36
4.6.2 Network Information .................................................................................. 36

4
4.6.3 Online Information...................................................................................... 37
4.6.4 Record Information..................................................................................... 39
4.7 Maintenance Menu.......................................................................................... 39
4.7.1 Basic Functions............................................................................................ 39
4.7.2 Settings Functions ....................................................................................... 40
5.0 Remote Viewing ............................................................................................... 41
5.1 Remote Viewing via the Cloud.................................................................... 41
5.2 Remote Viewing via PC ViewClient .............................................................44
5.3 Remote Viewing via Mac ViewClient ..........................................................44
5.4 Internet Explorer......................................................................................... 51
Appendix A: Determining Your MAC Address......................................................................... 60
Appendix B: Internet Explorer Security Setup Guide..............................................................61
Appendix C: Viewing your DVR in Chrome ............................................................................. 67
Appendix D: Viewing your DVR in Firefox............................................................................... 68
Appendix E: Determining Network Information ..................................................................... 70
Appendix F: Port Forwarding ..................................................................................................72
Appendix G: Recommended PTZ Camera Setup..................................................................... 77
Appendix H: How to Setup Alarm Inputs ................................................................................ 79

5
1 System Startup
1.1 System Startup
Powering the DVR On
Connect the HDMI, VGA, or BNC output of the DVR to a TV or monitor. Make sure your TV or
Monitor is plugged in, powered on, and on the right input. Plug the included power plug in to
an AC outlet and in to the power port on the back of the DVR. The DVR will automatically run a
system check, and will start loading after few seconds. You will see the Setup Wizard after the
system has finished loading.
2 Setup Wizard
The Setup Wizard will guide you through configuring the basic settings for your DVR such
as; the administrator password, time settings, record settings, hard drive settings, etc… This
wizard can be turned off by checking the box labeled “Do not display this wizard on startup”. It
can also be enabled or disabled from the Basic Menu. Once completed the wizard will close and
your cameras will be displayed on the screen.
2.1 Setup Wizard Interface
The Setup Wizard’s Graphical User Interface (GUI) welcome screen is shown below. We
recommend completing each step of the setup wizard before configurin g any additional
settings in the DVR. Begin configuring your DVR by clicking the “Next” button near the bottom
right.

6
2.2 Setting the Administrators Password
The first step we recommend taking is configuring a username and password for the
administrator. This will prevent unauthorized access to many of your DVRs important
functions. Do not share or display the administrator’s password of your DVR. We recommend
creating a user name for each person that will access the DVR (After completing the setup
wizard, see section 4.1.5 on how to create additional users).
Click "Next" to go on to the next window. You may also click “Cancel” to exit the Setup
Wizard or “Prev” to return to the previous menu.
***Note: By default, the administrator user name is: admin. There is no password, but for
better security, we strongly recommend that you setup a password here. ***
2.3 Basic Setup
Configuring the Date/Time,Time Zone,DST and Language are essential for proper
operation of your DVR. You can also configure the Date/Time Format, as well as the Video
Format on this screen. Most users find the default values acceptable:
System Tab:

7
Video Format: Select NTSC for the America Regions or PAL for European Regions.
Language: Please select your appropriate language here.
Time Tab:
Date/Time: Here you can set the date and time. Click the calendar icon to the right of
the date to choose the correct date, and then click the time. A digital number pad will
appear and allow you to set the time.
Date Format: Here you can set the way the date will be displayed and recorded.
Time Format: Here you can select whether the time will be displayed in 24hr or 12hr
format.
Time Zone: Here you can set the correct time zone for your location.
Auto Update: Check this box to allow the DVR to automatically sync its time with the
internet time servers.
Time Server: You can select which internet time servers you would like to sync with.
DST Tab:
8
Enable: This will enable or disable the Daylight Savings Time (DST) function.
Mode: you can choose to set DST by a specific date, or by week number.
Offset: This will adjust the time by one or two hours during DST.
From: This is the day that DST will start (Currently the 2nd Sunday in March at 2AM).
To: This is the day that DST will end (Currently the 1st Sunday in November at 2AM).
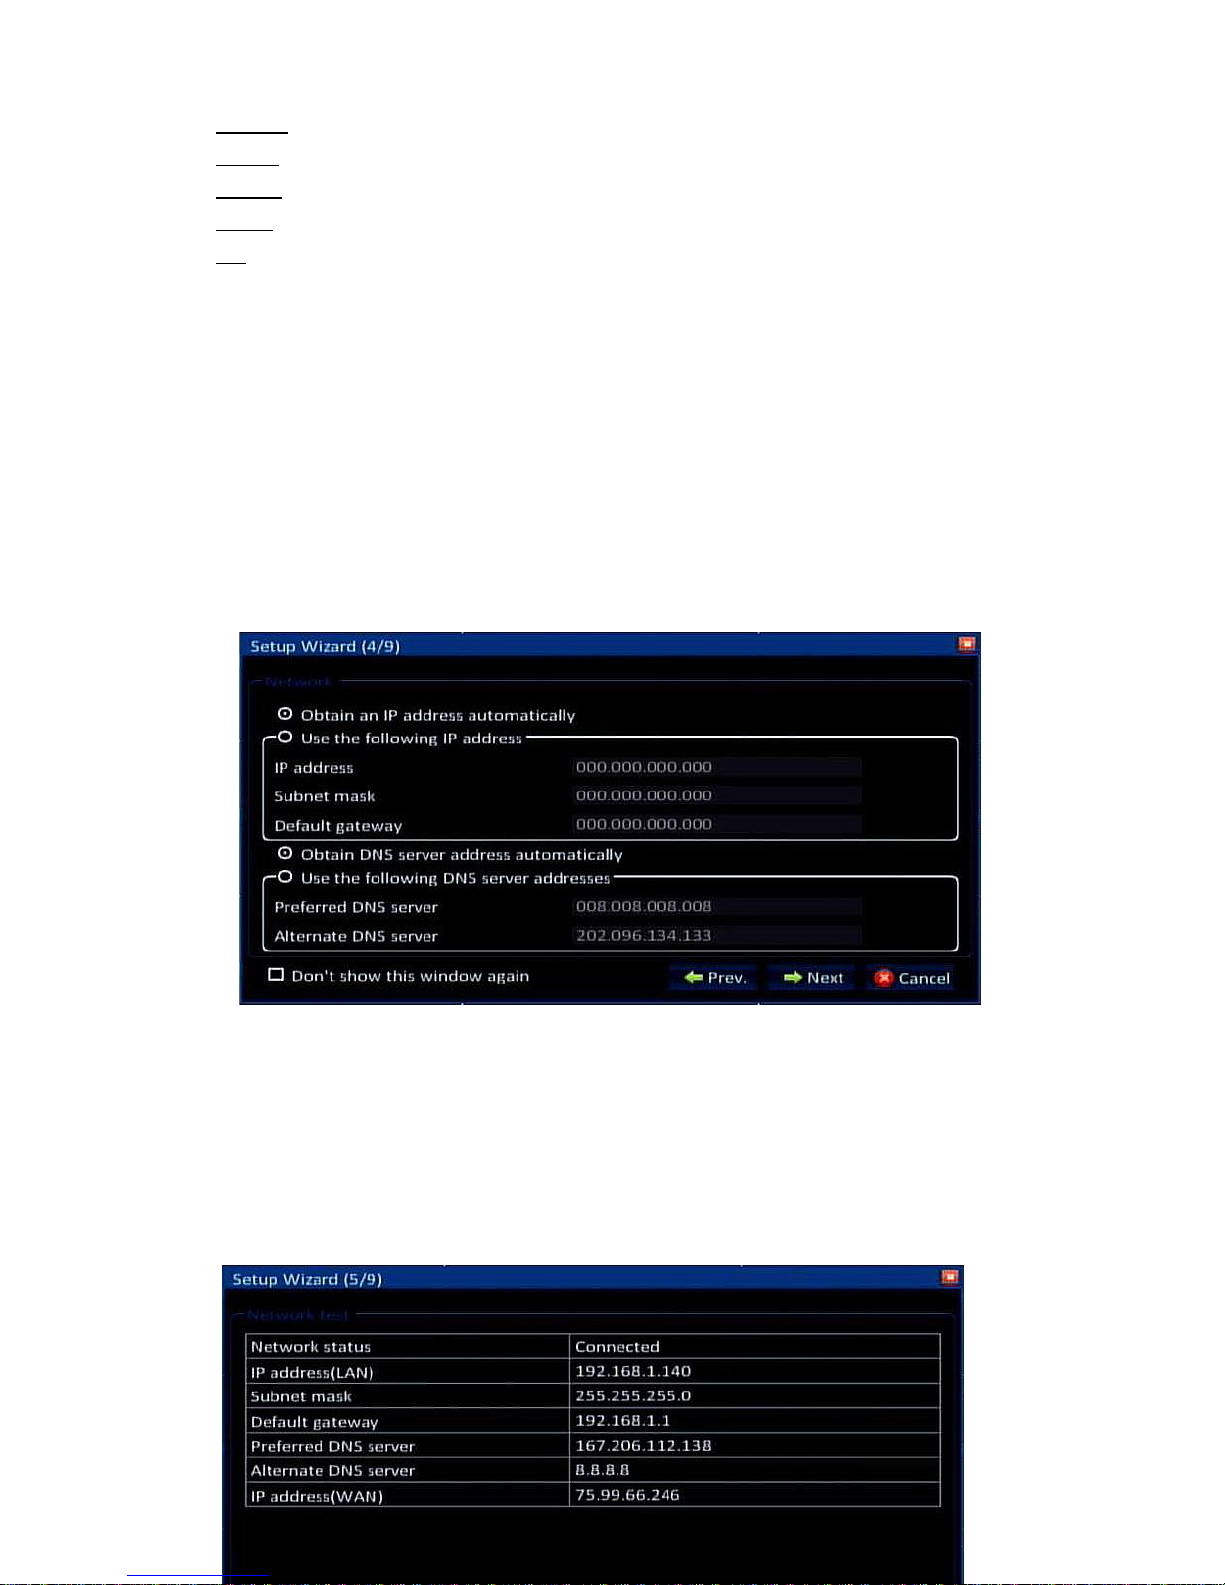
2.4 Network Setup
There are many different ways to setup the DVR on the network. By default the DVR comes
setup for the automated Cloud Setup, which allows you to remote view your DVR from
anywhere in the world without having to do any additional setup. For the default Cloud Setup,
you must select “Obtain IP Address Automatically” and “Obtain DNS Server Address
Automatically”. See section 4.2.2 for more information on network settings after completing
the setup wizard. Click “Next” to continue to the next screen:
2.5 Network Testing
The system will automatically test your network setup. If the network settings are not
correct, please return to the previous page to correct the settings and then click Next. If no
testing is required, just click Skip to go to the next screen:

9

10
2.6 DDNS & Port Setup
Dynamic Domain Name Service (DDNS) and Port settings can be configured here. For the
automated remote view Cloud Setup;DDNS must be enabled and the server must be set to
Cloud Setup. Most users will find the default DDNS and port settings to be acceptable. See
section 4.2.3 for more information on DDNS once you have completed the setup wizard. Click
Next to move on to the next screen:
DDNS Tab:
DDNS: Here you can enable or disable the DDNS function.
Server: Here you can select a DDNS provider from the drop down list.
Default: This will use the selected DDNS providers default server settings.
Server Address: The address of the DDNS provider if you are not using the default value.
Server Port: The port number of the DDNS server if you are not using the default value.
Host Name: This is your assigned DDNS address.
Username: This is your DDNS Username.
Password: This is your DDNS Password.
Port Tab:

11
Media Port: This is the port the DVR will use to send all video and control data on. If you are
doing port forwarding, this port must be forwarded. This must be a unique value.
Web Port: This is the HTTP port the DVR will use; this port is used for remote viewing
through Internet Explorer. If you are doing port forwarding, this port must be forwarded.
This must be a unique value.
***Note: port range: 1-65535***
2.7 Record Mode & Record Setup
You can configure the record settings,audio settings, and record mode from this screen. By
default the DVR is set to record on motion with a good compromise between video quality and
recording time. Most users will find the default settings acceptable. Click “Next” to move on to
the next screen.
Basic Tab:
Enable: Here you can enable or disable the recording of specific channels.
Audio: Here you can enable or disable audio recording for specific channels.
Mode: Here you can set the record mode, Choose “Schedule” for motion or schedule
setup, Choose “Continuous” for continuous recording, or choose “Manual” to manually
start and stop recording.
Bit Rate:

12
Resolution: Here you can select the recording resolution for each channel (CIF, WCIF,
HD1, WHD1, D1, and WD1).
Frame Rate: Here you can select the recording frame rate for each channel (1-30).
Quality: Here you can select the quality the video will be compressed with.
***Note: Increasing resolution, frame rate, and quality will decrease the amount of storage time available***
2.8 HDD Setup
Here you can view the Hard Drive (HDD) Information, Format the HDD, and select the
recycling parameters. Most users will find the default values acceptable. You must format the
hard drive before Clicking Next to go on to the next screen:
Format: Check this box and click “Format” to format the hard drive in the unit.
Overwrite: Here you can select whether the hard drive will fill up and stop recording
(Never), Overwrite when the drive becomes full (By Capacity), or try to store up to a
maximum number of days of video (By Days).
13
3 Basic Operations
This section covers the basic operations of the DVR, including using the Menu Bar,Logging
In to the DVR, and opening the Main Menu.
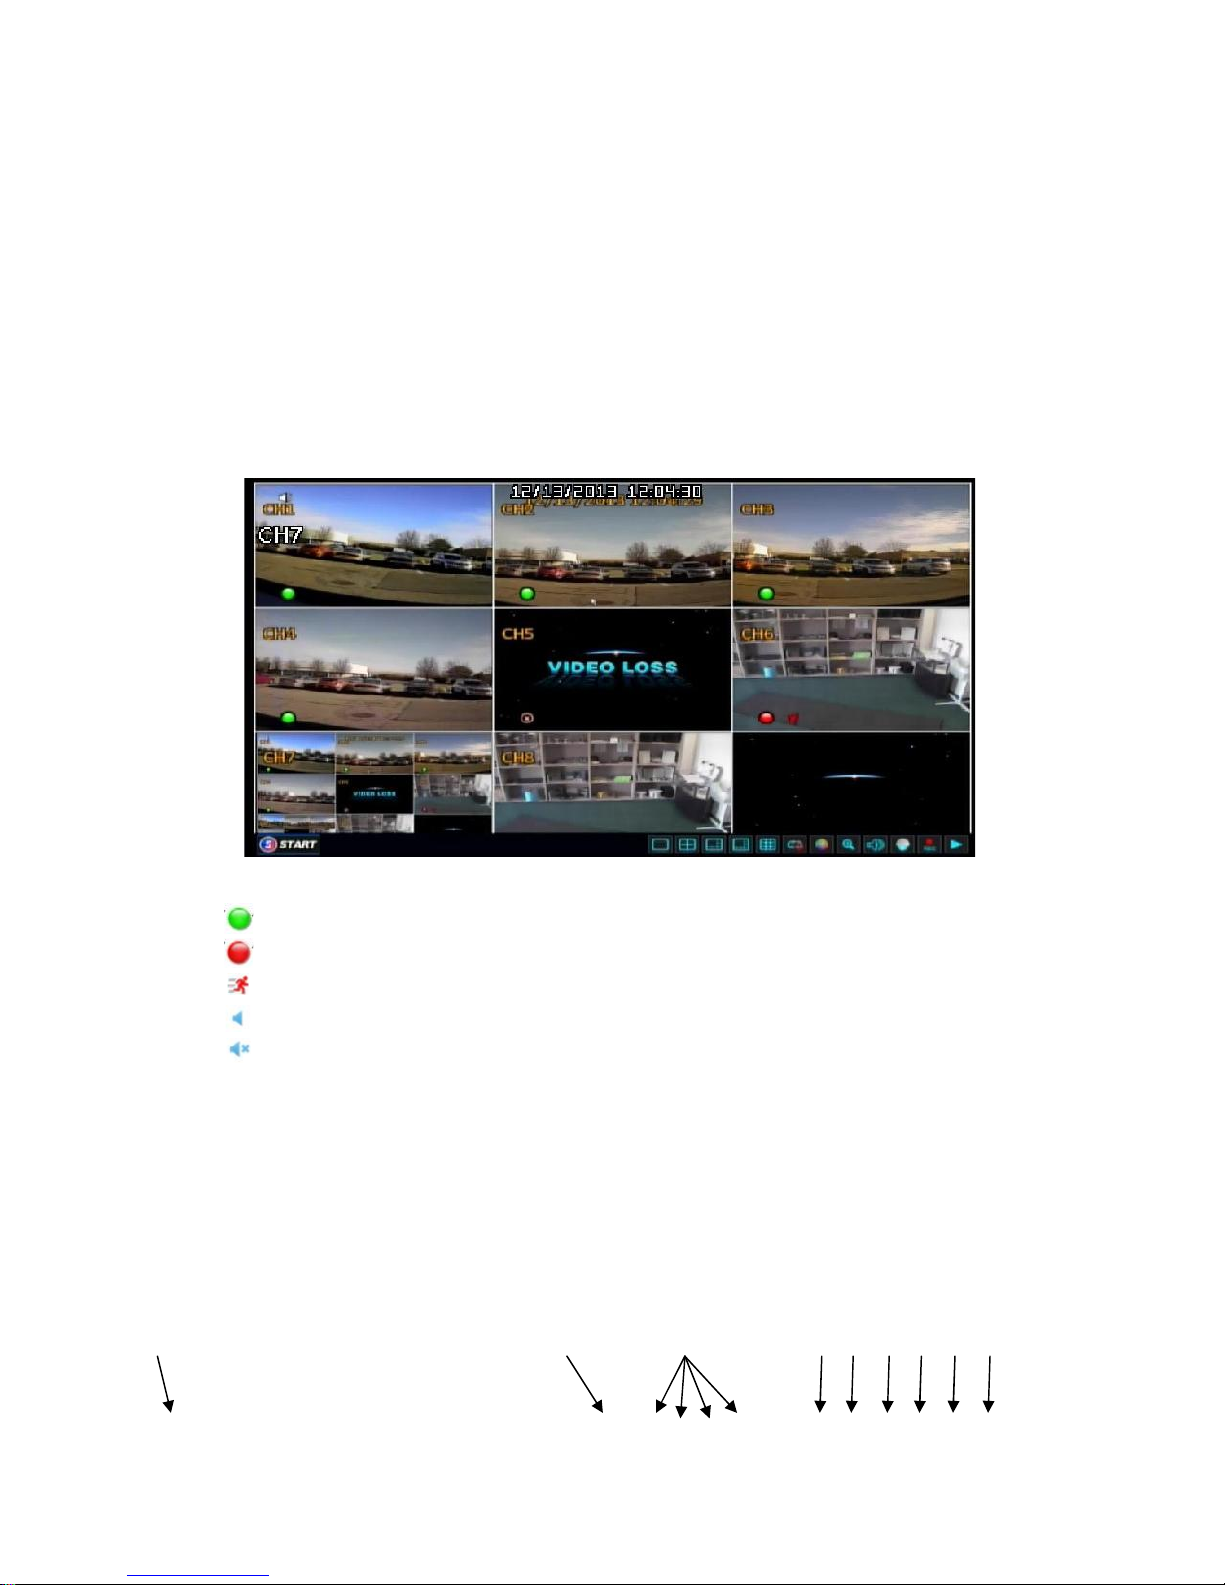
3.1 Live View:
Live view is the default screen that is displayed on your DVR. This displays your cameras,
the time and date, as well as the recording status and menu bar. It is important to check your
DVR regularly to make sure it is recording properly:
“ ” on a camera image means the camera is recording continuously.
“ ” on a camera image means the camera is recording on motion or alarm.
“ ” on a camera image means this channel is currently detecting motion.
“ ” on the screen means audio is enabled.
“ ” on the screen means audio is disabled.
3.2 The Menu Bar:
The Menu Bar is a bar with buttons that will display at the bottom of the live viewing
screen. To hide or show the Menu Bar you must right click the screen with the mouse. The
functions of the Menu Bar are listed below:
1
2
3
4
5
6
7
8
9
14
1. Start Button: This opens the main menu; it may prompt you to login.
2. Sequence: This will allow you to switch between cameras at pre-determined time
marks.
3. 1-4-9-16-32 Split: This will switch the display mode between a single, 4, 9, 16 or 32
channel display.
4. Color: This allows you to adjust the color, hue, saturation and brightness of each
camera.
5. Digital Zoom: Click this button, then using your mouse; draw a box on the screen to
zoom into the selected portion of the video.
6. Volume: Adjust the volume output of the DVR.
7. PTZ: Click this button to display the PTZ Control window.
8. Manual Record: Click this button to manually override the record mode and record
continuously. You can click it again to disable the manual override.
9. Play: Click this button to enter timeline playback.
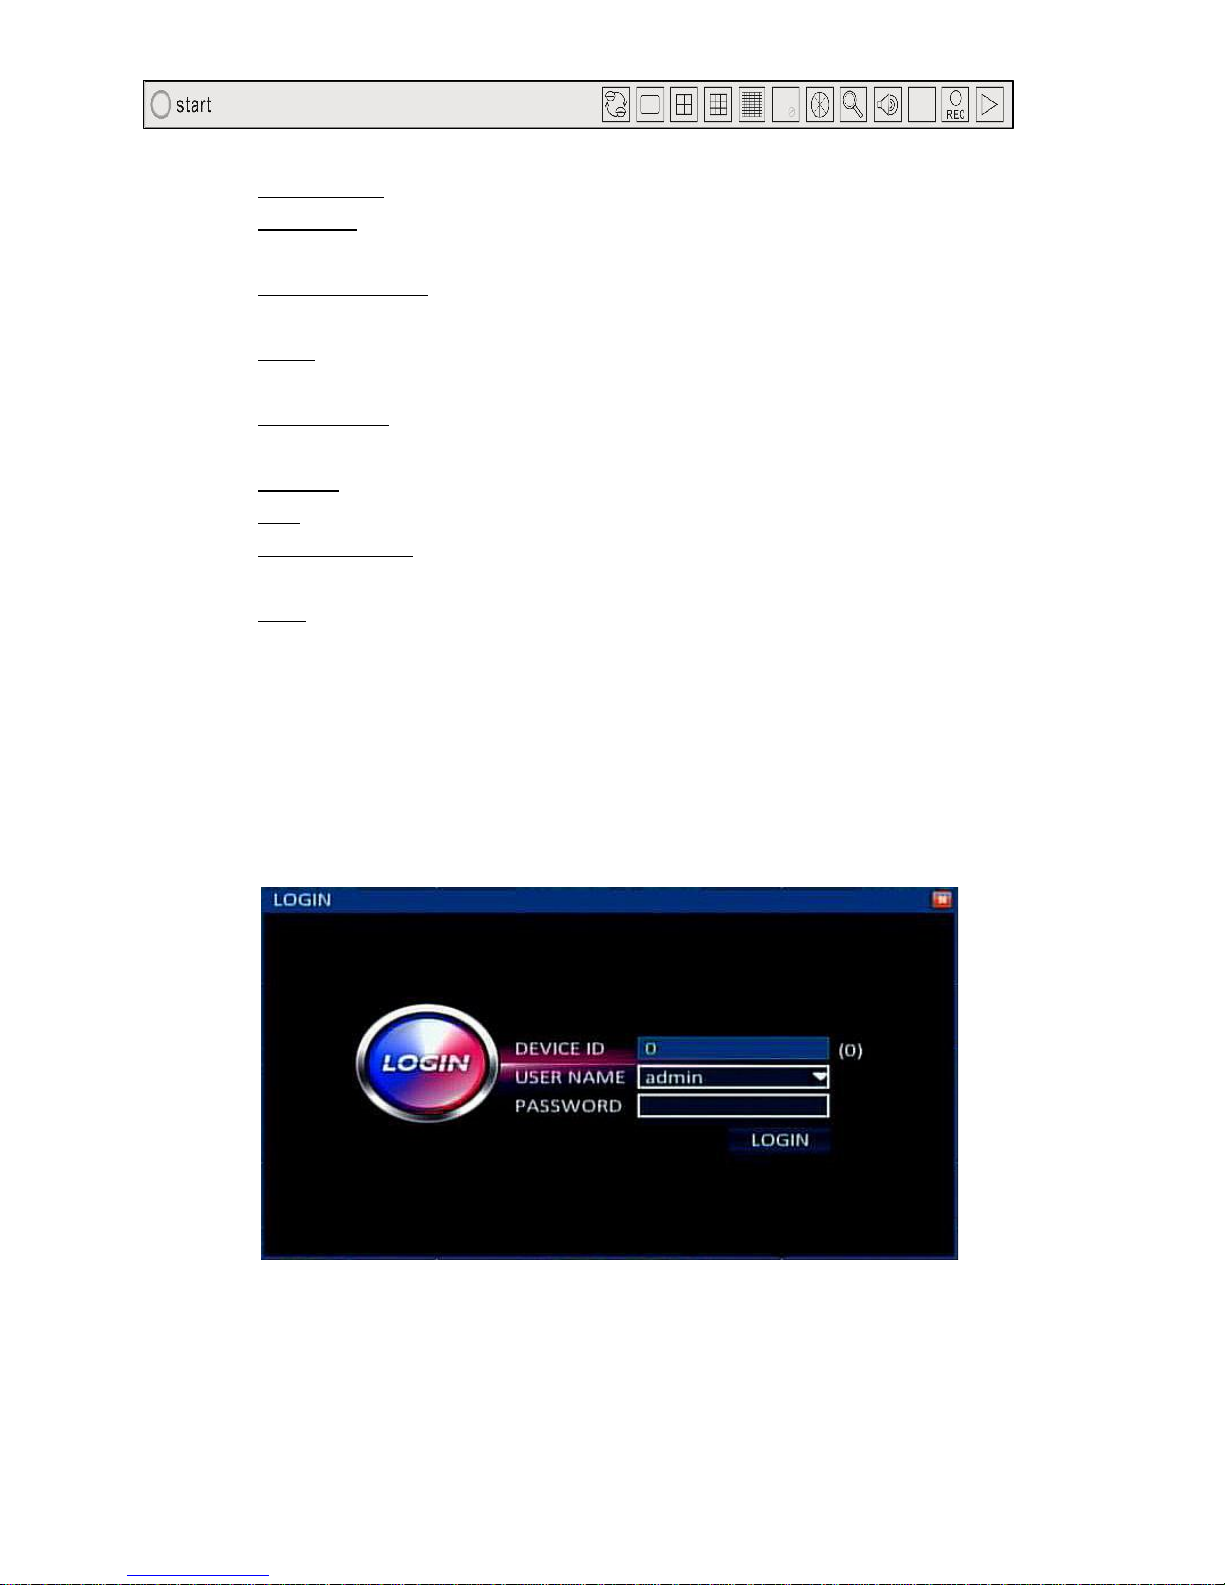
3.3 Logging in to the DVR:
When you click the Start button on the Menu Bar, you may be asked to login. Enter your
username, password, and Device ID. The device ID should match the number in parenthesis to
the right of the Device ID field. The default user name is “admin” with no password, but if you
do setup a password during the setup wizard, you then need to input your password here.

15
4 Main Menu
From the main menu you can navigate to all of the configuration options and functions of
the DVR.
4.1 Basic Menu
The Basic Menu is used to configure the basic and most important DVR functions:
4.1.1 System Menu
From the System tab we can configure the system basics:
Device Name: You can set an easy to remember name for your DVR
Device ID: You can change the Device ID if you have multiple DVRs that you want to control

16
separately with an IR Remote.
Video Format: You can select the NTSC (America Region) or PAL (European Region) video
format
VGA Resolution: You can select the output resolution for the VGA video output.
Language: You can select the appropriate language here.
Logout Time: Here you can set the delay time before the system automatically logs you out .
Setup Wizard: Enable or disable the Setup Wizard on startup.
4.1.2 Date/Time
From the Date/Time menu you can set the Date/Time Parameters.
Date/Time: Here you can set the Date and time. Click the calendar icon to the right of the
date to choose the correct date, and then click the time. A digital number pad will appear
and allow you to set the time.
Date Format: Here you can set the way the date will be displayed and recorded.
Time Format: Here you can select whether the time will be displayed in 24hr or 12hr
format.
Time Zone: Here you can set the correct time zone for your location.
Auto Update: Check this box to allow the DVR to automatically sync its time with the
internet time servers.
Time Server: You can select which internet time servers you would like to sync with.

17
Enable: This will enable or disable the Daylight Savings Time (DST) function.
Mode: You can choose to set DST by a specific date, or by week number.
Offset: This will adjust the time by one or two hours during DST.
From: This is the day that DST will start (Currently the 2nd Sunday in March at 2AM).
To: This is the day that DST will end (Currently the 1st Sunday in November at 2AM).
4.1.3 Display
The Display Menu will allow you to configure different aspects of the DVR display such as
channel names, margins, auto sequencing and output display.
Name: Here you can change the name of the camera to easily identify what it’s looking at.
Mask: You can click this button to set the privacy mask. Click and drag your mouse to create
a grey square over the area you do not wish to record. To remove the privacy mask, double
left click on it with the mouse. You can have up to 4 separate privacy masks per camera.
Color: Here you can change the brightness, contrast, hue and saturation of each camera.
Time/Name: Here you can change the location of the time and camera name for each
camera. You can also enable or disable the time overlay and camera name overlay.

18
Margin-Top: Here you can adjust the top margin for the main display.
Margin-Bottom: Here you can adjust the top margin for the main display.
Margin-Left: Here you can adjust the top margin for the main display.
Margin-Right: Here you can adjust the top margin for the main display
Layout: You can select a layout for auto sequencing (1x1, 2x2, 3x3, etc…). You can also
select custom layout and then use the “+” and “-” controls below to add or remove
different cameras and layouts.
Main Output: Here you can select the default view for the main output. You can also set
which cameras will be displayed, in preferred order.

19
4.1.4 Record
Here you can set the record parameters of the DVR such as record resolution, frame rate,
video quality, and record mode:
Enable: Here you can enable or disable the recording of each camera.
Audio: Here you can enable or disable audio recording for each supported channel.
Mode: Here you can set the record mode to schedule (for motion or alarm recording),
continuous, or manual.
Resolution: Here you can set the resolution the DVR will record in, You can choose from CIF
(320x240), WCIF(464x240), HD1(704x240), WHD1(928x240), D1 (704x480), and
WD1(928x480).
Frame Rate: Here you can select the frame rate each camera will record at. You can select
between 1 and 30 frames per second (FPS).
Quality: Here you can select the quality of the compressed video. You can select normal,
good, better or best quality
***Note: Increasing resolution, frame rate, or quality will decrease the amount o f storage
days your device will have***

20
To modify the schedule: Click on “Manual”, “Normal”, or “Alarm”, then click and drag your
mouse on the schedule.
CH: Select the channel you would like to change the schedule on.
Copy CH: You can copy a channel’s schedule to another channel or to all channels.
4.1.5 Users
Here you can add or delete users, change user authority, and change user passwords.
User List: This will list all the users you have setup for this DVR.
Delete User: after checking the check box next to a user, click the delete button to delete a
user
Add user: Click this button to add a new user, a new window will appear.
Table of contents


