SECURENET UMU User manual

Quick Start Guide
OUTDOOR CAMERA
POWERED BY
UMU


Getting to know the camera
MicroSD CARD & RESET
BUTTON COVER
LENS
ETHERNET SOCKET
ANTENNA
12V POWER SOCKET
ADJUSTING NUT
MICROPHONE
STATUS INDICATOR
+Flashing blue: the camera is on
and ready for Wi-Fi connection
+ Steady blue: the camera is
running properly
+ Steady red: the camera is starting
+ Flashing red: there is a network
connection issue
STATUS INDICATOR
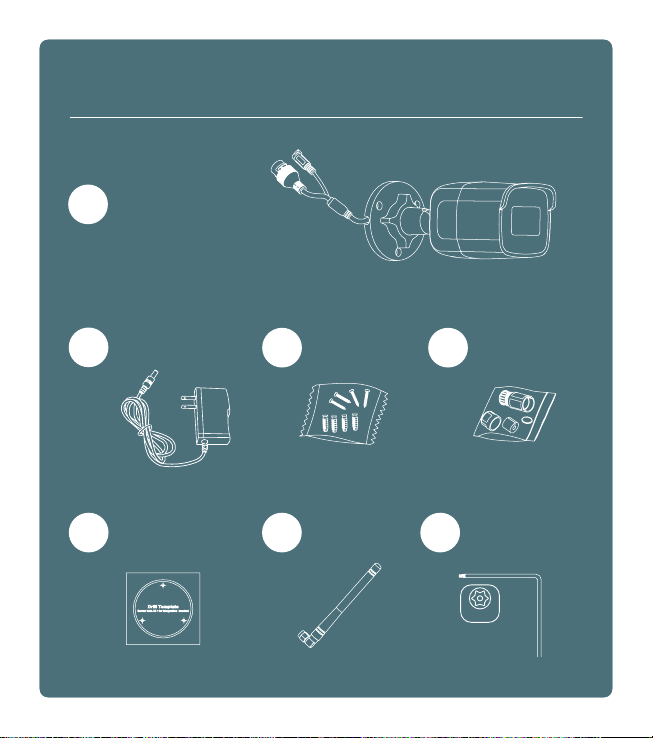
1OUTDOOR CAMERA
3SCREWS &
ANCHORS 4ETHERNET KIT
5DRILL TEMPLATE 6ANTENNA 7T10 HEX KEY
T10
What’s in the box?
2POWER ADAPTER
Installation options
Run the power adapter to a nearby internal power outlet. The camera
will communicate over the local Wi-Fi network.
You may need the following equipment to extend the range of your
power adapter cable (not included):
+ AC power extension cord OR
+ 12V DC 5.5mm x 2.1mm power extension cable OR
+ 18/2 stranded Siamese cable, pigtail connectors
Wi-Fi WITH POWER ADAPTER Recommended
Power the camera via an Ethernet cable and PoE switch.
The camera will communicate via direct IP connection over
Ethernet (Communicating over local Wi-Fi is also an option)
You’ll need the following equipment (not included):
+ Ethernet cable
+ PoE switch to provide an electrical current over Ethernet
POWER OVER ETHERNET PoE
Before starting, be sure to plan the internal path for your power source cable. You
may be able to conceal the cable either within the wall cavity, the attic or by using
a plastic conduit (not included).
For security, the camera should be mounted at least 9 feet from the ground.
A
B
OR
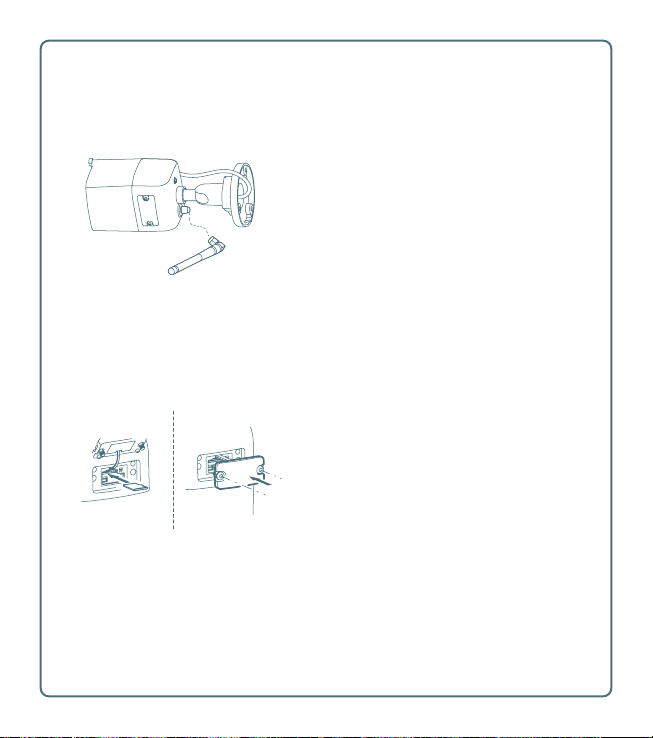
If connecting via Wi-Fi, attach the
antenna to the back of the camera,
screwing it tightly into position.
Using the T10 hex key, unscrew the
cover on the bottom of the camera.
Insert the MicroSD card and replace the
cover.
The card will be formatted during the
add camera process.
Installing the antenna
Installing a MicroSD card (optional)

Stick the adhesive drill template to the
exterior surface of the wall to mark the
desired mounting position.
Drilling and running the power cable
Depending on the mounting surface,
you may require screw anchors.
If using anchors, drill holes at each
of the three outer markers with a
5mm drill bit, then insert the anchors.
Otherwise, if drilling into the surface
directly, drill pilot holes with a 1.5mm
drill bit.
Using a 25mm drill bit, drill a larger
hole in the center of the template.
Drill a hole on the interior side of the
wall and feed the power adapter (or
Ethernet cable for PoE) from the inside,
through the wall and out the hole at
the center of the template.
If feeding the power adapter or Ethernet cable through the wall cavity, using
string or a wire may be helpful to fish the adapter cable though.

Installing the Ethernet kit (PoE only)
The Ethernet accessory kit includes a
lock nut, a waterproof end-cap, a rubber
gasket and an O-gasket.
Insert the Ethernet cable through the
plastic lock nut and waterproof end-cap.
Attach the rubber gasket.
Place the thin O-gasket onto the end of
the camera Ethernet socket.
Connect the Ethernet cable to the
camera Ethernet socket.
Slide the rubber gasket into the bottom
of the waterproof end-cap, then twist
the end-cap to lock it into the camera
Ethernet socket.
Screw the lock nut and end cap together,
ensuring the rubber gasket is in place.
This will complete the seal around the
Ethernet cable.
For protection against moisture, wrap
electrical tape around the unused 12V
adapter socket.
The Ethernet kit is not required if powering with the 12V power adapter.

Mounting and adjusting the camera
Push the camera socket cables into the
wall through the center template hole.
Place the camera into the final mounting
position and fasten it securely to the wall
with the 3 included mounting screws.
Loosen the large adjusting nut at the
base of the camera. Adjust the camera to
the desired viewing angle, then tighten
the adjusting nut to lock the camera in
position.
Plug the power adapter into the outlet
(or Ethernet cable into the PoE switch)
to power up the camera.
Connecting to the camera
In the app, go to the Video or Settings > Video settings page and tap the circular
“+” button to launch the camera installation wizard.
Follow the instructions in the app to connect the camera to your account and
configure the network settings.

This device complies with Part 15 of the FCC Rules. Operation is subject to the following two conditions:
(1) This device may not cause harmful interference, and
(2) This device must accept any interference received, including interference that may cause undesired operation.
Note: This product has been tested and found to comply with the limits for a Class B digital device, pursuant to Part 15 of the FCC Rules. These limits are designed to
provide reasonable protection against harmful interference in a residential installation. This product generates, uses, and can radiate radio frequency energy and, if not
installed and used in accordance with the instructions, may cause harmful interference to radio communications. However, there is no guarantee that interference will
not occur in a particular installation. If this product does cause harmful interference to radio or television reception, which can be determined by turning the equipment
o and on, the user is encouraged to try to correct the interference by one or more of the following measures:
—Reorient or relocate the receiving antenna.
—Increase the separation between the equipment and receiver.
—Connect the equipment into an outlet on a circuit dierent from that to which the receiver is connected.
—Consult the dealer or an experienced radio/TV technician for help.
Please take attention that changes or modification not expressly approved by the party responsible for compliance could void the user’s authority to operate the
equipment.
This device complies with Industry Canada licence-exempt RSS standard(s). Operation is subject to the following two conditions:
(1) this device may not cause interference, and
(2) this device must accept any interference, including interference that may cause undesired operation of the device.
Le présent appareil est conforme aux CNR d’Industrie Canada applicables aux appareils radioexempts de licence. L’exploitation est autorisée aux deux conditions
suivantes :
(1) l’appareil ne doit pas produire de brouillage, et
(2) l’utilisateur de l’appareil doit accepter tout brouillage radioélectrique subi, même si le brouillage est susceptible d’en compromettre le fonctionnement.
Under Industry Canada regulations, this radio transmitter may only operate using an antenna of a type and maximum (or lesser) gain approved for the transmitter by
Industry Canada. To reduce potential radio interference to other users, the antenna type and its gain should be so chosen that the equivalent isotropically radiated
power (e.i.r.p.) is not more than that necessary for successful communication.
Conformément à la réglementation d’Industrie Canada, le présent émetteur radio peut
fonctionner avec une antenne d’un type et d’un gain maximal (ou inférieur) approuvé pour l’émetteur par Industrie Canada. Dans le but de réduire les risques de
brouillage radioélectrique à l’intention des autres utilisateurs, il faut choisir le type d’antenne et son gain de sorte que la puissance isotrope rayonnée équivalente (p.i.r.e.)
ne dépasse pas l’intensité nécessaire à l’établissement d’une communication satisfaisante.
CAN ICES-3 (B)/NMB-3(B)
This equipment complies with FCC/IC RSS-102 radiation exposure limits set forth for an uncontrolled environment. This equipment should be installed and operated with
minimum distance 20cm between the radiator & your body.
ce matériel est conforme aux limites de dose d’exposition aux rayonnements, FCC / CNR-102 énoncée dans un autre environnement.cette eqipment devrait être installé
et exploité avec distance minimale de 20 entre le radiateur et votre corps.
Resetting the camera
If you change your Wi-Fi network or for some other reason you cannot connect to
the camera, you will need to reset it.
Remove the cover on the bottom of the camera with the T10 hex key, then press
and hold the Reset button for 10 seconds.
In the app, go to the Settings > Video settings page and select the camera. Update
the Wi-Fi settings to re-establish a connection to the camera.
Do not place the camera in extremely hot, cold, dusty, or damp locations, and do not expose it to electromagnetic radiation.
The operating temperature is -22° F to +140° F (-30° C to +60° C).

2

Table of contents


