nooie Nooie Cam Outdoor User manual

Nooie Cam Outdoor
Quick Start Guide

In The Box Look Closer
Adjust the View
Speaker
MicroSD
Card Slot
Reset Button
80°
360° 360°
Microphone
LED Indicator
Power Cord
Camera
10ft Power Cord
4 Concrete Screws 4 Wall Anchors
4 Wood Screws
USB Plug
Cable Clip Wall Mount Plate

Mark the location of the two holes in
the wall mount plate, drill the holes
and screw the plate to the wall.
Please read “Setup”section on the back before the mounting.
Mount It on the Wall
Two sides of the wall mount plate:
For Concrete
This side connects
to the product.
Put this side
against the wall.
For Wood
Attach the Camera
Step 1
Please take a minute to check the
marking dot of the camera base. Make
sure aligns with the spring lock at the
bottom of the wall mount plate, then
push the camera into the plate.
Step 2
Rotate the camera base clockwise
until you hear a click.
Step2
Step1
Step2
Tips:
Adjust the view of the camera and
use the live-streaming video in the
app to fine-tune its position.

Customer Care
Have more questions?
Check out the FAQ on our website!
www.nooie.com/support
Want to give your feedback?
Tag us #nooie on social media!
Need other help?
1. 30-day return policy and a two-year
limited warranty.
2. Timely customer service via
3. Lifetime technical support
provided by Nooie.
Warranty Terms
Detach from the Wall
Step1
Step 1
Insert a pin into the hole and push
to release the camera base.
Step 2
Turn the camera base couterclockwise
until it’s released.
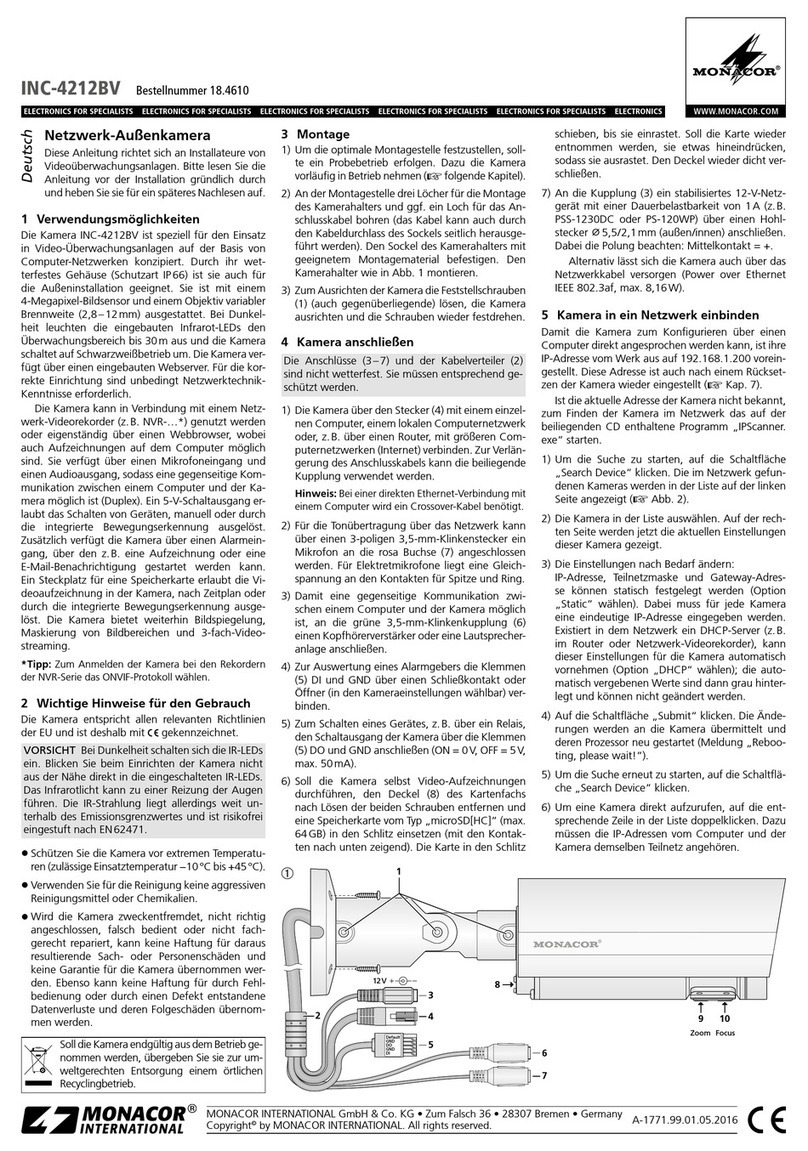
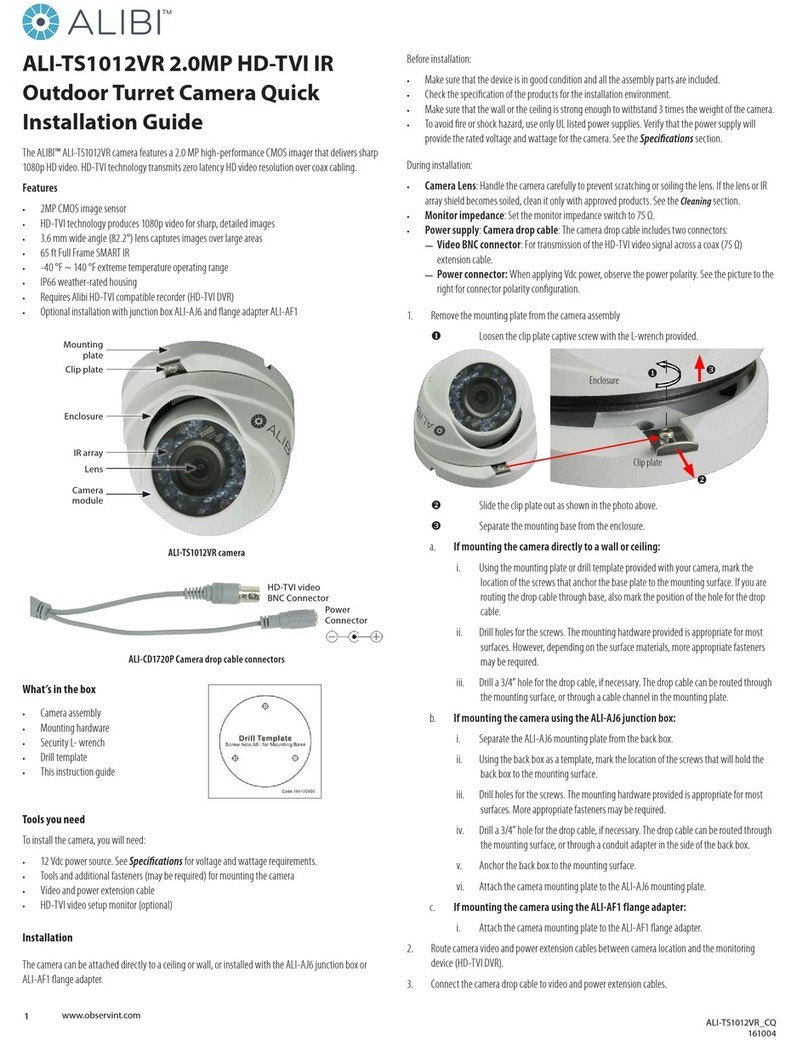
1. Download the Nooie Cam App and create an account.
2. Connect the camera to a power supply near your home Wi-Fi
router before you take it outside.
3. Open the app, click “Add Camera” on the main page
and follow the instructions.
4. After a successful pairing, keep your camera plugged into power while
mounting on the wall. Make sure to mount it in a place with strong enough Wi-Fi signal.
Setup
Note: 5GHz network is not supported.
LED Indicator
Steady Red
The device is powered on and initializing.
Flashing Red
The device is ready to connect.
Flashing White and Red
The Wi-Fi password is incorrect,
please reset and reconnect.
Steady White
The device is working properly.
Flashing White
Connecting in progress.

Leichte Hinweise
Andauerndes rotes Licht
Das Gerät ist eingeschaltet und wird
gerade initialisiert.
Blinkendes rotes Licht
Das Gerät ist bereit, sich zu verbinden.
Blinkt zwischen weißem, rotem Licht
Wi-Fi Konto oder Passwort ist falsch,
bitte verbinden Sie erneut.
Andauerndes weißes Licht
Das Gerät funktioniert ordnungsgemäß.
Blinkendes weißes Licht
Das Gerät ist verbunden.
1. Laden Sie die Nooie Cam App herunter und erstellen Sie ein Konto.
2. Schließen Sie die Kamera an eine Stromversorgung in der Nähe Ihres Heim-Wi-Fi-Routers an, bevor Sie sie
nach draußen bringen.
3. Öffnen Sie die App,dann drücken „Kamera hinzufügen“ auf der Hauptseite und folgen Sie den Anweisungen.
4. Nach einer gelungenen Paarung,schließen Sie ans Netz an und halten Ihre Kamera an der Wand fest.Achten
Sie darauf, es an einem Ort mit einem starken genug Wi-Fi-Signal zu montieren.
Einstellen
Hinweis: 5-GHz-Netzwerk wird nicht unterstützt.
1. Téléchargez l'application «Nooie Cam» et créez un compte.
2. Branchez la caméra sur une source d'alimentation proche de votre routeur Wi-Fi domestique avant de le
sortir à l'extérieur.
3. Ouvrez l'application, cliquez sur «Ajouter une caméra» sur la page principale et suivez les instructions.
4. Une fois le couplage réussi, maintenez votre caméra branché au secteur tout en le fixant au mur.
Assurez-vous de le monter dans un endroit où le signal Wi-Fi est suffisamment puissant.
Installer
Remarque: le réseau 5 GHz n'est pas pris en charge.
Indications lumineuses
Voyant blanche fixe
L'appareil fonctionne correctement.
Voyant rouge fixe
L'appareil est sous tension et en cours
d'initialisation.
Voyant rouge clignotant
L'appareil est prêt à se connecter.
Voyant clignote entre blanche et rouge
Le compte Wi-Fi ou le mot de passe est
incorrect, veuillez reconnecter.
Voyant blanche clignotante
La connexion est en cours.

Indicaciones de luz
Luz roja sólida
El dispositivo está encendido e inicializado.
Luz roja intermitente
El dispositivo está listo para conectarse.
Parpadeando entre la luz blanca y roja
Wi-Fi cuenta o contraseña es incorrecto,
por favor vuelva a intentarlo.
Luz blanca sólida
El dispositivo funciona correctamente.
Luz blanca intermitente
La conexión está en progreso.
1. Descarga la aplicación Nooie Cam y crea una cuenta.
2. Conecte la cámara a una fuente de alimentación cerca del enrutador de Wi-Fi de su hogar antes de
llevarlo afuera.
3. Abra la aplicación, haga clic en "Add Camera (Agregar Cámara)" en la página principal y siga las instrucciones.
4. Después de un emparejamiento exitoso, mantenga su cámara conectada a la corriente mientras la monta en
la pared. Asegúrate de montarlo en un lugar con una señal de Wi-Fi lo suficientemente fuerte.
Preparar
Nota: la red de 5GHz no es soporte.
Lo Stato delI'indicatore
1. Scarica l'app Nooie Cam e crea un account.
2. Collegare la fotocamera a un alimentatore vicino al router Wi-Fi di casa prima di portarla all'esterno.
3. Apri l'app, fai clic su "Aggiungi Fotocamera" nella pagina principale e segui le istruzioni.
4. Dopo un accoppiamento riuscito, mantenere la fotocamera collegata all'alimentazione durante il
montaggio a parete. Assicurati di montarlo in un luogo con un segnale Wi-Fi abbastanza forte.
Impostare
Nota: la rete 5GHz non è supportata.
Indicatore Rossa Fissa
Il dispositivo è acceso e in fase di
inizializzazione.
Indicatore Rossa Lampeggiante
Il dispositivo è pronto per la connessione.
Indicatore Bianco
Il dispositivo funziona perfettamente.
Lampeggia tra luce bianca e rossa
L'account Wi-Fi o la password sono sbagliati,
ti preghiamo di riprovare.
Indicatore Lampeggiante Bianco
La connessione è in corso.

ライトインジケーター
白いライトの点灯
デバイスは正常に動作
赤色ライト点灯
デバイスの電源が入っていて、初期化
赤色ライトの点滅
デバイスは接続準備
白いライトと赤いライトで点滅
Wi-Fiアカウント又はパスワードがエラー
再接続ください。
白いライトの点滅
接続中
1. Nooie Camアプリをダウンロードしてアカウントを作成します。
2. カメラを外に持ち出す前に、自宅のWi-Fiルーターの近くにある電源に接続します。
3. アプリを開き、メインページの[カメラの追加]をクリックして、指示に従います。
4. ペアリングが成功したら、電源を入れる状態でカメラを壁に取り付けてください。。Wi-Fi信号が十分に強い場所に
取り付けてください。
セ ットアップ
ご注意:5GHzネットワークまだ対応できません.
Table of contents
Other nooie Outdoor Camera manuals


