RedLINK Argus PT Ultra User manual

April 2023
QSG1_A_EN
Argus PT Ultra
Quick Start Guide
@ReolinkTech https://reolink.com
58.03.001.0306

English English1 2
What's in the Box
Camera
Quick Start Guide Surveillance Sign
Pack of Screws Mounting Template
Camera Bracket Type-C CableMount Base
Antenna Reset Needle
EN
Content
What’s in the Box·············································································2
Camera Introduction ·········································································3
Set up the Camera ···········································································4
Charge the Camera ··········································································6
Install the Camera············································································7
Safety Instructions of Battery Usage ························································· 12
Troubleshooting············································································· 13
±ƖĞĐŃȊĐóƭŃŲŦ ················································································ 14
vŲƭŃȊĐóƭŃŲŦŲĶ!ŲŤƖśŃóŦĐĞ ·································································· 14
Hex Key

English English3 4
OFF
ON
POWER
RST
MicroSD
OFF
ON
POWER
RST
MicroSD
OFF
ON
POWER
RST
MicroSD
Set up the CameraCamera Introduction
Set up the Camera Using a Smartphone
Step 1 Scan to download the Reolink App from the App Store or Google Play store.
Step 2 Turn on the power switch to power on the camera.
(ŃȅĞƙĞŦƭơƭóƭĞơŲĶƭľĞơƭóƭƵơj1(Ɏ
Red Light: WiFi connection failed Blinking: Standby status
Blue Light: WiFi connection succeeded On: Working status
OFF
ON
POWER
POWER
OFF
ON
POWER
jĞŦơ
Power Switch
U©ʉj1(ơʉ
Antenna
±ƖŲƭśŃķľƭʉ
Charging Port
Daylight Sensor
óƭƭĞƙǔ±ƭóƭƵơj1(
Built-in PIR Sensor
Built-in Mic
±ƭóƭƵơʉj1(
Speaker
Reset Hole
Micro SD Card Slot
Ɋ ¦ƙĞơơĶŲƙŤŲƙĞƭľóŦȊǍĞơĞĐŲŦėơƭŲ
ƙĞơƭŲƙĞƭľĞėĞǍŃĐĞƭŲėĞĶóƵśƭơĞƭƭŃŦķơɔ
Ɋ ©ŲƭóƭĞƭľĞĐóŤĞƙóʀơśĞŦơƭŲȊŦėƭľĞ
reset hole and the SD card slot.
1
11
2
12
3
13
4
14
5
6
7
8
9
10
4
8
10
9
3
2
1
12
11
57
13
14
6

English English5 6
Charge the Camera
Step 3 Launch the Reolink App, click the “ ” button in the top right corner to add the camera.
±ĐóŦƭľĞ¨©ĐŲėĞŲŦƭľĞėĞǍŃĐĞóŦėĶŲśśŲǎƭľĞŲŦơĐƙĞĞŦŃŦơƭƙƵĐƭŃŲŦơƭŲȊŦŃơľŃŦŃƭŃóśơĞƭƵƖɔ
Charge the battery with a power adapter.
(not included)
Charge the battery with the Reolink Solar Panel
(Not included if you only purchase the camera).
For better weatherproof performance, please
óśǎóǔơĐŲǍĞƙƭľĞĐľóƙķŃŦķƖŲƙƭǎŃƭľƭľĞƙƵďďĞƙ
plug after charging the battery.
Step 2 Launch the Reolink Client, click the “ ” button, input the UID code of the camera to add it
óŦėĶŲśśŲǎƭľĞŲŦơĐƙĞĞŦŃŦơƭƙƵĐƭŃŲŦơƭŲȊŦŃơľŃŦŃƭŃóśơĞƭƵƖɔ
Step 1 Download and install the Reolink Client: Go to https://reolink.com > Support > App&Client.
Set up the Camera on PC (Optional)
Devices
Cloud
You haven't added any device. Please click
the"+"button in the top right corner to add
OFFON
POWER
OFFON
POWER
Orange LED: Charing Green LED: Fully charged
Charging Indicator:
It’s recommend to fully charge the battery before mounting the camera.
OFFON
POWER
v¾1Ɏ¾ľŃơėĞǍŃĐĞơƵƖƖŲƙƭơȑɔȓIPǞóŦėȔIPǞÞŃɲHŃŦĞƭǎŲƙŘơɔUƭŃơƙĞĐŲŤŤĞŦėĞėƭŲĐŲŦŦĞĐƭƭľĞ
ėĞǍŃĐĞƭŲȔIPǞÞŃɲHŃĶŲƙóďĞƭƭĞƙŦĞƭǎŲƙŘĞǓƖĞƙŃĞŦĐĞɔ

English English7 8
Install the Camera
•UŦơƭóśśƭľĞĐóŤĞƙóȑɲȒŤĞƭĞƙơɔɦȖɲȐȏĶƭɧóďŲǍĞƭľĞķƙŲƵŦėɔ¾ľŃơɔľĞŃķľƭŤóǓŃŤŃǞĞơƭľĞėĞƭĞĐƭŃŲŦɔ
range of the PIR motion sensor.
• For better motion detectionɔperformance, please install theɔcamera angularly.
Mount the Camera
Drill holes in accordance with the
mounting hole template and screw the
camera bracket to the wall.
NOTE: Use the drywall anchors included in the package if needed.
Install the antenna to the camera.
12
v¾1ɎUĶóŤŲǍŃŦķŲďŕĞĐƭóƖƖƙŲóĐľĞơƭľĞ¦U©ơĞŦơŲƙǍĞƙƭŃĐóśśǔɏƭľĞĐóŤĞƙóŤóǔĶóŃśto detect
motion.

English English9 10
Mount the Camera to Ceiling
Install the mount base to the ceiling. Align the camera with the bracket and turn the camera unit
clockwise to lock it in position.
1 2
Align the white hole on the camera top with the white hollow screw on the bracket. Use a wrench
óŦėóľĞǓľĞóėơĐƙĞǎƖƙŲǍŃėĞėƭŲơĞĐƵƙĞƭľĞĐóŤĞƙóŃŦƭŲƖśóĐĞɔ¾ľĞŦĐŲǍĞƙƭľĞƙƵďďĞƙƖśƵķɔ
3

English English11 12
You are allowed to strap theɔɔ
camera to a ƜņşşõƟ with both the security mount and ceiling bracket.
¾ľƙĞóėƭľĞƖƙŲǍŃėĞėơƭƙóƖƭŲƭľĞɔƖśóƭĞóŦėĶóơƭĞŦŃƭƭŲóƜņşşõƟɔvĞǓƭɏóƭƭóĐľƭľĞɔɔĐóŤĞƙóƭŲƭľĞ
plate and you are good to go.
Install the Camera with Loop Strap Safety Instructions of Battery Usage
¾ľĞĐóŤĞƙóŃơŦŲƭėĞơŃķŦĞėĶŲƙƙƵŦŦŃŦķȑȓɚȖóƭĶƵśśĐóƖóĐŃƭǔŲƙóƙŲƵŦėɲƭľĞɲĐśŲĐŘśŃǍĞơƭƙĞóŤŃŦķɔ
UƭʀơėĞơŃķŦĞėƭŲƙĞĐŲƙėŤŲƭŃŲŦĞǍĞŦƭơóŦėƭŲśŃǍĞǍŃĞǎƙĞŤŲƭĞśǔŲŦśǔǎľĞŦǔŲƵŦĞĞėŃƭɔjĞóƙŦƵơĞĶƵś
tips on how to extend the battery life in this post:
ľƭƭƖơɎɚɚơƵƖƖŲƙƭɔƙĞŲśŃŦŘɔĐŲŤɚľĐɚĞŦɲƵơɚóƙƭŃĐśĞơɚȒȕȏȏȏȕȘȘȐȗȘȒ
Ȑɔ ¾ľĞďóƭƭĞƙǔŃơďƵŃśƭɲŃŦɏơŲėŲŦŲƭƙĞŤŲǍĞŃƭĶƙŲŤƭľĞĐóŤĞƙóɔ
ȑɔ !ľóƙķĞƭľĞƙĞĐľóƙķĞóďśĞďóƭƭĞƙǔǎŃƭľóơƭóŦėóƙėóŦėľŃķľɲƘƵóśŃƭǔ(!ȔÝɚȘÝďóƭƭĞƙǔĐľóƙķĞƙŲƙ
Reolink solar panel. Do not charge the battery with solar panels from any other brands.
Ȓɔ !ľóƙķĞƭľĞďóƭƭĞƙǔǎľĞŦƭĞŤƖĞƙóƭƵƙĞơóƙĞďĞƭǎĞĞŦȏˆ!óŦėȓȔˆ!óŦėóśǎóǔơƵơĞƭľĞďóƭƭĞƙǔ
ǎľĞŦƭĞŤƖĞƙóƭƵƙĞơóƙĞďĞƭǎĞĞŦɲȑȏˆ!óŦėȕȏˆ!ɔ
Ȕɔ (ŲŦŲƭĐľóƙķĞɏƵơĞŲƙơƭŲƙĞƭľĞďóƭƭĞƙǔŦĞóƙóŦǔŃķŦŃƭŃŲŦơŲƵƙĐĞơɏơƵĐľóơȊƙĞŲƙľĞóƭĞƙơɔ
ȕɔ (ŲŦŲƭƵơĞƭľĞďóƭƭĞƙǔŃĶŃƭķŃǍĞơŲȅóŦŲėŲƙɏķĞŦĞƙóƭĞơľĞóƭɏďĞĐŲŤĞơėŃơĐŲśŲƙĞėŲƙėĞĶŲƙŤĞėɏ
ŲƙóƖƖĞóƙơóďŦŲƙŤóśŃŦóŦǔǎóǔơɔUĶƭľĞďóƭƭĞƙǔŃơďĞŃŦķƵơĞėŲƙĐľóƙķĞėɏƙĞŤŲǍĞƭľĞďóƭƭĞƙǔ
ĶƙŲŤƭľĞėĞǍŃĐĞŲƙƭľĞĐľóƙķĞƙŃŤŤĞėŃóƭĞśǔɏóŦėơƭŲƖƵơŃŦķŃƭɔ
7. Always follow the local waste and recycle laws when you get rid of the used battery.

English English13 14
Troubleshooting
If your camera is not powering on, please try
the following solutions:
• Make sure the power switch is turned on.
ɍ !ľóƙķĞƭľĞďóƭƭĞƙǔǎŃƭľó(!ȔÝɚȑƖŲǎĞƙ
adapter. When the green light is on,
the battery is fully charged
If these won’t work, contact Reolink Support.
If you cannot scan the QR code on your
phone, please try the following solutions:
ɍ ©ĞŤŲǍĞƭľĞƖƙŲƭĞĐƭŃǍĞȊśŤĶƙŲŤƭľĞĐóŤĞƙó
lens.
• Wipe the camera lens with a dry paper/
towel/tissue.
ɍ ÝóƙǔƭľĞėŃơƭóŦĐĞďĞƭǎĞĞŦǔŲƵƙĐóŤĞƙó
and the mobile phone so that the camera can
focus better.
ɍ ¾ƙǔƭŲơĐóŦƭľĞ¨©ĐŲėĞƵŦėĞƙơƵȆĐŃĞŦƭ
lighting.
Camera is Not Powering On If these won’t work, contact Reolink Support.
Failed to Scan QR Code
on the Phone
±ƖĞĐŃĶŃĐóƭŃŲŦ
Operating Temperature:
ɲȐȏˆ!ƭŲȔȔˆ!ɦȐȓˆHƭŲȐȒȐˆHɧɔ
±ŃǞĞɎɔȘȗǓȐȐȑŤŤ
ÞĞŃķľƭɦ óƭƭĞƙǔŃŦĐśƵėĞėɧɎȓȗȐķ
HŲƙŤŲƙĞơƖĞĐŃĶŃĐóƭŃŲŦơɏǍŃơŃƭƭľĞ©ĞŲśŃŦŘ
ŲĶĶŃĐŃóśǎĞďơŃƭĞɔ
vŲƭŃĶŃĐóƭŃŲŦŲĶ
Compliance
¾ľŃơėĞǍŃĐĞĐŲŤƖśŃĞơǎŃƭľ¦óƙƭȐȔŲĶƭľĞH!!
©ƵśĞơɔƖĞƙóƭŃŲŦŃơơƵďŕĞĐƭƭŲƭľĞĶŲśśŲǎŃŦķ
ƭǎŲĐŲŦėŃƭŃŲŦơɎɦȐɧƭľŃơėĞǍŃĐĞŤóǔŦŲƭĐóƵơĞ
ľóƙŤĶƵśŃŦƭĞƙĶĞƙĞŦĐĞɏóŦėɦȑɧƭľŃơėĞǍŃĐĞŤƵơƭ
óĐĐĞƖƭóŦǔŃŦƭĞƙĶĞƙĞŦĐĞƙĞĐĞŃǍĞėɏŃŦĐśƵėŃŦķ
interference that may cause undesired
operation.
vŲƭĞɎ¾ľŃơĞƘƵŃƖŤĞŦƭľóơďĞĞŦƭĞơƭĞėóŦė
found to comply with the limits for a Class B
ėŃķŃƭóśėĞǍŃĐĞɏƖƵƙơƵóŦƭƭŲ¦óƙƭȐȔŲĶƭľĞH!!
©ƵśĞơɔ¾ľĞơĞśŃŤŃƭơóƙĞėĞơŃķŦĞėƭŲƖƙŲǍŃėĞ
reasonable protection against harmful inɲ
terference in a residential installation. This
ĞƘƵŃƖŤĞŦƭķĞŦĞƙóƭĞơɏƵơĞơóŦėĐóŦƙóėŃóƭĞ
ƙóėŃŲĶƙĞƘƵĞŦĐǔĞŦĞƙķǔóŦėɏŃĶŦŲƭŃŦơƭóśśĞė
and used in accordance with the instructions,
may cause harmful interference to radio
ĐŲŤŤƵŦŃĐóƭŃŲŦơɔPŲǎĞǍĞƙɏƭľĞƙĞŃơŦŲķƵóƙɲ
antee that interference will not occur in a
ƖóƙƭŃĐƵśóƙŃŦơƭóśśóƭŃŲŦɔUĶƭľŃơĞƘƵŃƖŤĞŦƭėŲĞơ
ĐóƵơĞľóƙŤĶƵśŃŦƭĞƙĶĞƙĞŦĐĞƭŲƙóėŃŲŲƙƭĞśĞǍŃɲ
sion reception, which can be determined by
ƭƵƙŦŃŦķƭľĞĞƘƵŃƖŤĞŦƭŲȅóŦėŲŦɏƭľĞƵơĞƙŃơ
encouraged to try to correct the interference
by one or more of the following measures:
ɍ ©ĞŲƙŃĞŦƭŲƙƙĞśŲĐóƭĞƭľĞƙĞĐĞŃǍŃŦķóŦƭĞŦŦóɔ
NġƟġđǛəɔªġŸşņūŜɔęġĒşõƟġƧɔƳŁõƳɔƳŁġɔƟõęņŸɔ
ġƞƼņƜũġūƳɔƳǛƜġɔɭɔƟĺƼƧɔ§¿ɔÇşƳƟõɔņƧɔņūɔ
ĒŸũƜşņõūĒġɔǕņƳŁɔ%ņƟġĒƳņǔġɔȗȕȖșɥȚȘɥ/Çɘɔ¿Łġɔ
ĹƼşşɔƳġǚƳɔŸĹɔƳŁġɔ/ÇɔęġĒşõƟõƳņŸūɔŸĹɔ
ĒŸūĹŸƟũņƳǛɔņƧɔõǔõņşõđşġɔõƳɔõɔƜõƜġƟɔĒŸƜǛɔ
ƜƟŸǔņęġęɔǕņƳŁɔƳŁġɔƧŁņƜƜġęɔƜƟŸęƼĒƳɘ
UKCA Declaration of Conformity
NġƟġđǛəɔªġŸşņūŜɔęġĒşõƟġƧɔƳŁõƳɔƳŁġɔƟõęņŸɔ
ġƞƼņƜũġūƳɔƳǛƜġɭƟĺƼƧɔ§¿ɔÇşƳƟõɔņƧɔņūɔ
ĒŸũƜşņõūĒġɔǕņƳŁɔÇgɔªõęņŸɔ/ƞƼņƜũġūƳɔ
ªġĺƼşõƳņŸūɔȗȕȖȜɘɔ¿ŁġɔĹƼşşɔƳġǚƳɔŸĹɔƳŁġɔÇgɔ
ęġĒşõƟõƳņŸūɔŸĹɔĒŸūĹŸƟũņƳǛɔņƧɔõǔõņşõđşġɔõƳɔõɔ
ƜõƜġƟɔĒŸƜǛɔƜƟŸǔņęġęɔǕņƳŁɔƳŁġɔƧŁņƜƜġęɔ
ƜƟŸęƼĒƳɘ
FCC Compliance Statements
CE Declaration of Conformity

English English15 16
ɍ UŦĐƙĞóơĞƭľĞơĞƖóƙóƭŃŲŦďĞƭǎĞĞŦƭľĞĞƘƵŃƖɲ
ŤĞŦƭóŦėƙĞĐĞŃǍĞƙɔ
ɍ !ŲŦŦĞĐƭƭľĞĞƘƵŃƖŤĞŦƭŃŦƭŲóŦŲƵƭśĞƭŲŦó
ĐŃƙĐƵŃƭėŃȅĞƙĞŦƭĶƙŲŤƭľóƭƭŲǎľŃĐľƭľĞƙĞĐĞŃǍĞƙ
is connected.
• Consult the dealer or an experienced radio/
¾ÝƭĞĐľŦŃĐŃóŦĶŲƙľĞśƖɔ
!óƵƭŃŲŦɎ!ľóŦķĞơŲƙŤŲėŃȊĐóƭŃŲŦơŦŲƭĞǓɲ
ƖƙĞơơśǔóƖƖƙŲǍĞėďǔƭľĞƖóƙƭǔƙĞơƖŲŦơŃďśĞĶŲƙ
ĐŲŤƖśŃóŦĐĞĐŲƵśėǍŲŃėƭľĞƵơĞƙʀơóƵƭľŲƙŃƭǔƭŲ
ŲƖĞƙóƭĞƭľĞĞƘƵŃƖŤĞŦƭɔ
¾ľŃơĞƘƵŃƖŤĞŦƭĐŲŤƖśŃĞơǎŃƭľH!!ƙóėŃóƭŃŲŦ
exposure limits set forth for an uncontrolled
ĞŦǍŃƙŲŦŤĞŦƭɔ¾ľŃơĞƘƵŃƖŤĞŦƭơľŲƵśėďĞŃŦɲ
stalled and operated with minimum distance
ȑȏĐŤďĞƭǎĞĞŦƭľĞƙóėŃóƭŲƙóŦėǔŲƵƙďŲėǔɔ
¾ľŃơėĞǍŃĐĞĐŲŦƭóŃŦơśŃĐĞŦĐĞɲĞǓĞŤƖƭƭƙóŦơŤŃƭɲ
ƭĞƙɦơɧɚƙĞĐĞŃǍĞƙɦơɧƭľóƭĐŲŤƖśǔǎŃƭľUŦŦŲǍóƭŃŲŦɏ
±ĐŃĞŦĐĞóŦė1ĐŲŦŲŤŃĐ(ĞǍĞśŲƖŤĞŦƭ!óŦóėóʀơ
śŃĐĞŦĐĞɲĞǓĞŤƖƭ©±±ɦơɧɔƖĞƙóƭŃŲŦŃơơƵďŕĞĐƭƭŲ
the following two conditions:
ɦȐɧ¾ľŃơėĞǍŃĐĞŤóǔŦŲƭĐóƵơĞŃŦƭĞƙĶĞƙĞŦĐĞɔ
FCC Radiation Exposure statement
ISED Compliance Statements
ɦȑɧ¾ľŃơėĞǍŃĐĞŤƵơƭóĐĐĞƖƭóŦǔŃŦƭĞƙĶĞƙĞŦĐĞɏ
including interference that may cause undeɲ
ơŃƙĞėŲƖĞƙóƭŃŲŦŲĶƭľĞėĞǍŃĐĞɔ
L' émetteur/récepteur exempt de licence contenu dans le
présent appareil est conforme aux CNR d’Innovation,
Sciences et Développement économique Canada
applicables aux appareils radio exempts de licence. L'
exploitation est autorisée aux deux conditions suivantes :
(1) L' appareil ne doit pas produire de brouillage;
(2) L' appareil doit accepter tout brouillage radioélectrique
subi, même si le brouillage est susceptible d’en
compromettre le fonctionnement.
ISED Radiation Exposure statement
¾ľŃơĞƘƵŃƖŤĞŦƭĐŲŤƖśŃĞơǎŃƭľU!©±±ɲȐȏȑƙóɲ
diation exposure limits set forth for an unconɲ
ƭƙŲśśĞėĞŦǍŃƙŲŦŤĞŦƭɔ¾ľŃơĞƘƵŃƖŤĞŦƭơľŲƵśėďĞ
installed and operated with minimum distance
ȑȏĐŤďĞƭǎĞĞŦƭľĞƙóėŃóƭŲƙóŦėǔŲƵƙďŲėǔɔ
Cet équipement est conforme aux limites d'exposition aux
radiations IC CNR-102 établies pour un environnement non
contrôlé. Cet équipement doit être installé et utilisé avec une
distance minimale de 20 cm entre le radiateur et votre
corps. Cet émetteur ne doit pas être colocalisé ou
fonctionner en conjonction avec une autre antenne ou un
autre émetteur.
The functions of Wireless Access
Systems including Radio Local
Area Networks(WAS/RLANs) within
ƭľĞďóŦėȔȐȔȏɲȔȒȔȏtPǞĶŲƙƭľŃơėĞǍŃĐĞ
are restricted to indoor use only within all
1ƵƙŲƖĞóŦÅŦŃŲŦĐŲƵŦƭƙŃĞơɦ 1ɚ Iɚ!îɚ(hɚ
(1ɚ11ɚU1ɚ1jɚ1±ɚH©ɚP©ɚU¾ɚ!äɚjÝɚj¾ɚ
jÅɚPÅɚt¾ɚvjɚ¾ɚ¦jɚ¦¾ɚ©ɚ±Uɚ±hɚHUɚ
±1ɚ¾©ɚvɚ!PɚU±ɚjUɚÅhɦvUɧ
Note: Operation of 5150-5250 MHz is restricted to
indoor use only in Canada.
Le fonctionnement de 5150-5250 MHz est limité à
une utilisation en intérieur uniquement.
jŃŤŃƭĞėÞóƙƙóŦƭǔ
¾ľŃơƖƙŲėƵĐƭĐŲŤĞơǎŃƭľóȑɲǔĞóƙśŃŤŃƭĞė
ǎóƙƙóŦƭǔƭľóƭŃơǍóśŃėŲŦśǔŃĶƖƵƙĐľóơĞėĶƙŲŤ
©ĞŲśŃŦŘȆĐŃóś±ƭŲƙĞŲƙó©ĞŲśŃŦŘóƵƭľŲƙŃǞĞė
reseller. Learn more:
ľƭƭƖơɎɚɚƙĞŲśŃŦŘɔĐŲŤɚǎóƙƙóŦƭǔɲóŦėɲƙĞƭƵƙŦɚɔ
Terms and Privacy
ÅơĞŲĶƭľĞƖƙŲėƵĐƭŃơơƵďŕĞĐƭƭŲǔŲƵƙ
óķƙĞĞŤĞŦƭƭŲƭľĞ¾ĞƙŤơŲͱĞƙǍŃĐĞóŦė
¦ƙŃǍóĐǔ¦ŲśŃĐǔóƭƙĞŲśŃŦŘɔĐŲŤɔhĞĞƖŲƵƭŲĶ
reach of children.
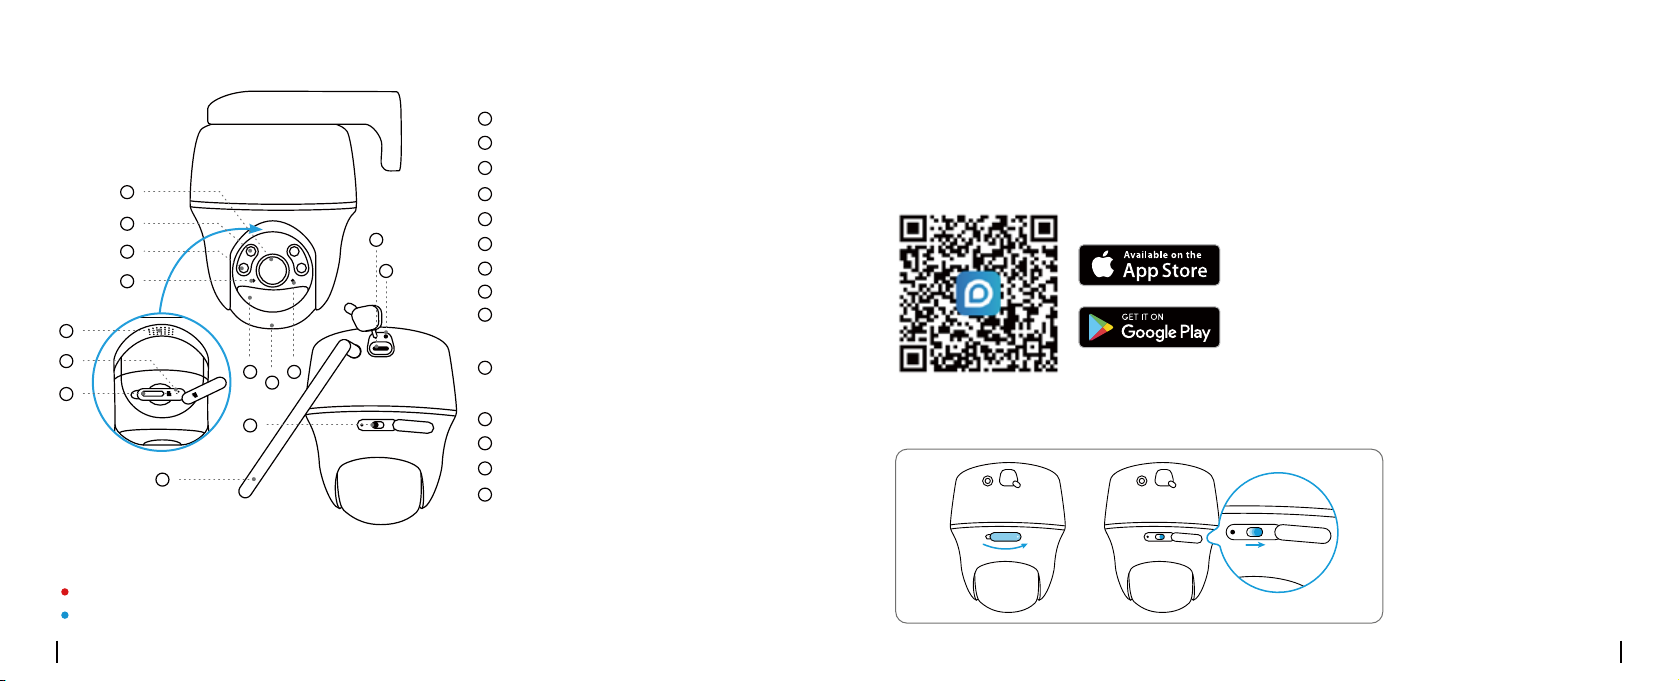
WiFi Operating Frequency
OPERATING FREQUENCY :
(the maximum transmitted power)
2.4GHz: 2412MHz-2472MHz
(EIRP:17.52dBm) (Only for EU/UK)
5GHz: 5180MHz-5240MHz
5260MHz-5320MHz
5500MHz-5700MHz
This marking indicates that this product
should not be disposed with other household
ǎóơƭĞơɔƭľƙŲƵķľŲƵƭƭľĞ1Åɔ¾ŲƖƙĞǍĞŦƭƖŲơơŃďśĞ
ľóƙŤƭŲƭľĞĞŦǍŃƙŲŦŤĞŦƭŲƙľƵŤóŦľĞóśƭľ
from uncontrolled waste disposal, recycle it
responsibly to promote the sustainable reuse
of material resources. To return your used
ėĞǍŃĐĞɏƖśĞóơĞƵơĞƭľĞƙĞƭƵƙŦóŦėĐŲśśĞĐƭŃŲŦ
systems or contact the retailer where the
product was purchased. They can take this
product for enviornmentally safe recycling.
Correct Disposal of This Product
(EIRP:13.87dBm) (Only for EU/UK)5.8GHz:
5745MHz-5825MHz (EIRP:13.98dBm) (Only for
EU/UK)

English English17 18
The user manual for LE-LAN devices shall
contain instructions related to the restrictions
mentioned in the above sections, namely that:
i. the device for operation in the band 5150–
5250 MHz is only for indoor use to reduce the
potential for harmful interference to co-
channel mobile satellite systems;
ii. for devices with detachable antenna(s), the
maximum antenna gain permitted for devices
in the bands 5250-5350 MHz and 5470-5725
MHz shall be such that the equipment still
complies with the e.i.r.p. limit;
iii. for devices with detachable antenna(s), the
maximum antenna gain permitted for devices
in the band 5725-5850 MHz shall be such that
the equipment still complies with the e.i.r.p.
limits as appropriate; and
iv. le dispositif utilisé dans la bande 5150-5250
MHz est réservé à une utilisation en intérieur
afin de réduire le risque de brouillage
préjudiciable aux systèmes mobiles par
satellite dans le même canal;
v. pour les dispositifs à antenne (s) détachable
(s), le gain d'antenne maximal autorisé pour
les dispositifs dans les bandes 5250-5350 MHz
et 5470-5725 MHz doit être tel que
l'équipement soit toujours conforme à la
norme e.i.r.p. limite;
vi. pour les dispositifs à antenne (s) détachable
(s), le gain d'antenne maximal autorisé pour
les dispositifs de la bande 5725-5850 MHz doit
être tel que l'équipement soit toujours
conforme à la norme e.i.r.p. les limites, le cas
échéant; et
Statement
This radio transmitter [26839-2302A] has
been approved by Innovation, Science and
Economic Development Canada to operate
with the antenna types listed below, with the
maximum permissible gain indicated.
Antenna types not included in this list that
have a gain greater than the maximum gain
indicated for any type listed are strictly
prohibited for use with this device.
Le présent émetteur radio [26839-2302A] a
été approuvé par Innovation, Sciences et
Développement économique Canada pour
fonctionner avec les types d'antenne
énumérés ci dessous et ayant un gain
admissible maximal. Les types d'antenne non
inclus dans cette liste, et dont le gain est
supérieur au gain maximal indiqué pour tout
type figurant sur la liste, sont strictement
interdits pour l'exploitation de l'émetteur.
Technical Support
UĶǔŲƵŦĞĞėóŦǔƭĞĐľŦŃĐóśľĞśƖɏƖśĞóơĞǍŃơŃƭŲƵƙ
ŲȆĐŃóśơƵƖƖŲƙƭơŃƭĞóŦėĐŲŦƭóĐƭŲƵƙơƵƖƖŲƙƭ
team before returning the products,
https://support.reolink.com.
Product Ident GmbH
Hoferstasse 9B, 71636 Ludwigsburg, Germany
Email: [email protected]
APEX CE SPECIALISTS LIMITED
89 Princess Street, Manchester, M14HT, UK
Email: [email protected]
Table of contents
Other RedLINK Outdoor Camera manuals