SEFAM DreamStar Series User manual

DreamStar™ is a brand registered by SEFAM.
DreamStar™Product Range
DreamStar™ Duo
DreamStar™ Duo Evolve
DreamStar™ DuoST
DreamStar™ DuoST Evolve

2 Table of contents DreamStar Duo, DuoST
TABLE OF CONTENTS
Before you start ......................................................3
Safety precautions............................................ 3
Intended use ...................................................... 4
Contra-indications ............................................ 4
Adverse effects ................................................. 5
Verification of the elements of the system.. 5
Device Description..................................................6
Views of the device........................................... 6
Symbols on the device..................................... 7
Installation...............................................................8
Standard installation of the device................ 8
Installation for use with battery power or
(optional) cigarette-lighter cable.................... 9
Operation...............................................................10
Filling the water chamber (if included) ....... 10
Starting Treatment ......................................... 10
Stopping Treatment ....................................... 11
Mask unplugged feature................................ 11
Accessing the device menu.......................... 11
Available features ........................................... 13
Transporting the device................................. 13
Using a memory card..................................... 14
How to set the DreamStar™ Duo / Duo Evolve
device ....................................................................15
Accessing the settings menu ....................... 15
Step 1: Heat level (if the water chamber is
included)........................................................... 15
Step 2: Settings ............................................... 16
Step 3: Set Parameters Display.................... 17
Step 4: Set Patient Reminders display........ 18
Step 5: Setting the clock................................ 18
Step 6: Miscellaneous Settings .................... 18
How to set the DreamStar™ DuoST / DuoST
Evolve device.........................................................20
Accessing the settings menu ....................... 20
Step 1: Heat level (if the water chamber is
included)........................................................... 20
Step 2: Settings ............................................... 21
Step 3: Set Parameters Display.................... 22
Step 4: Set Patient Reminders display........ 23
Step 5: Setting the clock................................ 23
Step 6: Miscellaneous Settings.................... 23
Other Information .................................................25
General Information ....................................... 25
Reminders about to expire............................ 25
How to use when adding oxygen (optional) .......27
Installation with an oxygen adapter
(optional) .......................................................... 27
Starting and stopping the treatment........... 27
Use of the swivel outlet elbow (optional)............28
Installation........................................................ 28
Monthly cleaning............................................. 28
Cleaning and Maintenance ..................................29
Daily ...................................................................29
Weekly...............................................................29
Monthly .............................................................31
Troubleshooting....................................................32
Helpful hints.....................................................32
Device messages............................................34
Technical characteristics.....................................35
Performance of the device............................35
Integrated Humidifier performance.............35
Operating conditions for the device and
humidifier..........................................................36
Transportation and storage conditions ......36
Device electrical characteristics...................36
Physical characteristics.................................36
CE marking.......................................................36
Standards compliance ...................................37
Disposing of the device at the end of its
life.......................................................................37

DreamStar Duo, DuoST Before you start 3
Before you start
Please read this manual carefully before using your DreamStar™ device so that you fully understand
the limitations of this device.
Safety precautions
WARNING:
Means in this manual that there is a risk of danger of injury or accident to
yourself or others.
The Dreamstar™ Duo, Dreamstar™ DuoST devices (and their equivalents in the Evolve configuration) cannot
be used without a medical prescription. Under no circumstances should you attempt to adjust prescribed
settings without agreement of the medical team.
Use the device only for the recommended use as described in this manual. Advice contained in this manual
should not supersede instructions of your health professional.
This device is not intended to provide assistance for vital functions.
The DreamStar™ product range devices must only be used with the circuits, masks, fittings and
accessories recommended by a physician or provided by your health care provider. Make sure the
‘Directions for Use’ instructions for each accessory are in the package and read them carefully.
If you suspect that the device or one of its accessories is defective or damaged or not working properly,
please contact your health care provider.
Do not try to open or modify the device (risk of electric shock). Maintenance of this equipment is to be
performed by skilled personnel only. Please contact your health care provider.
If necessary, the device can be detached from the electrical network by unplugging the power supply cord.
Make sure that the power supply cord is accessible.
If the device is connected to a base of multiple sockets, then an additional base of multiple sockets or an
extension wire should not be connected to the system.
During treatment, only equipment provided by your health care provider should be connected to the device
USB connector.
Place the device on a stable horizontal surface in a clean environment. Do not use the device if it has been
set next to or on top of another device.
Be careful not to obstruct the air outlet, or any other opening of the device or respiratory circuit, either
accidentally or intentionally. Do not cover the unit or place it too close to a wall. Do not introduce liquids or
objects into the air outlet.
Please hold the device and the power cord away from any water source (electrocution hazard). Use the
device and its accessories (power cords) only if they are dry and in working order.
Keep the cord away from heated surfaces.
If supplemental oxygen is to be introduced, carefully follow the instructions and safety precautions for
using oxygen.
Do not use this device near flammable vapors and in particular do not use the integrated heated humidifier
near flammable anesthetics, whether they are present alone or in combination with other gases (explosion
hazard).
Once the mask is in place, make sure that the device produces an air flow. Never block the mask exhalation
vent, which allows air to be expelled continually. When the device is operating, the air produced flushes the
exhaled air out through the mask vent hole. When the device is not operating, insufficient fresh air is
produced in the mask, presenting a risk of re-breathing exhaled air, which under certain circumstances
could risk patient safety within several minutes.
If the operation of the unit is defective and if the patient uses a nasal mask, the device resistance is low
enough that the patient can exhale through the machine or even open his mouth. If a full face mask is used,
the mask must have an anti-asphyxia valve.
In case of power failure or malfunction, remove the mask.
Do not leave long lengths of tubing on the bed. They could twist round your head or your neck while you are
sleeping.
Keep the device away from children and pets or pests.

4 Before you start DreamStar Duo, DuoST
If your device is equipped with a water chamber:
When using the water chamber, take precautions to eliminate the risk of introducing water into the device
since this can cause irreversible damage. The device must be placed on a stable horizontal surface and
must not be tilted.
The humidifier has a plate that, like the base of the water chamber, may become hot during normal
operation. Avoid touching them.
The water chamber must be cleaned before the first use, after any technical intervention, and regularly
thereafter, following the instructions provided under "Cleaning and Maintenance", on page 29.
Always empty the water chamber before moving or transporting the device.
Fill the water chamber away from the device to prevent water from flowing over it.
Do not use the device if leakage is detected in the chamber, due for example to the deterioration of the
gasket.
The heated humidification feature must not be used where the ambient temperature is higher than 35˚C
(95˚F) because the temperature of the air delivered to the patient could exceed 43˚C (109.4°F), which could
pose a risk of scalding the upper airways.
Adding a humidifier may affect the device performance.
There is a risk of air leakage if the water chamber or the cover is not reassembled correctly, which could
cause the applied pressure to deviate from the prescribed pressure.
CAUTION:
In this manual it means that there is the possibility of material damage to
this device or any other.
If your device is equipped with a cover where the water chamber should be, the heated humidification
feature must be disabled. Otherwise, the heating element of the device could continue to provide heat to
the device, although it would not reach dangerous temperatures. However, if it is enabled, set the heat level
to the minimum value, and alert your home care provider.
Be sure to position the device in order to prevent anyone stumbling into or tripping over the power cord.
If the device is placed on the ground, ensure it is in a place free from dust, bedding, clothing or other
objects that could block air intake.
Like all medical electrical devices, the DreamStar™ product range device is vulnerable to interference from
mobile and portable radiofrequency communication equipment (mobile phones, Wi-Fi…).
After storing or transporting the device, ensure it is used in compliance with the conditions of use specified
in this manual.
Intended use
The Dreamstar™ Duo, Dreamstar™ DuoST (and their equivalents in the Evolve configuration) are
intended for the non-invasive ventilation of patients weighing over 30 kg (66 lbs), suffering from
respiratory failure or Sleep Apnoea Syndrome (SAS), but who are not dependent on ventilatory
assistance. These devices can be used at home or in a sleep centre.
Contra-indications
Studies have shown that the use of positive pressure is contra-indicated in some patients with one of
the following pre-existing conditions:
Severe bullous emphysema or emphysema previously complicated by pneumothorax.
Pneumoencephalus, trauma or recent surgery with sequela of cranio-nasopharyngeal fistula.
Decompensated cardiac insufficiency or hypotension, particularly in case of decreased blood
volume or cardiac arrhythmia.
Dehydration.
Massive epistaxis or history of massive epistaxis. Acute sinusitis, otitis media, or perforated
tympanic membrane.
Tracheotomy.

DreamStar Duo, DuoST Before you start 5
Adverse effects
Please contact your health care professional if while using the DreamStar™ product range device, the
following symptoms appear: dry airways or nose, skin sensitivity, runny or bleeding nose, ear pain,
discomfort sinus, daytime sleepiness, mood changes, disorientation, irritability or memory loss.
Verification of the elements of the system
The DreamStar™ product range device is delivered with the following components:
carrying case
detachable power supply cord
tubing
memory card
reusable filter
patient manual
cover (optional)
water chamber (optional)
The DreamStar™ product range devices can be used with the following optional accessories. Contact
your home care provider for additional information on available accessories. During use, follow the
instructions provided with the accessories.
battery cable
cigarette-lighter cable
filter holder kit
optional high-efficiency filter (disposable)
swivel outlet elbow, 70° 22 mm diameter

6 Device Description DreamStar Duo, DuoST
Device Description
This DreamStar™ product range device is equipped with custom accessories and includes an
integrated electrical power supply.
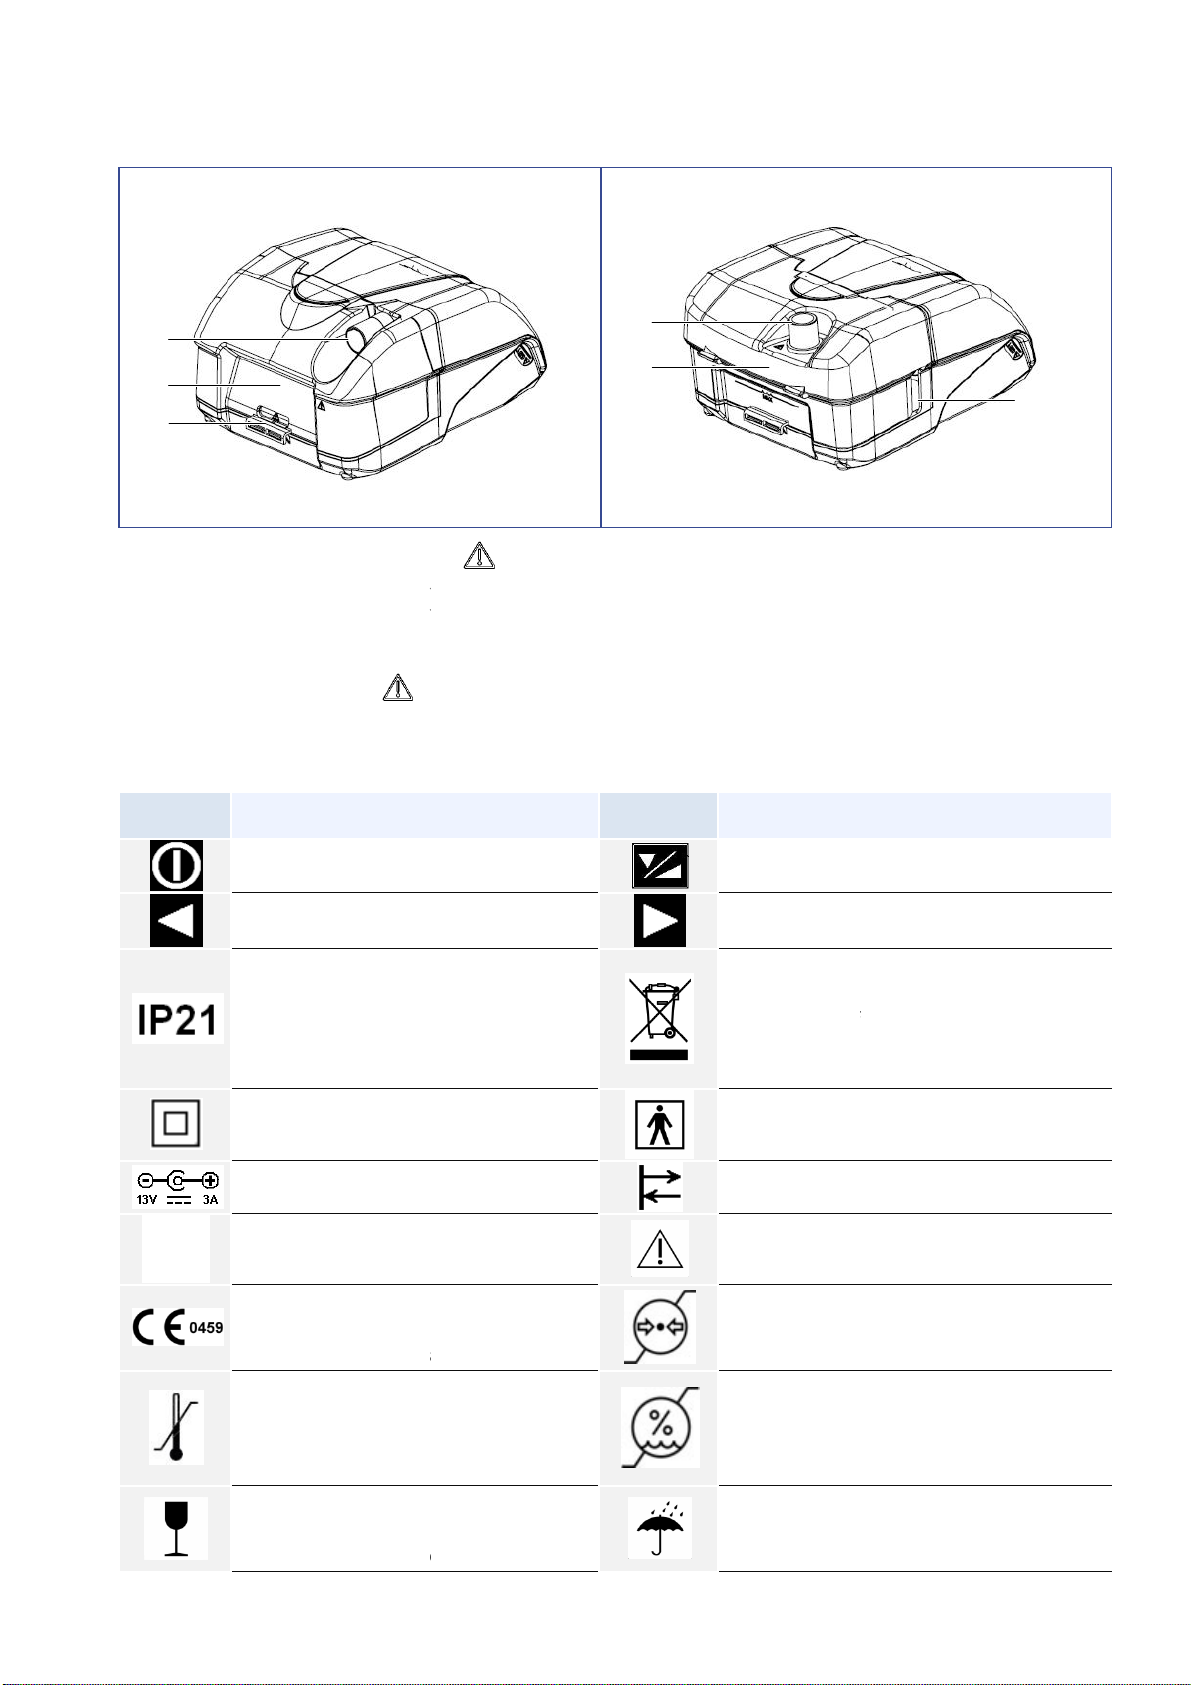
Views of the device
Figure 1 –Front view
1
Screen
Allows viewing the information.
2
Left control button
This allows the selection of the symbol displayed at the
lower left of the screen.
3
Right control button
This allows the selection of the symbol displayed at the
lower right of the screen.
4
Ramp and selection button
Provides access to ramp functions. It is also used to select
the next parameter in the displayed menu during the device-
settings.
5
On/Off button
Turns the device on or off. It is used also to exit the device-
setting menus.
Figure 2 –View of the right side
Figure 3 –Rear view without the water chamber
6
Power port
This is where the power cord is connected.
7
External battery port
This allows the device to be powered by an external battery
or a cigarette-lighter power cable.
8
Air intake filters
Prevent dust in the airflow from entering the device.
9
Heating element
The base of the heated humidifier is used to heat the water
chamber.
10
Serial cable/USB connector
Available on the devices, it is used by your physician or
home care provider.
2
4
3
5
1
6
7
10
8
11
9
DreamStar Duo, DuoST
11 Memory card connector
Figure 4 -
Rear view of a device with cover
12
Outlet connector (indicated by
13 Water chamber (if
included)
14 Cover (if included)
15 Air inlet (indicated by )
Symbols on the device
Symbol Description
Symbol of On/Off button.
Symbol of Left control button.
Device protected against solid
objects up to 12 mm and against
vertically falling drops of water.
Class II device.
DC power supply.
Refer to the user manual.
Device
complies with the
requirements of European Directive
93/42/EC on medical devices.
On packaging: this icon means
“Storage temperature limit”.
Temperature range:
(-4 °F to +140 °F)
On packaging: this icon means
“Fragile”, as the package needs to
be handled with care.
15
14
12
Connector into which you can slide the memory card.
Rear view of a device with cover
Figure 5 -
Rear view of a device with water chamber
Outlet connector (indicated by
)
Air outlet to which the tubing will be connected.
included)
W
ater chamber in case of humidification, which is marked
to show the maximum fill level for water
Symbols on the device
Symbol Description
Symbol of On/Off button.
Symbol of Ramp and selection button.
Symbol of Left control button.
Symbol of Right control button.
Device protected against solid
objects up to 12 mm and against
vertically falling drops of water.
Waste device to be eliminated
separately from the household waste.
For further information, refer to the
paragraph "
Disposing o
the end of its life
Type BF device.
Recording and play back.
Refer to the user manual.
Specific warning.
complies with the
requirements of European Directive
93/42/EC on medical devices.
On packaging this symbols means,
"atmospheric pressure limit".
On packaging: this icon means
“Storage temperature limit”.
Temperature range:
-20°C to +60°C
On packaging this symbols means,
"relative humidity limit ".
On packaging: this icon means
“Fragile”, as the package needs to
be handled with care.
On packaging: this icon means “Keep
dry”, as the package needs to be
protected against
12
13
Device Description 7
Connector into which you can slide the memory card.
Rear view of a device with water chamber
Air outlet to which the tubing will be connected.
ater chamber in case of humidification, which is marked
to show the maximum fill level for water
.
Symbol of Ramp and selection button.
Symbol of Right control button.
Waste device to be eliminated
separately from the household waste.
For further information, refer to the
Disposing o
f the device at
the end of its life
", page 37.
Type BF device.
Recording and play back.
Specific warning.
On packaging this symbols means,
"atmospheric pressure limit".
On packaging this symbols means,
"relative humidity limit ".
On packaging: this icon means “Keep
dry”, as the package needs to be
protected against
moisture and water.
15
8 Installation DreamStar Duo, DuoST
Installation
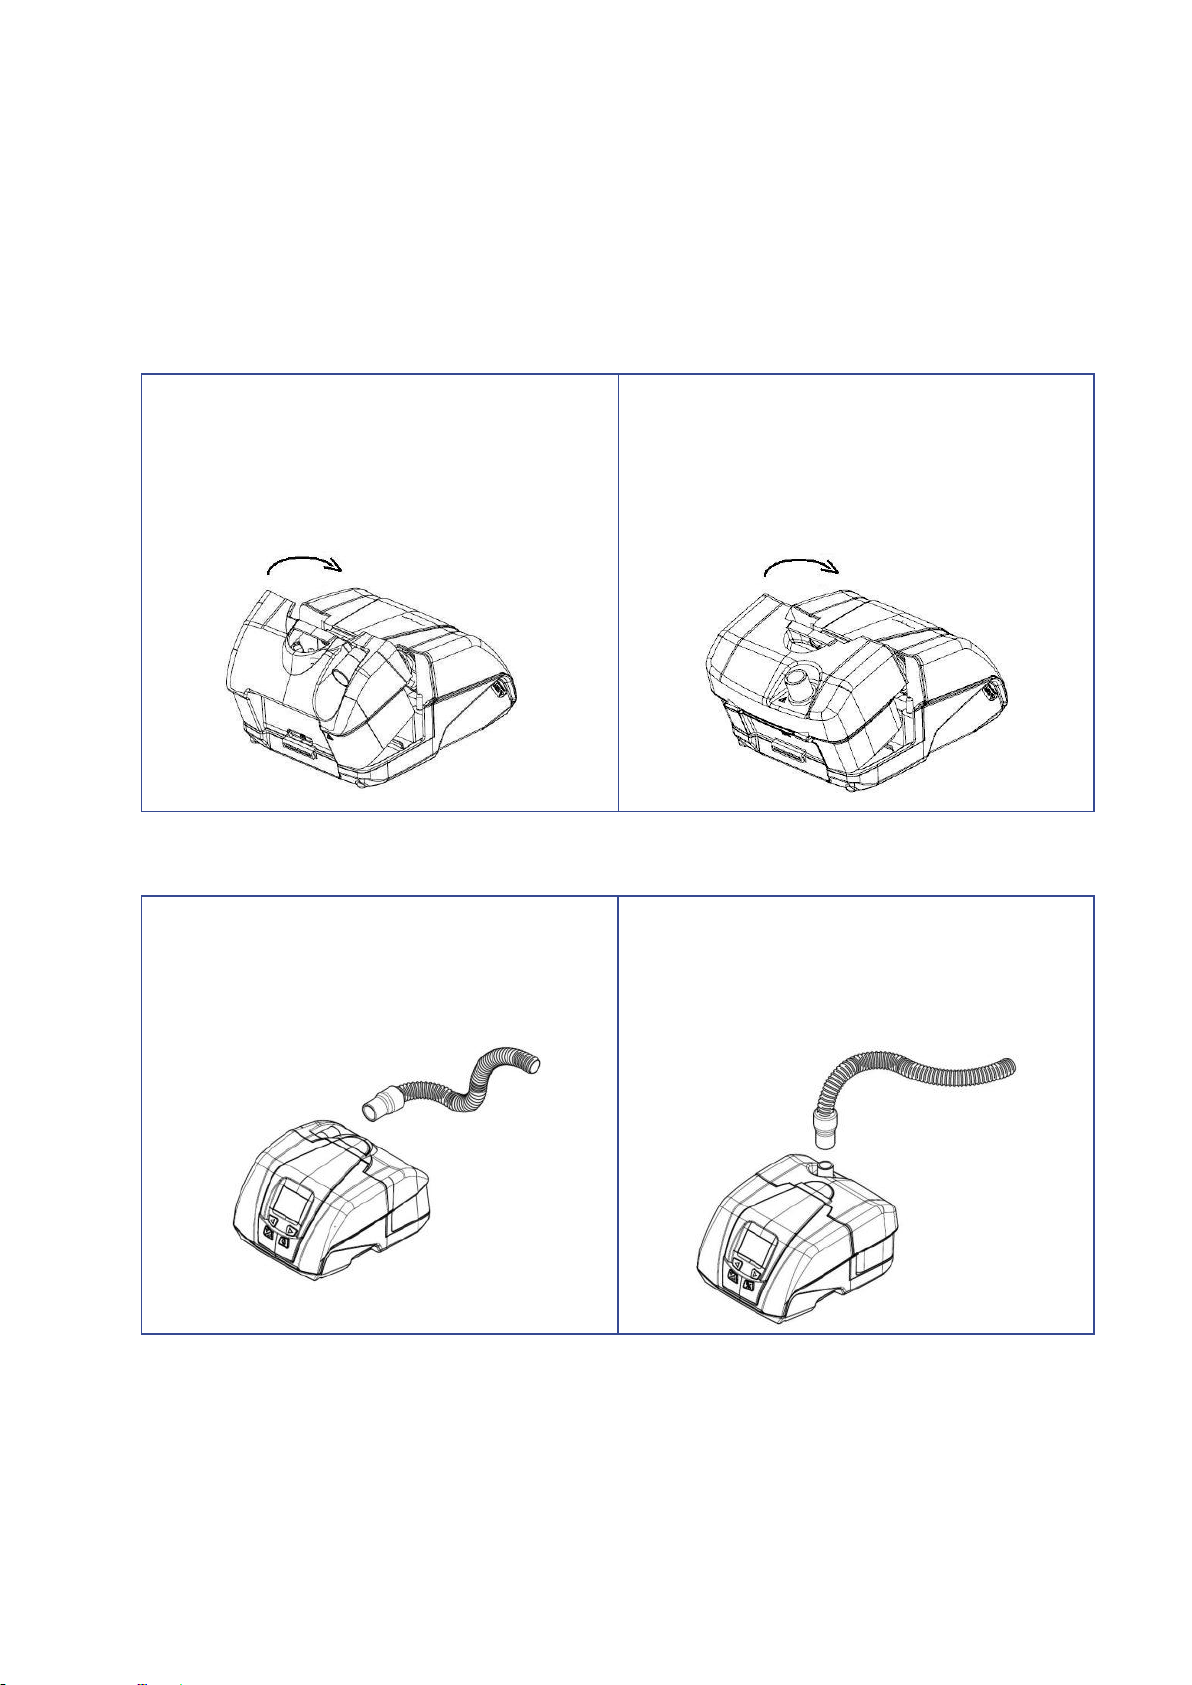
Standard installation of the device
The device is delivered with either a cover (configuration A) or with a water chamber (configuration B).
1. Installation of the cover or the water chamber
A. Device with cover
Snap the cover onto the base at the rear of
the device and tilt the cover forward to lock.
B. Device with water chamber
Attach the water chamber base to the heating
element and tip the water chamber forward to
lock it in place.
2. Connecting the patient circuit
A. Device with cover
Connect one end of the patient circuit to the
outlet connector on the back of the rear cover
of the device.
B. Device with water chamber
Connect one end of the patient circuit to the
outlet connector on the top of the water
chamber cover.
3. Prepare the mask according to the instructions provided in the operating instructions that came
with the mask. Connect the mask to the other end of the patient circuit.
4. Plug the end of the power cord into the power input of the device and the other end into the
power source.
DreamStar Duo, DuoST Installation 9
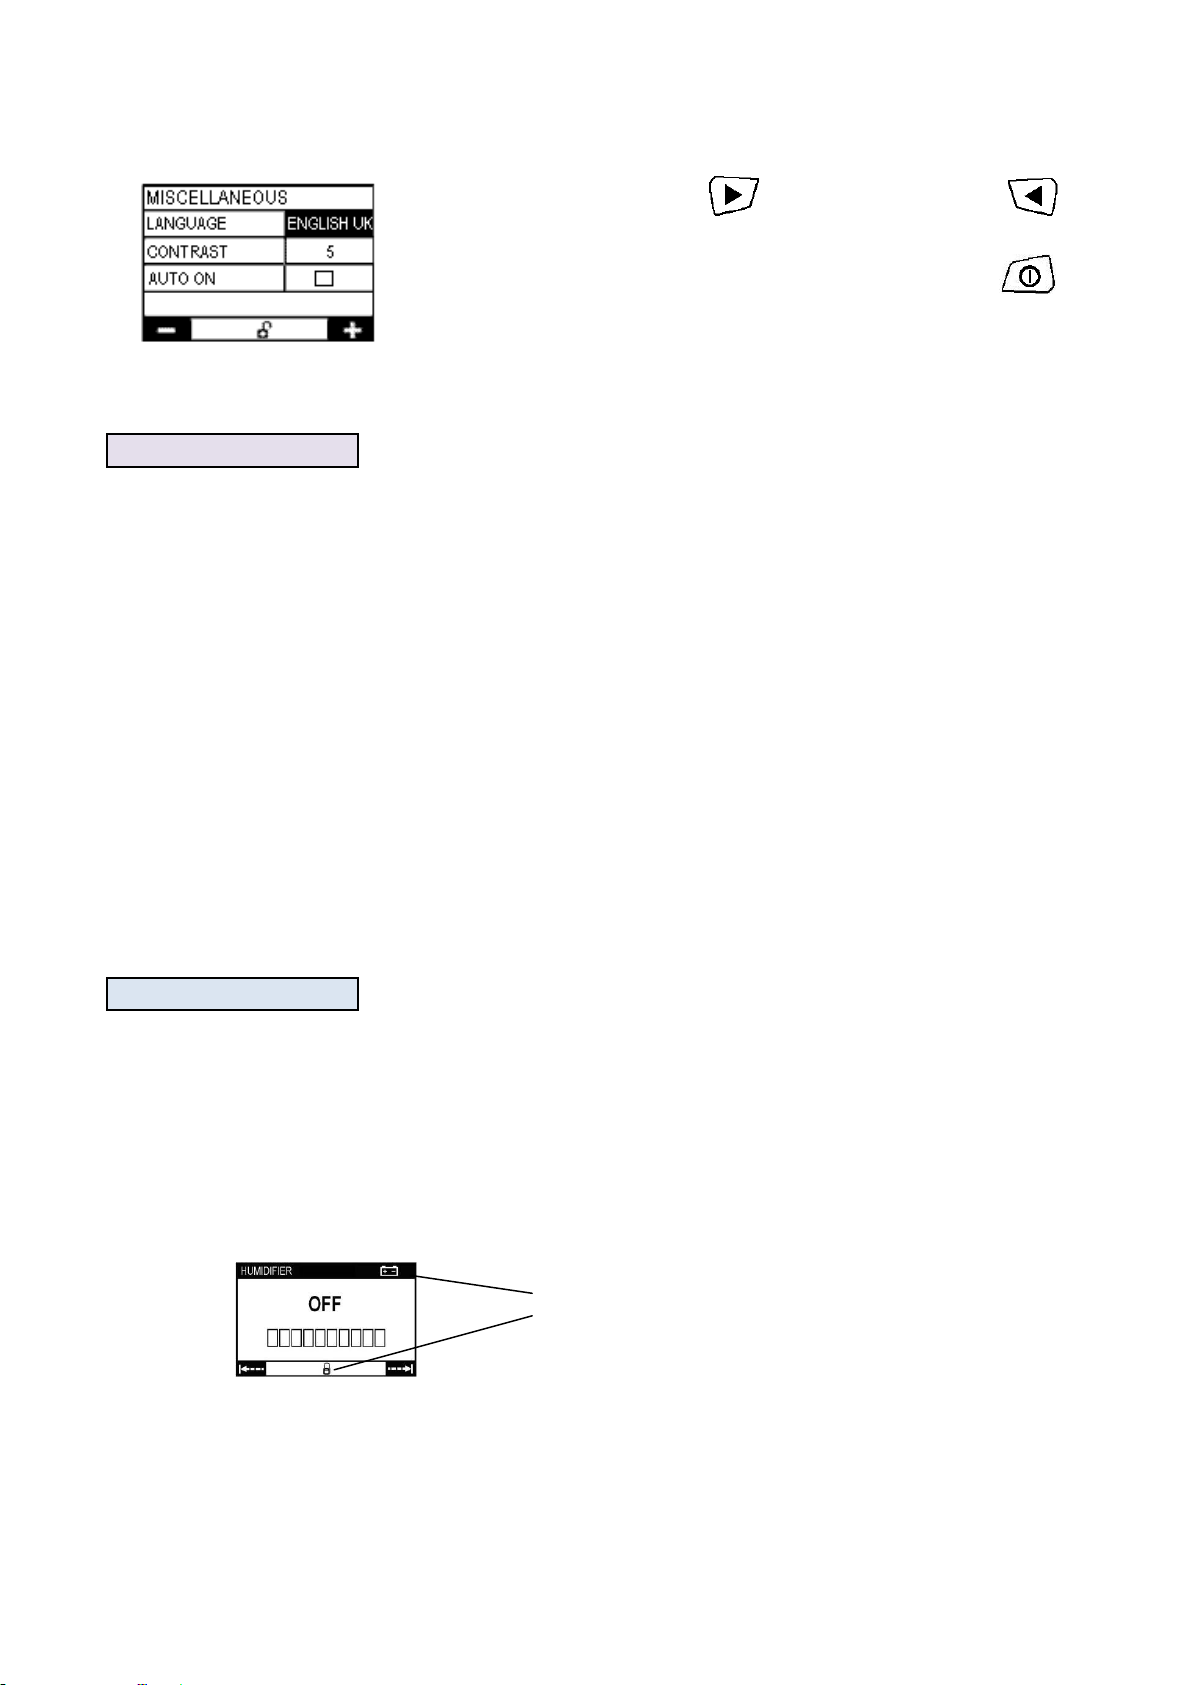
5. At the first power-on, the screen lights up and displays the language setting screen:
Press the right control button or the left control button as
many times as necessary to display the desired language.
After the language is selected, press the On/Off button to
return to the page header, then press this button a second time to
exit the menu.
6. The display shows the time and date. The device is ready to operate.
WARNING
There is a risk of air leakage if the water chamber or the cover is not installed correctly, which could cause the
applied pressure to deviate from the prescribed pressure.
Installation for use with battery power or (optional)
cigarette-lighter cable
The DreamStar™ product range device can be powered by a rechargeable 12 volt optional special
battery by connecting the battery cable to the inlet of the external battery of the device (item 7 of
Figure 2 page 6.
The device can also be powered from a cigarette-lighter socket using an optional cable specially
designed for this purpose. For this configuration, replace Step 4 of the standard installation
procedure with the following step:
Connect the power cable to the input of the external battery of the device (Item 7 of Figure 2
page 6) and the other end of the cable directly to the cigarette lighter socket.
Continue with steps 5 through 6 of the standard installation procedure.
CAUTION
Do not use a battery power cable other than the one supplied with the battery.
Do not connect the battery power cable to a 24 volt cigarette-lighter cable.
Do not use a 24 volt battery.
Do not connect to the DreamStar™ product range device a 12-volt power supply plugged in the mains.
Note:
When the device is battery-powered, the heated humidification feature (if included) cannot be used and the
following screen page is displayed after the settings button has been pressed:
Indicates that the humidifier is not
functioning because it under
battery power.
10 Operation DreamStar Duo, DuoST
Operation
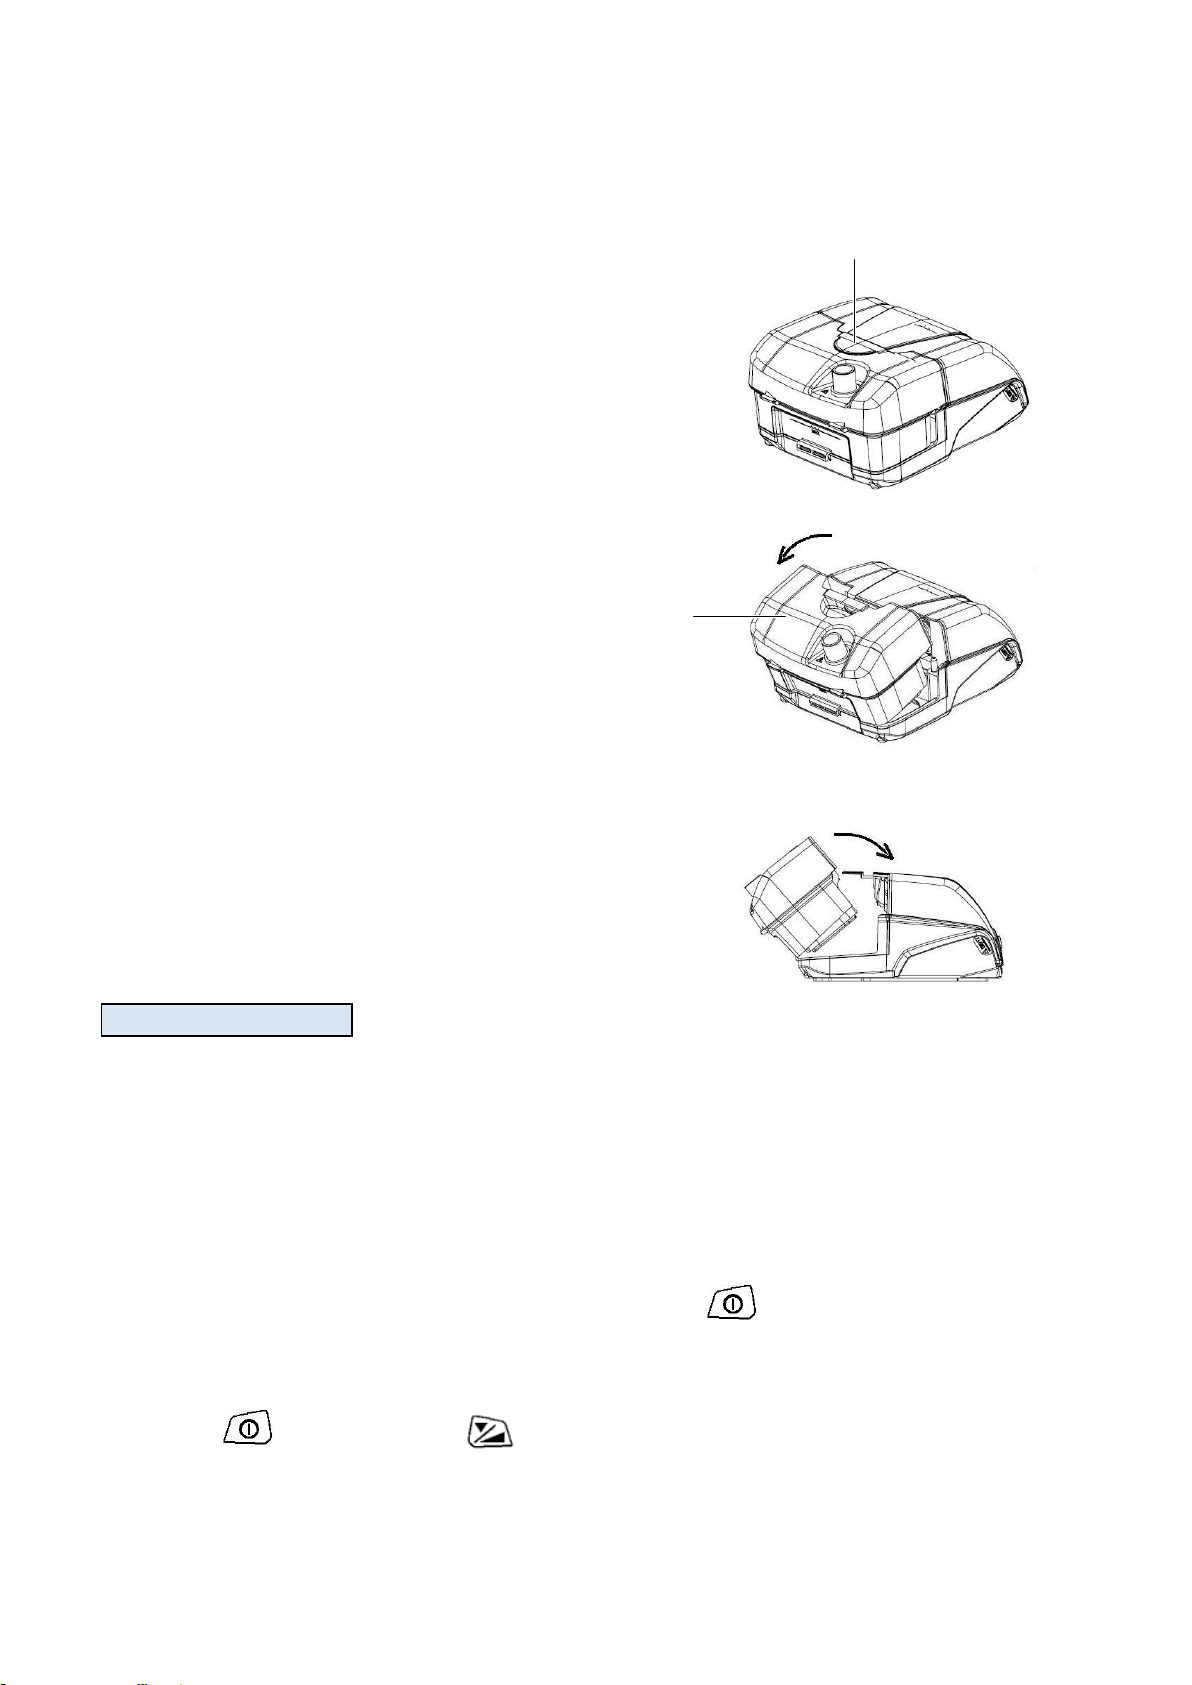
Filling the water chamber (if included)
1. Switch off the device and remove the
patient tubing. Press with your fingers at
the "Push" marking on the top of the unit
to separate the water chamber from the
device.
2. Tip the tank back and remove the tank
from the device.
3. Fill the water chamber (through the upper orifice) to the maximum level mark.
4. Reattach the water chamber to the rear of
the device
CAUTION
Be careful not to exceed the maximum fill level.
Do not add any other product to the water in the water chamber.
Do not use alkaline solution (physiological saline solution).
Use only room temperature water; do not fill the water chamber with hot or chilled water.
Starting Treatment
1. Put your mask on as described in the user instructions. If the Auto ON feature has been enabled
by your health care provider, the device will start during your first breathings in the mask.
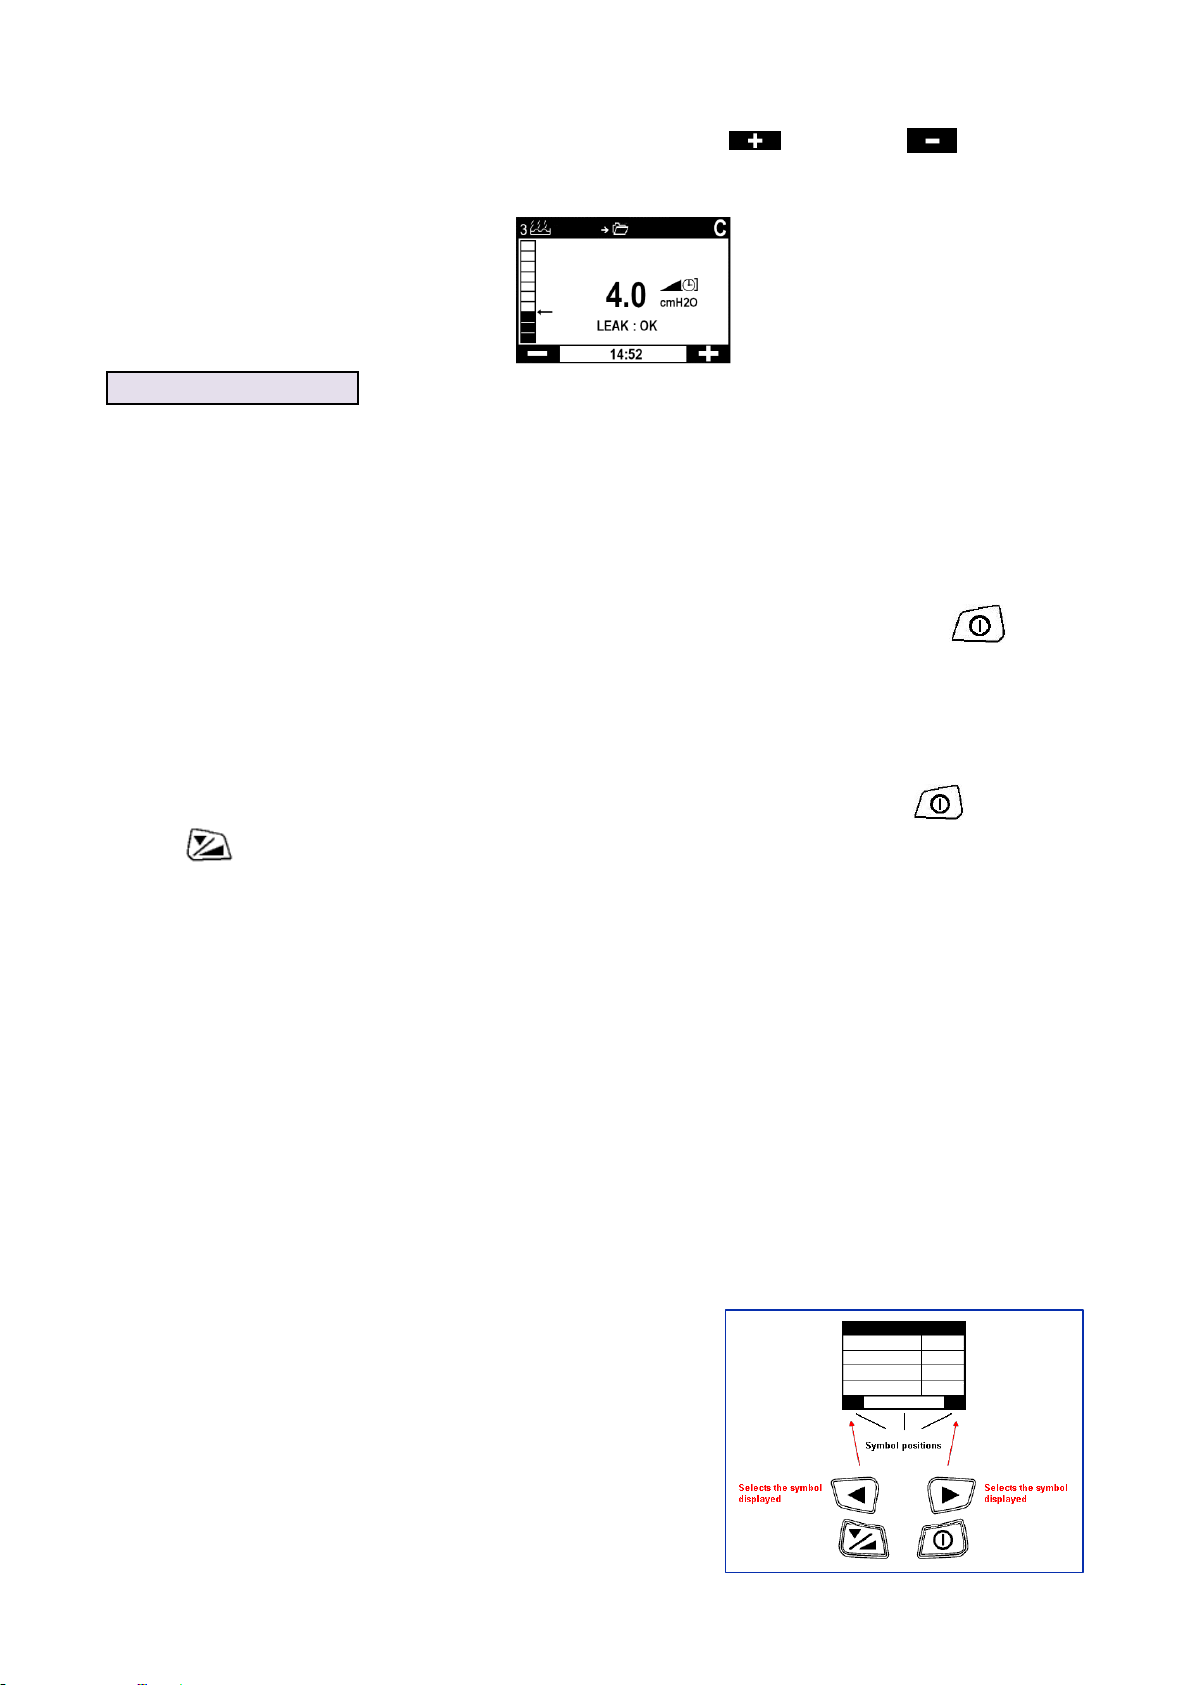
2. Otherwise, to start treatment, press the On/Off button . The device screen displays the
delivered pressure.
3. If the message “MASK UNPLUGGED" displays on the screen, this means that the mask is not
connected properly. Reposition your mask correctly to eliminate the leaks, and press the On/Off
button or the ramp button . The device will restore the set pressure and the message
"MASK UNPLUGGED" will disappear.
4. Lie down and place the tubing so that it can follow your movements while you sleep.
5. The symbols that may be displayed on the screen are summarized in the table entitled
"Description of symbols displayed on the screenhea" on page 12.
Water Chamber
"Push" marking
DreamStar Duo, DuoST Operation 11
6. If your device includes a water chamber and if the humidification function has been activated, the
heated humidifier turns on automatically. You can increase or decrease the heat level
by moving the arrow at the bargraph using the right or left parameter settings button, as shown
hereafter.
WARNING
Following a power supply interruption, the device will resume the same mode it was in (on/off) before the
disconnection.
Stopping Treatment
1. Remove the mask.
2. Turn off the DreamStar™ product range device by pressing the On/Off button for two
seconds.
Mask unplugged feature
If you remove your mask, the device automatically switches to low power. The machine will restore
normal power when you reconnect you mask or if you press the On/Off button or the ramp
button . Otherwise, the device will stop after 30 minutes. This feature can be used at night if you
need to get out of bed.
Accessing the device menu
The four buttons on the front of the device allow you to access the device settings menu, scroll
through different pages, or possibly modify the value of certain parameters within these pages.
The parameters are accessible when the machine is in standby or operating mode.
The parameters that are accessible are grouped on several screen pages indicating:
device settings related to prescribed treatment
general device settings, such as date and time
recorded compliance data
reminders
Description of a screen page
Each screen page includes:
a first line or page header
up to 4 parameter lines with associated values
a final line showing the various symbols used for
such features as changing a parameter value,
moving about a page, or moving from page to
page (see table entitled “Description of symbols
displayed on the screen").

12 Operation DreamStar Duo, DuoST
Description of symbols displayed on the screen
Symbol
Description
Symbol
Description
Access to device information.
Access to device settings.
Provides access to the next page
available for display on the screen.
Provides access to the preceding
page displayed on the screen.
Allows the value of the parameter
displayed on the screen to be raised.
Allows the value of the parameter
displayed on the screen to be
lowered.
The heated humidification feature is
activated without heat or on a device
connected to a battery.
Heated humidification feature
enabled with heat.
The symbol blinks if the heated
humidifier has a problem.
Parameters displayed on the screen
can be changed.
Parameters displayed on the screen
are for information and cannot be
changed.
Feature enabled.
Feature disabled.
YES.
NO.
Ramp feature.
The symbol blinks when the ramp
feature is selected but still disabled.
Patient respiratory cycle indicator (on
DreamStar™ DuoST or DreamStar™
DuoST Evolve.)
C
CPAP operating mode.
B
Bilevel operating mode (two pressure
levels).
Vt
Tidal volume.
Indicates that compliance is being
recorded.
LEAK
Indicates the leak level.
Displays OK, +, ++, +++, ++++.
DD/MM/YYYY
The dates displayed by the device are
in the format day/month/year.
The symbol blinks when one or
several patient reminders are about
to expire.
Memory card present.
The symbol blinks if the memory card
is not operational.
Indicates that a battery is connected.
Indicates that a remote control is
connected.
The device has detected an operating
error. The symbol displays alternately
with the error code.
For settings specific to the DreamStar™ Duo or DreamStar™ Duo Evolve device, see "How to set the
DreamStar™ Duo / Duo Evolve device", on page 15.
For settings specific to the DreamStar™ DuoST or DreamStar™ DuoST Evolve device, see "How to set
the DreamStar™ DuoST / DuoST Evolve device", on page 20.
The General Information menu for the devices is described on page 25.

DreamStar Duo, DuoST Operation 13
Available features
The device operates either in constant mode (CPAP), or in Bilevel mode, which delivers two levels of
pressure (one inspiratory and one expiratory). Additionally, the ST model allows a backup frequency
to be set.
The device includes an integrated power supply and can be equipped with a humidification function
(Evolve configuration), which can be enabled or disabled by the home care provider.
The patient reminder feature can help you remember events, such as filter and mask changes, device
inspections, and memory card compliance data downloads on the memory card. This feature, which
is identical on all of devices in the product range, is described under "Reminders about to expire", on
page 25.
Ramp feature
If enabled by your home care provider, the Ramp feature allows for a gradual rise in pressure to help
you fall asleep: the treatment begins at a reduced pressure called comfort pressure, then the
pressure increases to treatment pressure. In Bilevel mode, the pressure is reduced to the comfort
pressure and then raised to the inspiratory positive airway pressure (IPAP) pressure and the
expiratory positive airway pressure (EPAP).
Pressure Alter
If it is enabled by the physician or home care provider, this feature provides the option to change the
prescribed pressure by 1 cmH2O.
Note:
This feature is only available in CPAP mode.
Transporting the device
Unplug the device and disconnect the accessories from the device. Store them in the carrying case.
DreamStar™ or DreamStar™ Evolve device with cover
You must separate the cover from the device. Detach the cover from the machine by pressing on
"Push" at the top of the device. Then, lift the cover back and remove it from the device. Place the
cover and the device in the separate compartments of the carrying case.
DreamStar™ Evolve device with water chamber
You must remove the water chamber from the device and drain it. Detach the water chamber from
the machine by pressing on "Push" at the top of the device. Then, lift the water chamber back and
remove it from the device. Disassemble it by following the instructions under "Cleaning and
Maintenance", on page 29 and empty the water chamber completely. Place the chamber and the
device in the separate compartments of the carrying case.
CAUTION
To eliminate any risk of introducing water into the device and thereby causing irreversible damage, the water
chamber must be completely emptied before moving or transporting the device.

14 Operation DreamStar Duo, DuoST
Using a memory card
An external storage medium can be used either to store the most recent compliance data stored in the
device, or to update your device's setting parameters. Refer to the instructions given by your home care
provider to use this card. If the device is running, turn it off before you insert the memory card into the
memory card connector: the symbol appears to the right of the display header. If this symbol
flashes, the card is inserted incorrectly, or inserted upside down, or it is not operational. Reinsert it
correctly, and if the symbol is still flashing, contact your home care provider.
Updating Settings
If the care provider has configured the memory card to update the settings of the machine, the
device will start automatically when inserting the card into it. Once the update is complete, a
message appears asking to remove the card. Remove it. This operation can be performed only once.
Data Download
Data download starts automatically when inserting the card into the machine. An indicator allows the
progress of the data downloaded to be monitored. Once the data has been recorded, a message
displays on the device "DOWNLOAD FINISHED. REMOVE MEMORY CARD." The memory card can then
be given to your home care provider.
Notes:
The download data and update settings functions are only accessible if the device is in standby.
If the card is left inside the device, the machine cannot be turned on and no feature can be accessed.
DreamStar Duo, DuoST How to set the DreamStar™ Duo / Duo Evolve device 15
How to set the DreamStar™ Duo / Duo
Evolve device
Accessing the settings menu
To access the device settings, press the right control button to select the symbol
displayed on the screen when the device is in standby only. In the Settings page display:
The symbol at the bottom of the screen indicates that it is impossible to change the
parameters displayed.
The symbol at the bottom of the screen indicates that the parameters displayed can be
changed:
oSelect the parameter to change by pressing the ramp button as many times as it is necessary
.
oIncrease or decrease the parameter value by pressing the control buttons.
To return to the page header, press the ramp button at the bottom of the page or the On/Off
button .
To move from one settings page to another, select the symbol displayed on the screen by
pressing the right control button . To return to the previous page, select the symbol by
pressing the left control button .
To exit the settings menu, press the On/Off button or wait 30 seconds.
Note:
In the following pages, the values displayed are given by way of example.
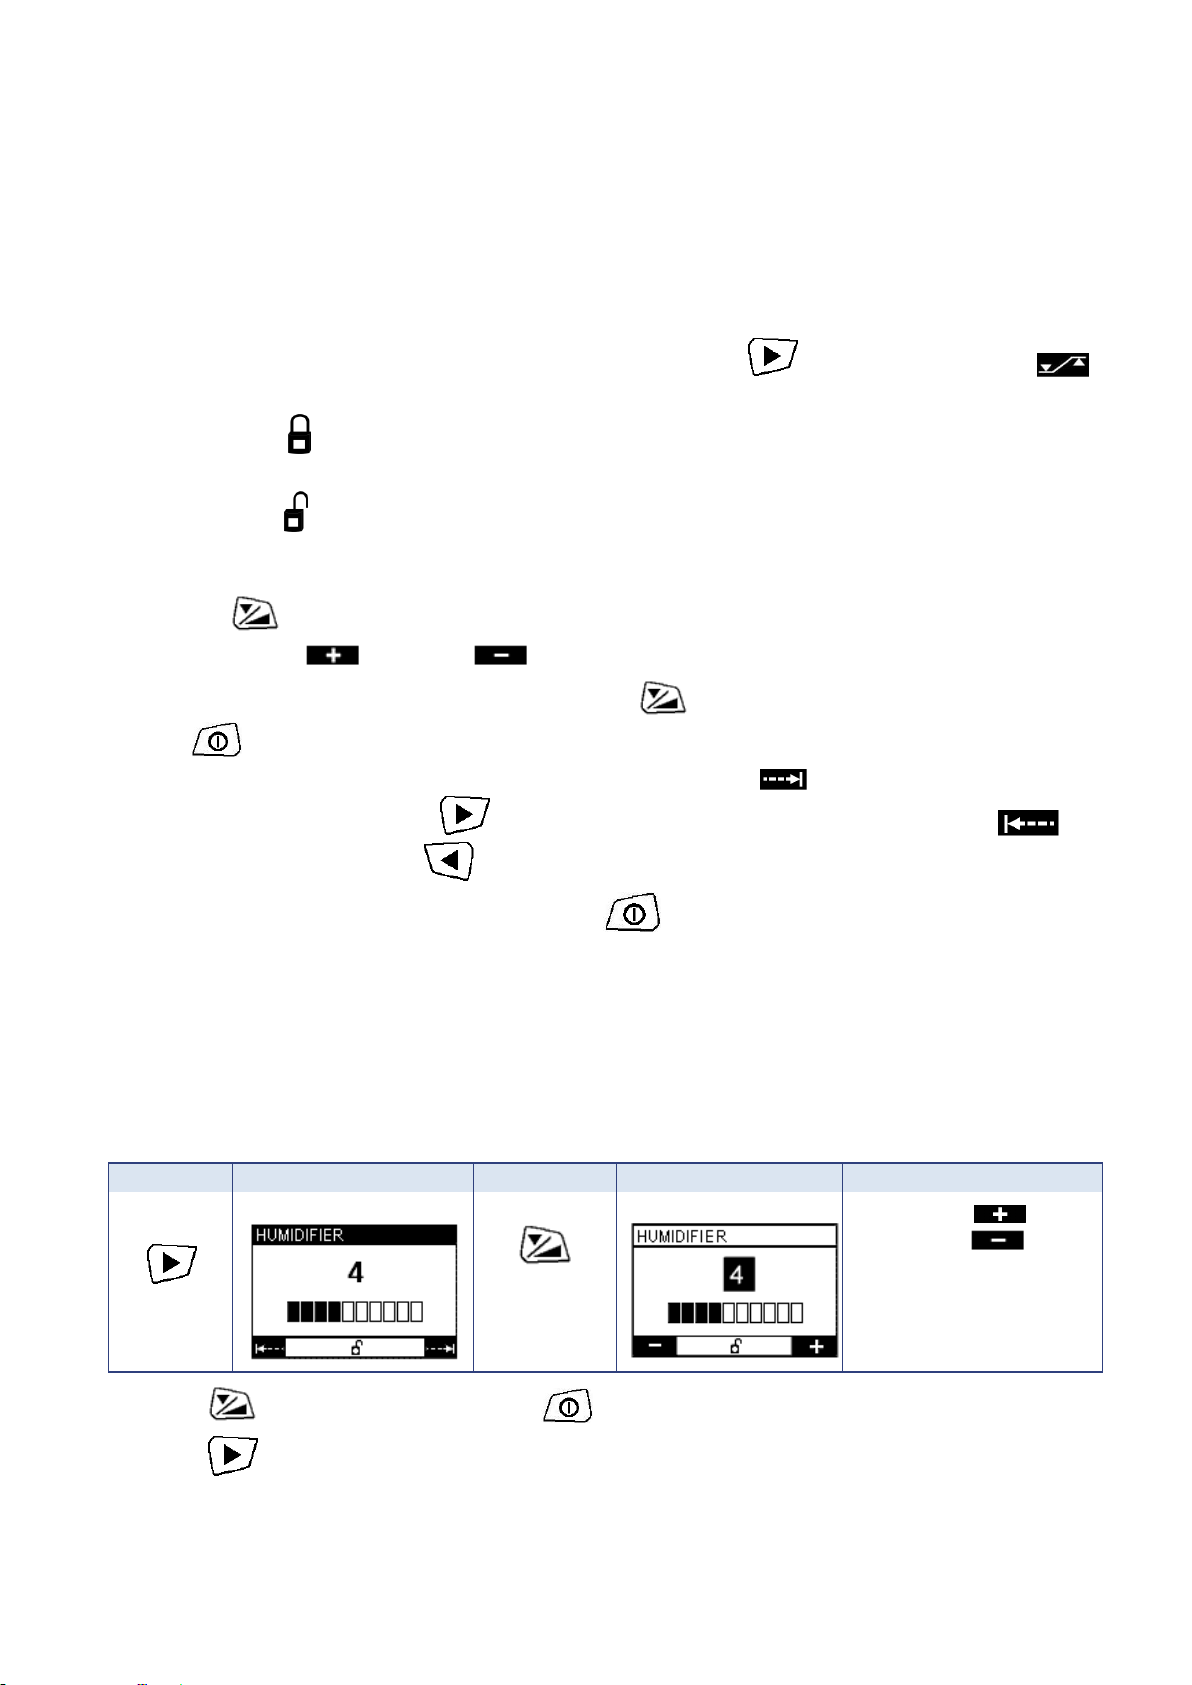
Step 1: Heat level (if the water chamber is included)
This page displays only when your home care provider has enabled the device’s heated
humidification feature.
Press
in standby or
operating
mode.
The page displays:
Press
to select the
setting.
The page changes:
Increase or
decrease the
parameter value with
the right or left
parameter settings
button.
Press at the bottom of the page or to return to the page header.
Press to move to the next page.
Note:
When the device is battery-powered, the heated humidification feature cannot be used (see paragraph
"Installation for use with battery power or (optional) cigarette-lighter cable page 9.

16 How to set the DreamStar™ Duo / Duo Evolve device DreamStar Duo, DuoST
DreamStar™ Duo or DreamStar™ Duo Evolve
Step 2: Settings
In CPAP mode
This page displays only if the ramp feature and (or) the Pressure Alter feature were activated by the
home care provider.
The page displays:
Press
as many times
as necessary to
access the
desired
parameter
setting.
The page changes:
Increase or decrease
the parameter value with the right
or left parameter settings button.
Then press to access the
next menu parameter.
Press at the bottom of the page or to return to the page header.
Press to move to the next page.
Comfort pressure: Level of pressure produced by the device when the ramp feature starts up.
Ramp time: Time the device takes to reach the prescribed pressure when starting from the comfort
pressure.
Pressure: set pressure, level of pressure prescribed, which may be altered by 1 cmH2O if the
Pressure Alter feature has been enabled by your home care provider.
In Bilevel mode
This page appears only if the ramp feature has been enabled by the home care provider.
The page displays:
Press
as many times
as necessary to
access the
desired
parameter
setting.
The page changes:
Increase or decrease
the parameter value with the right
or left parameter settings button.
Then press to access the
next menu parameter.
Press at the bottom of the page or to return to the page header.
Press to move to the next page.
Comfort pressure: Level of pressure produced by the device when the ramp feature starts up.
Ramp time: Set time for the device to reach the inspiratory positive airway pressure (IPAP) and the
expiratory positive airway pressure (EPAP) when starting from the comfort pressure.

DreamStar Duo, DuoST How to set the DreamStar™ Duo / Duo Evolve device 17
DreamStar™ Duo or DreamStar™ Duo Evolve
Step 3: Set Parameters Display
In CPAP mode
The page displays:
Prescribed P.: Level of pressure prescribed by your physician.
Pressure Alter: The symbol shows that the feature has been
enabled by the home care provider.
Max ramp time: Maximum ramp time set by the home care provider.
Press to move to the next page.
In Bilevel mode
The Pressure Alter feature is unavailable in Bilevel mode.
The page displays:
Max ramp time: Maximum ramp time set by the home care provider.
EPAP: Set expiratory pressure (low-pressure setting for expiratory
positive airway pressure).
IPAP: Set inspiratory pressure (high-pressure setting for inspiratory
positive airway pressure).
Press to move to the next page.
The page displays:
Pressure rise time: set by physician. Time the device takes to rise from
the expiratory positive airway pressure (EPAP) to the inspiratory positive
airway pressure (IPAP).
Inspi. Sens.: Inspiratory sensitivity set by physician (detection sensitivity
of the start of the inspiratory phase of respiration).
Expi. Sens.: Expiratory sensitivity set by physician (detection sensitivity
of the start of the expiratory phase of respiration).
Press to move to the next page.
18 How to set the DreamStar™ Duo / Duo Evolve device DreamStar Duo, DuoST
DreamStar™ Duo or DreamStar™ Duo Evolve
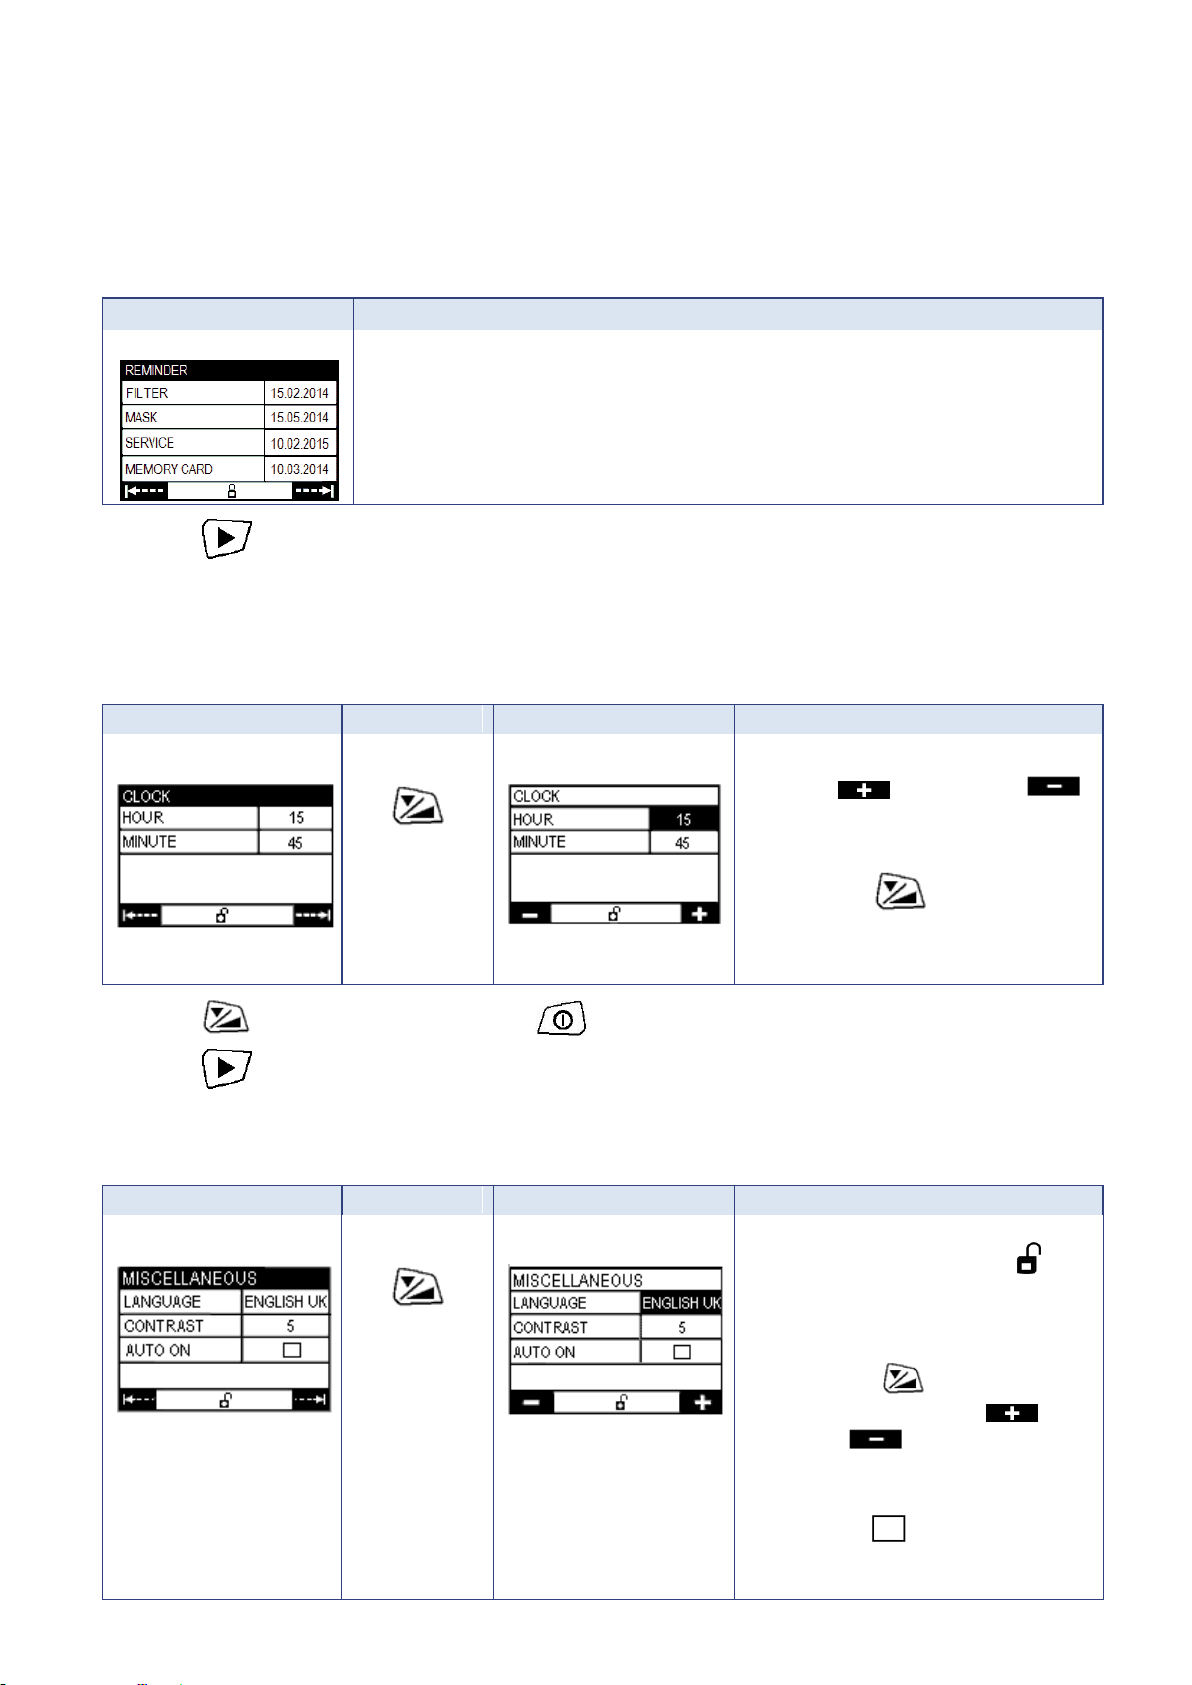
Step 4: Set Patient Reminders display
This page displays only if the home care provider has activated a reminder to remind you for example
to replace the filter or the mask.
The page displays:
The reminder activation date is shown opposite the corresponding
reminder.
Press to move to the next page.
Step 5: Setting the clock
The time can be set when the device is in standby only.
The page displays:
Press
as many times
as necessary
to access the
desired
parameter
setting.
The page changes:
Increase or decrease
the parameter value with the right
or left parameter settings button.
Then press to access the
next menu parameter.
Press at the bottom of the page or to return to the page header.
Press to move to the next page.
Step 6: Miscellaneous Settings
The page displays:
Press
as many times
as necessary
to access the
desired
parameter
setting.
The page changes:
If your home care provider has
given you the feasibility , the
language can be selected by
successive presses on the left or
right parameters settings button.
Then press to access the
contrast. Increase or
decrease the contrast with
the right or left parameter settings
button.
The symbol indicates that the
Auto ON feature has not been
enabled by the home care provider.

DreamStar Duo, DuoST How to set the DreamStar™ Duo / Duo Evolve device 19
DreamStar™ Duo or DreamStar™ Duo Evolve
Auto ON : functionality allowing to automatically start the treatment without pressing the On/Off
button.
Press at the bottom of the page or to return to the page header.
Press to exit the menu.
20 How to set the DreamStar™ DuoST / DuoST Evolve device DreamStar Duo, DuoST
How to set the DreamStar™ DuoST /
DuoST Evolve device
Accessing the settings menu
To access the device settings, press the right control button to select the symbol
displayed on the screen when the device is in standby only. In the Settings page display:
The symbol at the bottom of the screen indicates that it is impossible to change the
parameters displayed.
The symbol at the bottom of the screen indicates that the parameters displayed can be
changed:
oSelect the parameter to change by pressing the ramp button as many times as it is necessary
.
oIncrease or decrease the parameter value by pressing the control buttons.
To return to the page header, press the ramp button at the bottom of the page or the On/Off
button .
To move from one settings page to another, select the symbol displayed on the screen by
pressing the right control button . To return to the previous page, select the symbol by
pressing the left control button .
To exit the settings menu, press the On/Off button or wait 30 seconds.
Note:
In the following pages, the values displayed are given by way of example.
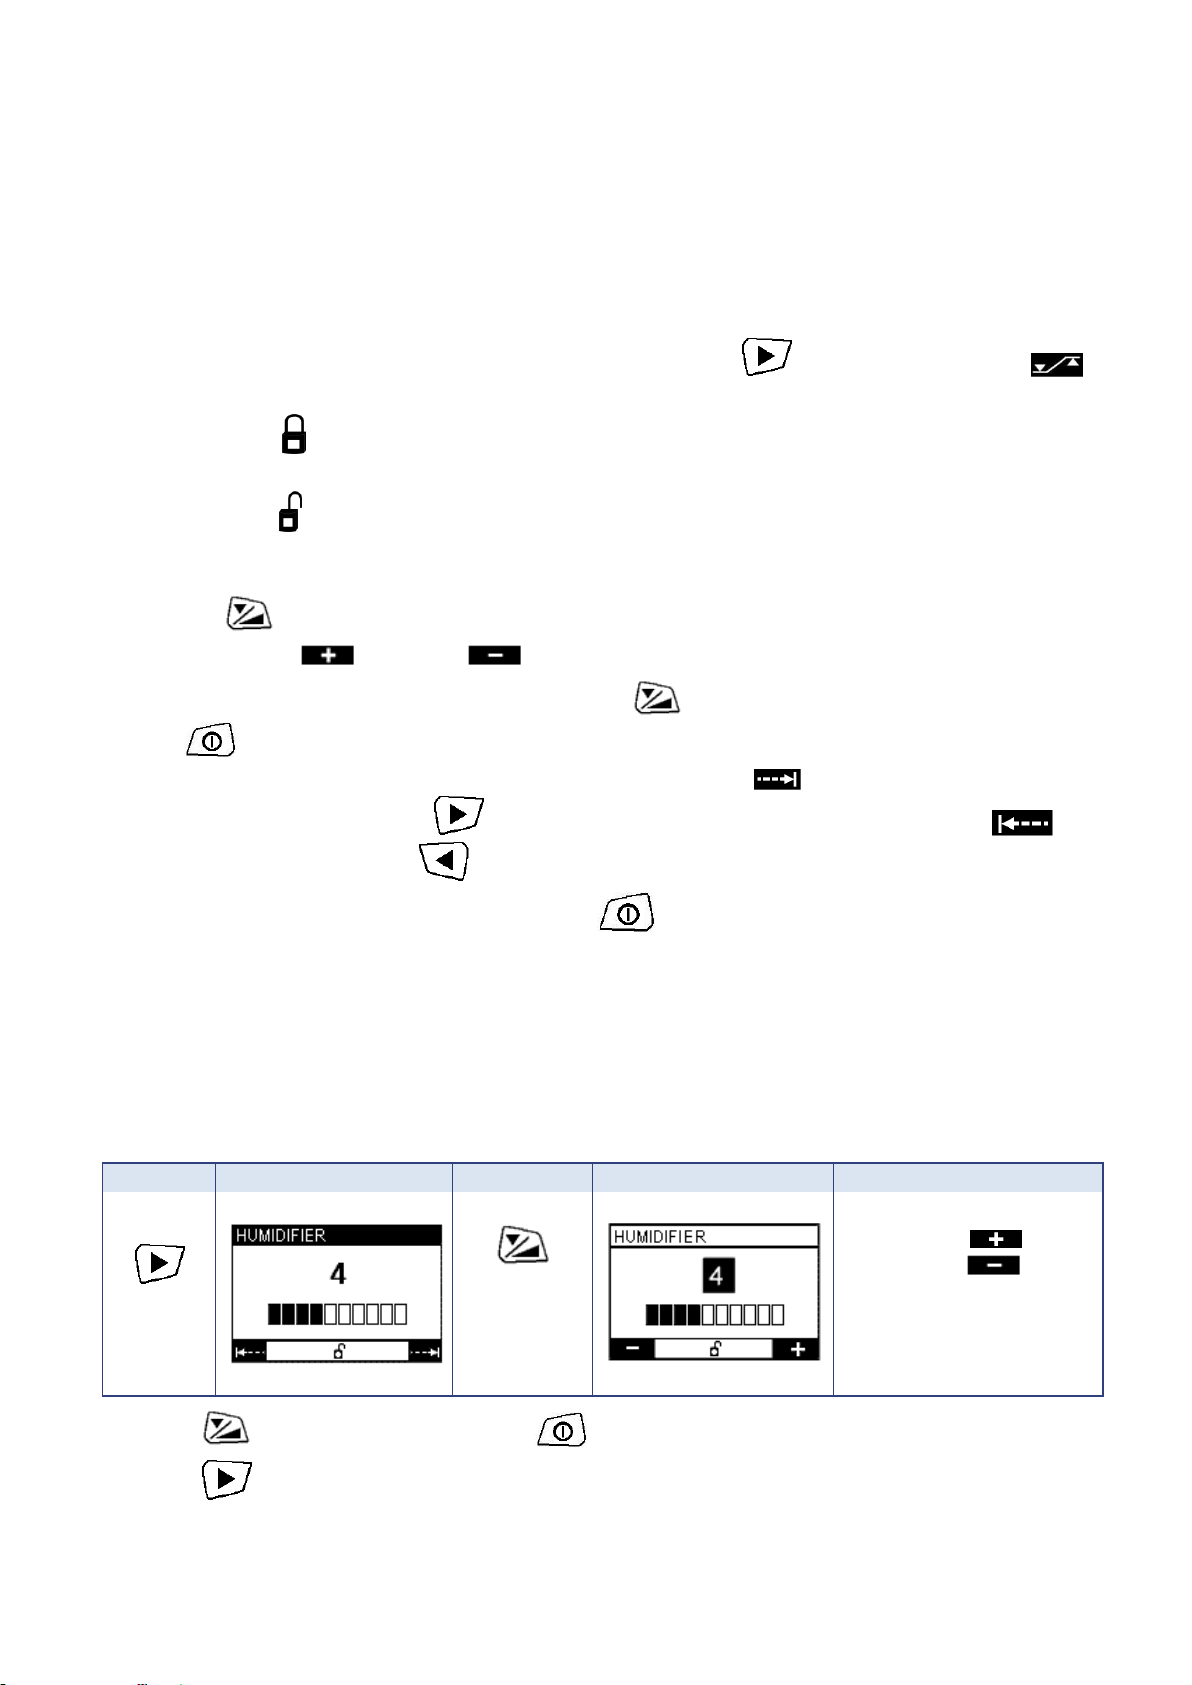
Step 1: Heat level (if the water chamber is included)
This page displays only your home care provider has enabled the device’s heated humidification
feature.
Press
in standby
or
operating
mode.
The page displays:
Press
to select the
setting.
The page changes:
Increase or
decrease the
parameter value with the
right or left parameter
settings button.
Press at the bottom of the page or to return to the page header.
Press to move to the next page.
Note:
When the device is battery-powered, the heated humidification feature cannot be used (see paragraph
"Installation for use with battery power or (optional) cigarette-lighter cable page 9.
Other manuals for DreamStar Series
2
This manual suits for next models
4
Table of contents
Other SEFAM Humidifier manuals


