Sega Homestar Extra User manual

Jzool.com
1
This manual was created for the benefit of customers who shop at Jzool.com Co., Ltd. (http://jzool.com). It
is in no way a comprehensive manual, and is only intended to facilitate use of the product and communicate
essential (but not all) warnings. The creators and distributors of this manual are in no way affiliated with the
manufacturer of the product and will not be liable for any harm, damage or inconvenience resulting from the
use of the product or interpretation of this manual.
Notes and warnings:
The best projection range for viewing is 2 to 2.3m from the screen or ceiling. At
this range the diameter of the projection should be around 2.7m.
The input voltage for this product is 100V-240V.
Do not turn the power on without setting a star disc first. The resulting light may
be powerful enough to damage your eyes if looked into directly.
The lens may get quite hot so please be careful not to touch it after use. Also, do
not project while the projector is on.
Keep away from moisture and from the reach of young children.
Set Contents
Your Homestar set should include the following items out of the box.
Main Unit
Star Discs (2 x Color, 1 x Monochrome)
AC Adapter (100-240V)
Remote Control Unit
Lens Cap
Manual (Japanese)
Supplementary Manual in English (This Document)
Warranty Card (Please note the warranty is effective in Japan only for 1 year after the
date of purchase. For more information on repair procedures please contact the seller)

Jzool.com
2
Basic functions
Star projection
Random meteors (shooting stars)
Diurnal motion
Diurnal motion speed adjustment
Off Timer
Parts of the Homestar main unit
1. Focus ring
2. Star disc tray
3. Projection angle adjuster
4. Power switch
5. Power indicator
6. Shooting star switch
Turns random shooting star function on and off.
7. Shooting star function active indicator.
8. Diurnal motion switch
Turns on the motion of the stars around the celestial poles.
It can be set to N (counter clockwise motion) to simulate
views in the Northern Hemisphere or S (clockwise) for the
Southern Hemisphere.
9. Diurnal motion indicator
Indicates the direction of diurnal motion.
10. Speed button
Adjust the speed of diurnal motion according to the
following three levels.
Slow: 30 minutes/revolution
Medium: 15 minutes/revolution
Fast: 3 minutes/revolution
11. Speed Green: slow, Orange: medium, Red: fast
12. Off timer
13. Off timer indicator
14. Infra red light receptor for remote control
15. Heat exhaust
16. Projection unit
17. Main power switch
18. AC power plug (Uses 100-240V AC power)

Jzool.com
3
Using your remote
16. The reset button is located on the underside of the remote
You should use the reset button after changing batteries or when
You find that that operation has become unstable.
To assist you in the dark, backlights on the remote will turn on
automatically when any button is pressed. Please make sure to
operate the remote only when the backlight is on. Lights will turn off automatically after 10
seconds of inactivity on the remote.
Please do not press two buttons at the same time as it may lead to unstable operation.

Jzool.com
4
Inserting your star disc
The top surface is the side on which any text
appears normal and legible. Match the wedge on
the star disc against the protrusion on the holder.
Once set, slide the star disc holder back into
place.
The included star discs are for the sky as can be seen from Japan. However, if your
location is between the latitudes of 30 and 45 degrees North (for example, the vast
majority of the United States), the star discs should fairly accurately depict the stars in your
region as well.
For the remainder of the manual, any numbers in brackets (#) will indicate the
corresponding button to press on the remote.
Basic Operation Place the Homestar on a flat surface. For best viewing results place
the Homestar roughly 2 – 2.3m (6.5 to 7.5 ft) away from the ceiling.
Plug the device into a 100-240 V power supply. To prevent blinding
from sudden light, do not turn the Homestar on before plugging it in.
Insert the star disc of your choice. The Homestar comes with three
discs. See top of page for details.
Make sure to slide it in horizontally.
Turn the power on (11). You’ll hear a single beep and the power LED
will turn green. It takes about 4 seconds for the light to reach
maximum brightness. Also note that the brightness is set to
maximum by default but can be adjusted using the remote (3).
When you finish using the Homestar press the power button (11) on
the remote. You’ll hear two beeps and the power LED will change to

Jzool.com
5
red to indicate that the power has been turned off.
Adjusting your Homestar
To adjust the projection angle, push on the release button as shown
in the diagram and rotate the unit.
The angle can be adjusted in 5 degree increments from 0 to 90
degrees (vertical to horizontal position). Do not force the unit
beyond 90 degrees.
Once at the desired angle, release the button to fix the unit in
position.
You may experience distortion or blurring if the projection surface
is not perpendicular to the unit.
Next, adjust the ring at the top of the unit to bring the projected
image into focus. If the image is still blurry there’s a possibility that
the unit is too close or too far away from the ceiling.
Do not look into the light source while its on or you may
cause serious damage to your eyes.
Use the remote to adjust brightness if necessary. The no. 3 buttons on the remote (see
“Using your remote”)
To replace/switch a star disc first
turn off the unit, then remove the
tray.
Follow the instructions on page 4 to
replace the star disc.

Jzool.com
6
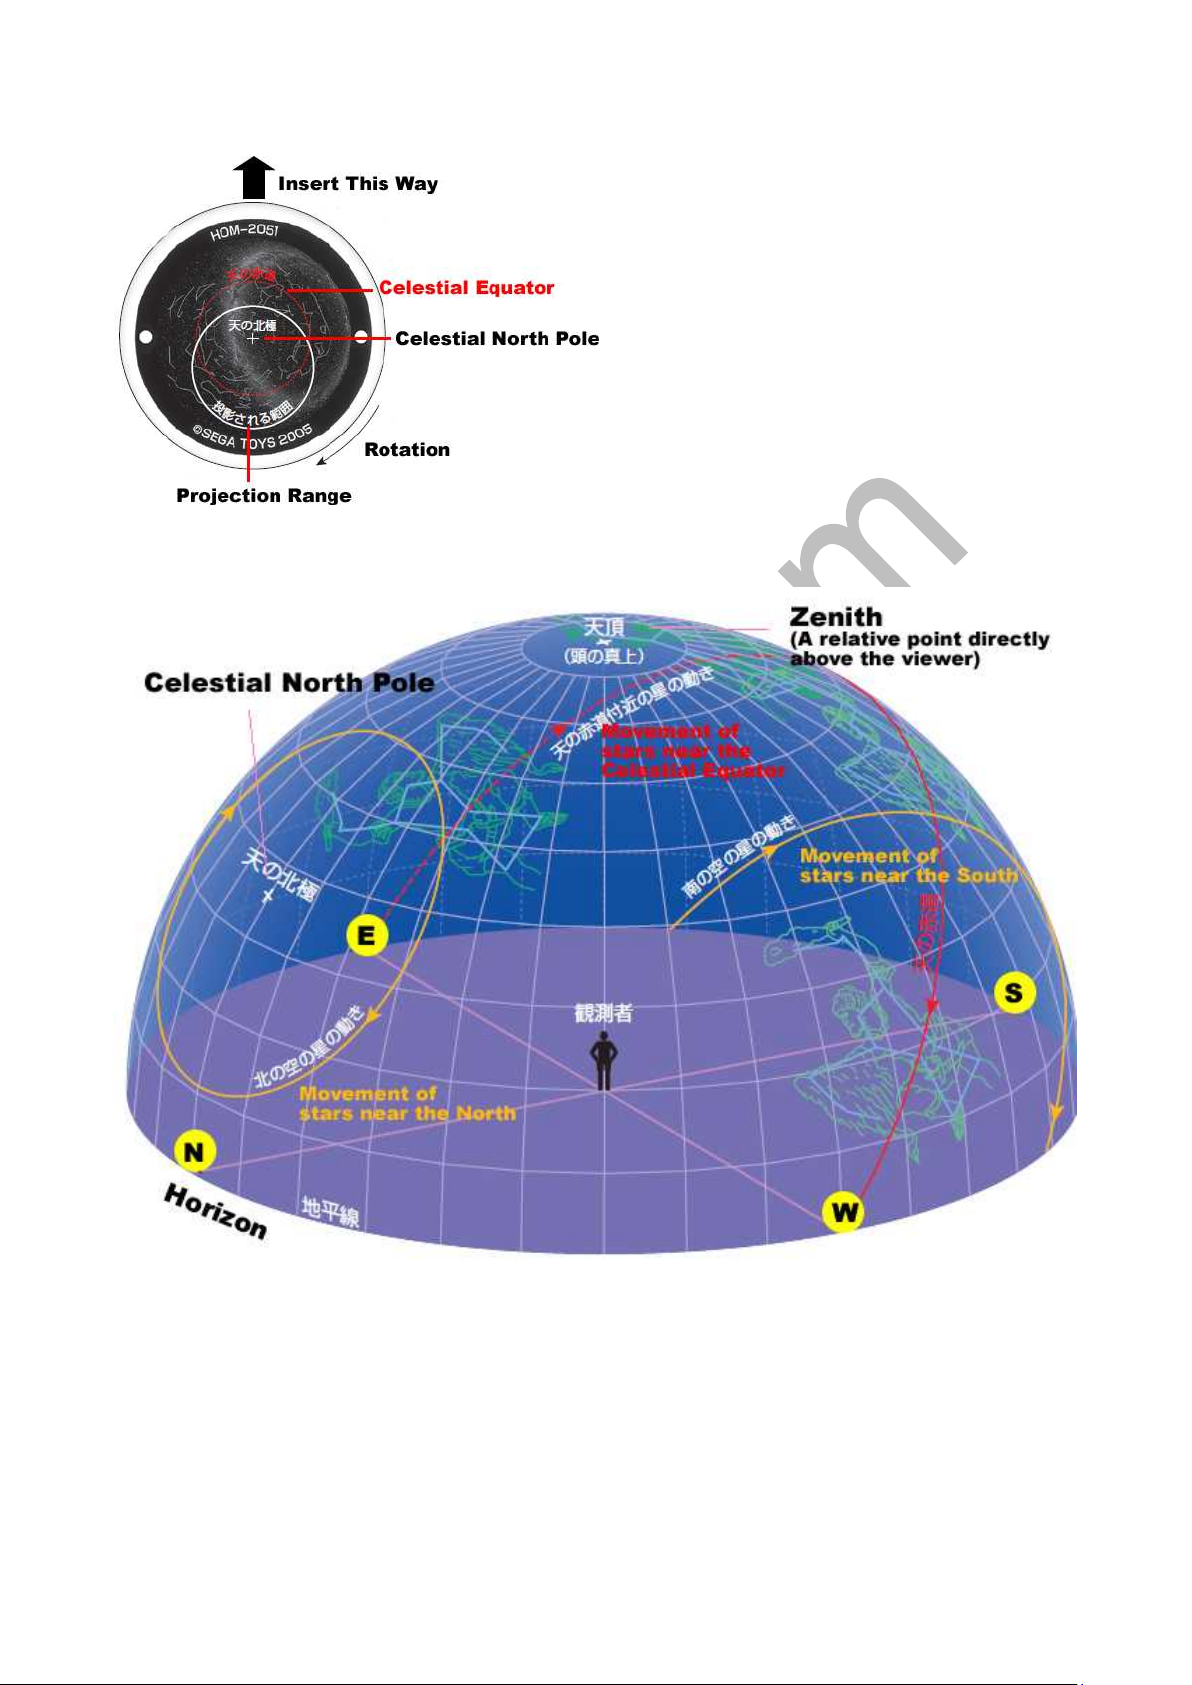
Understanding the Diurnal Motion
The movement of the sky with respect to the rotation of the
Earth is called Diurnal Motion and is simulated on the
Homestar by the rotation of the star disc. In the Northern
Hemisphere the sky will appear to rotate counter-clockwise
whereas if you’re standing somewhere in the Southern
Hemisphere the sky will move clockwise. So depending on
which type of star disc you’re using you will need to set the
correct direction for diurnal motion.
* The Homestar comes with three star discs, all of which
represent the skies seen in the Northern Hemisphere. So as
long as you’re using the default discs you should have diurnal
direction set to “N”.
Use button (14) on the remote to start or stop diurnal
motion. Press once for the Northern Hemisphere setting (See
the N lamp on the unit light up). Press again to switch to the
clockwise rotation of the Southern Hemisphere. If you press
one more time the diurnal motion will stop.
Use (13) to adjust the speed of diurnal motion. By default
the Homestar is set to complete one rotation every 15
minutes (equivalent to a day). Press the button to switch
between slow (30 min/rev) medium (15 min/rev) and fast (3 min/rev) respectively indicated
by green, orange and red lamp colors.
The random shooting star and off timer functions
Press the shooting star button (15) on the remote to cause
shooting stars to appear at random times. When the shooting star
function is active the SS lamp will turn orange.
Toggle the Off Timer button (12) on the remote to turn off the unit
after a certain amount of time has elapsed. You can switch between
15, 30 and 60 minutes. The timer is activated after you select the
desired time and press “Send”. Also note that the timer will reset
every time you perform an operation on the remote.

Jzool.com
7
Setting the projection time
You can set the Homestar to project the sky as it would appear at a certain date and time.
However, you should keep in mind that the Homestar is calibrated for Japan and regions with
similar latitudes. If your location is between the latitudes of 30 and 45 degrees North (for
example, the vast majority of the United States) the representation of the sky should be
fairly accurate. * This function does not work with the monochrome star disc.
Projecting the current time
While the unit is projecting, press “Send” (10) to have the unit project the
current time.
Specifying a time without committing it into memory
1. Press “Projection Time” (7)
2. Display will blink
3. Use the “Month” (4), “Day” (5) and “Hr/Min” (6) buttons to set the
projection time.
4. Select the diurnal motion direction. (8)
5. Confirm selection (9). Only the “:” on the display should be blinking at this point.
6. Press “Send” (10) to transfer the settings to the Homestar unit. The projection will
revolve and stop at the corresponding date and time.
Note that the display time will turn back to current time after 3 minutes and whatever projection time
you set will disappear from memory.
Specifying a time and committing it into memory
1. Press “Projection Time” (7)
2. Display will blink
3. Press “Projection Time” (7) again.
4. The memory placeholder “1” should start blinking.
5. Press “Confirm” (9)
6. Display will blink.
7. Use the “Month” (4), “Day” (5) and “Hr/Min” (6) buttons to set the
projection time.
8. Select the diurnal motion direction. (8)
9. Confirm selection (9). At this point the projection time will be committed to memory and
only the “:” on the display should be blinking.
10. Press “Send” (10) to transfer the settings to the Homestar unit. The projection will
revolve and stop at the corresponding date and time.
You can do the same to set up to four memory slots. To project a certain preset just press (7) until you
have the desire preset then press send (10).

Jzool.com
8
The celestial sphere and Homestar’s representation of the sky
The following sections are translations from the supplementary guide book.
When we look at the heavens it seems as if the stars are strewn across the surface of a great
sphere that surrounds the earth. This imaginary sphere is called the Celestial Sphere in
astronomical terms. Of course the actual sky consists of stars that are placed in vast
three-dimensional space each at varying distances from the Earth, so the two-dimensional
surface of the Celestial Sphere is merely conceptual.
The Homestar translates the surface of the Celestial Sphere to a flat, two-dimensional
representation which can be projected on your ceiling. The movement of the actual night sky
with respect to the rotation of the Earth is reproduced by the Homestar’s rotating star disc.
In actuality the Earth completes a rotation every 23 hours and 56 minutes. The Homestar
completes the rotation 120 times faster at 12 minutes per revolution.
The heavens revolve around a point called the Celestial Pole which corresponds to the point
above the axis of the Earth. So the direction beneath the celestial pole is always North. This
fact should give you an indication of direction when viewing the sky with the Homestar.

Jzool.com
9
The diagram on the left shows how to insert
a star disc for the Northern Hemisphere.
* Please note that the image at the edge of
the projection may appear blurry but this is
a limitation of the design and not a defect.
Here’s another representation of the Celestial Sphere. As the Sun rises in the East and sets
in the West, so do all the stars in sky. Constellations near the Celestial North Pole like the Big
Dipper will appear to rotate counter-clockwise whereas stars near the Celestial Equator will
appear to move across the sky in a great arc.

Jzool.com
10
The diagram on the left shows the movement of
the Big Dipper (the seven brightest stars of the
constellation Ursa-Major) which appears to
rotate around Polaris, the North Star.
The diagram below shows the movements of
Orion and Scorpius, two constellations that can
be seen close to the Celestial Equator.
Table of contents