Seiki SE40FYP1T User manual

1
En -
CONTENTS
Important Safety Instructions 2
Safety Information 3
Preparation 4
What's Included 4
Front View 5
Rear View 6
Installing the Stand 7
Removing the Stand for Wall-Mounting 7
Remote Control 8
Connecting External Devices 9
Customizing TV Settings 10
Initial Setup 10
Navigating the Setup Settings 11
Streaming 12
Media 13
Viewing Photos 13
Listening to Music 14
Source 14
Setup 15
Settings 15
Audio 16
Picture 17
Channel 18
Time 18
Network 19
Lock 21
Parental Control 22
Troubleshooting 24
Maintaining 25
Specication26
Limited Warranty 27
OTT APP Service 28

2
En -
IMPORTANT SAFETY INSTRUCTIONS
• Refer all servicing to qualified service personnel.
Servicing is required when the apparatus has been
damaged in any way, such as the power-supply cord
or plug is damaged, liquid has been spilled or objects
have fallen into the apparatus, the apparatus has
been exposed to rain or moisture, does not operate
normally, or has been dropped.
• Please keep the unit in a well-ventilated environment.
WARNING:Toreducetheriskofreorelectricshock,
do not expose this apparatus to rain or moisture.
The apparatus should not be exposed to dripping or
splashing. Objects filled with liquids, such as vases
should not be placed on apparatus.
WARNING: The batteries shall not be exposed to
excessiveheatsuchassunshine,reorthelike.
WARNING: The mains plug is used as disconnect
device, the disconnect device shall remain readily
operable.
WARNING: To reduce the risk of electric shock, do not
remove cover (or back) as there are no user-serviceable
partsinside.Referservicingtoqualiedpersonnel.
This lightning flash with arrowhead symbol
within an equilateral triangle is intended to
alert the user to the presence of non-insulated
“dangerous voltage” within the product’s enclosure that
may be of sufficient magnitude to constitute a risk of
electric shock.
The exclamation point within an equilateral
triangle is intended to alert the user to
the presence of important operating and
maintenance instructions in the literature accompanying
the appliance.
This equipment is a Class II or double insulated
electrical appliance. It has been designed in such
a way that it does not require a safety connection
to electrical earth.
This product contains electrical or electronic
materials. The presence of these materials
may,if not disposed of properly, have potential
adverse effects on the environment and human
health.
Presence of this label on the product means it
should not be disposed of as unsorted waste and
must be collectedseparately. As a consumer, you
are responsible for ensuring that this product is
disposed of properly.
• Read these instructions – All the safety
and operating instructions should be read
before this product is operated.
• Keep these instructions – The safety and
operating instructions should be retained for
future reference.
• Heed all warnings – All warnings on the
appliance and in the operating instructions
should be adhered to.
• Follow all instructions – All operating and
use instructions should be followed.
• Do not use this apparatus near water
– The appliance should not be used near
water or moisture – for example, in a wet
basement or near a swimming pool, and the
like.
• Clean only with dry cloth.
• Do not block any ventilation openings.
Install in accordance with the manufacturer’s
instructions.
• Do not install near any heat sources such
as radiators, heat registers, stoves, or other
apparatus(includingampliers)thatproduce
heat.
• Do not defeat the safety purpose of the
polarized or grounding-type plug. A polarized
plug has two blades with one wider than
the other. A grounding-type plug has two
blades and a third grounding prong. The
wide blade or the third prong are provided
for your safety. If the provided plug does not
tintoyouroutlet,consult anelectricianfor
replacement of the obsolete outlet.
• Protect the power cord from being walked on
or pinched particularly at plugs, convenience
receptacles, and the point where they exit
from the apparatus.
• Onlyuseattachments/accessoriesspecied
by the manufacturer.
• Use only with the cart, stand, tripod, bracket,
or table specified by the manufacturer, or
sold with the apparatus. When a cart is
used, use caution when moving the cart/
apparatus combination to avoid injury from
tip-over.
• Unplug this apparatus during lightning
storms or when unused for long periods of
time.

3
En -
SAFETY INFORMATION
To ensure reliable and safe operation of this equipment, please carefully read all the instructions in
this user guide, especially the safety information below.
Electrical Safety
• The TV set should only be connected to a main power supply with voltage that matches the
label at the rear of the product.
• To prevent overload, do not share the same power supply socket with too many other
electronic components.
• Do not place any connecting wires where they may be stepped on or tripped over.
• Do not place heavy items on any connecting wire, which may damage the wire.
• Hold the main plug, not the wires, when removing from a socket.
• During a thunderstorm or when not in using the television for long periods, turn off the power
switch on the back of the television.
• Do not allow water or moisture to enter the TV or power adapter. Do NOT use in wet, moist
areas, such as bathrooms, steamy kitchens or near swimming pools.
• Pull the plug out immediately, and seek professional help if the main plug or cable is damaged,
liquid is spilled onto the set, if the TV set accidentally exposed to water or moisture, if anything
accidentally penetrates the ventilation slots or if the TV set does not work normally.
• Do not remove the safety covers. There are no user serviceable parts inside. Trying to service
theunityourselfisdangerousandmayinvalidatetheproduct’swarranty.Qualiedpersonnel
must only service this apparatus.
• To avoid a battery leakage, remove batteries from the remote control, when the remote is not
use for long period, or when the batteries are exhausted.
• Donotbreakopenorthrowexhaustedbatteriesintoare.
• For best results, use type AAA (example-alkaline, carbon-zinc, etc.) batteries.
• Install only new batteries of the same type in your product.
• Failure to insert batteries in the correct polarity, as indicated in the battery compartment, may
shorten the life of the batteries or cause batteries to leak.
• Do not mix old and new batteries.
• Do not mix Alkaline, Standard (Carbon-Zinc) or Rechargeable (Nickel Cadmium) or (Nickel
Metal Hydride) batteries.
• Batteries should be recycled or disposed of as per state and local guidelines.
• Do not attempt to recharge disposable batteries.
• Do not short circuit battery terminals.
• Keep away from children.
Physical Safety
• Do not block ventilation slots in the back cover. You may place the TV in a cabinet, but ensure
at least 5cm (2’’) clearance all around.
• Do not tap or shake the TV screen, or you may damage the internal circuits. Take good care
of the remote control.
• TocleantheTVuseasoftdrycloth.Donotusesolventsorpetroleumbaseduids.
• Do not install near any heat sources such as radiators, heat registers, stoves or other
apparatus(includingampliers)thatproduceheat.
• Do not defeat the safety purpose of the polarized or grounding-type plug. A polarized plug
has two blades with one wider than the other. A grounding plug has two blades and a third
grounding prong, the wide blade,or the third prong is provided for your safety. If the provided
plugdoesnottintoyouroutlet,consultanelectricianforreplacementoftheobsoleteoutlet.
• Protect the power cord from being walked on or pinched particularly at plugs.
• Unplug the apparatus during lightning storms or when unused for long periods.
• Referallservicingtoaqualiedservicepersonnel.Servicingisrequirediftheapparatusdoes
not operate normally or if the apparatus, including the power supply cord or pulg, has been
damaged in any way.
• Servicing is also required if liquid has been spilled, or objects have fallen into the apparatus;
when the apparatus has been exposed to rain or moisture; or if the apparatus has been
dropped.
• Always connect your television to a power outlet with protective ground connection.
4
En -
User Manual
User Manual
PREPARATION
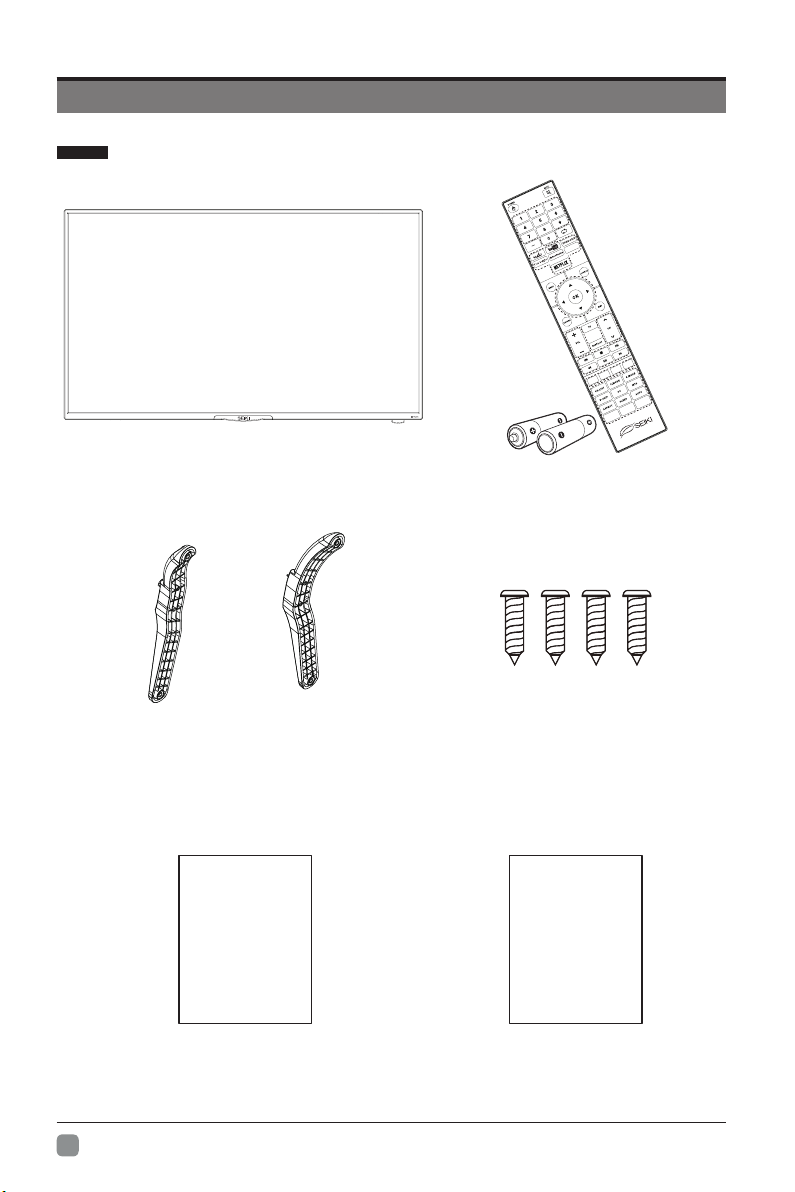
What's Included
Remote Control with Batteries
TV Set
Quick Start Guide
Quick
Start Guide
TV Stand Four Screws(TP4X14A-HO)
5
En -
PREPARATION
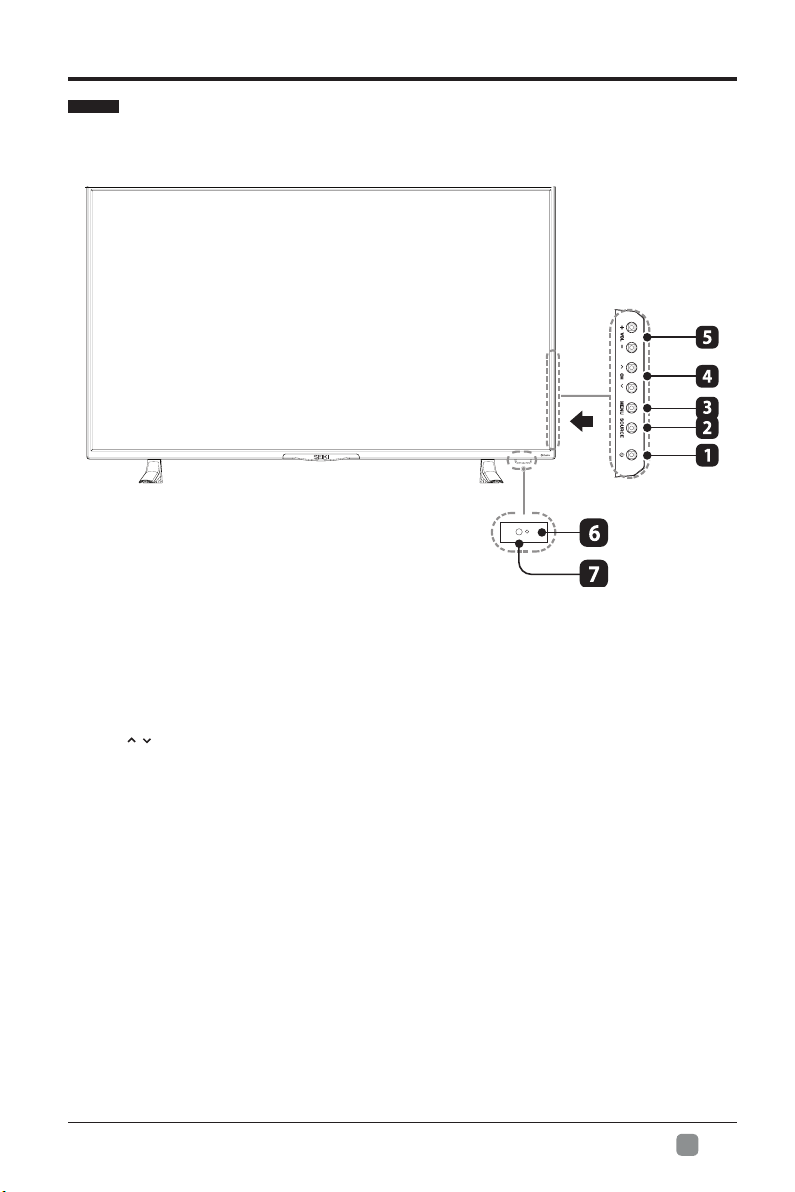
Front View
1. POWER
Switch the TV between On / Standby mode.
2. SOURCE
Press to select among different input signal sources.
3. MENU
Display the OSD (on screen display) menu.
4. CH /
Press to select a channel.
5. VOL +/-
Press to adjust the volume.
6. POWER Indicator
Illuminate blue when the TV is turned on. Illuminate red when the TV is in standby mode.
7. IR (Infrared Receiver)
Receive IR signals from the remote control.

6
En -
PREPARATION
Rear View
1. Power Cord
Connect to AC power outlet.
2. Headphone Socket
Connect to the Headphones.
3. USB Port
Connect to a USB storage device to play
compatibleaudioandphotoles.
4. LAN
Network connection port.
5. HDMI Input
ConnecttoaHigh-Denition(HD)signal
input device.
6. VGA Input
Connect to a computer or other devices
with a VGA interface.
7. PC AUDIO Input
Connect to a computer audio output.
8. DTV/TV Input
Connecttotheantenna(75ΩVHF/UHF)
socket with the RF coaxial cable.
9. OPTICAL Output
Connect a digital sound system to this
jack.
10. AUDIO Input
Connect to the AUDIO (L/R) output
sockets on external audio devices.
11. COMPOSITE/COMPONENT IN
Connect to AV devices with composite/
component (Y/Pb/Pr) video and audio
output sockets. COMPOSITE VIDEO and
COMPONENT(Y/PB/PR) share with AUDIO
IN (L/R).
2
HDMI 1
HDMI
3
HDMI
10

7
En -
PREPARATION
Installing the Stand
WARNING: This apparatus is intended to be supported by UL Listed wall mount bracket.
Removing the Stand for Wall-Mounting
• 1.Lay the TV face down on a flat,
cushioned surface to avoid damages
and scratches.
• 2.Untighten the 4 pcs screws holding
the stand assembly and remove them.
• 3.Attach the wall-mount bracket to
the TV using the mounting holes on
the back of the TV. Mount this TV
according to the instructions included
in the wall-mount bracket.
• 1. Lay the TV face-down on a flat,
cushioned surface to avoid damages
and scratches.
• 2. Fix the Left Base Stand to the main
unit using 2pcs provided screws.
• 3. Fix the Right Base Stand to the
main unit using 2pcs provided screws.
8
En -
PREPARATION
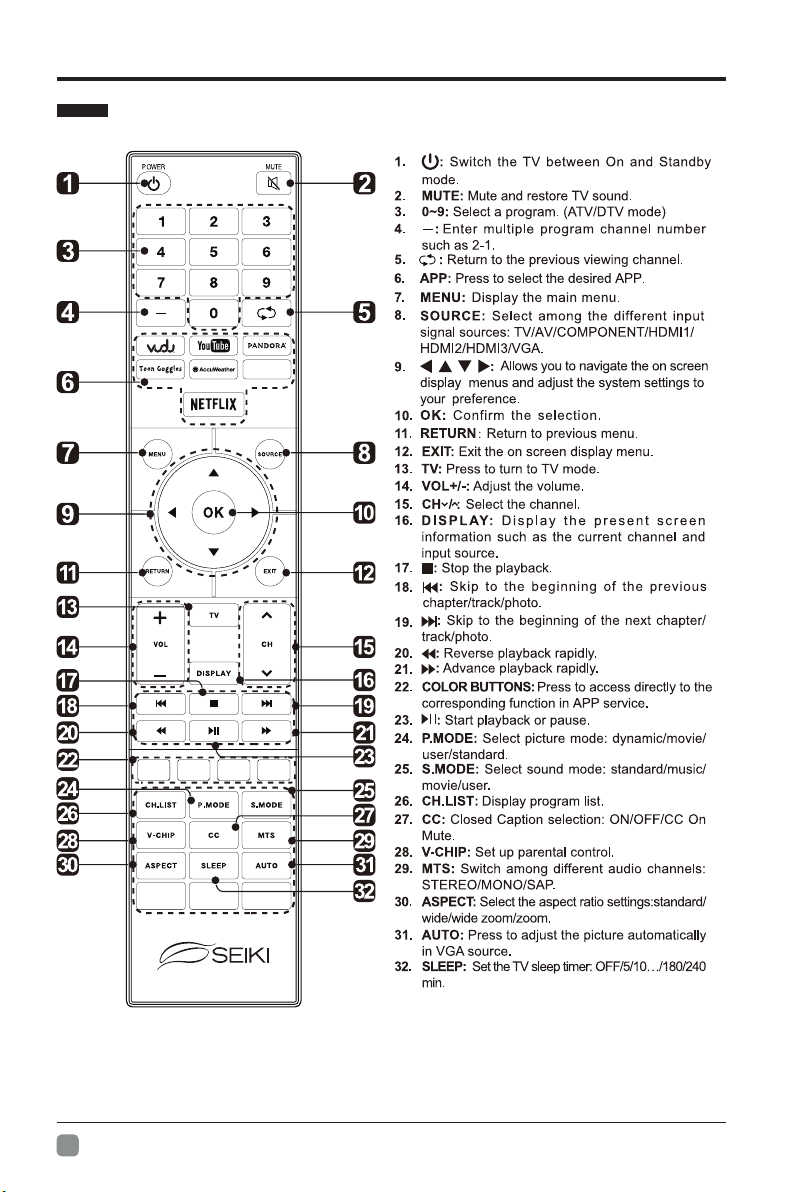
Remote Control

9
En -
CONNECTING EXTERNAL DEVICES
RF Cable(not included)
Audio Cable
(not included)
Composite/Component Cable
(not included)
Video Camera
Game Console
Blu-ray Player / Recorder
VCR Satellite Receiver
Satellite
Antenna Cable
OR
HDMI Device
Computer
Digital Audio System
VGA Cable
(not included)
3.5mm Audio
Cable
(not included)
Headphones
Cable
(not included)
HDMI Cable(not included)
Optical Cable
(not included)
2
HDMI 1
HDMI
3
HDMI
WIFI
Network Cable
(not included)

10
En -
CUSTOMIZING TV SETTINGS
Initial Setup
• Connect the power cord to the power socket after you have completed all the
physical connections. At this stage, the TV will enter Standby Mode and the red
LED indicator will illuminate.
• In Standby Mode, press the button on the main unit or on the remote control to
turn the TV on. The red LED indicator will turn blue.
• The first time you turn the TV on, it will go into the Setup Wizard. Press
buttons to select your desired mode and press OKtoconrm.
Home Mode : The picture mode will be Standard if you select
this mode.
Retail Mode : Select Dynamic Mode if you would like your
picture to be brighter. At times this mode may use more energy
to operate the Volume/Sound Mode and Picture Mode.
• The SLEEP-MODE Power should be less than 0.5 W.
5

11
En -
CUSTOMIZING TV SETTINGS
• Ifchannelscannotbefound,this
framewillbedisplayedautomatically.
Navigating the Setup Settings
• Press the MENU button to display the main menu.
• Use buttons to select SETUP menu and then press buttons to
navigate and select the available menu.
8
7
9
:Exit
MENU
12
En -
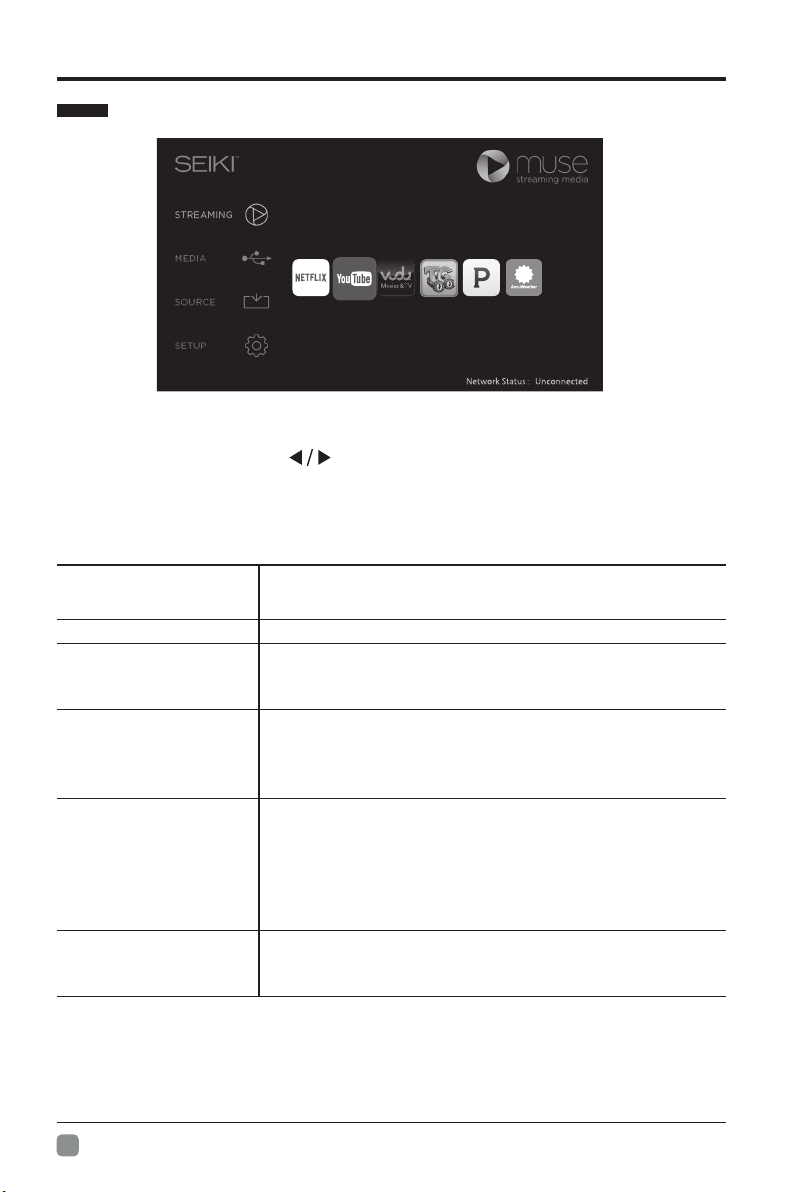
STREAMING
NETFLIX Enjoys TV shows & movies streamed instantly over the
Internet.
YouTube YouTube your way on the best screen in your house.
VUDU
Discover, watch and collect the latest movies and
TV shows in high quality 1080p. Free to sign up. No
subscriptions, late fees or commitments.
Toon goggles
A subscription video on-demand platform that offers
animated, fun and educational cartoons, engaging
games and songs from all over the world and in many
different languages to children.
Pandora
Free personalized radio that offers effortless and
endless music enjoyment and discovery. Just start with
the name of one of your favorite artists, songs, genres
or composers and Pandora will do the rest. It’s easy to
create personalized stations that play only music you’ll
love.
AccuWeather
Displays the current weather conditions and the
temperature anywhere in the world in centigrade or
Fahrenheit.
CUSTOMIZING TV SETTINGS
• Press the MENU button on the main unit or on the remote control to display the
STREAMING. Then press buttons to select the desired APP and press OK
button to view what you want. Or press the hotkey on the remote control to enter
the APP directly.
Note:After the TV connects to network, the status Unconnected will alter to
Connected.
13
En -
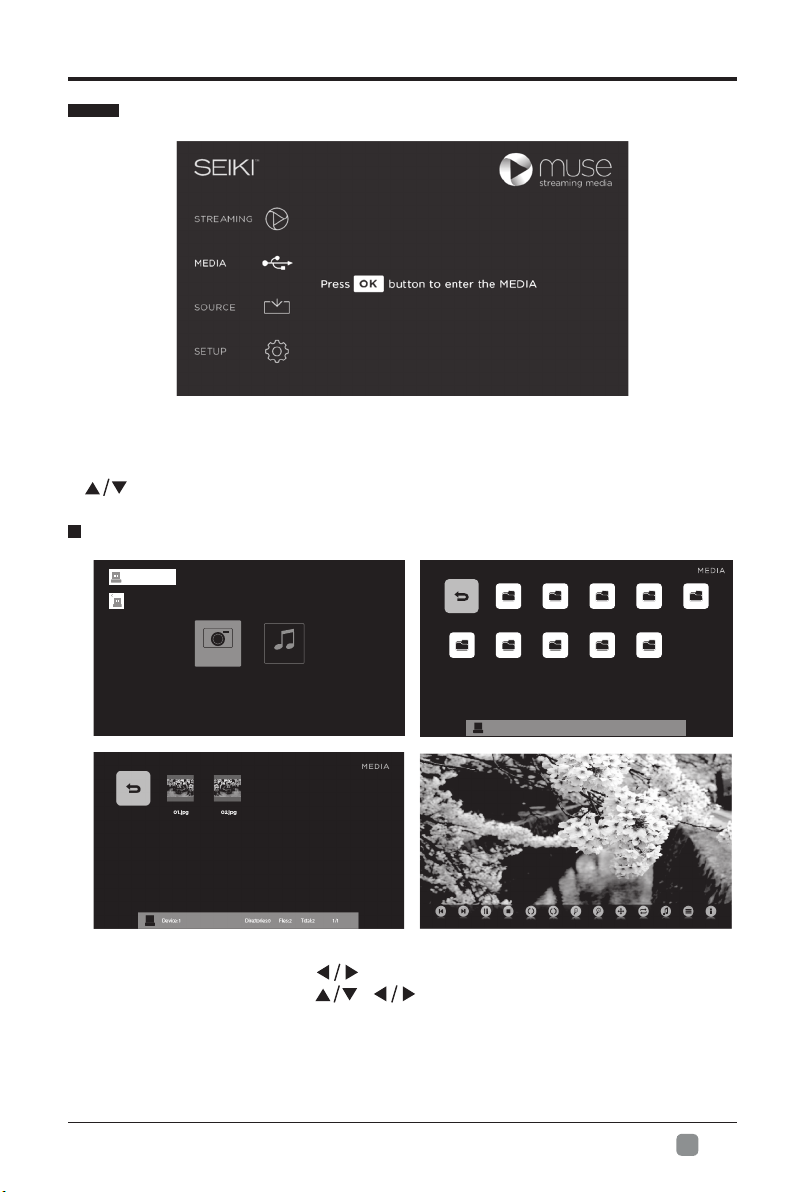
• After entering MEDIA, press buttons to select PHOTOS and then select the
disk type to enter. Then use / buttons to navigate in the picture folder
and then press OK button enter.
CUSTOMIZING TV SETTINGS
MEDIA
NOTE:Portable storage devices( USB disk or Hard disk) should be inserted.
• Press the MENU button on the main unit or on the remote control and then press
buttons to select the MEDIA, and then press OK button to enter.
Viewing Photos
Note: File format supported: JPEG.
Return WMAW MV WMEW MB WMC
WMDW MN WMTW MY WMU
Device: 1 Directories:10 Files:0 Total:10 1/1
MEDIA
MUSIC
PHOTOS
Device Found: 1

14
En -
• After entering MEDIA, press buttons to select MUSIC and then select the
disk type to enter. Then use / buttons to navigate in the music folder
and then press OK button enter.
CUSTOMIZING TV SETTINGS
Listening to Music
Note: File format supported: MP3.
SOURCE
• Press the MENU button on the main unit or on the remote control and press
buttons to select the SOURCE menu. Then press buttons to select different
input sources among: TV/ AV/ COMPONENT/ HDMI1/ HDMI2/ HDMI3/ VGA and
press OKbuttontoconrm.
Return WMAW MV WMEW MB WMC
WMDW MN WMTW MY WMU
Device: 1 Directories:10 Files:0 Total:10 1/1
Crazy in love.mp3 Vol.7
Status: Play
00 04 16
MEDIA
00 01 14
MEDIA
PHOTOS
MUSIC
Device Found: 1

15
En -
SETUP
CUSTOMIZING TV SETTINGS
• Press the MENU button on the main unit or on the remote control to display the
main interface. Then press buttons to select SETUP menu and press
button to select the desired option.
SETTINGS
• Press buttons to select SETTINGS menu and then press OK button to
enter. Press buttons to select the following setting options and then press
buttons to adjust each option’s setting.
Menu Language Select menu language : English, French or Spanish.
The default on-screen menu language is English.
Transparency Select to turn On/Off transparency function.
Zoom Mode
Select zoom mode : Wide/Wide Zoom/Zoom/Standard.
Note: Different input source, the zoom mode options
may differ.
Noise Reduction Reduce the noise level of the connected device: Off/
Weak/Middle/Strong.

16
En -
CUSTOMIZING TV SETTINGS
Advanced Adjust advanced option’s setting: H-POS, V-POS, Clock,
Phase or Auto. (VGA source mode only)
Closed Caption
CC Mode Select CC mode : On, Off or CC on Mute.
Basic
Selection
Basic Selection: CC1, CC2, CC3, CC4,
Text1, Text2, Text3, Text4.
Advanced
Selection
Advanced Selection: Service1, Service2,
Service3, Service4, Service5, and Service6.
Option
Options: Mode, Font, Size, Edge Effect,
Edge Color, Text Color, Background Color,
Text Opacity, Background Opacity.
DLC Select to turn On/Off the dynamic luminance control.
Restore Default Restore the TV to factory default settings.
• Press buttons to select AUDIO menu and then press OK button to enter.
Press buttons to select the following audio options and then press
buttons to adjust each option’s setting.
AUDIO
Sound Mode
Allow the selection of an audio-enhancement technique:
Standard/Music/Movie/User
Alternative: you may press the S.MODE button to select
the sound mode directly.
Bass Control the relative intensity of lower-pitched sounds. (For
User mode)
Treble Control the relative intensity of higher-pitched sounds. (For
User mode)
Balance Adjust the relative volume of the speaker in a multiple
speaker system.
SPDIF Mode Select the digital audio output mode between RAW/PCM.
Surround Sound Provide an enhanced listening experience.
Auto Volume Volume levels are automatically controlled.
Audio Language Select audio language among: English, French, Spanish
17
En -
CUSTOMIZING TV SETTINGS
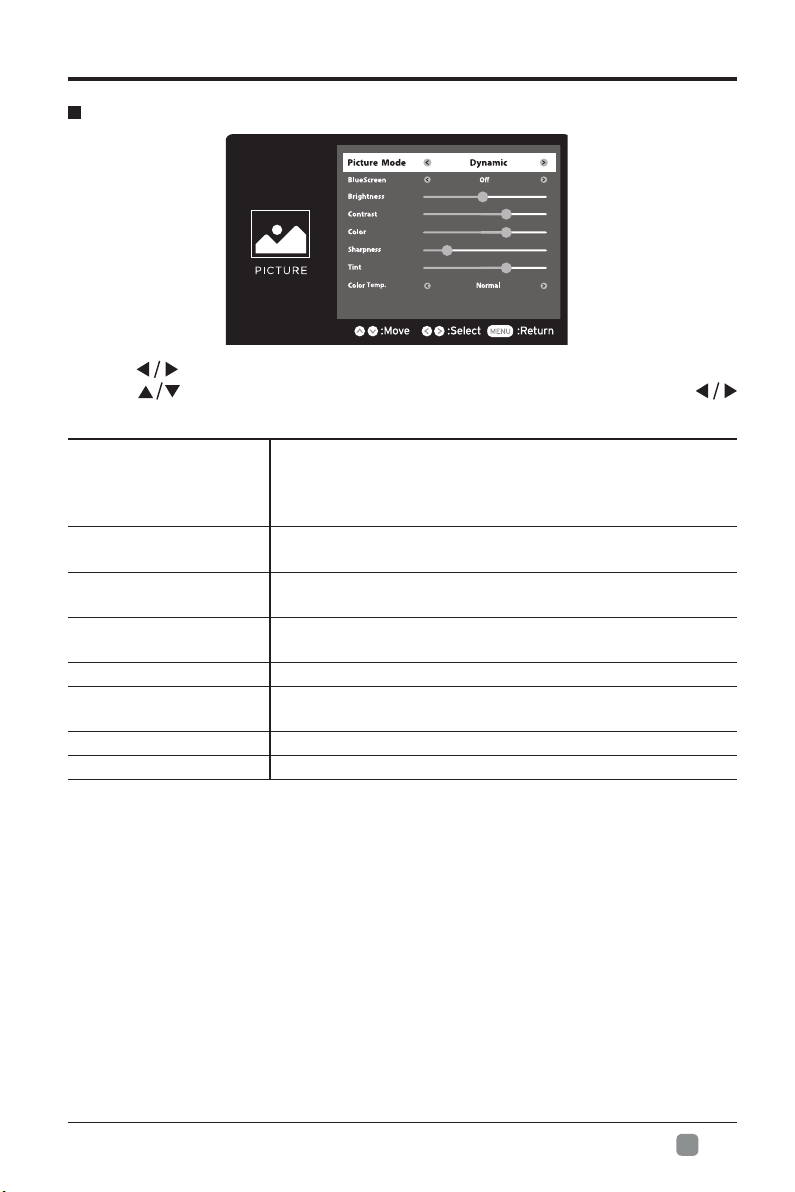
• Press buttons to select PICTURE menu and then press OK button to enter.
Press buttons to select the following picture options and then press
buttons to adjust each option’s setting.
PICTURE
Picture Mode
Cycle among picture mode: Dynamic/Movie/User/
Standard.
Alternative: you may press the P.MODE button to
select the picture mode directly.
Blue Screen Allow the blue background to turn On/Off during weak or
no signal conditions.
Brightness Increase or decrease the amount of white in the picture.
(For User mode)
Contrast Adjust the difference between light and dark levels in
the pictures. (For User mode)
Color Control the color intensity. (For User mode)
Sharpness Adjust the level of crispness in the edges between light
and dark areas of the picture. (For User mode)
Tint Adjust the balance between red and green levels.
Color Temp. Cycle among color temperatures: Cool/Normal/Warm.

18
En -
COSTOMIZING TV SETTINGS
• Press buttons to select CHANNEL menu and then press OK button to enter.
Press buttons to select the following channel options and then press
buttons to adjust each option’s setting.
CHANNEL
Air/Cable Select antenna between Air and Cable.
Auto Scan
First, select your cable system from Auto/STD/IRC/HRC.
Next, select the Auto Scan feature to scan your available
cable channels. It will perform the auto scan if the Air antenna
is selected.
Favorite Set the selected channel as favorite channels.
Show/Hide Show/Hide the selected channel.
Channel Name Display the current channel name.
Label Display the current channel label.
Signal Information Display the information of current signal.
• Press buttons to select TIME menu and then press OK button to enter.
Press buttons to select the following time options and then press
buttons to adjust each option’s setting.
TIME
19
En -
COSTOMIZING TV SETTINGS
Sleep Timer
Select a period of time after which the TV automatically
switches to standby mode: Off/5/10/…/180/240 min.
Alternative: You may press the SLEEP button repeatedly to
select the number of minutes directly.
Time Zone Select a Time Zone: Hawaii/ Alaska/ Pacific/ Mountain/
Central/ Eastern/ Atlantic/ Newfoundland.
Daylight Saving
Time Select to turn On/Off daylight saving time.
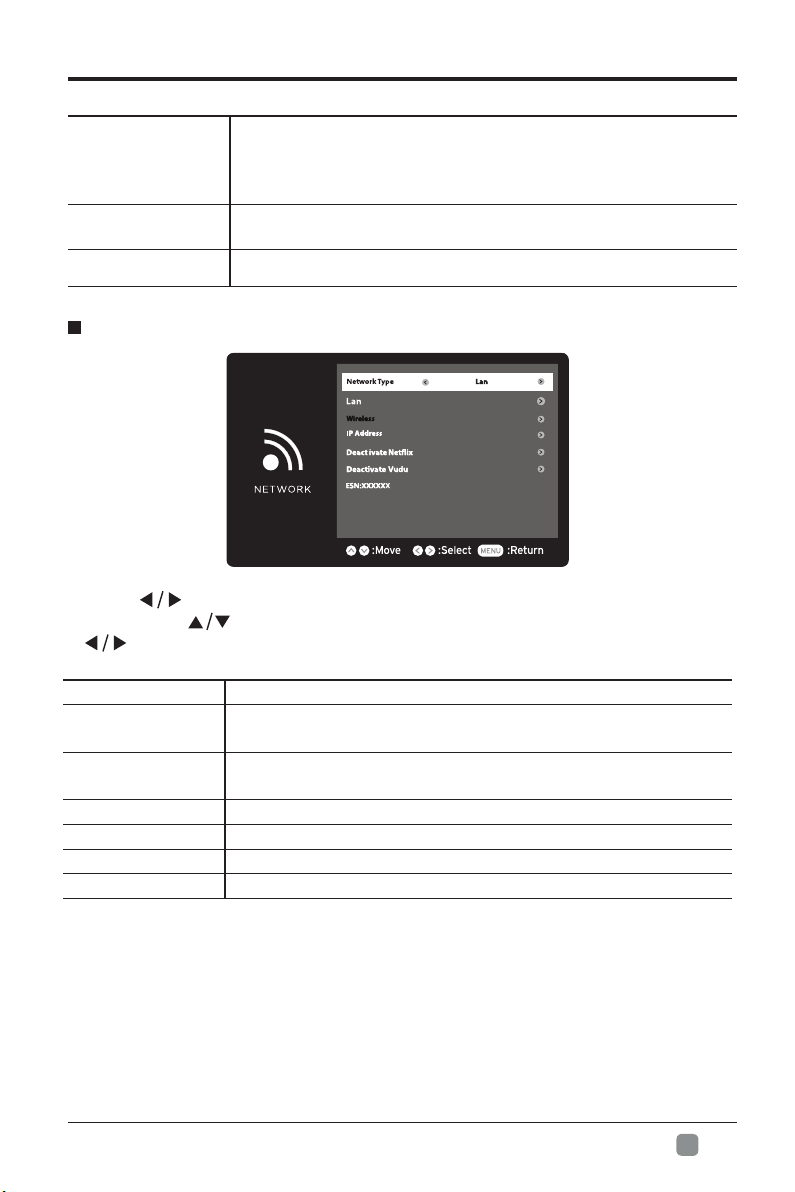
• Press buttons to select NETWORK menu and then press OK button to
enter. Press buttons to select the following network options and then press
buttons to adjust each option’s setting.
NETWORK
Auto Upgrade
• After the TV connects to network, the system will automatically detect software
version.
Network Type Select two types of network: Wireless or Lan.
Lan Connect the TV to the wired Lan: Auto Get IP/Manual Get
I P.
Wireless Connect the TV to the wireless network through searching
theavailableWi.
IP Address Display the current IP information.
Deactivate Netix DeactivateNetixandcleartheaccountinformation.
Deactivate Vudu Deactivate Vudu and clear the account information.
ESN Electronic Serial Number

20
En -
• If there is a new software, a menu screen will pop up reminding that it may lose
the current settings if starts the upgrade. Press Yes to enter.
• Then a menu bar will remind that the upgrade is fully automatic, and will start after
one minute later, please do not turn off the power during the upgrading.
• Below occasions are possible while your internet is connected to enjoy your OTT
services.
• 1.Please check your internet signal strength while internet is connected, signal
strength below 50 may result bad connection and non-smooth picture.
• 2.To enter OTT services, 30 second may be required for internet connection.
Reminder for internet connection:
Recommended 10Mb above internet speed
COSTOMIZING TV SETTINGS
This manual suits for next models
1
Table of contents
Other Seiki LED TV manuals

Seiki
Seiki SE32HY19C User manual

Seiki
Seiki SE321FB User manual

Seiki
Seiki SE39UY04 User manual

Seiki
Seiki SC-32AU300 User manual

Seiki
Seiki SE40FY19T User manual

Seiki
Seiki SE50FYOM User manual

Seiki
Seiki SE26HQ04 User manual

Seiki
Seiki SE131FS User manual

Seiki
Seiki SE60GY05 User manual

Seiki
Seiki SE40FY27 User manual

Seiki
Seiki SE55UET User manual

Seiki
Seiki SE55FGT User manual

Seiki
Seiki SE421TT User manual

Seiki
Seiki SE32HYT User manual

Seiki
Seiki SE42UMT User manual

Seiki
Seiki SE40FY19B User manual

Seiki
Seiki SE551GS User manual

Seiki
Seiki LED Series User manual

Seiki
Seiki SE58GY27T User manual

Seiki
Seiki SC-60UK850N User manual


