Seiwa SW RP07 User manual

SW RP07

Table of Contents
Introduction . . . . . . . . . . . . . . . . . . . . . . ............ . . . . . 3
Specifications . . . . . . . . . . . . . . . . . . . . ........... . . . . . . 4
Installation . . . . . . . . . . . . . . . . . . . . . . ........... . . . . . . .5
Operation . . . . . . . . . . . . . . . . . . . . . . . ........... . . . . . . .7
Key Functions . . . . . . . . . . . . . . . . . . . .......... . . . . . . . 7
Backlight Intensity . . . . . . . . . . . . . . . . . . . ......... . . . . 7
Display Speed Logs Water Temperature . . ........... . . . .7
Display Average Speed . . . . . . . . . . . . . . . ............ . . . .8
Display Trip Log . . . . . . . . . . . . . . . . ..................... . . .8
Display Elapsed Time . . . . . . . . . . . . . . . .................. . .8
Resetting the Trip Log Elapsed Time Clock . ...... . . . . 8
Display Start Setting the Race Timer . . . . . . . . . . . . . . 9
Calibrating Speed . . . . . . . . . . . . . . . . ................... . . 10
Selecting Speed & Log Units of Measure . . . . .... . . . 10
Selecting Average Speed Damping . . . . . . .. ......... . . 10
Calibrating Temperature . . . . . . . . . . . . . . ................. 11
Selecting Temperature Units (Deg. C F) . . ...... . . . . . 11
Calibrating Clock Speed . . . . . . . . . . . . . ............. . . . 11
NMEA 0183 Sentences . . . . . . . . . . . . . . ........ . . . . . 12
Notes and Warnings . . . . . . . . . . . . . . ................... . . 12
Other Seiwa products. . . . . . . . . ......... . …...... . . . . . 16
Introduction
The SW RP07 provides accurate digital instrumentation for boat speed and average boat speed, trip
distance and total distance traveled, water temperature, elapsed time and provides a race timer that
can be preset to two different (pre-programmable) values.
The SW RP07 displays speed and average speed up to 50.0 Knots (58 M.P.H.) in tenths, very
accurate water temperature in degrees F or C in tenths, trip log to 999.9 miles and permanent log to
9,999 miles.
A downcounting race timer is presettable for two different start times from 1 to 99 minutes each. It
beeps off the minutes and last ten seconds before reaching zero. After reaching zero, the race timer
continues to track elapsed time.
Speed can be displayed in Knots, MPH and KM H with selectable display damping. Temperature
can be displayed in degrees Fahrenheit or Celsius. Speed, temperature and clock speed may all be
calibrated using the front panel keys.
Five levels of backlighting can be selected and remotely switched ON OFF. All setup and
calibration constants are saved to a non-volatile memory. The SW RP07 outputs NMEA
0183 data of boat speed, logs, and water temperature and works on both 12 and 24 VDC systems.
The SW RP07 with its large display digits draws only .035 amps and only .055 amps with full
backlighting. Both transom mount and thru-hull mount speed temperature transducers are available
separately.
Specifications
Power supply: 9.50 to 33.00 VDC, .037 amps nominal
Operating temperature: 32 to 122 F ( 0 to 50 C)
Size: 4.3" x 4.3” x 3.5” deep (110 x 110 x 89 mm).
Display Data: Speed, Average Speed, Water Temperature, Race Timers, Elapsed time
Resolution: 0.1 Knot, MPH or KM H, 0.1 deg F° or C°
Ranges: Speed - 0.0 to 50.0 knots Temperature - 0.0 to 32.0 deg C Race Timer - 1 to 99 minutes

Transducers: Transom and thru-hull speed temperature transducers available separately.
Display: 4 digit LCD, 5 levels of backlighting.
N EA 0183 sentences:
Water temperature: $VWMTW,xx.x,C*CS
Total Trip Logs: $VWVLW,xxxx,N,yyy.y,N*CS
Speed (Knots km h): $VWVHW,,,,,xx.x,N,yyy.y,K*CS
CS=Check Sum
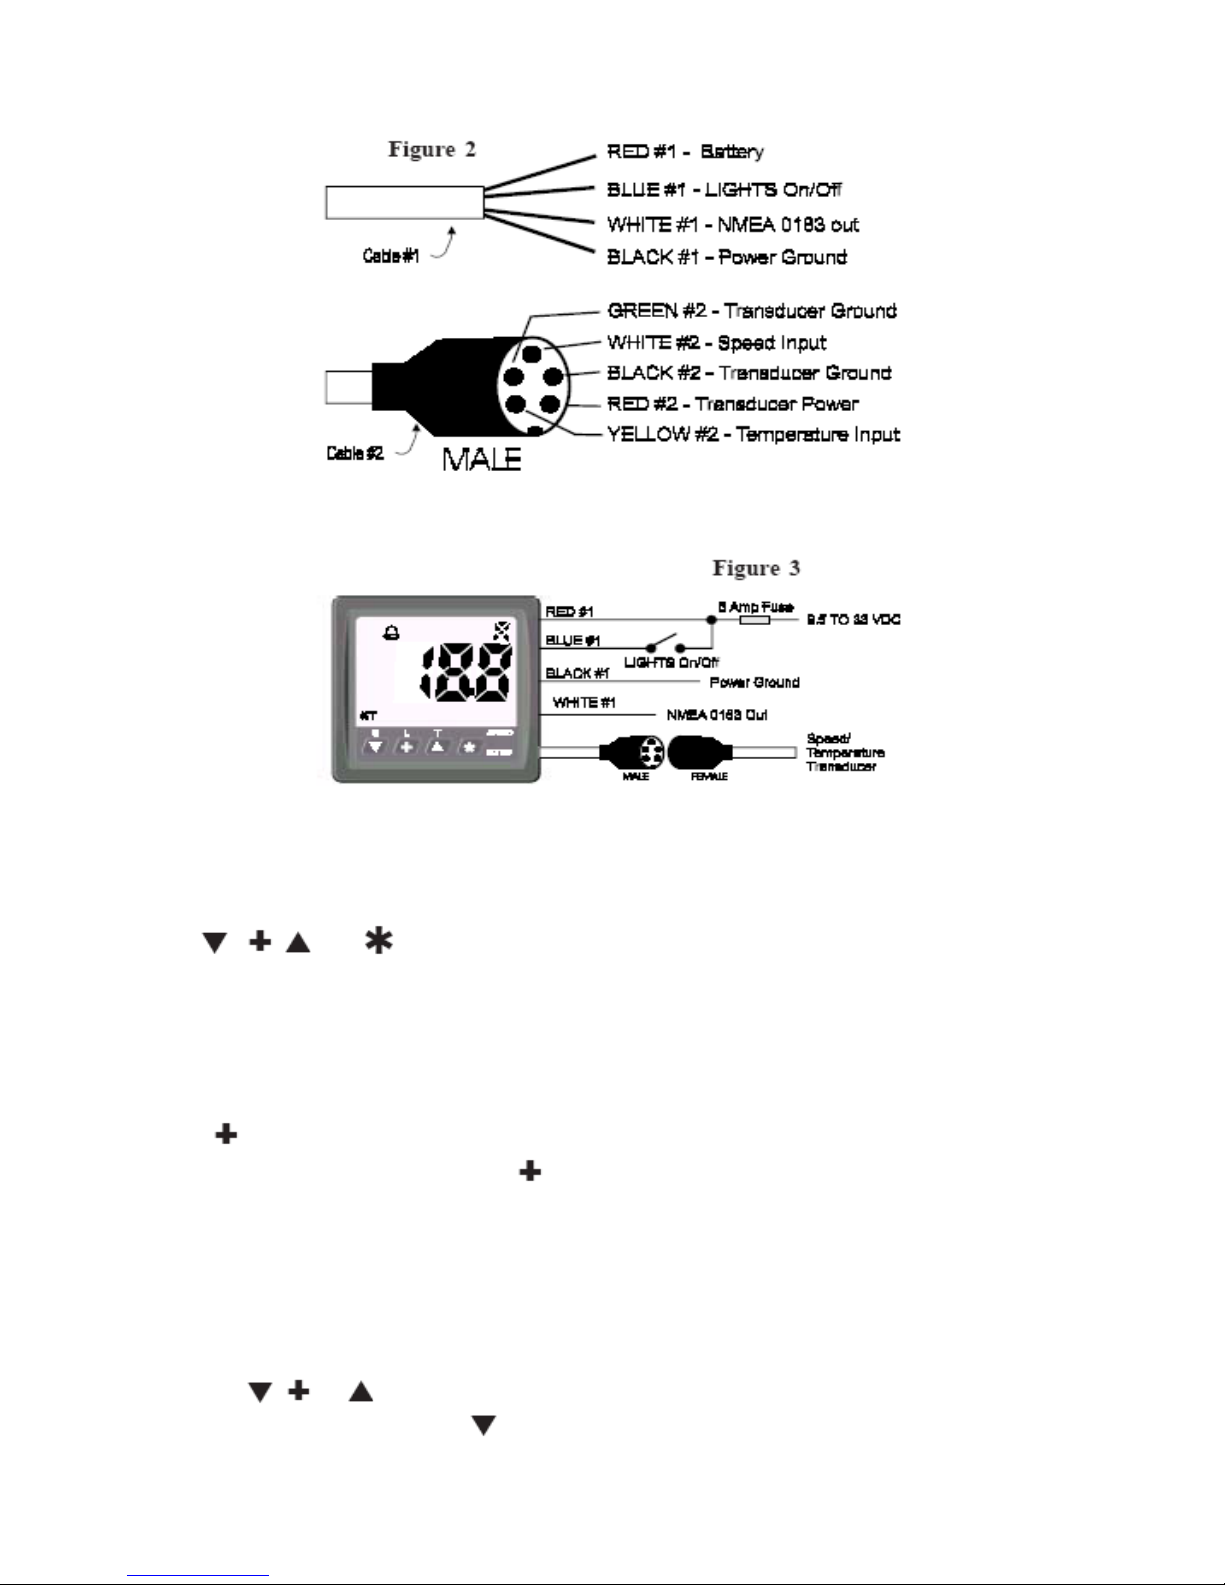
Installation
Before starting the installation, please read this entire section first. Finger tighten the screws that
mount the instrument bracket - It is not necessary or recommended to use tools.
Drill a 2-1 8" (55mm) mounting hole where you desire to
mount the instrument (Figure 1).
Connect the various wires from Cable 1 and Cable 2 as
shown in Figures 2 and Figure 3.
Carefully check all your wiring against figures 2 and 3 and then mount the instrument in
the hole. Use only finger tension to tighten the bracket hold-down nuts
Operation
Key Functions
The , , and keys are used to select
what to display, set backlight levels, calibrate speed, temperature
and clock speed and set change constants and units of
display. New information is automatically saved to non-volatile
memory.
Backlight Intensity
Press the key 1 2 second to adjust the backlight level for
night viewing. Each time you press the key 1 2 second, the
level will get brighter 1, 2, 3, 4, OFF, 1, 2, ... etc. The blue
backlight ON OFF control wire in cable #1 must be switched
to +12 24V for the backlights to work and offers external
backlight ON OFF control. If ON OFF control is not
required, connect the blue wire to +12 24VDC permanently.
Display Speed Logs Water Temperature
Press the , , or key to select Speed, Logs or Water
Temperature display. Pressing the key again while
displaying speed will toggle the display between speed and

average speed. Pressing the key again while displaying the
distance traveled log will toggle the display between total
distance traveled and trip distance traveled. The trip log displays
with a decimal point such as "82.3" and the permanent log
displays to a full digit such as "562" so you always know which
log you are viewing.
Display Average Speed
Press the key for a second time to display the average speed
An “A” will be displayed above the speed to indicate Average
Speed display. The damping used to compute the average speed
is adjustable and can be set between 1 and 20.
Display Trip Log
Press the key for a second time to display the trip log. The
trip log displays with a decimal point such as "82.3" and the
permanent log displays to a full digit such as "562" so you always
know which log you are viewing. Each time you press the
key the display will toggle between Permanent Log and Trip
Log.
Display Elapsed Time
Press the key for 1 2 second to display the elapsed time since
the instrument was turned on. When the elapsed time exceeds
60 minutes, the elapsed time clock displays hours and minutes
in place of minutes and seconds and the semi-colon flashes.
Resetting the Trip Log Elapsed Time Clock
While viewing the Trip Log, press and hold the key for 10
seconds (till you hear a long beep) to reset both the trip log and
elapsed time clock to zero.
Display Start Setting the Race Timer
The race timer can be started with one of two different values
between 1 and 99 minutes (factory preset to 5 and 10 minutes).
To start the timer with the first value, press both the and
keys. The display will start counting down from 5:00, beeping
at each minute and for each of the last ten seconds. To start the
timer with the second (10 minute) value, press both the and
keys simultaneously.
If the timer was already running, the current value is displayed.
To stop and preset the timer, press the appropriate key
combination ( and or the and keys). To restart the timer,
press the appropriate key combination again.
The race timer start times are factory preset to start at either 5
or 10 minutes. To change the first start value, press and hold
Table of contents
Popular Boating Equipment manuals by other brands


Humphree
Humphree HCS-5 installation manual

Vetus
Vetus BOW4512D Operation manual and installation instructions

Dock Doctors
Dock Doctors SLIDING BOARDING STEP Assembly instructions

Mastervolt
Mastervolt Mass Combi 12/2000-100 Quick installation

SeaView
SeaView PM5-FMD-8 installation instructions

Hobie
Hobie Mirage 360 manual


