Selmo Galaxy User manual

EN
Rev. 01 - March 2018
Pg. 1
Selmo
Selmo Electronic
Via Pacinotti, 24 - 35030 Rubano www.selmo.it(PD) Italy- Tel 049.8976761, Fax 049.8976085 -
Selmo Electronic
Via Pacinotti, 24 - 35030 Rubano www.selmo.it
Comfort technology division
“Galaxy”
Remote control for chronothermostat
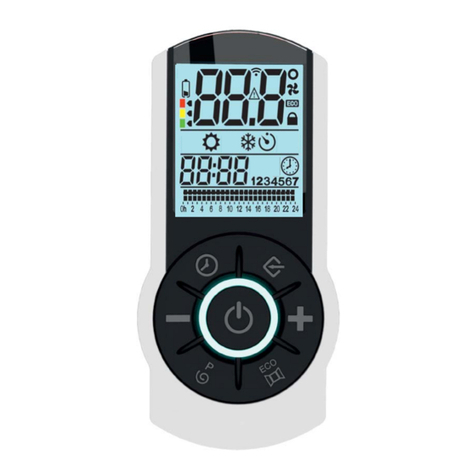
GALAXY is a remote control of ergonomic
design for Selmo chronothermostats,
equipped with a large backlit display.
GALAXY is equipped with a double infrared
transmitter to optimize communication with
the thermostat.
In the package is also included its wall
mount holder.
It is also compatible with open window, ASC
and ECO functions.
GALAXY is a certified product:
GALAXY complies with the directives:
-Eco-design Directive for Energy-using Products, 2005/32/EC (<0,5W).
EN 62233:2008
EN 55014-1:2006 + A1:2009 + A2:2011
EN 55014-2:1997 + A1:2001 + IS1:2007 + A2:2008 ===> Cat. 2
EN 61000-3-2:2014
EN 61000-3-3:201
-Eco-design Directive for Energy-using Products, 2005/32/EC (<0,5W).
Available colors: -White

EN
Rev. 01 - March 2018
Pg. 2
Selmo
Selmo Electronic
Via Pacinotti, 24 - 35030 Rubano www.selmo.it(PD) Italy- Tel 049.8976761, Fax 049.8976085 -
Selmo Electronic
Via Pacinotti, 24 - 35030 Rubano www.selmo.it
Comfort technology division
Technical features
Repairs: Must be carried out by an authorized service center.
Contact your supplier.Compatibility with other products:
2 years warranty from the date of purchase.Warranty:
The warranty does not cover the following cases:
- Products that are tampered with or damaged by the customer;
- Products that have been installed or used by the customer in a manner inconsistent with what is specified in this manual;
- Products that have been modified by the customer.
Notes
Product
Remote control
Applications
Thermostats and Chronotermostats
Color
White
Display
LCD
Keypad
7 keys keypad
Temperature selection
Digital
Mode selection
Digital
Operative modes and activable
functions
Comfort, Night, Antifreeze, Stand-by, Crono, Fil-
Pilote, Boost 2h, ECO, Open window relevation,
ASC , Keys lock.
Impostable temperature range
7°C ÷ 30°C
Operating temperature range
-10°C ÷ +40°C
Batteries
2x1,5V, Tipo AAA
Signal transmission
Infrared (via 2 transmitters)
Dimensions
109 x 52 x 29mm(HxL x l)
Fixing
Wall fixing using the appropriate support
Warranty
2 years
“Galaxy”
Remote control for chronothermostat

EN
Rev. 01 - March 2018
Pg. 3
Selmo
Selmo Electronic
Via Pacinotti, 24 - 35030 Rubano www.selmo.it(PD) Italy- Tel 049.8976761, Fax 049.8976085 -
Selmo Electronic
Via Pacinotti, 24 - 35030 Rubano www.selmo.it
Comfort technology division
“Galaxy”
Remote control for chronothermostat
Functions
-7 possible modes of operation.
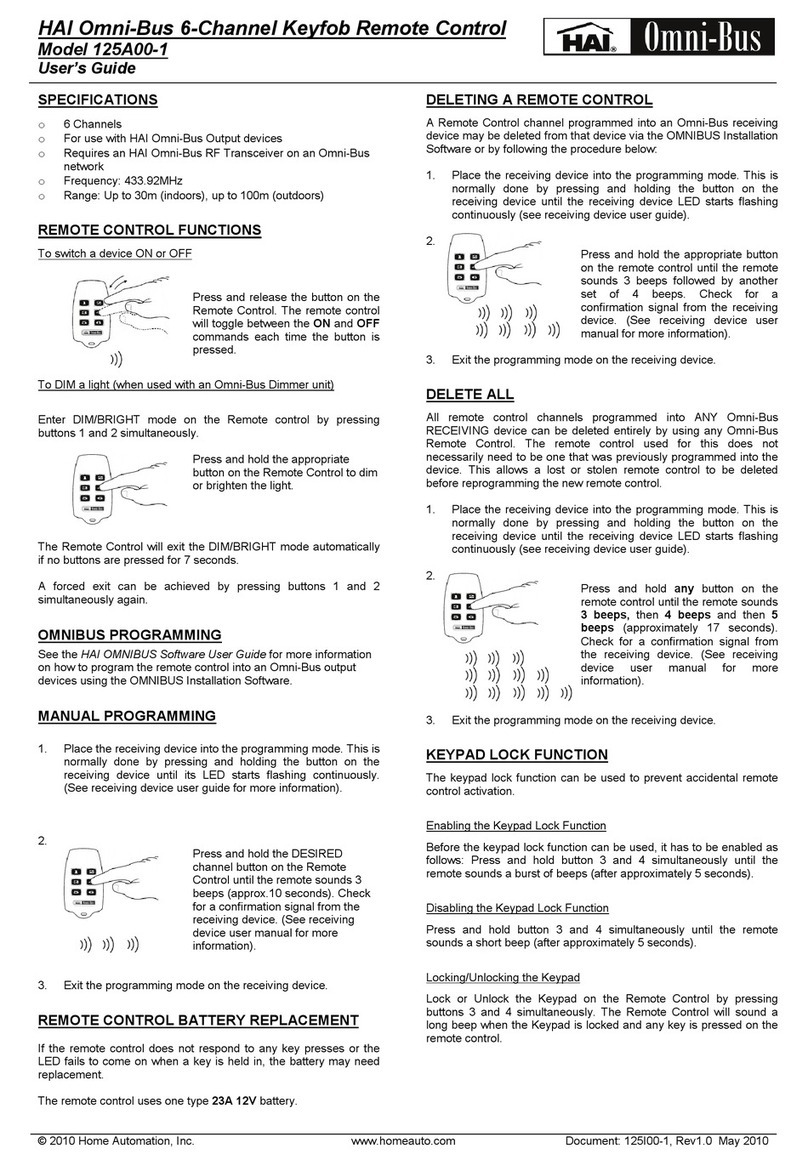
The remote control enables the following operating modes in the chronothermostat:
Ø"Comfort" mode.
Ø"Night" mode.
Ø"Antifreeze" mode.
Ø"Fil-Pilote" mode.
Ø"Crono" mode.
Ø"Boost 2h" mode.
Ø"Stand-by" mode.
N.B.for a complete description of the operating modes, please refer to the thermostat
user manual.
·ECO function: Fast activation mode; through the dedicated key, the
function lowers the temperature by 3°C.
·"Open window detection", "ASC"and "Key-lock".
N.B. these modes are not available on every model of clock thermostat
·Settable "Comfort" and "Night" temperature.
·Daily and weekly program for the user to set as desired.
·Display with permanent indication of the set temperature, time and
mode of operation.

EN
Rev. 01 - March 2018
Pg. 4
Selmo
Selmo Electronic
Via Pacinotti, 24 - 35030 Rubano www.selmo.it(PD) Italy- Tel 049.8976761, Fax 049.8976085 -
Selmo Electronic
Via Pacinotti, 24 - 35030 Rubano www.selmo.it
Comfort technology division
[ + ] key
BACKLIT DISPLAY:
VIEW ALL INFORMATION
RELATED TO THE
THERMOSTAT.
[On/stand-by]
key
[ - ] key
[mode]
key
[Chrono] key
[Eco] key
“Galaxy”
Remote control for chronothermostat

EN
Rev. 01 - March 2018
Pg. 5
Selmo
Selmo Electronic
Via Pacinotti, 24 - 35030 Rubano www.selmo.it(PD) Italy- Tel 049.8976761, Fax 049.8976085 -
Selmo Electronic
Via Pacinotti, 24 - 35030 Rubano www.selmo.it
Comfort technology division
Operating mode
icons:
6-Fil-Pilote;
5-Comfort;
4-Night;
3-Antifreeze;
2-Boost2h;
1-Stand-By
"Open window detection’’
indicator Keys lock indicator
Clock
Current day of the week
Current crono program indicator
ECO function indicator
Temperature indicator
Low battery icon
ASC function indicator
Night Antifreeze
“Galaxy”
Remote control for chronothermostat
-Power ON / Stand-by
Press the [On/Stand-by] key to turn on the device or to enter the "Stand-by" mode.
When the device is turned on, the display shows the set temperature, mode and time. In
"Stand-by" mode the current time and day of the week are displayed.
-Operating modes
Press the [Mode] key to select the desired operating mode. An icon on the display indicates the
selected operating mode (as in the legend below).
Comfort Mode
The "Comfort" temperature corresponds to the temperature the user desires.
This operating mode is intended for the ordinary use of the thermostat.
-Pressthe[Mode] keyuntilthe"Comfort"iconisshownonthedisplay.
- Set the desired temperature through the [+]and[-] keys.
Night Mode
The “Night" mode allows setting a temperature value lower than the “Comfort” temperature.
This operating mode should be selected during the night or when the room is not occupied
for 2 hours or longer.
-Pressthe[Mode] key until the "Night"icon appears on the display.
- Set the desired temperature through the [+] and [-] keys.
Chrono mode icon

EN
Rev. 01 - March 2018
Pg. 6
Selmo
Selmo Electronic
Via Pacinotti, 24 - 35030 Rubano www.selmo.it(PD) Italy- Tel 049.8976761, Fax 049.8976085 -
Selmo Electronic
Via Pacinotti, 24 - 35030 Rubano www.selmo.it
Comfort technology division
“Galaxy”
Remote control for chronothermostat
Chrono Mode
"Comfort" and "Night" temperatures and the operating time intervals can be configured.
To enable the “Chrono” function, press the [mode] key until the "Chrono" icon is shown on the display.
Howtosetthetimesequence: press the [Chrono] key to enter the set ting mode.
Setting time and date:
-The flashing digit indicates the day of the week: press the [+] and [-] keys to set the desired day,
-P res s [mode ] to confirm.
-Use the [+] and [-] keys to set the hour and then [mode] to advance to the minutes setting.
-Repeat the same procedure to set the minutes. Press [mode] to confirm.
Setting the weekly schedule:
The programming starts automatically from day 1 and 00:00 o’clock.
-The [+] key sets the "Comfort" tempera ture in the in dica ted hour, marke d with a full bar;
-The [-] key sets the "Night" temperature marked with an empty bar.
-Ateach[+] or [-] key press, the program will advance automatically to the following hour.
Seeanexampleon
the right.
Pr ess [mode] to confirm and advance to the following day.
Once the 7th day has been configured, the program returns automatically to the previous operating mode.
Anti-ice mode
The “Anti-ice” mode enables the heating element of the chronothermostat when the room temperature
drops below 7°C (please ref er to the t hermostat user manual).
It is recommended to use this mode when the room is not occupied for several days.
- Press the [mode]key until this mode is selected.
Boost 2h mode
The "Boost 2h" mode can be used to quickly heat the room.
- To enable the function, press the relative [boost2h] key, the "2h" icon is shown on the display.
The user can exit this mode by pressing the [boost2h] key, the [On/Stand-by] key or [mode].
Fil-pilote
- Press the [mode] key and select the "Fil- Pilot e" mode, the relative icon will show on t he display.
- Set the desired temperat ure t hrough t he [+] and [-] keys.

EN
Rev. 01 - March 2018
Pg. 7
Selmo
Selmo Electronic
Via Pacinotti, 24 - 35030 Rubano www.selmo.it(PD) Italy- Tel 049.8976761, Fax 049.8976085 -
Selmo Electronic
Via Pacinotti, 24 - 35030 Rubano www.selmo.it
Comfort technology division
“Galaxy”
Remote control for chronothermostat
To insert the batteries, pull out the plastic flap of the dedicated
compartment, making a little pressure over the cleats and sliding the
flap down.
Then insert 2x1.5V AAA batteries paying attention to the direction,
indicated inside the body, close the door by inserting it from the
bottom and pull it up until you can hear the joint.
For the wall mounting of the remote control it is possible to use the
two-sided adhesive strips in the remote control holder. You can add,
on glue area a small amount of silicone glue supplied in the package
to allow a better fixing.
There is also a screw and a dowel to fix the support with a wall hole
Dowel dimensions: Diameter 5mm, Length 25mm.
To place the remote control in the support, insert it from top to
bottom, matching the tooth of the support with the corresponding
hole in the remote control.
In the image on the right is shown the correct insertion of the
remote control in the support.
Adhesive strip
Glue Area
Battery and wall support mounting

EN
Rev. 01 - March 2018
Pg. 8
Selmo
Selmo Electronic
Via Pacinotti, 24 - 35030 Rubano www.selmo.it(PD) Italy- Tel 049.8976761, Fax 049.8976085 -
Selmo Electronic
Via Pacinotti, 24 - 35030 Rubano www.selmo.it
Comfort technology division
“Galaxy”
Remote control for chronothermostat
3. Functions
Key-lock
This function allows the user to block the keypad to avoid undesired key pressures. To enable
the Key-lock function, press simultaneously the [mode] and [+] keys for 3 seconds. To disable
the function, repeat the same procedure.
ECO mode
The "ECO" function can be used to reduce the electric consumption when the room is not occupied for a
cert ain period.
- To enable the function, press the dedicated [ECO] key.Every temperature previously set is lowered by
3°C. The “ECO” icon is shown on the display.
- To disable this function, press again the [ECO] key.
NOTE: This function is not available on every chronothermostat model; please refer to the user
manual for a precise description of the function.
ASC FUNCTION
To enable the "ASC" function press the [mode] key until the "Chrono" icon is shown on the display.
- press simultaneously the keys [ECO] and [+] for at least 3 seconds.
- To disable this function, repeat theprocedure.
NOTE: This function is not available on every chronothermostat model; please refer to the user
manual for a precise description of the function.
NOTE: This function is only available in the “Chrono” mode
OPEN WINDOW DETECTION FUNCTION
- To enable the "open window detection" function, press simultaneously the [ECO] and [-] keys for
at least 3 seconds.
- To disable t his function, repeat t he procedure.
NOTE:This function is not available on every chronothermostat model; please refer to the user
manual for a precise description of the function.
Low battery warning: when the battery power is low, the relative icon appears on the display. The
batteries must be replaced as soon as possible.
Note: The signal is transmitted from the remote control to the thermostat after one second from the
last key pressure.
N.B. Some functions may be not supported on your thermostat.
Please refer to the user manual.
DISPOSAL
This appliance is not an ordinary waste. It must be disposed of through appropriate collection centers. In case of
replacement, it can be returned to the distributor.
This end-of-life treatment of the product will allow us to preserve our environment and to curb the consumption
The manufacturer reserves the right to make changes at any time as it
deems necessary to improve the product without prior notice.
DISPOSAL
This appliance is not an ordinary waste. It must be disposed of through appropriate collection centers. In case of
replacement, it can be returned to the distributor.
This end-of-life treatment of the product will allow us to preserve our environment and to curb the consumption
of natural resources.
This symbol applied to the product indicates the obligation to deliver it to the appropriate collection centers to be
disposed of in compliance with Directive 2002/96 / CE (WEEE).
Table of contents
Other Selmo Remote Control manuals
