selsiuz 4-in-1 Cool Operating manual

37821 rev. 02
ɂ Gebruikers- en installatiehandleiding | 4-in-1
Ⱦ User and installation manual | 4-in-1
Ɇ Guide d’utilisation et d’installation | 4-en-1
ȿ Manual de usuario e instalación | 4-en-1

2
SELSIUZ 4-IN-1 HANDLEIDING
ɂInleiding
Bedankt voor de aanschaf van het Selsiuz
systeem. Deze handleiding bevat alle benodigde
informatie om snel vertrouwd te raken met uw
product. Lees eerst de gehele handleiding door
alvorens met het product te gaan werken. Via de
inhoudsopgave kunt u de informatie die u nodig
heeft terugvinden in de handleiding.
Deze handleiding is bedoeld voor de installateur
en de eindgebruiker van de Selsiuz Cooler en
Selsiuz kraan.
Dit is de oorspronkelijke handleiding. Bewaar
deze handleiding goed! Voor meer informatie zie
de website www.selsiuz.com
Inhoudsopgave
04 Installatie
20 Algemene informatie
21 Veiligheidsinformatie
22 Dagelijks gebruik
26 Systeem spoelen/reinigen
28 Probleemoplossing
30 Storingscodes
Ǽ
ȾIntroduction
Thank you for purchasing the Selsiuz system. This
manual contains all the necessary information to
quickly familiarize yourself with your new
product. Please read the entire manual before
working with the product. You can easily use the
in the manual.
This manual is intended for the installer and end
user of the Selsiuz Cooler and Selsiuz faucet.
This is the original manual. Keep this manual in a
safe place! For more information consult the
website www.selsiuz.com
Table of Contents
05 Installation
31 General Information
32 Safety Information
33 Daily use
37 System flushing/cleaning
39 Troubleshooting
41 Error codes

3
VERSIE: SH.22.1.1
ɆIntroduction
Nous vous remercions d’avoir acheté le système
Selsiuz. Ce manuel contient toutes les
informations nécessaires pour vous familiariser
rapidement avec ce produit. Lisez l’intégralité du
manuel avant d’utiliser le produit. Via la table des
matières, vous trouverez les informations dont
vous avez besoin.
Ce manuel est destiné à l’installateur et à
Selsiuz.
Vous avez en main le manuel original.
Conservez-le en lieu sûr ! Pour plus d’informations
consultez le site www.selsiuz.com
Table des matières
06 Installation
42 Informations générales
43 Consignes de sécurité
44 Utilisation quotidienne
48 Rinçage/nettoyage du système
50 Résolution des problèmes
52 Codes d’erreur
ȿIntroducucción
Gracias por comprar el sistema Selsiuz. Este
manual contiene toda la información necesaria
para familiarizarse rápidamente con su producto.
Lea todo el manual antes de trabajar con el
producto. A través del índice, puede encontrar la
información necesaria en el manual.
Este manual está destinado al instalador y usuario
Este es el manual original. ¡Guarde bien este
manual! Para obtener más información, visite el
sitio web www.selsiuz.com
Índice
07 Instalación
53 Información general
54 Información de seguridad
55 Uso diario
59 Sistema de enjuague/limpieza
61 Solución de problemas
63 Códigos de error

4
SELSIUZ 4-IN-1 HANDLEIDING
ūLees en volg alle instructies uit Hoofdstuk:
Veiligheidsinforamtie.
ūRaadpleeg de aparte handleidingen bij de
overige onderdelen voor meer relevante
informatie.
ūControleer voor installatie of alle benodigde
onderdelen meegeleverd zijn.
ūVoor hulp bij installatie kunt u de
installatievideo op www.selsiuz.com
raadplegen of contact opnemen met +31 882
33 55 19
ūDe (rvs) slangen met rubberen dichtring mogen
niet vaster gedraaid worden dan handvast plus
nog een halve slag (ca. 5 Nm), anders gaat de
rubberen dichtring kapot.
ūGebruik alleen originele Selsiuz onderdelen.
Het gebruik van andere onderdelen leidt tot
het ongeldig maken van de garantie en het
CE-keurmerk en kan leiden tot schade en letsel.
Voordat u begint: controleer het
keukenkastje
Het is belangrijk dat u voordat u begint met
installeren uw keukenkastje goed inspecteert. In
uw keukenkastje dient het volgende aanwezig te
zijn:
ūVoldoende ruimte om de Selsiuz cooler te
plaatsen (min. 50 mm tussenruimte tussen de
spoelbak en de bovenkant van de Selsiuz
cooler).
ūEen geaarde wandcontactdoos met 16 A
zekering.
ūToevoer voor koud water.
ūToevoer voor warm water.
ūKraangat van 35 mm en 2 van 30 mm.
ɂInstallatie

5
VERSIE: SH.22.1.1
ūRead and follow all instructions in the chapter:
Safety Information.
ūFor more relevant information on additional
parts, consult the separate manuals.
ūBefore installation, check that all necessary
parts are included.
ūFor installation assistance, please watch the
installation video on www.selsiuz.com or
contact +31 88 233 55 19
ūThe (stainless steel) hoses with rubber sealing
may not be tightened more than hand tight plus
another half a turn (approx. 5 Nm), otherwise
the rubber sealing ring will tear.
ūOnly use original Selsiuz parts. Using other
parts will void the warranty and the CE quality
mark and may result in damage and injury.
Before you start: check the kitchen
cupboard
It is important that you carefully inspect your
kitchen cupboard before you start installing. The
following should be present in your kitchen
cupboard:
ūEnough space to place the Selsiuz boiler (min.
50mm gap between the sink and the top of the
Selsiuz cooler).
ūAn earthed wall socket with 16 A fuse.
ūInlet for cold water.
ūInlet for hot water.
ūTap hole of 35 mm and 2 of 30 mm.
ȾInstallation

6
SELSIUZ 4-IN-1 HANDLEIDING
ūLisez et suivez toutes les instructions de la
section: Consignes de sécurité.
ūVeuillez vous référer aux manuels fournis avec
les autres pièces pour plus d’informations
pertinentes.
ū
toutes les pièces nécessaires sont incluses.
ūTéléchargez la vidéo d’installation surwww.
selsiuz.com pour obtenir de l’aide ou contactez-
nous au +31 882 33 55 19
ūLes tuyaux (en acier inoxydable) avec bague
d’étanchéité en caoutchouc ne peuvent pas être
serrés plus qu’à la main plus un demi-tour
supplémentaire (environ 5 Nm), sinon la bague
d’étanchéité en caoutchouc se brisera.
ūN’utilisez que des pièces Selsiuz originales.
L’utilisation d’autres pièces annulera la garantie
et le marquage CE et peut entraîner des
dommages et des blessures.
Avant de commencer : vériez l’armoire
de la cuisine
Il est important que vous inspectiez attentivement
l’armoire de la cuisine avant de commencer
l’installation. Les éléments suivants doivent s’y
trouver :
ū
Selsiuz (espace minimal de 50 mm entre l’évier
et la partie supérieure du refroidisseur Selsiuz).
ūUne prise murale mise à la terre avec un fusible
de 16 A.
ūUne alimentation en eau fraîche.
ūUne alimentation en eau chaude.
ūOuverture pour robinet de 35 mm et 2 de 30
mm.
ɆInstallation

7
VERSIE: SH.22.1.1
ūLea y siga todas las instrucciones del Capítulo:
Información sobre la seguridad.
ūPara obtener más información sobre otras
partes relevantes, consulte los manuales
separados.
ū
partes necesarias estén incluidas.
ūSi necesita ayuda con la instalación, consulte el
video de instalación en www.selsiuz.com o
llame al +31 882 33 55 19
ūLas mangueras (de acero inoxidable) con anillo
de sellado de goma no deben apretarse más
que a mano, más otra media vuelta (aprox. 5
Nm), de lo contrario el anillo de sellado de
goma se romperá.
ūUtilice solo repuestos originales de Selsiuz. El
uso de otros repuestos anulará la garantía y la
marca CE, además puede provocar daños y
lesiones.
Antes de empezar: revise el armario de
la cocina
Es importante que inspeccione cuidadosamente el
armario de su cocina antes de comenzar con la
inatalación. Lo siguiente debe estar presente en el
armario de la cocina:
ū
Selsiuz (espacio mínimo de 50 mm entre el
fregadero y la parte superior del enfriador
Selsiuz).
ūUna toma de corriente a tierra con un fusible de
16 A.
ūSuministro de agua fría.
ūSuministro de agua caliente.
ūAgujero para grifo de 35 mm y 2 de 30 mm.
ȿInstalación

8
SELSIUZ 4-IN-1 HANDLEIDING
01
02
Installatie
Spoel de leidingen door zodat er geen vuil achterblijft in de leidingen.
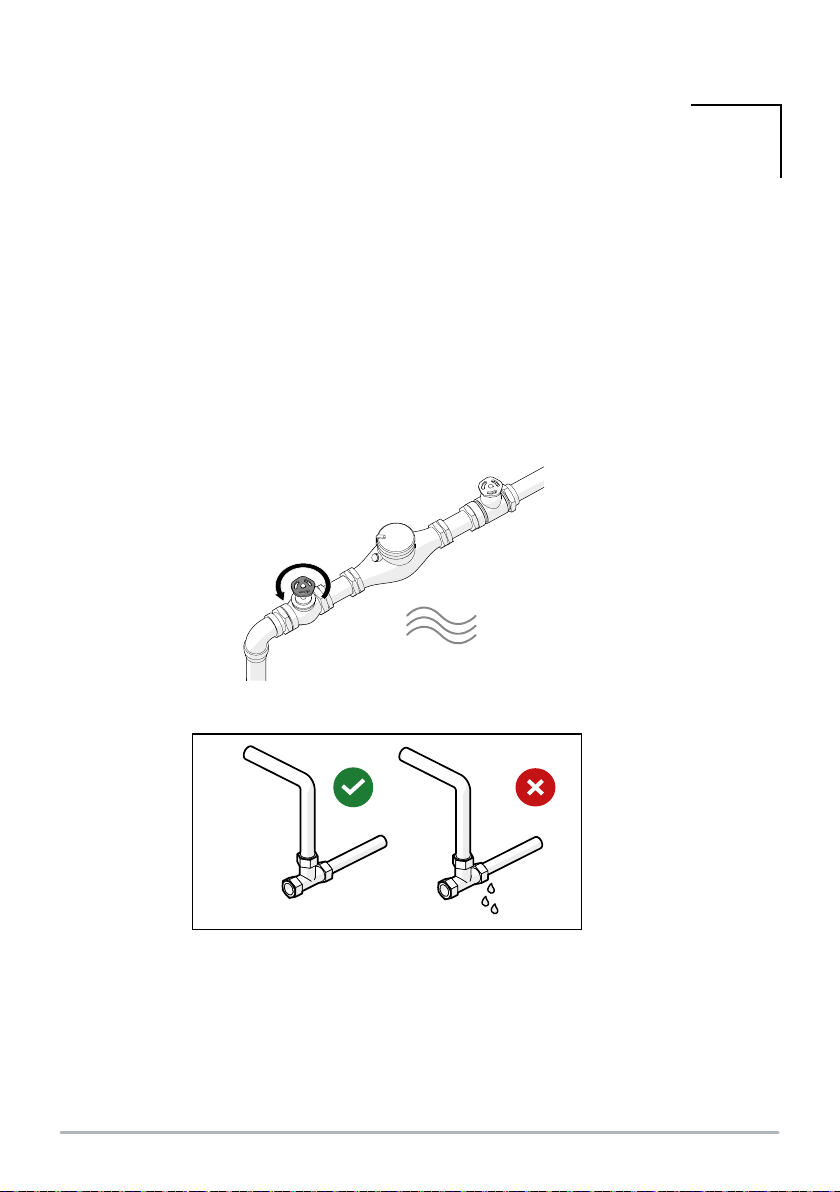
Sluit de watertoevoer naar de keuken af.
ɂ
ɂ
Installation
Ⱦ
Ⱦ
Installation
Coupez l’alimentation en eau de la cuisine.
Ɇ
Ɇ
Instalación
Enjuague las tuberías para que no quede suciedad en las tuberías.
Cierre el suministro de agua a la cocina.
ȿ
ȿ
9
VERSIE: SH.22.1.1
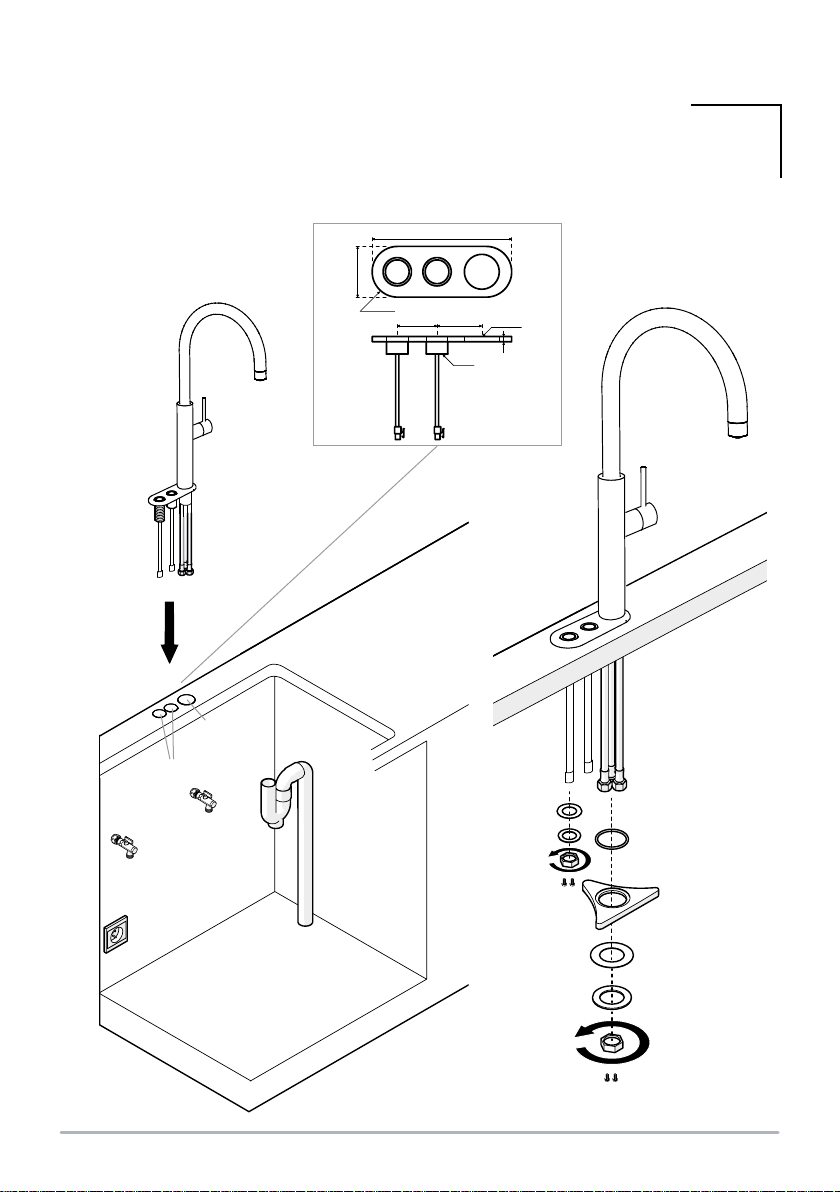
03
2x
Ø35 mm
Ø30 mm
Ø28
4642
140
52
6
R26
Ø33,5
Monteer de kraan
ɂ
Mount the tap
Ⱦ
Montez le robinet
Ɇ
Instale el grifo
ȿ
10
SELSIUZ 4-IN-1 HANDLEIDING
350260.3
2x 350260.8 350201.7
04
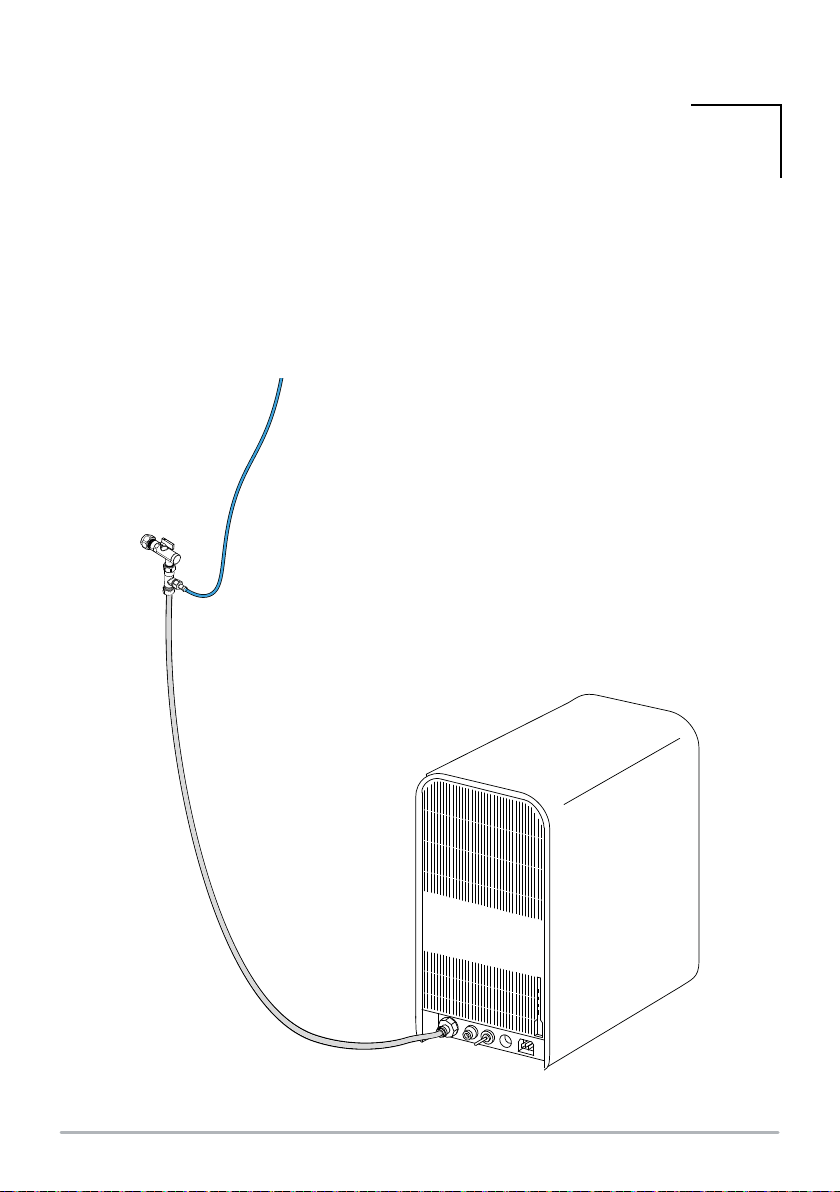
Plaats een t-stuk op de koudwaterleiding en plaats hierop de push-in koppeling.
ɂ
Ⱦ
Ɇ
Coloque un conector T en la tubería de agua fría y conecte el acoplamiento a presión
sobre este.
ȿ
11
VERSIE: SH.22.1.1
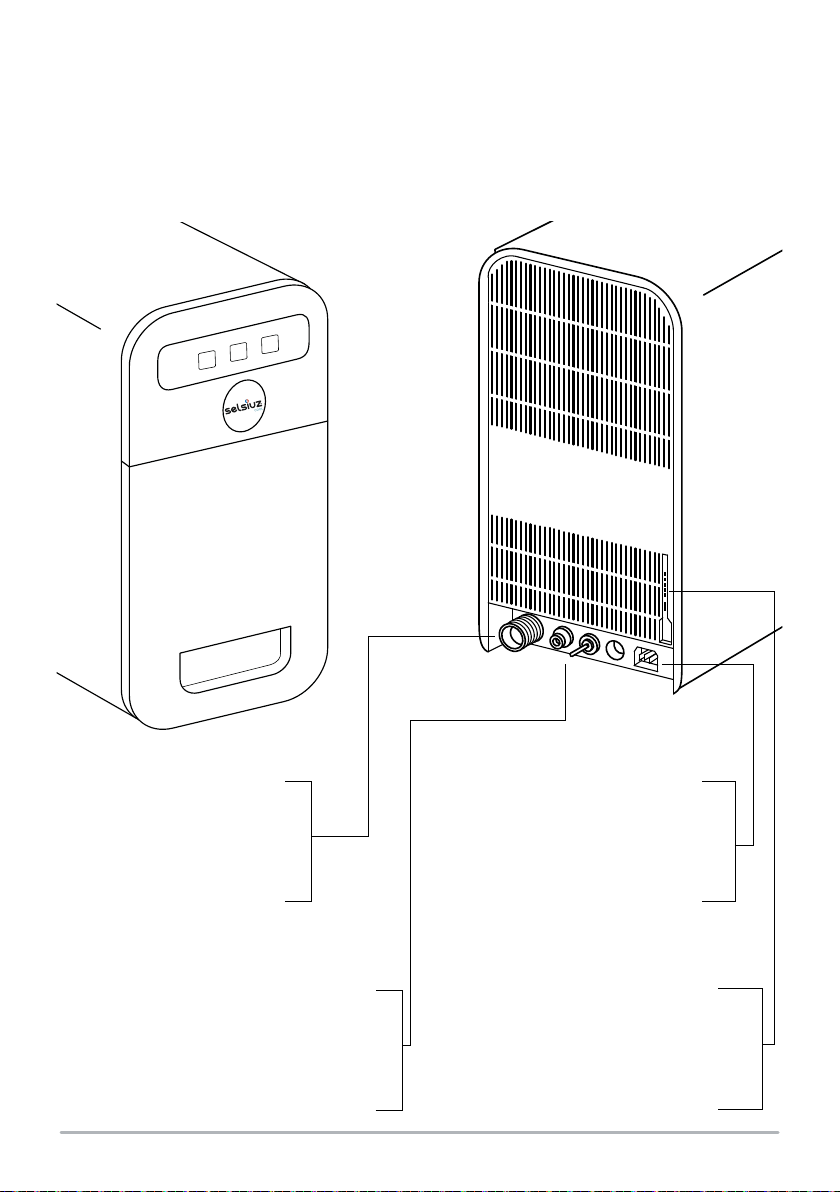
Voorkant
Aansluiting koud water in
6 mm aansluiting gekoeld en bruisend water
Aansluiting voedingskabel
Aansluiting aansturing Cooler
Achterkant
ɂ
ɂ
ɂ
ɂ
ɂ
ɂ
Front
Cold water inlet connection
6 mm connection chilled and sparkling water
Connection for power supply cable
Cooler control connection
Back
Ⱦ
Ⱦ
Ⱦ
Ⱦ
Ⱦ
Ⱦ
Face avant
Connexion arrivée d’eau fraîche
Connexion 6 mm pour eau refroidie et gazeuse
Connexion du câble d’alimentation
Connexion commande du refroidisseur
Face arrière
Ɇ
Ɇ
Ɇ
Ɇ
Ɇ
Ɇ
Parte delantera
Conexión para el agua fría
Conexión de 6 mm para el agua fría y con gas
Conexión para el cable de alimentación
Conexión para regular el enfriador
Parte trasera
ȿ
ȿ
ȿ
ȿ
ȿ
ȿ
12
SELSIUZ 4-IN-1 HANDLEIDING
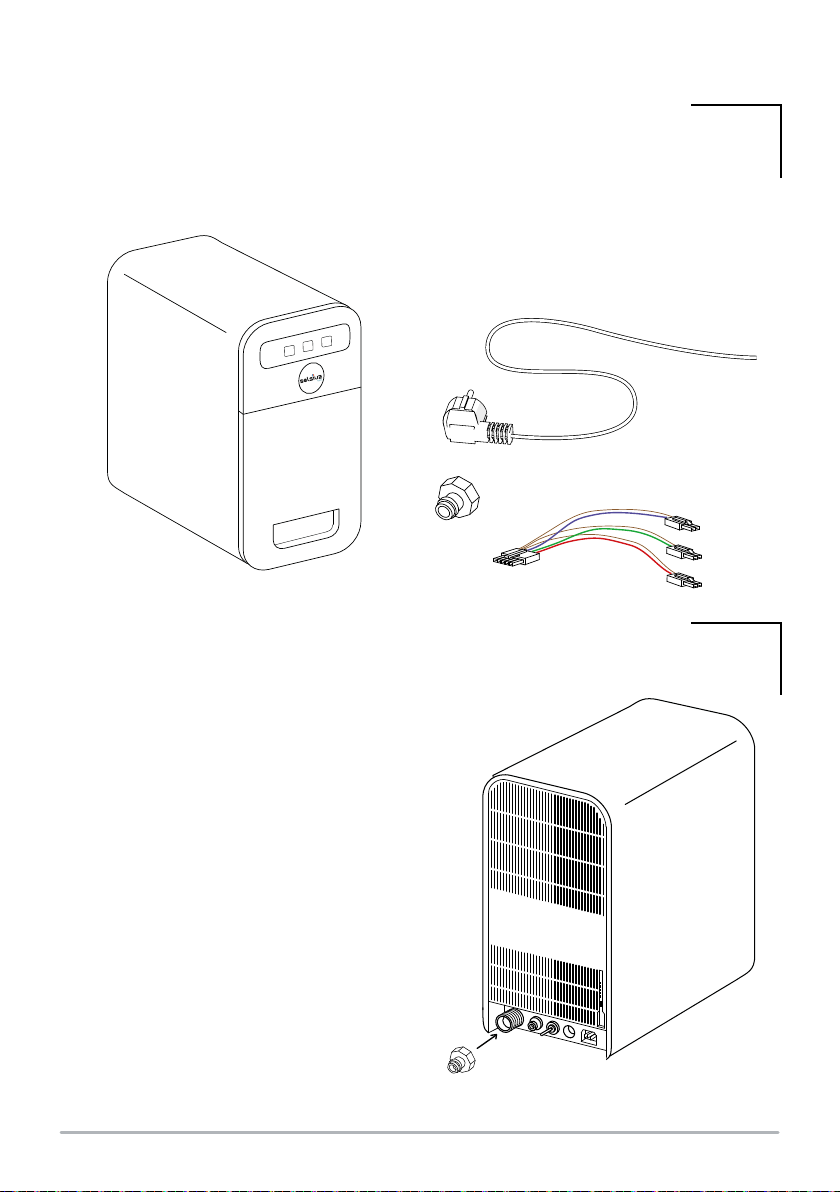
05
06
Haal de onderdelen uit de doos die bij de cooler in de doos verpakt zit.
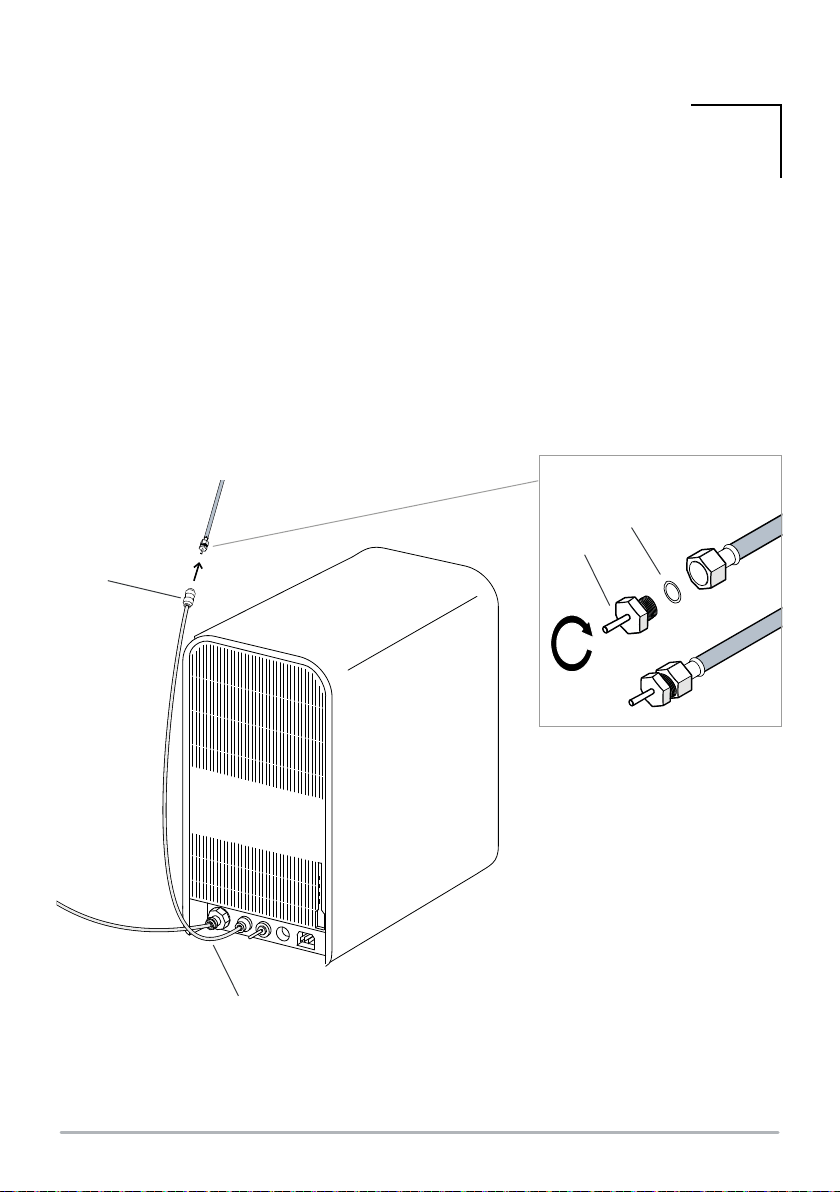
Draai de push-in koppeling op de achterkant
van de cooler
ɂ
ɂ
Take the parts out of the box that comes with the cooler.
cooler
Ⱦ
Ⱦ
Sortez de leur boîte les pièces emballées dans la boîte du refroidisseur.
Tournez le raccord instantané sur la face arrière
du refroidisseur
Ɇ
Ɇ
Retire las partes que vienen embaladas en la caja del enfriador.
Inserte el acoplamiento a presión en la parte
trasera del enfriador
ȿ
ȿ
13
VERSIE: SH.22.1.1
07
Sluit de cooler aan door de 8 mm slang in de koppeling achter de cooler en in de
koppeling op het t-stuk van de koudwaterleiding te drukken.
ɂ
Connect the cooler by pushing the 8mm hose into the connector on the back of
the cooler and into the connector on the T-piece of the cold water pipe.
Ⱦ
Connectez le refroidisseur en exerçant une pression sur le tuyau de 8 mm dans
le raccord à l’arrière du refroidisseur et sur le raccord de la pièce en T du tuyau
d’eau froide.
Ɇ
Conecte el enfriador insertando la manguera de 8 mm en el acoplamiento en la
parte trasera y ajustando el conector T en la tubería de agua fría.
ȿ
14
SELSIUZ 4-IN-1 HANDLEIDING
350260.8
350260.3
350260.6
350260.1
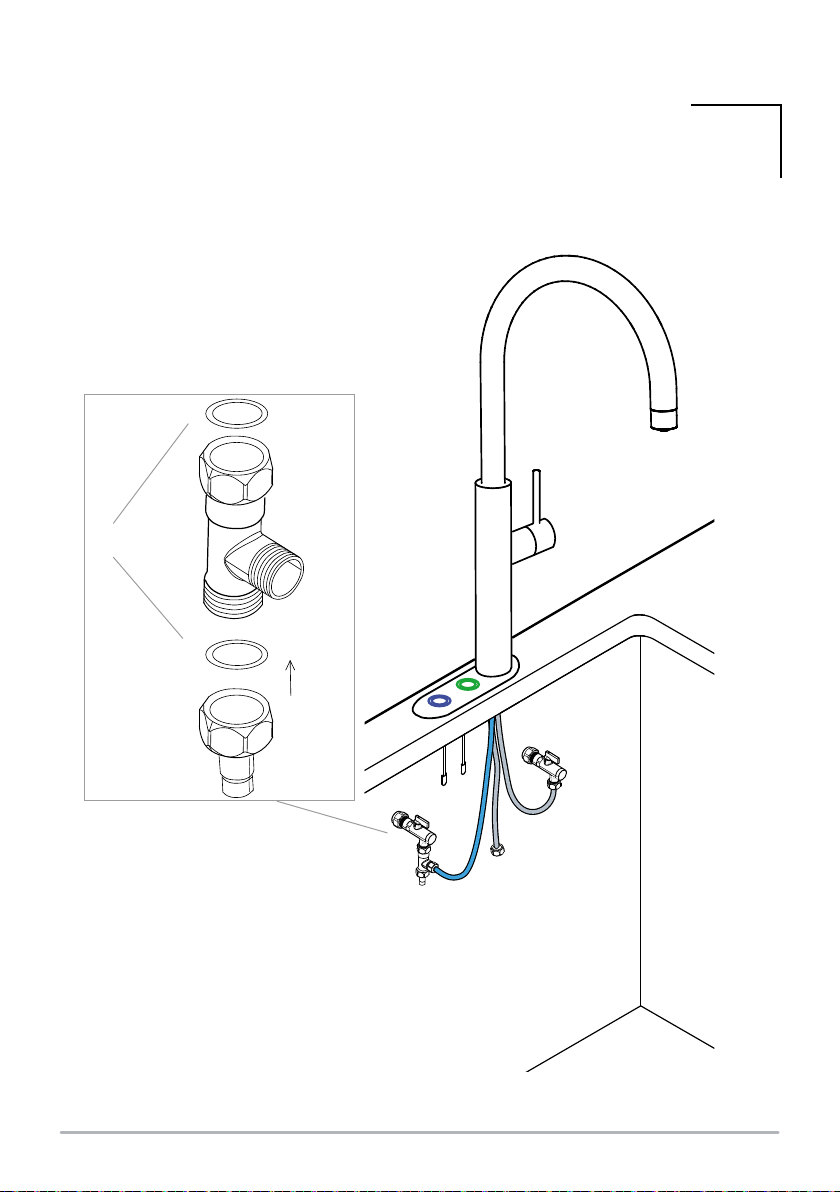
08
de cooler. Monteer het verloop stuk en sluit de 6 mm slang aan tussen de cooler
en het verloopstuk.
ɂ
cooler. Mount the reducer and connect the 6 mm hose between the cooler and
the reducer.
Ⱦ
Montez le raccord instantané sur le tuyau court du robinet et raccordez-le au
refroidisseur. Montez le réducteur et connectez le tuyau de 6 mm entre le
refroidisseur et le réducteur.
Ɇ
Monte el acoplamiento de ajuste a presión en la manguera corta del grifo y
conéctelo al enfriador. Monte el adaptador y conecte la manguera de 6 mm entre
el enfriador y el adaptador.
ȿ
15
VERSIE: SH.22.1.1
09
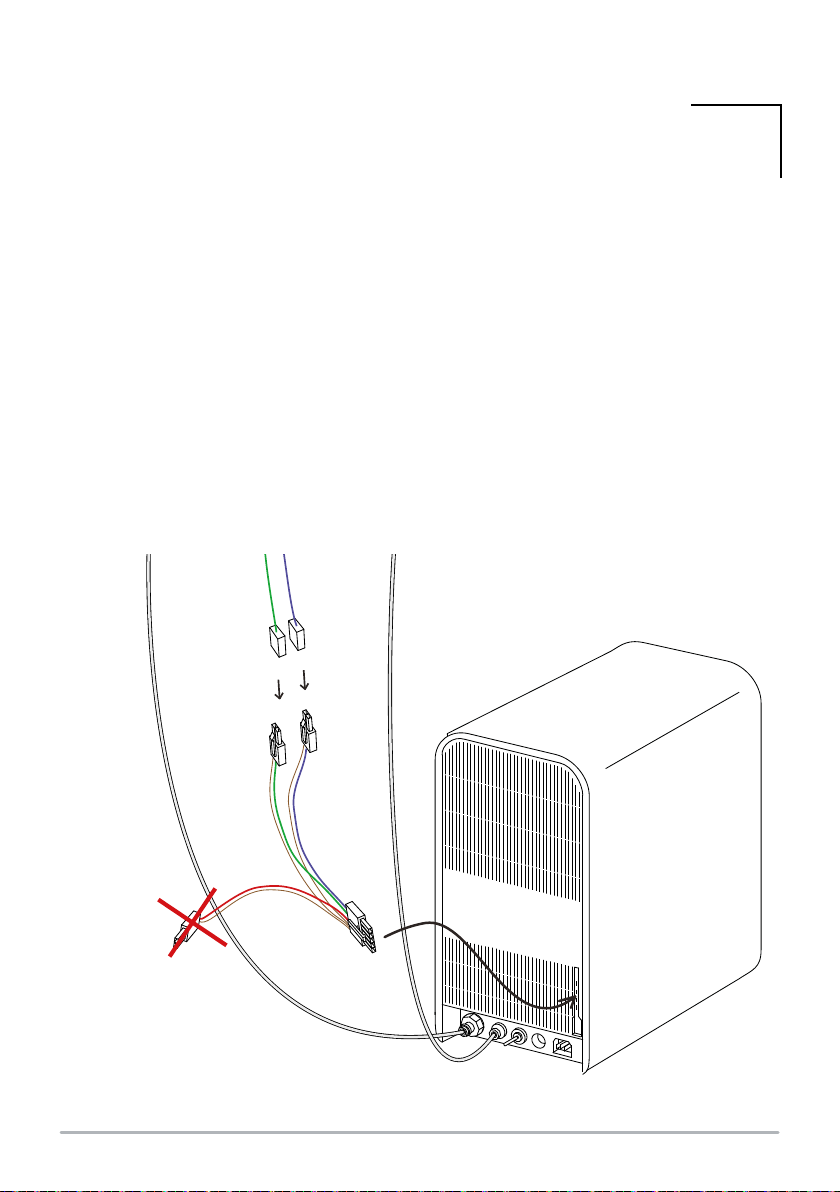
Klik de stekkers van de kraan in de adapter en sluit de adapter aan op de cooler.
ɂ
Click the plugs of the tap into the adapter and connect the adapter to the cooler.
Ⱦ
refroidisseur.
Ɇ
Enchufe los cables del grifo en el adaptador y conecte el adaptador al enfriador.
ȿ
16
SELSIUZ 4-IN-1 HANDLEIDING
10
350260.9
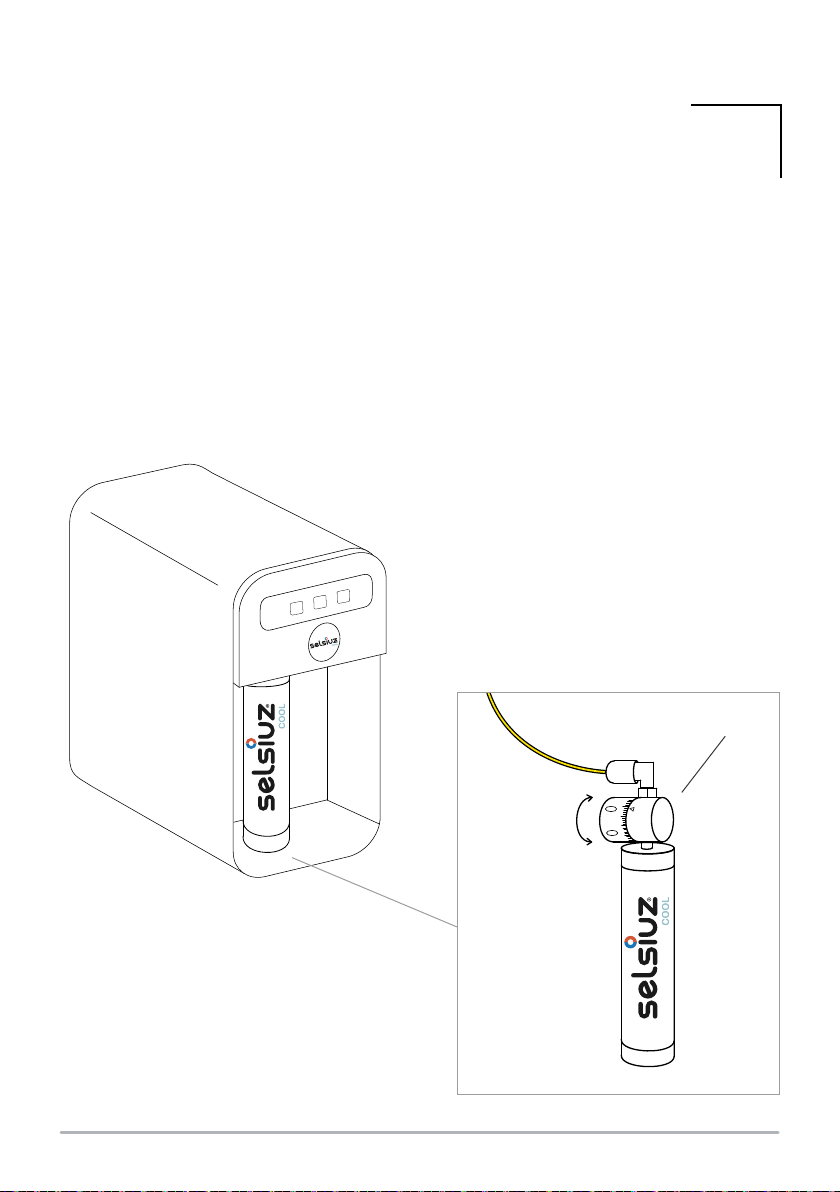
Druk de gele slang in de voorkant van de cooler in de CO
in het
water kan naar wens ingesteld worden met deze knop.
ɂ
Push the yellow hose at the front of the cooler into the COregulator and screw
the bottle into it. (Note, always keep the bottle upright when doing this!). The
amount of COin the water can be adjusted as desired with this knob.
Ⱦ
Poussez le tuyau jaune dans la face avant du refroidisseur dans le distributeur de
COet vissez la bouteille dedans. (attention, gardez toujours la bouteille à la
verticale !). Ce bouton permet de régler à votre convenance la quantité de CO
dans l’eau.
Ɇ
Inserte la manguera amarilla en la parte delantera del enfriador, en el distribuidor
de COy enrosque aquí la botella. (Atención, mantenga siempre la botella en
posición vertical). La cantidad de COen el agua, puede ser ajustada con este
botón.
ȿ
17
VERSIE: SH.22.1.1
11
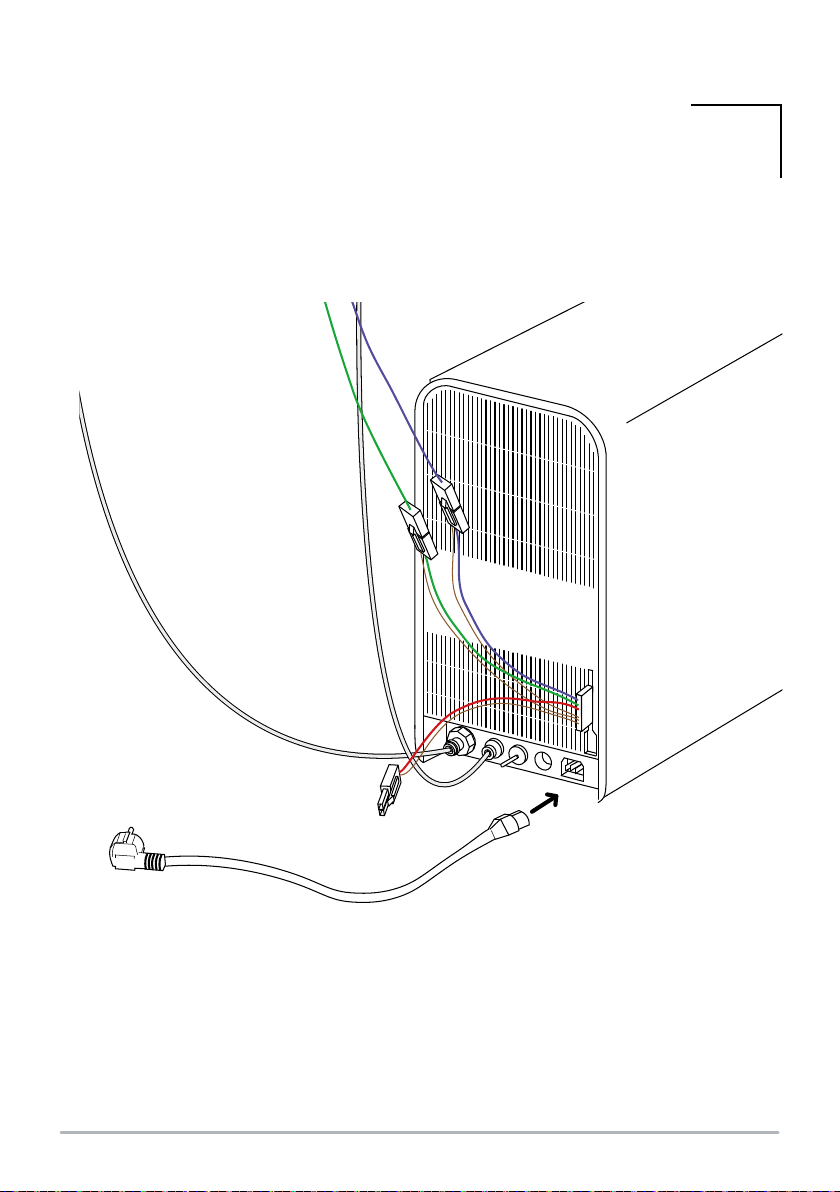
Sluit de voedingskabel aan op de cooler aan de achterkant.
ɂ
Connect the power supply cable to the back of the cooler.
Ⱦ
Connectez le câble d’alimentation à la partie arrière du refroidisseur.
Ɇ
Conecte el cable de alimentación en la parte trasera del enfriador.
ȿ
18
SELSIUZ 4-IN-1 HANDLEIDING
12
Vul de Selsiuz cooler met water door de waterleiding te openen en controleer alle
aansluitingen op lekkages. Indien u een lekkage aantreft, verhelp deze.
ɂ
Fill the Selsiuz cooler with water by opening the water supply and check all
Ⱦ
Remplissez le refroidisseur Selsiuz avec de l’eau en ouvrant l’arrivée d’eau et
réparez-la.
Ɇ
Llene el enfriador Selsiuz con agua, abriendo la tubería del agua, y compruebe
que no haya fuga en todas las conexiones. En caso de fuga, repárela.
ȿ

19
VERSIE: SH.22.1.1
13
Steek de stekker van de cooler in het stopcontact.
ɂ
Put the plug of the cooler into the socket.
Ⱦ
Ɇ
Enchufe el cable del enfriador en el enchufe de la pared.
ȿ

20
SELSIUZ 4-IN-1 HANDLEIDING
2. INLEIDING
2.1 Bedoeld en onbedoeld gebruik
Dit apparaat is bedoeld om drinkwater op te
slaan, te koelen en beschikbaar te stellen voor
gebruik. De cooler dient te worden aangesloten
in een huiselijke omgeving.
Dit apparaat dient niet te worden gebruikt voor:
ūCommerciële of industriële toepassingen;
ūIn vervoersmiddelen of aan boord van schepen
of vliegtuigen;
ūVoor medische doeleinden;
ūIn de horeca.
De cooler mag alleen gebruikt worden volgens
de voorschriften in deze handleiding. Ander
gebruik dan omschreven in deze handleiding
wordt gezien als onbedoeld gebruik.
2.2 Algemene beschrijving van de
werking
De Cooler wordt voorzien van koud
drinkwater. Slaat het drinkwater op en maakt
gekoeld en bruisend water beschikbaar. Het water
kan met de Selsiuz 4-in-1 kraan worden getapt. De
kraan geeft naast gekoeld en bruisend water ook
de mogelijkheid koud en warm water te tappen.
De bepalingen genoemd in deze handleiding zijn een aanvulling op de genoemde bepalingen in de
handleiding die bij de Selsiuz boiler is meegeleverd. Voor het Selsiuz 4-in-1 systeem blijven deze
bepalingen van toepassing.
ɂ
Table of contents
Languages:
Other selsiuz Plumbing Product manuals

Popular Plumbing Product manuals by other brands

Grohe
Grohe 23 429 manual

Oras
Oras Ventura 8010 manual

STIEBEL ELTRON
STIEBEL ELTRON MEW Instructions for operating and installation

Pfister
Pfister Carnegie RT6-4WE Quick installation guide

Bradley
Bradley EXPRESS MG-EXT installation instructions

Adjust-a-Sink
Adjust-a-Sink E140 Series installation instructions

American Standard
American Standard Trimbook Urinal 6561.017 Specification sheet

Sanela
Sanela SLP 37R Instructions for use

Kohler
Kohler 99721T-4 installation instructions

SOG
SOG Type B Operating and Maintenance Intructions

Bradley
Bradley S19-220 Installation

Grohe
Grohe GROHTHERM 1000 COSMOPOLITAN 34 065 manual


