SELTEKA IF-442HD Wi-Fi User manual

1
1. Content
1. Content ...............................................................................................................................................................1
2. Important safety instructions ..............................................................................................................................2
3. Brief Description of the Receiver........................................................................................................................3
4. Complement .......................................................................................................................................................3
5. Receiver Description and Illustrations................................................................................................................3
5.1. Front panel ................................................................................................................................................3
5.2. Rear panel.................................................................................................................................................3
5.3. Remote Control.........................................................................................................................................4
6. Installation...........................................................................................................................................................5
7. Connection of the Receiver to TV Set, IPTV network, Video Player or DVD ....................................................5
7.1. Connection of the receiver to a TV set and IPTV network .......................................................................5
7.2. Connection of the receiver to a video player or DVD ...............................................................................6
7.3. Connection of the receiver to a digital audio decoder ..............................................................................6
8. Setting of the Receiver .......................................................................................................................................7
8.1. First startup of the receiver .......................................................................................................................7
8.2. Main menu.................................................................................................................................................8
8.3. Settings......................................................................................................................................................8
8.3.1. Favorite editor..................................................................................................................................8
8.3.2. Channel search................................................................................................................................8
8.3.3. System setting .................................................................................................................................9
8.3.3.1. Languages...............................................................................................................................9
8.3.3.2. Network..................................................................................................................................10
8.3.3.3. TV output settings..................................................................................................................10
8.3.3.4. Parent menu..........................................................................................................................12
8.3.3.5. System functions ...................................................................................................................13
8.3.4. System information........................................................................................................................18
8.4. Internet ....................................................................................................................................................18
8.5. Teleguide.................................................................................................................................................18
8.6. Recordings ..............................................................................................................................................20
8.7. Media player............................................................................................................................................22
9. Receiver Control...............................................................................................................................................23
9.1. Channel switching...................................................................................................................................23
9.2. Program list .............................................................................................................................................24
9.3. Volume control ........................................................................................................................................26
9.4. Picture freeze ..........................................................................................................................................26
9.5. Aspect Ratio............................................................................................................................................26
9.6. Teleguide.................................................................................................................................................26
9.7. Main menu. Settings ...............................................................................................................................27
9.8. Returns to previously watched channel..................................................................................................27
9.9. Page up, Page down...............................................................................................................................27
9.10. TV/R ........................................................................................................................................................27
9.11. Audio selection. Subtitle..........................................................................................................................27
9.12. Switch off Timer.......................................................................................................................................27
9.13. Favorites..................................................................................................................................................27
9.14. Recordings ..............................................................................................................................................27
9.14.1. Records..........................................................................................................................................27
9.14.2. YouTube downloads......................................................................................................................28
9.15. Media Player Control...............................................................................................................................28
9.15.1. Play, Pause....................................................................................................................................28
9.15.2. Stop................................................................................................................................................28
9.15.3. Rewind, Fast Forward....................................................................................................................29
9.15.4. Skip Back, Skip Next......................................................................................................................29
10. Technical Specifications...................................................................................................................................29

2
2. Important safety instructions
Please read this manual carefully before using this product.
Before connecting the AC power cord to the outlet, make sure the voltage designation of the digital
receiver corresponds to the local electrical supply. If you are unsure of your power supply, ask your
local power company.
Never insert anything metallic into the cabinet openings of the digital receiver; otherwise it may create
the danger of electric shock.
To avoid electric shock, never touch the inside of the digital receiver. Only a qualified technician should
open the case of the receiver.
Never use your digital receiver if the power cord has been damaged. Do not allow anything to rest on
the power cord, and keep the cord away from place where people can trip over it.
Be sure to hold the plug, not the cord, when disconnecting the receiver from an electric socket.
Two position bi-stabile ON-OFF push-push network switch turns on the receiver for operation or turns
off. Its function is described in detail in chapter 8.1 First startup of the receiver. Power network switch
does not turn off the receiver from power network totally. There remain, however, some parts with
voltage. Device that completely disconnects receiver from power network is power network plug. For
this reason power network outlet must be easily reached.
Batteries shall not be exposed to excessive heat such as sunshine, fire or the like.
Ensure a minimum distance of 5 cm around the apparatus for sufficient ventilation.
Ensure that the ventilation is not impeded by covering the ventilation openings with items such as
newspapers, table-cloths, curtains, etc.
Do not place naked flame sources, such as lighted candles on the apparatus.
Take attention to the environmental aspects of battery disposal. Do not threw away batteries with the
domestic waist but only to special gathering points.
Use the apparatus only in moderate climates (not in tropical climates).
Openings in the digital receiver cabinet are provided for ventilation. To prevent overheating, these
openings should not be blocked or covered. Also, avoid using the receiver on a bed, sofa, rug, or other
soft surface. Doing so may block the ventilation openings in the bottom of the cabinet. If you put the
receiver in a bookcase or some other enclosed space, be sure to provide adequate ventilation.
Do not expose the digital receiver to extreme temperature conditions or to extreme humidity conditions.
The apparatus shall not be exposed to dripping or splashing and that no objects filled with liquids, such
as vases, shall be placed on the apparatus.
Do not place the digital receiver on an unstable cart, stand, tripod, bracket, table, or floor where it can
fall. It is damaged if dropped, hit or scratched. Do not clean the front with keton-type materials (e.g.
acetone), ethyl alcohol, toluene, ethyl acid, methyl, or chloride - these may damage the panel.
If your digital receiver does not operate normally in particular, if there are any unusual sounds or
smells coming from it unplug it immediately and contact an authorized dealer or service center.
High temperature can cause problems. Don`t use your digital receiver in direct sunlight, and keep it
away from heaters, stoves, fireplaces, and other sources of heat.
Unplug the power network plug when it is going to be left unused for an extended period of time. Also it
is recommended to disconnect the receiver from power network at the time of thunderstorm.
To reduce the risk of fire or electric shock, and annoying interference, use the recommended
accessories only which are listed in chapter 4 Complement.
If the receiver is broken, do not try to repair it yourself. Contact qualified service personnel.
Unplug power cable from the AC outlet before any service.
Be sure the service technician uses authorized replacement parts or their equivalents. Unauthorized
parts may cause fire, electrical shook, or other hazards.
Following any service or repair, be sure the service technician performs safety checks to certify that
your digital receiver is in safe operating order.
This symbol indicates important instructions accompanying the product.
This symbol indicates dangerous voltage inside the product that presents
a risk of electric shock or personal injury.
3
3. Brief Description of the Receiver
IPTV receivers IF-442HD and IF-442HD Wi-Fi –television receivers enable to receive signals of Digital TV that
are transmitted by package data networks. It can be used together with analogue televisions, sound amplifiers,
video players and other domestic receiving and recording devices. It can receive HD (high definition) programs.
IF-442HD and IF-442HD Wi-Fi receivers have media players that allows watching video recordings, photos of
Digital format and restore musical records.
IF-442HD Wi-Fi receivers has an integrated Wi-Fi module that let a receiver‘s access point in Wi-Fi zone of data
transmission network to connect to IPTV broadcaster server as well as with LAN cable.
4. Complement
- IPTV digital receiver IF-442HD or IF-442HD Wi-Fi 1 pc
- Remote control 1 pc
- External power supply 1 pc
- AAA type batteries 2 pc
- HDMI cable 1 pc
- AV adapter 1 pc
- User manual 1 pc
5. Receiver Description and Illustrations
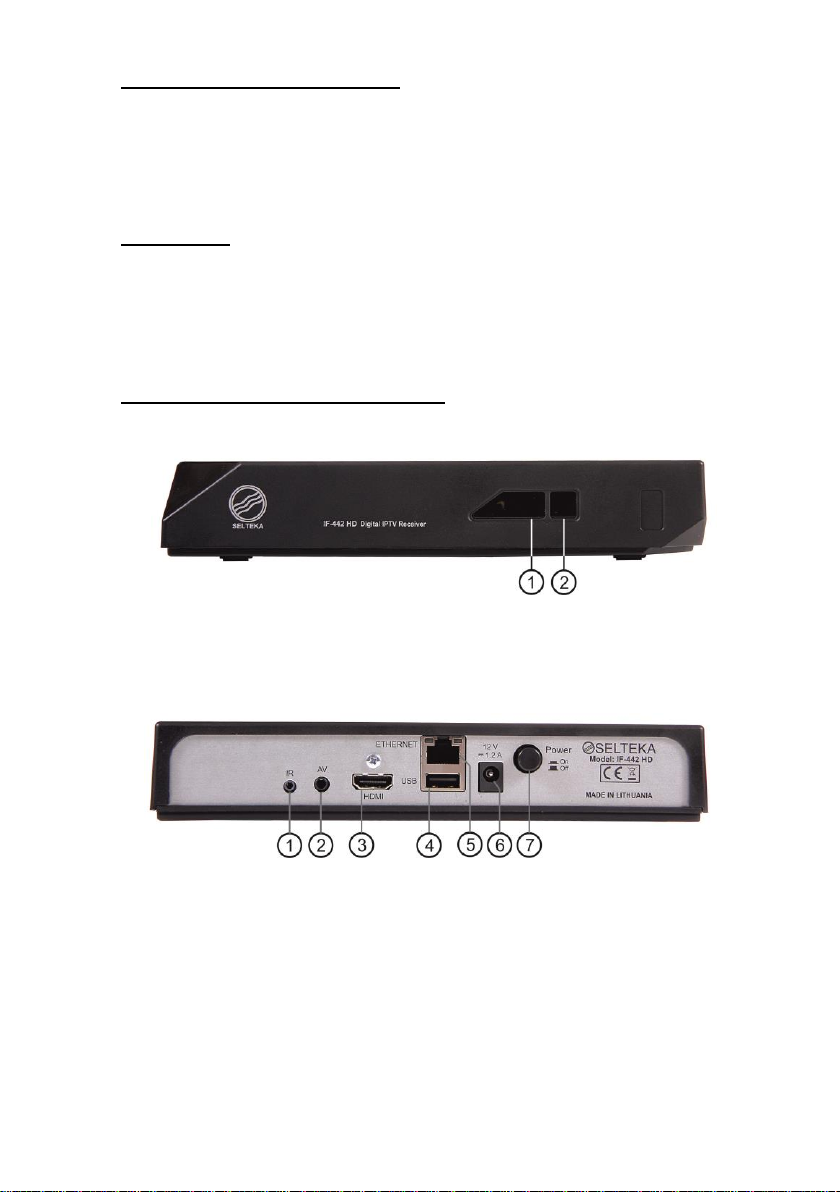
5.1. Front panel
Fig. 1 Front panel
1. Remote control sensor.
2. ON / standby indicator.
It is red in standby mode, and it is green when the receivers is in operation mode.
5.2. Rear panel
Fig. 2 Rear panel
1. IR, external remote control sensor connector.
2. AV, Audio / Video connector.
It is used to connect a receiver to a TV-set with a SCART-RCA cable by using AV adapter.
3. HDMI, high definition television connector.
It is intended for television connection to the receivers with HDMI cable.
4. USB connector.
It is intended to connect external media.
5. ETHERNET, connector of computer network.
It is intended to connect to computer networks files server.
6. Power connector.
It is intended for external power supply cable connection.
7. Power switch.

4
5.3. Remote Control
Fig. 3 Remote control
1. Mute
It turns the volume off / on.
2. Standby
It switches the receiver on / off (standby mode).
3. 0-9
Number buttons. They are used to select TV channels, radio
channels or menu options.
4. Freeze
It stops / plays the picture.
5. Aspect Ratio
It is used to change aspect ratio 4:3 or 16:9 mode.
6. Guide
It is used to show electronic program guide.
7. TXT
It is used to switch the teletext on / off.
8. Help
It is used to show help window.
9. OPT
It directly opens SETTINGS menu.
10. Return
It is used to switch back to the previous channel.
11. OK
It shows the channel list or confirms the choice in the menu list.
12. /
They are used to change the displayed options and channels to be
selected.
13. /
They are used to decrease / increase the volume. When “menu”
function is active - left / right line movement.
14. Menu
It is used to open up the menu.
15. Exit
It is used to exit from the menu. Changes are not saved.
16. Info
It is used to show the information on the current channel or program
on the TV screen.
17. Vol + / -
It is used to increase / decrease the volume.
18. Ch + /-
It is used to switch the channels.
19. Page up / Page down
They switches between pages in channel and file lists.
20. Colored (hot buttons)
Red, green, yellow, blue buttons can be programmed to control the
most frequently used functions.
21. TV/R
It is used to show the providers list (IP Radio or IPTV) and set it.
22. SUB
Not active now.
23. Timer
Not active now.
24. LANG
It is used to select audio track.
25. Media Player Control Buttons:
Record, Play, Pause, Stop,
Rewind, Skip Back, Skip Next, Fast Forward.
They are intended to control Media player.
5
6. Installation
Please read this manual before installing the receiver
The receivers must be placed close to a TV set or any other domestic devices in order to connect them together
through cables included in the complement. The following important rules and safety requirements must be
followed.
- the receiver cannot be placed close to devices emitting radio waves, for instance, mobile phones.
- the receivers must be directly visible by user to control it by means of the remote control.
- never connect or disconnect HDMI, AV and Ethernet cables when power is switched on.
7. Connection of the Receiver to TV Set, IPTV network, Video Player or DVD
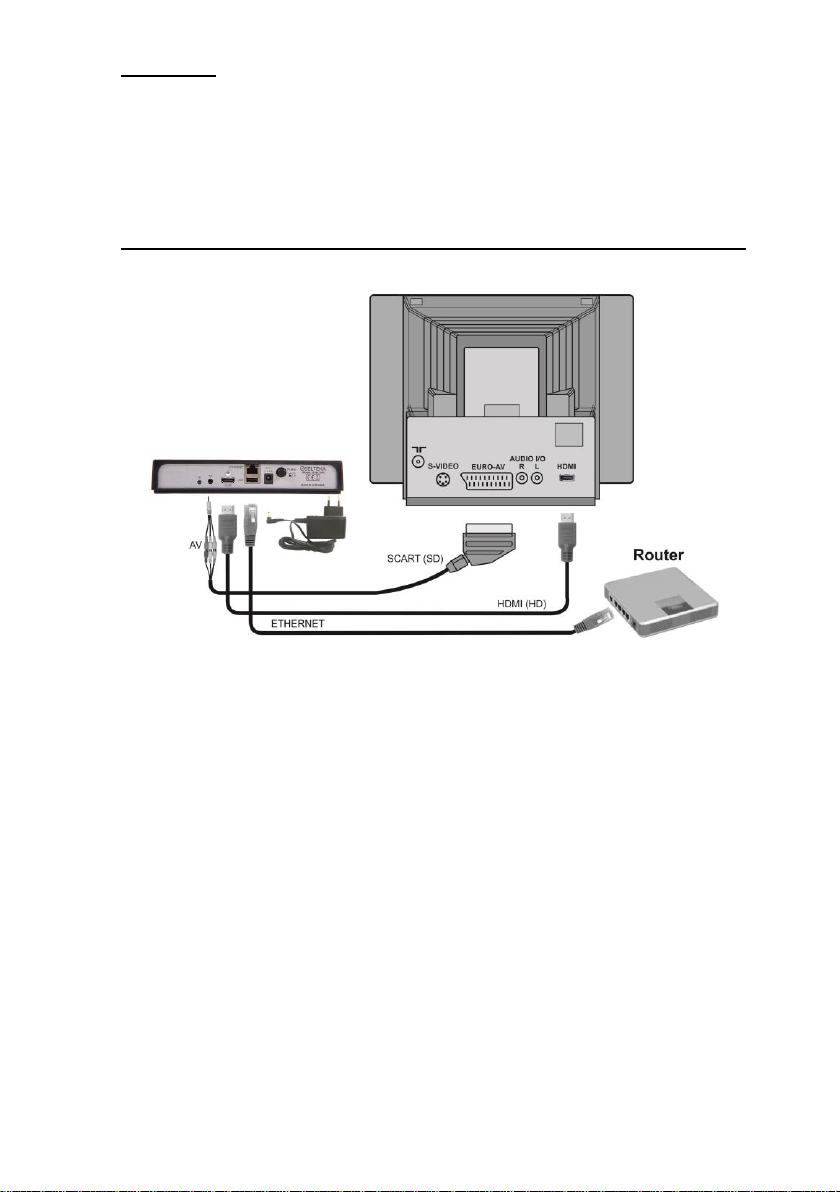
7.1. Connection of the receiver to a TV set and IPTV network
Fig. 4 Connection of the receiver to a TV set through SCART-RCA-AV adapter or HDMI cable and IPTV
network
External power supply connection to Digital receiver
Connect complement external power supply plug to the Digital receivers power connect. Use only complement
external power supply.
Connecting Standard definition (SD) signal to analogue TV set
Connect SCART connector of SCART-RCA cable to a TV set, RCA connectors connect to AV adapter RCA
connectors and TRRS connector connect to a digital TV receiver as shown in Fig. 4 Connection of the receiver
to a TV set through SCART-RCA-AV adapter or HDMI cable and IPTV network. In setting menu of a TV set
select SCART input.
Connecting high definition (HD) signal to analogue TV set
Connect HDMI cable as shown in Fig. 4 Connection of the receiver to a TV set through SCART-RCA-AV adapter
or HDMI cable and IPTV network. Select HDMI input in your TV set menu. High definition Digital television
Picture appears in the screen. Video settings are described in detail in section 8.3.3.3. TV output settings.
Receiver connection to IPTV network
Connect IPTV networks cable as shown in Fig. 4 Connection of the receiver to a TV set through SCART-RCA-
AV adapter or HDMI cable and IPTV network. IPTV network settings are described in detail in section 8.3.3.2
8.3.3.2.
6
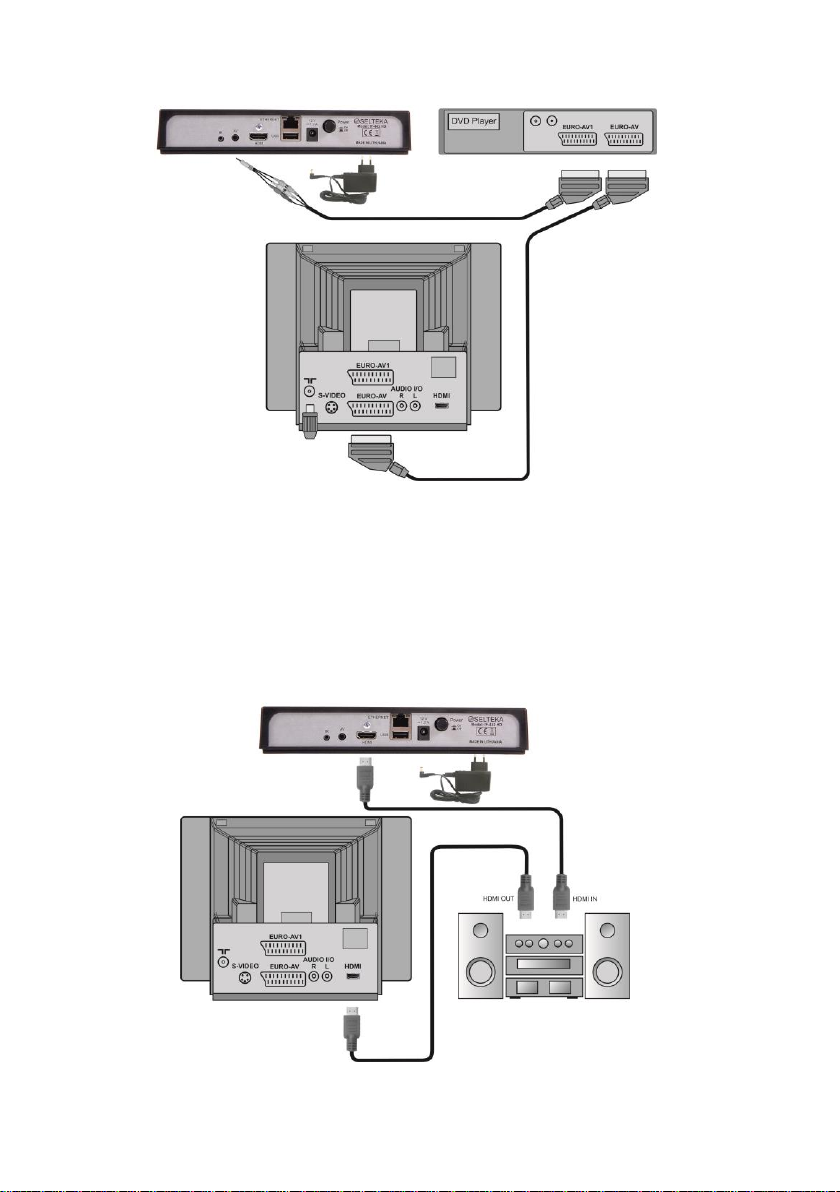
7.2. Connection of the receiver to a video player or DVD
Fig. 5 Connection of the receiver to a video player or DVD
Interconnections must be made as shown in Fig. 5 Connection of the receiver to a video player or DVD. For
functioning of the system, all the devices must be plugged into power outlets. This manual and the manuals of
other devices must be followed.
7.3. Connection of the receiver to a digital audio decoder
Interconnection for the receivers and a Digital audio decoder (stereo, home theatre) is made via HDMI cables (1
pc of HDMI cable is included in complement). Digital audio signals are fully decoded inside the connected
decoder.
The channels must be broadcast in Dolby AC3 standard, and the correct path must be chosen, as it is described
in section 8.3.3.3. TV output settings.
Fig. 6 Connection of the receiver to a digital audio decoder

7
8. Setting of the Receiver
8.1. First startup of the receiver
Make sure that the external power supply is connected to the receiver, plug the external power supply plug to
the power outlet. Press the button Power On / Off on the rear panel to turn on the receiver power. When power
switch button is pressed up, position On, receiver is turned on, when button is pressed again and sticks
out from cabinet, position Off, receiver is turned off. When the power is turned on, the indicator on front
panel lights red until software boots up. Then the indicator changes color to green. At the time of software boot
in advertising saver will appear on the television screen, and then the menu Initial settings (First setting up)
will appear.
Fig. 7 First setting up
Menu language
Initial settings menu language line is selected. Enter language menu by pressing OK button and select desirable
language for menu. Default language is English.
On purpose to select the direction of language list or other suggested menu selections –upstairs or downstairs,
it is necessary to choose a selective parameter indicator on the right or by pressing remote control /
buttons.
Time zone
By pressing remote control button select a lower line Time zone. The selected line is highlighted. The default
zone is UTC, time zone GMT. Time zone is selected analogically to the selection of the menu language by
pressing the OK button. Time zone in Lithuania is selected UTC+02:00.
Daylight Saving Time
By pressing remote control button select the following lower line Daylight Saving Time. Press OK button,
select yes, if you want that receiver would automatically adjust to switch between seasonal time, or no if you
want that the time shown in winter and summer will not change.
Network connection
In order to confirm all settings select Apply line by pressing remote control button and press OK. After the
few seconds the window Network connection appears in television window. Press the OK button and select
LAN (cable) or WLAN (wireless) connection. In the receivers IF-442HD without integrated Wi-Fi module leave
default LAN connection. After the selection of any other connection and by pressing remote control button
pass the line Apply and press OK. In the case of selecting LAN you will straightly pass to the menu of IPTV
type. After the selection of WLAN and confirmed the selection you will have to find your available wireless
networks at the list of IP and set the password of that networks as it is described at the section 8.3.3.2 Network.
IPTV type
In opened window IPTV type it is possible to select the mean of Access to the transmitted content or way. By
pressing the OK button and choosing one of IPTV types, confirm it by pressing Apply. Further actions are
described in detail at the section 8.3.2. Channel search.
If you did not do the settings when switched the receivers for the first time, you can do this later, as it is
described in further sections of the user manual.
8
8.2. Main menu
Main menu includes a lot of settings which allow to configure the receiver. To enter main menu, press MENU
button on the remote control. Menu lines may be marked (selected) by using / buttons. Selected line is
highlighted. To enter the window of the selected menu line, press OK button, and in order to return back to the
previous menu window, press MENU button. To exit from main menu, press EXIT button. To enter to submenu
SETTINGS and RECORDINGS select corresponding line and press OK.
Fig. 8 Main menu
8.3. Settings
You can change receiver‘s parameters in the selection of this menu by adjusting it to the conditions of the user.
8.3.1. Favorite editor
This option allows to edit the program list made by a user. The editor works only when the full list is loaded and
this function is supported by an operator. Section 8.5 Teleguide gives a detailed explanation on how to perform
this task.
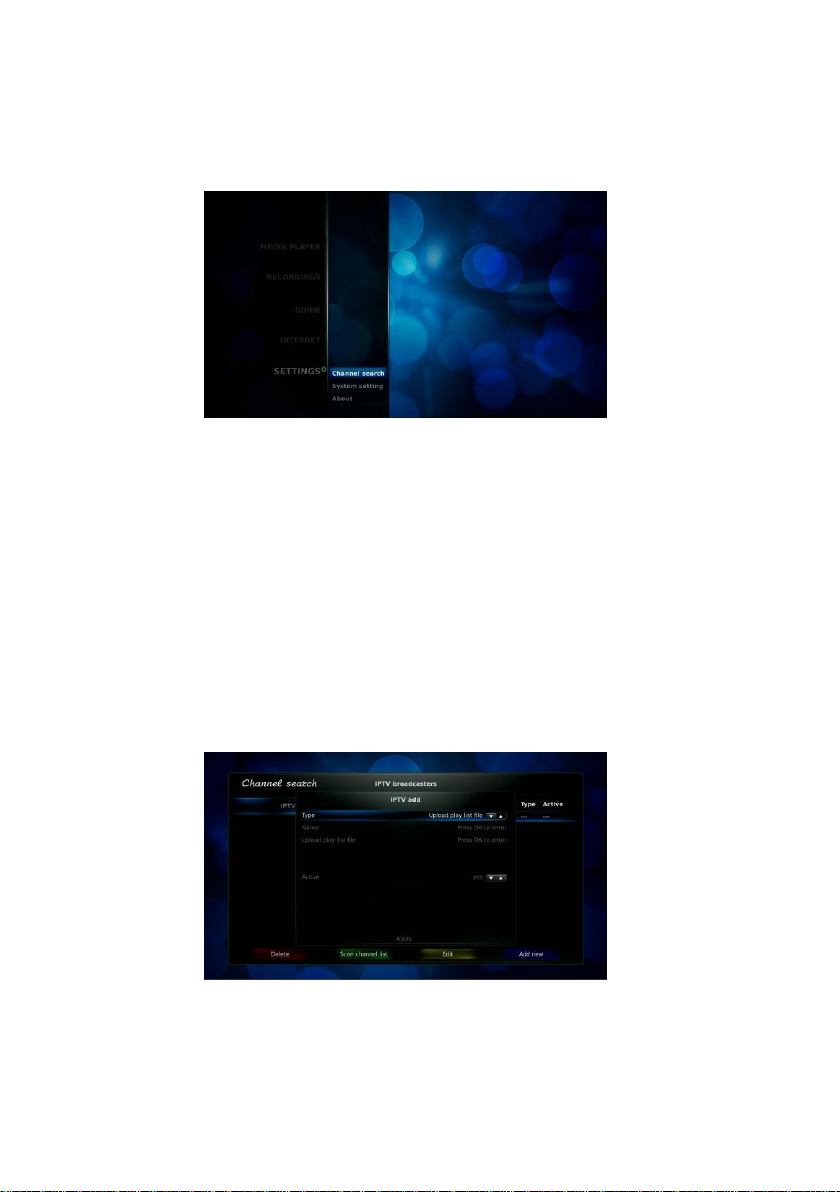
8.3.2. Channel search
Before starting the search of the channels, make sure that the LAN networks cable is connected or it was
connected to the wireless WLAN networks. Channel search in IPTV receiver –is a playlist load or reference to
the playlist where IP addressed are indicated as well as other information of broadcaster transmitted TV
programs. Select Menu->SETTINGS->Channel search and press OK. Enter to the submenu of channel search
and press button, pass to the right side of the window, and active colorful buttons will appear. Press the blue
Add new button. The playlist loading window will open.
Fig. 9 Channel search
If you chose Type->Upload play list file, then put a USB storage with the recorded playlist file to the USB
socket, then choose the line Name and press OK. The virtual keyboard will open. By using it, enter the desired
broadcaster name. The selection of necessary symbols is being exercised by moving the cursor of the keyboard
and pressing OK. When the broadcaster‘s title setting will be finished, move the cursor to Enter and press OK.

9
Fig. 10 Enter broadcaster name
Select the line Upload play list file and press OK. Select USB port where the USB storage is being put. Select
the file of the playlist and press OK. The way how to upload the playlist will appear.
If you selected Type->Link to play list, set the title of broadcaster, next select the line Enter to add link and
press OK, set http:// reference path where playlist file is being kept.
IPTV content with SDP protocol can be transmitted in local IP networks. This way you have to select Type-
>SDP and set a new title on your request.
After mentioned actions select the line Apply and press OK, a new broadcaster‘s playlist will be added. Press
green button Scan channel list and you could overlook the list of broadcaster‘s transmitted programs in a new
window. Press red button Delete and you can remove the chosen playlist in order to do so you must enter
password. Press yellow button Edit, and you could change the playlist with a new one or switch a chosen
broadcaster off (make it inactive).
After the finish of all actions in channel search window, press Exit in a remote control, and the receiver will start
showing the first program from the list.
Other IPTV types are designed for specific broadcasters which transmit IPTV content by special protocols and
configurations.
8.3.3. System setting
At the submenu of basic menu SETTINGS select System setting and press OK button. A new System
settings window will appear, where you can change and/or apply system settings for receiver.
To enter System settings window options, select the submenu line and press button.
8.3.3.1. Languages
Menu->SETTINGS->System setting->Language. These system setting allow selecting the language of the
menu, sound track and subtitles. Each language setting can be selected separately. Selecting the language of
sound track you can also select the alternative language in case if there is no basic language in selected sound
track transmission. If there are no selected soundtrack languages in your program, default language tracks will
be automatically selected. To save the changes press yellow remote control button Save settings, see Fig. 11
Languages.
Fig. 11 Languages
The receiver by uploading configuration or playlist sets such sound track and subtitles which have been chosen
in this menu. You can change the sound track and subtitles manually while watching the program and the
receiver will memorize the options.

10
8.3.3.2. Network
Both IPTV receivers models are equipped by 10/100 Mbit LAN interfaces while IF-442HD Wi-Fi and wireless 150
Mbit WLAN interface. To see the list of possible networks connection you need to enter Menu->SETTINGS-
>System setting->Network.
Fig. 12 Network connections
If a LAN cable is plugged into network (ETHERNET socket), you can see actual link speed.
If you want to connect to the selected WLAN Access Point (AP) you can select it and press OK button. The
receiver will request AP for connection. If it is a password protected network, the screen keyboard will open for
password input. Necessary symbols selection is made by moving a keyboard cursor and pressing OK. When
you will enter the password, move the cursor to Enter and press OK. Next time the receiver will remember the
passwords for the few last successfully connected AP and will connect to him automatically.
Fig. 13 Connect to WLAN. Enter password
By pressing red button Set default route you can select default connection route to internet. In case the default
connection is available, the receiver will link to internet via this network. If the default connection is not available,
the receiver will try to link internet via any other available network connection. By pressing yellow button Wlan
Off you can switch OFF WLAN adapter. By pressing Info button you can look network information regarding the
corresponding network or AP.
To check the Access to the internet and actual route connection to the networks, press green button Check
internet.
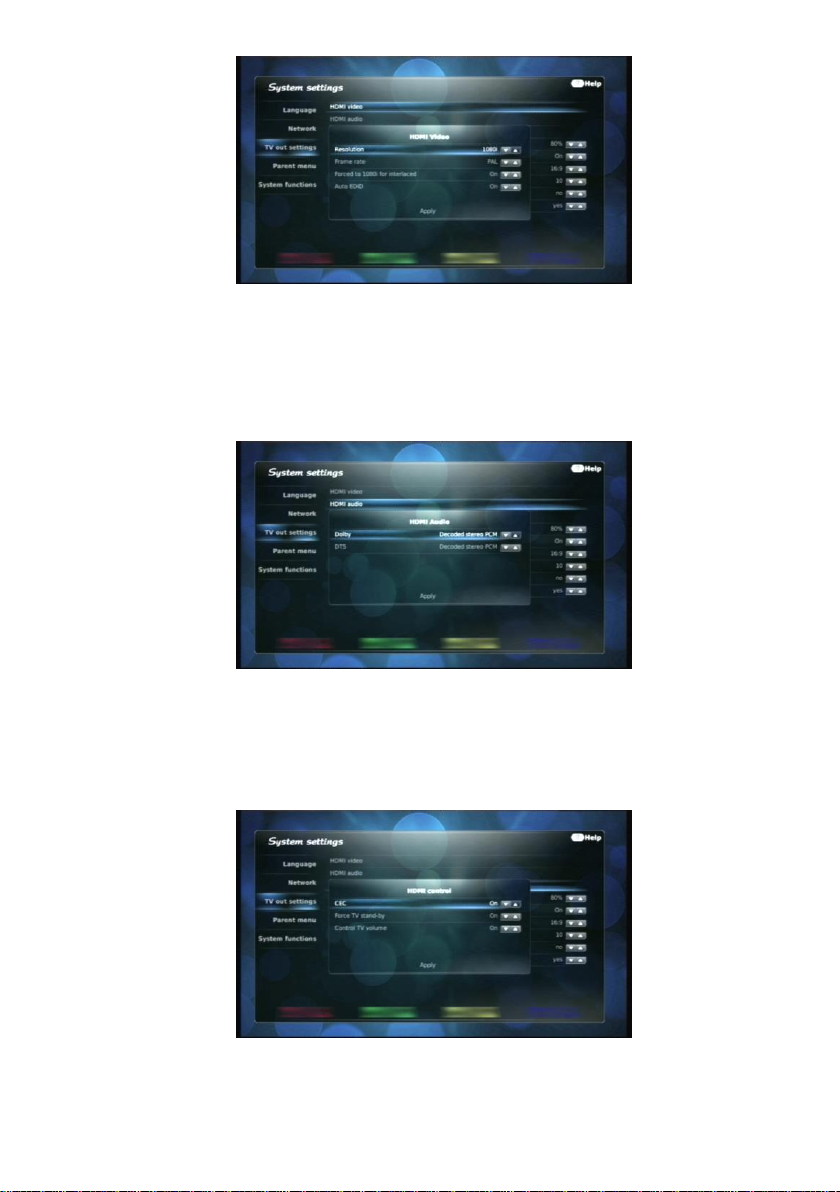
8.3.3.3. TV output settings
There are two ways to connect receivers to television –by HDMI and SCART-RCA or RCA-RCA cables via AV
adapter.
Superior way is by HDMI cable, because it gives a possibility to get a high definition (HD) view in television
screen. When television will be connected with HDMI cable, receiver reads supportive formats EDID table and
sets the most optimum television modes. These modes can be changed manually, but be careful –some modes
can be incompatible with your television and there will be no view in the screen then at all. In such case make a
video connection with SCART-RCA cable (signal through AV output is always available), select HDMI Video
option and select Auto EDID mode. Turned on Auto EDID mode means that receivers will read EDID table from
connected television and set HDMI resolution and frames rate. Frames rate satisfy restored video signal
parameters. Thus the best quality of restore will be reached. If video signal parameters, i.e. resolution and
frames rate is connected to television are not supported (no equivalent modes in EDID table), receivers will
select the most suitable mode supported by television.
11
Fig. 14 TV output settings. HDMI Video
For further usage of selected functions you have to save the options. Menu->SETTINGS->System setting->TV
out settings->HDMI Video you have to select the function Apply and press OK. If Auto EDID is switched on,
the receiver will set a selected resolution and frame rate at the first switch. If Auto EDID is switched off, then
selected resolution and frame rate in this window are set by receiver as fixed and automatically invariable.
Frames rate is selected by PAL (default option).
If Forced to 1080i for interlaced is selected ON, the system sets HDMI for 1080i even if EDID has 1080p (not
1080i)
Fig. 15 TV output settings. HDMI Audio
Menu->SETTINGS->System setting->TV out settings->HDMI Audio, you can select the type of audio in HDMI
output. Select Pass Through, receiver will divert the selected soundtrack to selected output in compressed
format (not decoded). Selected Decoded stereo PCM, receivers will divert the selected sound track to a
selected output by decoded stereo format. Because of limited number of decoders installed in receiver‘s
software, not all sound tracks will be output in stereo PCM mode.
Fig. 16 TV output settings. HDMI control

12
Modern TV sets have a fully installed all features and commands set maintenance in CEC remote control
protocol. Thus some TV sets functions can be controlled from digital TV receiver through HDMI. To switch IF-
442HD / IF-442HD Wi-Fi and TV set to a standby by one click in remote control Standby button and to
control audio of digital TV receiver and TV set it is necessary to switch on CEC, Force TV stand-by and
Control TV volume enter Menu->SETTINGS->System setting->TV out settings->HDMI control, see Fig. 16
TV output settings. HDMI control.
To save selected settings and functions of HDMI and S/PDIF you have to select the line Apply in each window
and press OK button.
Fig. 17 Other TV output settings
Menu->SETTINGS->System setting->TV out settings->OSD layer opacity you can set a requested OSD
transparency to see the view in manipulating with menu options in this function.
Menu->SETTINGS->System setting->TV out settings->Convert 4:3 SD video you can select right received
SD programs aspect ratio according to vertical and horizontal in TV sets which screen aspect ratio is 16:9. It is
recommended to leave default setting, and while watching if there is a necessity to change aspect ratio you have
to use a button Aspect Ratio on the remote control. Pressing it in turn the aspect ratio options change On –
scale - Off.
Menu->SETTINGS->System setting->TV out settings->TV connected on CVBS you can select aspect ratio
16:9 or 4:3, to save original view proportions when you watch through AV output. This option is applied to old
model televisions which have 4:3 screen and there is no possibility to change view proportions.
Menu->SETTINGS->System setting->TV out settings->Infobar display time sec you can select how many
seconds the informational bar show will be seen in the screen after program turn over or called it by pressing
Info button.
Menu->SETTINGS->System setting->TV out settings->Simplified channel list window, select yes and the
list will be shown in bigger letters, detailed information on the right screen side will be unseen. see 9.2. Program
list. Option is designed for televisions which have low resolution.
Menu->SETTINGS->System setting->TV out settings->Background image you can turn background image
by selecting Yes, which is visible in TV screen when there is no view or entering to various menu options in
screen background. Select No, and the background behind menu options will appear in black.
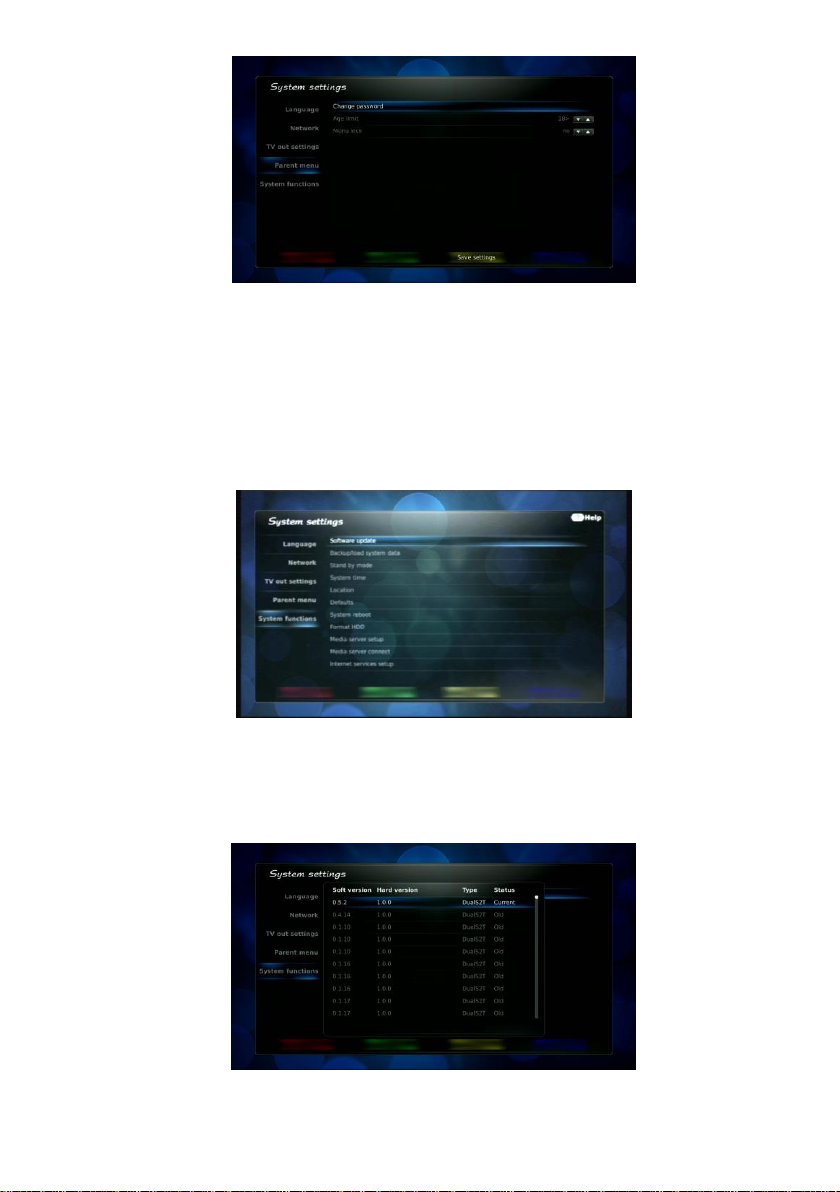
8.3.3.4. Parent menu
Menu->SETTINGS->System setting->Parent menu allows changing the password and set age limit –any
other classified by the broadcaster program will be blocked if age limit is passed.
To change age limit the password must be entered. Initial password is 0000. if you use limitation function for the
first time you have to change the password. Enter a new password from 4 numbers, repeat it once again, select
Apply and press OK.
To save selected limitations press yellow button in remote control Save settings.
Do not forget the password! Otherwise, you must apply a service center to unblock the menu.
13
Fig. 18 Parent menu
Broadcaster usually send the information about age limit in every broadcast. The option Age limit allows
indicating age which will be limited it is higher. If indicated age is less that broadcaster‘s sent age, then the
program will be automatically blocked. Every time selecting the program the receivers will ask a password to
unblock it. Channel search menu and factory default options will be also blocked. This option also blocks all
menu that allows changing regulation –Channel search, System setting. The password will be required to
enter before entering these menu.
8.3.3.5. System functions
Menu->SETTINGS->System setting->System functions
Fig. 19 System functions
Software update
Receivers has a possibility to update the software by loading a new version. Put the update file into USB
storage, NXP folder. Connect USB storage to receiver‘s USB socket, select the line Software update and press
OK. The system will find all software updates in USB storage NXP folder.
Fig. 20 Software update

14
If the receiver is connected to data network, then configuration downloaded by broadcaster transfers from its
server software update data and these updates will be visible as much as those written in USB storage. Column
Status indicates software in the receiver, old versions if it was left in USB storage or broadcaster server and
new SW version.
Select actual update and press OK. In an opened window Start update? select YES and press OK. The update
will start, do not unplug receiver, because after update finish receivers will automatically restart and watched
programs video and audio will be visible.
If IPTV broadcaster in server has put an actual SW update, you do not have to check it every time. After
switching on / off receivers it will automatically start a search of new SW, find it, download it, load to the memory
and update.
Fig. 21 Downloading software from network
When receiver finds an actual SW update, it downloads it and notice Downloading software appears at TV set
screen, see Fig. 21 Downloading software from network. If you do not wish the software to be downloaded and
updated, press OK –Cancel button. After download the notice Please insert USB storage for backup. When
inserting USB flash disk to any USB port, there the new SW copy will be saved in NXP folder. If you do not wish
to save back up SW copy, press OK –Skip. SW will be updated as described above.
It he process of SW update was not successful or power supply interrupted, leave UBS storage with update file
in connection and plug receivers supply again, the receiver will recover the software.
Any attempt to update receiver‘s software illegally leads to guarantee lost.
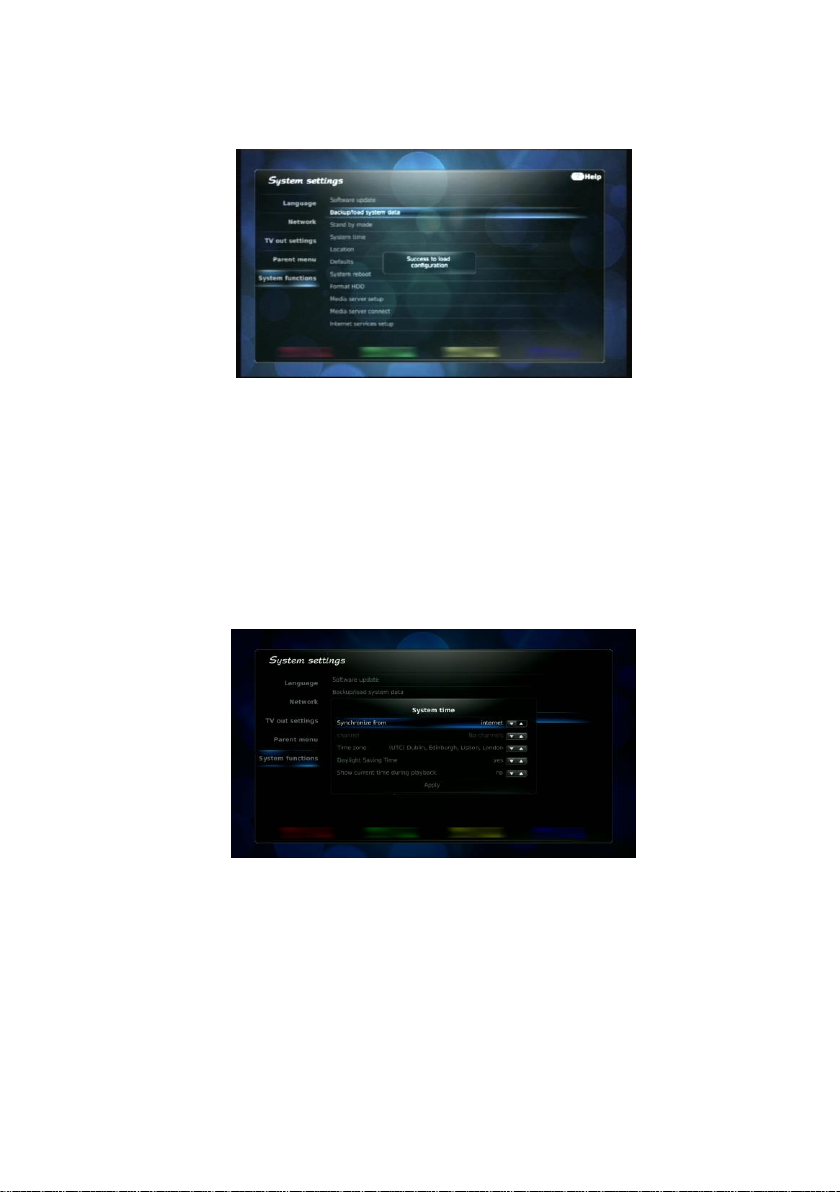
Backup/load system data
IF-442HD and IF-442HD Wi-Fi models are possible only for system data (configuration) load.
IPTV broadcaster in its configuration usually indicates the place in server from which SW updates, playlist, EPG
and other services information must be downloaded.
Fig. 22 Load system data
To load configuration insert USB storage to USB socket with stored configuration file, select line Backup/load
system data and press OK, new line Load box config will appear and press OK one more time. If there are
two USB sockets in receiver, select the one where USB storage is inserted and press OK, the list with USB
storage folders and files will appear. Select xml configuration file given by IPTV broadcaster and press OK. The
configuration will be loading for several seconds, after the finish of the process the notice Success to load
configuration will appear in the screen. In case of failure, apply to your IPTV broadcaster.
15
After configuration load in software update option it is possible to find updates suggested by IPTV broadcaster
and to update SW as it was described in paragraph Software update. IPTV broadcaster given playlist will be also
loaded, found and used as described in 8.3.2. Channel search.
If broadcaster changes configuration of receivers, he checks if there is a new configuration version each time
you turn receiver off and on, and download and load the configuration.
Fig. 23 Load configuration from network
If a new configuration has a reference to a new software version, it will be automatically loaded and installed,
see Fig. 21 Downloading software from network. Also, if there are any changes in playlist, it will be automatically
updated, and new versions will appear in program list or old and non-actual programs will be deleted.
Stand by mode
Select Stand by mode and press OK, and you can select the time after the receiver will go to standby if a user
is inactive (fell asleep, forgot to turn off IPTV receivers when switched off television or alike). Confirm the option
by pressing Apply.
System time
System time and its correction are made automatically. Receiver synchronize the time from the first selected
program and after that from the program selected from this menu. Selection local program is recommended.
Fig. 24 System time
In System time window must be selected Time zone and option Daylight Saving Time. When all options are
set, press Apply. System time will be synchronized and window will close. The time in receivers is always being
corrected and figured by the season. If you had already selected settings in original settings or do not wish to
make any changes, then press Exit button on remote control to go out from menu fully.
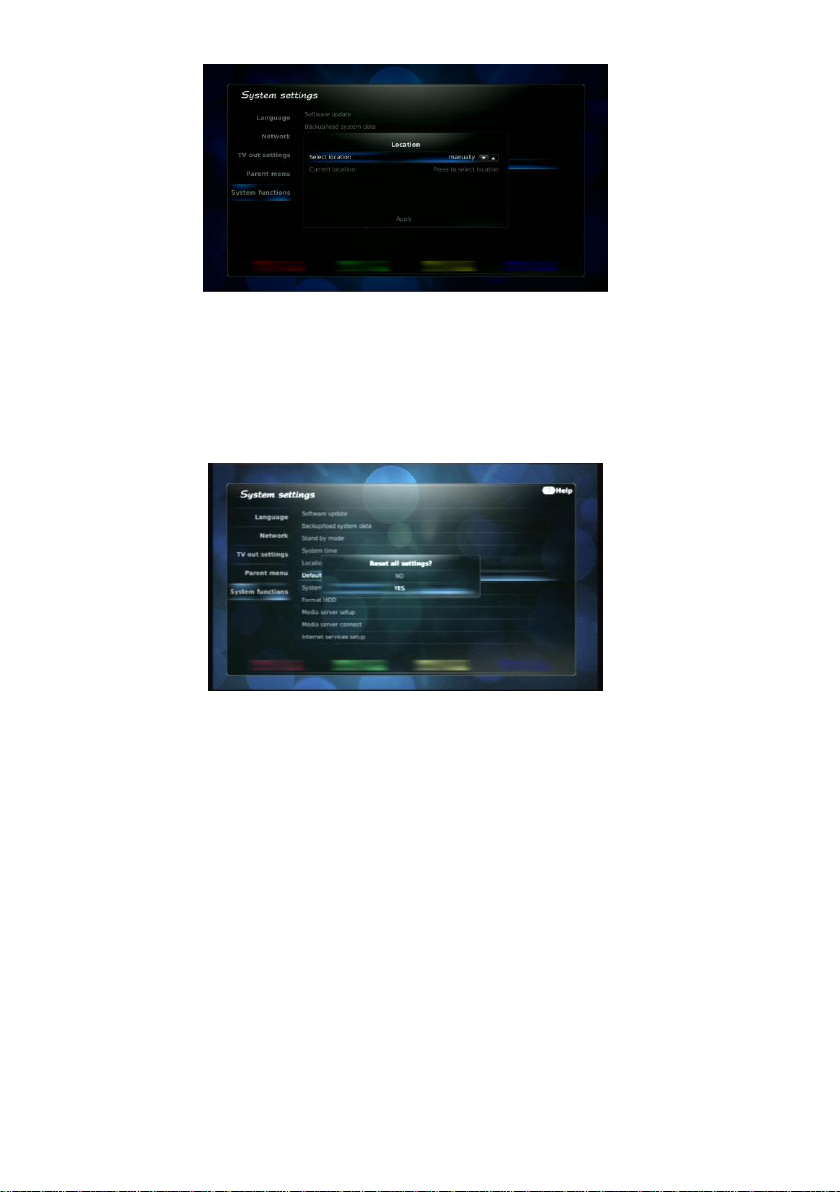
Location
There are two possible ways to set the place where to operate receivers: automatically, when the place is set by
IP address on the internet, at place of the window internet according IP and manually. When you select a
manual way to set the location, in the line Current location: you have to enter the name of the town or location
where the receiver is being operated in. Leaving default place choose internet according IP is being
recommended.
16
Fig. 25 Location
Defaults
If there a necessity to delete all settings in receivers had appeared (including all found and programs), then you
have to delete receiver‘s memory and to restore previous factory settings. Select Menu->SETTINGS->System
setting->System functions->Defaults and press OK button. When the window asks Reset all settings?
appears, select YES and press OK one more time. Factory settings will be loaded, list of programs cleaned and
First setting up menu will appear in the screen.
Fig. 26 Defaults
System reboot
This function allows rebooting receivers at any moment.
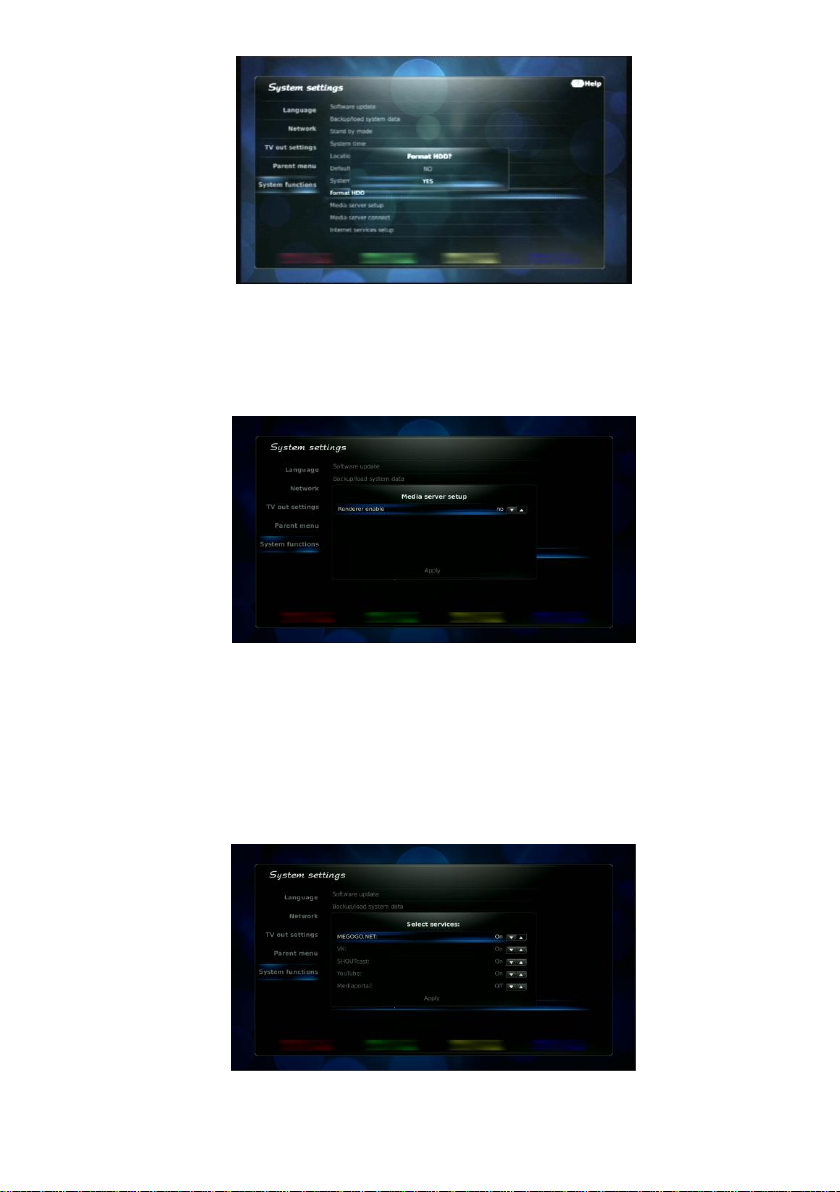
Format HDD
The Set-Top-Box has a USB connection for external media, which can vary from a hard drive to a USB flash
drive. Usually, the hard drives and USB flash drives are formatted in FAT32 or NTFS systems. If chosen MEDIA-
>USB, the hard drives are listed among the aforementioned systems. The player sees all the folders and files
and plays the supported files.
However, record functions with external media, which are formatted with the help of the aforementioned file
systems are not supported. In order for the functions to work, it is necessary to format the media in this set-top
unit in XFS system. The function Format HDD is used for this purpose.
In order to format the hard drive or USB flash drive, connect any of them to the Set-Top-Box via USB port,
choose Menu->SETTINGS->System setting->System functions->Format HDD. Choose the respective device
and press the button OK. In a pop-up widow Format HDD? choose YES and press the button OK again. The
formatting will start. All the pre-existing information will be deleted. When the hard drive is fully formatted, the
display will show Formatting complete and the media device will appear in MEDIA->External HDD. The
formatted drive will contain folders with instant entries, see 8.6 Recordings.
17
Fig. 27 Format HDD
Media server setup
If there are any plugged in devices at your local networks that could restore the video from networks, these
possible find a media server at this networks. Select the line Media server setup and press OK. In opened
window Reender enable select Yes and move cursor down and press Apply. Receiver media renderer will be
visible at home network.
Fig. 28 Media server setup
Media server connect
If there are any switched in by family members devices at local home networks, enter this option and it will be
visible and you can select the device from which you want to play video or watch television programs maintained
by DLNA server. Select active media server from the list and it will be visible in menu of MEDIA PLAYER, see
8.7. Media player.
Internet services setup
Receiver has a possibility to play records and Picture other actual information from various internet portals. Enter
Internet services setup option and you can turn on or off these suggested services. For more details see 8.4.
Internet.
Fig. 29 Internet services setup
18
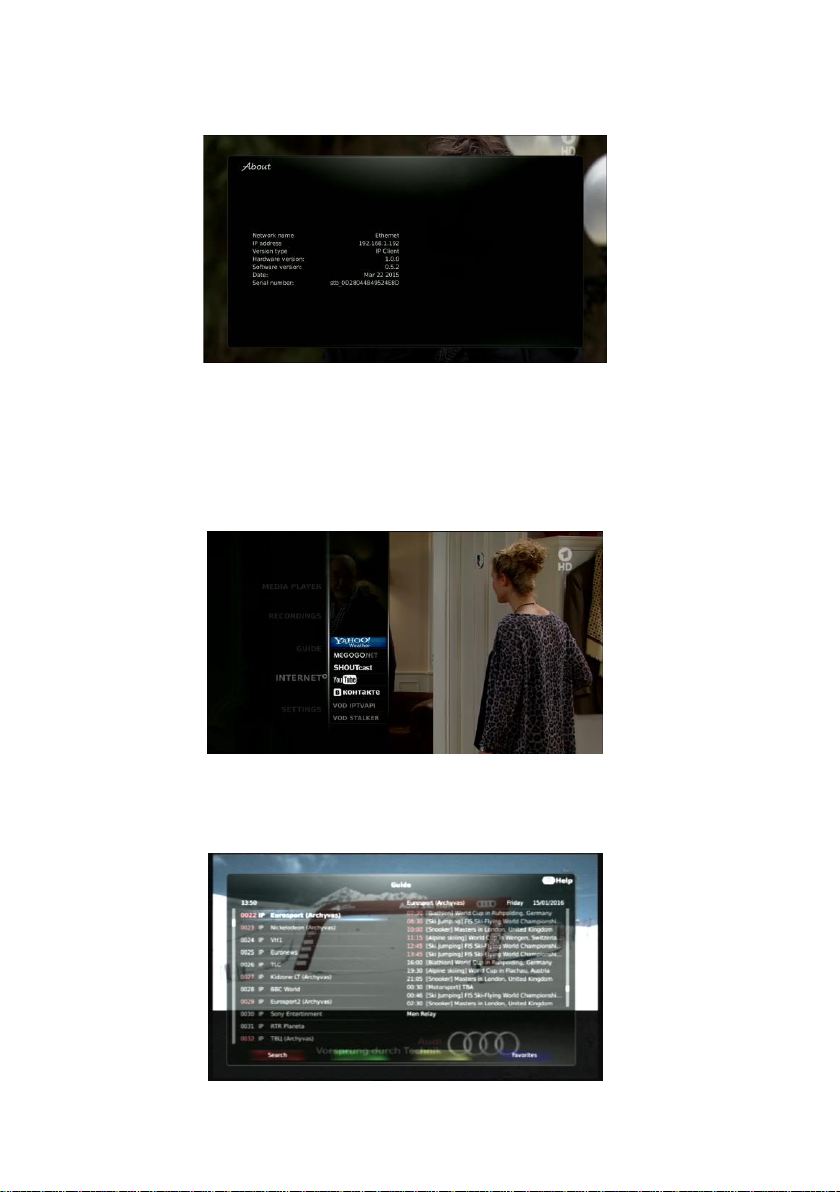
8.3.4. System information
Select the line About and press OK. Opened window will show the information about receiver‘s versions in
device and program parts, receiver IP address and other actual information.
Fig. 30 System information
8.4. Internet
Connection to media portals in receivers is default. You can open its list entering the option in main menu
Internet. You can switch off undesirable portals as it is described in details 8.3.3.5. System functions, Internet
services setup.
IPTV broadcaster can also suggest records from its archives. Then a new portal of internet services will appear,
for example, Archive. Conditions to use this service must be discussed with IPTV broadcaster at agreement.
Fig. 31 Internet
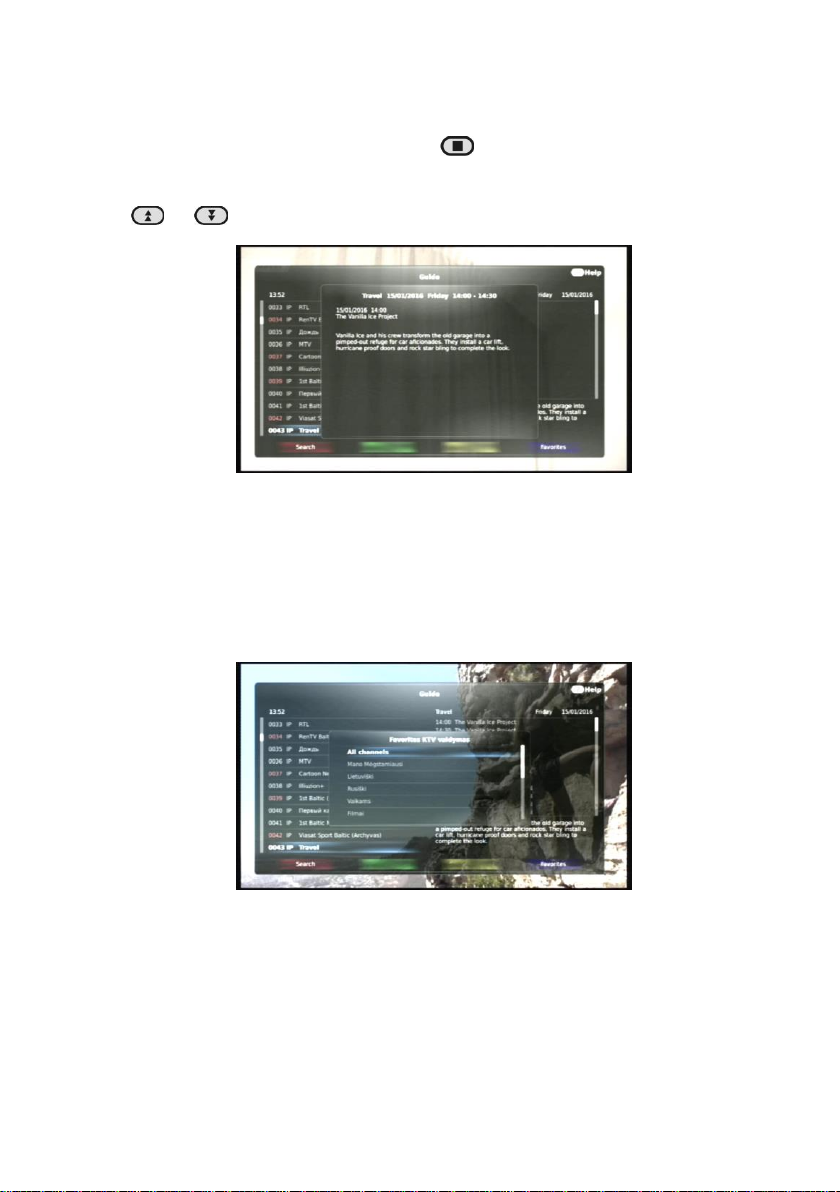
8.5. Teleguide
Select Menu->GUIDE->OK or press remote control button Guide.
Fig. 32 Teleguide
19
The view of selected program will be visible at the background, programs list visible at the left side of opened
window, and on the right Schedule of selected programs broadcasts. The broadcasts which time notices are
framed in red are previous broadcasts that are saved in archive. It can be reviewed by guiding a cursor on it and
pressing OK. The sign on the right side of the screen Indicator of media playing / stop shot shows that this is
record from archive, see Fig. 42 Infobar. Record can be controlled as described in 8.7. Media player. If you want
to move to a real time mode, press remote control button Stop.
Use buttons / to select requested program on the left side of the window. Use buttons / to move the
cursor on the right or on the left side of the screen. Buttons on the right window side / are used to navigate
in broadcasts Schedule. To move expeditiously to yesterday‘s or tomorrow‘s Schedule use buttons in remote
control and . Select requested broadcast in a Schedule and press OK.
Fig. 33 Teleguide. Info
When you select a desirable broadcast press the button in remote control Info. The window with detailed
description of this broadcast will open.
The red button Search on the remote control opens a virtual keyboard. Having gathered the whole title of a
chosen program or a fragment of it and having pressed Enter, you will quickly find selected program in the list.
The blue button Favorites opens the window of favorite programs where the list is divided into various
categories: Lithuanian, Children, Films, Sport, etc. These categories are created and the programs are placed by
the operator. You can enter any category by pressing OK button and the left side of the screen will only show
the programs listed in the respective category, so that you could choose one from them.
Fig. 34 Favorites
You can upload your most favorite programs into the category My favorites (the operator might choose to name
it differently). In order to do that, press Menu or Exit to close the TV guide and enter the editor of your favorite
programs Menu->SETTINGS->Favorite editor->OK. Open the Favorite list edit and on the left you’ll see the
list of all programs and on the right, the list of categories.

20
Fig. 35 Favorite editor
Choose the programs you want to upload to the list of your favorites by pointing the cursor and press OK. A blue
dot will appear next to the chosen program. Press OK repeatedly and the program will be cancelled. If you want
to cancel all markings press the blue remote control button Unselect all.
When you have finished marking, press the yellow remote control button Add channels. The selected programs
will be added to the list of your favorites.
Fig. 36 Favorite list edit
In order to delete the programs from the list of your favorites mark them by analogy and press the green button
Delete channels.
In order to exit the window press Menu or Exit.
Important!
Information in teleguide is displayed only if broadcaster transmits it. Otherwise, the informational
window will be empty.
8.6. Recordings
This menu allows to control the entries generated by the Set-Top-Box. Select Menu->RECORDINGS->Records
and press OK. The list of instant entries will appear. In order to open the file, select it by moving the cursor with
/ and press OK. When media file is played you can fast forward through it by pressing / . The timeline
of a record and its playing time are displayed below. By pressing button on the remote control, you’ll open
the window where you’ll be able to specify where to start the restoration. With the help of media buttons you can
control the record while it’s playing, see Fig. 3 Remote control. Press the button Info two times while the record
is playing and you’ll open a window with all the information about the media file.
Read paragraph 9.14 Recordings.
The records are only visible in the list and their functions are only working when the flash drive is inserted into
USB port or a hard drive is connected and they are formatted in XFS system. Their volume should be at least 8
GB.
This manual suits for next models
1
Table of contents


