- 3 - 10/2022
2022, .
• Prior to using this appliance, please read the user‘smanual
thoroughly, even in cases, when one has already familiarised
themselves with previous use of similar types of appliances. Only use
the appliance in the manner described in this user‘smanual. Keep
this user‘smanual in asafe place where it can be easily retrieved for
future use.
• We recommend saving the original cardboard box, packaging
material, purchase receipt and responsibility statement of the vendor
or warranty card for at least the duration of the legal liability for
unsatisfactory performance or quality. In the event of transportation,
we recommend that you pack the appliance in the original box from
the manufacturer.
. . . . . . . . . . . . . . . . . . . . . . . . . . . . . . . . . . . . . . . . . . . . . . . . . . . . . . . . . . . . . . . . . . . .
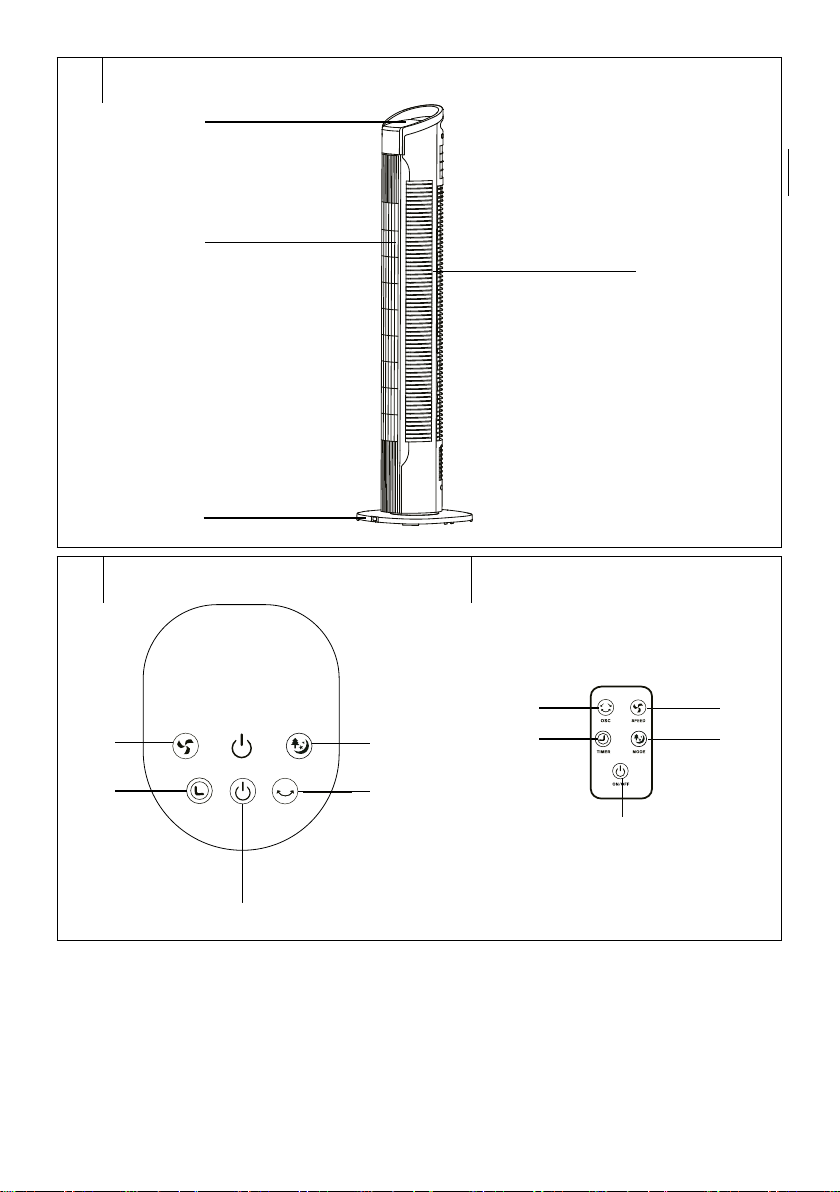
DESCRIPTION OF THE FAN
A1 Rotating speed control
A2 Air outlets
A3 Base
A4 Air inlets
. . . . . . . . . . . . . . . . . . . . . . . . . . . . . . . . . . . . . . . . . . . . . . . . . . . . . . . . . . . . . . . . . . . .
DESCRIPTION OF THE CONTROL PANEL
B1 Button - serves to set the
fan speed
B2 Button - serves to set the
timer
B3 Button - serves to turn the
appliance on / off
B4 Button - serves to turn
horizontal oscillation on / off
B5 Button - serves to select
the operating mode
. . . . . . . . . . . . . . . . . . . . . . . . . . . . . . . . . . . . . . . . . . . . . . . . . . . . . . . . . . . . . . . . . . . .
DESCRIPTION OF THE REMOTE CONTROL
C1 Button - serves to turn
horizontal oscillation on / off
C2 Button - serves to set the
timer
C3 Button - serves to turn the
appliance on / off
C4 Button - serves to select
the operating mode
C5 Button - serves to set the
fan speed
. . . . . . . . . . . . . . . . . . . . . . . . . . . . . . . . . . . . . . . . . . . . . . . . . . . . . . . . . . . . . . . . . . . .
INSTALLING THE BASE
The fan is supplied from the factory with adisassembled base.
1. Take the body of the fan out of the packaging material and carefully
turn it upside down – see figure D1.
2. Place both parts of the base A3 against the bottom part of the body
of the fan. Check that the power cord passes through the hole in the
middle of the base A3 – see figure D2.
3. Carefully push both parts of the base A3 until they click into the
body of the fan – see figure D3.
4. Using the supplied bolts, secure the base A3 in place –
seefigureD4.
. . . . . . . . . . . . . . . . . . . . . . . . . . . . . . . . . . . . . . . . . . . . . . . . . . . . . . . . . . . . . . . . . . . .
USING THE FAN
Place the fan on ahorizontal, stable, dry and smooth surface within reach
of apower socket. Connect the power cord to apower socket.
Turning on / off
Press button B3, to turn on the fan. The power indicator light will be lit.
Press button B3 again to turn off the fan.
Speed setting
To set the speed of the fan, use button B1. Repeatedly press button
B1 to toggle through the speeds in the following order: L(low speed) –
M(medium speed) – H(high speed). Each time the button is pressed, the
indicator of the respective speed will also be lit on the control panel.
Setting the timer
To set the timer, use button B2. The timer can be set in the range of 30
minutes to 7 hours and 30 minutes. Each time button B2 is pressed,
the timer duration is increased as follows: 30minutes – 1hour – 2hours
– 4hours. Indicator lights will gradually be lit on the control panel A1,
indicating the total duration of the timer.
After the set time has elapsed, the fan will turn off automatically.
Setting horizontal oscillation
Pressing button B4 will start the left to right oscillation of the fan.
Pressing button B4 again will turn off the oscillation. The fan will
remain turned at the angle at which it was stopped.
Selecting an operating mode
To select an operating mode, use button B5. Repeatedly press
button B5 to select the required operating mode: NORMAL (standard
mode)– NATURE (natural air flow mode) – SLEEP (sleep mode). If the
operating mode NATURE or SLEEP is selected, the respective indicator
will also be lit on the control panel A1.
The default mode is NORMAL (normal mode).
Controlling the fan using the remote control
Controlling the fan using the remote control is the same as using the
control panel A1. The symbols on the remote control correspond to the
symbols on the control panel A1.
. . . . . . . . . . . . . . . . . . . . . . . . . . . . . . . . . . . . . . . . . . . . . . . . . . . . . . . . . . . . . . . . . . . .
CLEANING AND MAINTENANCE
Before cleaning it, make sure that the fan is turned off and disconnected
from the power socket. Clean the fan regularly to ensure its long lifetime.
For cleaning, do not use cleaning products with an abrasive effect,
solvents, etc. that could damage the appliance.
Warning:
To prevent the risk of injury by electrical shock, do not
submerge the appliance, power cord or power plug in
water or any another liquid.
To clean the outer surface of the of the fan, use aclean, lightly dampened
cloth. Then wipe everything so that it is thoroughly dry. Ensure that
moisture does not enter through the air inlets or outlets into the fan.
You can also remove any dirt inside the air inlet or outlet by using
avacuum cleaner with abristle brush.
Note:
Regularly check that the bolts on the base A3 are securely
tightened.
. . . . . . . . . . . . . . . . . . . . . . . . . . . . . . . . . . . . . . . . . . . . . . . . . . . . . . . . . . . . . . . . . . . .
STORAGE
If you will not be using the fan for alonger period of time, store it in
aclean, dry location that is out of reach of children.
. . . . . . . . . . . . . . . . . . . . . . . . . . . . . . . . . . . . . . . . . . . . . . . . . . . . . . . . . . . . . . . . . . . .
EN Tower Fan
User'smanual