- 5 - 09/2023
2023, .
• Prior to using this appliance, please read the user'smanual
thoroughly, even in cases, when one has already familiarised
themselves with previous use of similar types of appliances. Use the
appliance only as described in this user'smanual. Keep the manual
for future reference. In the event that you hand this appliance over to
somebody else, make sure to also include this user'smanual.
• Carefully unpack the appliance and take care not to throw away any
part of the packaging before you find all its parts. We recommend to
keep the original packaging, packaging materials, receipt, and proof
of the seller'sliability or warranty certificate for aminimum of the
duration of statutory right of faulty performance or warranty of quality.
When transporting the appliance, we recommend packaging it again
in the original box provided by the manufacturer.
. . . . . . . . . . . . . . . . . . . . . . . . . . . . . . . . . . . . . . . . . . . . . . . . . . . . . . . . . . . . . . . . . . . .
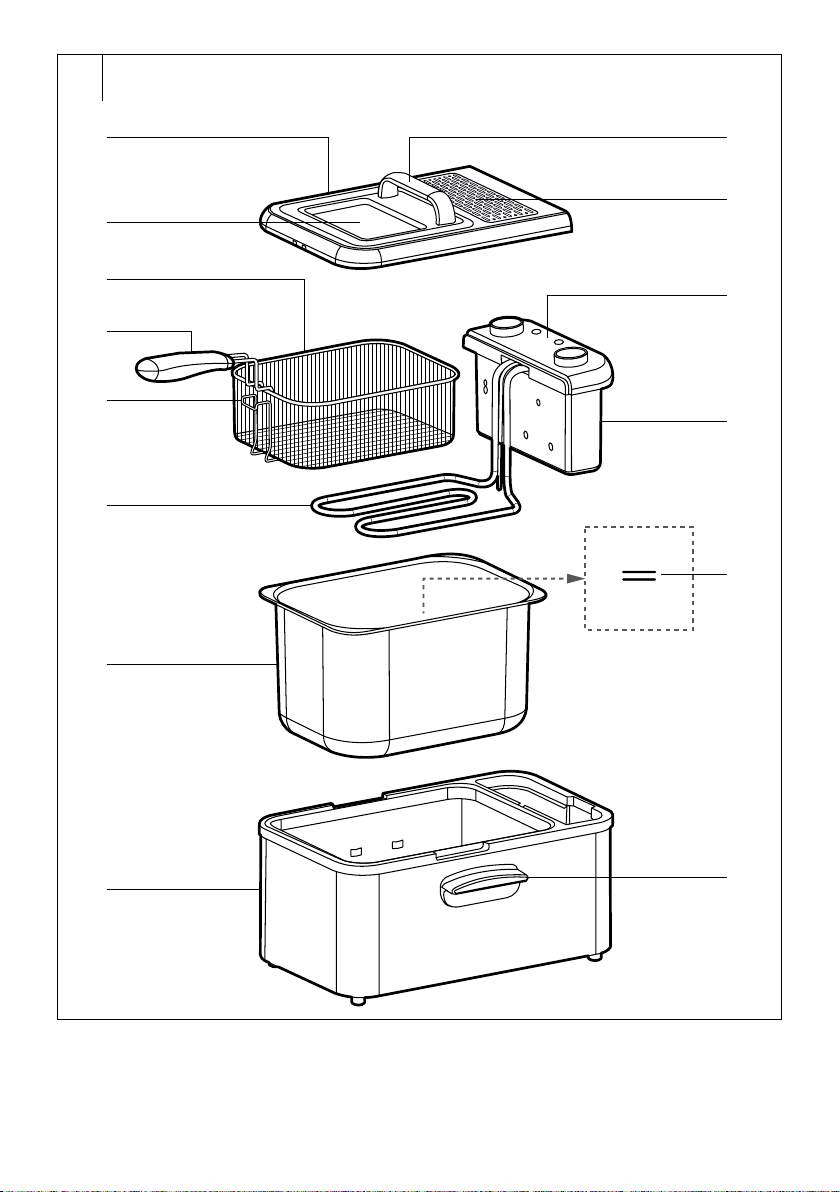
DESCRIPTION OF THE APPLIANCE
A1 Lid
A2 Viewing window for inspecting
the frying process
A3 Frying basket from chrome-
plated steel
A4 Removable basket handle
A5 Fixed basket bracket for
draining the frying medium
A6 Heating element
A7 Frying pot
A8 Fryer outer body
A9 Lid handle
A10 Ventilation openings
A11 Controls
A12 Heating box
A13 Minimum and maximum
frying medium level marks
A14 Body handles
They are heat resistant
andprevent any burns
andallow handling of the hot
appliance during operation
evenwithout the use of
protective gloves
. . . . . . . . . . . . . . . . . . . . . . . . . . . . . . . . . . . . . . . . . . . . . . . . . . . . . . . . . . . . . . . . . . . .
B1 Handle wires B2 Wire holder
. . . . . . . . . . . . . . . . . . . . . . . . . . . . . . . . . . . . . . . . . . . . . . . . . . . . . . . . . . . . . . . . . . . .
C1 Power indicator light
C2 Rotary timer
Allows you to set the frying
time inthe range of 5 to 30
minutes
C3 Timer indicator light
C4 Temperature control knob
Allows you to set the frying
temperature inthe range of
130 to 190°C
. . . . . . . . . . . . . . . . . . . . . . . . . . . . . . . . . . . . . . . . . . . . . . . . . . . . . . . . . . . . . . . . . . . .
D1 Lid cover plate
D2 Metal filter
D3 Transparent glass
. . . . . . . . . . . . . . . . . . . . . . . . . . . . . . . . . . . . . . . . . . . . . . . . . . . . . . . . . . . . . . . . . . . .
INTENDED USE OF THE FRYER
• This fryer is intended exclusively for deep frying food using suitable oil
or shortening. It is not intended for solid fats, for heating water or other
liquids or for cooking food directly in the frying pot without the use of
afrying medium.
. . . . . . . . . . . . . . . . . . . . . . . . . . . . . . . . . . . . . . . . . . . . . . . . . . . . . . . . . . . . . . . . . . . .
BEFORE FIRST USE
• Before first use, wash lid A1, frying basket A3 withhandle A4, frying
pot A7 with hot detergent solution. Then rinse them with clean water
and dry thoroughly with afine wiping cloth. All these parts can also be
washed in adishwasher.
• Wash both inside andoutside of the fryer with alightly dampened
wiping cloth andwipe dry. Never submerge the deep fryer unit in
water or any other liquid!
. . . . . . . . . . . . . . . . . . . . . . . . . . . . . . . . . . . . . . . . . . . . . . . . . . . . . . . . . . . . . . . . . . . .
OPERATION
PREPARING THE FRYER
• Place the fryer on asuitable flat surface so that children cannot reach
it. Always position the handles of the fryer so that nobody can brush
against them and knock or tilt the fryer over, or spill its hot contents
• If you wish to place the fryer on ahob underneath arange hood,
ensure that the hob is turned off.
• Remove the frying basket andattach the handle A4 to the frying
basket by pressing the handle wires B1 towardsyourself with your
fingers and inserting the angled ends into the holes of the holders B2
in thebasket. Then secure the wires in the holder with gentle pressure.
You will hear an audible click.
• Place the dry andempty frying pot A7 in the fryer body. Slide the
heating box A12 with the heating element A6 into the pot.
• Pour the frying medium (frying oil or liquid or dissolved shortening fat)
into the frying pot up to the MAX mark. Only use oils or fats that are
specifically labelled as “non-foaming” and are suitable for deep-frying.
This information can be found on the packaging or label.
Warning:
Never pour more frying medium into the frying pot
than up to the MAX mark and never less than up to
the MIN mark
Never pour any liquid, such as water, into the frying
pot.
Never mix different types of fats or oils together. They
could overflow from the fryer.
• Clean the top edge of the frying pot and any other parts, which have
been soiled while the frying pot was being filled.
. . . . . . . . . . . . . . . . . . . . . . . . . . . . . . . . . . . . . . . . . . . . . . . . . . . . . . . . . . . . . . . . . . . .
FOOD PREPARATION
• As arule, cut food into equal-sized pieces to ensure that it cooks
evenly
• If the food intended for deep frying is damp, then dry it first. Always
season food with spices only after frying and do not apply the spices
above the frying pot or during the course of frying.
• If you wish to deep fry battered food, ensure that it is evenly battered
and that any excess breadcrumbs are tapped off because loose
breadcrumbs spoil the quality of the frying medium
• Certain types of food, such as doughnuts, can be deep fried directly in
the frying pot containing the frying medium without using the frying
basket.
• Cut large pieces of food, e.g. chickens, into smaller pieces. This will
prevent subsequent scalding when removing the food from the basket.
• Do not place too many food pieces on top of each other, they could
stick together.
• Remove any excess ice from frozen foods since it could cause the oil
to boil over.
• Do not fill the basket more than halfway, otherwise the temperature of
the frying medium will fall and the frying result will not be optimal.
. . . . . . . . . . . . . . . . . . . . . . . . . . . . . . . . . . . . . . . . . . . . . . . . . . . . . . . . . . . . . . . . . . . .
DEEP FRYING
• Connect the power cord plug to apower socket.
• Set the temperature control knob C4 to the desired temperature
andturn the timer C2 to turn on the fryer. The operation indicator light
C1 and the indicator light C3 will be lit. The indicator light indicates
that the temperature has been reached andlasts approximately 10
minutes.
EN Fryer
User’smanual