Sengoku HeatMate HME-GS10 User manual

Far Infrared Graphite Heater
HME-GS10
Operator’s Manual
SENGOKU L.A., LTD.
1- 877- 438 - 4328

IMPORTANT INSTRUCTIONS
READ CAREFULLY- The far infrared graphite heater is designed for safe operation. Nevertheless,
installation, maintenance and operation of the heater can be dangerous
When using electrical appliances, basic precautions should always be followed to reduce the risk
of fire, electric shock, and injury, including the following:
Read all instruction before using this heater.
1 . Remove the unit form it’s packaging and check to make sure it is in good condition before using.
2. Make sure all holding tapes are removed before using.
3.
4 . Check the household voltage to ensure it matches the heater’ s rated specification.
5 . Check the power cord and plug carefully before used, to make sure that they are not damaged.
6 .
7 . Do not use heater near flammable objects, like furniture, pillows, bedding, paper, clothes, curtains,
etc.; they must be at least 3 feet (1 meter) away from the heater, and not facing heater directly.
8. Do not use near or in the immediate vicinity of a bath or swimming pool or any source of liquid.
9. To protect against electric shock, do not immerse cord or plug in water or any other liquid.
1 0 . Do not insert or allow foreign objects to enter any ventilation or exhaust opening, as this may
cause and electric shock, fire or damage to the heater.
11. Always unplug the heater when not in use.
1 2. Do not allow cord to overhang the counter top where it can be easily pulled by children.
13. Do not touch or put foreign objects into the grill while in operation.
14. Do not leave the appliance unattended when in use.
15. This heater is not intended for use in bathrooms, laundry and similar indoor locations, never
place heater where it may fall into a bathtub or other water container.
1 6. No liability can be accepted for any damage caused by noncompliance with these instructions
or any other improper use or mishandling.
17. This appliance is not intended for use by anyone including children or people with disabilities
(physical, sensory or mental).
. Observing the following
procedures will reduce the risk of fire, electric shock, or injury and keep installation time to a
minumum.
Do not let children play with parts of package (such as plastic bags).
Before unplugging the power cord, be sure to turn off the power button. When turning unit on/off be
sure your hands are dry to prevent electric shock.

1 8. If the supply cord is damaged in any way, it must be replaced by the manufacturer or its
service agent or a similarly qualified person in order to avoid a hazard.
19. Parts of the heater may exceed 200 /392 , contact with the heating tube, reflector, or metal
parts near the heating tube, may cause severe BURNS. To avoid burns, do not touch hot
surface.
20. Always allow heating element to cool at least 10 minutes before touching the heating tube or
adjacent part.
21 . This product contains recyclable materials. Do not dispose this product as unsorted municipal
waste. Please contact your local municipality for the nearest collection point.
22. This heater is hot when in use. To avoid burns, do not touch hot surfaces. Keep combustible
materials, such as furniture, pillows, bedding, papers, clothes, etc. and curtains at least 3
feet (1m) from the heater.
2 3. Extreme caution is necessary when any heater is used near children, or people with disabilities.
Heater can NOT be left unattended when operating.
24. Do not operate any heater if it malfunctions. Disconnect power at service panel and have
heater inspected by a reputable electrician before reusing.
25. To disconnect heater, turn controls to off, and turn off power to heater circuit at main
disconnect panel (or operate internal disconnect switch if provided) .
2 6. This heater has hot and arcing or sparking parts inside. Do not use it in areas where gasoline
paint, or flammable vapors or liquids are used or stored.
27. Use this heater only as described in this manual. Any other use not recommended by the
manufacturer may cause fire, electric shock, or injury.
SAVE THESE INSTRUCTIONS
Specification
Rating
120VAC 60Hz 1200W
Main unit dimensions Heater: W30.12* D5.3* H5.51(in)/W765* D132* H140(mm)
Stand: W33.46* D33.46*H(37.40 to 59.06) (in)
/W850* D850* H(950-1500)(mm)
Mass ( Weight)
13.18(lbs)/5.98(kg)
H(MAX) 150cm - H(MIN) 95cm/H(MAX) 59.06 (in) - H(MIN) 37.40 (in)
Power cord Rubber cord, length 7.87(ft)/2.4(m)
Heater
Far infrared electric heater 1pcs
Stand
Safety device
Overheat protection, Tip over function

Product Features
FREESTANDING
A lightweight and sturdy stand allows portable installation.
TIP-OVER PROTECTION
Tip-over protection to ensure safe operation. The unit will shut down immediately if tips over
or falls to prevent tip-over-related hazards.
ASSEMBLY INSTRUCTIONS
a) The heater must be properly installed before it is used.
b) The heater can be used indoor or outdoor with provided stand only.
c) User must follow these instructions to reduce the risk of fire, electric shock, or injury.
d) Do not alter or make any changes to the unit.
W 85CM
/33.46 (IN)
D 85CM
/33.46 (IN)
H95CM-150CM
/37.40 (in)-59.06 (in)
INSTANT HEAT
WEATHERPROOF
TWO HEAT SETTINGS
ODORLESS
SILENT
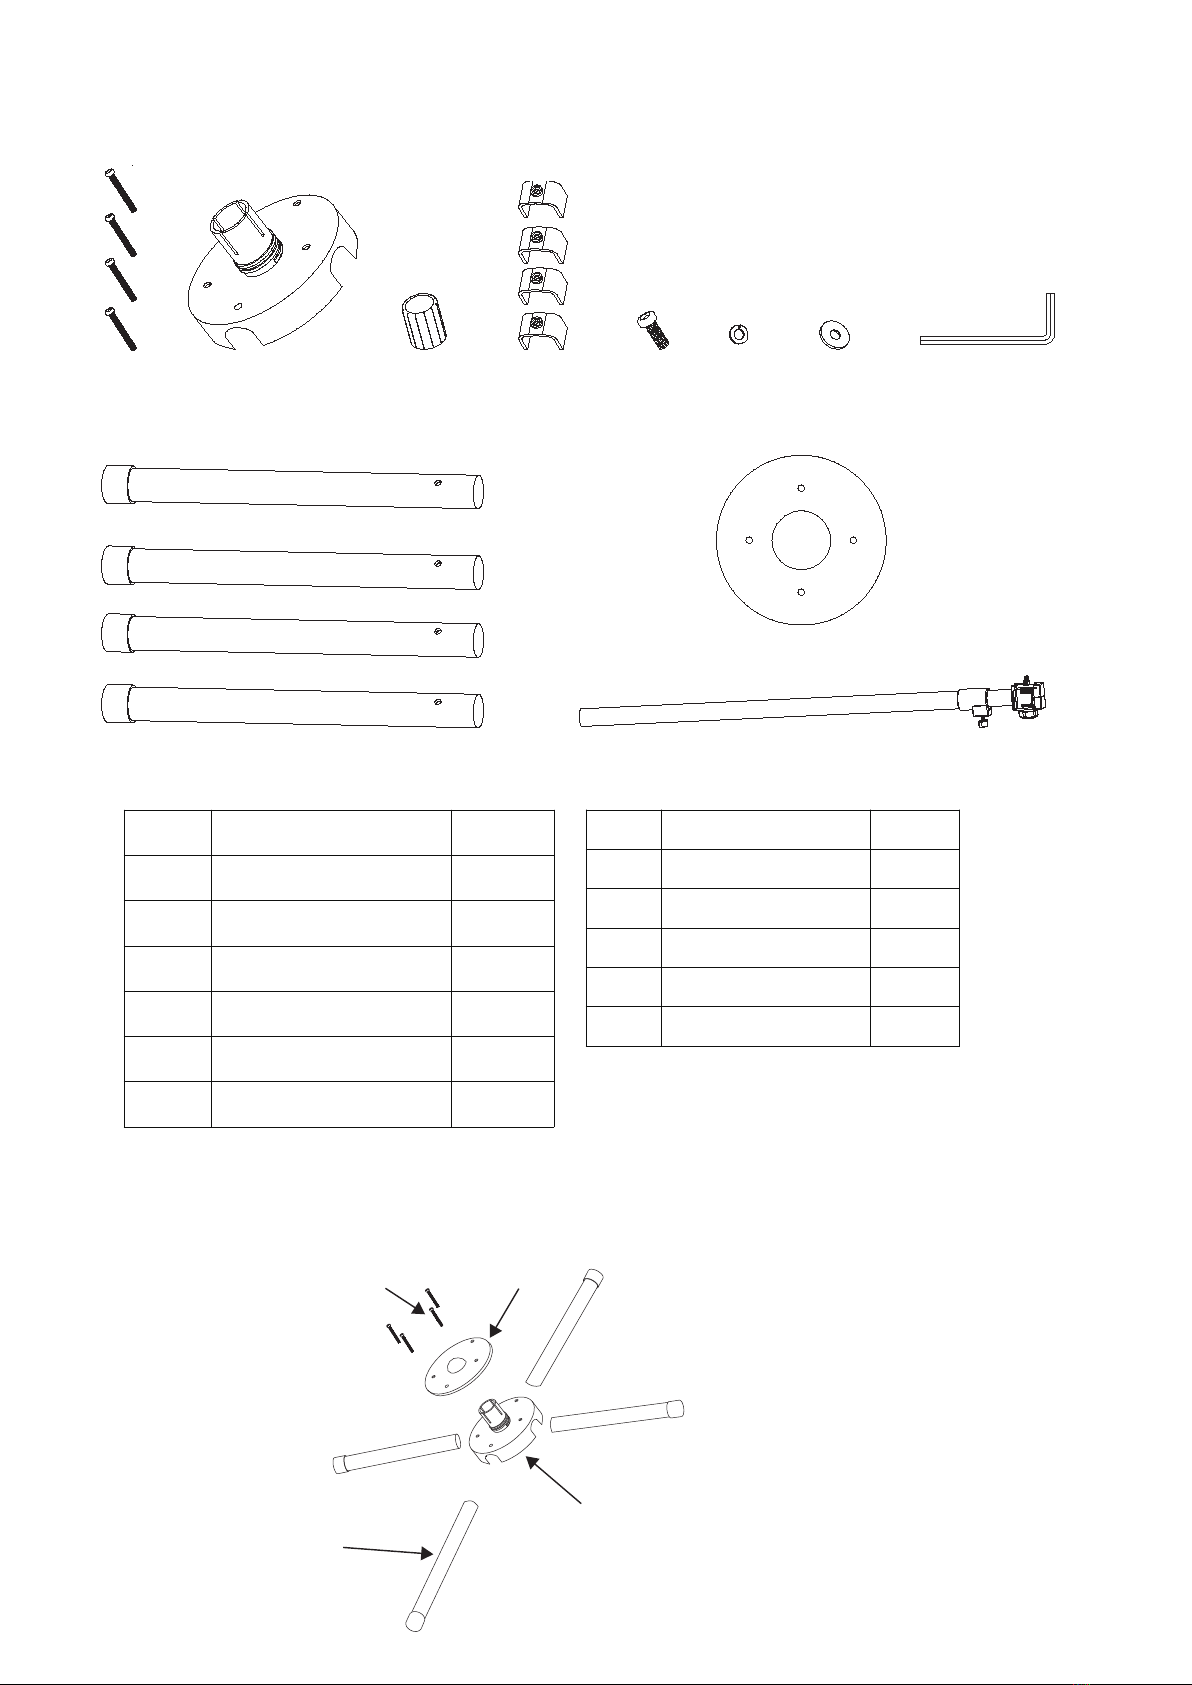
A.Stand assembly
Stand Accessories List
1. Put foot(H14) into the base(H8) ,and then put the Holder(H15) on top of the Base(H8),
finally put Screws(H7) into the hole as shown in Fig-a.
Fig-a
NO. Desc Qty
H13 Flat washer 1
H14 Foot,dia=40 4
H15 Holder 1
H16 Pole,dia=80 1
T1 L shape wrench 1
Fastener
NO. Desc Qty
H7 Screw 4
H8 Base 1
H9 1
H10 Fixed part 4
H11 Screw 1
H12 Spring washer 1
H14
H15
H8
H7
H7 H8 H9 H10 H11 H12 H13
H14 H16
T1
H15

2. Turn to the back side, secure the fixed parts (H10) with Screws(H7) as shown in Fig-b.
3. Secure Fastner(H9)& Pole (H16) as show in Fig-c, then turn over to the back
side,secure Screw(H11), Spring washer(H12), Flat washer (H13)as shown in Fig-d.
Fig-b
Fig-c Fig-d
H10
H16
H9
H11
H12
H13

B.Heater & Stand installtion
Installation hardware contents
1. Tighten the hand knob screw to secure the stand positions as shown in Fig-e.
2. Secure the bracket (H5) on the back of heater with 2 nuts (H3) using the wrench as
shown in Fig - f.
Tighten the hand
knob screw to
secure the stand
position.
H5
H3
H3
Secure the bracket tight with 2 nuts
Fig - f
Fig-e
H1 H2 H3 H5
H4
NO. Desc Qty
H1
H2
H3
H4
H5
Screw
Wing Nut
Nut
Screw
Bracket
H6
H6 Zip tie
1
3
2
2
1
3
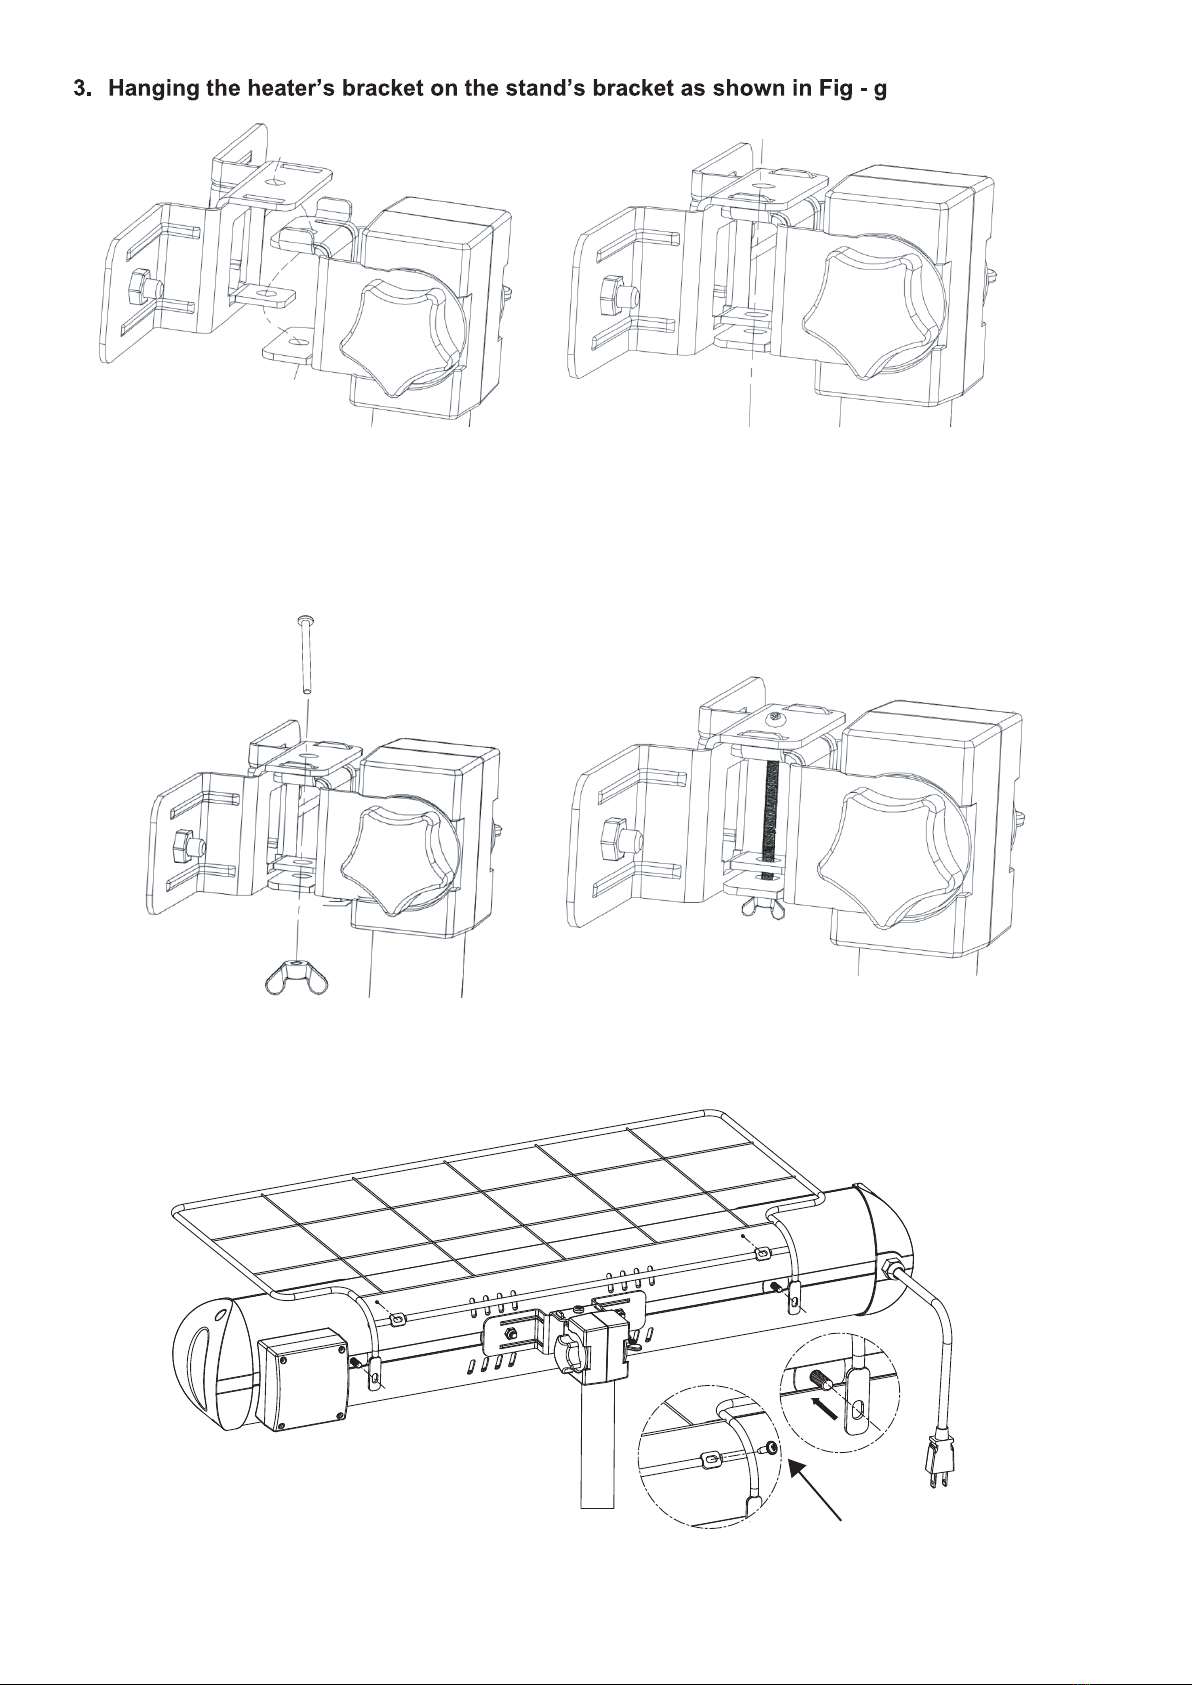
4. Fasten Screw (H1) with wing nut (H2) as shown in Fig - h
5. Assembly the protection bracket on the heater, the top panel on protection bracket
could be clipped into the screws as shown in Fig - i.
Fig - g
Fig - h
Fig - i
H4
H1
H2

6. Fasten the protection bracket with 2 wing nuts (H2), and secure the top 2 screws
using the screwdriver as shown in Fig - j.
7. Secure the power cord with the zip ties (H6) as shown in Fig - k.
Fig - j
H2
H7x3
Keep the power cord
away from the heater
WANING!
FOR OUTDOOR USE,
MUST PLUG INTO
GFCI OUTLET.

WARNING
THE HEATER MUST BE PLACED ON A FLAT, STABLE SURFACE FOR USE WITH THE STAND.
THE HEIGHT OF STAND WITH HEATER IS 60 INCHES.
THE POWER CORD MUST BE PLUGGED INTO A GFCI OUTLET FOR OUTDOOR USE.
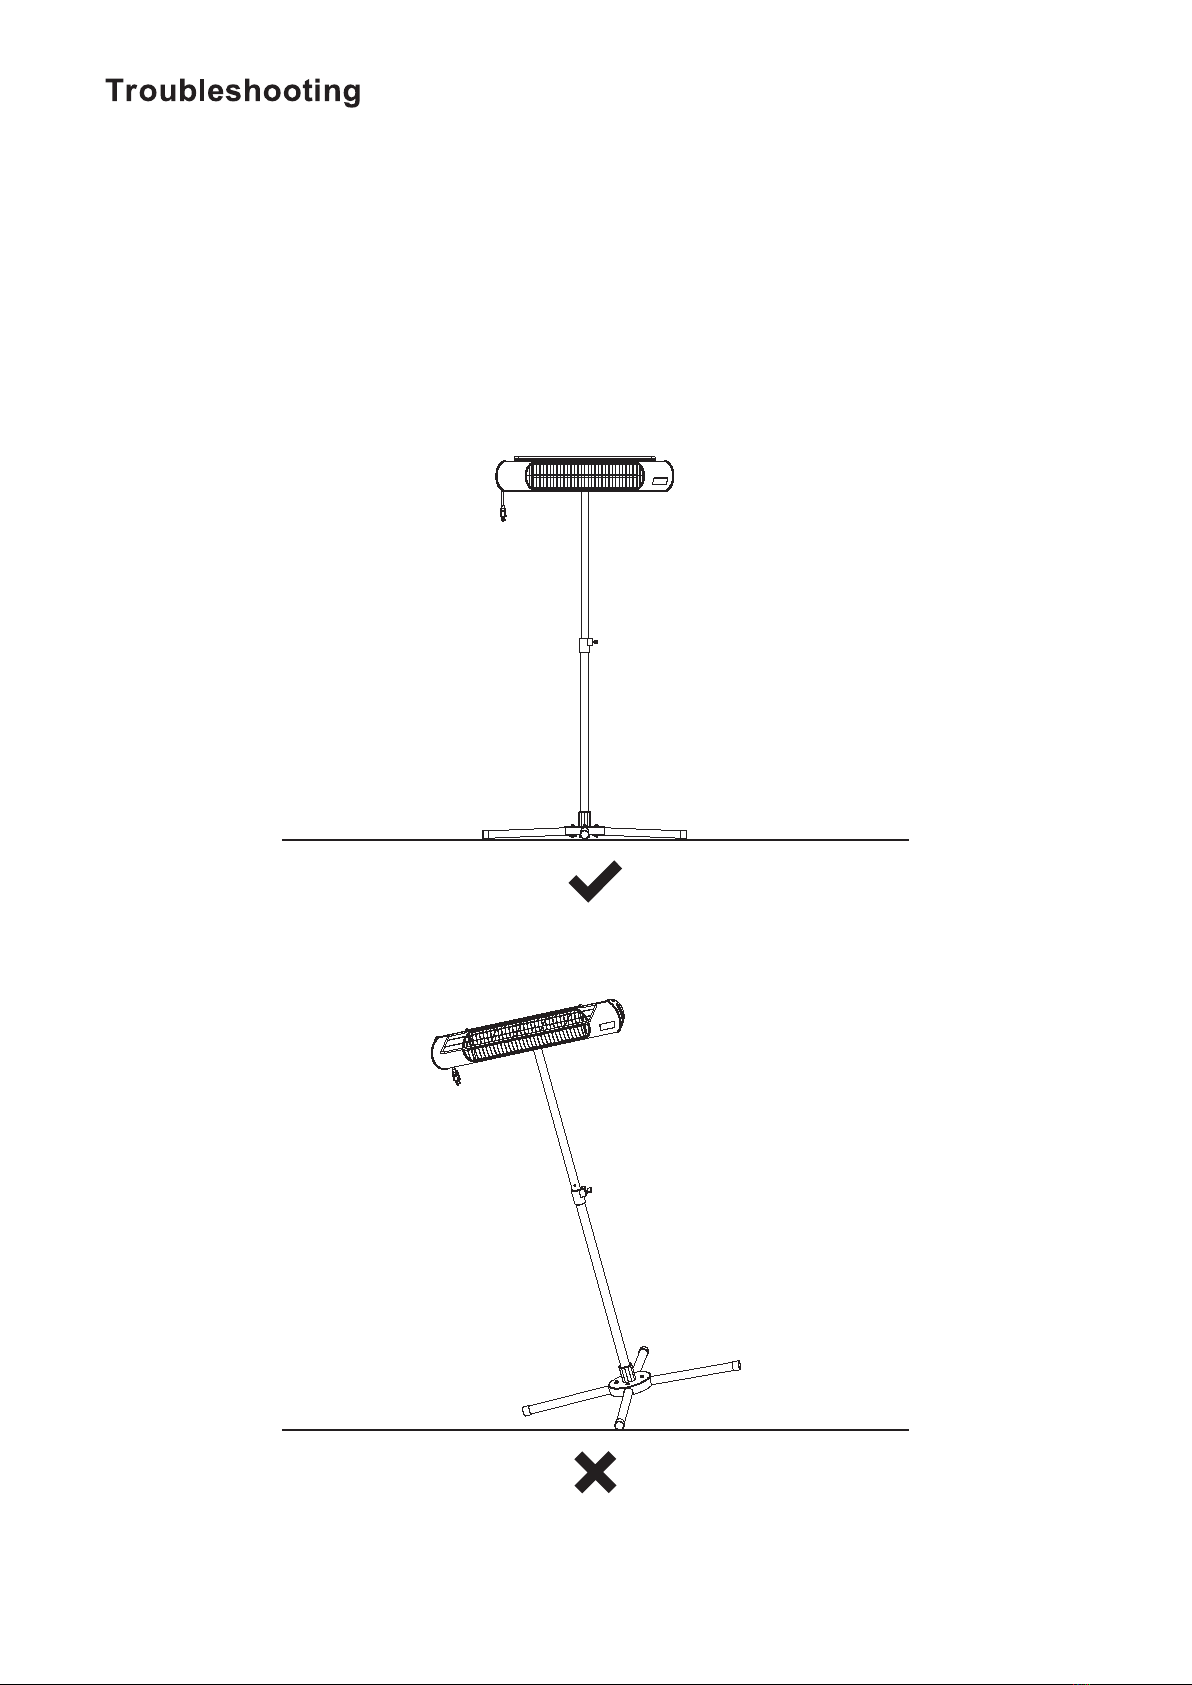
Noted: The heater has a tilt protection function. When the heater exceeds a 60 ° angle, it
automatically stops working.

Grounding instructions
CAUTION:
This heater is for use on 120 volts. The cord has a plug as shown in below
No adapter is available for this blade configuration, and none should be
used. The type outlet is a 120 volts grounding outlet. When properly
installed, it provides a ground connection through the cord to the heater to
protect the operator from electric shock.
Attention: Digital display position should be on left for correct installation direction
OPERATING INSTRUCTION
a) The heater must be properly installed before it is used.
b)
c)
d)
e)
f)
METAL SCREW
COVER OF GROUNDED
OUTLET BOX
GROUNDING
PIN
GROUNDING
PIN
GROUNDING
MEANS
ADAPTER
AA210
(A) (B)
(C)
(D)
The heater can be used indoor or outdoor.
Do not change the heater structure.
Follow instructions and cautionary statements for cleaning, user-maintenance, operations.
Any service to the unit must be performed by manufacturer representative.
User-operated devices intended to reduce the risk of fire, electric shock, or injury.
ALL INSTRUCTIONS MUST BE FOLLOWED.
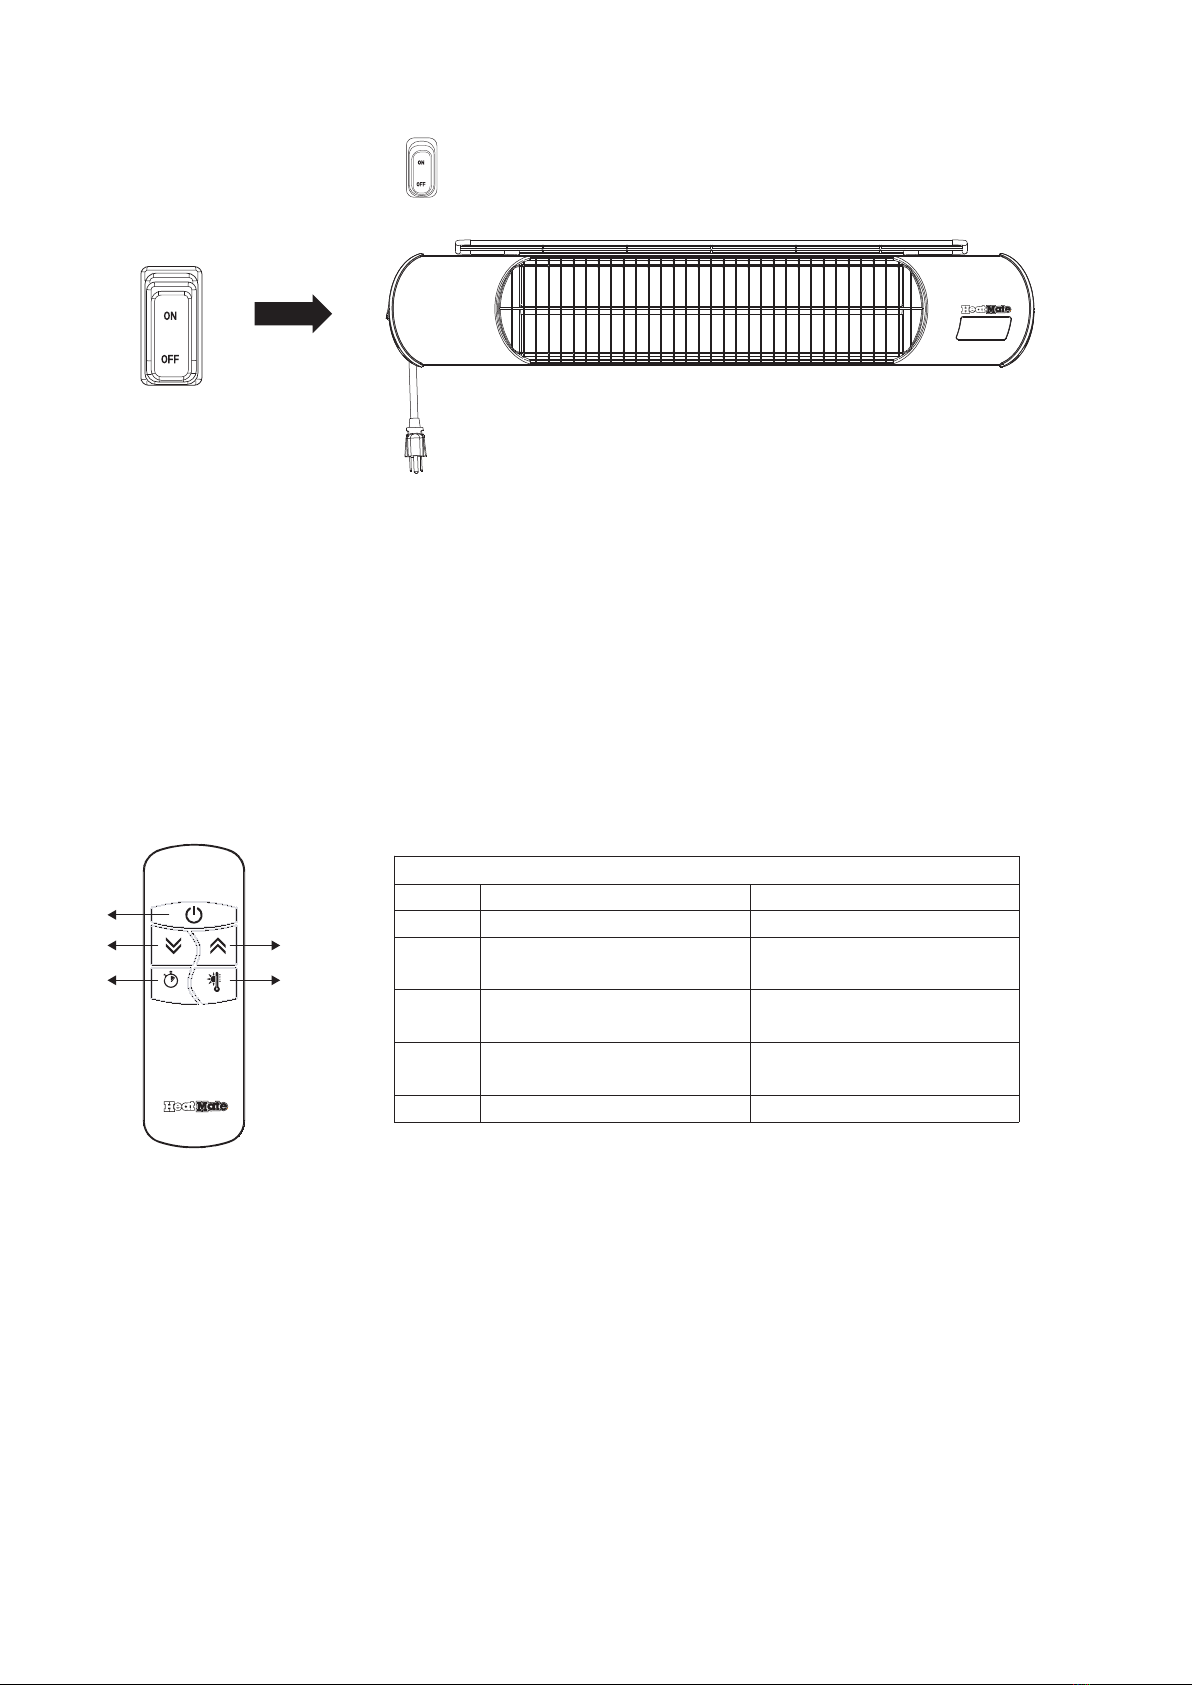
1 . PLUG the unit into a plug socket, make sure the power supply is the same as rated
2 . PRESS the power button on the left side of the heater
3.
4. DOWN & UP BUTTON, setting the
OPERATION BY REMOTE CONTROLLER:
The heater is operated from the remote control supplied . Insert 2 x AAA Alkaline batteries
into the remote control.
1 . POWER BUTTON: Turns heater on or off.
2. UP BUTTON: Increases the temperature and timer level .
3. DOWN BUTTON: Decreases temperature and timer level.
4. LEVEL BUTTON: Use to adjust heat levels (LO-HI). Press the Level button then use the up and
down buttons (2 and 3) to increase or decrease the heating level.
5. TIMER BUTTON: Use to set the timer from 0H– 24H (0-24 hours). Adjust using buttons 2 & 3
to the number of hours you would like to set.
①
③
⑤
②
④
Remote Control Function
Button
Function ( Heater On)
Function ( Heater Off)
1
Turns heater on or off
2
Increase Heat Level or
Timer hours
Turns heater on to
Level 1 (minimum)
3
Decrease Heat Level or
Timer Hours
Turns heater on to
Level 2 ( Maximum)
4
Enable Heat Level
adjustment
5
Enable Timer adjustment
0-24
TURN ON / OFF the heater by remote control.
heat level or timer.
1. Check if the power cord is plugged into an electrical outlet.
So Call Customer Service (see the back side page).
2. Error code shows on the display.
E1
E2
L1,2 shows in the display, but no heat: Bulb is damaged.
.
:When the heater reaches 185 °F(85℃) or above, it will shut off. Allow the heater to cool down for
15 minutes, and restart the heater by pressing the Power button on remote control.
: Error on Display: The heater has a tilt protection function. When the heater’s working angle
exceeds 60° it automatically stops working. Change the working angle and manually press the power
button, then the remote control function will be reactivated.
Floor
Wrong angle position
Floor
Correct angle position
.
(CAUTION: DO NOT wet the heater.)
All maintenance must be performed by certified electrician.
store.

Keep this manual in a place where it is accessible to the user at any time after reading.
Do not put any spray cans or alike
nearthe unit.
When you jiggle the cord, the power
turns on or off.
Read this "Safety precautions" carefully before using, and use it correctly.
The precautions shown here are for safe and correct use of the products, in order to prevent harm,
damages or injuries. Also, in order to clarify the magnitude of harm and damage and the extent of
urgency, the precautions are categorized as “warming" and "caution", which are matters likely to
occur when handling incorrectly. Since both are important contents concerning safety. Make sure
to comply with them.

Be sure to disconnect the power
plug and wait until the unit is no
longer hot before cleaning.
Do not spill water or liquid on the
operating unit.
Risk of fire. Please be aware of falling
of flammable objects.

Do not use near the flammable items
such as curtains and mattresses /
blankets, etc.
The power cord cannot be split,
manipu-lated, bent forcefully, pulled,
twisted, used in
bundle, put under a heavy object,
inserted, placed under the unit of
the electricheater, etc.
Do not use the heater if the power
cord or power plug is damaged,
or the outlet is loose.
skin burns.
Risk of fire.
Risk of fire.
Pleaes pay special attention when unit
is used around children and people
with disabilities, people with sensitive
skin.
When used in conjunction with other
devices, the branch outlet section
may become heated abnormally and
ignite. Do not use the extension cord.
It may cause abnormal beat generation,
fire, or electric shock. If the operating unit is
directed to a person for
a long time even at a
relatively low
temperature burns.
Risk of electric shock or injury.


Table of contents
Other Sengoku Heater manuals


