Sengoku Mega-23K User manual

Mega-23K, CV-23K, HMC-23K
MODEL
A
U
T
O
S
T
A
R
T

1.WARNING:
FAILURE TO INSTALL, MAINTAIN, AND/OR
OPERATE THIS KEROSENE HEATER ACCORD-
ING TO MANUFACTURER'S INSTRUCTIONS MAY
RESULT IN CONDITIONS WHICH CAN PRODUCE
BODILY INJURY AND/OR PROPERTY DAMAGE.
NOTE: The WARNING and IMPORTANT
Instructions appearing in this manual are not meant
to cover all possible conditions and situations that
may occur. It must be understood that common
sense, caution, and carefulness are factors which
cannot be built into this heater. These factors must
be supplied by the person(s) installing maintaining,
or operating the kerosene heater.
Always contact your dealer, distributor, service
agent, or the manufacturer on any problems or
conditions you do not understand.
2.WARNING: RISK OF EXPLOSION
* NEVER use any fuel other than clear or red dyed
No. 1-K kerosene. NEVER use fuel such as
gasoline, benzene, paint thinners or other oil
compounds in this heater.
* NEVER refill heater fuel tank when heater is
operating or still hot.
* NEVER use heater in areas where flammable
vapors or gases may be present.
* NEVER fill heater fuel tank in living space; fill tank
outdoors.
* NEVER store nor transport kerosene in other than
a metal or plastic container that is (1) acceptable
for kerosene, (2) non-red in color, and (3) clearly
marked“Kerosene.”NEVER store kerosene in the
living space; kerosene should be stored in a well
ventilated place outside the living area.
* The unit is EXTREMELY HOT while in operation.
Due to high surface temperatures, keep children,
clothing, furniture, and other combustible objects
at least 36″away from top and front area.
* RISK OF INDOOR AIR POLLUTION
USE HEATER ONLY IN WELL VENTILATED
AREAS. People with breathing problems should
consult a physicianbeforeusing the heater.
In a house of typical construction, that is, one that
is not of unusually tight construction due to heavy
insulation and tight seals against air infiltration, an
adequate supply of air for combustion and
ventilation is provided through infiltration;
however, if the heater is used in a small room
where less than 200 cubic feet (5.7 m
3
) of air
space is provided for each 1,000 BTU per hour of
heater rating (considering the maximum burner
adjustment), the door(s) to adjacent room(s)
should be kept open or the window to the outside
should be opened at least 1 inch (25.4 mm) to
guard against potential buildup of indoor air
pollution. Do NOT use the heater in a bathroom
or any other small room with the door closed.
* NEVER use heater to heat or boil water nor use as
a cooking appliance.
3.WARNING: RISK OF FIRE
NEVER use gasoline in this heater.
4.NEVER leave heater operating if you intend to leave
for any period of time. Always make sure to turn
heater off and inspect to insure that it is completely
extinguished prior to going to bed.
5.NEVER Ieave heater unattended. NEVER use as a
source of heat for drying objects.
6.NEVER place objects on the top plate.
7.If poor quality kerosene is used, so much carbon will
be accumulated on the upper part of the wick that it
may not move down, a strong odor will be
generated and shorter wick life will result; therefore,
careful attention should be paid to the kerosene
quality. When lowering the wick, make certain fire is
out. (For details, see Extinguishing on page 6.)
8.Adjustment of room temperature, when the room
becomes too hot, should be carried out by
ventilation such as opening a window, but never by
means of the wick adjuster knob. If heat is reduced
excessively by means of the wick adjuster knob, it
will cause imperfect combustion, thereby resulting in
accumulation of carbon, and odor will be generated.
9.CAUTION: RISK OF BURNS
NEVER operate the heater without the guard or
grille completely attached.
10.Do Not Mix Old and New Batteries.
Do Not Mix Alkaline, Standard, or Rechargeable
Batteries.
SAVE THESE INSTRUCTIONS
WARNINGS & CAUTIONS
-
1
-

A
U
T
O
S
T
A
R
T
?
?
A
U
T
O
S
T
A
R
T
Bail handle
Back guard
Shutoff knob
Fuel gauge
Drip tray
Top plate
Body
Front guard
Wick adjuster knob
Igniter knob
Wall guard
Fuel cap
Front plate
Top guard
Please read this Instruction Manual carefully. It will show you how to assemble, maintain, and operate
the heater safely and efficiently to obtain full benefit from its many built-in features.
Cautions
Introduction
Operating Controls
/
Features
Specifications
Unpacking and Assembly
Fueling
Ignition
Wick Adjustment
Extinguishing the Heater
Wick Maintenance
Carbon Removal
Wick Replacement
Igniter Replacement
Wick Raising Mechanism
Long Term Storage
Trouble Shooting Guide
Exploded Parts Drawing
Parts List
Kerosene
Page
1
2
2
2
3
4
5
5
6
7
Page
7
8
9
10
11
12
13
14
15
I. INTRODUCTION
TABLE OF CONTENTS
Model No.
Type of Heater
Heat Output
Fuel Tank
Tank Capacity
Continuous Combustion Time
Max. Fuel Consumption
Ignition Method
Weight (empty)
Dimensions Height
Width
Depth
Max. Wick
Height
Wick No.
U.L. Listed
21.8 Ibs.
25 1/2 inches
18 1/8 inches
(
40 7/8 inches)
Dimensions with Wall guards
18 1/8 inches
(
45 inches)
25/64
in.
(10 mm)
OS-0023
Yes
※
※
※
Convection
Max.23,500 BTU/hr.
Integral
1.9 U.S. Gallons
9-12 hr.
0.178 U.S.gallon/hr.
Battery
-
C Cell x 2
SPECIFICATIONS
FEATURES
Mega-23K,
CV-23K,
HMC-23K
-
2
-
NEVER LEAVE THE HEATER
UNATTENDED WHILE BURNING!

㈰Heater ㈪Drip Tray
㈫Burner
㈬Top Plate
㈭Front Grill
㈮Rear Grill
㈯Top Grill
㉀Bail Handle
㉂Batteries
㉃Siphon Pump
㈷Wall guards
㈹
㈺
II. UNPACKING AND ASSEMBLY
Assembly
Unpacking
Remove the heater and all packing
materials from the box.(see fig.1)
Take time to locate each of these
items:
Reach inside the body of the heater,
remove all packing materials and
take out the burner.
After locating each of these items,
remove the styrofoam and all other
packing materials in the box.
Save the box for summer storage.
1. Drip Tray
Place the heater on the drip tray
and lock in position by turning
clockwise.(see fig.2)
2. Side Grills
Locate front and rear grills.
Take the rear grill and insert the
mounting wire into the upper slot,
both top and bottom.
Repeat this procedure with the front
grill on the opposite side of the
heater. (fig.3)
Side Grills MUST BE INSTALLED.
Drip Tray
(fig.1)
(fig.2)
(fig.3)
-
3
-
Burner
Heater 's Body
Drip Tray
Burner/Burn Chamber
Top Plate
Front Grill
Rear Grill
Top Grill
Bail Handle
Wall guards
Batteries
Siphon Pump
Owner's Manual
Safety Tips

A
U
T
O
S
T
A
R
T
Take the heater, kerosene, and siphon pump outdoors for fueling. Tighten the
air-tight cap located on the top of the siphon; insert the straight tube into the
kerosene container, place the flexible hose through the opening of the fuel
tank. Squeeze the bulb rapidly, which will lift fuel from the kerosene container
into the heater tank. (see fig.9&9A)
Watch the fuel gauge on the base of the heater to determine the amount of
kerosene transferred from container to heater. When you approach the full
mark, loosen the airtight cap on the siphon, which will stop the flow of
kerosene.
Allow the siphon to drain before removing it from the tank and the container.
Replace the tank cap and the kerosene container cap securely. Thoroughly
wipe up any spilled kerosene.
VERY IMPORTANT: Allow a minimum of 60 minutes (use a timer) for
kerosene to completely saturate the wick and eliminate any air pockets
which might otherwise occur before lighting the heater for the first time.
III. FUELING
3. Burner and Top Plate
Set the burner into the body, following the
instructions on the burner : "This side
up". Locate the spring adjusting the
burner, so it can be reached when the
door is open. (fig.4)
Place the top plate on the top of the
heater so the holes on the attached
brackets are aligned to mount the bail
handle as described below. (fig.4)
A
U
T
O
S
T
A
R
T
A
U
T
O
S
T
A
R
T
6. Final Steps
Install the 2 "C" batteries in the battery case on the
back of the heater following the + and - signs.
Open the front door of the body and rotate the burner
from side to side using the burner knob.
Raise the wick to the full "up" position.
Use the knob to lift the burner so that you can test the
manual shutoff to make certain that the wick drops out
of sight.
Do Not Mix Old and New Batteries.
Do Not Mix Alkaline, Standard, or Rechargeable Batteries.
5. Wall guards
Set the 3 wall guards to the drip tray. (fig.8&8A)
MOUNTING
BRACKET
DOOR
spring
4. Top Grill and Bail Handle
Attach the top grill to the three metal
mounting brackets. (fig.5 &6)
Install the bail handle by aligning holes on the
bracket of the top plate with the handle while
rotating the handle down.
THE BAIL HANDLE IS DESIGNED TO SECURE THE
TOP PLATE
in place in addition to the purpose of
carrying/moving the heater. (fig.7&7A
(fig.7A)
(fig.8)
(fig.9)
(fig.9A)
(fig.7)
NEVER LEAVE THE HEATER
UNATTENDED WHILE BURNING!
(fig.4) (fig.5) (fig.6)
(fig.8A)

The first time the heater is lit, it should be done outdoors to allow residues of
oils and waxes used in manufacturing the heater and the wick to burn off. This
will eliminate any odors from this initial light up from collecting inside the home.
TOO HIGH
Produces smoke
and soot
TOO LOW
Produces odor or
carbon monoxide
CORRECT
Most efficient
combustion
V. WICK ADJUSTMENT
Observe the heater flame during this initial light up. During the first 5 minutes, flames will gradually build
up and appear at the top of the burner. As the burn chamber warms, the kerosene fuel will vaporize from
the wick more easily. After 5-7 minutes, you will be able to use the wick adjuster knob to correctly
position the flames at the top of the burner so that no more than
1
/
2
″to
3
/
4
″of flames appear,
distributed evenly around the circumference of the flame spreader disk located in the center top of the
burner. Four notches will appear in the flame where the crossbars in the burner deflect the air flow.
Because of changes in heater temperature and in room temperature, subsequent adjustments
will be required after 60 minutes and periodically thereafter.
IV. AUTOMATIC IGNITION SYSTEM
IGNITION BY MATCH
The heater has been designed to be lit by using the automatic ignition system.
This system consists of 2 "C" cell batteries, connecting wires, a manual arm
which holds the igniter itself and which, when pushed, raises the burner and
brings the igniter in contact with the wick after the wick has been raised to its
maximum height.
The ignition sequence is as follows: Open the door below the mica window.
Push in the auto start knob, The burner will be lifted up and the igniter coil will
appear and begin to glow. Hold the auto start knob in and turn the wick adjuster
knob clockwise to raise the wick. As the wick approaches the glowing igniter
ignition will occur. As soon as flames are observed through the open door,
release the igniter knob which will lower the burn chamber back down over the
wick. It is important to rotate the burner knob left and right, back and forth, a
few times to insure that the burner is properly located on the wick adjuster.
Should you experience difficulty with the igniter mechanism or dead batteries,
the heater can be lit using a match. This is done by raising the wick, lifting the
burner using the burner knob, and applying a lighted match to the exposed top
edge of the wick.(see fig.12)
CAUTION: Be sure to remove the match or any broken portions of it from the
burner area. A match head left in place can cause misalignment of the burner
which may result in incomplete burning, odor, soot, or fire.
-
5
-
VI. EXTINGUISHING THE HEATER
NOTE: The flames must be adjusted so that they are neither too high nor too low in order to obtain
proper combustion. Basic adjustment of the flame is controlled by using the wick adjuster knob to raise
or lower the wick. A fine adjustment of the flame can be made by grasping the burner knob and moving
the burner from side to side and front to back until the bright yellow-white flames appearing at the top of
the burner are as even as possible. After each adjustment, allow a few seconds time for the flames to
stabilize.
IMPORTANT NOTE: During the burning period, heat which builds up inside the body of the heater will
gradually warm first the burner, then the wick adjuster mechanism, and finally the kerosene located in the
tank of the heater itself. As this warming occurs, more and more kerosene will vaporize which in turn may
require further downward adjustment of the wick in order to maintain the flames at the
1
/
2
″height above
the burner. Because of this need for adjustment from time to time, the heater should never be left
unattended and should be extinguished before going to bed or leaving your home.
To extinguish, grasp the wick adjuster knob with one hand and push down
the manual shutoff with the other hand. You will feel a strong spring
tension attempting to rotate the wick adjuster knob counterclockwise and
lower the wick. By relaxing your grasp slightly, allow the spring to gently
lower the wick and extinguish the flames. When the spring action stops,
confirm the wick has been fully lowered by turning the wick adjuster knob
counterclockwise as far as possible. Allow 10-15 seconds, open the door
on the body of the heater, lift the burner with the burner knob, and confirm
that no flickering flames are present and the heater is fully extinguished.
(fig.13)
NOTE: Once the heater has been extinguished, wait 10 minutes before
re-lighting. The 10-minute cooling off period allows the heater to return to
normal condition and prevents the creation of a strong odor which will occur if
an attempt is made to immediately relight an extinguished heater.
WARNING: After a period of use, tar and carbon may build up on the wick,
interfering with its smooth lowering into the body of the heater. This could result
in the flames not extinguishing completely. It is the owner's responsibility to
inspect and maintain the wick to prevent such a hazard from occurring.
Because the risk of fire and/or carbon monoxide poisoning, never attempt to save kerosene or reduce
the amount of heat produced by your heater by operating it at a wick setting below the minimum Wick
Stop setting, or showing less than
1
/
2
″
-
3
/
4
″of flame around the circumference of the flame spreader
disk.
-
6
-
NEVER LEAVE THE HEATER
UNATTENDED WHILE BURNING!
(fig.13)

VII. WICK MAINTENANCE VERY IMPORTANT !
VIII. CARBON REMOVAL/DRY BURNING
Carry out the "Carbon Removal" outdoors if windless, on a porch or the like, or in a room with
window(s) open because a strong odor is produced.
(a)
With the fuel tank having only a small amount of kerosene, keep the wick burning without refilling
with kerosene even when the tank becomes empty. When the flame starts to burn out, raise wick
fully and leave it there untill it burns out. Wait approximately 60 minutes, then relight the wick
with a
match if necessary, and allow it to burn out again. When it cools, remove any remaining ash
with an old toothbrush.
(b) The upper part of the wick will be cleared from carbon with this operation and softened; however, if
any
parts are still stiff, pinch them by means of small pliers to fracture the carbon into pieces,
supply
a small amount kerosene to tank and once more perform the "Carbon Removal." After the
carbon has been removed, refill tank and wait 60 minutes before igniting wick.
Carry out the "Carbon Removal" within 5 to 7 days after the first use of the kerosene heater. This will
reduce carbon accumulation to the wick. Thereafter perform the "Carbon Removal"
every 5 or 6
tank fulls of kerosene.
If any water gets into the tank, or when the kerosene heater season comes to an end, completely remove
all kerosene from the fuel tank. VERYIMPORTANT!
NOTE: "CARBON REMOVAL" SHOULD BE DONE WEEKLYDURING THE HEATING SEASON
UNLESS NEEDED MORE FREQUENTLY. CHECK TO BE SURE.
The top of a fiberglass wick accumulates carbon in the process of burning kerosene. This must be
removed to maintain peak efficiency in burning. It is most important that you feel for carbon hardness after
the
second or third tankful of fuel. Awick in good condition will feel soft while one that is carbonized will
feel like a bristle brush or, in late stages, the top could be coated with hard black carbon.
Check for resistance when turning the wick adjuster knob; check if flame height is correct; check if it
is
difficult to ignite by the igniter.
Any of these troubles result from carbon on the upper part of the wick.
To get rid of carbon, perform the "Carbon Removal" in the following procedure.
-
7
-

IX. WICK REPLACEMENT
(5)
Unscrew 3 screws from the body and lift it off.
(6) Lift off the body base.
(7) Remove 4 nuts which hold the wick adjuster. (fig.17)
(8) Lift out the entire assembly.
(9) To remove the wick from the adjuster, fold it and slide it out.
Caution: the teeth holding the wick are very sharp. (see
fig.18 on page 9)
(10) The replacement wick has a black line.
(11)
Fold the new wick and slide it into the adjuster. The black
line on the outside of the wick should match the bottom
edge of the adjuster. Press the wick against the teeth inside
the adjuster to obtain a firm grip. Start at the bottom row of
(12) Check to see that the gasket is still in place on the burner tank.
(13) Replace the wick and adjuster mechanism on the draft tube of the heater tank, making sure the
wick fits evenly in place.
(14) Slowly work the
assembly down, making sure not to catch the threads in the unwoven section
of
the wick on the 4 wick adjuster mounting studs.
(15) Position the adjuster shaft to the front of the heater.
(16) Reinstall the wick adjusting knob.
(17) Check the wick movement by rotating the knob clockwise and counter-clockwise. The wick
should move up and down freely.
(see fig.19 on page 9)
(18) Snug but do not tighten 4 wing nuts on the mounting studs.
(19) Raise the wick a little and check for correct clearance between wick holder and draft tube (all
around).
(20) Evenly tighten wing nuts in several steps.
(21) Check height of wick, 3/8 inch above rim of wick adjuster.
(see fig.20 on page 9)
(22) Recheck for correct clearance using a 7/32 dia. drill bit.
(23) Check the tipover switch by upsetting the pendulum and by pushing down the manual shut off
lever.
(24) Reinstall the shelter plate with 3 securing screws.
(25) Remove the wick adjusting knob.
(26) Reinstall the body base and replace the wick adjusting knob.
(27) Turn wick adjuster knob clockwise as far as you can. Then push down the manual shut off. Wick
should drop quickly to the lowest position possible.
Wick replacement should be performed on a completely cool heater after the tank is empty and the
remainder of the kerosene in the heater has been burned off.
(1) Remove the batteries from the heater.
(2) Remove top guard.
(3) Take off the top plate. Lift burner assembly out of heater.
(4)
Pull off the wick adjuster knob. Open the fuel cap.
(fig.14) (fig.16)
(fig.16)
(fig.17)
(fig.15)
(fig.15)
(fig.14)
-
8
-
NEVER LEAVE THE HEATER
UNATTENDED WHILE BURNING!

X. IGNITER REPLACEMENT
Be sure igniter is 2.5V DC, 1A only.
(A) Remove batteries from case.
(B) Remove the top guard, top plate, body and burner.
(C) Push the igniter knob. To remove the igniter, push
in and turn counterclockwise. Install new igniter and
reassemble the heater. Then install batteries.
(fig.21)
(28) Reinstall the heater body and tighten 4 screws.
(29) Replace the burner into the body making sure to follow the instructions on the burner, "this side
up".
(30) Reinstall top plate.
(31) Reinstall top guard and fasten 2 securing screws.
Install the batteries in the battery case. Fill with clean, pure 1-K kerosene. Wait at least 60 minutes
for kerosene to fully saturate the new wick. IMPORTANT!
If this is not done air bubbles may form
in
the wick reducing its ability to draw up kerosene.
Remember to "dry burn" the new wick after each 5 or 6 tankfulls of kerosene are consumed.
NOTE: Wick height is measured from top rim of the wick adjuster. The wick
height should be 25/64 in. (10 mm).
AFTER THE ASSEMBLY IS IN
PLACE, ROTATE 90゜
LEFT AND
RIGHT AS WELL AS UP AND
DOWN UNTIL THE WICK
SLIDES FREELY
REMOVE OLD WICK
WICK ADJUSTER
FOLD IN
WICK TO
REMOVE UNFOLD
WICK
BLACK
LINE
INSTALL NEW WICK
7/32 IN. (5.7 mm) All around
RIM OF
WICK
ADJUSTER
WICK 25/64 IN. (10 mm)
PENDULUM ON
TIP OVER SWITCH
Igniter
-
9
-
(fig.18)
(fig.19) (fig.20)
(fig.21)
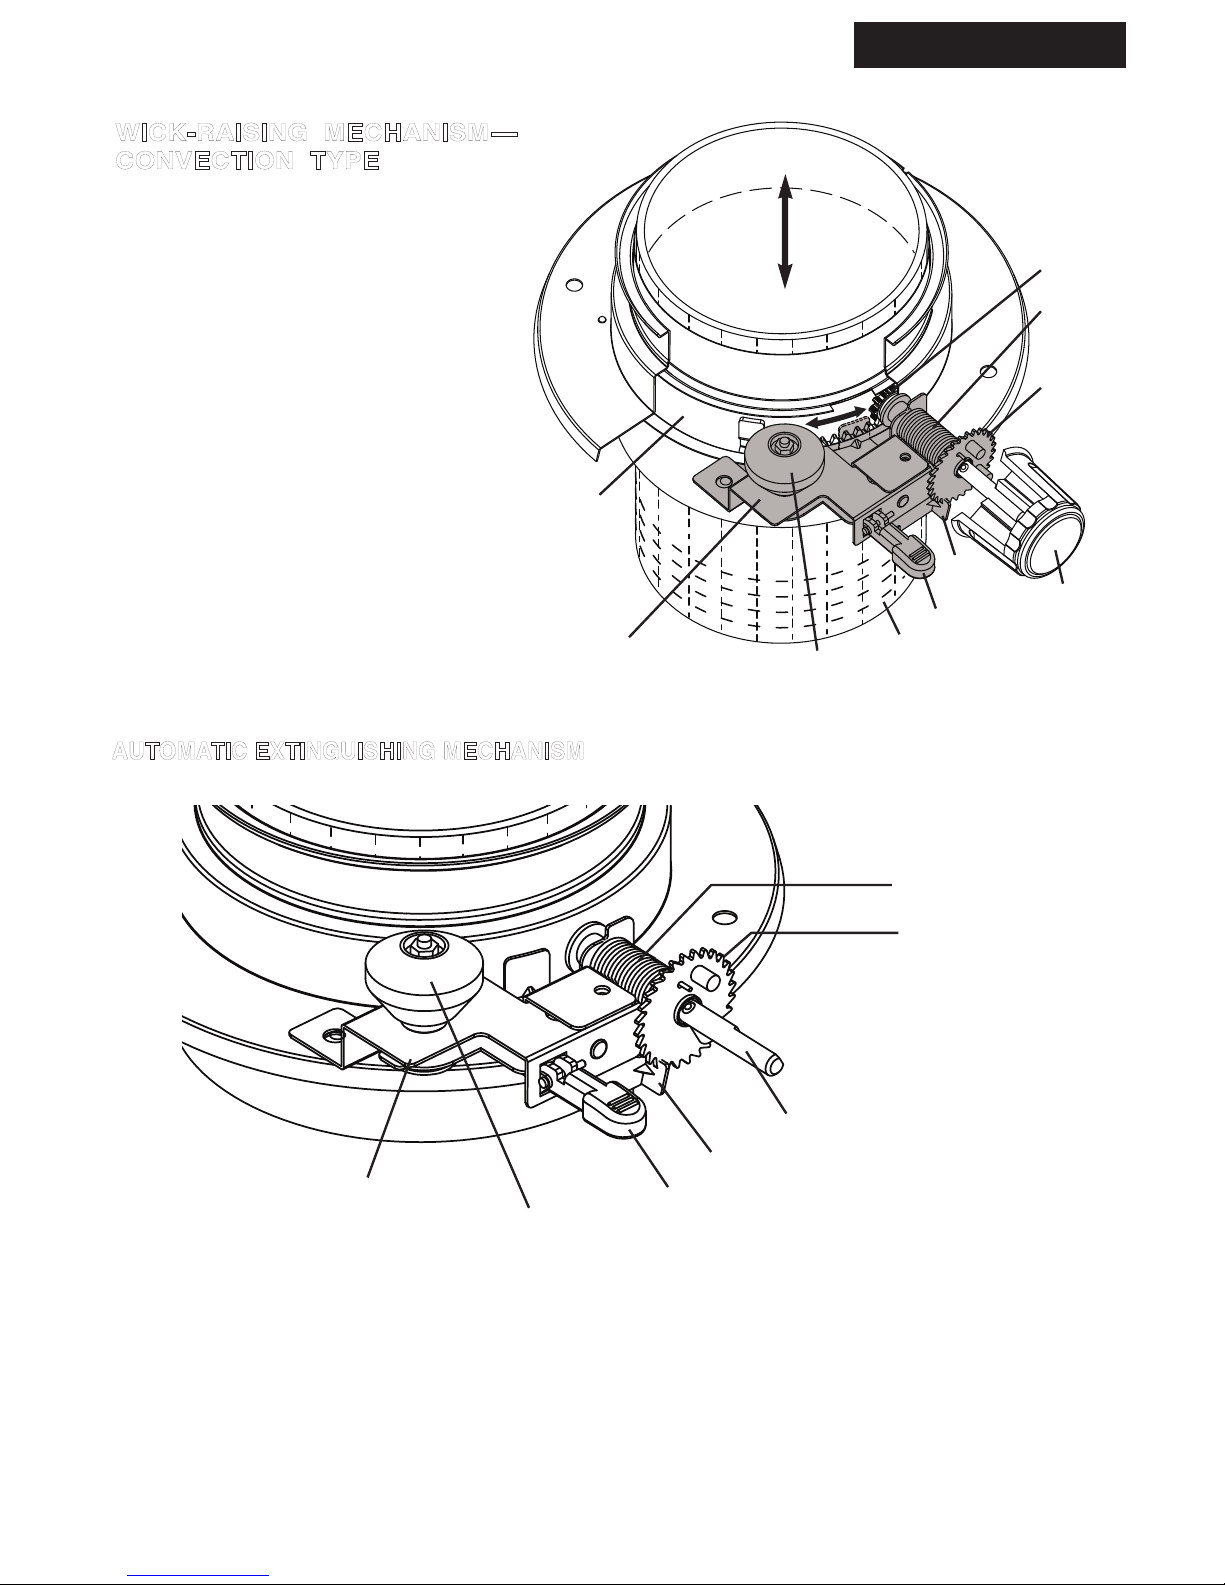
Rotating the wick control knob clockwise
turns the pinion at the other end of the wick
control shaft and causes the rack mounted
along the outer circumference of the wick
frame to turn. This results in the wick
being lifted to the top of the wick holder
assembly. As the wick rises, the torsion
spring mounted on the wick control shaft
is put under tension and compressed. The
wick can be contacted by the igniter when
in the full "up" position. It is held there
against the tension of the torsion spring by
the latch that engages the ratchet mounted
on the wick control shaft. Pressing the
manual shutoff lever downward releases the
latch, allowing the torsion spring to rapidly
lower the wick. The descent of the wick can
be slowed by lightly grasping the wick control
knob. Lowering the wick slowly in this
manner reduces the likelihood of a kerosene
odor.
FUNCTION OF THE AUTOMATIC SAFETY SHUTOFF DEVICE
The safety shutoff device is built into the wick raising and lowering mechanism. It is a primary safety
system in a kerosene heater. Its purpose is to prevent the spread of flame should a heater be accidentally
tipped over while in use.
It functions in the following manner. When the pendulum starts to swing because of a shock, it causes
the latch to be retracted from the wick control shaft ratchet. This permits the torsion spring to quickly
retract the wick to the fully lowered position. The resulting quick drop puts out the flame.
AUTOMATIC EXTINGUISHING MECHANISM
WICK-RAISING MECHANISM
-
CONVECTION TYPE
Latch
Manual shutoff lever
Pendulum
Safety shut off device
Wick Control Shaft
Torsion Spring
Ratchet
-
10
-
NEVER LEAVE THE HEATER
UNATTENDED WHILE BURNING!
Ratchet
Latch
Wick Control Knob
Manual shutoff lever
Rack
Torsion
Spring
Pinion
Wick
Pendulum
Safety shut off device

IMPORTANT:
For the automatic safety shutoff mechanism to function as intended, the wick must be
free of gummy tar deposits.
This can be accomplished by regularly "dry burning" the wick as described
on page 7 under
"Wick Maintenance" and "Carbon Removal
/
Dry B
urning
."
CAUTION
The operation of the automatic safety shutoff mechanism should be checked periodically, i.e., once a
week during the heating season. This can be done by using the wick control knob to raise the wick
to the fully upright position. DO NOT LIGHT THE WICK FOR THIS TEST. Grasp the upper corners of
the protective grille and give the heater a firm shake. If the safety shutoff is working correctly, you will
hear a loud snap as the latch disengages from the ratchet and the torsion spring quickly drops the wick.
Now attempt to rotate the wick control knob counterclockwise. A correctly functioning automatic tipover
device will lower the wick completely.
If you are able to lower the wick further, this indicates it is time
to "dry burn" for carbon and tar removal again.
NOTE:
Every time the wick is removed and replaced, the safety shutoff must be tested to insure it
is operating properly.
XI. LONG TERM STORAGE
(1) Agitate and rinse inner part of the tank with a little of the remaining kerosene, then pour out entirely.
Water never mixes with kerosene, and it causes rust inside the tank. Remove all kerosene.
(2) With the kerosene out of the fuel tank, ignite and keep the wick burning. Keep the wick fully turned
up until it burns out (about an hour).
(3) Detach the body, burner and batteries. Remove the wick adjuster from the fuel reservoir, dry the
inside of the fuel tank thoroughly. Remove the carbon accumulated on the wick adjuster and/or the
soot adhering to the burner with a brush or screwdriver.
(4) After cleaning, reassemble the heater. Remember to reassemble the wick adjuster so as to keep the
gap between the wick adjuster and wick guide cylinder equal all the way around. Refer to page 8
"Wick Replacement."
(5) The batteries should be taken out from the battery case because they may leak and corrode the
kerosene heater.(see fig.22)
(6) Store the kerosene heater with the tipover extinguishing device deactivated and the wick lowered
down.
(7)
Put the kerosene heater in the original box with original packing (
reassemble the guard
) and keep it
in a well-ventilated place.
Also keep the Owner's Manual with heater.(see fig.23)
Store the kerosene heater carefully using the following procedure so it will operate safely next season.
Owner's
Manual
(fig.22) (fig.23)
-
11
-

QUICK CURES FOR COMMON TROUBLES
Action to be Taken
Remove wick assembly and dry out wick on absorbent paper.
Drain tank. Reinstall wick assembly. Fill with clean, pure
kerosene (1-K Low Sulphur).
Fill with clean, pure kerosene (1-K Low Sulphur).
Check and replace batteries if necessary. Replace igniter
coil, disconnected or broken wire.
Use the wick adjusting knob to lower wick until the igniter
contacts top of wick
Remove wick assembly and dry out wick on absorbent paper.
Drain tank. Reinstall wick assembly. Fill with clean, pure
kerosene (1-K Low Sulphur).
Burn wick clean. (In more serious cases, trim with scissors.)
Heater Won't Light
1. Water in kerosene
2. Empty tank
3. Igniter fails to glow
brightly
4. Igniter coil contacts side
of wick
Flame Flickers or Dies
1. Water in kerosene
2. Wick covered with carbon
Use adjusting knob to lower wick.
Move out of direct drafts.
Use wire handle to rotate burner until it seats on ring
encircling
wick.
Burn wick clean. (In more serious cases, trim with scissors.)
Remove wick assembly and dry out wick on absorbent paper.
Drain tank. Reinstall wick assembly. Fill with clean, pure
kerosene (1-K Low Sulphur).
Flame Smokes or Causes Odor
1. Flame too high
2. Air drafts hitting heater
3. Burner unit not leveled
4. Wick contaminated with
carbon or tar
5. Impure kerosene
Drain tank.
Replace wick.
Fill with clean, pure kerosene (1-K Low Sulphur).
Excessive Wick Burning Down
1. Dangerous volatile fuel
such as alcohol, gasoline,
paint thinner, etc. mixed
in kerosene.
Remove wick assembly and dry out wick on absorbent paper.
Drain tank. Reinstall wick assembly. Fill with clean, pure
kerosene (1-K Low Sulphur).
Burn wick clean. ( See page 7)
Wick Adjuster Sticks
1. Water in kerosene
2. Carbon or tar build-up
on wick
If the whole heater is enveloped in flames :
If possible smother flames with a fire extinguisher or sand. Otherwise, smother with blankets,
then immediately pour water on the blankets. Do not pour water directly on the heater.
-
12
-
NEVER LEAVE THE HEATER
UNATTENDED WHILE BURNING!

QUICK CURES FOR COMMON TROUBLES
Action to be Taken
Remove wick assembly and dry out wick on absorbent paper.
Drain tank. Reinstall wick assembly. Fill with clean, pure
kerosene (1-K Low Sulphur).
Fill with clean, pure kerosene (1-K Low Sulphur).
Check and replace batteries if necessary. Replace igniter
coil, disconnected or broken wire.
Use the wick adjusting knob to lower wick until the igniter
contacts top of wick
Remove wick assembly and dry out wick on absorbent paper.
Drain tank. Reinstall wick assembly. Fill with clean, pure
kerosene (1-K Low Sulphur).
Burn wick clean. (In more serious cases, trim with scissors.)
Heater Won't Light
1. Water in kerosene
2. Empty tank
3. Igniter fails to glow
brightly
4. Igniter coil contacts side
of wick
Flame Flickers or Dies
1. Water in kerosene
2. Wick covered with carbon
or tar
Use adjusting knob to lower wick.
Move out of direct drafts.
Use wire handle to rotate burner until it seats on ring
encircling
wick.
Burn wick clean. (In more serious cases, trim with scissors.)
Remove wick assembly and dry out wick on absorbent paper.
Drain tank. Reinstall wick assembly. Fill with clean, pure
kerosene (1-K Low Sulphur).
Flame Smokes or Causes Odor
1. Flame too high
2. Air drafts hitting heater
3. Burner unit not leveled
4. Wick contaminated with
carbon or tar
5. Impure kerosene
Drain tank.
Replace wick.
Fill with clean, pure kerosene (1-K Low Sulphur).
Excessive Wick Burning Down
1. Dangerous volatile fuel
such as alcohol, gasoline,
paint thinner, etc. mixed
in kerosene.
Remove wick assembly and dry out wick on absorbent paper.
Drain tank. Reinstall wick assembly. Fill with clean, pure
kerosene (1-K Low Sulphur).
Burn wick clean. ( See page 7 )
Wick Adjuster Sticks
1. Water in kerosene
2. Carbon or tar build-up
on wick
IF fire occures : Exit quickly and warn others. Call fire department.
DO NOT : Move heater , try to smother fire , or put water on the fire.
-
13
-
NEVER LEAVE THE HEATER
UNATTENDED WHILE BURNING!

29
30
EXPLODED PARTS DRAWING
NOTE: SPECIFY MODEL NUMBER AND SERIAL NUMBER WHEN ORDERING PARTS.
2
4
7
1
3
5
8
9
23
22
16
17
18
19
20
21
13
12
14
15
31
28
11
10
24
25
26
27
6
-
14
-

-
15
-
1
2
3
4
5
6
7
8
9
10
11
12
13
14
15
16
17
18
19
20
21
22
23
24
25
26
27
28
29
30
31
PICTURE
REFERENCE
NUMBER
DESCRIPTION
PART NUMBER
PARTS LIST
OS-CVK01D
OS-CVK03A
OS-CVK04B
OS-CVK05D
OS-CVK06E
OS-CVK07E
OS-CVK08C
OS-CVK09
OS-CVK10
OS-CVK13
OS-CV14
(M4)
OS-CVK16
OS-
0023
OS-CV17
OS-CV19A
OS-CV20
OS-CVK21
OS-CVK23
OS-CVK24
OS-CV25
OS-CVK26A
(M3x6)
OS-CVK27A
OS-CVK28
OS-CV29
OS-CVK30B
OS-CVK31
OS-CVK33
OS-CV34
OS-CVK35
TOP GRILLE
TOP PLATE
BURNER ASS'Y
BAIL HANDLE
BACK GRILLE
FRONT GRILLE
BODY
WINDOW
WINDOW SUPPORT
PANEL
KNOB
NUT, WICK HOLDER
WICK HOLDER ASS'Y
WICK
WICK CASING GASKET
KEROSENE LEVEL GAUGE
RUBBER PACKING-(A)
KEROSENE TANK ASS'Y
IGNITION ASS'Y
IGNITION KNOB
IGNITION KNOB SCREW
BATTERY CASE ASS'Y
TAPPING SCREW, BATTERYHOLDER
FUEL CAP ASS'Y
RUBBER PACKING-(B)
IGNITER COIL
DRIP TRAY ASS'Y
TIPOVER SWITCH
DOOR
DOOR KNOB
WALL GUARDS
NEVER LEAVE THE HEATER
UNATTENDED WHILE BURNING!
C
-
5K
KEROSENE
Locating and using proper kerosene is the single most important thing you, the owner, can do to ensure
your satisfaction in the use of the heater. The correct grade of kerosene will be labeled 1-K, which
means it has been carefully refined to eliminate virtually all but the merest trace of sulphur. Sulphur
causes the "rotten egg" smell. Kerosene containing sulphur will cause your heater to produce a
disagreeable odor and make using it unpleasant.
All heaters will produce a slight odor on start up and turn down. This is normal, unavoidable, and to be
expected. Some people are much more sensitive to this odor than others. Once your heater has reached
its proper operating temperature (7-10 minutes) and is operating normally, there is no odor.
Kerosene may be purchased either crystal clear or dyed red. Kerosene deteriorates rapidly in storage,
so fresh kerosene should be used at all times. Kerosene is easily contaminated by water which
condenses in the fuel seller's tank. You can test kerosene for water by tilting your container and drawing
four cups from the lowest part of the container into a clear glass jar. Let it sit for a few hours and then
examine the bottom of the jar for little pin-heads (or BB's) which are actually water droplets. Water
droplets will infiltrate your wick, but cannot pass through it. Instead, they block the flow of kerosene
causing your heater to not burn properly.
If you buy kerosene in bulk, be certain to store it in a blue container. NEVER store kerosene in a red
container which is the universal symbol for gasoline. NEVER attempt to use any other fuel such as
gasoline, alcohol, white gas, or camping stove fuel in your kerosene heater. These fuels are very volatile
and can cause uncontrolled flames.
Kerosene deteriorates with age and will not burn properly in the heater. It should be stored away from
direct sunlight or other sources of heat. NEVER store kerosene in your living quarters.
A kerosene heater cannot function properly if the kerosene is contaminated with even a small amount of
water. Water is frequently present in kerosene which is purchased from bulk storage. This water is due to
condensation and comes out of the air which replaces kerosene when a large tank is emptied. For this
reason, it is better to buy bulk kerosene from a dealer who dispenses it from a 55-gallon drum.
When purchasing kerosene in bulk, you must rely on the reputation of your dealer. Even the best dealer
can occasionally receive a "bad batch" from his fuel distributor.
Poor quality kerosene, kerosene contaminated with water or traces of other fuel oils, or kerosene with
more than a very small trace of sulphur can cause: odor and smoke, low flame, difficulty in lighting or
extinguishing the heater, excessive tar deposits on the wick, reduced wick life. If you experience any of
the above, the first thing to do is check your kerosene. If there is any doubt as to its quality, dispose of it
properly and retest your heater using a gallon of prepackaged kerosene.
Kerosene stored below 40
o
F will not vaporize easily and will not produce the expected amount of heat
until it has warmed up in the tank of the heater in which it is being used. The best idea is to store the
heater itself, or a tank full of kerosene, indoors if you intend to use your heater under severe winter
conditions in a shed, garage, or ice-fishing house.
Kerosene in the USA is sometimes dyed red due to tax laws and the red dyed kerosene should be
translucent (able to be seen through) and not cloudy.
First
Choice:
Second
Choice:
Third
Choice:
Prepackaged 1-K Kerosene
55-Gallon Drum
Bulk Kerosene from a Large
Tank
(
either stored in the ground
or elevated above ground
)
For people who are sensitive to normal
kerosene odors, or experience "fumes" during
the operation of their heater, we recommend
Clear Lite
TM Synthetic Fuel manufactured by
Exxon Chemical Co. It is completely odorless
and is safer to store than kerosene.
-
16
-
This manual suits for next models
2
Table of contents
Other Sengoku Heater manuals


Popular Heater manuals by other brands


GÜDE
GÜDE GHS 4200 PIEZO operating instructions

Kiwi
Kiwi kht-8453 instruction manual

Frost Fighter
Frost Fighter IDH400QR LP/NG Installation - Operation/Maintenance Instructions and Parts List

Midea
Midea NTH20-18MRA instruction manual

Global Industrial
Global Industrial 246102 user manual

Rheem
Rheem 874826NF installation instructions


