Senix LSPG-L2 User manual

Operator’s Manual
20” LAWN MOWER
CAUTION: Before using this product, read
this manual and follow all safety rules
and operating instructions.
SENIX TOOLS 6441 Hendry Road, Suite A, Charlotte, NC 28269
www.senixtools.com
Model No. LSPG-L2
• SAFETY
• ASSEMBLY
• OPERATION
• MAINTENANCE
• WARRANTY
TM

WWW.SENIXTOOLS.COM
2
PRODUCT SPECIFICATIONS
Engine Oil: SAE 30
Fuel: Unleaded Gasoline
Engine: Briggs & Stratton
MODEL NUMBER
Model Number:
Serial Number:
Date of Purchase:
Record the model number, serial number, and date of purchase above.
TABLE OF CONTENTS
WARRANTY STATEMENT
SENIX LIMITED WARRANTY
FORTWO YEARS from the date of sale this product is warranted against defects in material or workmanship.
This warranty covers ONLY defects in material and workmanship.Warranty coverage does NOT include:
• Expendable items which can wear out from normal use within the warranty period, such as mower blades, blade adapters, belts, lters, or spark plugs.
• Product damage resulting from user attempts at product modication or repair or caused by product accessories.
• Repairs necessary because of accident or failure to operate or maintain the product according to all supplied instructions.
• Preventative maintenance or repairs necessary due to improper fuel mixture, contaminated or stale fuel.
This warranty is void if this product is ever used while providing commercial services or if rented to another person.
This warranty gives you specic legal rights, and you may also have other rights which vary from state to state.
SENIX TOOLS 6441 Hendry Rd. Charlotte, NC. 28269
www.senixtools.com
Warranty Statement.........................................Page 2
Safety Instructions ......................................Pages 3-6
Slope Guide ......................................................Page 7
Assembly......................................................Pages 8-9
Operation .................................................Pages 10-11
Service and Maintenance........................Pages 12-13
O-Season Storage.........................................Page 14
Troubleshooting.............................................Page 15
Parts.................................................................Page 16
Warranty..........................................................Page 17

WWW.SENIXTOOLS.COM 3
GENERAL OPERATION
Read this operator’s manual carefully in its entirety before attempting to assemble
this machine. Read, understand, and follow all instructions on the machine and in
the manuals before operation. Keep this manual in a safe place for reference and
ordering replacement parts
• Be completely familiar with the controls and the proper use of this machine
before operating it.
• This machine is a precision piece of power equipment, not a plaything.
Therefore, exercise extreme caution at all times.This machine has been
designed to perform one job: to mow grass. Do not use it for any other purpose.
• Never allow children to operate this machine.
• Only responsible individuals who are familiar with these rules of safe operation
should be allowed to use this machine.
• Thoroughly inspect the area where the equipment is to be used. Remove all
stones, sticks, wire, bones, toys and other foreign objects, which could be
tripped over or picked up and thrown by the blade.Thrown objects can cause
serious personal injury.
• Plan your mowing pattern to avoid discharge of material toward roads,
sidewalks, bystanders and the like. Also, avoid discharging material against
a wall or obstruction, which may cause discharged material to ricochet back
toward the operator.
• To help avoid blade contact or a thrown object injury, stay in operator zone
behind handles and keep children, bystanders, helpers and pets at least 75 feet
from mower while it is in operation. Stop machine if anyone enters area.
• Always wear safety glasses or safety goggles during operation and while
performing an adjustment or repair to protect your eyes.Thrown objects which
ricochet can cause serious injury to the eyes.
• Wear sturdy, rough-soled work shoes, lose-tting slacks, shirts and hearing
protection. Shirts and pants that cover the arms and legs and steel-toed shoes
are recommended. Never operate this machine in bare feet, sandals, slippery or
light-weight (e.g. canvas) shoes.
• Do not put hands or feet near rotating parts or under the cutting deck. Contact
with blade can amputate ngers, hands, toes and feet. Keep clear of the
discharge opening at all times.
• A missing or damaged discharge cover can cause blade contact or thrown
object injuries.
• Many injuries occur as a result of the mower being pulled over the foot during
a fall caused by slipping or tripping. Do not hold on to the mower if you are
falling: release the handle immediately.
• Never pull the mower back toward you while you are walking. If you must back
the mower away from a wall or obstruction rst look down and behind to avoid
tripping and then follow these steps:
a. Step back from mower to fully extend your arms forward.
b. Be sure you are well balanced with sure footing.
c. Pull the mower back slowly, no more than half way toward you.
d. Repeat these steps as needed.
• Do not operate the mower while under the inuence of alcohol or drugs.
• Do not engage the self-propelled mechanism on machines so equipped while
starting engine.
• The blade control handle is a safety device. Never attempt to bypass its
operation. Doing so makes the safety device inoperative and may result in
personal injury through contact with the rotating blade.The blade control
handle must operate easily in both directions and automatically return to the
disengaged position when released.
• Never operate the mower in wet grass. Always be sure of your footing. A slip
and fall can cause serious personal injury. If you feel you are losing your footing,
release the blade control handle immediately and the blade will stop rotating
within three seconds.
• Mow only in daylight or good articial light.Walk, never run.
• Stop the blade when crossing gravel drives, walks or roads.
• If the equipment should start to vibrate abnormally, stop the engine and check
immediately for the cause.Vibration is generally a warning of trouble.
• Shut the engine o and wait until the blade comes to a complete stop before
removing the grass catcher or unclogging the chute.The cutting blade
continues to rotate for a few seconds after the blade control is released.
• Never place any part of the body in the blade area until you are sure the blade
has stopped rotating.
• Never operate mower without proper trail shield, discharge cover, grass catcher,
blade control handle or other safety protective devices in place and working.
Never operate mower with damaged safety devices. Failure to do so can result
in personal injury. Check frequently for signs of wear or deterioration and
replace as needed.
• Muer and engine become hot and can cause a burn. Do not touch.
• Never attempt to make a wheel or cutting height adjustment while the engine
is running.
WARNING
This symbol points out important safety instructions which, if not followed, could
endanger the personal safety and/or property of yourself and others. Read and
follow all instructions in this manual before attempting to operate this machine.
Failure to comply with these instructions may result in personal injury.
DANGER
This machine was built to be operated according to the safe operation practices
in this manual. As with any type of power equipment, carelessness or error on
the part of the operator can result in serious injury.This machine is capable of
amputating ngers, hands, toes and feet and throwing debris. Failure to observe
the following safety instructions could result in serious injury or death.
WARNING
Your Responsibility—Restrict the use of this power machine to persons who read,
understand and follow the warnings and instructions in this manual and on the
machine.
SAVE THESE INSTRUCTIONS!
SAFETY INSTRUCTIONS

WWW.SENIXTOOLS.COM
4
• Only use parts and accessories made for this machine by the manufacturer as
listed in the parts pages of this Operator’s Manual. Failure to do so can result in
personal injury.
• When starting engine, pull cord slowly until resistance is felt, then pull rapidly.
Rapid retraction of starter cord (kickback) will pull hand and arm toward
engine faster than you can let go. Broken bones, fractures, bruises or sprains
could result.
• If situations occur which are not covered in this manual, use care and good
judgement.
SLOPE OPERATION
Slopes are a major factor related to slip and fall accidents, which can result in severe
injury. Operation on slopes requires extra caution. If you feel uneasy on a slope, do
not mow it. For your safety, use the Slope Guide included as part of this manual to
measure slopes before operating this machine on a sloped or hilly area. If the slope
is greater than 15 degrees, do not mow it.
Do:
• Mow across the face of slopes; never up and down. Exercise extreme caution
when changing direction on slopes.
• Watch for holes, ruts, rocks, hidden objects, or bumps which can cause you
to slip or trip. Tall grass can hide obstacles. Uneven terrain could overturn the
machine, or cause operator to lose their balance or footing.
• Always be sure of your footing. A slip and fall can cause serious personal
injury. If you feel you are losing your balance, release the blade control handle
immediately and the blade will stop rotating within three (3) seconds.
• Use extra care while operating machine with a grass catcher or other
attachment(s).They can aect the stability of the machine.
Do Not:
• Do not start and stop on slopes. Avoid making sudden changes in speed or
direction. Make turns slowly and gradually.
• Do not mow near drop-os, ditches or embankments, because you could lose
your footing or balance.
• Do not mow slopes greater than 15 degrees as shown on the slope guide.
• Do not mow on wet grass. Unstable footing could cause slipping.
HAULING
Use full width ramps for loading and unloading a machine for transport.
CHILDREN
Tragic accidents can occur if the operator is not alert to the presence of children.
Children are often attracted to the mower and the mowing activity. They do not
understand the dangers. Never assume that children will remain where you last
saw them.
• Keep children out of the mowing area and under watchful care of a responsible
adult other than the operator.
• Be alert and turn mower o if a child enters the area.
• Before and while moving backwards, look behind and down for small children.
• Use extreme care when approaching blind corners, doorways, shrubs, trees,
or other objects that may obscure your vision of a child who may run into the
mower.
• Keep children away from hot or running engines.They can suer burns from a
hot muer.
• Never allow children under 14 years of age to operate this machine. Children
14 and over should read and understand the instructions and safe operation
practices in this manual and on the machine and be trained and supervised by
an adult.
SERVICE
Safe Handling of Gasoline
To avoid personal injury or property damage use extreme care in handling gasoline.
Gasoline is extremely ammable and the vapors are explosive. Serious personal
injury can occur when gasoline is spilled on yourself or your clothes which can
ignite.Wash your skin and change clothes immediately.
• Use only an approved gasoline container.
• Never ll containers inside a vehicle or on a truck or trailer bed with a plastic
liner. Always place containers on the ground away from your vehicle before
lling.
• Remove gas-powered equipment from the truck or trailer and refuel it on the
ground. If this is not possible, then refuel such equipment on a trailer with a
portable container, rather than from a gasoline dispenser nozzle.
• Keep the nozzle in contact with the rim of the fuel tank or container opening at
all times until fueling is complete. Do not use a nozzle lock-open device.
• Extinguish all cigarettes, cigars, pipes and other sources of ignition.
• Never fuel machine indoors because ammable vapors will accumulate in the
area.
• Never remove gas cap or add fuel while engine is hot or running. Allow engine
to cool at least two minutes before refueling.
• Never over-ll fuel tank.To allow for expansion of the fuel, do not ll above the
bottom of the fuel tank neck.
• Replace gasoline cap and tighten securely.
• If gasoline is spilled, wipe it o the engine and equipment. Move machine to
another area.Wait 5 minutes before starting engine.
• Never store the machine or fuel container near an open ame, spark or pilot
light as on a water heater, space heater, furnace, clothes dryer or other gas
appliances.
• To reduce re hazard, keep machine free of grass, leaves, or other debris build-
up. Clean up oil or fuel spillage and remove any fuel-soaked debris.
• Allow machine to cool at least 5 minutes before storing.
SAFETY INSTRUCTIONS

WWW.SENIXTOOLS.COM 5
GENERAL SERVICE
Never run an engine indoors or in a poorly ventilated area. Engine exhaust contains
carbon monoxide, an odorless and deadly gas.
• Before cleaning, repairing, or inspecting, make certain the blade and all moving
parts have stopped. Disconnect the spark plug wire and ground against the
engine to prevent unintended starting.
• Check the blade and engine mounting bolts at frequent intervals for proper
tightness. Also, visually inspect blade for damage (e.g., bent, cracked, worn).
• Replace blade with the original equipment manufacture’s (O.E.M.) blade only,
listed in the Parts pages of this manual. Use of parts which do not meet the
original equipment specications may lead to improper performance and
compromise safety!
• Mower blades are sharp and can cut.Wrap the blade or wear gloves, and use
extra caution when servicing them.
• Keep all nuts, bolts, and screws tight to be sure the equipment is in safe
working condition.
• Never tamper with safety devices. Check their proper operation regularly.
• After striking a foreign object, stop the engine, disconnect the spark plug wire
and ground against the engine.Thoroughly inspect the mower for any damage.
Repair the damage before starting and operating the mower.
• Never attempt to make a wheel or cutting height adjustment while the engine
is running.
• Discharge cover, and trail shield are subject to wear and damage which could
expose moving parts or allow objects to be thrown. For safety protection,
frequently check components and replace immediately with original
equipment manufacturer’s (O.E.M.) parts only, listed in the Parts pages of this
manual. Use of parts which do not meet the original equipment specications
may lead to improper performance and compromise safety!
• Do not change the engine’s governor setting or over-speed the engine.The
governor controls the maximum safe operating speed of the engine.
• Check fuel line, tank, cap, and ttings frequently for cracks or leaks. Replace if
necessary.
• Do not crank engine with spark plug removed.
• Maintain or replace safety and instruction labels, as necessary.
• Observe proper disposal laws and regulations. Improper disposal of uids and
materials can harm the environment.
• According to the Consumer Products Safety Commission (CPSC) and the U.S.
Environmental Protection Agency (EPA), this product has an Average Useful Life
of seven (7) years, or 140 hours of operation. At the end of the Average Useful
Life have the machine inspected annually to ensure that all mechanical and
safety systems are working properly and not worn excessively. Failure to do so
can result in accidents, injuries or death.
DO NOT MODIFY ENGINE
To avoid serious injury or death, do not modify engine in any way. Tampering with
the governor setting can lead to a runaway engine and cause it to operate at unsafe
speeds. Never tamper with factory setting of engine governor.
SAFETY INSTRUCTIONS

WWW.SENIXTOOLS.COM
6
SAFETY INSTRUCTIONS
SAFETY SYMBOLS
This page depicts and describes safety symbols that may appear on this product. Read, understand, and follow all instructions on the machine before attempting to
assemble and operate.
Symbol Description
READ THE OPERATOR’S MANUAL(S)
Read, understand, and follow all instructions in the manual(s) before attempting to assemble and
operate
DANGER — ROTATING BLADES
To reduce the risk of injury, keep hands and feet away. Do not operate unless discharge cover or grass
catcher is in its proper place. If damaged, replace immediately.
DANGER — BYSTANDERS
Do not mow when children or others are around.
DANGER — HAND/ FOOT CUT
Keep hands and feet away from rotating parts.
DANGER — THROWN DEBRIS
Remove objects that can be thrown by the blade in any direction. Wear safety glasses.
DANGER — SLOPES
Use extra caution on slopes. Do not mow slopes greater than 15°.
WARNING—GASOLINE IS FLAMMABLE
Allow the engine to cool at least two minutes before refueling.
WARNING— CARBON MONOXIDE
Never run an engine indoors or in a poorly ventilated area. Engine exhaust contains carbon
monoxide, an odorless and deadly gas.
WARNING— HOT SURFACE
Engine parts, especially the muffler, become extremely hot during operation. Allow engine and
muffler to cool before touching.
WARNING:
the warnings and instructions in this manual and on the machine.
Your Responsibility—Restrict the use of this power machine to persons who read, understand and follow
SAVE THESE INSTRUCTIONS!
DANGER
KEEP HANDS and FEET AWAY
WARNING— LOOKBEHIND WHILE BACKING.
WARNING— DO NOT OPEN OR REMOVE SAFETY SHIELDS WHILE ENGINE IS RUNNING.

WWW.SENIXTOOLS.COM 7
SLOPE GAUGE
(OK) (TOO STEEP)
USE THIS SLOPE GAUGE TO DETERMINE
IF A SLOPE IS TOO STEEP FOR SAFE OPERATION!
To check the slope, proceed as follows:
1. Remove this page and fold along the dashed line.
2. Locate a vertical object on or behind the slope (e.g. a pole, building, fence, tree, etc.)
3. Align either side of the slope gauge with the object (See Figure 1 and Figure 2 ).
4. Adjust gauge up or down until the left corner touches the slope (See Figure 1 and Figure 2).
5. If there is a gap below the gauge, the slope is too steep for safe operation (See Figure 2 above).
15° dashed line
Figure 2Figure 1
15° Slope
15° Slope
WARNING
Slopes are a major factor related to tip-over and roll-over accidents which can result in severe injury or death. Do not operate machine on slopes
in excess of 15 degrees. All slopes require extra caution. Always mow across the face of slopes, never mow up and down slopes.

WWW.SENIXTOOLS.COM
8
ASSEMBLY
IMPORTANT: This unit is shipped without gasoline or oil in the engine. Make sure
to service engine with gasoline and oil as instructed in the Engine
Manual before starting or running the machine.
NOTE: Reference to right and left hand side of the Lawn Mower is observed from
the operating position.
OPENING CARTON
1. Cut each corner of the carton vertically from top to bottom.
2. Remove all loose parts.
3. Remove loose packing material.
REMOVING UNIT FROM CARTON
1. Lift unit from the rear to detach it from underlying carton material and roll unit
out of carton.
2. Check carton thoroughly for any other loose parts.
Assembly parts in carton
• Bolt/Nut for mounting lower handle(Qty. 4)
• Star Knob/Bolt for mounting upper handle (Qty. 2)
• Axle Sleeve/Axle Pin/Nut for mounting wheels (Qty. 4)
• Side Discharge Cover
• Side Discharge Bolt/Nut (Qty. 2)
• RearTrailing Shield
• Shield Holder (Qty. 2)
• Bottle of oil
• User Manual/Engine Manual
ASSEMBLY
Attach Handle
IMPORTANT: Position the handle assembly before rear wheel installation.
1. Fix the lower handle on mower deck by bolts and nuts (Figure 2).
2. Connect the upper handle to the lower handle by bolts and star knobs (Figure 3).
Attaching Four Wheels
Cutting height of three mounting holes: Top hole:1.35 inch; Middle hole: 2.3 inch;
Bottom hole: 3.15 inch. Available cutting height is from 1.35inch to 3.15inch which
is only related to wheel mounting holes. Select desired holes for wheel mounting.
1. Align the wheel with wheel mounting holes and attach the wheel to the mower.
2. Screw each wheel with axle pin,axle sleeve and nut (Figure 4).
3. Make sure four wheels are rmly locked and at a same cutting height.
IMPORTANT: To avoid unbalance, never choose dierent height holes for four
wheels.
Figure 2
Figure 3
Figure 4

WWW.SENIXTOOLS.COM 9
ASSEMBLY
Attach Rear Trailing Shield
IMPORTANT: Do not operate unless an rear trailing shield is assembled in place.
1. Insert shield holders into mounting holes of mower deck (Figure 5).
2. Pass the rear trailing shield through two holders.
3. Ensure the rear trailing shield is hanging down.
Position Starter Rope and Cable
1. Hold the blade control against the upper handle (Figure 6).
2. Slowly pull starter rope handle from engine and slip starter rope into the rope
guide (Figure 6).
3. Use the cable clamp to secure the control cable to the handle (Figure 6).
IMPORTANT: To reduce wear and allow for proper operation, make sure to leave
some slack in the upper portion of the cable.
Attach Side Discharge Cover
Use the supplied nuts, bolts, and a 10 mm wrench to assemble the side discharge
cover to the mower deck (Figure 7).
Figure 5
Figure 6
Figure 7
WWW.SENIXTOOLS.COM
10
OPERATION
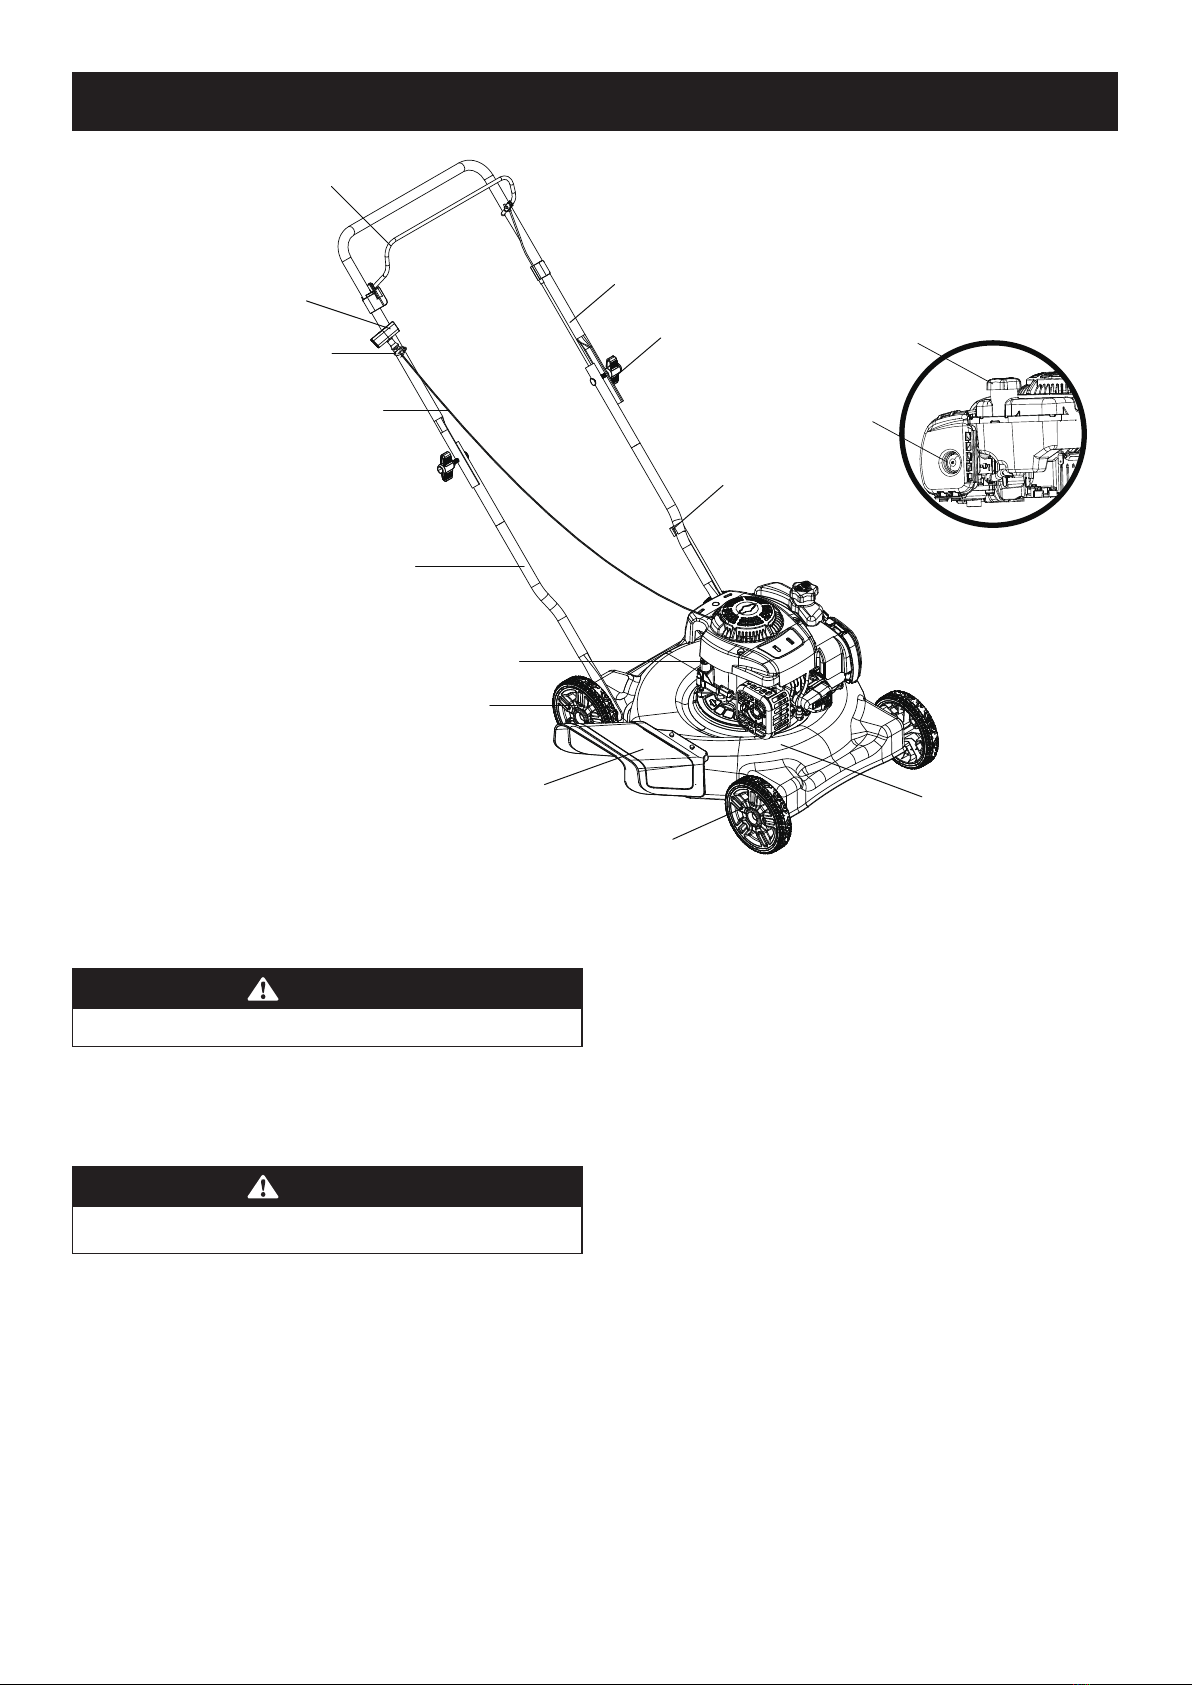
Blade Control
Starter Rope Handle
Rope Guide
Recoil Starter Rope
Lower Handle
Oil Tank Cap
Rear Wheel
Side Discharge Cover
Front Wheel
Star Knob
Cable Clamp
Upper Handle
Fuel Tank Cap
Primer
Mower Deck
BLADE CONTROL
The blade control is attached to the upper handle of the mower. Depress and hold it
against the upper handle to start the mower. Release to stop the engine and blade.
WARNING
This blade control is a safety device. Never attempt to bypass its operation.
SIDE DISCHARGE COVER
The side discharge cover needs to be attached when side discharging. Follow
instructions in the assembly section to use the side discharge cover.
WARNING
Keep hands and feet away from the chute area on cutting deck. Refer to warning
label on the unit.
RECOIL STARTER
Pull the recoil starter rope to drive the recoil starter until the engine starts. Recoil
starter rope can be clamped into the rope guide on the right upper handle for
facilitating the pulling operation. Stand behind the unit, hold the blade control,
then pull the recoil starter rope to start the unit.
PRIMER
The primer is located on the left side of the engine.The primer is used to pump fuel
into the carburetor and aid in starting the engine.

WWW.SENIXTOOLS.COM 11
OPERATION
WARNING
Make sure no one other than the operator is standing near the lawn mower while
starting engine or operating mower. Never run engine indoors or in enclosed,
poorly ventilated areas. Engine exhaust contains carbon monoxide, an odorless
and deadly gas. Keep hands, feet, hair and loose clothing away from any moving
parts on engine and lawn mower.
FUEL and OIL
See the engine Operator’s Manual for fuel and oil instructions.
TO START ENGINE
1. Push the primer three times. Do not prime to restart a warm engine.
2. Standing behind the mower, pull the blade control back against the upper
handle.
3. While holding the blade control against the upper handle, Keep a rm grip on
the starter handle and pull rope out with a rapid, continuous, full arm stroke.
Repeat until engine starts. Let the rope rewind each time slowly (Figure 8).
WARNING
If you push the primer too many times, excessive fuel will ood the engine and it
will be dicult to start.
WARNING
Keep a rm grip on the starter cord handle to prevent rapid retraction of starter
cord (kickback). Rapid retraction can pull hand and arm toward engine faster than
you can let go, and result in broken bones, fractures, bruises or sprains.
TO STOP ENGINE
1. Release the blade control to stop the engine and blade.
WARNING
Wait for the blade to stop completely before performing any work on the mower.
1
Figure 8
USING YOUR LAWN MOWER
Be sure lawn is clear of stones, sticks, wire, or other objects which could damage
lawn mower or engine. Such objects could be accidently thrown by the mower in
any direction and cause serious personal injury to the operator and others.
For a healthy lawn,always cut o one-third or less of the total length of the grass.
When cutting heavy grass, reduce walking speed to allow for more eective cutting
and a proper discharge of the clippings.
Do not cut wet grass. It will stick to underside of the deck and prevent proper
mulching of grass clippings.
New or thick grass may require a narrower cut or a higher cutting height.
WARNING
The operation of any lawn mower can result in foreign objects being thrown into
the eyes, which can damage your eyes severely. Always wear safety glasses while
operating the mower, or while performing any adjustments or repairs on it.
WARNING
If you strike a foreign object, stop the engine. Disconnect the spark plug wire,
thoroughly inspect mower for any damage, and repair damage before restarting
and operating. Extensive vibration of mower during operation is an indication of
damage.The unit should be promptly inspected and repaired. Refer to the Engine
Manual.

WWW.SENIXTOOLS.COM
12
SERVICE AND MAINTENANCE
WARNING
Before performing any type of maintenance/service, disengage all controls
and stop the engine.Wait until all moving parts have come to a complete
stop. Disconnect spark plug wire and ground it against the engine to prevent
unintended starting.
Interval Item Service Service Log
Each use 1. Engine oil level
2. Loose or missing hardware
3. Unit and engine
1. Check
2.Tighten or replace
3. Clean
1st 5 hours 1. Engine oil 1. Change
Annually or 25 hours 1. Spark Plug
2. Control linkages/pivots and wheels
3. Underside of mower deck2
1. Check
2. Lube with light oil
3. Clean
Annually or 50 hours 1. Air lter & Pre-Cleaner(If Equipped)1
2. Engine Oil
1. Clean
2. Change
Annually or 200 hours 1. Air lter & Pre-Cleaner11. Change
Annually 1. Spark plug 1. Replace
Before Storage 1. Fuel system 1. Run engine until it stops from lack of fuel, or add stabilizer to a
full tank of fresh fuel prior to storage.
1Clean more often under dusty conditions or when airborne debris is present.
WARNING
Always stop engine, disconnect spark plug wire, and ground against engine before
performing any type of maintenance on your machine.
GENERAL RECOMMENDATIONS
• Always observe safety rules when performing any maintenance.
• The warranty on this lawn mower does not cover items that have been
subjected to operator abuse or negligence.To receive full value from warranty,
operator must maintain the equipment as instructed here.
• Changing of engine-governed speed will void engine warranty.
• All adjustments should be checked at least once each season.
• Periodically check all fasteners and make sure these are tight.
•
•
Follow the maintenance schedule given below. This chart describes service
guidelines only. Use the Service Log column to keep track of completed
maintenance tasks. See the Engine Operator’s Manual for fuel, oil, air lter and
spark plug instructions.
CLEAN ENGINE
• Daily or before every use, clean grass, cha or accumulated debris from engine.
Keep linkage, spring, and controls clean. Keep area around and behind muer
free of any combustible debris.
• Keeping engine clean allows air movement around engine.
• Engine parts should be kept clean to reduce the risk of overheating and ignition
of accumulated debris.
CAUTION
Do not use water to clean engine parts.Water could contaminate fuel system. Use
a brush or dry cloth.
WWW.SENIXTOOLS.COM 13
SERVICE AND MAINTENANCE
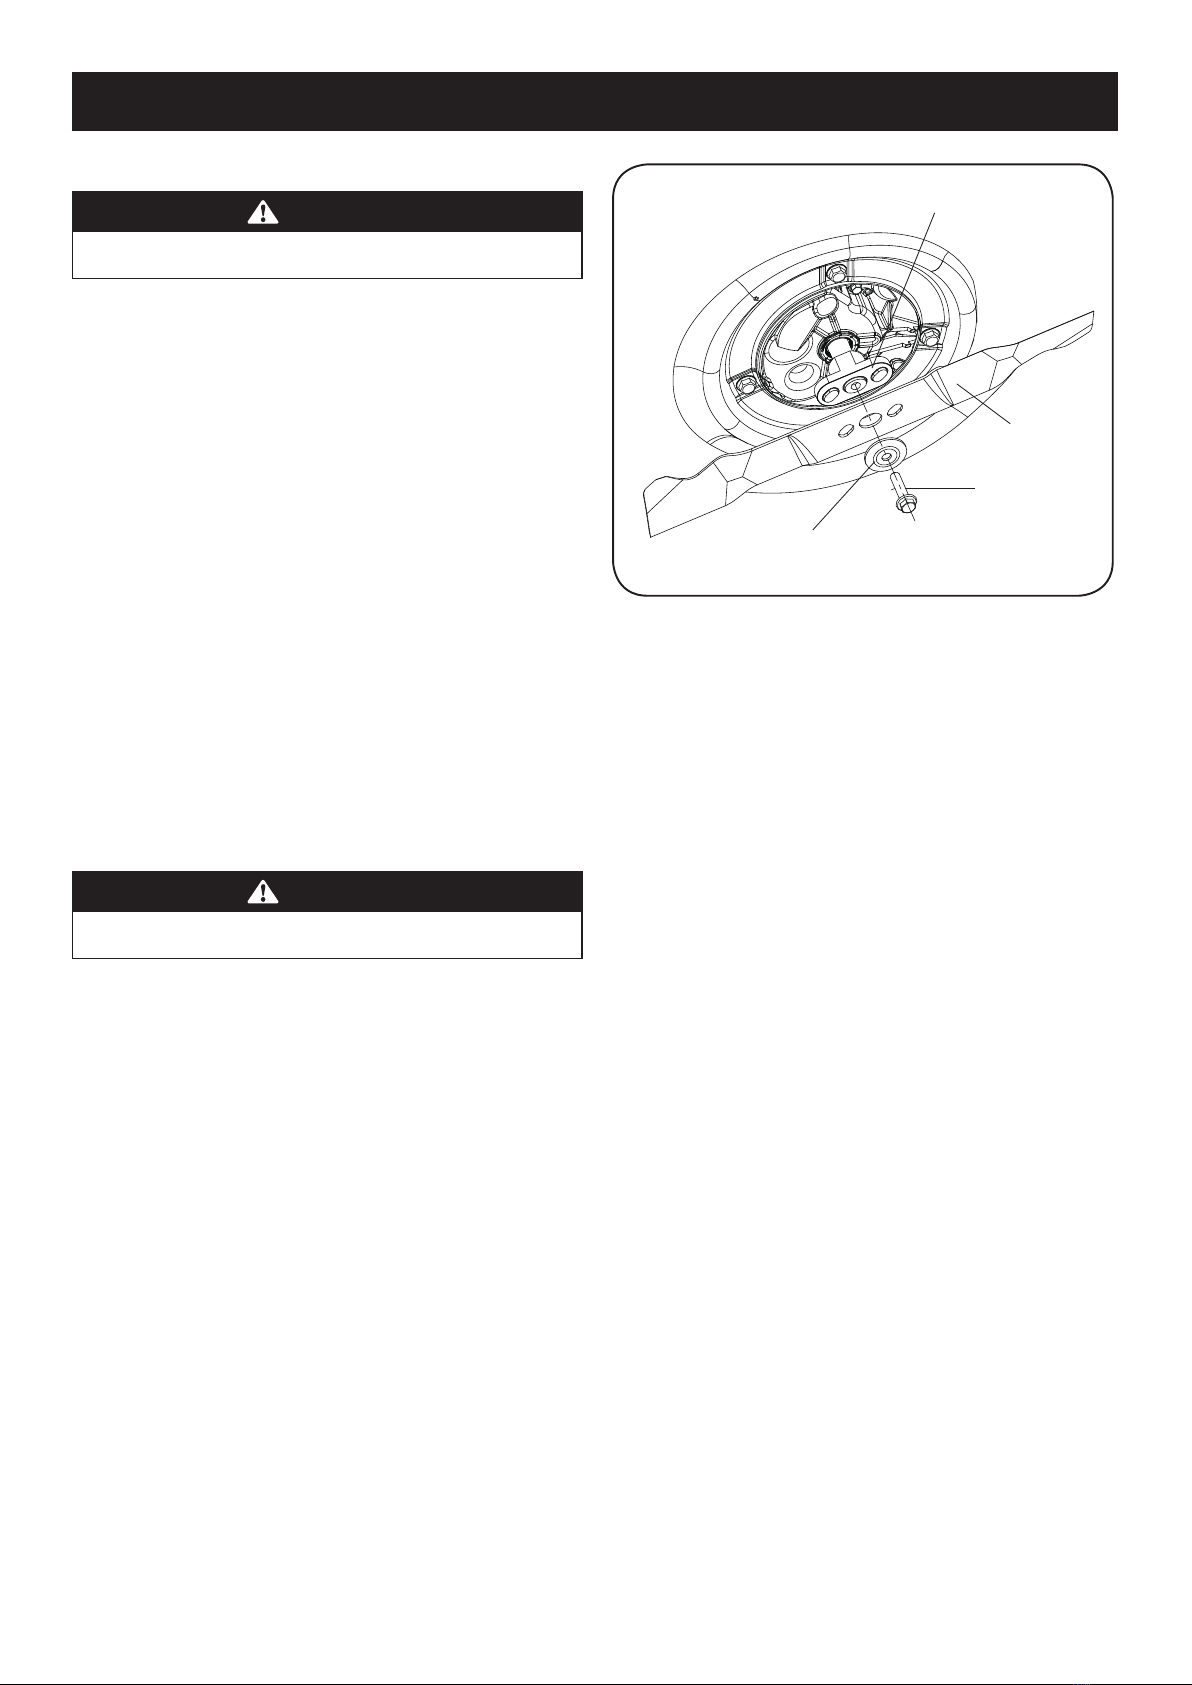
BLADE CARE
WARNING
When removing the cutting blade for replacement, protect your hands with a pair
of heavy gloves or use a heavy rag to hold the blade. Do not repair or alter blade.
Periodically inspect the blade adapter for cracks, especially if you strike a foreign
object. Replace when necessary. Follow the steps below for blade service (Figure 9).
1. Disconnect spark plug boot from spark plug.Turn mower on its side making sure
that the air lter and the carburetor are facing up.
2. Remove the bolt and the blade bell support which hold the blade and the blade
adapter to the engine crankshaft.
3. Remove blade and adapter from the crankshaft.
4. Remove blade from the adapter for testing balance . Balance the blade on a
round shaft screwdriver to check. Remove metal from the heavy side until it
balances evenly.When sharpening the blade, follow the original angle of grind.
Grind each cutting edge equally to keep the blade balanced.
5. Lubricate the engine crankshaft and the inner surface of the blade adapter with
light oil. Slide the blade adapter onto the engine crankshaft. Place the blade
on the adapter such that the side of the blade marked“Bottom”(or with part
number) faces the ground when the mower is in the operating position. Make
sure that the blade is aligned and seated on the blade adapter anges.
6. Place blade bell support on the blade. Align notches on the blade bell support
with small holes in blade.
7. Replace hex bolt and tighten hex bolt to torque: 29.5-33.2 ft-lb (40-45 Nm) max.
WARNING
An unbalanced blade will cause excessive vibration when rotating at high speeds.
It may cause damage to mower and could break causing personal injury.
Blade Adapter
Blade
Bolt
Blade Bell Support
Figure 9

WWW.SENIXTOOLS.COM
14
OFF-SEASON STORAGE
WARNING
Never store lawn mower with fuel in tank indoors or in poorly ventilated areas
where fuel fumes may reach an open ame, spark, or pilot light as on a furnace,
water heater, clothes dryer, or gas appliance.
PREPARING THE ENGINE
For engines stored over 30 days:
• To prevent gum from forming in fuel system or on carburetor parts, run engine
until it stops from lack of fuel or use gasoline mixed with gas additive. If you
use a gas additive, run the engine for several minutes to circulate the additive
through the carburetor—after which the engine and fuel can be stored longer
than 30 days.
• While engine is still warm, change the oil.
• Clean engine of surface debris.
PREPARING THE LAWN MOWER
• Clean and lubricate mower thoroughly as described in the lubrication
instructions.
• Do not use a pressure washer or garden hose to clean your unit.
• Coat mower’s cutting blade with chassis grease to prevent rusting.
• Refer to Preparing the Engine for correct engine storage instructions.
• Store mower in a dry, clean area. Do not store next to corrosive materials, such
as fertilizer.
• When storing any type of power equipment in a poorly ventilated or metal
storage shed, care should be taken to rust-proof the equipment. Using a light
oil or silicone, coat the equipment, especially cables and all moving parts of
your lawn mower before storage.

WWW.SENIXTOOLS.COM 15
TROUBLESHOOTING
WARNING
Disconnect the spark plug wire and ground it against the engine to prevent
unintended starting. Before performing any type of maintenance/service,
disengage all controls and stop the engine.Wait until all moving parts have
come to a complete stop. Always wear safety glasses during operation or while
performing any adjustments or repairs.
This section addresses minor service issues.To refer to your engine manual to locate your nearest Briggs and Stratton service dealer.
Problem Cause Remedy
Engine Fails to start 1. Blade control disengaged.
2. Spark plug boot disconnected.
3. Fuel tank empty or stale fuel.
4. Engine not primed (If equipped with primer).
5. Faulty spark plug.
6. Engine ooded.
7. Blocked fuel line.
1. Engage blade control.
2. Connect wire to spark boot.
3. Fill tank with clean, fresh gasoline.
4. Prime engine as instructed in the Operation section.
5. Clean, adjust gap, or replace.
6.Wait a few minutes to restart.
7. Contact your service dealer to clean the fuel line cleaned.
Engine runs erratic 1. Spark plug boot loose.
2. Stale fuel.
3.Vent in gas cap plugged.
4.Water or dirt in fuel system.
5. Dirty air cleaner.
6. Blocked fuel line.
1. Connect and tighten spark plug boot.
2. Fill tank with clean, fresh gasoline.
3. Clear vent.
4. Run engine until it stops from lack of fuel. Rell with fresh fuel.
5. Refer to Air Cleaner in Engine Maintenance section.
6. Contact your service dealer to clean the fuel line cleaned.
Engine overheats 1. Engine oil level low.
2. Air ow restricted.
1. Fill crankcase with proper oil.
2. Clean area around and on top of engine.
Occasional skips (hesitates) 1. Spark plug gap too close. 1. Adjust gap by a qualied specialist.
Idles poorly 1. Spark plug fouled, faulty, or gap too wide.
2. Dirty air cleaner.
1. Reset gap or replace spark plug.
2. Refer to Air Cleaner in Engine Maintenance section.
Excessive vibration 1. Cutting blade loose or unbalanced.
2. Bent cutting blade.
1.Tighten blade and adapter. Balance blade.
2. Replace blade.

WWW.SENIXTOOLS.COM
16
PARTS
No. Part # Description Qty.
1 A025036-007-00 Blade 1
2 A025036-006-00 Blade Adapter 1
3 A025036-017-00 Axle Pin 4
4 A025036-016-00 Wheel 4
5 A025036-018-00 Axle Sleeve 4
6 8NE-08D01 Nut 10
7 8SQDD08-20D Bolt 6
8 A025036-011-00 Cable Assembly 1
9 8NA-08D Nut 2
10 A025036-010-00 Knob 2
11 A025036-004-00 Bolt 2

WWW.SENIXTOOLS.COM 17
WARRANTY
LIMITED TWO-YEAR WARRANTY
2-year limited warranty on all Senix B&S series gasoline powered equipment.
FOR TWO YEARS from the original date of retail purchase this Senix product is warranted against defects in materials or
workmanship. Defective product will receive free repair.*
This warranty does not cover normal wear of parts and components such as cutting chain, line or blades nor does this
warranty cover product transportation cost for warranty or service.
Warranty is subject to the following conditions:
• For engine parts issue, please refer to your engine manual to locate the nearest authorized service dealer for any warranty
related issues
• Warranty applies to the original purchaser at retail and is not transferrable*
• Warranty Registration at www.senixtools.com
• Only genuine Senix accessories have been used with or on this product
• The tool has been subjected to normal wear and tear
• The tool has not been used for trade or professional purposes
• The tool has not been used for rental purposes
• This warranty only covers defects arising under normal usage and does not cover any malfunction, failure or defect resulting
from misuse, abuse (including overloading the product, exposure to water or rain) accidents, neglect or lack of proper
installation and improper maintenance or storage.
To locate your nearest Senix service provider call toll free at 1-800-261-3981 or email us at senix.ser[email protected]om.
Additional Limitations
Limited to two years from the date of purchase on power equipment. The manufacturer is not responsible for direct, indirect,
incidental or consequential damages. Some states and provinces do not allow limitations on how long an implied warranty
lasts and/or do not allow the exclusion or limitation of incidental damages, so the above limitations and exclusions may not
apply to you.
SENIX TOOLS declines any responsibility in regard to civil liability arising from abusive use or not in conformity with proper use
and maintenance of the machine as described in the operator’s manual.
SENIX TOOLS is not responsible for direct, indirect, incidental or consequential damages.
After the purchase, the manufacturer recommends proper maintenance of the machine and to read the operator’s manual
before using the machine.
*Original purchase receipt may be required for proof of purchase

Manual del operador
CORTADORA DE CÉSPED DE 50 CM
PRECAUCIÓN: Antes de usar esta
herramienta, lea este manual y siga todas
las medidas de seguridad e instrucciones
de operación.
SENIX TOOLS 6441 Hendry Road, Suite A, Charlotte, NC 28269
Para asistencia al cliente, llame al 1-800-261-3981 o envíenos un correo electrónico a senix.
www.senixtools.com
N.º de modelo LSPG-L2
• SEGURIDAD
• ENSAMBLAJE
• OPERACIÓN
• MANTENIMIENTO
• GARANTÍA
TM

WWW.SENIXTOOLS.COM 19
ESPECIFICACIONES DEL PRODUCTO
Aceite de motor: SAE 30
Combustible: Gasolina sin plomo
Motor: Briggs & Stratton
NÚMERO DE MODELO
Número de modelo:
Número de serie:
Fecha de compra:
Registre el número de modelo, el número de serie y la fecha de compra en la parte
de arriba.
ÍNDICE
DECLARACIÓN DE GARANTÍA
GARANTÍA LIMITADA DE SENIX
DURANTE DOS AÑOS a partir de la fecha de venta, este producto está garantizado contra defectos de materiales o mano de obra.
Esta garantía cubre ÚNICAMENTE defectos de material y mano de obra. La cobertura de la garantía NO incluye:
• Artículos desechables que pueden desgastarse por el uso normal dentro del período de garantía, como cuchillas de cortacésped, adaptadores de cuchillas, correas,
ltros o bujías.
• Daño del producto resultante de los intentos del usuario de modicar o reparar el producto o causado por los accesorios del producto.
• Reparaciones necesarias debido a un accidente o por no operar o mantener el producto de acuerdo con todas las instrucciones provistas.
• Mantenimiento preventivo o reparaciones necesarias debido a una mezcla de combustible inadecuada, combustible contaminado o rancio.
Esta garantía es nula si este producto se utiliza alguna vez mientras se prestan servicios comerciales o si se alquila a otra persona.
Esta garantía le otorga derechos legales especícos, y usted también puede tener otros derechos que varían de un estado a otro.
SENIX TOOLS 6441 Hendry Rd. Charlotte, NC. 28269
www.senixtools.com
Declaración de garantía............................. Página 19
Instrucciones de seguridad................. Páginas 20-23
Guía de pendientes .................................... Página 24
Ensamblaje........................................... Páginas 25-26
Operación............................................. Páginas 27-28
Servicio y mantenimiento................... Páginas 29-30
Almacenamiento fuera de temporada...... Página 31
Solución de problemas................................Página 32
Parte..............................................................Página 33
Garantía....................................................... Página 34

WWW.SENIXTOOLS.COM
20
OPERACIÓN GENERAL
Lea este manual del operador detenidamente en su totalidad antes de intentar
ensamblar esta máquina. Lea, entienda y siga todas las instrucciones de la máquina
y del(de los) manual(es) antes de la operación. Guarde este manual en un lugar
seguro para consultarlo y solicitar piezas de repuesto.
• Familiarícese completamente con los controles y el uso adecuado de esta
máquina antes de operarla.
• Esta máquina es un equipo motorizado de precisión, no un juguete. Por lo
tanto, tenga mucho cuidado en todo momento. Esta máquina ha sido diseñada
para realizar un trabajo: cortar césped. No la use para ningún otro propósito.
• Nunca permita que los niños operen esta máquina.
• Solo las personas responsables que estén familiarizadas con estas reglas de
operación segura deben poder usar esta máquina.
• Inspeccione minuciosamente el área donde se utilizará el equipo. Quite todas
las piedras, palos, alambres, huesos, juguetes y otros objetos extraños que
puedan tropezarse o levantarse, o que la cuchilla pueda arrojar. Los objetos
arrojados pueden provocar lesiones personales graves.
• Planique su patrón de corte para evitar la descarga de material hacia caminos,
aceras, transeúntes y similares. Además, evite descargar material contra una
pared u obstrucción, lo que puede hacer que el material descargado rebote
hacia el operador.
• Para ayudar a evitar el contacto con la cuchilla o una lesión por objeto arrojado,
permanezca en la zona del operador detrás de las manijas y mantenga a los
niños, transeúntes, ayudantes y mascotas al menos a 23 metros de distancia de
la podadora mientras esté en funcionamiento. Detenga la máquina si alguien
ingresa al área.
• Siempre use anteojos o gafas de seguridad durante la operación y mientras
realiza un ajuste o reparación para proteger sus ojos. Los objetos arrojados que
rebotan pueden provocar lesiones oculares graves.
• Use zapatos de trabajo resistentes, de suela áspera, pantalones holgados,
camisas y protección auditiva. Se recomiendan camisas y pantalones que
cubran los brazos y las piernas y zapatos con punta de acero. Nunca opere
esta máquina descalzo, con sandalias, zapatos resbalosos o muy livianos (por
ejemplo, de lona).
• No coloque las manos ni los pies cerca de las piezas giratorias o debajo de la
plataforma de corte. El contacto con la hoja puede amputar los dedos, manos,
dedos de los pies y pies. Manténgase alejado de la abertura de descarga en
todo momento.
• Una cubierta de descarga faltante o dañada puede causar el contacto de la
cuchilla o lesiones por objetos lanzados.
• Muchas lesiones ocurren como resultado de que la cortadora de césped se pase
sobre el pie durante una caída causada por resbalones o tropiezos. No se agarre
a la podadora si se está cayendo: suelte el mango inmediatamente.
• Nunca jale la podadora hacia usted mientras camine. Si debe alejar la
podadora de una pared u obstrucción, primero mire hacia abajo y hacia atrás
para evitar tropezar y luego siga estos pasos:
a. Aléjese de la podadora para extender completamente los brazos hacia
adelante.
b. Asegúrese de estar bien equilibrado con una base segura.
c. Jale la podadora hacia atrás lentamente, no más de la mitad de su camino
hacia usted.
d. Repita estos pasos según sea necesario.
• No opere la podadora bajo la inuencia de alcohol o drogas.
• No active el mecanismo autopropulsado en máquinas así equipadas mientras
arranque el motor.
• El mango de control de la hoja es un dispositivo de seguridad. Nunca intente
omitir su funcionamiento. Si lo hace, el dispositivo de seguridad quedará
inoperante y podría provocar lesiones personales por contacto con la cuchilla
giratoria. El mango de control de la cuchilla debe funcionar fácilmente en
ambas direcciones y volver automáticamente a la posición desenganchada
cuando se suelte.
• Nunca opere la máquina sobre hierba mojada. Siempre fíjese dónde pisa.
Un resbalón y una caída pueden causar lesiones personales graves. Si siente
que está perdiendo el equilibrio, suelte el mango de control de la cuchilla
inmediatamente y la cuchilla dejará de girar en tres segundos.
• Opere sólo a la luz del día o con una buena luz articial. Camine, nunca corra.
• Detenga la cuchilla al cruzar calles de grava, senderos o caminos.
• Si el equipo comienza a vibrar de forma anormal, detenga el motor y
compruebe inmediatamente la causa. La vibración es generalmente un
indicador de problemas.
• Apague el motor y espere hasta que la cuchilla se detenga por completo antes
de retirar el recogedor de césped o desatascar el conducto. La hoja de corte
continúa girando durante unos segundos después de que se suelta el control
de la hoja.
• Nunca coloque ninguna parte del cuerpo en el área de la cuchilla hasta que esté
seguro de que la cuchilla ha dejado de girar.
• Nunca opere la cortadora de césped sin el protector de seguimiento adecuado,
la cubierta de descarga, el recogedor de césped, el mango de control de
la cuchilla u otros dispositivos de protección de seguridad en su lugar y
funcionando. Nunca opere la podadora con dispositivos de seguridad dañados.
Si lo hace, se pueden producir lesiones personales.Verique con frecuencia
signos de desgaste o deterioro y reemplace según sea necesario.
• El silenciador y el motor se calientan y pueden causar quemaduras. No tocar.
• Nunca intente hacer un ajuste de la altura de corte o de una rueda con el motor
en marcha.
ADVERTENCIA
Este símbolo señala importantes instrucciones de seguridad que, si no se siguen,
podrían poner en peligro su seguridad personal y/o su propiedad y la de otros.
Lea y siga todas las instrucciones de este manual antes de intentar operar esta
máquina. El incumplimiento de estas instrucciones puede resultar en lesiones
personales.
PELIGRO
Esta máquina fue construida para ser operada de acuerdo con las prácticas de
operación segura de este manual. Como ocurre con cualquier tipo de equipo
motorizado, el descuido o error por parte del operador puede resultar en lesiones
graves. Esta máquina es capaz de amputar dedos, manos, dedos de los pies y
pies, y arrojar escombros. El incumplimiento de las siguientes instrucciones de
seguridad podría provocar lesiones graves o la muerte.
ADVERTENCIA
Su responsabilidad: restrinja el uso de esta máquina eléctrica a las personas que
lean, comprendan y sigan las advertencias e instrucciones de este manual y de la
máquina.
¡CONSERVE ESTAS INSTRUCCIONES!
INSTRUCCIONES DE SEGURIDAD
Table of contents
Languages:
Other Senix Lawn Mower manuals


