Senna All Recall Focus Duo User manual

All Recall Focus Duo
by Senna
User Manual
Look for the video instructions on You tube and Vimeo:
www.youtube.com/watch?v=i8COpQazR6k&noredirect=1
http://vimeo.com/65087901
http://vimeo.com/65092675

1. Introduction
All Recall Focus Duo is a brand new remote wireless device which controls focus and zoom on DSLR
cameras. It is especially suitable when using jibs, sliders and steadicams. Motor torque of 16 kg,
extended range of operation of 320°, and the adjustable gear ring allow precise control of focus and
zoom on any lens. For precise control of lenses with range smaller than 320°, in/out range calibration
is available.
Its matchless option of memorizing four different focus or zoom positions, allows automatic recall at
any point of shooting with simplistic memory buttons located on the ergonomic control panel. The
replay speed between the stored positions is also adjustable. The system allows remote recording and
trigger command for Cannon DSLRs. For night working mode, there is a practical glowing ring.
1.1Features of All Recall Focus:
- Wireless Range: 300m/1000´ line of sight
- Remote control of focus and zoom
- Memory: Four points of focus/zoom recall and speed reply option
- Adjustable gear ring: Universal gear ring fits any lens
- Travel Focus Function: In/Out range calibration
- Remote recording and trigger command
1.2 Specifications:
Parameter
Description
Operating voltage
12VDC
Operating temperature
0 ÷ 45 °C / 32 ÷ 113 °F (or more if connected to power
adapters)
Battery
Rechargeable 12V, 1200 mAh
Motor power output
5VDC, 2A max.
Servo motor signal
5V PWM, 40 mA max.
Servo motor torque
≤16 kg /35 Ibs
Servo motor speed
0.19 sec/60° without load
Servo motor range
≤ 320°
IR remote control
Compatible with following Canon:
Canon 5D Mark II, Canon 5D Mark III, Canon 7D
Wireless frequency
431 ÷ 478 MHz, frequency is preset on 433 MHz and can
not be changed on device, only in factory when ordering,
in steps of 200 KHz (235 channels)
RF modulation
GFSK
Wireless output power
20 mW
Wireless range
up to 300 m/1000 Ft. in open area
Transmitter dimension
3.1'' x 2.75'' x 4.3'' (W x H x D) without antenna
Receiver dimension
3.14'' x 1.77'' x 3.14'' (W x H x D) without antenna

2. All Recall Duo Focus set includes:
Receiver
Transmitter
Focus and zoom motor gears
Rods (⌀ 15mm)
Camera plate
Receiver/transmitter charger
-
External spare battery
Infrared sensor (REC and trigger)
Voltmeter - battery state check
2 types of gears (small for DSLR,
bigger for movie cameras)
Spare battery charger
2 adjustable gear rings
Warranty letter
User Manual
Packaging –Flight case

3. Mounting the All Recall Focus Duo:
3.1 To mount All Recall Focus Duo properly, please follow the steps:
1. Attach the rods on the camera plate
2. Mount your camera on the camera plate
3. Mount the receiver on the rods (it should be turned to the right, as shown on the picture
above)
4. Mount the IR sensor for REC/trigger command on the left rod so that it stand right in front of
the sensor of your camera, as it is shown in the picture.
5. Mount the Motor 2 (zoom motor) on the rights rod (see the picture above)
6. Mount the Motor 1 (focus motor) on the left rod (see the picture above)
7. Connect the motors with the receiver
8. Connect the IR sensor with the receiver
9. Mount the adjustable gear rings on the focus and zoom gears on your lens. (Pay attention that
the rest of the ring is turned in the opposite direction from the motor driver)
10. Make In/Out range calibration (See the charter In/out range calibration)
11. Connect focus and zoom gears to your lens’ gears. Pay attention: Motor gear spring must be
tensed.
For larger lens, when you need a longer rod to mount the focus motor gear, you can attach one
rod to another, like shown in the picture:

3.3 In/Out range calibration
All Recall zoom and focus motor gears have an extended range of 320°. If your camera lens has
smaller focus/zoom gear range, it is recommended that you make in/out range calibration, to protect
your lens gears from being forced to move beyond their physical range.
To make range calibration, please follow the steps:
1. Keep the focus /zoom gears separated from the lens
2. Turn the motor 1 (focus) potentiometer to
maximum position
3. Turn the motor 2 (zoom) potentiometer to
maximum position
4. Shortly press memory buttons 1 and 3
simultaneously. (Focus/zoom Motors now have full
operation range of 320°)
5. Now turn the motor 1 potentiometer to
minimum position and pay attention in which
direction All Recall focus gear is turning.
6. Turn the motor 2 potentiometer to minimum
position and pay attention in which direction All
Recall zoom gear is turning.

7. Turn your lens’ focus gear in opposite direction
from the motion of All Recall focus gear until it has
reached the maximum position.
8. Turn your lens’ zoom gear in opposite direction
from the motion of All Recall zoom gear until it has
reached the maximum position.
9. Connect motor 1 gear to the lens
gear.
10. Connect motor 2 gear to the lens
gear.
Pay attention that motor
gear springs are tensed!
11. Turn the focus and zoom potentiometers slowly until you have reached the range-end position on
your camera lens. Then stop.
12. Shortly press memory buttons 1 and 3 simultaneously.
The range of focus and zoom motors is compatible to your
lens range and you can move it without fear of damaging
the lens.
IMPORTANT! You need to repeat this procedure any time
you reattach the focus and zoom gears to the lens and also
when you change the lens. You do not need to repeat the
procedure if you have turned the focus controller off for
some time without separating the gear from the lens. When
the transmitter is turned off, all the settings are kept in
memory.

Possible problem: After you have made range calibration one of the motors-gears does not spin.
Solution: When this happens, it means that you have probably changed motor gear polarity settings.
To return the motor gear polarity to default, please follow the instructions in the charter 3.4.1 Return
to default motor polarity settings.
If the motor still does not work, after you have changed the polarity, please contact our service.
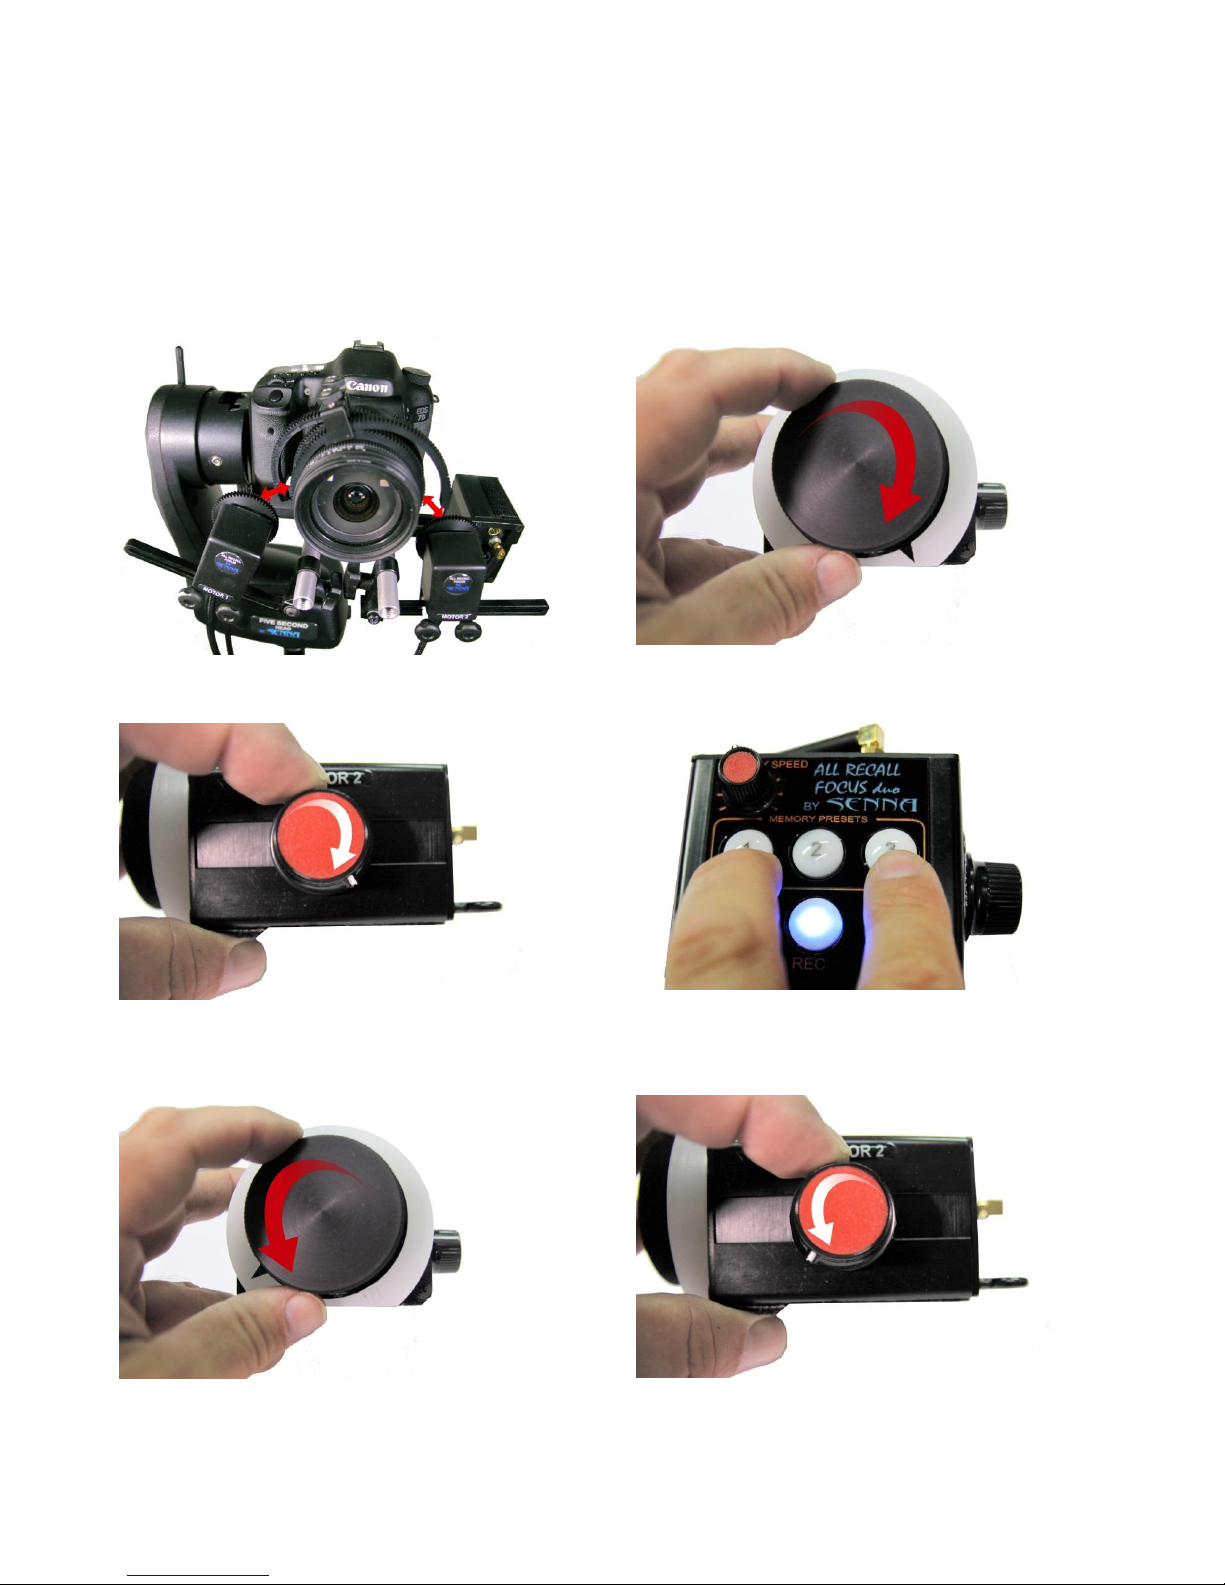
3.4 Motor gear polarity
Motor-gear polarity is set to default.
If you would like to change the direction of motor-gears you should follow the steps:
Motor 1 polarity change:
1. Keep the transmitter off.
2. Press and hold the button 3.
3. While holding that button 3, switch the transmitter on.
4. Release the button 3.
5. Motor 1 polarity has been changed.
Motor 2 polarity change:
1. Keep the transmitter off.
2. Press and hold the buttons 1 and 2 together.
3. While holding the buttons 1 and 2 switch the transmitter on.
4. Release the buttons 1 and 2.
5. Motor 2 polarity has been changed.
IMPORTANT!
When the polarity is changed, the in/out range calibration must be done the opposite way, meaning that
minimum points should be changed with maximum positions and vice versa!
3.4.1 Return to default motor polarity settings:
To return to default motor-gear polarity settings, please follow the steps:
Motor 1 polarity change:
6. Keep the transmitter off.
7. Press and hold the button 1.
8. While holding that button 1, switch the transmitter on.
9. Release the button 1.
10. Motor 1 polarity has been changed to default.
Motor 2 polarity change:
6. Keep the transmitter off.
7. Press and hold the buttons 2 and 3 together.
8. While holding the buttons 2 and 3 switch the transmitter on.
9. Release the buttons 2 and 3.
10. Motor 2 polarity has been changed to default.

3.5 Motor gear position adjustment:
The Focus motor gear can be adjusted in different positions to fit your lens. See the pictures.
4. Transmitter
After the power switch on the transmitter and receiver is turned ON, devices will start establishing
wireless communication and memory buttons on transmitter will flash.
When the memory buttons stop flashing, the light on REC button will continue to shine blue. Wireless
communication between transmitter and receiver is now established.
Antenna
It is recommended, after all equipment is installed, to turn antennas vertical on both devices.
Otherwise operating range may be decreased.

4.1 Changing focus
To move the focus gear on your camera lens, use the focus potentiometer at the bottom side of the
transmitter. Position and speed of focus change directly correspond to potentiometer movement.
4.2 Changing zoom
To move the zoom gear on your camera lens, use the zoom potentiometer on the right side of the
transmitter. Position and speed of zoom change directly correspond to potentiometer movement.
4.3 To check the status of transmitter’s
battery, please follow the steps:
1. Attach the digital voltmeter to the
transmitter as shown on the picture.
2. Read the battery voltage on the display.
If the voltage is under 10,0 batteries need to
be charged.
If the voltage is near 12,0 batteries are fully
charged.
4.4 Setting the night mode ring
To set the desirable light strength of night mode
Ring, please follow the steps:
1. Press the REC button, before you switch the
transmitter ON.
2. Keep the REC button pressed and switch the
transmitter ON.
3. The night mode ring will start pulsing.
4. When the ring has reached the desirable strength of
light, release the REC button.
5. Night mode ring is now set to desirable light strength.

5. Receiver
After All Recall Focus receiver is turned on with a power switch, device will go through a short self-
testing and signal and power LED indicators will flash twice. After that, both LED indicators will turn
on.
If the receiver fails to establish wireless communication, signal LED light will flash fast.
IMPORTANT! If you do not connect zoom and focus motors with transmitter, wireless communication
cannot be established.
5.1 To check the status of receiver’s
battery, please follow the steps:
1. Attach the digital voltmeter to the
receiver as shown on the picture.
2. Read the battery voltage on the
display.
If the voltage is under 10,0 batteries need
to be charged.
If the voltage is near 12,0 batteries are
fully charged.

6. Functions:
6.1 Focus/zoom memory
Motor 1 allows storing up to 4 positions of focus or zoom, depending on your choice and depending on
which lens’ gear you mount the Motor 1.
When you have mounted the Motor 1 on the proper lens’ gear, follow the steps below to store 4
different memory positions of focus or zoom:
1. Move the big potentiometer at the bottom size of the transmitter to reach the desirable
position
2. Press and hold the memory button 1 until all tree memory buttons turn red.
3. Position 1 is now stored in memory, and the memory button 1 shines red. (See the picture)
4. Move the big potentiometer at the bottom size of the transmitter to reach the desirable
position.
5. Press and hold the memory button 2 until all tree memory buttons turn red.
6. Position 2 is now stored in memory, and the memory button 2 shines red. (See the picture)
7. Move the big potentiometer at the bottom size of the transmitter to reach the desirable
position
8. Press and hold the memory button 3 until all tree memory buttons turn red.
9. Position 3 is now stored in memory, and the memory button 3 shines red. (See the picture)
10. Press shortly the previously stored memory button, so that its light indicator turns off. (No
memory button should be turned on!)
11. Move the potentiometer to the new desirable position. That is the 4th manual memory.
12. You have now stored 4 memory positions. (See the picture below)
Setting the memory points
6.1.1Changing of stored memory position
To store a new position on the memory button on which you have already stored one, follow
the steps:
1. Move the big potentiometer at the bottom size of the transmitter to reach the new position.
2. Press a memory button again and hold it until all tree memory buttons turn red.
3. You have now changed previously stored memory position with the new one, and the memory
button shines red.

6.2 Memory recall
To recall a stored position follow the steps:
1. Shortly press the desired memory button.
2. Memory button will turn green and the gear will reach the stored position. (See the pictures below)
* To recall the 4th position, follow the steps:
1. Press shortly the memory button which is turned on at that moment. No green light should be
turned on.
2. When all memory buttons are turned off, 4th memory position is active. (See the picture below)
Memory points recall
6.3 Recall Speed
The speed of change between different memory positions depends on the position of the speed recall
potentiometer. Left end position represents the slowest moving; right end position represents fastest
moving. You can adjust the recall speed during your work and the change will apply immediately.
6.4 Remote REC and trigger command
Communication between rec/trigger
sensor and the camera sensor
All Recall Duo Focus is equipped with Canon
remote controller.
IMPORTANT! This option will not be available if you do not connect the REC/trigger sensor with the
receiver, or if the sensor is not properly mounted (See the charter Mounting the All Recall Focus Duo)
To activate the rec/trigger sensor, please follow the steps:
1. Turn your DSLR camera on.
2. Press AF drive
3. Move the cursor to the third option (timer), as it is shown
on the picture
4. Rec/Trigger command is activated.

6.5 New setup
When All Recall Duo Focus is not in use for longer time, please turn it off to save the battery. When you
turn it on again, all the settings will be saved in memory and it is not necessary to store them again.
7. Batteries
Focus transmitter and receiver work on internal lithium batteries.
Batteries should be charged for 3 hours max.
The capacity of receiver/transmitter batteries is 4 working hours.
IMPORTANT!
DO NOT charge the batteries over night!
DO NOT leave the batteries to get empty completely! You will not be able to charge them again!
When All Recall Duo Focus is not in use for a longer time, please turn it off to save the battery. When
you turn it on again, all the settings will be saved in memory and it is not necessary to store them
again.
If the batteries are empty or broken, you can replace them with external spare battery which is included in
the set. Simply attach it with Velcro strip. See the pictures.
Attaching the spare battery to receiver and transmitter
The capacity of external battery is 4 working hours.
The spare battery should be charged for 3 hours max.
IMPORTANT! When being charged, spare battery should always be turned on.
Always turn the spare battery off when it is not in use or being charged. If it gets empty completely you may
not be able to change it again.
Other manuals for All Recall Focus Duo
1
Table of contents
Popular Remote Control manuals by other brands

Echo
Echo ECHO-5 Operations & installation guide

Midea
Midea KJR-120X/TFBG-E Installation and owner's manual

Barthelme
Barthelme Chromoflex Pro Series instruction manual

Universal Remote Control
Universal Remote Control CLIKR-5 UR5U-8780L operating instructions

Thompson
Thompson ROC5209 Operating instruction

Sennheiser
Sennheiser EZS 1010 manual