Sensaphonics ASI Audio 3DME User manual
3DME 3DME 3DME
3DME
Three dimensional music enhancement
3DME
Three dimensional music enhancement
outlined
outlined
Novocento Wide Light and Avenir Next Demi no outlines
Novocento Wide Light no outlines
91 63 47 33
5477CP
72 34 26 1
7697CP
0 79 100 0
1665CP

Puede encontrar las instrucciones en español en:www.asiaudio.com
Welcome to 3DME Three Dimensional Music Enhancement 3
Hardware and Features 5
Getting Started: Connecting Your 3DME and Attaching Eartips 7
The Audio Seal Test 11
The ASI Audio App 14
The Main Screen 16
The Equalizer Screen 19
The Options Screen 20
The Pop-up Menu - Presets and Help 22
Charging the Battery 29
Cleaning and Maintenance 30
About Safe Sound Levels and Hearing Protection 31
Technical Specifications 34
Support 35

3
WELCOME TO3DME
THREE DIMENSIONAL MUSIC ENHANCEMENT
3DME is a unique in-ear listening
system that combines patented
Active Ambient™ audio
technology from Sensaphonics®
with a powerful smartphone app
to enhance listening and promote
long-term hearing health.
The system includes:
3DME Active Ambient™
Earphones – Universal-t, dual
driver in-ear monitors (IEMs) with
embedded binaural microphones
capture the ambient sound around
you with full 3D directionality and
three sizes of eartips to isolate your
ears and deliver superb sound.
3DME Bodypack Mixer/Amplier
Connects and combines your
sound source with the ambient
mic feed to add 3D stage mic
level to your monitor mix. The
bodypack also houses powerful
limiter and EQ functions. (When
used without a direct monitor mix,
you can still hear and control your
customized ambient feed with full
3D directionality.) Note: The Power
switch is on the bottom.
ASI Audio Smartphone App
Program the bodypack and tailor
your sound mix, levels, mic level,
EQ and sound limiting, save
custom presets, and performs an
Audio Seal Test for proper IEM t.

4
Accessories also included:
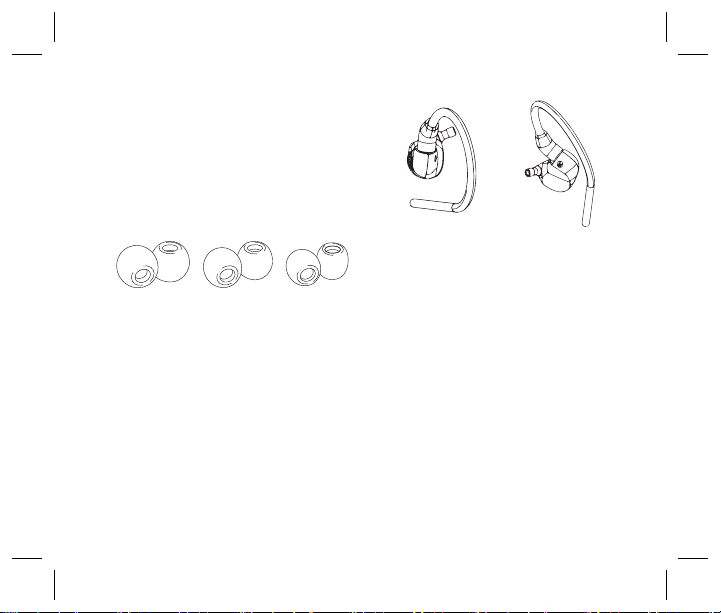
• 3 pairs of premium memory foam earphone tips (Small, Medium and Large)
• Battery charger with micro-USB cable for bodypack
• Audio cable: 12-inch jumper cable, stereo mini-plugs
• Programming cable system for bodypack (micro USB)
• Earphone cleaning tool
• Clothing clip for securing IEM cable
• Storage case

5
3DME Ambient Earphones
• Universal t earphones with 3
sizes of ear tips
• Embedded ambient
microphone system
• Universal-t dual-driver design
• Embedded binaural ambient
microphone system
• Includes 3 sizes of ear tips to
ensure correct t
3DME Accessories
• Audio jumper cable, stereo
• Programming cable, micro-USB
• Battery charger
• Cleaning tool
• Clothing clip
• Storage case
HARDWARE AND FEATURES
Earbud with tip
Wall charger and jumper cable

6
Top and right of bodypack Bottom and left of bodypack
2
3
44
5
6
7
8
9
3DME Bodypack Mixer / Amplifier
1 - Ambient volume control switches (+/-)
(top panel)
2 - Battery status LEDs (4 LEDs) (top
panel)
3 - Dual earphone jacks (right side)
4 - Cable management/strain relief
(right and left sides)
5 - Monitor input mini-jack (left panel);
tip-left, ring-right
6 - Micro-USB charging/data port (bottom)
1
7 - USB power/charging status LEDs
(bottom)
8 - Power switch (bottom)
9 - Monitor output mini-jack (bottom);
tip-left, ring-right. The output signal
directly reflects the total signal
reaching your ears, including both the
microphone and monitor input
signals modified by the Mic Level, EQ
and Limiter. This output signal is
useful for monitoring your listening
level and for binaural recording.

7
Your 3DME universal-t IEMs
have embedded Active Ambient
microphones to capture the
ambient sound around you and
deliver accurate 3D directionality.
GETTING STARTED:
CONNECTING YOUR 3DME AND ATTACHING EARTIPS
relief (right and left sides)
5- Monitor input mini-jack (left
panel)
6- Micro-USB charging/data port
(bottom)
7- USB power/charging status
LEDs (bottom)
8- Power switch (bottom)
5
8
For rich, full sound, the earpieces
must be fully inserted to achieve
a full, tight seal. Three sizes of
ear tips are included. NOTE: The
earpiece cables are designed to
run up, over and behind the ears,
meeting behind the head.
Installing Ear Tips
1. Select an ear tip, holding
it rmly between thumb and
forenger.
2. Place the sound port (nozzle)
into the core of the tip at a slight
angle. As they join, straighten out
the tip and push the tip as far back
as it will go.
Inserting In-Ears
1. Before inserting into the ear
canal, observe left/right marking
on the earpiece.
Memory foam ear tips, 3 sizes
Ear buds without tips

9
2. Place the sound port (nozzle)
into the core of the tip at a slight
angle. As they join, straighten out
the tip and push the tip as far back
as it will go.
Inserting In-Ears
1. Before inserting into the ear
canal, observe left/right marking
on the earpiece.
2. Roll the tip between your ngers
to compress the foam into a thin
cylinder.
3. Insert the tip as deep as
possible without irritating the ear,
positioning the cable to run up,
over and behind the ear.
4. Hold the earpiece in place for
15-30 seconds, allowing the tip to
expand and conform to your ear
canal. This will create a custom
t and perfect seal - providing an
optimal audio experience.
Step 1 Step 2
Proper fi

10
IMPORTANT:
If the earpieces are not fully sealed, a brief feedback squeal may occur. If
you have any doubts about your fit, use the Audio Seal Test.
Very rarely, an ear tip can come off and remain in the ear canal when
removing your 3DME IEM. Should this occur and the ear tip cannot be
removed easily, please consult or immediately visit an audiologist or
medical provider.
These professionals are equipped with medical grade tweezers
designed specifically for ear canal disruptions. It is also very important to
have your ears checked for excessive ear wax build up or other hearing
challenge issues that can cause you to use loud sound volumes not
recommended for extended periods of time. Properly sealed earphones
allow for safe hearing at lower volume levels.
Note: Turn the bodypack on prior to connecting your earphone cable
to the bodypack.
Warning: Listening at a high volume for a long time may damage
your hearing.

11
In-ear monitors require a full seal of
the ear canal for full bass response.
A poor seal also reduces hearing
protection and can enable acoustic
feedback. The Audio Seal Test was
developed by Sensaphonics to help
users ensure proper t and full seal.
During the test you will hear two
alternating tones, one at 50 Hz and
the other at 500Hz, each played at
the same volume.
THE AUDIO SEAL TEST
If you have any doubts about your
fit, use the Audio Seal Test to
confirm that your IEMs are fully
sealed.
Note: If the earpieces are inserte
with the bodypack already
switched on (not recommended),
a brief feedback squeal may occ
until the earpieces are fully seale
For this reason, a safety limiter
is engaged when the bodypack
is rst switched on,limiting the
level of any possible feedback
to its default setting (84 dB-SPL).
Pressing either the + or - switch o
the top of the mixer pack release
the safety limiter and restores yo
stored limiter threshold settings.
To access, tap the
‘Seal Test button (ear)
found in the upper
right of the ASI Audio
app screen
If the ear canals are properly sealed, both
tones will be clearly audible.
If the earpiece is not properly sealed, the
50 Hz tone will be much lower in volume,
oreven inaudible.
Warning: Listening at a high volume for a
long time may damage your hearing.

12
Activate the Seal Test
1. Access the Audio Seal Test through
the ASI Audio app or directly on the
asiaudio.com website (https://
asiaudio.com/pages/audio-seal-test).
2. Follow the instructions to complete
your seal test.
3. Note the relative levels of the two
tones and consult the chart on the next
page.
Custom-fit option
As part of the ASI Audio x
Sensaphonics partnership, we offer
custom-fit ear tips for 3DME
earphones. These low profile, soft
silicone tips are molded to the exact
shape of your ear canal to provide a
consistent, secure fit with a full seal for
outstanding isolation and comfort. To
find an audiologist and get fitted for
custom molded eartips, visit
asiaudio.com/pages/gold-circle-
audiologists.
What You Hear Probable Meaning What To Do
Both tones, clear & at
the same level
Correct insertion with
proper t & full seal
Rock on! Proceed to the mic level,
limiter, and EQ screens on the ASI
Audio app.
Both tones, but the
higher pitched (500 Hz)
tone is much louder
than the 50 Hz tone
Incomplete seal
caused by poor t of
ear tip or by incom-
plete insertion. This
is the most common
problem.
Isolate problem to left or right
earpiece, then try a different size or
shape of ear tip. Review the IEM in-
sertion procedure, then fully re-insert
the earphone and repeat the test.
If a full seal cannot be achieved, try
different ear tips, both size and style,
and repeat the test until a full seal is
achieved.
500 Hz only; no 50 Hz
bass tone at all
Very poor seal. A more
severe version of the
previous issue.
Review insertion procedure, fully rein-
sert IEMs, and test again. If a full seal
cannot be achieved, try different ear
tips, both size and style, and repeat
the test until a full seal is achieved.
Other results Problem likely not
related to t or seal
Contact your audiologist or ASI
Audio.

13
What You Hear Probable Meaning What To Do
Both tones, clear & at
the same level
Correct insertion with
proper t & full seal
Rock on! Proceed to the mic level,
limiter, and EQ screens on the ASI
Audio app.
Both tones, but the
higher pitched (500 Hz)
tone is much louder
than the 50 Hz tone
Incomplete seal
caused by poor t of
ear tip or by incom-
plete insertion. This
is the most common
problem.
Isolate problem to left or right
earpiece, then try a different size or
shape of ear tip. Review the IEM in-
sertion procedure, then fully re-insert
the earphone and repeat the test.
If a full seal cannot be achieved, try
different ear tips, both size and style,
and repeat the test until a full seal is
achieved.
500 Hz only; no 50 Hz
bass tone at all
Very poor seal. A more
severe version of the
previous issue.
Review insertion procedure, fully rein-
sert IEMs, and test again. If a full seal
cannot be achieved, try different ear
tips, both size and style, and repeat
the test until a full seal is achieved.
Other results Problem likely not
related to t or seal
Contact your audiologist or ASI
Audio.

14
The ASI Audio app is the control
center for Music Enhancement, with
access to a suite of sound tools that
let you customize the sound of your
3DME.
Download from the ASI Audio
website, Google Play Store, Amazon
Appstore or Apple App Store (When
Available).
After installing the app, connect your
smartphone or tablet to the 3DME
bodypack with the included micro-
USB data cable. Open the app and
power up the bodypack. Connect
earphone cable to the bodypack.
Note: Turn the bodypack on prior to
inserting the earpieces and
connecting your earphone cable to
the bodypack.
THE ASI AUDIO APP
15
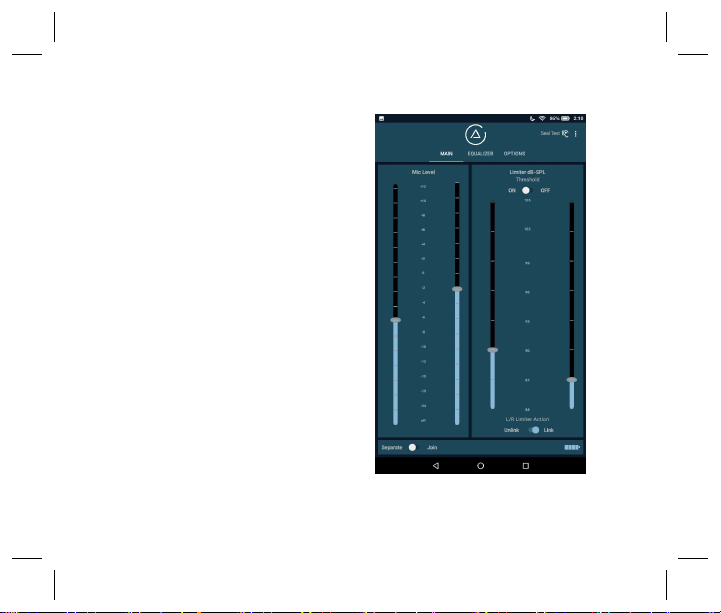
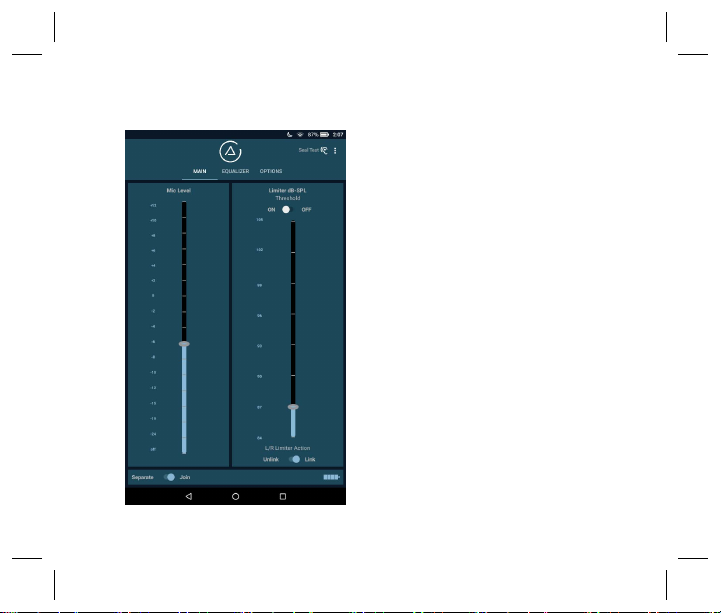
The app has 3 main sections: Mic
Level & Limiter; Equalizer; and
Options.
As you customize the Mic level,
Limiter, and EQ to your preferences,
settings are automatically saved to
the bodypack and stay active until
changed with the app.
Warning: Listening at a high
volume for a long time may damage
your hearing.
Note: A safety limiter is engaged
when the bodypack is first
switched on,limiting the level of any
possible feedback to its default
setting (84 dB-SPL). Pressing either
the + or - switch on the top of the
bodypack releases the safety limiter
and restores your stored limiter
threshold settings.
16
Includes controls for ambient mic
level and limiter threshold.
Left and right channels may be
treated as a binaural (stereo) pair, or
adjusted separately by tapping the
Join/Separate button. Joined L/R
channels is the system default.
The Join/Separate function applies
to the Mic level and Limiter
Threshold.
Mic Level (Mic level Gain) and
Limiter
The slider on the left sets the base
level for the mic level in your monitor
mix from the embedded
microphones.
Warning: Listening at a high
volume for a long time may
damage your hearing.
THE MAIN SCREEN
17
Note: The 3DME’s mic level feature
can also be used by itself (without a
separate IEM feed) for acoustic
ensembles – essentially operating
as a custom-tuned high idelity
earplugs with volume control.
Warning: Listening at a high
volume for a long time may
damage your hearing.
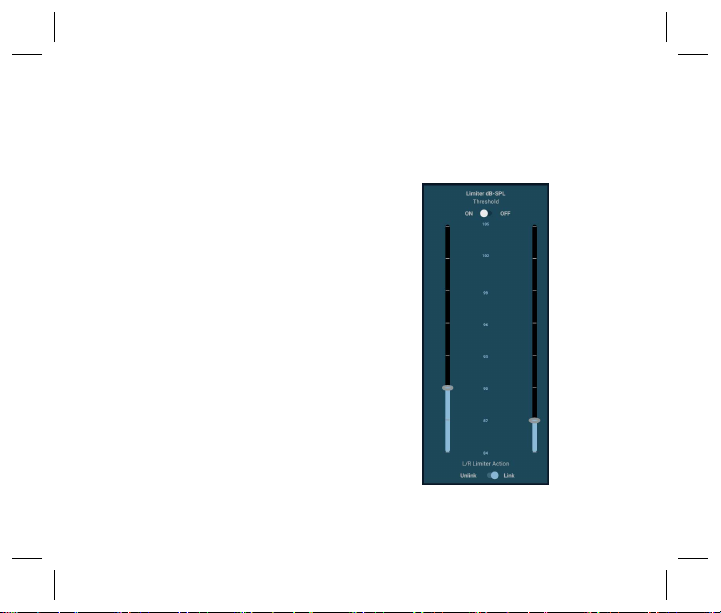
Limiter Control
The limiter on the right side of the
home screen is key to hearing
health. Select the level where
limiting begins, between 84 and
105 dB-SPL in 3 dB increments.
-Use the slider to set the threshold
for limiter engagement.
-The Limiter Left and Right
Thresholds are joined or separated
by the Join/Separate button.
-Maximum volume reduction is 20
dB.
-Limiter function can be turned off
(not recommended!).

18
-Maximum volume reduction is
20 dB
-Limiter function can be turned off
(not recommended!)
Notes on limiting
• The 3DME limiter is designed for
music with adaptive attack, average
responding, frequency selective
operation.
• The Limiter Action Link/Unlink
button determines if limiting
action applies to both channels
together (linked), or independently
(unlinked).
Linking Action is independent of
the Join/Separate function (used for
setting the Mic level Level, Limiter
threshold, and EQ).
•Feedback/Safety Limiter:
If the earpieces are inserted with
the bodypack already switched on,
afeedback squeal could occur
until theearpieces are sealed.
A safety limiter is engaged when
the bodypack is first turned on to
limt the level of any feedback.
Press the + or - switch on the top of
the bodypack to disengage the
safety limiter and go to your stored
limiter settings.

19
The 3DME lets you customize
personal equalization via a 7-band
EQ.
-Each band is adjustable from +12
to -12 dB.
-If using separate channels, select
left or right channel (above EQ
sliders) to make desired settings.
-To reset, switch to Flat below the
sliders to return all values to 0.
-The Join/Separate function
applies to the EQ adjustment.
Warning: Listening at a high
volume for a long time may
damage your hearing.
THE EQUALIZER SCREEN

20
THE OPTIONS SCREEN
3DME Bodypack Switches
This option allows you to program
the (+/-) rocker switches on the
bodypack top panel as a toggle
switch.
Step Mode is the default setting. The
+ and – buttons on the bodypack
change the volume of ambient
sound one step at a time (+12 dB to
-24 dB, plus Off).
Preset Mode converts the
+/- bodypack buttons into an A/B
toggle switch between 2 ambience
mic settings – one can be used while
performing, while the other for
conversation between songs.
Press the "SET + BUTTON" or "SET
- BUTTON" button to use the
current mic level as the preset for
the + or - button on the bodypack.
Other manuals for ASI Audio 3DME
1
This manual suits for next models
1
Table of contents


