Sense PD200 User manual

PD200
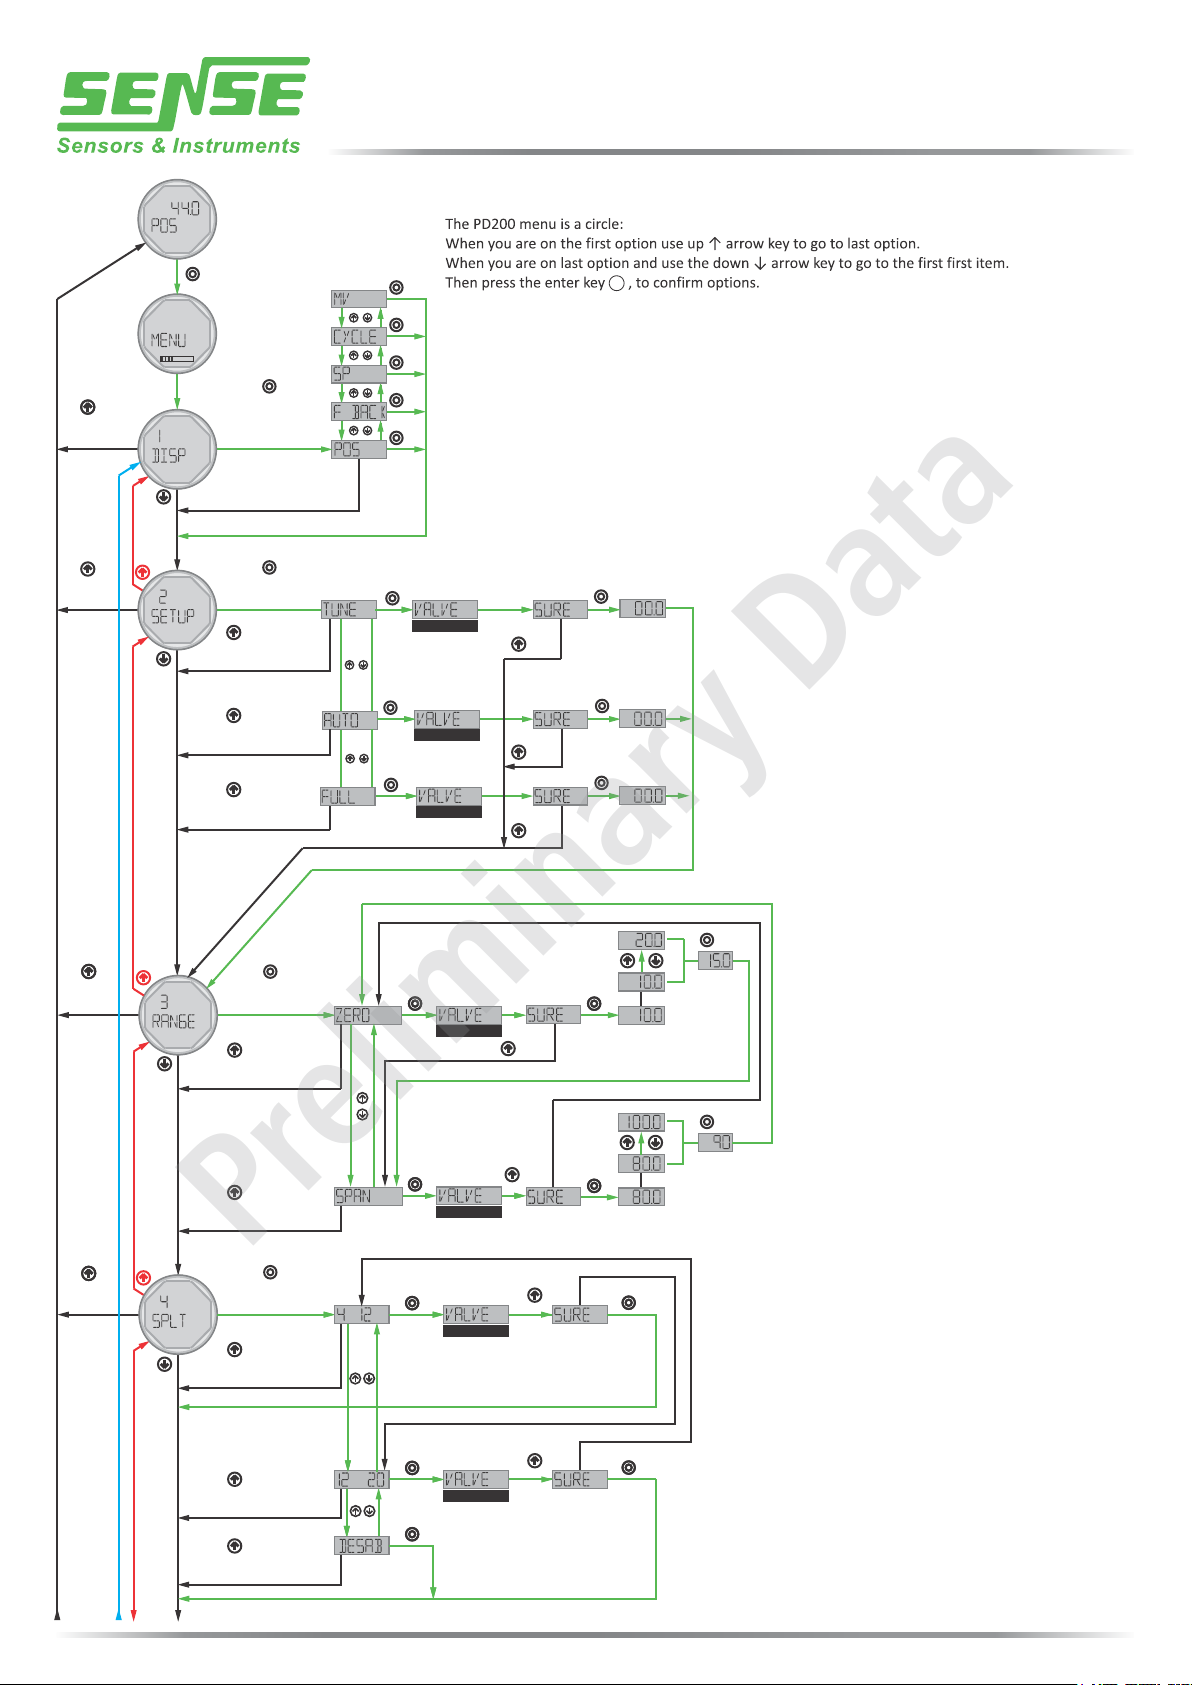
Navigation Menu
HART
COMMUNICATION PROTOCOL
R
Preliminary Data
Smart Valve Positioner
3 sec to
Next Menu
3 sec to
Next Menu
3 sec to
Next Menu
3 sec
to Exit
3 sec
to Exit
3 sec
to Exit
3 sec
to Exit
5 sec.
Run Mode
Pd200 Navigation Flowchart
AUTO
valve will move
valve will move
valve will move
valve will move
valve will move
valve will move
Quit without changes,
press ? for 3s
3 sec to
Next Menu
3 sec to
Next Menu
3 sec to
Next Menu
Press Enter key to
select what the
display will show
Press Enter to
select the function
Selected
Value
Selected
Value
Press Enter to
select this function
Press Enter to
select this function
AUTO
valve will move
valve will move
valve will move
3 sec to
Next Menu
3 sec to
Next Menu
Doing
Calibration
Doing
Calibration
Doing
Calibration
Smart Valve Positioner for
Linear or Rotary Valves
YES
YES
YES
YES
YES
YES
YES
1
NO
3 sec
NO
3 sec
NO
3 sec
NO
3 sec
NO
3 sec
NO
3 sec
NO
3 sec
3 s
1.3 – F BACK : Allows to indicate on display the current positon of the valve in % or the input current in mA .
● Press Enter key ○ to select what the display will show
1.5 – MV: Indicates on display the manipulated variable in%.
1.1 - POS: Indicates on the display the current position of the valve from 0% to 100%.
1.4 – CYCLE: The display will show alternately Position in %, Setpoint in %
● Press Enter key ○ to set the option
● Use up or down arrow keys ↑ ↓ to navigate to the item you want to set
In this menu function is possible to select 5 modes of exhibition on the LCD display:
1 - DISP
1.2 – SP: Indicates on the display the current input signal value from 0% to 100%. This parameter represents the desired
position value.
● Press Enter key ○ on calibration procedure you want to do.
● If you are SURE to proceed with the calibration process selected confirm
with the Enter key ○.
● If you want to exit without performing the calibration use the up arrow key ↑
for 3 seconds.
● Use up or down arrow keys ↑ ↓ to navigate to the item you want to set.
2 - SETUP
2.1 - TUNE: Allows to perform PID control tuning automatically (Kp, Tr and Td).
2.2 - AUTO: During this adjustment, the positioner will check the positions of
0% and 100% of valve opening and closing.
In this menu function, it is possible to perform 3 positioner calibration modes:
2.3 - FULL: Executes AUTO SETUP and AUTOTUNING to find complete valve
tuning, including PID parameters.
● Press Enter key ○ to select this function.
3 - RANGE
In this menu function, it is possible to adjust the minimum and
maximum operating range of valve opening, as follows:
● Use up or down arrow keys↑ ↓ to navigate to the item you
want to set.
● Press Enter key ○ to select the option.
3.2 – SPAN: Allows to adjust the working range from 80 to
100%.
● If you want to quit the ZERO / SPAN menu press the up
arrow key ↑ for 3 seconds and return to main menu
● Press Enter key ○ to select this function.
3.1 – ZERO: Allows to adjust the working range from 0 to 20%.
● Use up or down arrow keys ↑ ↓ to increase or decrease the
value. Hold it to fast increase or decrease.
● When the value is ready, store it with the Enter key ○ and
return to ZERO / SPAN menu to set the other if you want.
3 s
● If you are NOT SURE to proceed press the up arrow key ↑ for 3 seconds.
● Press Enter key ○ to select this function.
● Press Enter key ○ to select the option.
● If you are SURE to proceed with the split, confirm with the Enter key ○.
● Use up or down arrow keys ↑ ↓ to select one option.
4 - SPLT (Split Range)
In this menu function, it is possible to adjust the positioner to work in 4 mA
to 12mA or 12 to 20mA.
4.2 – (12 ... 20mA): Split Range enabled from 12 to 20mA.
4.3 – (DESAB): Split Range disabled.
4.1 – (4 ... 12mA): Split Range enabled from 4 to 12mA.
To exit SPLT option use ↑ 3 sec
Preliminary Data

3 sec
to Exit
3 sec
to Exit
Selected
Value
Selected
Value
Selected
Value
3 sec to
Next Menu
3 sec to
Next Menu
3 sec to
Next Menu
3 sec to
Next Menu
3 sec to
Next Menu
3 sec
to Exit
3 sec
to Exit
valve will move
valve will move
valve will move
valve will move
3 sec to
Next Menu
3 sec to
Next Menu
valve will move
valve will move
3 sec to
Next Menu
3 sec to
Next Menu valve will move
valve will move
Change digit
Select digit
Confirm
Selected
Value
Selected
Value
Selected
Value
3 sec to
Next Menu
Press Enter to
select this function
3 sec to
Next Menu
Press Enter to
select this function
Press Enter to
select this function
Change digit
Select digit
Confirm
Smart Valve Positioner for
Linear or Rotary Valves
YES
YES
YES
YES
2
NO
3 sec
NO
3 sec
NO
3 sec
NO
3 sec
Preliminary Data
↑ ↓ 3 seconds to exit without change
↑ ↓ 3 seconds to exit without change
↑ ↓ 3 seconds to exit without change
3s
3s
3s
3s
3s
● Press Enter key ○ to select this option
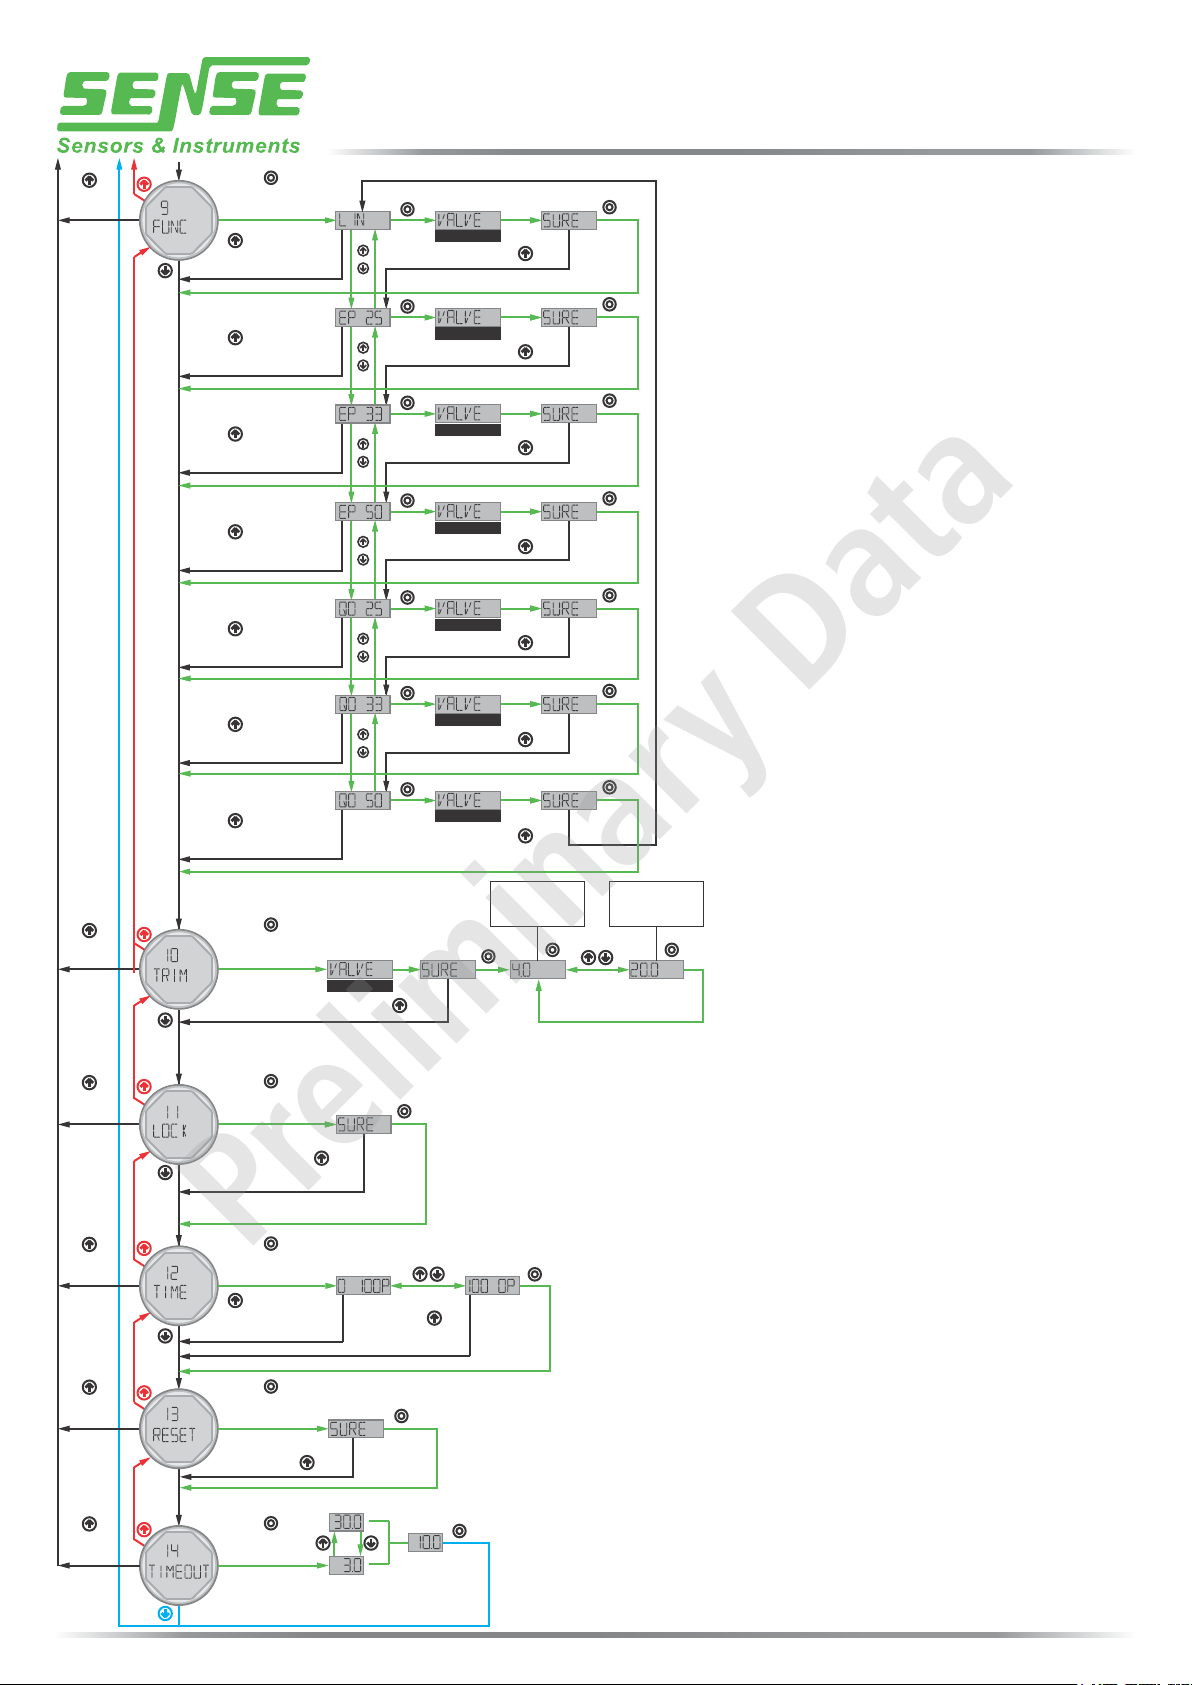
5.1 – KP: Allows to adjust the proportional gain of the digital PID control from 0 to 50.
5.2 – TR: Allows to adjust the digital PID control integral time from 0.1 to 50 (s).
● If you want to quit the KP, Tr and Td setting, press the up arrow key ↑ for 3 seconds and
return to main menu.
5- PID
● When the value is ready, store it with the Enter key ○ and return to KP, Td and Tr setting to
set the other if you want.
5.3 – TD: Allows to adjust the digital PID control derivative time from 0 to 10 (s).
● Use up or down arrow keys ↑ ↓ to increase or decrease the value. Hold it to fast increase or
decrease.
● Use up or down arrow keys ↑ ↓ to select one option and press the Enter key ○.
In this menu function, you can manually set the parameters Proportional Gain (KP), Integral
Time (TR) and Derivative Time (TD).
●Use up or down arrow keys ↑ ↓ to increase or decrease the value. Hold it to fast
increase or decrease.
6.1 – E ALM: Enables positioner alarm on:
● When the value is ready, store it with the Enter key ○ and return to ‘’E ALM’’ setting
to set the other if you want.
● If you want to quit the ALARM setting, press the up arrow key ↑ for 3 seconds and
return to main menu.
In this menu function, it is possible to enable the alarm setpoint.
6.1.1 - LOWER: Allows to adjust the alarm range from 0 to 40% of the valve position.
6.1.2 – UPPER: Allows to adjust the alarm range from 60 to 100% of the valve position.
6- ALARM
6.2 – DESAB: Disable the alarm
● Press Enter key ○ to select this option
● Use up or down arrow keys ↑ ↓ to select one option.
● Press Enter key ○ to select the option"
● If you chose the "E ALM" option, use the up or down arrows to select ‘’UPPER’’ or
‘’LOWER’’ option and press the Enter key ○.
3s
In this menu function, it is possible to configure the valve action mode.
● Press Enter key ○ to select this option
● Press Enter key ○ to select the option.
7.2 - REVERS: Reverse action
● Use up or down arrow keys ↑ ↓ to select ‘’DIRECT or ‘’REVERS’’ option.
7.1 –DIRECT: Direct action
● If you are NOT SURE to proceed press up arrow keys ↑ 3 seconds.
● If you want to quit the ACTION options press the up arrow key ↑ for 3 seconds
and return to main menu.
● If you are SURE to proceed with the selected option press the Enter key ○.
7- ACTION
In this menu function, it is possible to define the operating mode of the valve.
8.1 - AUTO: The valve operates in automatic mode.
● Press Enter key ○ to select the option.
● If you select ‘’AUTO’’ confirm with the Enter key ○. The display will show SURE.
● Use up or down arrow keys ↑ ↓ to select ‘’AUTO or ‘’MAN’’ option.
● Press Enter key ○ to select this option
● If you are SURE to proceed with the selected option press the Enter key ○. The unit
executes the option and goes to the next menu.
8.2 - MAN: The valve operates in manual mode and can be moved to 0%, 25%, 50%,
75%, 100% and “ADJUST” (User Adjustable).
● When the value is ready, store it with the Enetr key ○ .
● On ‘’ADJUST’’ option use the up or down arrow key ↑ ↓ to increase or decrease value.
● Use up or down arrow keys ↑ ↓ to select one option option.
● There are five fixed options and one adjustable. Press the enter key ○ on the option desired.
● If you are NOT SURE to proceed press up arrow keys ↑ 3 seconds. The unit will go to the
‘’MAN’’ option.
● Press Enter key ○ to select the option.
● To quit the option and return to the main menu press up arrow key ↑ for 3 seconds.
3 sec
to Exit
3 sec
to Exit
3 sec
to Exit
3 sec
to Exit
3 sec
to Exit
valve will move
Press Enter to
select this function
3 sec to
Next Menu
valve will move
3 sec to
Next Menu
valve will move
3 sec to
Next Menu
valve will move
3 sec to
Next Menu
valve will move
3 sec to
Next Menu
valve will move
3 sec to
Next Menu
valve will move
3 sec to
Next Menu
Press Enter to
select this function
valve will move
Press Enter to
select this function
Press Enter to
select this function
3 sec to
Next Menu
Press Enter to
select this function
3 sec to
Next Menu
Smart Valve Positioner for
Linear or Rotary Valves
3
YES
YES
YES
YES
YES
YES
YES
YES
YES
NO
YES
3 sec
Caution:
The current input
will be set to 0%
Caution:
The current input
will be set to 100%
NO
3 sec
NO
3 sec
NO
3 sec
NO
3 sec
NO
3 sec
NO
3 sec
NO
3 sec
NO
3 sec
NO
3 sec
Preliminary Data
To exit TRIM option
use ↑ 3 sec
Press Enter to
select this function Selected
Value
3s
3 sec
to Exit
9.7 - QO50: Quick Opening Curve. Hyperbolic.
● Press Enter key ○ to select this option
● Use up or down arrow keys ↑ ↓ to navigate to the item you want to set
9.2 - EP25: Equal Percentage Curve.
● Press Enter key ○ on the option you want to configure
9.3 - EP33: Equal Percentage Curve.
● If you are NOT SURE to proceed with the selected option, press the up arrow key ↑
for 3 seconds.
● If you are SURE to proceed with the selected option, confirm with the Enter ○ key .
9.4 - EP50: Equal Percentage Curve.
● If you want to quit and return to the main menu press the up arrow key ↑
for 3 seconds.
9.1 - LIN: Linear Curve.
In this menu function, the user configures the type of valve characterization curve.
9- FUNC
9.5 - QO25: Quick Opening Curve. Hyperbolic.
9.6 - QO33: Quick Opening Curve. Hyperbolic.
● Configure the other point or press up arrow key ↑ for 3 seconds to eit
the TRIM option.
20: Set the input current as valve closed 100%
● Press Enter key ○ to select this function.
10 - TRIM
● Press Enter key ○ to select the option.
4: Set the input current as valve closed 0%.
● Use up or down arrow keys ↑ ↓ to select the appropriate point 4 mA
or 20 mA.
● If you are SURE to proceed press the Enter key ○.
● If you want to quit the menu press the up arrow key ↑ for 3 seconds.
In this menu function it is possible to adjust the input current to the open
and close position, correcting small variation on the 4mA and 20mA.
11 - LOCK
In this menu function, the user has 2 modes of operation:
● If you are SURE to lock press the Enter key ○.
No: In this function, it is possible to perform the configuration, either via local mode or via remote mode.
● If you are NOT SURE to lock press up arrow key ↑ for 3 seconds. The unit will go to the next option.
● If you want to quit the menu press the up arrow key ↑ for 3 seconds.
● Press Enter key ○ to select this function.
Sure : In this function, it is not possible to configure neither via local mode or via remote mode.
13 - RESET
In this menu function, the user has 2 modes of operation:
● If you want to quit the menu press the up arrow key ↑ for 3 seconds.
Sure : In this function, it is not possible to configure neither via local mode or via remote mode.
No: In this function, it is possible to perform the configuration, either via local mode or via remote mode.
● Press Enter key ○ to select this function.
● If you are SURE to reset press the Enter key ○.
● If you are NOT SURE to reset press up arrow key ↑ for 3 seconds. The unit will go to the next option.
This option allows freely adjustment the time that the positioner waits to perform the calibration.
This time can be configured from 3 to 30 minutes.
14 - TIMEOUT
In this menu function, it is possible to view the time in seconds it takes the valve to open or close.
12.1 – 0 100P: Indicates the tme the valve takes to go to from 0 to 100% of stroke
12 - TIME
● The unit goes to the next option “RESET”.
● If you want to quit the menu use the up arrow key ↑ for 3 seconds.
12.2 – 100 1P: Indicates the tme the valve takes to go to from 100 to 0% of stroke.
● Press Enter key ○ to select this function.
● If you are SURE to reset press the Enter key ○.
● Use the up or down arrow keys ↑ ↓ to select the “0 100P” or “100 0P”.
● Confirm the selection with the Enter key○ .

4
Smart Valve Positioner for
Linear or Rotary Valves
Describing the Menu
7.2 - REVERS: Reverse acting.
8. MODE: In this menu function, it is possible to define the operating mode of the valve.
8.2 - MAN: The valve operates in manual mode and can be moved to 0%, 25%, 50%, 75%, 100% and “ADJUST” (User
4.1 – (4 ... 12mA): Split Range enabled from 4 to 12mA.
3. RANGE: In this menu function, it is possible to adjust the minimum and maximum operating range of
3.1 – ZERO: Allows to adjust the working range from 0 to 20%.
3.2 – SPAN: Allows to adjust the working range from 80 to 100%.
2.2 - AUTO: During this adjustment, the positioner will check the positions of 0% and 100% of valve opening and
4. SPLT (Split Range): In this menu function, it is possible to adjust the positioner to work in 4 to 12mA or 12 to 20mA.
5.3 – TD: Allows to adjust the digital PID control derivative time from 0 to 10 (s).
2.1 - TUNE: llows to perform PID control tuning automatically (Kp, Tr and Td).
6.2 – DESAB: Disables the alarm.
(KP), Integral Time (TR) and Derivative Time (TD).
6.1.1 - LOWER: Allows to adjust the alarm range from 0 to 40% of the valve position.
closing.
6.1.2 - UPPER: Allows to adjust the alarm range from 60 to 100% of the valve position.
6. ALARM: In this menu function, it is possible to enable the alarm setpoint.
6.1 – E ALM: Enables positioner alarm on:
2.3 - FULL: Executes AUTO SETUP and AUTOTUNING to find complete valve tuning, including PID parameters.
5. PID: In this menu function, you can manually set the parameters Proportional Gain
5.2 – TR: Allows to adjust the digital PID control integral time from 0.1 to 50 (s).
valve opening, as follows:
4.2 – (12 ... 20mA): Split Range enabled from 12 to 20mA.
5.1 – KP: Allows to adjust the proportional gain of the digital PID control from 0 to 50.
7. ACTION: In this menu function, it is possible to configure the valve action mode.
4.3 – (DESAB): Split Range disabled.
7.1 - DIRECT: Direct acting.
8.1 - AUTO: The valve operates in automatic mode.
Adjustable).
1.1 – POS (Position): Indicates on the display the current position of the valve from 0% to 100%
parameter represents the desired position value that is calculated from the
current input level.
1.2 – SP (Set Point): Indicates on the display the current input signal value of the positioner from 0% to 100%. This
in %) and the current value of the input signal (SP in %).
1.3 – F BACK (Feedback): Allows to indicate on display the current positon of the valve in % or the input current in mA
1.5 – MV (Manipulated Variable): Indicates on display the manipulated variable in%.
1. DISP: In this menu function is possible to select 5 modes of exhibition on the LCD display:
2. SETUP: In this menu function, it is possible to perform 3 positioner calibration modes:
1.4 – CYCLE: When this option is selected, the display will remain indicating alternately the current valve position (POS
Preliminary Data

5
Smart Valve Positioner for
Linear or Rotary Valves
NO: Return to main menu without resetting
14. TIMEOUT: This option allows freely adjustment the time that the positioner waits to perform the calibration. This time can
be configured from 3 to 30 minutes.
13. RESET: In this menu function, all default values will be restored, as follows:
12.2 - 100 0P: Indicates the time the valve takes to go from 100 to 0% of stroke.
YES: Returns to factory settings.
9.1 - LIN: Linear Curve.
9.3 - EP33: Equal Percentage Curve.
9.6 - QO33: Quick Opening Curve. Hyperbolic.
9. FUNC: In this menu function, the user configures the type of valve characterization curve.
9.7 - QO50: Quick Opening Curve. Hyperbolic.
10. TRIM: To adjust the input current to the open and close position, correcting small variation on the 4mA
11. LOCK: In this menu function, the user has 2 modes of operation:
9.2 - EP25: Equal Percentage Curve.
NO: In this function, it is possible to perform the configuration, either via local mode or via remote mode.
12. TIME: In this menu function, it is possible to view the time in seconds it takes the valve to open or close.
12.1 - 0 100P: Indicates the time the valve takes to go from 0 to 100% of stroke.
20: Set the input current as valve closed 100%
9.4 - EP50: Equal Percentage Curve.
9.5 - QO25: Quick Opening Curve. Hyperbolic.
YES: In this function, it is not possible to configure neither via local mode or via remote mode.
and 20mA.
4: Set the input current as valve closed 0%
Describing the Menu
Preliminary Data

6
Smart Valve Positioner for
Linear or Rotary Valves
Notes
Preliminary Data

We reserve the right to modify the information contained herein without prior notice. 2000000xxx Rev.D - 08/2020
Rua Tuiutí, 1237 - Tatuapé / SP - CEP: 11089-210 - Fone: 55 11 2145-0444 - www.sense.com.br - [email protected]
WWW.SENSE.COM.BR
HEAD OFFICE - SÃO PAULO
Rua Tuiuti, 1237 - Tatuapé
São Paulo - SP - Cep: 03081-012
Fone: +55 11 2145-0444
FACTORY - MINAS GERAIS
Av. Joaquim Moreira Carneiro. 600 - Santana
Santa Rita do Sapucaí - MG - Cep: 37540-000
Fone: +55 35 3471-2555
Preliminary Data
Table of contents
Popular Valve Positioner manuals by other brands


Siemens
Siemens 73N12F Installation and service instructions

Samson
Samson FOUNDATION 3730-5 Configuration manual

Samson
Samson 3730-0 Mounting and operating instructions

Samson
Samson TROVIS 3731-3 Mounting and operating instructions

Burkert
Burkert 8692 quick start

Siemens
Siemens SIPART Series operating instructions