Sensiblue S315 User manual

!
Sensiblue Model S315
Installation, Use and Service Manual

TABLE OF CONTENTS"
Thank you for your purchase of Sensiblue Model S315, if installed properly the
Sensiblue may provide you with safe disinfected drinking water for years to come!
Please remind yourself to check regularly if the LED still is green, for proper
disinfection. If the LED is red, turn to page 5 for refilling the salt container.
- 2 -
FORM.
A2
Heycop Metaalindustrie
info@heycop.com
Tel 0031 (0) 306353565
DRAWN
CHECKED
NAME DATE
DRAWING NO : Dimensional drawing REV
SCALE: SHEET 1 OF 1
Part :
TITLE SENSIBLUE 315
1:2
MAT.
A
RB 13-01-2014
IN 21-01-2014
207 mm
Thread size 3/4 " BSPT Thread size 3/4 " BSPT
375 mm
measurements
in millimeters
161 mm
Installation option 1 :
minimal distance 270 mm
(for refilling)
Net weight: 3 kg
Installation option 2 :
minimal distance 100 mm
- unscrew screws before refilling
Fig. 1 - Sensiblue dimensions
FORM.
A2
Heycop Metaalindustrie
info@heycop.com
Tel 0031 (0) 306353565
DRAWN
CHECKED
NAME DATE
DRAWING NO : Dimensional drawing REV
SCALE: SHEET 1 OF 1
Part :
TITLE SENSIBLUE 315
1:2
MAT.
A
RB 13-01-2014
IN 21-01-2014
207 mm
Thread size 3/4 " BSPT Thread size 3/4 " BSPT
375 mm
measurements
in millimeters
161 mm
Installation option 1 :
minimal distance 270 mm
(for refilling)
Net weight: 3 kg
Installation option 2 :
minimal distance 100 mm
- unscrew screws before refilling
SUBJECT
PAGE
Dimensions of Sensiblue
2
Installation instructions
3 & 4
Maintenance and servicing
5
Problem solving / Trouble shooting
7
Specifications & Requirements
6
Warranty, Liability & Copyright
8
INSTALLATION - OVERVIEW
Preparation
Though you may be able to install the Sensiblue yourself, we recommend using a
local certified installer to install it according local regulations. Make sure you keep
enough space around Sensiblue to replace salt container as mentioned in Fig. 1.
Install in a dry, clean, aerated and frost-free environment.
Inside the box:
‣Sensiblue S315
‣Bracket to mount Sensiblue S315 to
the wall
‣Installation manual
‣Blue Bracket for unmounting salt
container
Needed for installation:
‣(Flexible) tubing with brass fitting 3/4”
inch male thread.
‣2 Screws, Diameter 6mm, min. Length
45mm with plugs.
‣ONLY use Teflon tape, for making a
water tight connection
‣2 Wrenches (for Sensiblue: size 30)
‣Screwdriver and other tools for installing
tubing.
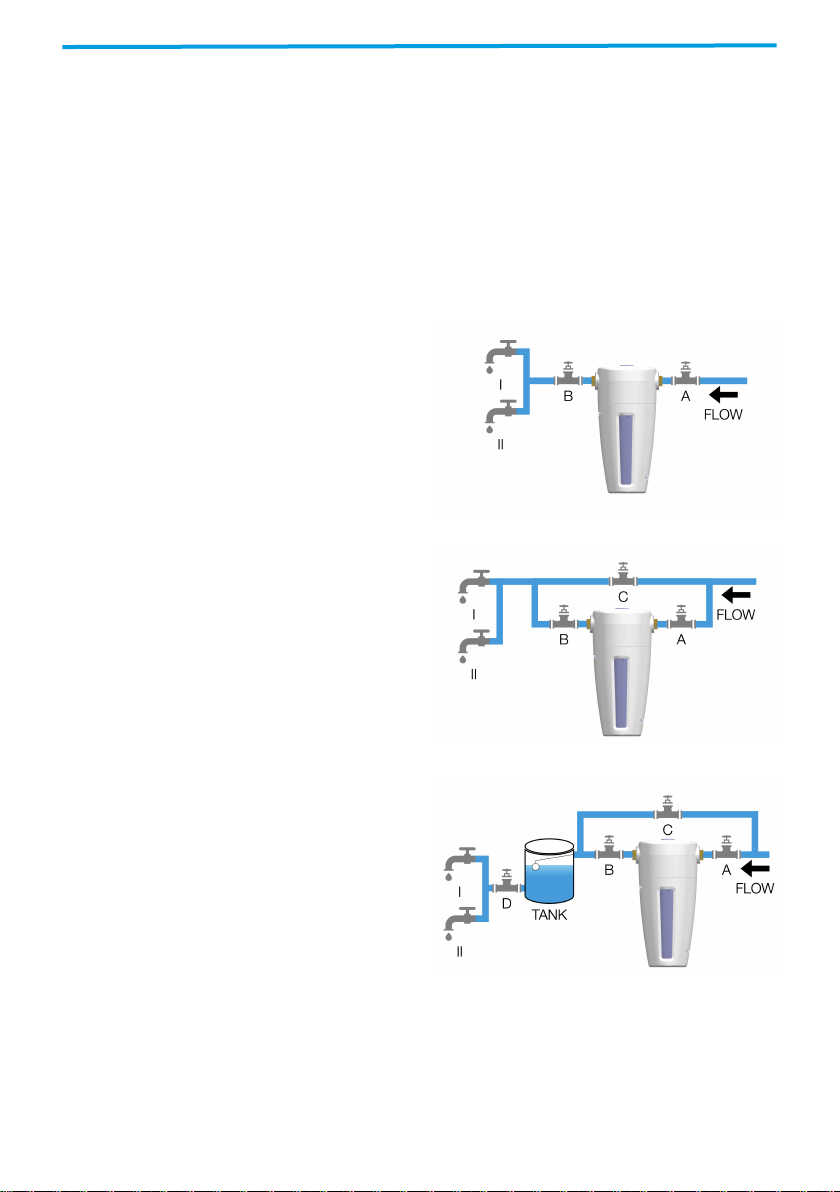
Typical installations
We advice you to install the Sensiblue
with a by-pass (Figures B & C) and -
when you have a water storage facility to
install the Sensiblue upstream of the tank.
Please be aware that we strongly advice
you to have 2 valves up- & downstream
(marked A & B in figures on the right) of
the Sensiblue, this is needed for
maintenance.
- 3 -
Fig. A - Installation in line
Fig. B - Installation with by-pass
Fig. C - Installation with by-pass and water
storage tank

INSTALLATION - STEPS
Step 1
Mount the bracket (horizontally levelled) to
the wall while having enough space
around the Sensiblue to work and to be
able to replace the salt container (see Fig.
1), distance 2 holes 140mm.
Be aware to let the water flow in the right
way - incoming water on IN connection,
outgoing water on OUT connection - see
Fig. 4, below. Make sure the internals of
the water works are clean before
connecting your tubing to the Sensiblue.
Only use Teflon tape to make the
connection water tight.
Fig. 5 - Please use 2 wrenches.
Step 2
Connect your tubing to the Sensiblue. We
advise the use of a minimal diameter of
15mm tubing to ensure proper function of
Sensiblue.
Make sure Sensiblue is mounted inside
the bracket before connection and make
sure you use 2 wrenches, on the
Sensiblue a wrench size 30 and another
wrench on the fitting you screw into the
Sensiblue, as seen in Fig. 5 - on the right.
Prevent any mechanical stress on
the internals of the Sensiblue.
Step 4
Make sure there is no water leaking after
closing the valves downstream and
opening the valves upstream, when the
system is under pressure.
Leave this manual and the blue salt
container bracket somewhere close to the
Sensiblue for later service and
maintenance.
Step 3
Open the water valves, fill up the
Sensiblue and make sure the LED on top
of the Sensiblue is lit up green (Fig. 6)
while your water is running. It takes 10 to
30 minutes for the water container to fill up
and to dissolve enough salt for the
Sensiblue to function properly and to start
up the electrolysis process. Depending on
your situation it may take up to 15 days of
normal use for the air to fully dissolve from
the salt container of the Sensiblue.
Fig. 6 - LED status light
Fig. 4 - Check labels IN & OUT
- 4 -
SERVICE AND MAINTENANCE
The Sensiblue disinfection process uses a very small amount of salt when in
operation. When the LED-light lits up red, there is not enough salt water for the
electrolysis process to function properly. You need to refill the Salt container.
Refilling Salt container
‣Close the valves upstream of the Sensiblue (Page 3, Valves A & C) in your water
circuit.
‣Open one of the downstream taps (Page 3, Taps I or II, etc) to release water
pressure.
‣Close the valve downstream of the Sensiblue (Page 3, Valve B)
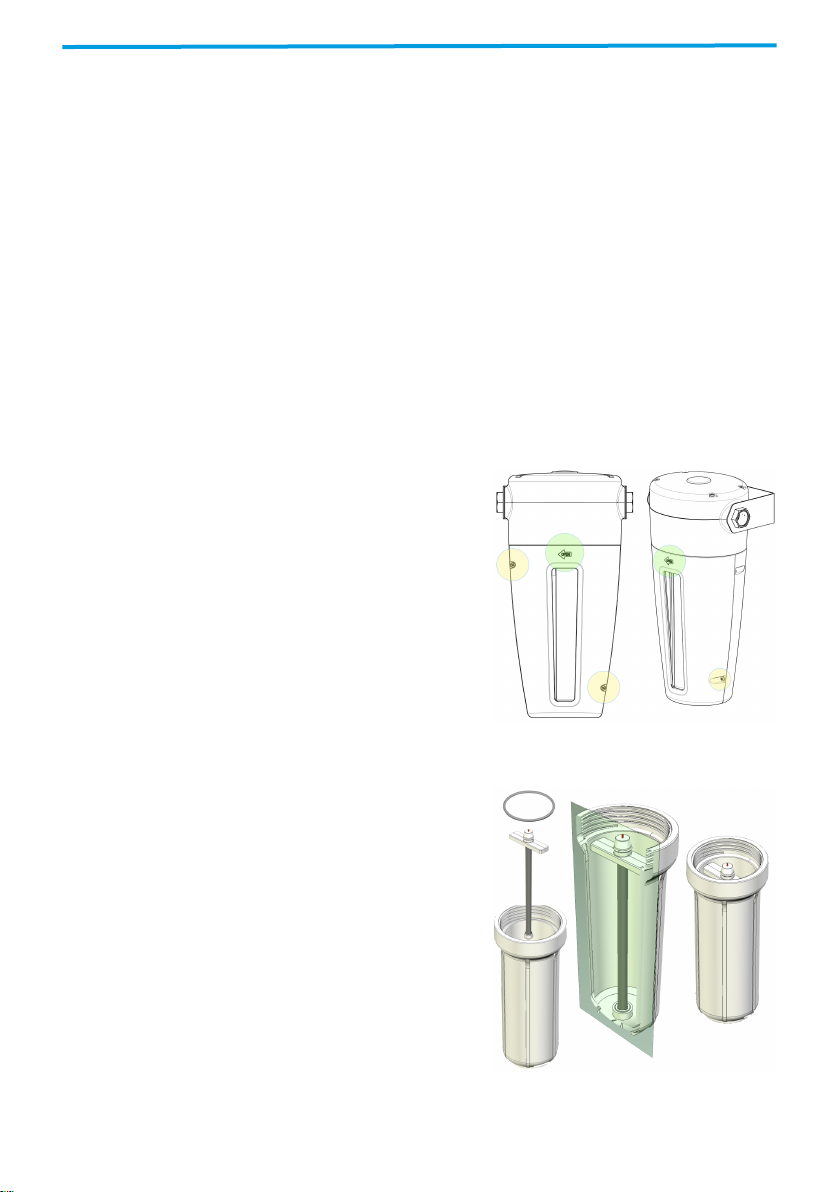
‣Open the white Sensiblue housing by turning the housing following the indicated
direction “OPEN”. If there is no space to remove the cap downwards, you may
unscrew the housing (marked yellow, Fig 7).
‣Unscrew the blue salt container anticlockwise.
‣Pour out 1/3rd of the water. After refilling it will
take 10-30 minutes before a sufficient amount
of salt has been dissolved for optimal
performance of chlorine production. Leaving
part of the salty water will accelerate startup.
‣Clean the container and O-ring with warm
water. (Fig 8)
‣Check the position of the T-shaped salt
distribution unit in the container and the
position of the O-ring; make sure the T-
shaped unit is pressed in below the O-ring.
‣Pour the salt in the container (consumable salt
pearls, dimensions 5-15mm, according
EN973 Type A and/ or DIN19604 Type 2). If
possible, fill the container up with water before
mounting to minimise air inclusions.
‣Mount the salt container back to the Sensiblue
and close it hand tight.
‣Slowly open the upstream valve, the container
will be de-aerated if you open a downstream
tap and close and open the upstream at least
10 times for deaerating the Sensiblue.
‣Note: After refilling the container it takes some
time for the Sensiblue to start up the
disinfection process. The LED indicator will
turn green again soon after.
Fig. 8 - exploded view of Salt
container
Fig 7. Screws of Salt container
- 5 -

PRODUCT SPECIFICATIONS
Sensiblue
Model S315
Max. capacity
Approximately 15 L/min; 900 L/h
Min. flow for disinfection
Approximately 3 L/min; 180 L/h
Max. water pressure
8 bar; 116 PSI
Min. water pressure for disinfection
0,2 bar; 3 PSI
Salt consumption
15 to 30 gr/m3
Active chlorine production
0,2 to 0,4 mg/L
Connections
2x 3/4” BSP female
Product Dimensions
175 x 233 x 370 mm
Product Weight (incl Salt)
3 kg
Salt amount
850 gr
Incoming water requirements
Max. temperature
45 degr. C.; 113 degr. F.
Min. temperature
5 degr. C.; 41 degr. F.
Req. feed - Ph
7 to 8 Ph
Max. prefiltration
100 micron; pref. 40 micron
Hardness
< 30 dH, <50 fH
Organics
KMn04 < 5 ppm
Iron
< 0,2 ppm
Salt requirement
5 - 15mm tabs EN973 TypA or DIN19604
Typ2
0
0,1
0,2
0,3
0,4
0,5
0,6
345678910 11 12 13 14 15
flow l/min
Active Chlorine production (mg/l)
at temp. 20 C
Fig. 2 - Chlorine production
0
0,2
0,4
0,6
0,8
1
1,2
1,4
1,6
3 4 5 6 7 8 9 10 11 12 13 14 15
flow l/min
Pressure drop ( bar )
Fig. 3- Pressure drop
- 6 -

PROBLEM SOLVING
Problem
Solution
LED indicates red:
Electrolysis process doesn’t work properly.
‣Check if there are still salt pearls in the salt container, if
there are none, please refill, see page 5.
‣Check if the T-shaped distribution unit inside salt
container is not blocked
LED does not work
Water pressure / flow is not sufficient.
‣Increase water flow to > 3L/min.
Leakage of the Sensiblue
‣Check if salt container is mounted properly, open and
close it again.
Active chlorine test
indicates production is
below 0,2 mg/l
‣Check if there are salt pearls in the salt container, if not,
refill.
‣Flow is insufficient, increase flow to > 3L/min.
‣Flow is too high, decrease the flow to <15L/min.
Water tastes salty
‣Make sure that all the air is out of the salt container
inside the Sensiblue. If there is air trapped inside the
container, pressure will build up when you close a tap
and when you open up a tap, it will push out a small
amount of very salt water. It may take up to 15 days,
with normal use of your water works, for the air to get
out of the Sensiblue.
‣If there is no air inside the Sensiblue, and you still taste
salt water, we advice you to add a small (minimum 5L.)
storage tank of water downstream of the Sensiblue, the
small amount of salty water will be diluted in the tank.
Adding a float switch in the tank is recommended to
minimize the amount of starts and stops of the
Sensiblue.
- 7 -

LIABILITY, WARRANTY &
COPYRIGHT"
Liability: Please check the website www.sensiblue.eu/general/terms-and-conditions
sections 6 and 9 with regards to any claims and damages. Installation of this product implies
that you agree with these terms and conditions.
Warranty: The factory guarantee period for the Sensiblue S315 disinfection unit is 5 years on
all non-wearing parts. The guarantee is valid when there is a proper installation of the Sensiblue
according to the instructions of this manual.
If you have any trouble to start up the Sensiblue please check the installation and operation
instructions first. If your Sensiblue has been working properly and if you experience an
operational problem please check the service and maintenance section first. If you are not able
to solve your problem contact your reseller and report your problem as well as your Sensiblue
serial number, which is located at the label on top of Sensiblue.
Copyright: No part of this publication may be reproduced, transmitted, transcribed, stored in
any retrieval system or translated into any human or computer language by any means or in
any form, without the prior written permission of Sensiblue B.V.. Contravention of the owner’s
copyright may also reduce the ability of Sensiblue to provide effective support for its equipment.
All the technical information, data and instructions contained in these operating instructions for
operations that can and are to be performed, are up to date at the time of editing. They contain
our current knowledge and experience to the best of our understanding.
We reserve the right to make technical modifications arising from the further development of the
Sensiblue product presented in these operating instructions. For this reason, no claims may be
derived from technical data, descriptions and illustrations.
Sensiblue reserves the right to make changes without notice to both this manual and to its
products described within this manual. Nothing in this manual represents any contractual or
other commitment on the part of Sensiblue and should not be taken as such. All possible care
has been taken in the preparation of this publication. Contact Sensiblue for suggestions for
improvement. This manual is originally written in English. A copy is available on request.
Copyright Sensiblue B.V. - version: Rev. D 01-Dec-2020
Always up-to-date:
Please scan this QR code to download the latest version of the installation
manual:
Link: www.sensiblue.eu/products/s315
ModelS315
SERIALNr:S201048315H MADEINEU
ModelS315
SERIALNr:S201049315H MADEINEU
ModelS315
SERIALNr:S201050315H MADEINEU
ModelS315
SERIALNr:S201051315H MADEINEU
ModelS315
SERIALNr:S201052315H MADEINEU
ModelS315
SERIALNr:S201053315H MADEINEU
ModelS315
SERIALNr:S201054315H MADEINEU
ModelS315
SERIALNr:S201055315H MADEINEU
ModelS315
SERIALNr:S201056315H MADEINEU
ModelS315
SERIALNr:S201057315H MADEINEU
ModelS315
SERIALNr:S201058315H MADEINEU
ModelS315
SERIALNr:S201059315H MADEINEU
ModelS315
SERIALNr:S201060315H MADEINEU
ModelS315
SERIALNr:S201061315H MADEINEU
ModelS315
SERIALNr:S201062315H MADEINEU
ModelS315
SERIALNr:S201063315H MADEINEU
ModelS315
SERIALNr:S201064315H MADEINEU
ModelS315
SERIALNr:S201065315H MADEINEU
ModelS315
SERIALNr:S201066315H MADEINEU
ModelS315
SERIALNr:S201067315H MADEINEU
ModelS315
SERIALNr:S201068315H MADEINEU
ModelS315
SERIALNr:S201069315H MADEINEU
ModelS315
SERIALNr:S201070315H MADEINEU
ModelS315
SERIALNr:S201071315H MADEINEU
ModelS315
SERIALNr:S201072315H MADEINEU
ModelS315
SERIALNr:S201073315H MADEINEU
ModelS315
SERIALNr:S201074315H MADEINEU
ModelS315
SERIALNr:S201075315H MADEINEU
ModelS315
SERIALNr:S201076315H MADEINEU
ModelS315
SERIALNr:S201077315H MADEINEU
ModelS315
SERIALNr:S201078315H MADEINEU
ModelS315
SERIALNr:S201079315H MADEINEU
ModelS315
SERIALNr:S201080315H MADEINEU
ModelS315
SERIALNr:S201081315H MADEINEU
ModelS315
SERIALNr:S201082315H MADEINEU
ModelS315
SERIALNr:S201083315H MADEINEU
ModelS315
SERIALNr:S201084315H MADEINEU
ModelS315
SERIALNr:S201085315H MADEINEU
ModelS315
SERIALNr:S201086315H MADEINEU
ModelS315
SERIALNr:S201087315H MADEINEU
ModelS315
SERIALNr:S201088315H MADEINEU
ModelS315
SERIALNr:S201089315H MADEINEU
ModelS315
SERIALNr:S201090315H MADEINEU
ModelS315
SERIALNr:S201091315H MADEINEU
ModelS315
SERIALNr:S201092315H MADEINEU
ModelS315
SERIALNr:S201093315H MADEINEU
ModelS315
SERIALNr:S201094315H MADEINEU
ModelS315
SERIALNr:S201095315H MADEINEU
Table of contents
Other Sensiblue Water Dispenser manuals

Popular Water Dispenser manuals by other brands

IBC Water
IBC Water AST0715MP-960 Installation & operating instructions

Lancaster Water Treatment
Lancaster Water Treatment X FACTOR LX15 Series Installation, operating and service manual

Elkay
Elkay EMABF8 Series Installation & use manual

Oasis
Oasis Osmosis Home installation manual

Monarch Water
Monarch Water ULTIMATE MINI AQUA HE install guide

Haier
Haier HLM-109B instruction manual


