Sensio Spa SSPA03 User manual

Complete Hydrotherapy Facial
A Five Step Routine
SSPA03
Instruction Manual
Thank you for purchasing the Complete Hydrotherapy Facial.
The Complete Hydrotherapy Facial is a five step routine that gives you professional
beauty salon results in your own home. The ionised water rehydrates the skin, opens the
pores for deep cleansing, removes impurities and helps remove any residual make-up.
It includes a hot and cool bar to open pores which allows deeply embedded dirt to be
removed and to tighten and cool down the skin after cleansing, a facial cleanser with a
brush and sponge attachment to exfoliate and massage your skin, leaving a healthy and
glowing complexion.
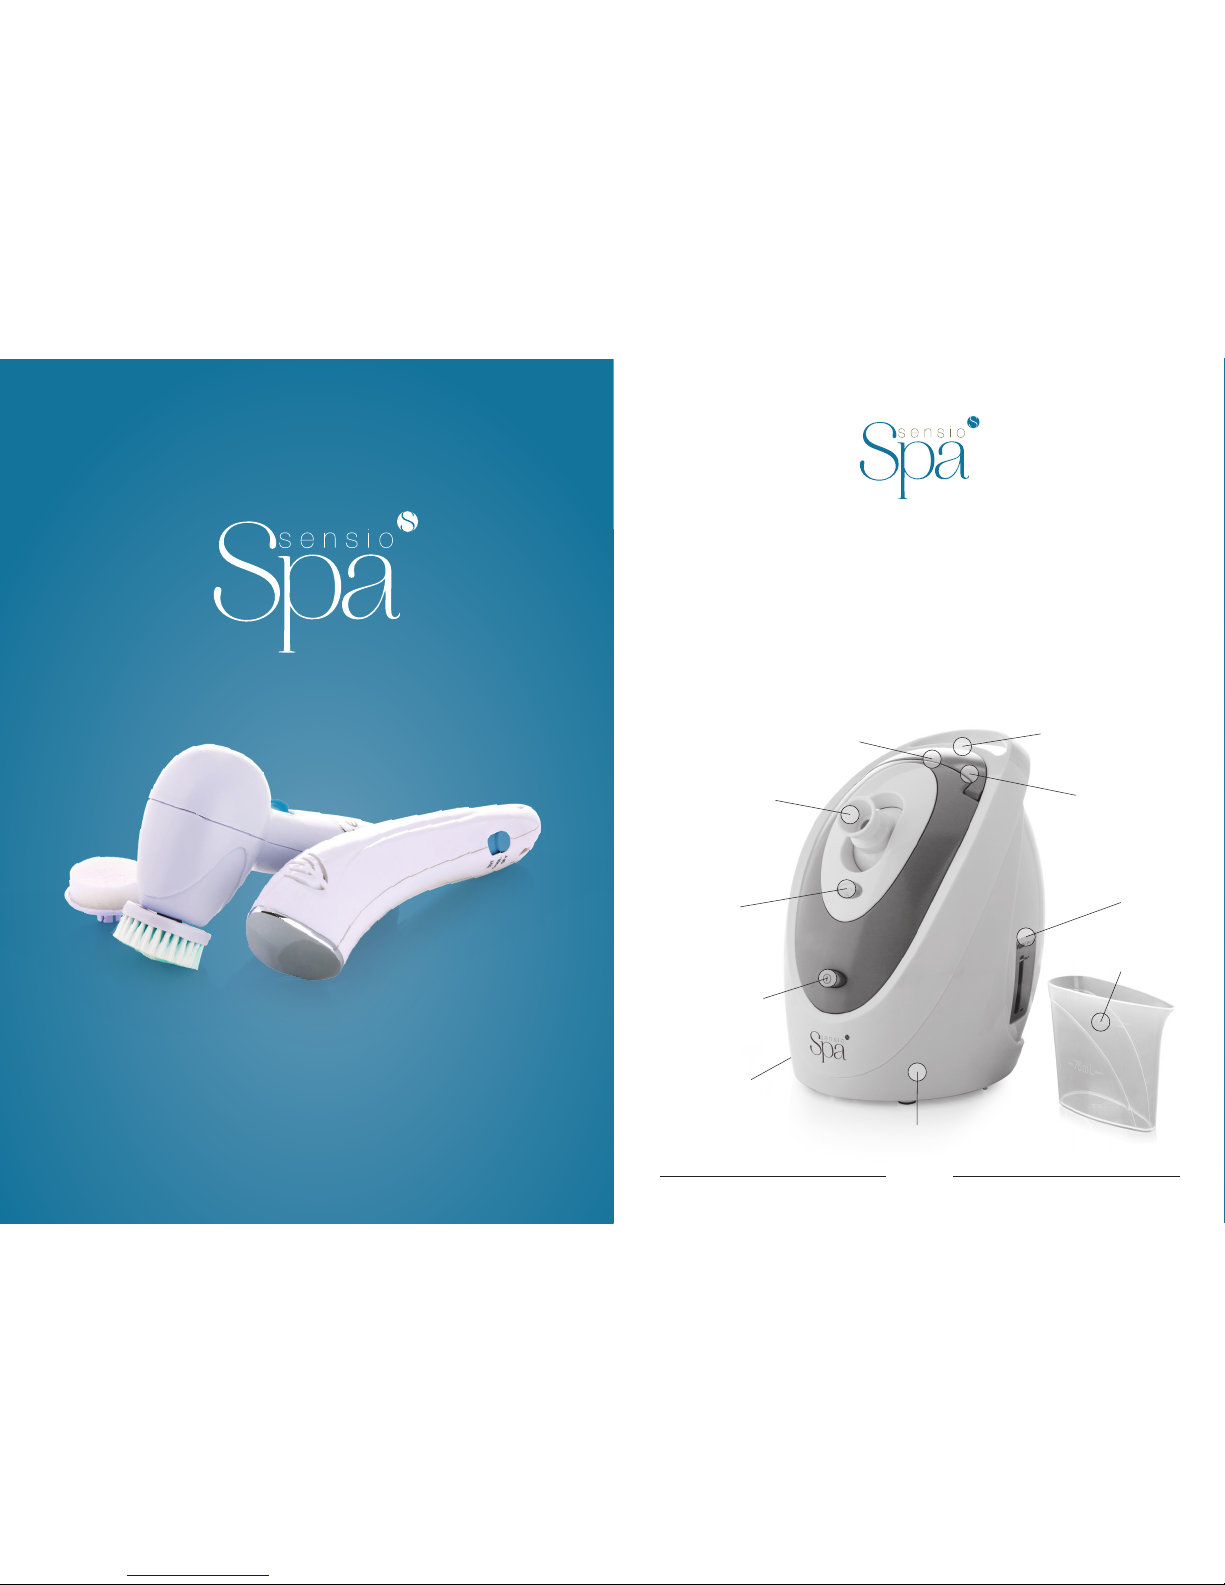
Key Features
Main Unit
Water Level
Power Switch
1
Power
Indicator
Steam Outlet Water
Supply Cover
Water Inlet
(not shown)
Water
Collection Tray
(not shown)
Filling Cup
Water Supply Cover
Open Button
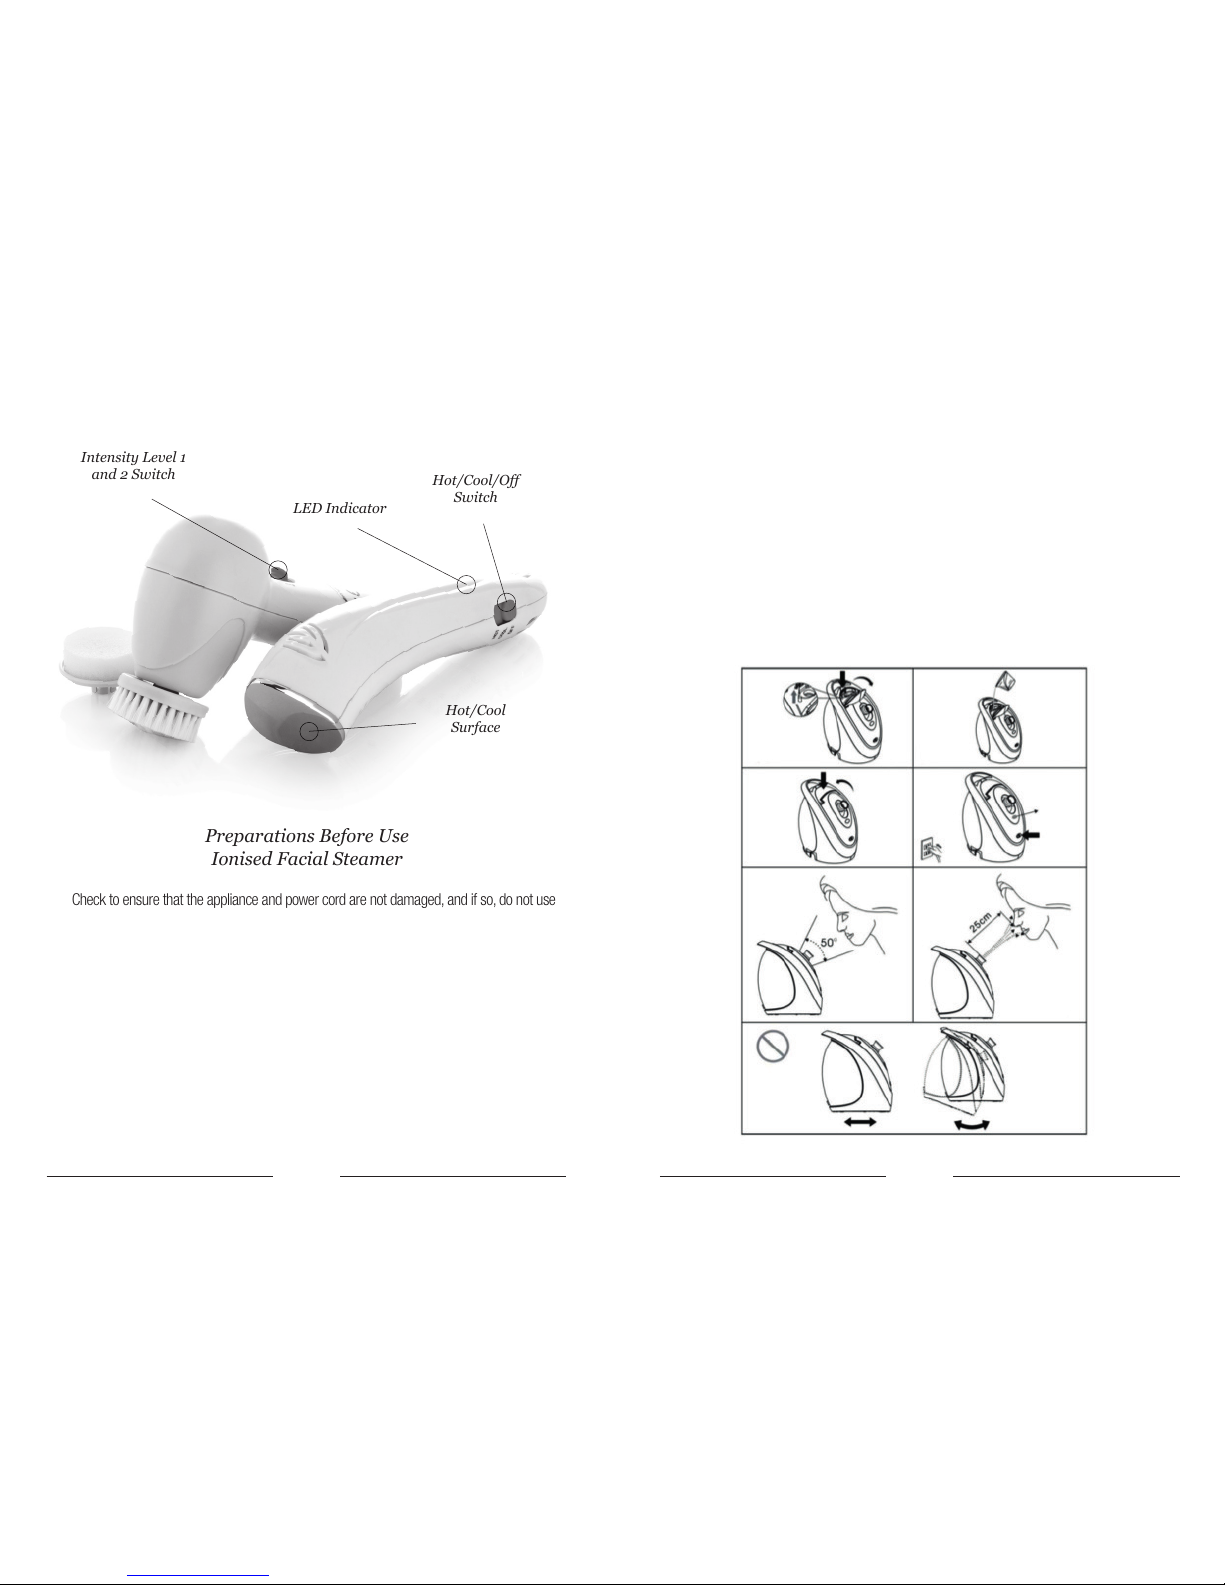
Preparations Before Use
Ionised Facial Steamer
• Check to ensure that the appliance and power cord are not damaged, and if so, do not use
the appliance.
• Check whether the water collection tray is installed below the drainage outlet of the
appliance.
• While the appliance is switched off, press the water supply cover open button to open
the water supply cover for adding distilled water only. Do not use tap water as this will
result in a build-up of limescale which will result in blockages which will significantly
reduce the working life of the appliance.
• Fill the filling cup (max. 150ml) with distilled water only, pour the water slowly into the appliance
through the water inlet. Take care not to spill any water on the surface of the machine.
Key Features
2
Hot/Cool/O
Switch
LED Indicator
Hot/Cool
Surface
Intensity Level 1
and 2 Switch
• Use a dry towel to wipe the spilt water (if any) on and around the appliance.
• Make sure the water does not exceed the MAX mark. Usually 150ml is enough, and any
more water will automatically drain out into the water collection tray. Pour the water out of
the tray.
• After adding water, check the water level display on the right. The white MAX line
indicates the highest water level and the MIN mark indicates when the water tank needs
to be refilled.
• Press and fasten the water supply cover. Adjust the vapour nozzle to the desired angle
(the nozzle can be adjusted within a range of 50 degrees).
• Clean your face with a wet towel before use to obtain best results.
3

Facial Cleanser
Inserting the batteries
• Make sure your hands are dry when inserting the battery.
• The appliance uses 2 x AA batteries (not included). For a longer running time, it is
recommended to use Alkaline batteries.
• Push downward to draw out the battery cover.
• Insert 2 x AA batteries. Note: Please match the polarity (+/-) symbols on the battery
with marks on the battery compartment.
• Push upward to close battery cover.
Directions for Use
How to use the Ionised Facial Steamer
• Make sure your hands are dry before connecting the appliance to the power supply to
prevent the risk of an electric shock. Insert the plug into the mains socket and press
the power switch until a click is heard. The neon power indicator will be illuminated.
• The appliance begins heating up. You may notice a slight boiling sound as the water is
heated to create the steam vapor. This is the normal sound of electric discharge or water
heating. A few drops of hot water may flow out of the steam outlet, which is normal. After
a few seconds, a small volume of steam begins to come out of steam outlet.
• After a few minutes, more and more steam comes out from the steam outlet to
create enough for facial steaming. Move your face slowly towards the steam until
adequate steam covers your entire face. Keep your face at least 25cm away from the
steam outlet, otherwise your face may burn or get scalded because of the increasing
temperature of the steam towards the steam outlet.
• If you feel too hot, move your face away from the steam outlet until you feel
comfortable. During steaming, you can also turn your face to let the steam spray onto
your face from different angles.
• During steaming, do not move or shake the appliance to avoid the risk of burns of
scalding from the hot steam coming out from the steam outlet.
4 5
• While the appliance is operating, do not add water into the water tank. If it is necessary
to add water, press the power switch until you hear a click and the power indicator turns
off; unplug the appliance; wait about 10 minutes for the appliance to cool down and then
open the water supply cover to add water. Never open the water supply cover to add
water into the appliance during the steam massage, otherwise hot steam or hot water
could be ejected out from the water inlet risking burns or scalding to your skin.
• During initial use, it is recommended to use the appliance 2-3 times a week. Observe
your skin and adjust the frequency and duration of steam massage accordingly. Do
not use the appliance if you have a skin allergy (e.g. during decortication). If your
skin itches, stings or becomes swollen after using the appliance, please stop using
the appliance and consult a doctor immediately. Skin trouble may also result from
psychological pressure, physical problem or use of cosmetics; consult relevant experts
in such cases.
• The power indicator will automatically turn red if the remaining water in the water tank
is too low. If this occurs, press the power switch until you hear a click and the power
indicator turns off, and then unplug the appliance. Wait about 10 minutes for the
appliance to cool down and refill.

6
What kind of water should be used for
Ionised Hydrotherapy Facial?
Only distilled water should be used. Tap water, mineral water or other ordinary water may
result in precipitation of carbonates in the machine and make the machine faulty.
Note: Impure water may shorten the service life of the appliance; therefore distilled water
should be used for the facial steaming. DO NOT use any liquid containing any chemicals or
component harmful to the skin.
How to use the Facial Cleanser
The facial cleanser is battery operated with 2 intensity levels and 2 interchangeable
attachments: a cleansing brush and a soft sponge.
• Simply click the attachment of your choice to the appliance until it locks into position
with a click.
• Keep your hair away from your face in order to prevent the hair from getting tangled in
the brush.
• If you are wearing make-up, it is recommended to remove most of the make-up first.
• Dampen the attachment head. For better results, apply cleanser or scrub cream of your
choice to your skin or brush and massage into your skin
• Switch the appliance on to your desired intensity level and gently slide the brush onto
your face using gentle circular movements over forehead, cheeks and chin.
• Do not press hard onto your skin. The cleansing process should always feel pleasant.
• For best results, it is recommended not to use for longer than 2 minutes, depending on
the sensitivity of your skin.
Cleansing Brush: Gently brush over the skin for deep cleansing to remove impurities
and help remove residual make-up. Choose the “1” setting for daily cleansing or “2” for
exfoliating. Do not exfoliate longer or more often than recommended on the packaging of
your scrub cream.
Soft Sponge: Dip in any cleansing cream and gently massage the skin to help skin product
absorption for 5-10 minutes on the “1” setting.
7
How to use the Hot and Cool Bar
• The Hot and Cool Bar must only to be used with the power supply unit provided with
the appliance.
• Remove any make-up. The skin should be clean and dry before using the appliance.
• Make sure that the switch is set at the OFF position.
• Connect the plug to the mains socket. (Make sure your hand is dry). Select the switch
to the “COOL” or “HOT” setting.
• After switching to the “COOL” setting, the LED indicator will turn green. After one
minute, the surface of bar will automatically become cool. When the temperature
decreases by around 20°C, you can apply to the surface to massage your skin.
• After switching to the “HOT” setting, the LED indicator will turn red. After one minute,
the surface of bar will automatically become hot. You can apply to the surface of your
face to gently massage your skin (depending on your comfort level and skin sensitivity).
Cleaning and Maintenance
• Pour out the water in the facial steamer after each use. Pour out the water in the water
collection tray before pouring out the water in the facial steamer.
• After pouring the water out of the water collection tray, wipe it with a dry towel and put
it back to place. Wipe the steam outlet, water inlet and main unit of the appliance with
a dry towel.
• Wipe the appliance with clean, dry cloth. Never immerse the appliance in water.
• Clean the brush and sponge attachments with tap water each time after usage. Max.
water temperature is 50°C.
• After cleaning, store in a dry place.
• Do not hang or pull the appliance by the power cord. Store the appliance in a cool,
dry place.
• Do not use any alcohol, acetone, petrol or abrasive cleaning agents.
• To prevent spread of germs, use a mild disinfectant to clean the appliance carefully.
Servicing
There are no user serviceable parts inside this appliance. Always refer servicing to qualified
service personnel. If you drop or damage your product, do not use until it has been
inspected and approved by a qualified electrician.

Important Cautions and Warnings
Please read all the instructions before use and pay particular attention to any warnings.
• Make sure your hands are dry when connecting the appliance to the power supply.
• Keep the facial steamer on a flat, level surface during use. Close the water supply
cover after adding water into the facial steamer.
• While steam is coming out, DO NOT adjust the steam outlet with hands.
• While using the facial steamer, do not open the water supply cover to add water.
• DO NOT add water into the facial steamer directly through a faucet or hose, but use a
filling cup instead. DO NOT add water by immersing the appliance in water.
• To add water into the appliance while it is operating, switch it off, wait about 10
minutes for it to cool down, and then open the water supply cover to add water.
• During the steam massage, keep your face at least 25 centimeters from the steam
outlet. DO NOT touch or look into the steam outlet or block the nozzle.
• Switch off the facial steamer at the end of the massage or if the indicator turns red.
• After unplugging the facial steamer, let it cool down for about 10 minutes and then
pour out the water remaining in the appliance. DO NOT open the water supply cover
immediately after the appliance stops operating, otherwise the hot steam or hot water
may burst out from the water inlet and burn or scald your skin.
• DO NOT alter the facial steamer or use it for purposes other than vapour massage.
• Use the appliance on a dry table in any circumstance. DO NOT use the appliance in a
damp environment or on the ground. Use a dry towel to wipe the water (if any) on or
around the appliance before using it.
• The appliances are NOT waterproof and CANNOT be used in the shower.
• DO NOT wrap the power cord around the appliance or the power cord may get damaged.
• This appliance is designed for domestic use only.
• This appliance is not aimed to be used by persons (including children) with impaired
physical, sensory or mental capabilities, or lacking experience and/or know-how unless
they are supervised or have received instructions from a person who is responsible for
their safety, regarding how the appliance should be used.
• Keep it out of reach of children. Children should be supervised to ensure that they do
not play with the appliance.
• DO NOT clean the appliance by immersing it in water.
Keep these instructions safe for future reference.
8 9
Important Safeguards
• DO NOT use the appliance if you have a skin allergy.
• DO NOT use the appliance on dry, chapped skin or when you suffer from skin diseases
or skin irritations, such as acne, sunburn etc.
• DO NOT use the appliance on wounds.
• DO NOT use the appliance too frequently; otherwise your skin may get injured.
• Stop using the appliance if you feel any discomfort on your skin
• For Ionised Hydrotherapy Facial steamer; if the supply cord is damaged, it must be
replaced by the manufacturer, its service agent or similarly qualified persons in order to
avoid a hazard.
IMPORTANT SAFETY POINTS FOR IONISED HYDROTHERAPY FACIAL STEAMER
Read these instructions thoroughly before using this appliance or connecting to the mains
supply. A 3 amp BS1362 ASTA approved fuse must be fitted. Before switching on, make
sure that the voltage of your electricity supply is the same as that indicated on the rating
plate. Connecting it to any other power source may cause damage.
This product may be fitted with a non-rewirable plug. If it is necessary to change the fuse
in the plug, the fuse cover must be refitted. If the fuse cover becomes lost or damaged,
the plug must not be used until a suitable replacement is obtained. If the plug has to be
changed because it is not suitable for your socket, or due to damage, it should be cut off
and a replacement fitted, following the wiring instructions shown. The old plug must be
disposed of safely because inserting it into a socket could cause an electrical hazard.
The wires in the mains cable of this product are coloured in accordance with the
following code:
BLUE = NEUTRAL BROWN = LIVE
If the markings on the terminals of your plug do not correspond to the colours shown of the
wires in the mains cable, proceed as follows:
The wire which is coloured BLUE must be connected to the terminal which is
marked Nor coloured BLACK.
The wire which is coloured BROWN must be connected to the terminal which is
marked Lor coloured RED.
DO NOT connect any wires to the earth terminal.
This symbol indicates that this is a
2-core appliance is Class II and
does not require an earth connection.
Replacements
Replacing the brush
Replace the brush every 3 to 6 months for optimal cleansing results. Replace the brush if
the deformed filaments can no longer be restored to their original shape. Worn filaments
will move impurities around rather than remove them. They could also irritate your skin.
Replacing the sponge
Replace the sponge every 1 to 3 months for optimal results. Replace the sponge
immediately if it changes colour or is mildewed. They could also irritate your skin.
Fault prevention
• While using the appliance, do not open the water supply cover to add water, otherwise
you may get burnt or scalded.
• DO NOT touch the steam outlet while using the appliance, otherwise you may get burnt
or scalded. Never look into the steam outlet at any time.
• If the appliance is to be disposed for long time, make sure to take out the batteries.
1110
Warranty
This product is guaranteed for a period of 2 years from the date of purchase, against
mechanical and electrical defects, when registered at www.sensiospa.com within 28
days of purchase. NB: Non-registered products are guaranteed for a period of 1 year.
It is particularly important that you carefully read the instructions provided, in order to get
maximum use from this product.
This guarantee is only valid if the appliance is used solely for domestic purposes in
accordance with the instructions and provided that it is not connected to an unsuitable
electricity supply, dismantled or interfered with in any way or damaged through misuse.
Under this guarantee we undertake to repair or replace free of charge any parts found to
be defective.
This guarantee is only valid with your original sales receipt as proof of purchase. You may
wish to attach the receipt to this card for ease of reference and to avoid accidental loss.
In the unlikely event of a fault or mechanical defect in material and workmanship
within the 12 months of purchase the product should be returned to the retailer for
replacement.
If the fault develops after 12 months and within 24 months from the date of original
purchase and you have registered your product online within 28 days of purchase, you
should contact customer services quoting the products model number and batch code.
This information can be located on the underside or back of the product. The batch code
will be stated in an YYWW format (e.g. 1133).
For spare parts please contact customer services quoting the product’s model number
and batch code. They will give you up-to-date prices.
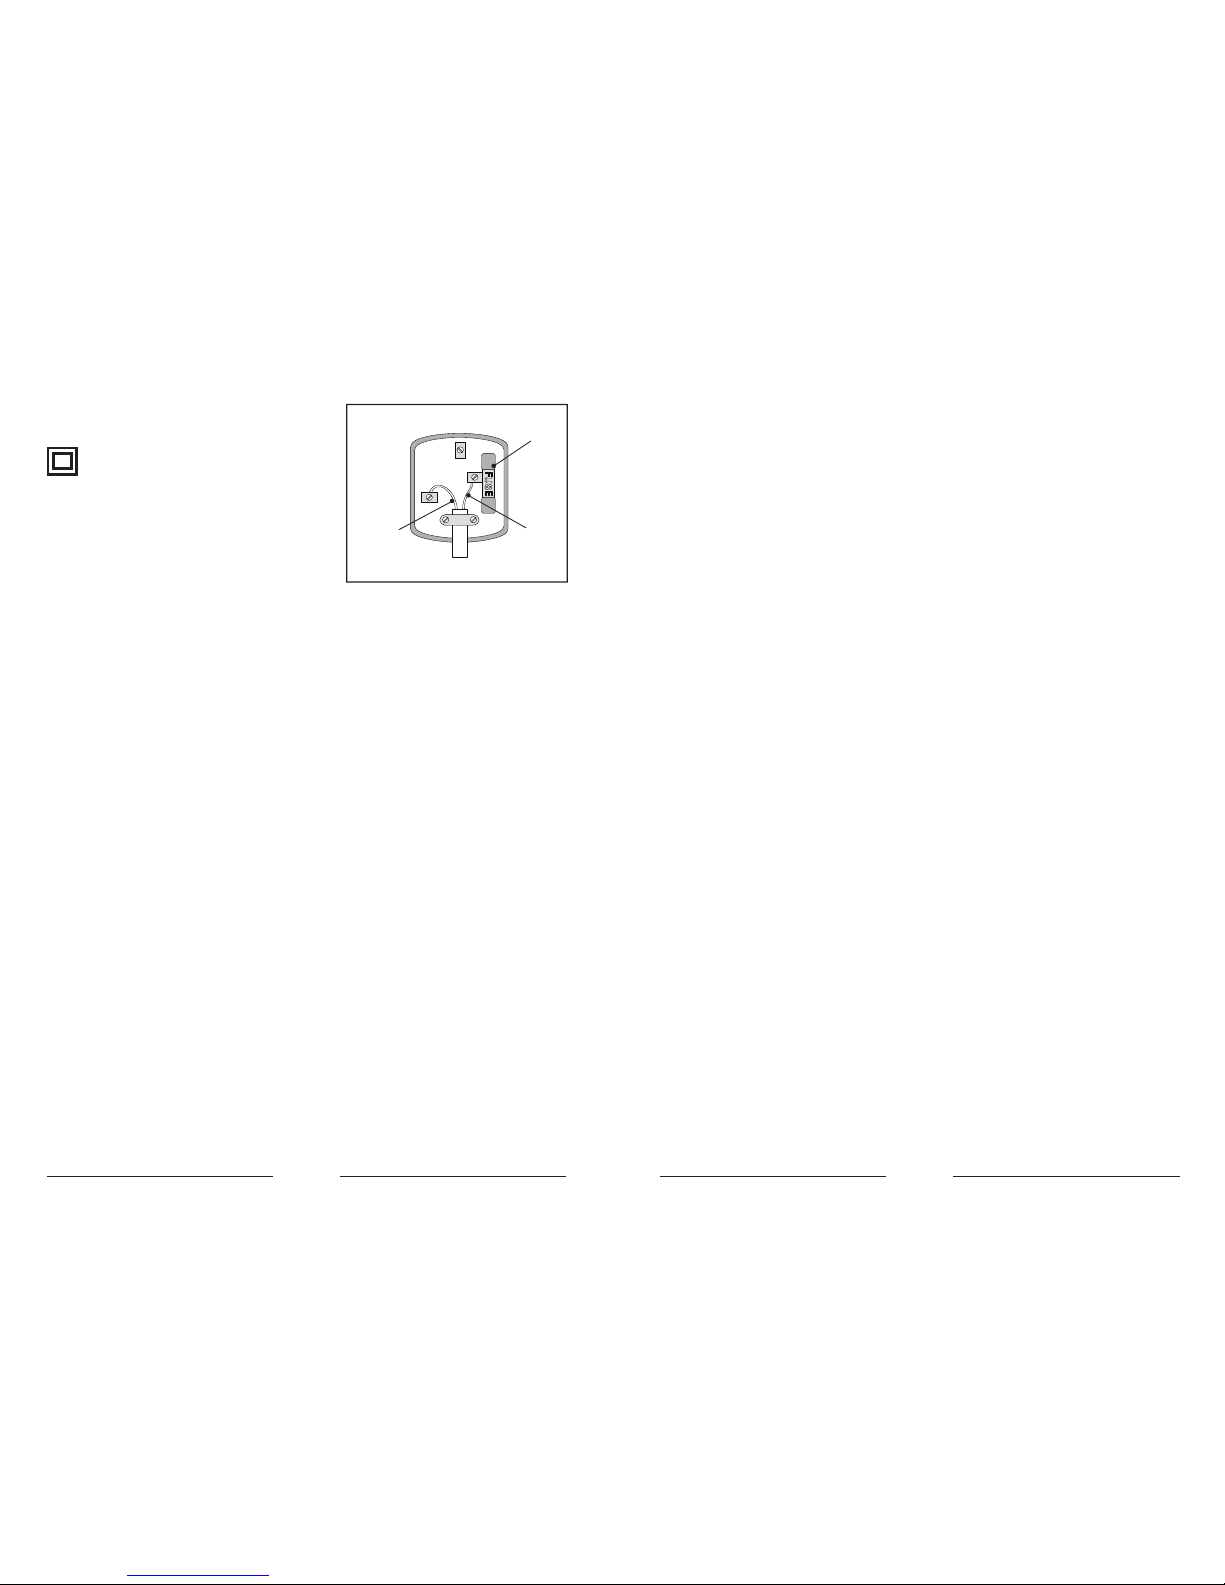
Plug should be BS1363 approved.
3 Amp Fuse
NEUTRAL
(Blue)
LIVE
(Brown)
Fit a 3 Amp fuse.
Ensure that the outer sheath of the cable is
rmly held by the clamp.

12
Warranty Exclusions
1. Batteries and damage from leakage is not covered by the terms of the guarantee.
2. The warranty does not cover acts of God such as fire, floods, hurricanes or tornadoes
or use for rental or commercial services.
3. Consumable items such as brushes are not covered under this warranty.
This guarantee does not cover any claims for consequential loss or damage.
This guarantee is only valid within the UK and Ireland. Nothing in this guarantee or the
instructions relating to this product excludes, restricts or otherwise affects your
statutory rights.
In line with our policy of continuous product development we reserve the right to change
the product, packaging and documentation specifications without notice.
ALL MPL HOME PRODUCTS ARE INTENDED FOR DOMESTIC USE ONLY
For technical queries, please contact
MPL Home Ltd IMEX, 575-599 Maxted Road, Hemel Hempstead, Herts, HP2 7DX
Model: SSPA03
Customer Helpline: 0345 467 6743
IMPORTANT INFORMATION FOR CORRECT DISPOSAL OF THE PRODUCT IN
ACCORDANCE WITH EC DIRECTIVE 2002/96/EC
At the end of its working life, the product must not be disposed of as urban waste. It must
be taken to a special local authority differentiated waste collection centre or to a dealer
providing this service. Disposing of a household appliance separately avoids possible
negative consequences for the environment and health, deriving from inappropriate
disposal and enables the constituent materials to be recovered to obtain significant savings
in energy and resources. As a reminder of the need to dispose of household appliance
separately, the product is marked with crossed-out wheeled dustbin.

www.sensiospa.com
Table of contents
Other Sensio Spa Personal Care Product manuals


