Sensor Networks JAWS 2.0 User manual

Operator Manual
Basic and Ultimate Kits

2

3
Contents
JAWS
™ Overview ................................................................... 4
Precautions ..................................................................................... 5
Setup ............................................................................................... 6
Powering the System .................................................................. 6
HD Display / Controller ................................................................... 7
Operation........................................................................................ 8
Grabber Operation...................................................................... 8
Changing Jaw Sets....................................................................... 8
Battery Status.............................................................................. 8
Power Saving Modes................................................................... 8
Battery Charging ......................................................................... 9
Operation with AC Mains Power .............................................. 10
Securing with a Lanyard............................................................ 11
Spare Parts................................................................................ 11
JAWS
™ Ultimate Kit Accessories .......................................... 12
Interchangeable Jaw Sets ......................................................... 12
Retrieval Accessories ................................................................ 12
Interconnecting Long Push Poles and Case .............................. 13
Specifications ................................................................................ 14
Care............................................................................................... 14
Warranty....................................................................................... 15
Appendix ....................................................................................... 16
Using the Accessories ............................................................... 16
Contact Us..................................................................................... 22

4
JAWS
™Overview
The
JAWS
™is a motorized retrieval device designed to be robust
and work in most environments. With a battery power pack, the tool
is portable and can be carried easily to any job site. Interchangeable
jaws sets and accessories allow equipping the tool to secure a large
variety of irregularly-shaped objects. A full line of accessories is
available in the
JAWS
™Ultimate Kit to deliver the tool to most
remote locations.
JAWS
™Basic Kit Contents
• JAWS 2.0 HD grabber
• JAWS 2.0 HD display/controller
• 50ft (15m) power/video cable
• AC adapter/charger
• operator manual
• hex key, spare screws
JAWS
™Ultimate Kit Contents
• JAWS 2.0 HD grabber • JAWS 2.0 HD display/controller
• AC adapter/charger • operator manual
• 50ft (15m) power/video cable + 50ft (15m) extension cable
• Jaw Sets: fork and tine | flat serrated | short serrated | sampling cups
curved serrated | needle-nose | tool adapter
• Tools: 2 snares: sm, lg | 2 magnets: sm, lg | Storage Case
4 hooks: sm, med, lg, xl
• Push Poles:
40 push poles - 60in (150cm) length
10 each: Ø 3
16in, 1
4in, 5
16in, 3
8in (Ø5,6,8,9mm)
4 push poles - 16in (40cm) length
1 each: Ø 3
16in, 1
4in, 5
16in, 3
8in (Ø5,6,8,9mm)
1 push pole - 12in (30cm) length × Ø 5
16in (Ø8mm)
1 push pole - 6in (15cm) × Ø 5
16in (Ø8mm)
• Push Pole Accessories:
quiver | tee handle | adjustable elbow
rubber flex joint | spring flex joint
•Miscellaneous: hex keys | spare screws | hoist lifting ring

5
Precautions
•EXPLOSION HAZARD: Do not use
JAWS
™ in an
explosive or hazardous environment.
•BODILY HARM HAZARD: Do not position
JAWS
™ near
moving machinery.
•Do not operate
JAWS
™ in temperatures below 0°F or above
120°F (-20°C - 50°C)
•Do not submerge
JAWS
™ in acids or caustics.
•Do not submerge
JAWS
™ deeper than 50 feet (15m) in water
or any other liquid. (Additional depth is attainable with a longer
main cable)
•Do not force
JAWS
™ into openings smaller than its diameter.
•Use only the supplied battery power pack as the
JAWS
™
power source.
•Keep the battery power pack away from high heat and equipment
that produces sparks.
•Replace any damaged or defective battery.
•Do not submerge battery power pack.
•Use only supplied charger to charge the battery. Follow battery
condition indicator on charger.

6
Setup
1. Connect main cable to grabber. Align the red dots and push
connector in until it clicks.
2. Connect extension cable as needed. Use without this cable is
recommended as the extra cable length consumes power that
would otherwise be available for the tool.
3. Connect cable to power pack.
4. Attach push rod or other rodding accessories to manipulate
the tool into position for grabbing.
Powering the System
ON: Press in the switch and release to start the system, the
status LED will blink Green while starting. The video will
display after 15 seconds. The status LED will change to Blue
indicating the system is ready.
OFF: Press in the switch for 2 seconds to power down the
system.
Power / Video
Cable
HD Display
/ Controller
HD Grabber
7
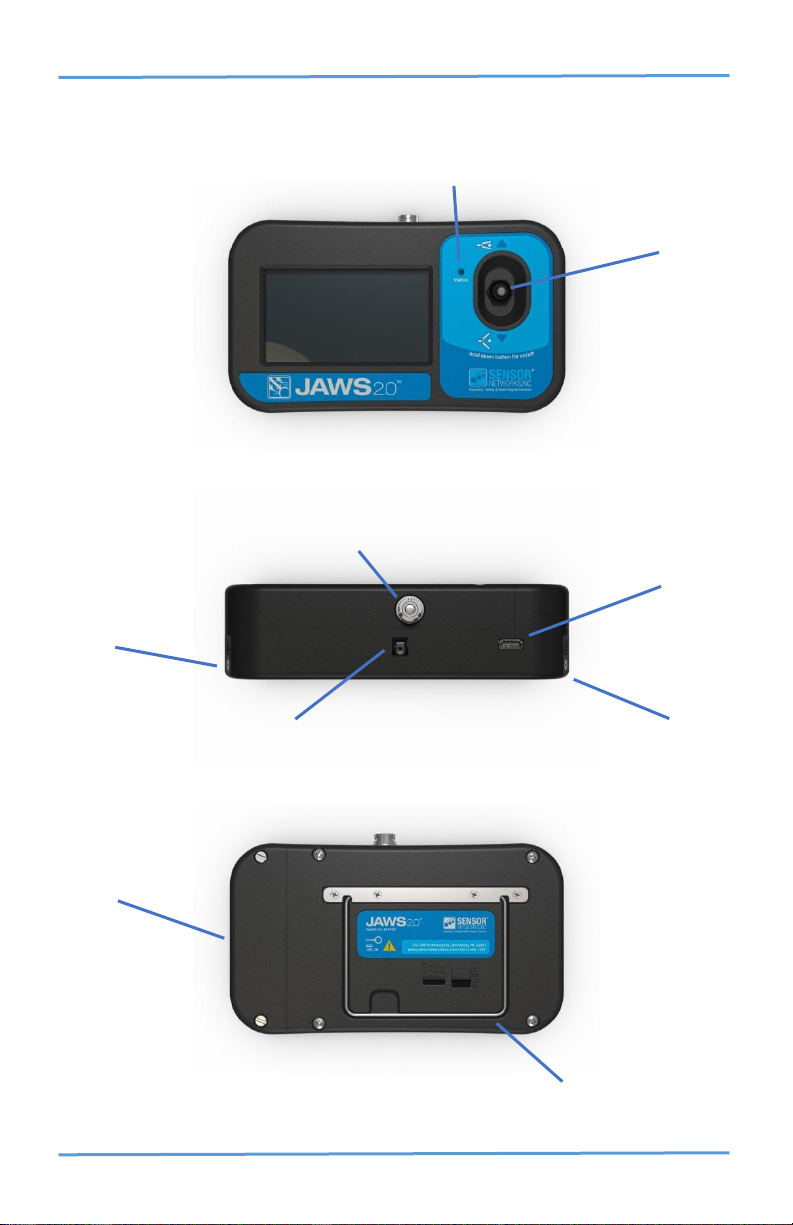
HD Display / Controller
Switch
Status LED
Cable Connector
HDMI Output
Power Connector
Battery Access
Folding Stand
¼”-20 Mount
For Lanyard
¼”-20 Mount
For Lanyard

8
Operation
Grabber Operation
Press the switch forward to close the tool jaws. When the jaws
have tightened fully, the status LED will change to Yellow.
Press the switch rearward to open tool jaws.
Changing Jaw Sets
To change the preferred jaw set on tool, use a 3/32-inch hex key
to remove the socket head screws on each jaw.
Slide each jaw off the tool and clean the interfacing surfaces.
Slide preferred jaw onto tool and install socket head screw.
Battery Status
Press the switch to the left to display the battery condition on the
status LED.
100% - 3 Green blinks
80% - 2 Green blinks
60% - 1 Yellow blink
40% - 1 Red blink
20% - 1 long Red blink
Power Saving Modes
After 10 minutes of no switch activity, the system will dim the
video display. The status LED will blink Blue. Moving the switch
will awaken the system.
After 20 minutes of no switch activity, the system will sleep using
a small amount of battery power. The status LED will blink
Blue. Moving the switch will awaken the system.
After 30 minutes of no switch activity, the system will completely
shut down and use no power. See Powering the System to
restart.
9
Battery Charging
Place the charger on a flat, level surface away from sources of
heat and moisture.
Plug the connector from the AC adapter into the back of the
charger and connect the adapter to the mains AC supply using
the cable supplied.
Place the battery into the battery bay ensuring that the 5-way
connector is fully seated. The LEDs in the status window will
provide status information and the charger will automatically
begin charging.
Green flashing: Battery charging
Green solid: Battery fully charged
Red: Error
Note: The battery does not charge while installed in the
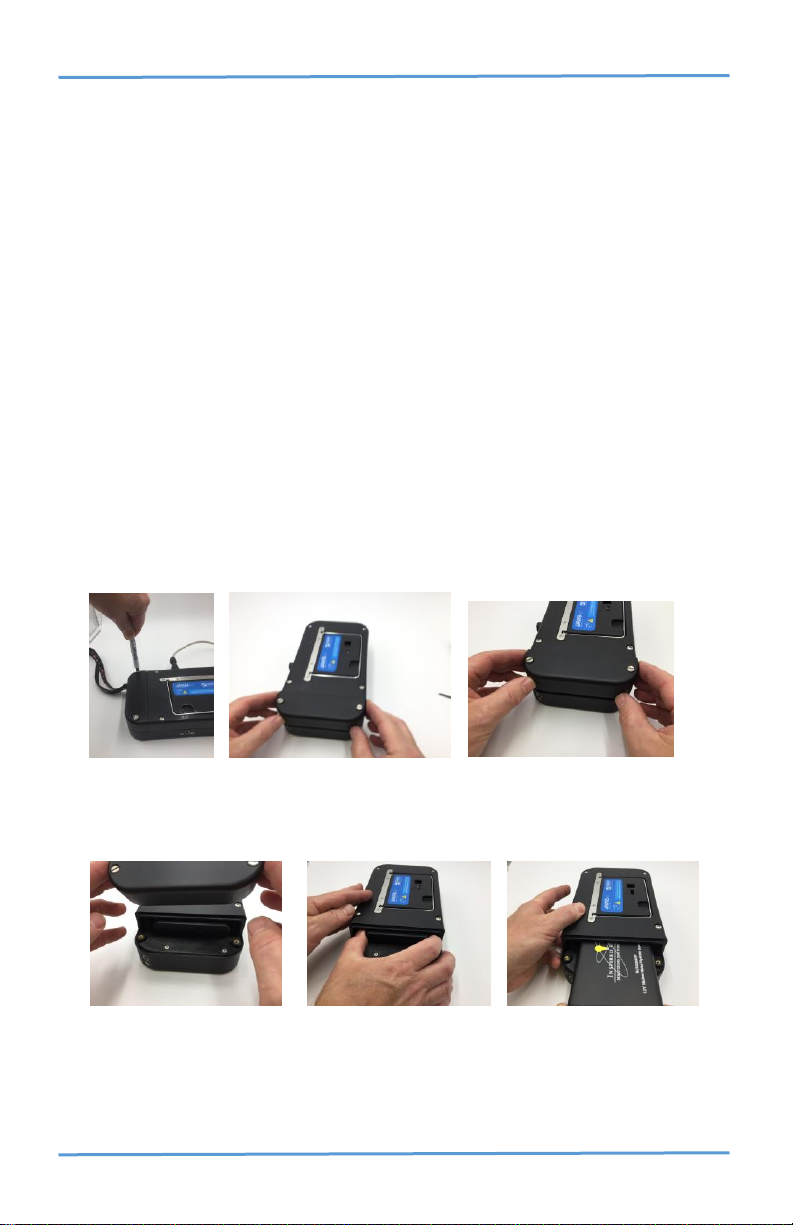
controller. Follow instructions below to charge battery.
Open the battery compartment by loosening the two screws on the
controller back cover. Pop the cover up and off.
Remove the battery and insert it into the supplied charger. Full
charge time is generally 2 hours.
10
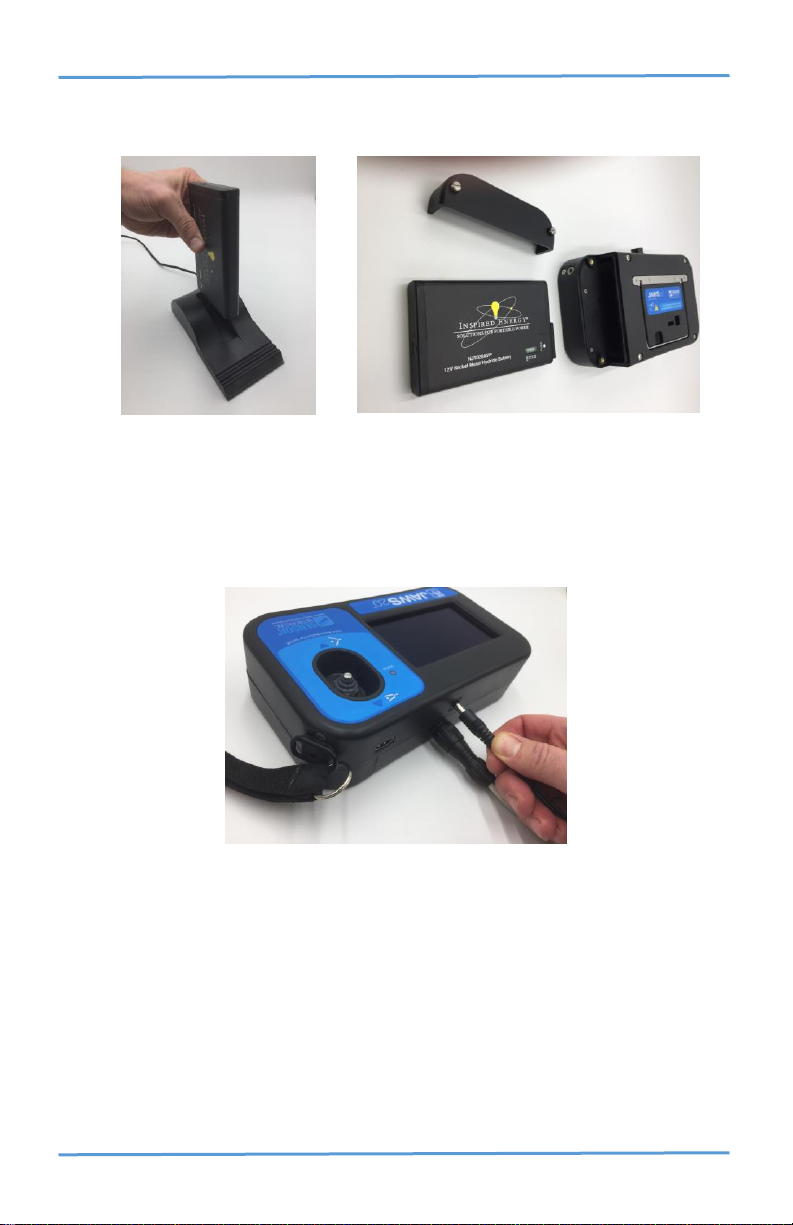
Reverse the above operation for portable / battery operation of the
JAWS tool.
Operation with AC Mains Power
Plug the barrel connector from the AC adapter into the power
jack on the HD Display / Controller. Connect the adapter to the
mains AC power outlet.
Power on the system, see Powering the System section.
The AC adapter will power only the tool system, the battery will
not charge if installed. The system will use AC power if available
first, and only use battery when AC is not present. Restarting the
system is necessary when changing power sources.

11
Securing the controller with a Lanyard
The JAWS 2.0 power pack / controller comes with an attachment
point for (not included) hand or neck lanyards. When using with
a lanyard, be sure to use only safety “break-away” lanyards.
Spare Parts
Part Number
Description
154701
JAWS
™HD Grabber
154900
JAWS
™HD Display / Controller
154740
Power / Video Cable 50ft (15m)
154730
Extension Cable 50ft (15m)
154703
154795
154796
154705
154707
Operator Guide
Rechargeable Battery
Battery Charger
Basic Kit Carrying Case
AC Adapter

12
JAWS
™ Ultimate Kit Accessories
Interchangeable Jaw Sets
Part Number
Description
143360
Jaw Set, Fork & Tine
143370
Jaw Set, Flat Serrated
143380
Jaw Set, Curved Serrated
143390
Jaw Set, Needle Nose
145610
Jaw Set, Sampling Cups
153230
Tool Adapter
Retrieval Accessories
Part Number
Description
153201
Dual Magnet Kit, Small & Large
143203
Small Snare
143204
Large Snare
143220
Adjustable Elbow
143230
Tee Handle
143210
Hook, Small
143270
Hook, Medium
143280
Hook, Large
143290
Hook, Extra Large
140890
Rubber Flex Joint
143297
Spring Flex Joint
143396
Hoist Lifting Ring
143356
Plastic Vial for spare parts
143240
Ø 5/16" x 6"L (Ø 8mm x 15cm) Push Pole
143250
Ø 5/16" x 12"L (Ø 8mm x 30cm) Push Pole
153235
Ø 3/16" x 16"L (Ø 5mm x 40cm) Push Pole
153236
Ø 1/4" x 16"L (Ø 6mm x 40cm) Push Pole
153238
Ø 5/16" x 16"L (Ø 8mm x 40cm) Push Pole
153239
Ø 3/8" x 16"L (Ø 9mm x 40cm) Push Pole
153207
Ultimate Kit Carrying Case

13
Interconnecting Long Push Poles and Case
Part Number
Description
143265
Ø 3/16" x 60"L (Ø 5mm x 150cm) Push Pole
143266
Ø 1/4" x 60"L (Ø 6mm x 150cm) Push Pole
143268
Ø 5/16" x 60"L (Ø 8mm x 150cm) Push Pole
143269
Ø 3/8" x 60"L (Ø 9mm x 150cm) Push Pole
143261
Push Pole Quiver

14
Specifications
Construction
Aircraft-grade Aluminum Housing
Stainless Steel Jaw Sets
Polyurethane Cable Jacket
Polyurethane Display / Controller
Size
1.4in (37mm) Diameter
7.1in (180mm) Length
Weight
0.8lb (.36Kg) Remote Grabber Tool
3.1lb (1.4Kg) Battery Power Pack
0.7lb (0.32Kg) Cable
Jaw Opening
2.75in (70mm) maximum
Power
15 watts, 12Vdc (rechargeable NiMH battery)
Depth Rating
100ft (30m) maximum of water
Care
•Clean with mild soap and water, do not use solvents.
•Oil linkage periodically after cleaning.
•Check cable for damage, replace if jacket is breached.
•Keep battery charged, ready for use.

15
Warranty
Sensor Networks Inc. (SNI) warrants that the Products sold to Buyer
hereunder will be free from defects in material and workmanship
furnished by SNI and will conform, within normal commercial
tolerances, to applicable specifications. This warranty shall apply only
where Buyer has given SNI written notice of such defect or
nonconformity within one year (365 days) after receipt of the
Products by Buyer. This warranty does not extend to any Product
which has been subjected to abuse, misuse, neglect or accident, or to
any Product which has been repaired or altered by other than SNI.
THE FOREGOING WARRANTY IS BUYER’S SOLE AND
EXCLUSIVE REMEDY AND IS IN LIEU OF ALL OTHER
WARRANTIES, EXPRESS OR IMPLIED, INCLUDING,
WITHOUT LIMITATION, MERCHANTABILITY, FITNESS
FOR A PARTICULAR PURPOSE, DESCRIPTION, QUALITY,
PRODUCTIVENESS, OR OTHERWISE.
This Warranty applies only to the original purchaser and cannot be
assigned or transferred to any third party without express written
consent of SNI. The warranty does not apply to expendable items or
normal wear and tear or failure due to overheating or radiation
exposure. Additionally, SNI assumes no responsibility, either
expressed or implied, regarding the improper usage of this equipment
or interpretation of test data derived from this product. SNI’s
responsibility and obligations, in all cases, are limited strictly to the
repair and/or replacement cost as outlined above. SNI is not
responsible for shipping costs. This warranty shall be governed by
the laws of the State of Pennsylvania.
If the equipment cannot be returned to SNI for whatever reason, the
customer agrees to pay for all travel and living expenses incurred to
have the SNI’s representative evaluate, assess or affect a field
warranty repair.

16
Appendix
Using the Accessories
Retrieval Tips and Using the JAWS 2.0 Kit
The JAWS 2.0 retrieval tool kit has been developed over decades of
successful loose-parts retrieval experience at Electric Power
Generation and Oil & Gas facilities around the world. Following are
some helpful tips and hints on how to maximize the value of your
JAWS 2.0 investment.
1. Adjustable elbow: PN 143220
Left: Connecting a push pole to the adjustable elbow. Use your
finger tip to compress the spring-loader locking pin. Slide male
fitting into the mating adaptor until seated and spring-loaded
locking pin pops into place. Right: Adjusting the elbow’s position
and tightening with hex wrench.
2. T-Handle PN 143230 handle with short pole 143250

17
The “T” Handle connects with any flex rod to provide rotational
control of the retrieval end-effectors. This function is very important
to performing successful retrievals.
3. JAWS 2.0 tool interconnects.
The adjustable elbow, the flex joints or any of the flexible rods can be
connected to the JAWS tool by squeezing the spring-loaded pushpin,
inserting and aligning the pin.
4. The small and large magnet are ideal for retrieving ferro-
magnetic objects such as most tools and metal filings.
Left: Connecting the adjustable elbow to the small rare-earth magnet.
Right: Large magnet. Both magnets are very powerful. Use care when
handling.
18
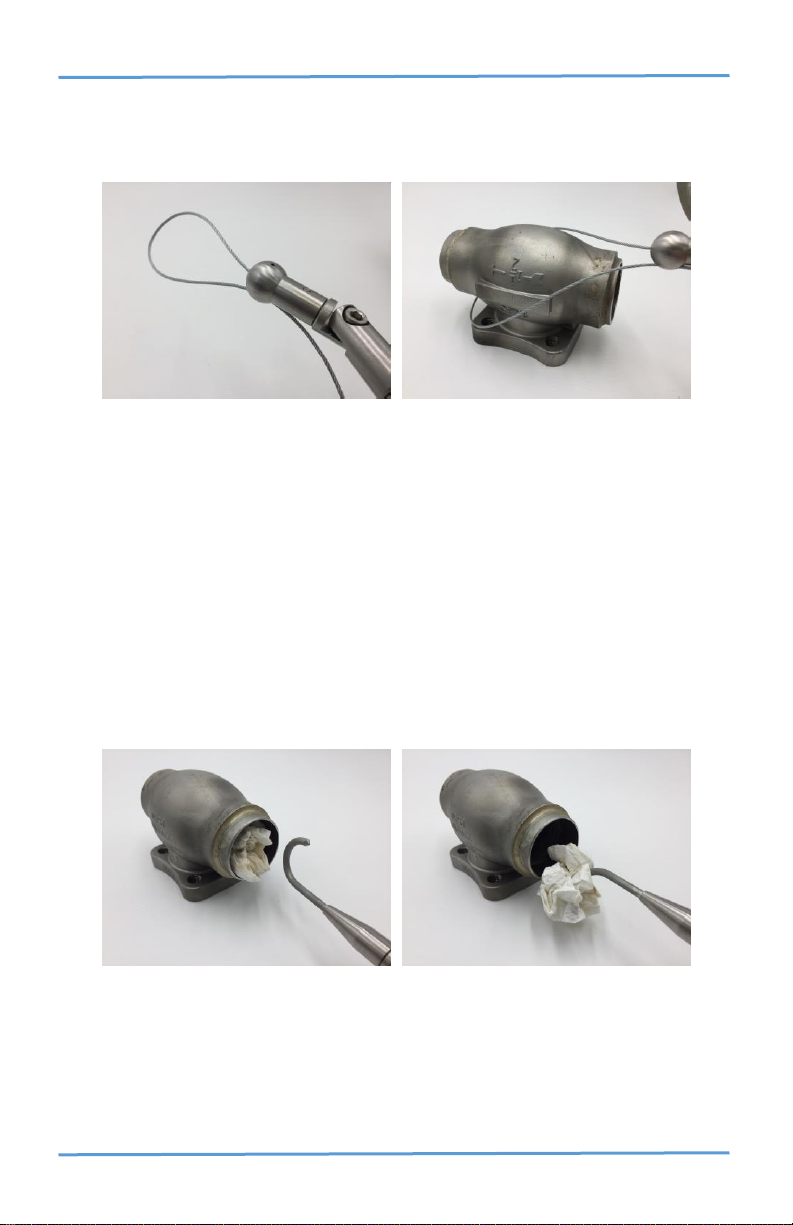
5. Snare closing in on a stainless-steel valve body. PN 143203
or 143204
The small snare (left) and the large snare (right) are used similarly
with or without the adjustable elbow. By pushing, rotating and
pulling on the flex rod, the user can lasso a large and heavy loose
part. Start by creating a large enough loop in the snare to fit over the
targeted part for retrieval. Lasso the loose part by pushing, pulling &
twisting the tool until the snare’s loop is effectively around the loose
part. By pulling the snare cable in and holding tension, large objects
can be successfully retrieved.
6. Hook closing in on a large rag. PN’s 143210,143270,143280,
or 143290
Four different hook sizes enable the retrieval of rags and other
random objects stuck in tight places. The hook is slid into and behind
the rag, then rotated for retrieval.

19
7. Flexible joints
Rubber flex joint (left) and spring flex joint right are used when the
JAWS tool or end effectors need to be pushed through an elbow or
pipe “T”.
8. Attaching the tool adaptor PN 153230 to the JAWS tool
requires removal of the one or both jaws and sliding the tool
adaptor in, securing with the 4-40 socket head screw and a
3/32-inch hex wrench. Attaching an end-effector to the tool
adaptor is the same as shown in #1 above.
The JAWS tool adaptor (left) enables the use of any end-effector
such as a magnet (center) or the snare (right). The combination of the
end effector and the JAWS tool has two benefits: Visual (CCTV)
observation of the retrieval and single-axis articulation (controlled
movement) of the tool.

20
9. Swapping the JAWS grabber options:
JAWS grabbers can be easily changed using a 3/32-inch hex wrench.
Be sure to securely tighten these before deploying the tool. Standard
/short Jaw (left) is best for navigating tight corners or elbows. The
fork & tine jaw (right) is good for softer objects.
Long flat-serrated jaw (left) provides more surface area and bite to
grab and retrieve big and heavy objects. The curved serrated jaw
(right) is well suited to grab round objects such as hammer handles.
Table of contents
Popular Industrial Equipment manuals by other brands


ABB
ABB HT598026 Operation manual

Alpha Technologies
Alpha Technologies ALPHA OUTBACK ENERGY Cordex HP LPS04 Installation & operation manual

Abe
Abe CraftCan 15 user guide

Sonny's
Sonny's APP100P2 owner's manual

Tarana
Tarana 1101-1027-KT installation guide

UniData Communication Systems
UniData Communication Systems 6526 manual