Sensor Switch WSX 2P User manual
1 of 2Sensor Switch 900 Northrop Road, Wallingford, CT 06492 Phone: 1.800.PASSIVE sensorswitch.com ©2013 Acuity Brands Lighting, Inc. All rights reserved 09/05/13
WSX 2P FAMILY
INSTRUCTIONS
WSX 2P
WSX PDT 2P
WSX 2P NL
WSX PDT 2P NL
PHYSICAL SPECS
SIZE: 2.74”H x 1.68”W x 1.63”D (6.96 cm x 4.27 cm x 4.14 cm)
(not including ground strap)
WEIGHT: 5 oz
MOUNTING: Single Gang Switch Box
MOUNTING HEIGHT: 30-48 in (76.2-121.9 cm)
SILICONE FREE
ROHS COMPLIANT
ELECTRICAL SPECS
MAXIMUM LOAD / POLE (RELAY)
800 W @ 120 VAC
1200 W @ 277VAC
1500 W @ 347VAC
MINIMUM LOAD: None
MOTOR LOAD: 1/4 HP
FREQUENCY: 50/60 Hz (timers are 1.2x for 50 Hz)
ENVIRONMENTAL SPECS
OPERATING TEMP
Standard: 14º to 122º F (-10º to 50º C)
LT Option (PIR): -40º to 122º F (-40º to 50º C)
LT Option (PDT): -4º to 122º F (-20º to 50º C)
RELATIVE HUMIDITY:
Standard: 20 to 75% non-condensing
LT Option: 20 to 90% non-condensing
(electronics coated for corrosion resistance)
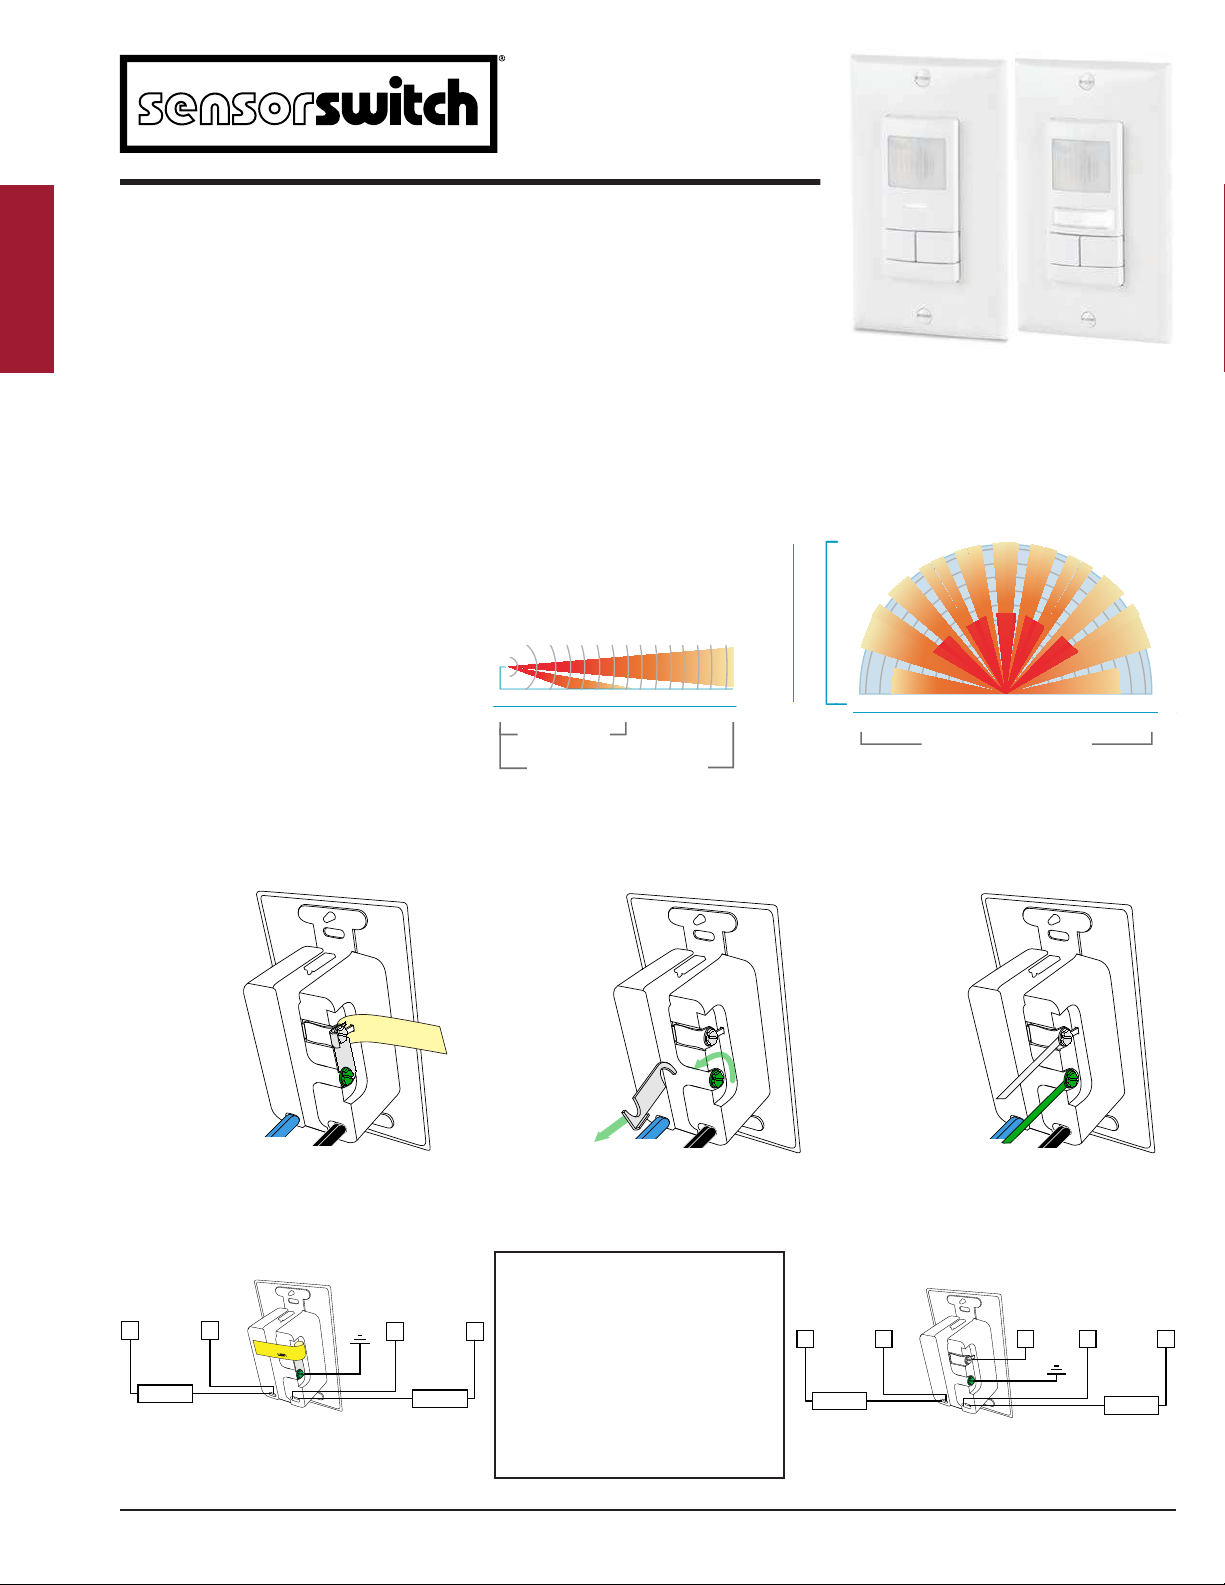
SPECIFICATIONS
COVERAGE PATTERN
36 30 20 10 0 ft 10 20
30 36
12 9 6 3 0 m
3 6 9 12
Small
motion
detection
Small
motion
detection
to ~20 ft
6
3
0 m
20
10
0 ft
Small motion ~40 ft coverage
TOP VI EW
1.2 m
4 ft
Small motion
detection to ~20 ft
Large motion detection to >36 ft
SIDE V IEW
0 18 27 369
ft
0 6 9 123
m
This product is pre-congured for wiring without a neutral; however, if connection to neutral is required by code, contractors can quickly and easily convert the unit in seconds.
CONVERSION FROM GROUND ONLY NO NEUTRAL TO NEUTRAL WIRING
Step 1:
Remove Yellow
Label
Step 2:
Loosen Screws and
Remove Metal Link
Step 3:
Connect Neutral to
Silver Screw and
Ground to Green Screw
WIRING TO GROUND NO NEUTRAL WIRING TO NEUTRAL
H
NGND
LOAD 2 BLU
BLU
HN
LOAD 1
BLK
BLK
REMOVE METALLINK
IF CONNECTING TO
NEUTRAL
GND
H N
LOAD 1
BLK
BLK
N
H
N
LOAD 2 BLU
BLU
DUAL RELAY DUAL RELAY
Notes:
- Unit will draw power from either line connection.
- When switching 277 VAC or 347 VAC on both relays, the
line inputs must be of the same phase.
120/277 VAC WIRING
BLACK* - Line 1 Input
BLACK* - Load 1 Output
*BLACK wires
can be reversed
}
BLUE* - Line 2 Input
BLUE* - Load 2 Output *BLUE wires
can be reversed
}
WIRE COLOR KEY
347 VAC WIRING (-347 Option)
Red wires replace Black wires.
Notes:
- Unit will draw power from either line connection.
- When switching 277 VAC or 347 VAC on both relays, the
line inputs must be of the same phase.
•Small motion (e.g. hand movements) detection up to 20 ft (6.10 m), ~625 ft2
•Large motion (e.g. walking) detection greater than 36 ft (10.97 m), ~2025 ft2
•Wall-to-wall PIR coverage
•Units with -PDT (Passive Dual Technology) option
(also called Microphonics) provide overlapping
detection of human activity over the complete
PIR coverage area. Advanced ltering is utilized
to prevent non-occupant noises from keeping
the lights on.

2 of 2Sensor Switch 900 Northrop Road, Wallingford, CT 06492 Phone: 1.800.PASSIVE sensorswitch.com ©2013 Acuity Brands Lighting, Inc. All rights reserved 09/05/13
On Mode
Reset
Factory
Defaults
Switch
Mode
LED
Operation
Predictive
Exit
Time
Microphone
Grace Period
Occupancy
Time
Delay
Photocell
Set-Pt
Minimum
On Time
Manual On
Grace
Period
Dual
Technology
(MicrophonicsTM)
Predictive
Grace
Time
4x
5x
7x
9x10x
2x 3x
12x
11x
13x
15x 16x
PRESS BUTTON
3.
While LED
flashes
back current
setting 10x...
OPERATIONAL SETTINGS _________________________________________________________________________________________________
PROGRAMMING INSTRUCTIONS ______________________________________________________________________________________
PRESS BUTTON
30 sec
20 min
30 min
17.5 min
15.0 min
12.5 min 10 min
5.0 min
2.5 min
7.5 min
1x
13x
2x
3x
4x
5x6x
7x
8x
9x
1.
While LED
flashes back new
setting 10x...
5.
On Mode
Reset
Factory
Defaults
Switch
Mode
LED
Operation
Predictive
Exit
Time
Microphone
Grace Period
Occupancy
Time
Delay
Photocell
Set-Pt
Minimum
On Time
Manual On
Grace
Period
Dual
Technology
(MicrophonicsTM)
Predictive
Grace
Time
4x
5x
7x
9x10x
2x 3x
12x
11x
13x
15x 16x
PRESS BUTTON
4.1.
5. 6.
LED FLASHES
CONFIRMATION
TWICE
PROGRAMMING
COMPLETE
7.
7.
Operational settings can be changed for either pole via the corresponding push-button using the sequence outlined below (note the example used is for changing occupancy time delay).
e.g., 5 ashes is default
10 min time delay
e.g., press 4x
to change
to 7.5 min
e.g., 4 ashes
conrms new 7.5
min time delay
setting
2. 3.
e.g., press 2x for
Occupancy Time
Delay
NOTE: (*) Indicates factory default (unless otherwise marked)
WARRANTY: Sensor Switch warrants these products to be free of defects in manufacture and workmanship for a period of 60 months.
Sensor Switch, upon prompt notice of such defect, will, at its option, provide a Returned Material Authorization number and repair or replace
returned product.
LIMITATIONS AND EXCLUSIONS: ThisWarranty is in full lieu of all other representation and expressed and implied warranties (including
the implied warranties of merchantability and tness for use) and under no circumstances shall Sensor Switch be liable for any incidental or
consequential property damages or losses.
C US LISTED
TITLE 24
ASSEMBLED in U.S.A.
5 YEAR WARRANTY
Sheet#: ISWSX2P002
PRESS BUTTON
PRESS BUTTON PRESS BUTTON
e.g., press 2x (for Occupancy
Time Delay) to save and exit
2= Occupancy Time Delay
Time sensor keeps lights on after last occupancy detection.
1 30 sec 4 7.5 min 715.0 min 13 30.0 min
22.5 min 5 10.0 min* 817.5 min
35.0 min 6 12.5 min 9 20.0 min
For additional time settings, contact technical support at
1.800.PASSIVE
3= On Mode
Automatic On turns lights on when occupancy is detected. Manual On
requires a button press to turn the lights on. Reduced Turn-On directs
the sensorto only detect large motions, such as a person entering
a room. Weaker signals, such as reections from glass, are
ignored. Once lights are on, the sensor returns to maximum
sensitivity.
1Automatic On 2Manual On 3Reduced Turn-On
WSX 2P models default: Pole 1 Auto On, Pole 2 Manual On
2SA and NL options default: Both poles Manual On
4= Switch Modes
These modes dictate switch functionality. Pressing the button
in Override Off mode (setting 1) turns off and keeps lights off
until pressed again. Disabling the Switch (setting 2) prevents the
button from turning the lights on.
Predictive Mode (setting 3) automatically determines if a user
has left the room after the lights are switched off. It does this
by monitoring the space for a period after the button is pressed
(Predictive Grace Time), following a certain delay (Predictive
Exit Time). If occupancy is detected the device will disable
auto-on and hold the lights off until manually switched. If no
occupancy is detected the sensor instantly reverts to auto-on
mode. (continued next column)
If Predictive Mode with Expiration (setting 4) is enabled, once
the sensor has disabled auto-on it will continue to monitor the
space. When no occupancy is detected for a duration equal to the
occupancy time delay, the sensor will revert to auto-on mode.
1Override Off (default Pole 2)
2Switch Disable
3Predictive Mode
4Predictive Mode with Expiration (default Pole 1)
2SA and NL options default: Both poles Override Off
5= Photocell Set-Point
The ambient light level at which the sensor prevents the lights
from initially turning on. Once on, the lights will remain on until
the occupancy time delay expires and turns them off.
1 Disabled* 6 4 fc
2Auto Setpoint 7 8 fc
30.5 fc 8 16 fc
41 fc 9 32 fc
52 fc 10 64 fc
Note: Sensor will be changed to Automatic On mode if photocell
is enabled. Photocell not present in -NL versions. LED ashes
while Auto-Setpoint mode is running.
7= LED Operation
Indicates behavior of device’s LED.
1Occupancy Indication* 3 Disabled
2 Relay Indication 4 Override On***
*Standard Factory Default *** Factory Default for -NL version
9= Restore Factory Defaults
Returns all functions to original settings.
1Maintain Current* 2 Restore Defaults (both poles)
10 = Minimum On Time
Required initial time for lamps to be on after each switch on,
regardless of occupancy status. Once met, lights resume
following occupancy time delay.
10 min (disabled)* 3 30 min 5 60 min
215 min 4 45 min
11 = Manual On Grace Period
Time period after lights automatically turn off that they can be
reactivated by motion. (Manual On (Semi-Auto) mode only)
10 sec 2 Unused 315 sec*
12 = Dual Technology (MicrophonicsTM)
Relative responsiveness of Microphonics detection. Included in
-PDT versions only.
1Normal* 3Medium 5Phase Off
2Off 4 Low (15-10-5 min)
13 = Microphone Grace Period
Time period after lights are automatically turned off that they
can be voice reactivated. Included in -PDT versions only.
10 sec 320 sec 540 sec 760 sec
210 sec* 430 sec 650 sec
15 = Predictive Mode Exit Time
Time period after manually switching lights off for occupant to
leave the space.
15 sec 37 sec 59 sec 715 sec 930 sec
26 sec 48 sec 610 sec* 820 sec
16 = Predictive Mode Grace Time
Time period after Predictive Mode Exit Time that sensor
rescans the room for remaining occupants.
10 sec 310 sec 530 sec* 750 sec
25 sec 4 20 sec 640 sec 860 sec
This manual suits for next models
3
Other Sensor Switch Accessories manuals


 Specifications")


